wheel TOYOTA SIENNA 2015 XL30 / 3.G Navigation Manual
[x] Cancel search | Manufacturer: TOYOTA, Model Year: 2015, Model line: SIENNA, Model: TOYOTA SIENNA 2015 XL30 / 3.GPages: 354, PDF Size: 6.81 MB
Page 43 of 354

43
1. BASIC INFORMATION BEFORE OPERATION
SIENNA_Navi+MM_01999-08003_(U)
14.06.02 18:35
BASIC FUNCTION
2
8. LINKING MULTI-INFORMATION DISPLAY AND NAVIGATION SYSTEM*
The following functions of the navigation system are linked with the multi-informa-
tion display in the instrument cluster:
• Navigation
• Audio
etc.
These functions can be operated using multi-information display control switches
on the steering wheel. For details, refer to “Owner’s Manual”.
*: If equipped
Page 44 of 354
44
SIENNA_Navi+MM_01999-08003_(U)
14.12.04 14:43
2. Bluetooth® SETTINGS
1. REGISTERING/CONNECTING Bluetooth® DEVICE
1Turn the Bluetooth® connection setting
of your cellular phone on.
This function is not available when
Bluetooth® connection setting of your cel-
lular phone is set to off.
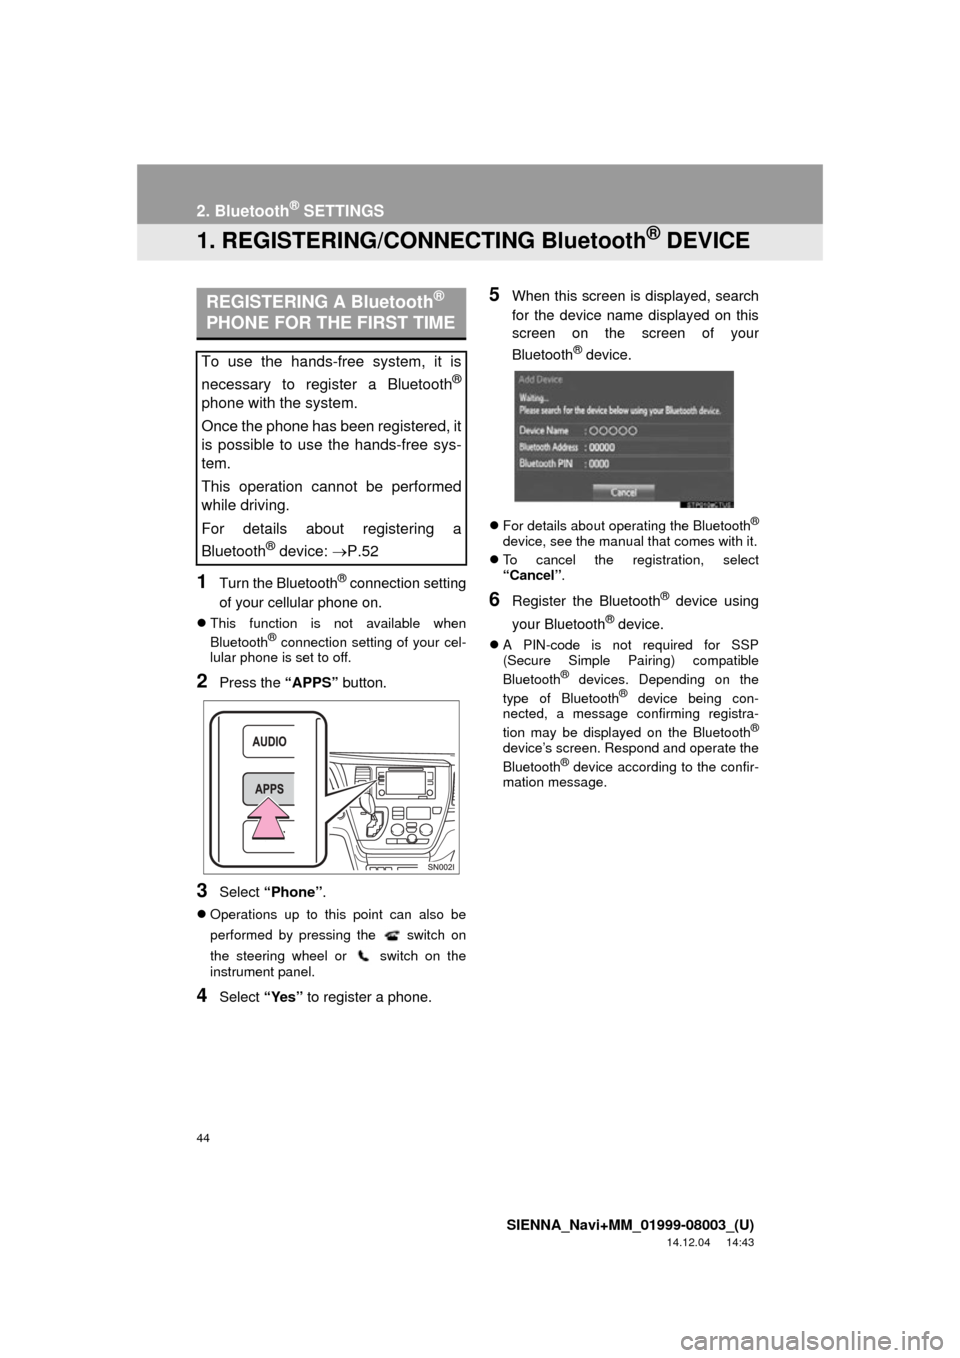
2Press the “APPS” button.
3Select “Phone” .
Operations up to this point can also be
performed by pressing the switch on
the steering wheel or switch on the
instrument panel.
4Select “Yes” to register a phone.
5When this screen is displayed, search
for the device name displayed on this
screen on the screen of your
Bluetooth
® device.
For details about operating the Bluetooth®
device, see the manual that comes with it.
To cancel the registration, select
“Cancel” .
6Register the Bluetooth® device using
your Bluetooth
® device.
A PIN-code is not required for SSP
(Secure Simple Pairing) compatible
Bluetooth
® devices. Depending on the
type of Bluetooth® device being con-
nected, a message confirming registra-
tion may be displayed on the Bluetooth
®
device’s screen. Respond and operate the
Bluetooth® device according to the confir-
mation message.
REGISTERING A Bluetooth®
PHONE FOR THE FIRST TIME
To use the hands-free system, it is
necessary to register a Bluetooth
®
phone with the system.
Once the phone has been registered, it
is possible to use the hands-free sys-
tem.
This operation cannot be performed
while driving.
For details about registering a
Bluetooth
® device: P.52
Page 75 of 354
75
1. BASIC OPERATION
SIENNA_Navi+MM_01999-08003_(U)
14.06.02 18:35
AUDIO/VISUAL SYSTEM
3
FunctionPage
Using the radio81, 91, 97
Playing an audio CD or MP3/WMA/AAC disc98
Playing a USB memory101
Playing an iPod®105
Playing a Bluetooth® device109
Using the AUX port11 4
Using the steering wheel audio switches11 6
Audio system settings11 9
Rear seat entertainment system130
INFORMATION
●The display and button positions will differ depending on the type of the system.
Page 97 of 354
97
2. RADIO OPERATION
SIENNA_Navi+MM_01999-08003_(U)
14.06.02 18:35
AUDIO/VISUAL SYSTEM
3
3. INTERNET RADIO*
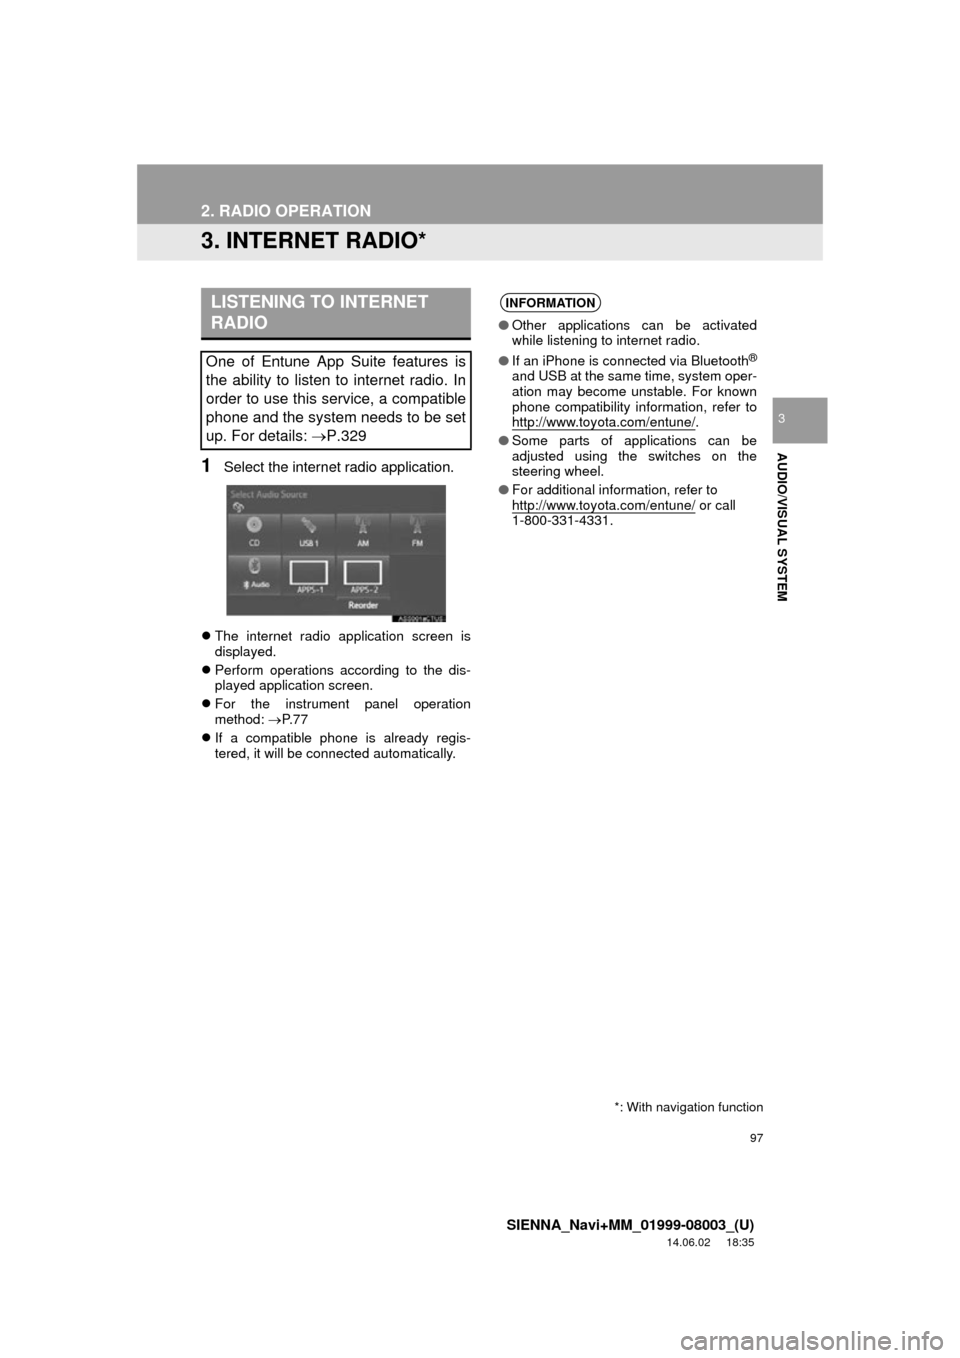
1Select the internet radio application.
The internet radio application screen is
displayed.
Perform operations according to the dis-
played application screen.
For the instrument panel operation
method: P. 7 7
If a compatible phone is already regis-
tered, it will be connected automatically.
LISTENING TO INTERNET
RADIO
One of Entune App Suite features is
the ability to listen to internet radio. In
order to use this service, a compatible
phone and the system needs to be set
up. For details: P.329
*: With navigation function
INFORMATION
●Other applications can be activated
while listening to internet radio.
● If an iPhone is connected via Bluetooth
®
and USB at the same time, system oper-
ation may become unstable. For known
phone compatibility information, refer to
http://www.toyota.com/entune/
.
● Some parts of applications can be
adjusted using the switches on the
steering wheel.
● For additional information, refer to
http://www.toyota.com/entune/
or call
1-800-331-4331.
Page 116 of 354
116
SIENNA_Navi+MM_01999-08003_(U)
14.06.02 18:35
4. AUDIO/VISUAL REMOTE CONTROLS
1. STEERING SWITCHES
“MODE/HOLD” switch
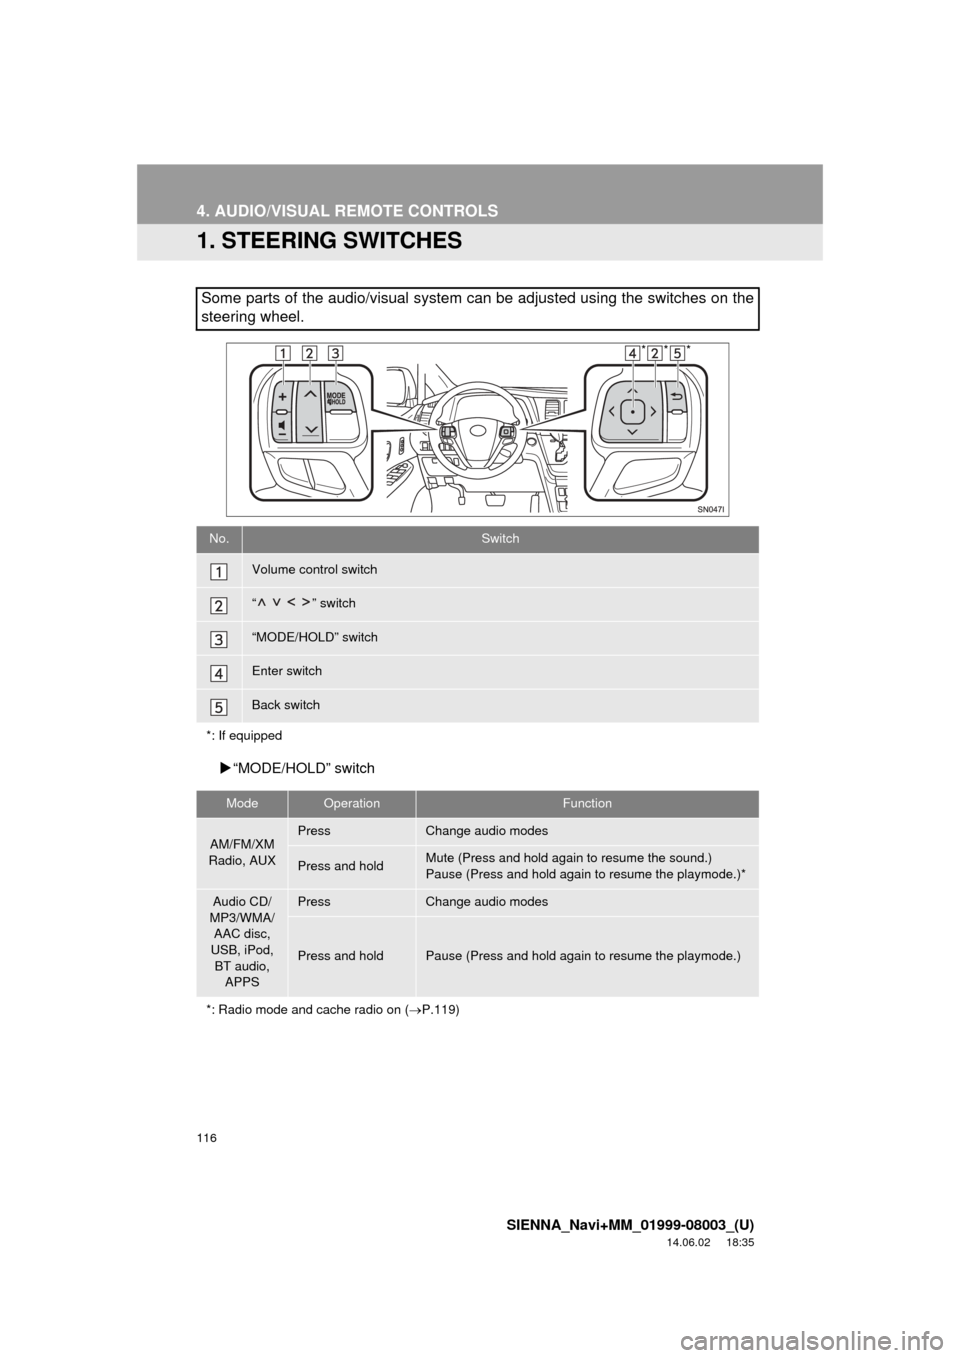
Some parts of the audio/visual system can be adjusted using the switches on the
steering wheel.
No.Switch
Volume control switch
“” switch
“MODE/HOLD” switch
Enter switch
Back switch
*: If equipped
ModeOperationFunction
AM/FM/XM
Radio, AUXPressChange audio modes
Press and holdMute (Press and hold again to resume the sound.)
Pause (Press and hold again to resume the playmode.)*
Audio CD/
MP3/WMA/ AAC disc,
USB, iPod,
BT audio, APPSPressChange audio modes
Press and holdPause (Press and hold again to resume the playmode.)
*: Radio mode and cache radio on ( P.119)
***
Page 185 of 354
185
1. VOICE COMMAND SYSTEM OPERATION
SIENNA_Navi+MM_01999-08003_(U)
14.06.02 18:35
VOICE COMMAND SYSTEM
4
1Press the talk switch.
2Say the phone number.
In the same manner as it is displayed on
the screen, “Dial
“Dial a number” say the phone number.
Say the phone number one digit at a time.
For example, if the phone number is
2345678:
Say “two three four five six seven
eight”
Do not say “twenty three forty five sixty
seven eight”
Calling to the following phone numbers
• 3 digit numbers (911, 411, 611)
• 7 digit numbers (Local phone numbers)
• 10 digit numbers (Area code + Local
phone number)
• 11 digit phone numbers (1 + Area code + Local phone number)
As the system cannot recognize additional
numbers, say the complete number with-
out stopping.
Calling to other phone numbers
3Say “Call” or press the switch on
the steering wheel.
VOICE COMMAND EXAMPLE:
DIAL NUMBER
When the system recognizes multiple
phone numbers, a phone number candi-
date list will be displayed on the screen.
Pressing the
switch on the steering
wheel makes a call to the top entry on
the list. If the desired phone number is
not displayed on the top of the screen,
say the number of the desired phone
number from the candidate list to select
a phone number from the candidate list.
Page 197 of 354

197
1. REAR VIEW MONITOR SYSTEM (WITH GUIDE FUNCTION)
SIENNA_Navi+MM_01999-08003_(U)
14.06.02 18:35
PERIPHERAL MONITORING SYSTEM
6
WA R N I N G
●The instructions given are only guide-
lines. When and how much to turn the
steering wheel will vary according to
traffic conditions, road surface condi-
tions, vehicle condition, etc. when park-
ing. It is necessary to be fully aware of
this before using the rear view monitor
system.
● When parking, be sure to check that the
parking space will accommodate your
vehicle before maneuvering into it.
● Do not use the rear view monitor system
in the following cases:
• On icy or slick road surfaces, or in
snow
• When using tire chains or emergency
tires
• When the back door is not closed com- pletely
• On roads that are not flat or straight, such as curves or slopes
● In the evening, or in other situations with
no light sources, the sides may not be
visible in wide mode.
● In low temperatures, the screen may
darken or the image may become faint.
The image could distort when the vehi-
cle is moving, or you may become
unable to see the image on the screen.
Be sure to visually check all around the
vehicle both directly and using the mir-
rors before proceeding.
● If the tire sizes are changed, the position
of the guide lines displayed on the
screen may change.
● The camera uses a special lens. The
distances between objects and pedestri-
ans that appear in the image displayed
on the screen will differ from the actual
distances. ( P.207)
Page 199 of 354
199
1. REAR VIEW MONITOR SYSTEM (WITH GUIDE FUNCTION)
SIENNA_Navi+MM_01999-08003_(U)
14.06.02 18:35
PERIPHERAL MONITORING SYSTEM
6
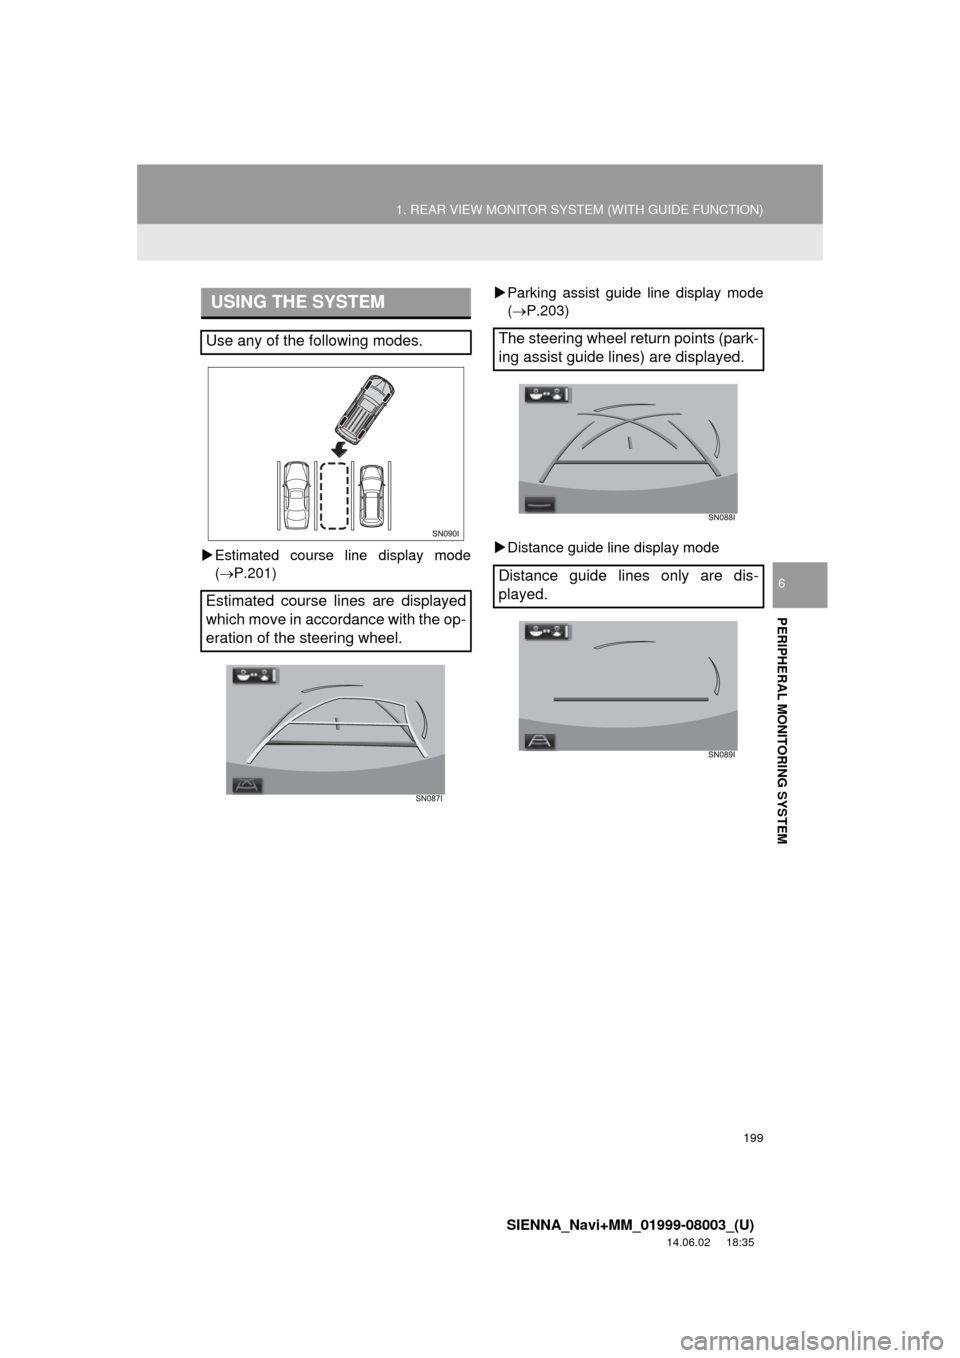
Estimated course line display mode
( P.201)
Parking assist guide line display mode
(P.203)
Distance guide line display mode
USING THE SYSTEM
Use any of the following modes.
Estimated course lines are displayed
which move in accordance with the op-
eration of the steering wheel.The steering wheel return points (park-
ing assist guide lines) are displayed.
Distance guide lines only are dis-
played.
Page 201 of 354
201
1. REAR VIEW MONITOR SYSTEM (WITH GUIDE FUNCTION)
SIENNA_Navi+MM_01999-08003_(U)
14.06.02 18:35
PERIPHERAL MONITORING SYSTEM
6
2. ESTIMATED COURSE LINE DISPLAY MODE
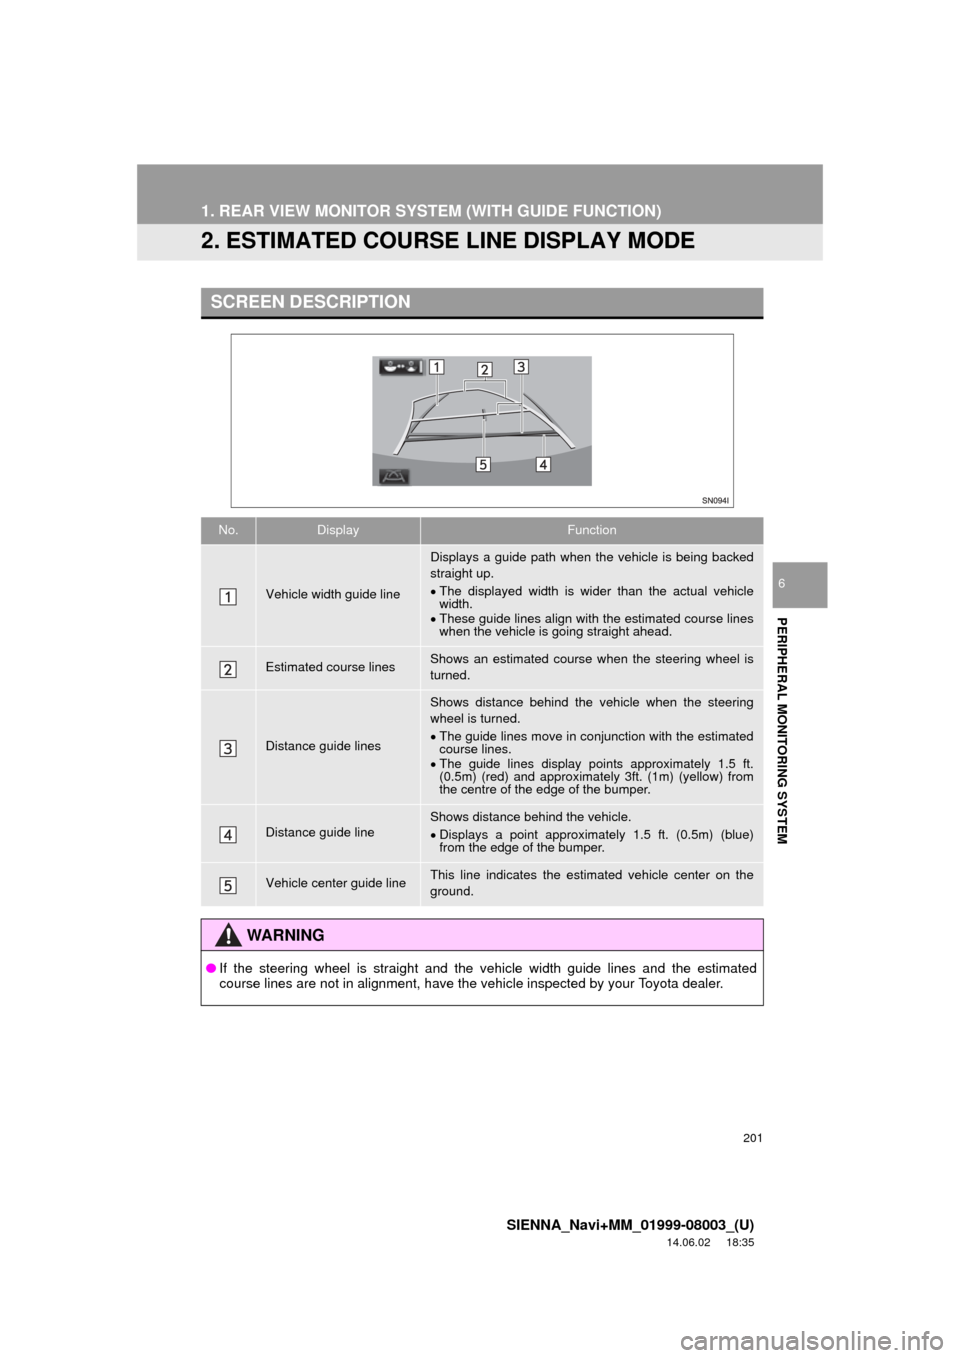
SCREEN DESCRIPTION
No.DisplayFunction
Vehicle width guide line
Displays a guide path when the vehicle is being backed
straight up.
The displayed width is wider than the actual vehicle
width.
These guide lines align with the estimated course lines
when the vehicle is going straight ahead.
Estimated course linesShows an estimated course when the steering wheel is
turned.
Distance guide lines
Shows distance behind the vehicle when the steering
wheel is turned.
The guide lines move in conjunction with the estimated
course lines.
The guide lines display points approximately 1.5 ft.
(0.5m) (red) and approximately 3ft. (1m) (yellow) from
the centre of the edge of the bumper.
Distance guide lineShows distance behind the vehicle.
Displays a point approximately 1.5 ft. (0.5m) (blue)
from the edge of the bumper.
Vehicle center guide lineThis line indicates the estimated vehicle center on the
ground.
WA R N I N G
● If the steering wheel is straight and the vehicle width guide lines and the estimated
course lines are not in alignment, have the vehicle inspected by your Toyota dealer.
Page 202 of 354
202
1. REAR VIEW MONITOR SYSTEM (WITH GUIDE FUNCTION)
SIENNA_Navi+MM_01999-08003_(U)
14.06.02 18:35
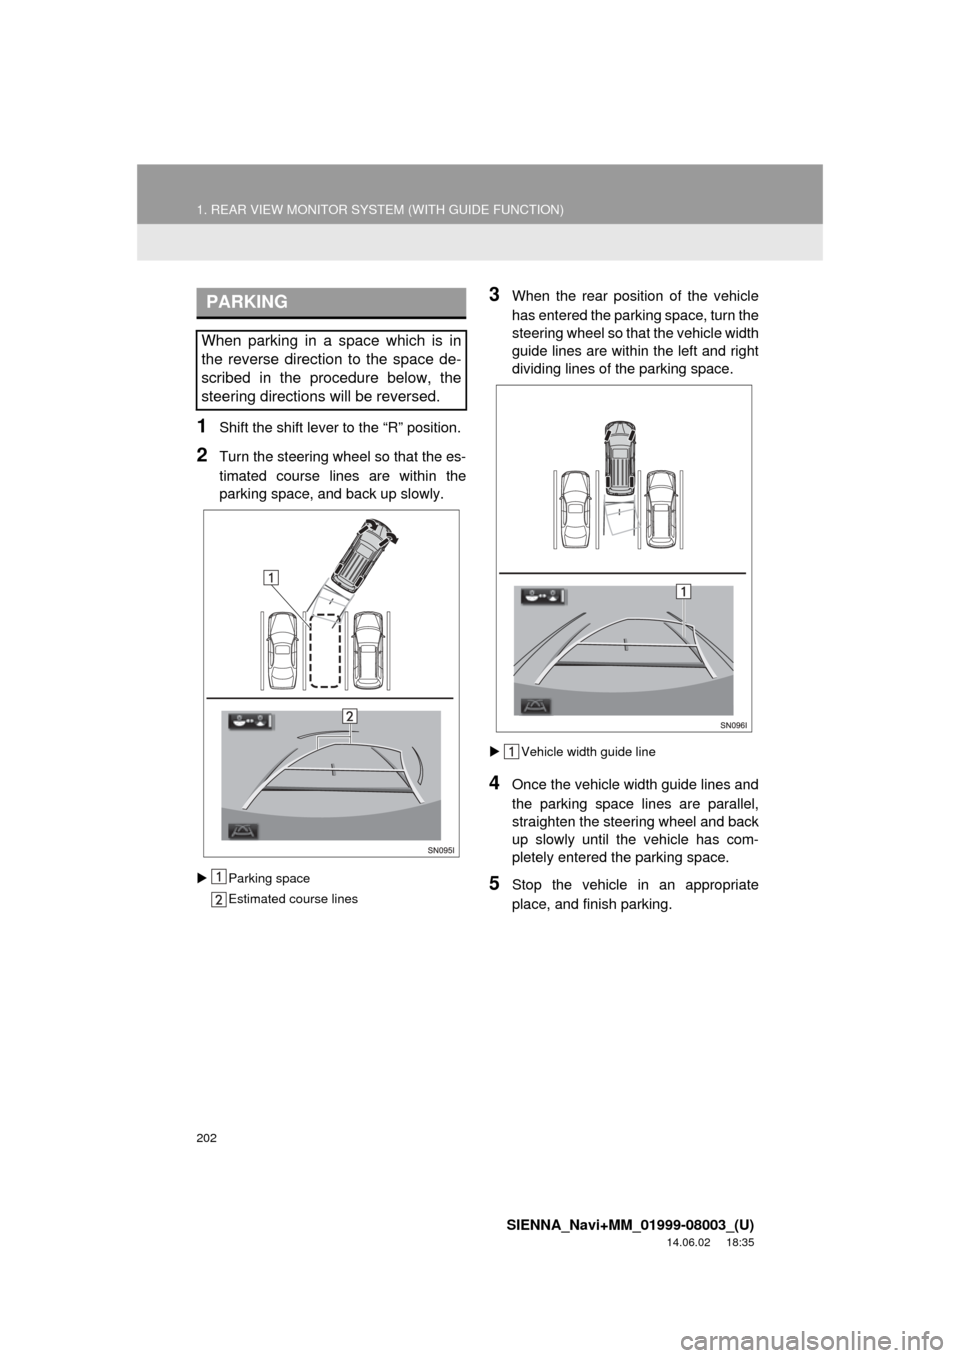
1Shift the shift lever to the “R” position.
2Turn the steering whee l so that the es-
timated course lines are within the
parking space, and back up slowly.
Parking space
Estimated course lines
3When the rear position of the vehicle
has entered the parking space, turn the
steering wheel so that the vehicle width
guide lines are within the left and right
dividing lines of the parking space.
Vehicle width guide line
4Once the vehicle width guide lines and
the parking space lines are parallel,
straighten the steering wheel and back
up slowly until the vehicle has com-
pletely entered the parking space.
5Stop the vehicle in an appropriate
place, and finish parking.
PARKING
When parking in a space which is in
the reverse direction to the space de-
scribed in the procedure below, the
steering directions will be reversed.