TOYOTA SIENNA 2015 XL30 / 3.G Owners Manual
Manufacturer: TOYOTA, Model Year: 2015, Model line: SIENNA, Model: TOYOTA SIENNA 2015 XL30 / 3.GPages: 664, PDF Size: 12.66 MB
Page 231 of 664
231
SIENNA_OM_01999-08001_(U)
4-2. Driving procedures
4
Driving
Automatic transaxle
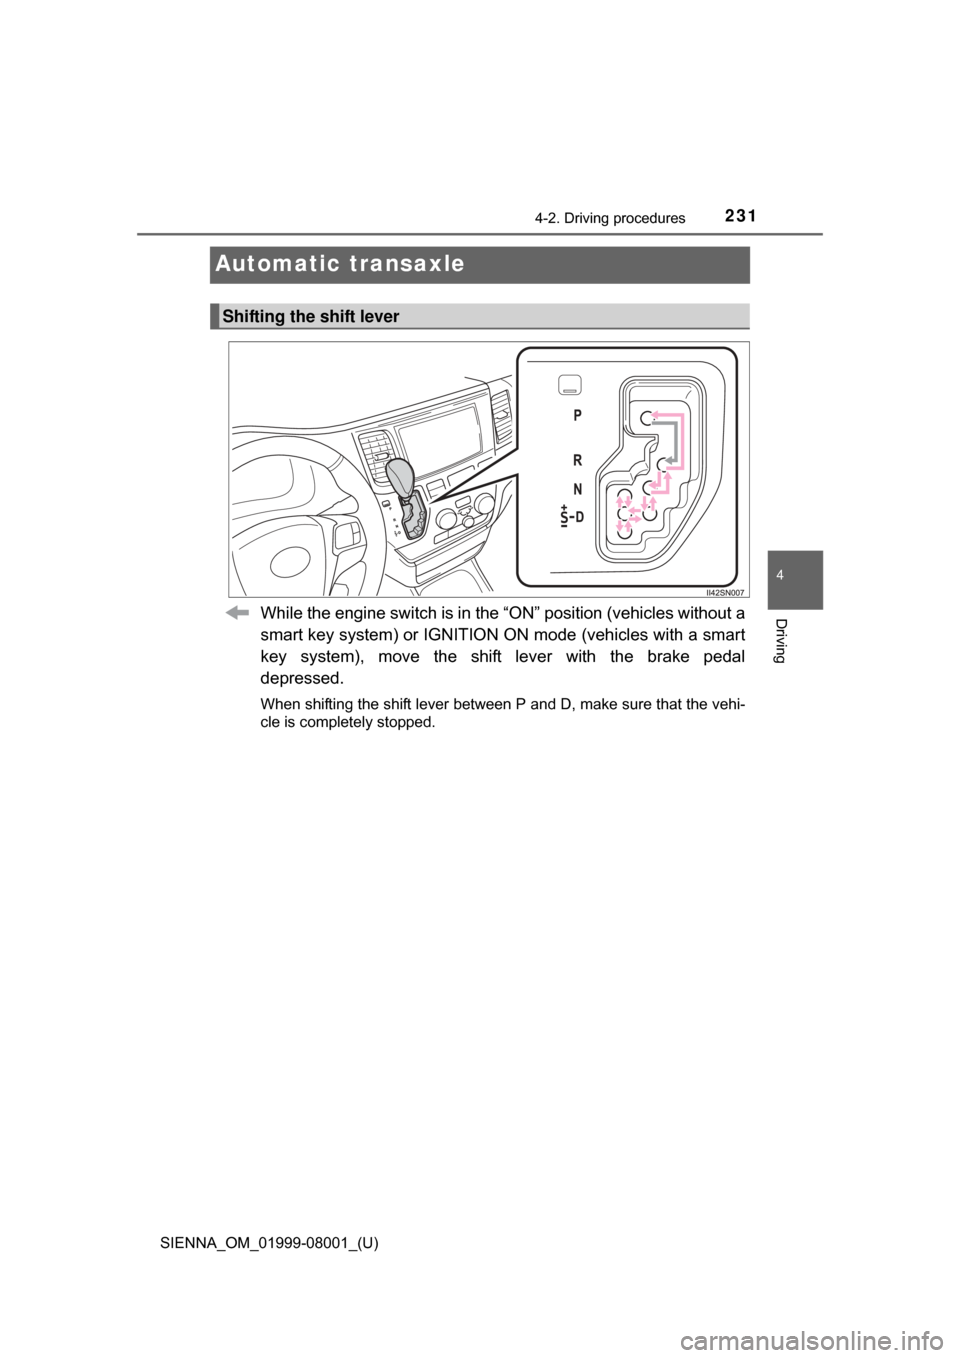
While the engine switch is in the “ON” position (vehicles without a
smart key system) or IGNITION ON mode (vehicles with a smart
key system), move the shift lever with the brake pedal
depressed.
When shifting the shift lever between P and D, make sure that the vehi-
cle is completely stopped.
Shifting the shift lever
Page 232 of 664
232
SIENNA_OM_01999-08001_(U)
4-2. Driving procedures
*1: Shifting to the D position allows the system to select a gear suitable forthe driving conditions. Setting the shift lever to the D position is recom-
mended for normal driving.
*2: Selecting shift ranges using S mode restricts the upper limit of the possi-ble gear ranges, controls engine braking forces, and prevents unneces-
sary upshifting.
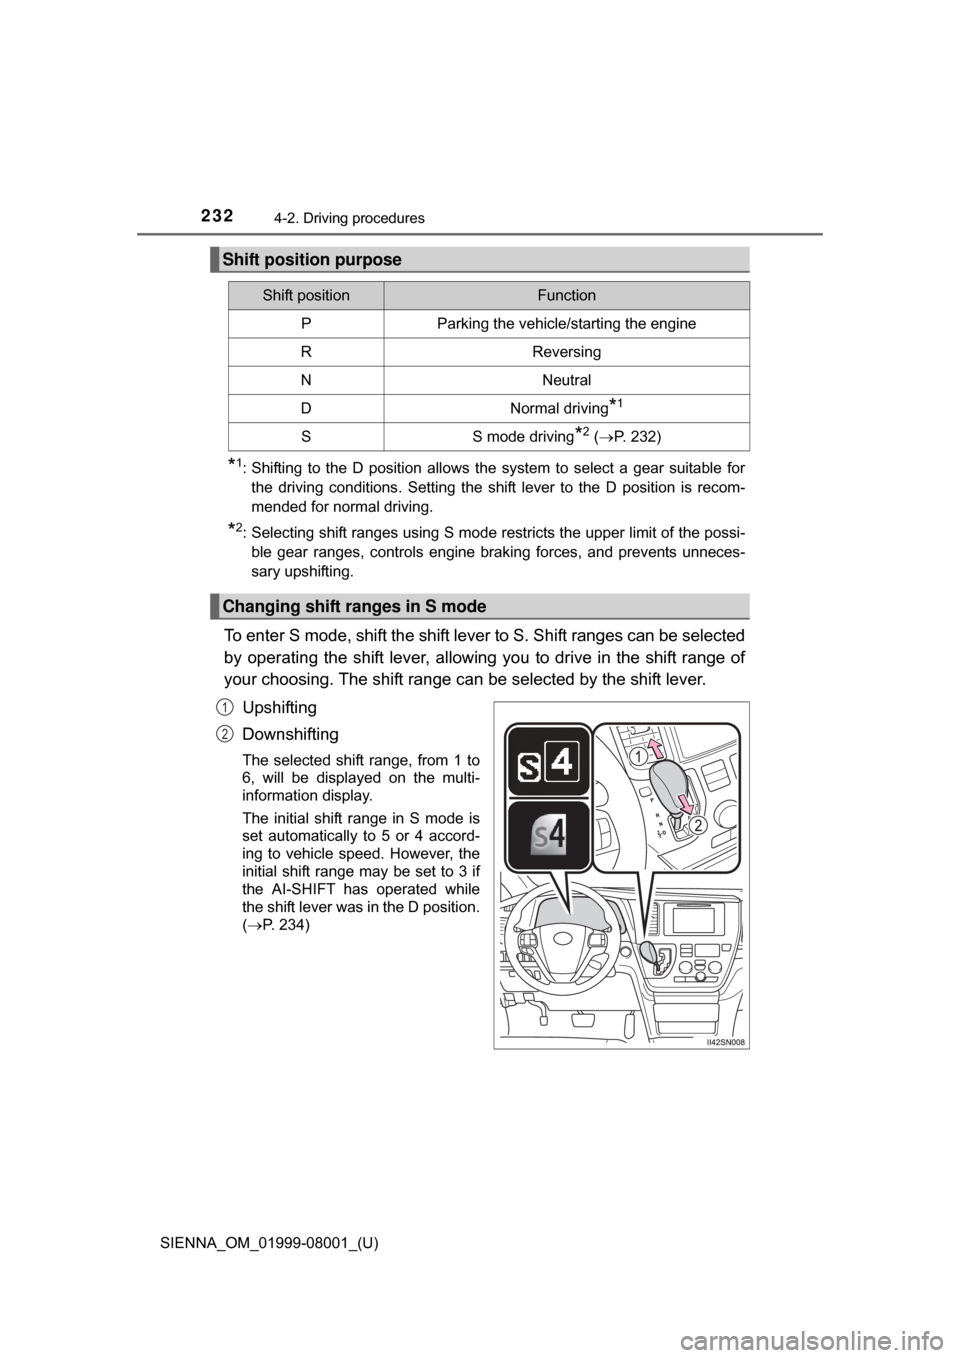
To enter S mode, shift the shift lever to S. Shift ranges can be selected
by operating the shift lever, allowing you to drive in the shift range of
your choosing. The shift range ca n be selected by the shift lever.
Upshifting
Downshifting
The selected shift range, from 1 to
6, will be displayed on the multi-
information display.
The initial shift range in S mode is
set automatically to 5 or 4 accord-
ing to vehicle speed. However, the
initial shift range may be set to 3 if
the AI-SHIFT has operated while
the shift lever was in the D position.
( P. 234)
Shift position purpose
Shift positionFunction
PParking the vehicle/starting the engine
RReversing
NNeutral
DNormal driving*1
SS mode driving*2 ( P. 232)
Changing shift ranges in S mode
1
2
Page 233 of 664

SIENNA_OM_01999-08001_(U)
2334-2. Driving procedures
4
Driving
■Shift ranges and their functions
●Automatically selecting gears bet ween 1 and 6 according to vehi-
cle speed and driving conditions. But, the gear is limited accord-
ing to selected shift range.
● You can choose from 6 levels of engine braking force.
● A lower shift range will provide gr eater engine braking force than
a higher shift range, and the engine speed will also increase.
■ S mode
●When the shift range is 5 or lower, holding the shift lever toward “+” sets the
shift range to 6.
● To prevent excessive engine speed, a function was adopted that automati-
cally selects a higher shift range before the engine speed becomes too high.
● To protect the automatic transaxle, a function is adopted that automatically
selects a higher shift range when the fluid temperature is high.
■ Downshift restriction wa rning buzzer (S mode)
To help ensure safety and driving performance, downshifting operation may
sometimes be restricted. In some circumstances, downshifting may not be
possible even when the shift lever is operated. (A buzzer will sound twice.)
■ When driving with the cr uise control or dynamic radar cruise control
activated (if equipped)
Even when performing the following actions with the intent of enabling engine
braking, engine braking will not activate while driving in S mode and down-
shifting to 5 or 4 because cruise control or dynamic radar cruise control will
not be canceled. ( P. 257, 261)
■ If the shift lever cannot be shifted from P
●P. 580
● Vehicles with AUTO ACCESS SEAT: If the AUTO ACCESS SEAT has not
been locked in place after being stowed, the shift lever cannot be shifted
from P.
For details, refer to “AUTO ACCESS SEAT OWNER’S MANUAL”.
Page 234 of 664

234
SIENNA_OM_01999-08001_(U)
4-2. Driving procedures
■If “S” does not come on even afte r shifting the shift lever to S
This may indicate a malfunction in the automatic transaxle system. Have the
vehicle inspected by your Toyota dealer immediately. (In this situation, the
transaxle will operate in the same manner as when the shift lever is in D.)
■ AI-SHIFT
AI-SHIFT automatically selects the suitable gear according to driver perfor-
mance and driving conditions.
AI-SHIFT automatically operates when the shift lever is in the D position.
(Shifting the shift lever to the S position cancels the function.)
WARNING
■When driving on slippery road surfaces
Do not accelerate or shift gears suddenly.
Sudden changes in engine braking may cause the vehicle to spin or skid,
resulting in an accident.
Page 235 of 664
235
SIENNA_OM_01999-08001_(U)
4-2. Driving procedures
4
Driving
Turn signal lever
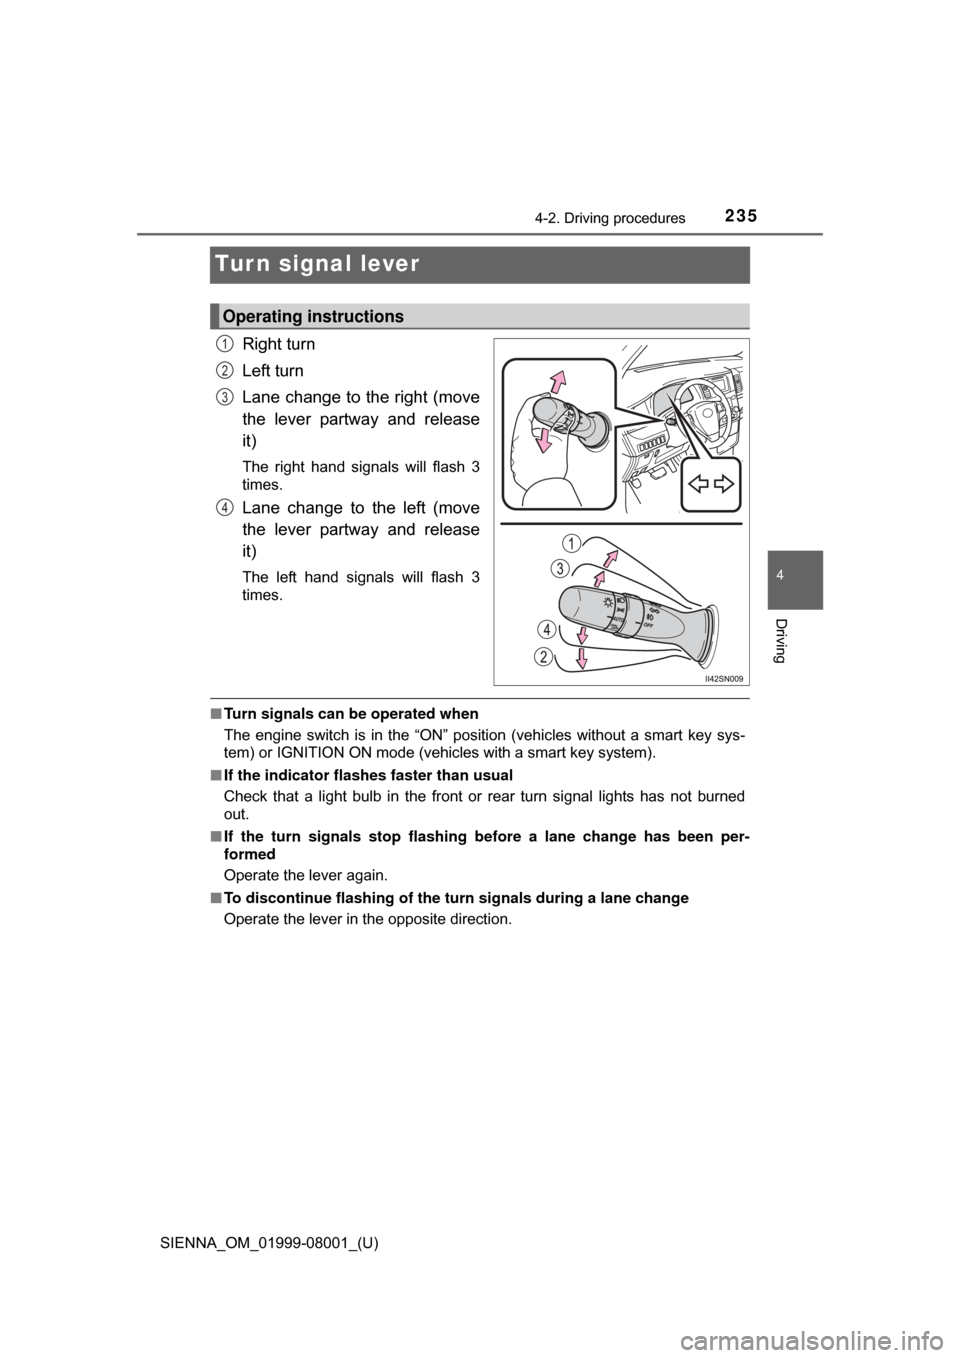
Right turn
Left turn
Lane change to the right (move
the lever partway and release
it)
The right hand signals will flash 3
times.
Lane change to the left (move
the lever partway and release
it)
The left hand signals will flash 3
times.
■Turn signals can be operated when
The engine switch is in the “ON” position (vehicles without a smart key sys-
tem) or IGNITION ON mode (vehicles with a smart key system).
■ If the indicator flashes faster than usual
Check that a light bulb in the front or rear turn signal lights has not burned
out.
■ If the turn signals stop flashing before a lane change has been per-
formed
Operate the lever again.
■ To discontinue flashing of the turn signals during a lane change
Operate the lever in the opposite direction.
Operating instructions
1
2
3
4
Page 236 of 664
236
SIENNA_OM_01999-08001_(U)
4-2. Driving procedures
Parking brake
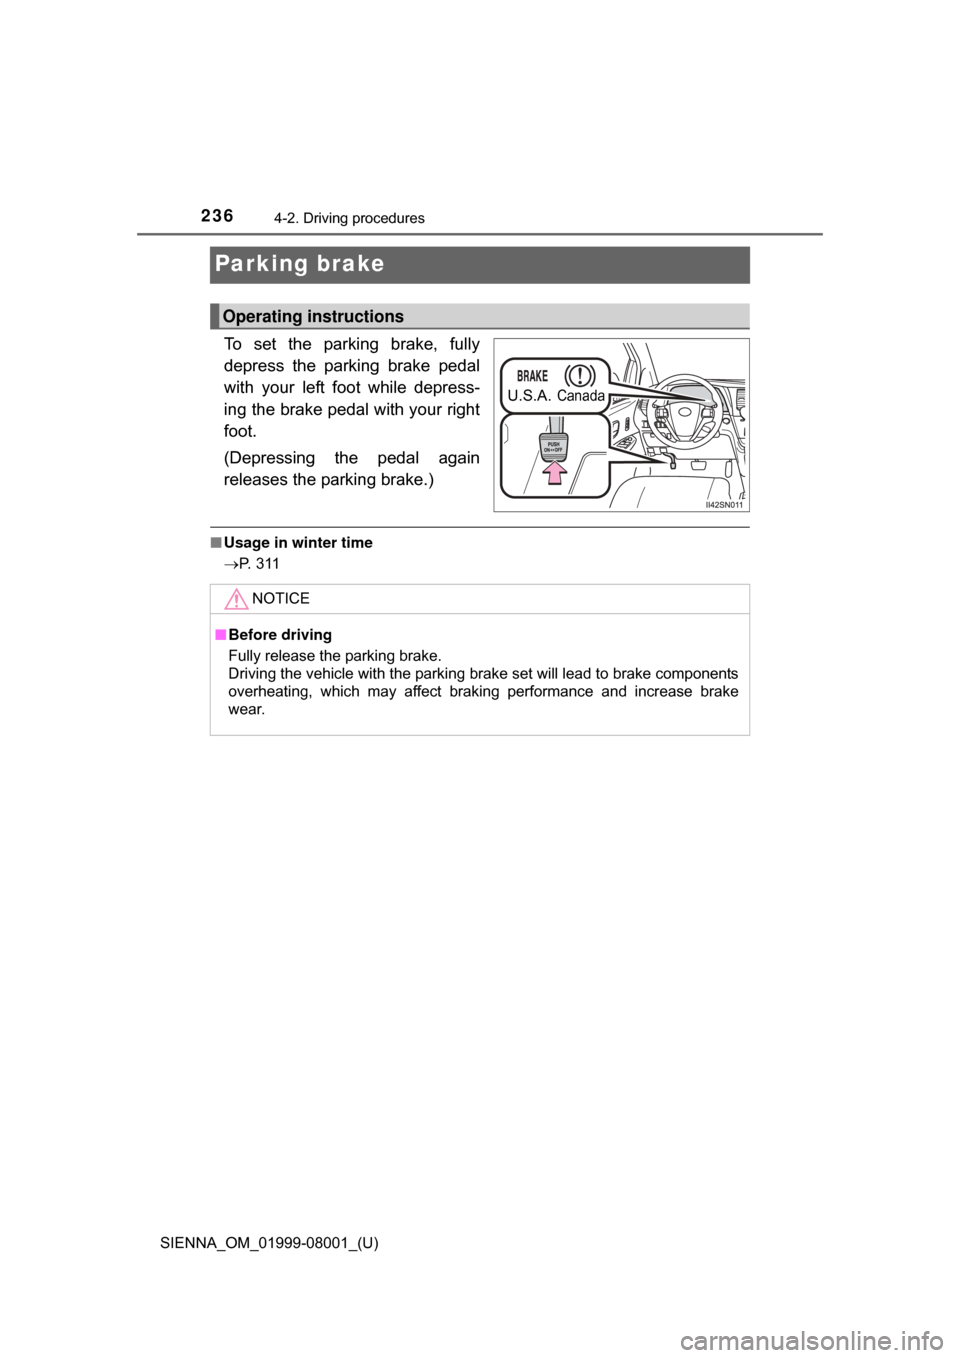
To set the parking brake, fully
depress the parking brake pedal
with your left foot while depress-
ing the brake pedal with your right
foot.
(Depressing the pedal again
releases the parking brake.)
■Usage in winter time
P. 3 1 1
Operating instructions
U.S.A.Canada
NOTICE
■Before driving
Fully release the parking brake.
Driving the vehicle with the parking brake set will lead to brake components
overheating, which may affect braking performance and increase brake
wear.
Page 237 of 664
237
SIENNA_OM_01999-08001_(U)
4-3. Operating the lights and wipers
4
Driving
Headlight switch
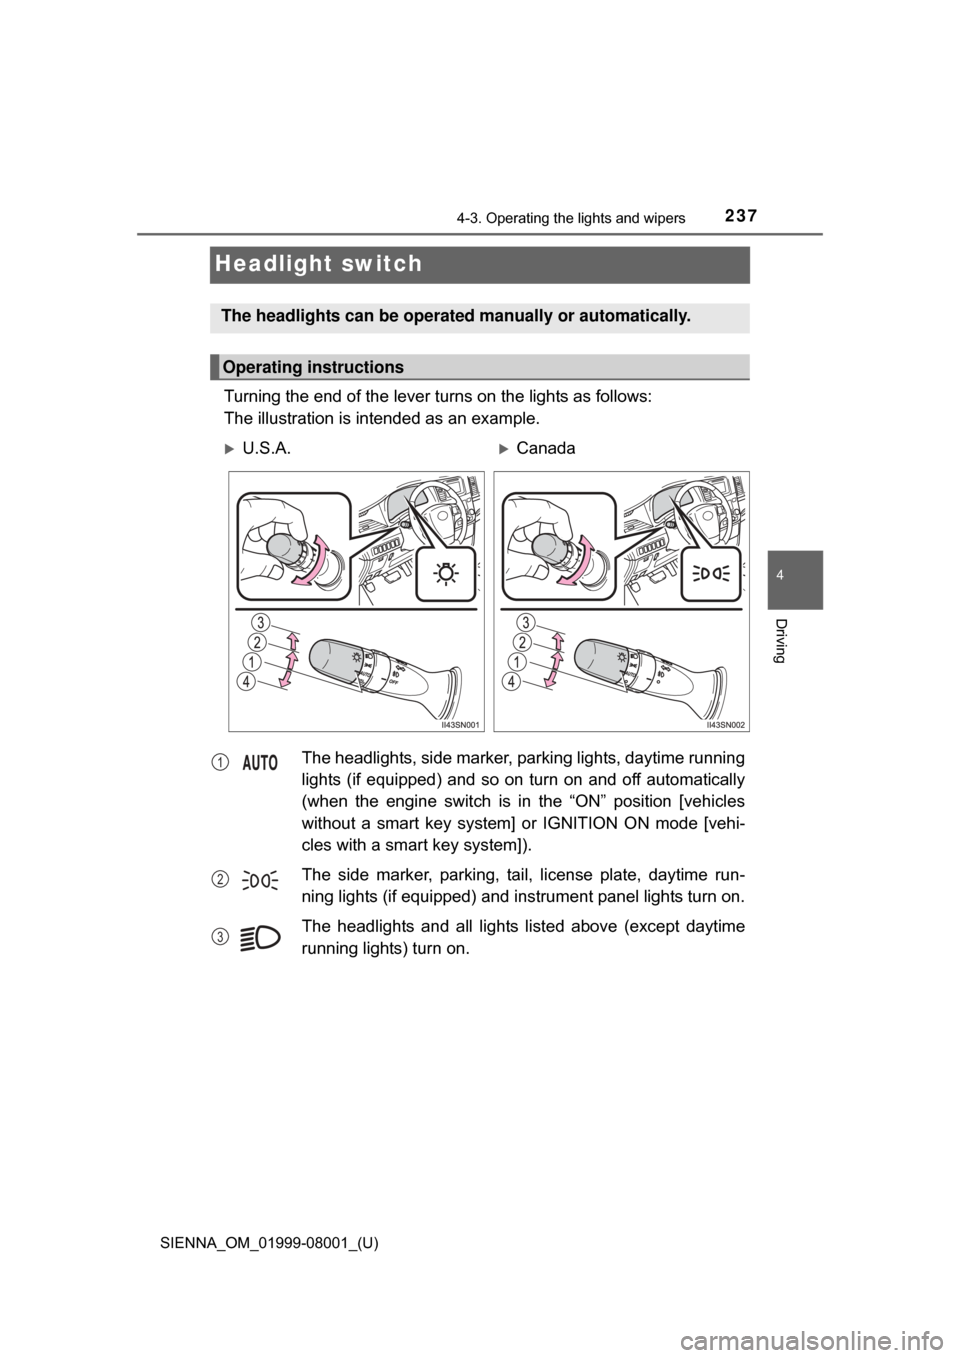
Turning the end of the lever turns on the lights as follows:
The illustration is intended as an example.
The headlights can be operate d manually or automatically.
Operating instructions
U.S.A.Canada
The headlights, side marker, parking lights, daytime running
lights (if equipped) and so on turn on and off automatically
(when the engine switch is in the “ON” position [vehicles
without a smart key system] or IGNITION ON mode [vehi-
cles with a smart key system]).
The side marker, parking, tail, license plate, daytime run-
ning lights (if equipped) and instrument panel lights turn on.
The headlights and all lights listed above (except daytime
running lights) turn on.
1
2
3
Page 238 of 664
238
SIENNA_OM_01999-08001_(U)
4-3. Operating the lights and wipers
*1: Vehicles without a daytime running light system
*2: Vehicles with a daytime running light system
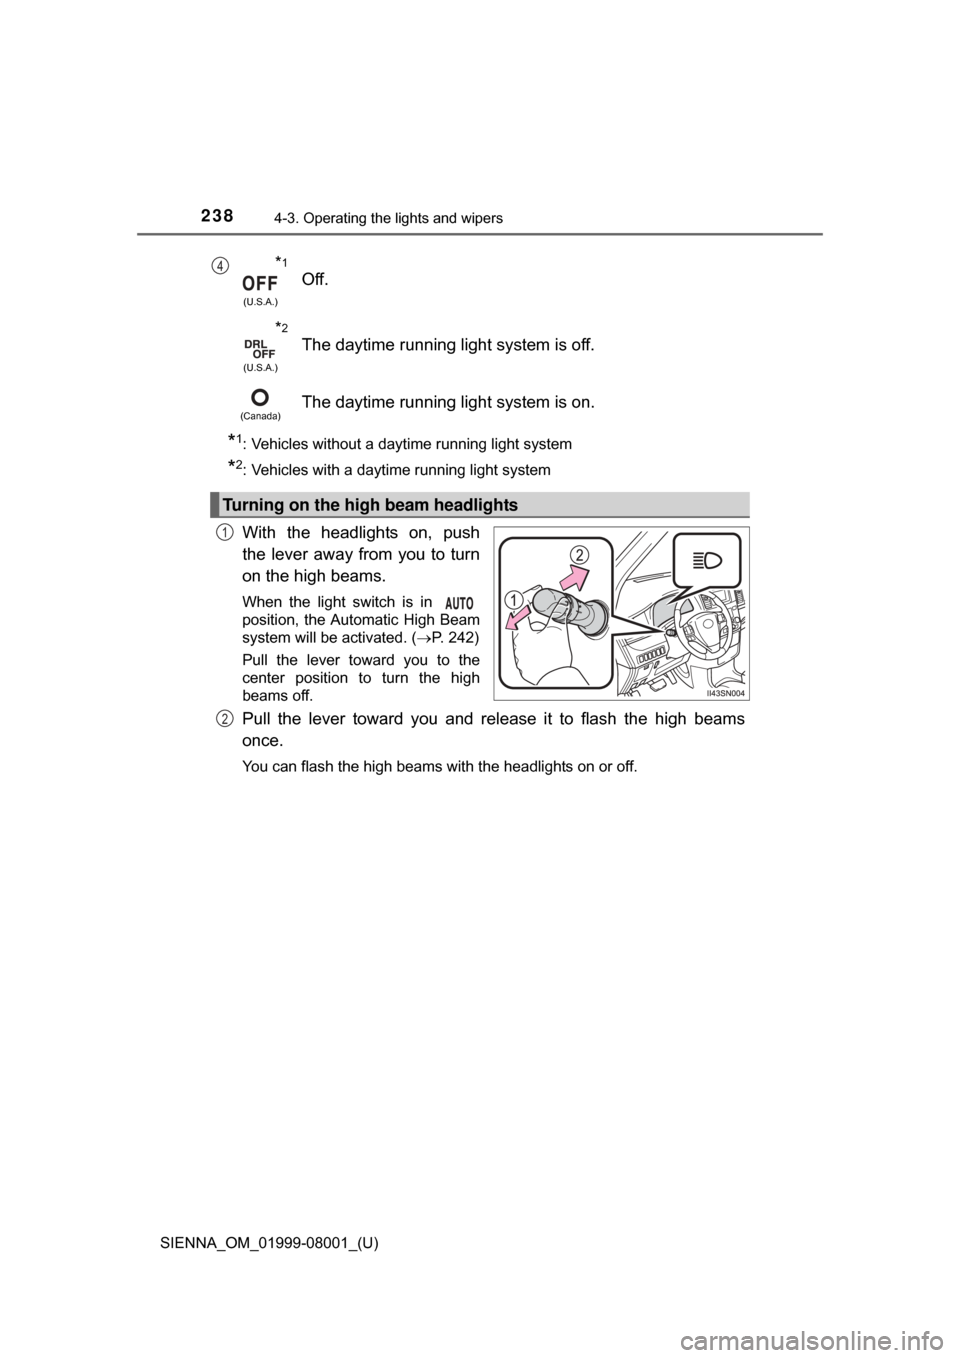
With the headlights on, push
the lever away from you to turn
on the high beams.
When the light switch is in
position, the Automatic High Beam
system will be activated. (P. 242)
Pull the lever toward you to the
center position to turn the high
beams off.
Pull the lever toward you and release it to flash the high beams
once.
You can flash the high beams with the headlights on or off.
*1
(U.S.A.)
Off.
*2
(U.S.A.)
The daytime running light system is off.
(Canada)The daytime running light system is on.
Turning on the high beam headlights
4
1
2
Page 239 of 664
SIENNA_OM_01999-08001_(U)
2394-3. Operating the lights and wipers
4
Driving
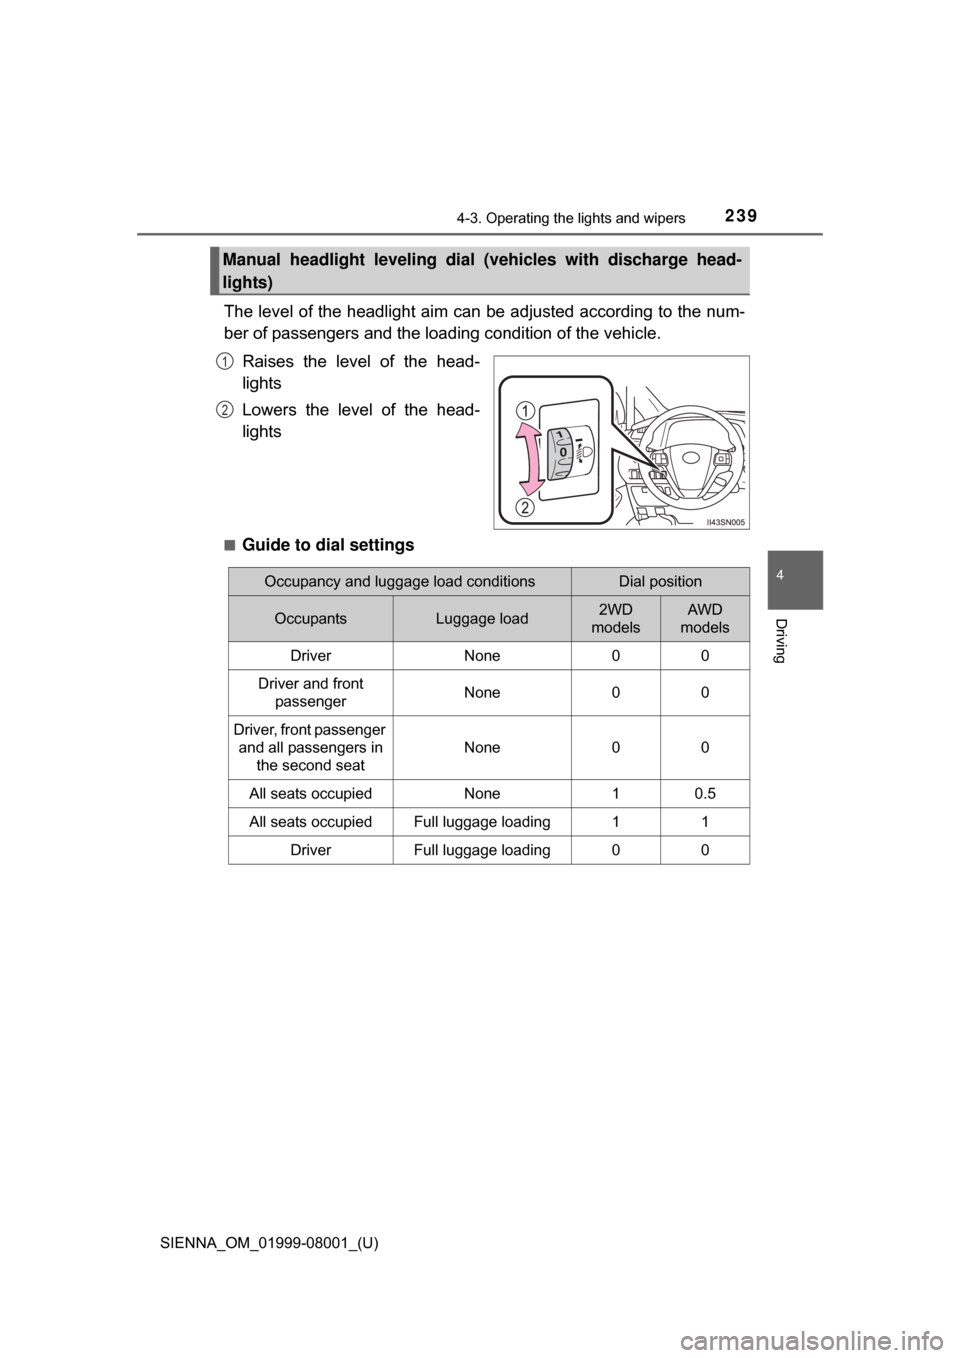
The level of the headlight aim can be adjusted according to the num-
ber of passengers and the loading condition of the vehicle.
Raises the level of the head-
lights
Lowers the level of the head-
lights
■Guide to dial settings
Manual headlight leveling dial (v ehicles with discharge head-
lights)
1
2
Occupancy and luggage load conditionsDial position
OccupantsLuggage load2WD
modelsAWD
models
DriverNone00
Driver and front
passengerNone00
Driver, front passenger and all passengers in the second seat
None00
All seats occupiedNone10.5
All seats occupiedFull luggage loading11
DriverFull luggage loading00
Page 240 of 664
240
SIENNA_OM_01999-08001_(U)
4-3. Operating the lights and wipers
■Daytime running light system (if equipped)
●Bulb type: To make your vehicle more visible to other drivers, the headlights
turn on automatically (at a reduced intensity) whenever the engine is started
and the parking brake is released. Daytime running lights are not designed
for use at night.
For the U.S.A.: Daytime running lights can be turned off by operating the
headlight switch.
LED type: To make your vehicle more visible to other drivers, the daytime
running lights turn on automatically whenever the engine is started and the
parking brake is released. Daytime running lights are not designed for use
at night.
For the U.S.A.: Daytime running lights can be turned off by operating the
headlight switch.
● Compared to turning on the headlights, the daytime running light system
offers greater durability and consumes less electricity, so it can help improve
fuel economy.
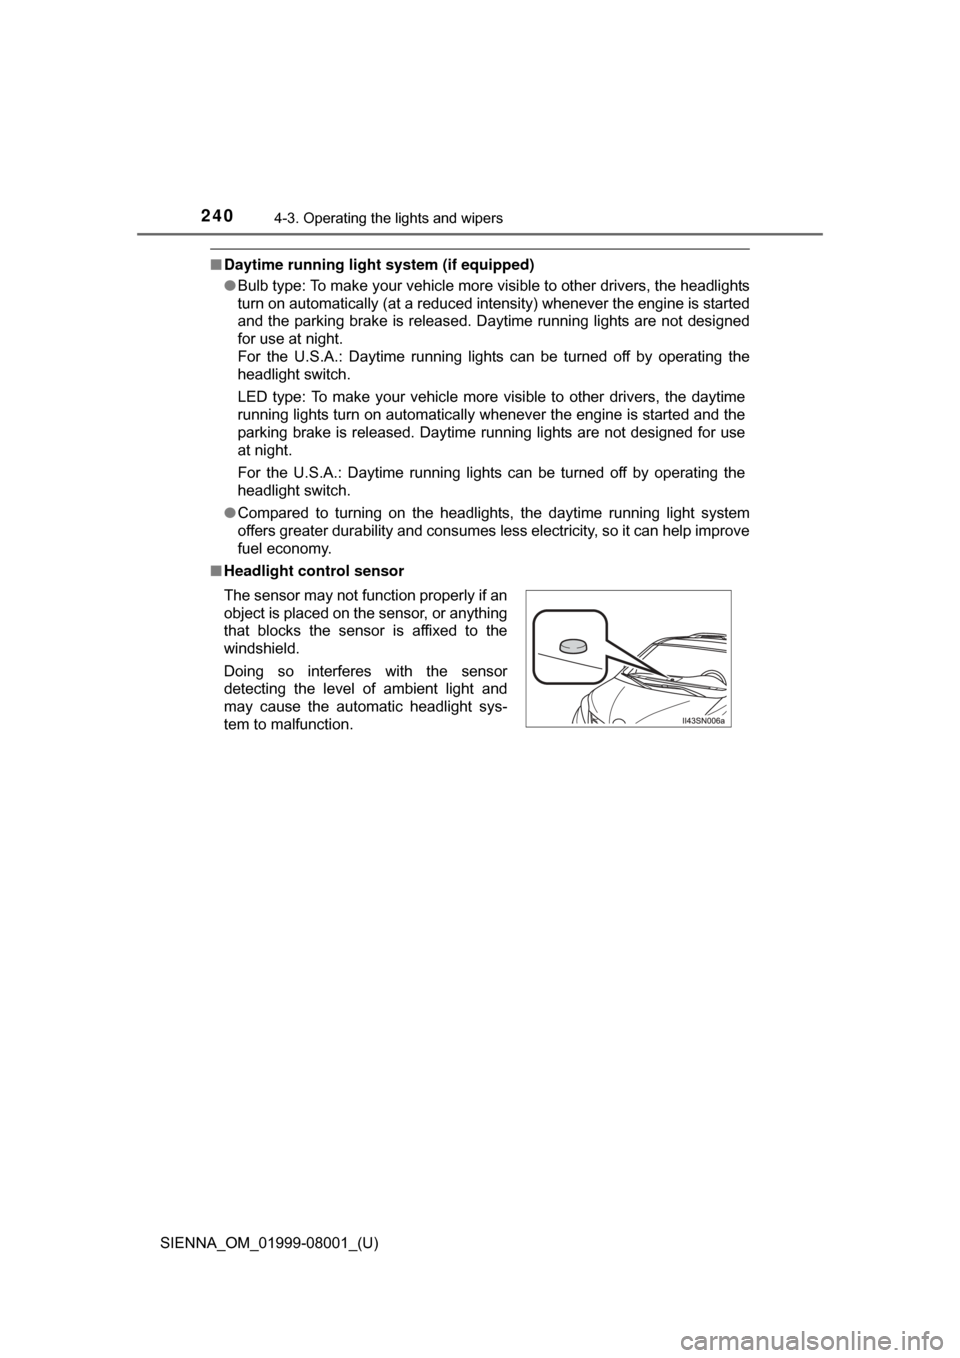
■ Headlight control sensor
The sensor may not function properly if an
object is placed on the sensor, or anything
that blocks the sensor is affixed to the
windshield.
Doing so interferes with the sensor
detecting the level of ambient light and
may cause the automatic headlight sys-
tem to malfunction.