steering wheel adjustment TOYOTA SIENNA 2015 XL30 / 3.G Owners Manual
[x] Cancel search | Manufacturer: TOYOTA, Model Year: 2015, Model line: SIENNA, Model: TOYOTA SIENNA 2015 XL30 / 3.GPages: 664, PDF Size: 12.66 MB
Page 171 of 664

SIENNA_OM_01999-08001_(U)
1713-3. Adjusting the seats
3
Operation of each component
■Recall procedure
Carry the electronic key that has been registered to the driving
position, and then unlock and open the driver’s door using the
smart key system or wi reless remote control.
The driving position will move to the recorded position.
If the driving position is in a position that has already been recorded, the
seat and outside rear view mirrors will not move.
■
Cancelation procedure
Carry only the key you want to cancel and then close the driver’s
door.
If 2 or more keys are in the vehicle, the driving position cannot be
canceled properly.
Check that the shift lever is in P.
Turn the engine switch to IGNITION ON mode.
While pressing the “SET” button, press and hold the door lock
switch (either lock or unlock) until the signal beeps twice.
If the button could not be canceled, the signal beeps continuously for
approximately 3 seconds.
■Recalling the driving position us ing the memory recall function
● Different driving positions can be registered for each electronic key. There-
fore, the driving position that is recalled may be different depending on the
key being carried.
● If a door other than the driver’s door is unlocked with the smart key system,
the driving position cannot be recalled. In this case, press the driving posi-
tion button which has been set.
■ Customization
The unlock door settings of the memory recall function can be customized.
(Customizable features: P. 624)
WARNING
■Seat adjustment caution
Take care during seat adjustment so that the seat does not strike the rear
passenger or squeeze your body against the steering wheel.
1
2
3
Page 176 of 664

1763-4. Adjusting the steering wheel and mirrors
SIENNA_OM_01999-08001_(U)
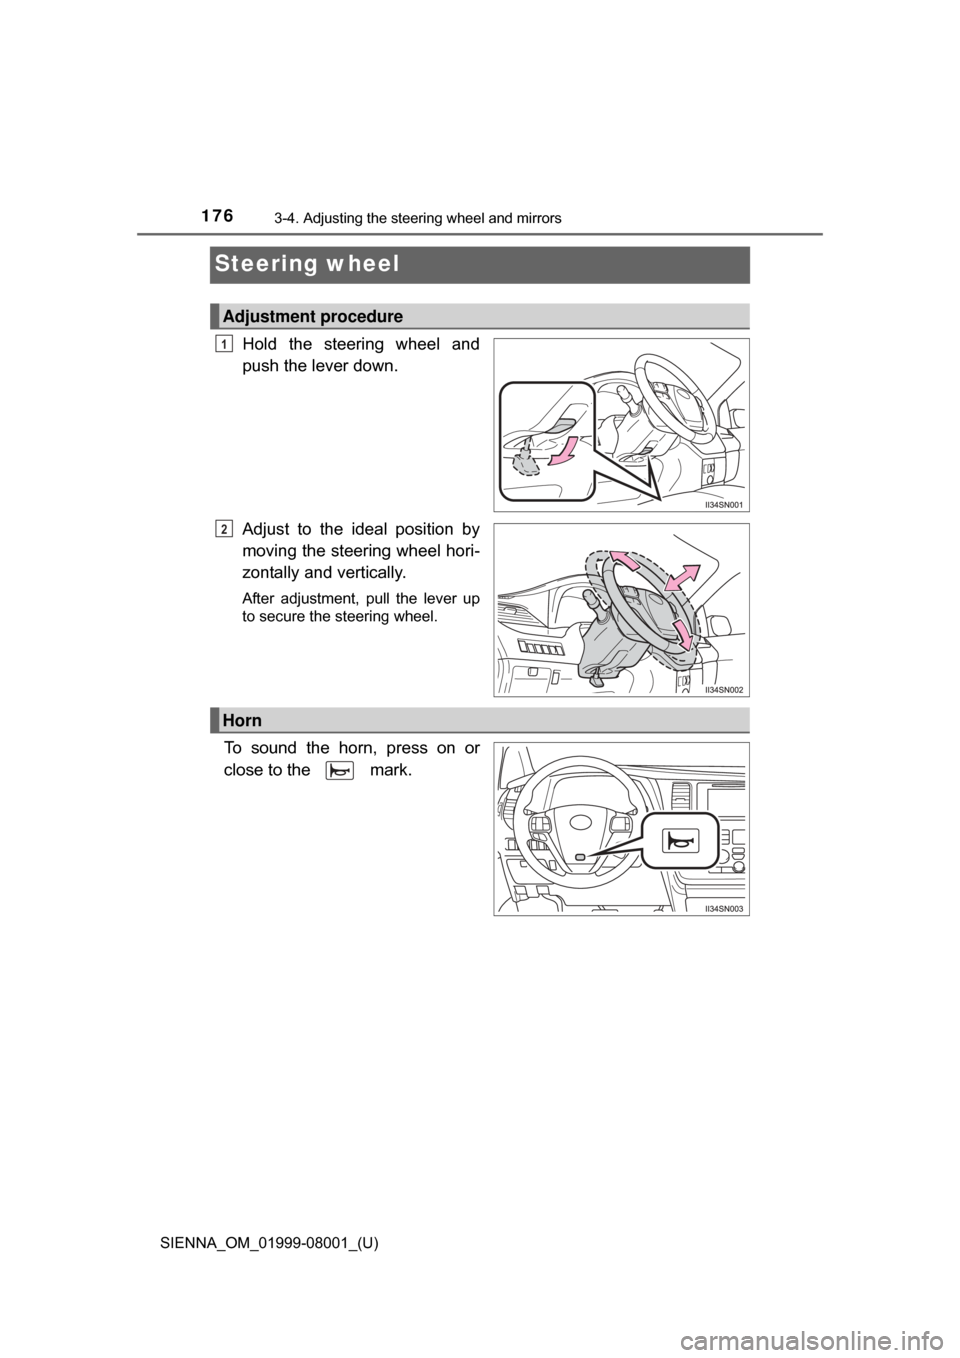
Steering wheel
Hold the steering wheel and
push the lever down.
Adjust to the ideal position by
moving the steering wheel hori-
zontally and vertically.
After adjustment, pull the lever up
to secure the steering wheel.
To sound the horn, press on or
close to the mark.
Adjustment procedure
1
2
Horn
Page 180 of 664

1803-4. Adjusting the steering wheel and mirrors
SIENNA_OM_01999-08001_(U)
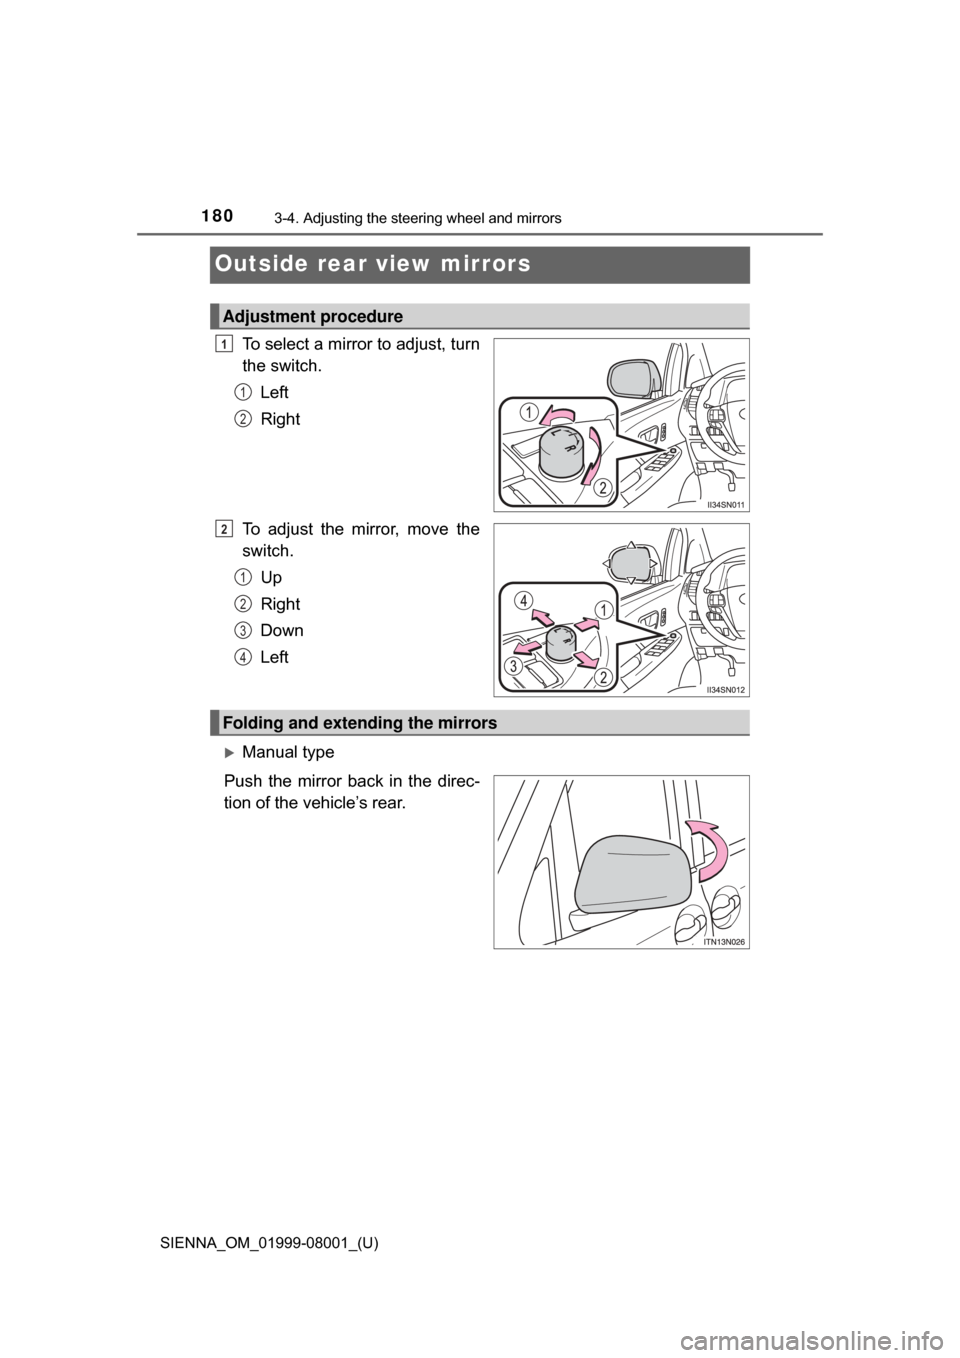
Outside rear view mirrors
To select a mirror to adjust, turn
the switch.Left
Right
To adjust the mirror, move the
switch. Up
Right
Down
Left
Manual type
Push the mirror back in the direc-
tion of the vehicle’s rear.
Adjustment procedure
1
1
2
2
1
2
3
4
Folding and extending the mirrors
Page 181 of 664

1813-4. Adjusting the steering wheel and mirrors
3
Operation of each component
SIENNA_OM_01999-08001_(U)
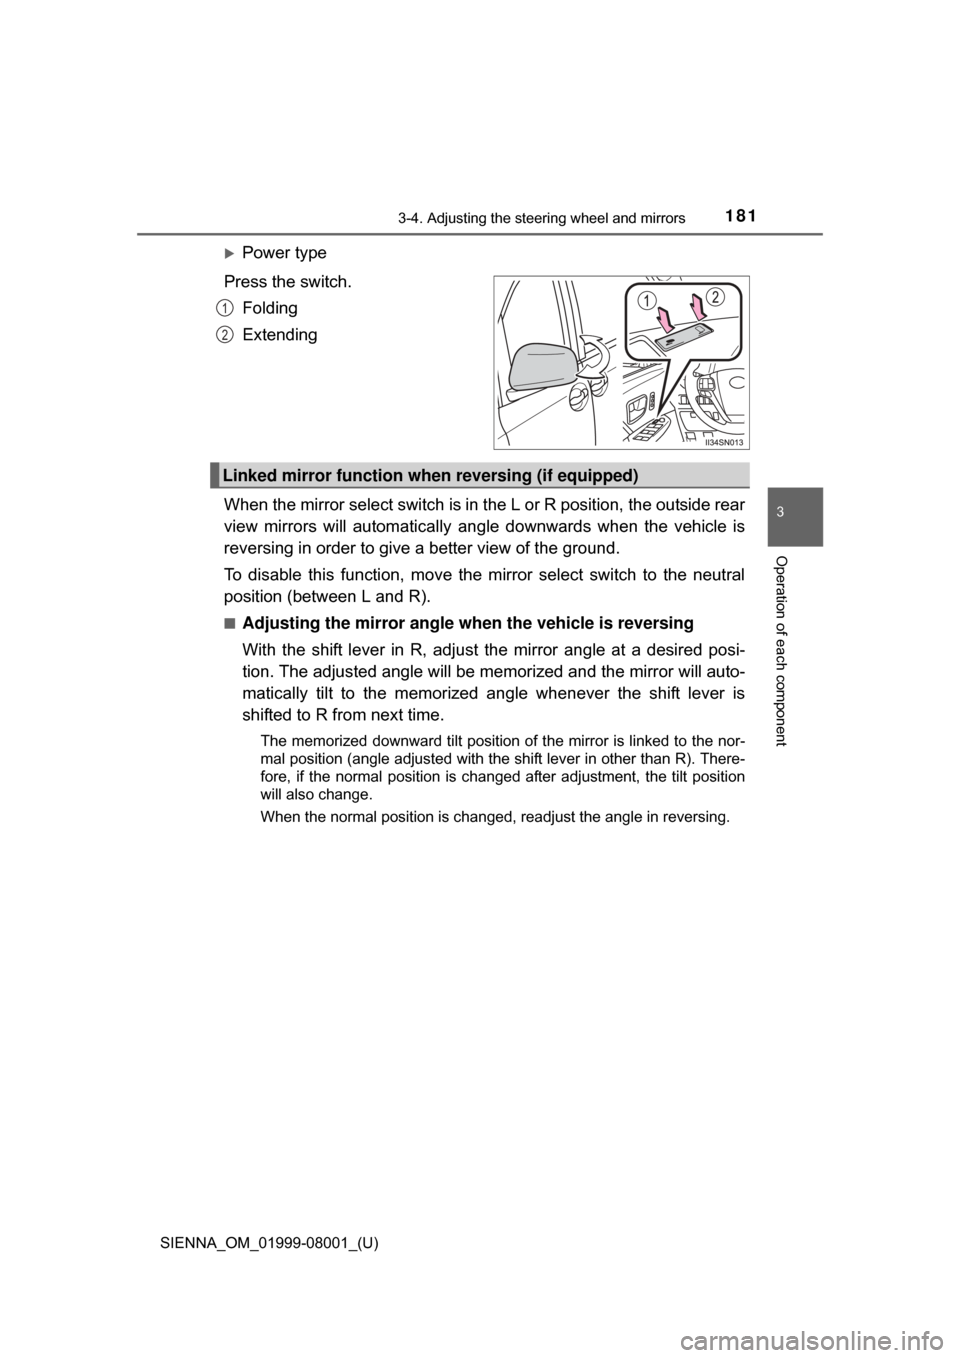
Power type
Press the switch. Folding
Extending
When the mirror select switch is in the L or R position, the outside rear
view mirrors will automatically angle downwards when the vehicle is
reversing in order to give a better view of the ground.
To disable this function, move the mirror select switch to the neutral
position (between L and R).
■Adjusting the mirror angle when the vehicle is reversing
With the shift lever in R, adjust the mirror angle at a desired posi-
tion. The adjusted angle will be memo rized and the mirror will auto-
matically tilt to the memorized angle whenever the shift lever is
shifted to R from next time.
The memorized downward tilt position of the mirror is linked to the nor-
mal position (angle adjusted with the shift lever in other than R). There-
fore, if the normal position is changed after adjustment, the tilt position
will also change.
When the normal position is changed, readjust the angle in reversing.
1
2
Linked mirror function when reversing (if equipped)
Page 182 of 664

1823-4. Adjusting the steering wheel and mirrors
SIENNA_OM_01999-08001_(U)
■Mirror angle can be adjusted when
Vehicles without a smart key system
The engine switch is in the “ACC” or “ON” position.
Vehicles with a smart key system
The engine switch is in ACCESSORY or IGNITION ON mode.
■ When the mirrors are fogged up (vehicles with outside rear view mirror
defoggers)
The outside rear view mirrors can be cleared using the mirror defoggers. Turn
on the rear window defogger to turn on the outside rear view mirror defog-
gers. ( P. 408)
■ Automatic adjustment of the mirror angle (vehicles with driving position
memory)
A desired mirror face angle can be entered to memory and recalled automati-
cally by the driving position memory. ( P. 168)
■ Auto anti-glare function (vehicles with auto anti-glare inside rear view
mirror)
When the anti-glare inside rear view mirr or is set to automatic mode, the out-
side rear view mirrors will activate in conjunction with the anti-glare inside
rear view mirror to reduce reflected light. ( P. 178)
WARNING
■When driving the vehicle
Observe the following precautions while driving.
Failing to do so may result in loss of control of the vehicle and cause an
accident, resulting in death or serious injury.
● Do not adjust the mirrors while driving.
● Do not drive with the mirrors folded.
● Both the driver and passenger side mirrors must be extended and properly
adjusted before driving.
■ When a mirror is moving
To avoid personal injury and mirror malfunction, be careful not to get your
hand caught by the moving mirror.
■ When the mirror defoggers are ope rating (vehicles with outside rear
view mirror defoggers)
Do not touch the rear view mirror surfaces, as they can become very hot
and burn you.
Page 543 of 664

5438-2. Steps to take in an emergency
SIENNA_OM_01999-08001_(U)
8
When trouble arises
WARNING
■If both the ABS and the brake system warning lights remain on
Stop your vehicle in a safe place immediately and contact your Toyota
dealer. The vehicle will become extremely unstable during braking, and the
ABS system may fail, which could cause an accident resulting in death or
serious injury.
■ When the electric power steerin g system warning light comes on
The steering wheel may become extremely heavy.
If the steering wheel becomes heavie r than usual when operating, hold
firmly and operate using more force than usual.
■
If the tire pressure warning light comes on
Be sure to observe the following precautions. Failure to do so could
cause a loss of vehicle control and result in death or serious injury.
Vehicles with standard tires:
●Stop your vehicle in a safe place as soon as possible. Adjust the tire
inflation pressure immediately.
●If the tire pressure warning light comes on even after tire inflation pres-
sure adjustment, it is probable that you have a flat tire. Check the tires.
If a tire is flat, change it with th e spare tire and have the flat tire
repaired by the nearest Toyota dealer.
●Avoid abrupt maneuvering and braking. If the vehicle tires deteriorate,
you could lose control of the steering wheel or the brakes.
Vehicles with run-flat tires:
●Decelerate to the lowest appropriate speed as soon as possible. Do
not drive over 50 mph (80 km/h).
●Check and adjust the tire inflation pressure immediately.
●If the tire pressure warning light comes on even after tire inflation pres-
sure adjustment, it is probable that you have a flat tire. Have the tire
replaced by the nearest Toyota dealer.
●Avoid abrupt maneuvering and braking. If the vehicle tires deteriorate,
you could lose control of the steering wheel or the brakes.
■If a blowout or sudden air leakage should occur
The tire pressure warning system may not activate immediately.
Page 660 of 664

660Alphabetical index
SIENNA_OM_01999-08001_(U)
Smart key systemAntenna location ................... 142
Entry function ........ 110, 121, 132
Starting the engine................ 226
Warning message ................. 558
Snow tires ................................ 311
Spare tire Inflation pressure .................. 601
Storage location .................... 565
Spark plug ................................ 598
Specifications .......................... 594
Speedometer .............................. 88
Steering wheel Adjustment ............................ 176
Audio switches
*.................... 320
Column lock release ..... 224, 229
“DISP” switch .......................... 90
Heated steering wheel .......... 416
Meter control switches ............ 94
Talk switch
*.......................... 400
Telephone switches
*............ 379
Stop lights Replacing light bulbs..... 520, 523
Wattage ................................ 602
Storage feature ........................ 422
Storage precautions ........ 205, 422
Stuck If your vehicle becomes stuck ................................... 590
Sunshades
Rear door .............................. 442
Roof ...................................... 190
Sun visors ................................ 435
Switch
Audio remote control switches
*........................... 320
BSM (Blind Spot Monitor) switch ................................. 303
Cruise control switch............. 257 “DISP” switch .......................... 90
Door lock switch ................... 114
Driving position memory
switches ............................. 168
Emergency flashers
switch ................................. 528
Engine switch ............... 223, 226
Fog light switch ..................... 247
Garage door opener switches ............................. 444
Heated steering wheel .......... 416
Ignition switch ............... 223, 226
Intuitive parking assist switch ................................. 273
Light switches ....................... 237
Moon roof switches............... 188
Outside rear view mirror switches ............................. 180
Pre-collision braking off switch ................................. 297
Power back door................... 133
Power door lock switch ......... 114
Power window switch ... 183, 186
Rear window wiper and washer switch..................... 252
Rear window and outside rear view mirror
defoggers switch ................ 408
Seat heater switches ............ 416
“SOS” button......................... 453
Talk switch
*.......................... 400
Telephone switches
*............ 379
Tire pressure warning
reset switch ........................ 489
TRAC OFF switch................. 292
Vehicle-to-vehicle distance button ................................. 261
Window lock switch .............. 183
Wiper and washer switch ......................... 248, 252