audio TOYOTA SIENNA HYBRID 2022 User Guide
[x] Cancel search | Manufacturer: TOYOTA, Model Year: 2022, Model line: SIENNA HYBRID, Model: TOYOTA SIENNA HYBRID 2022Pages: 600, PDF Size: 21.11 MB
Page 124 of 600
1242-1. Instrument cluster
(traction battery) is regenerated or
charged.
Yellow: When the hybrid battery
(traction battery) is in use.
Red: When the gasoline engine is
in use.
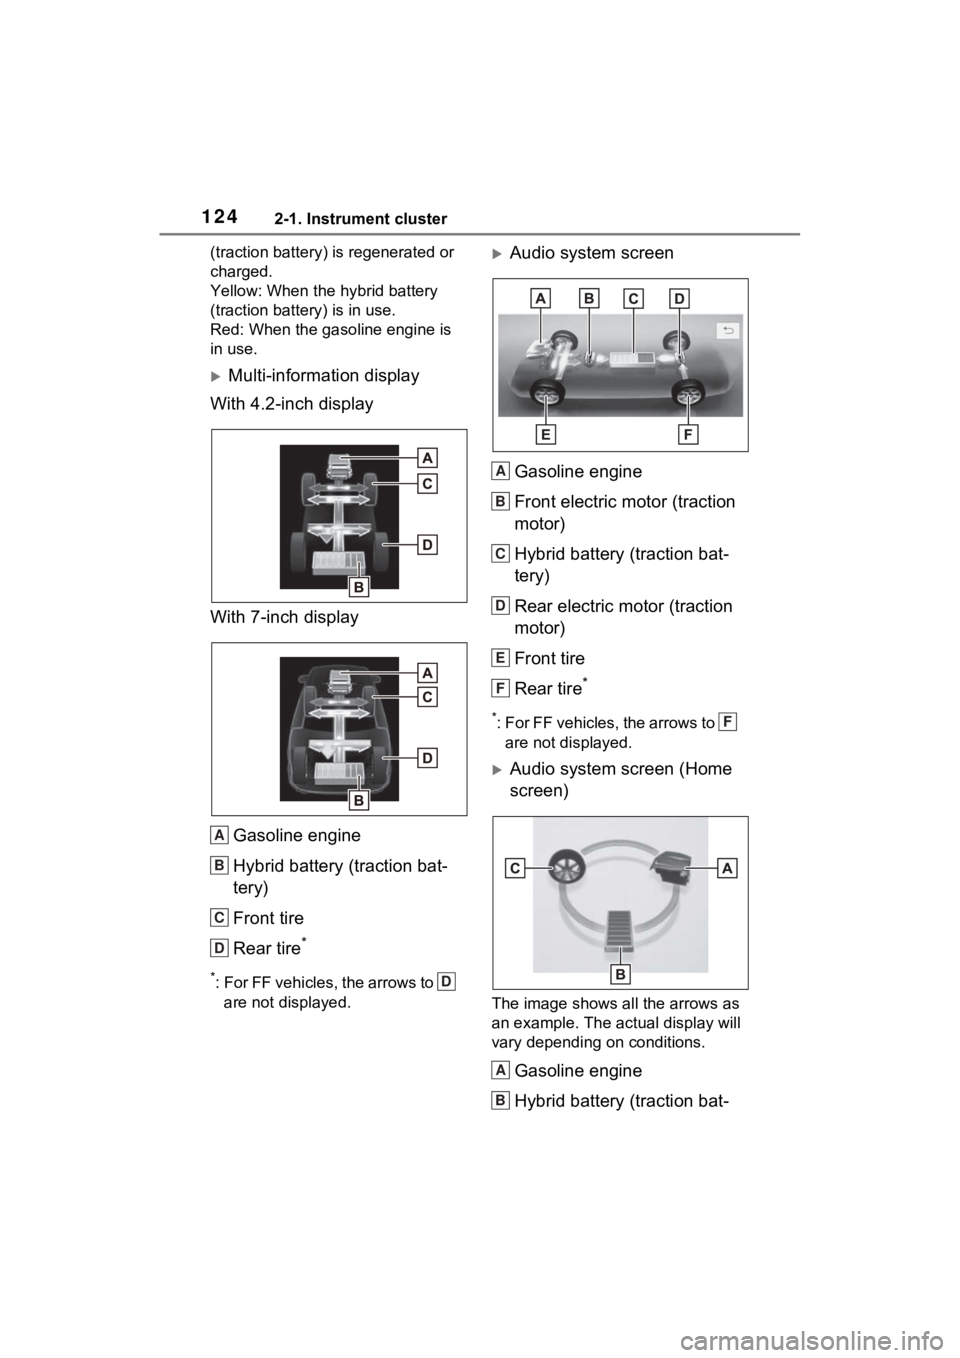
Multi-information display
With 4.2-inch display
With 7-inch display
Gasoline engine
Hybrid battery (traction bat-
tery)
Front tire
Rear tire
*
*: For FF vehicles, the arrows to are not displayed.
Audio system screen
Gasoline engine
Front electric motor (traction
motor)
Hybrid battery (traction bat-
tery)
Rear electric motor (traction
motor)
Front tire
Rear tire
*
*: For FF vehicles, the arrows to are not displayed.
Audio system screen (Home
screen)
The image shows all the arrows as
an example. The ac tual display will
vary depending on conditions.
Gasoline engine
Hybrid battery (traction bat-
A
B
C
D
D
A
B
C
D
E
F
F
A
B
Page 125 of 600
1252-1. Instrument cluster
2
Vehicle status information and indicators
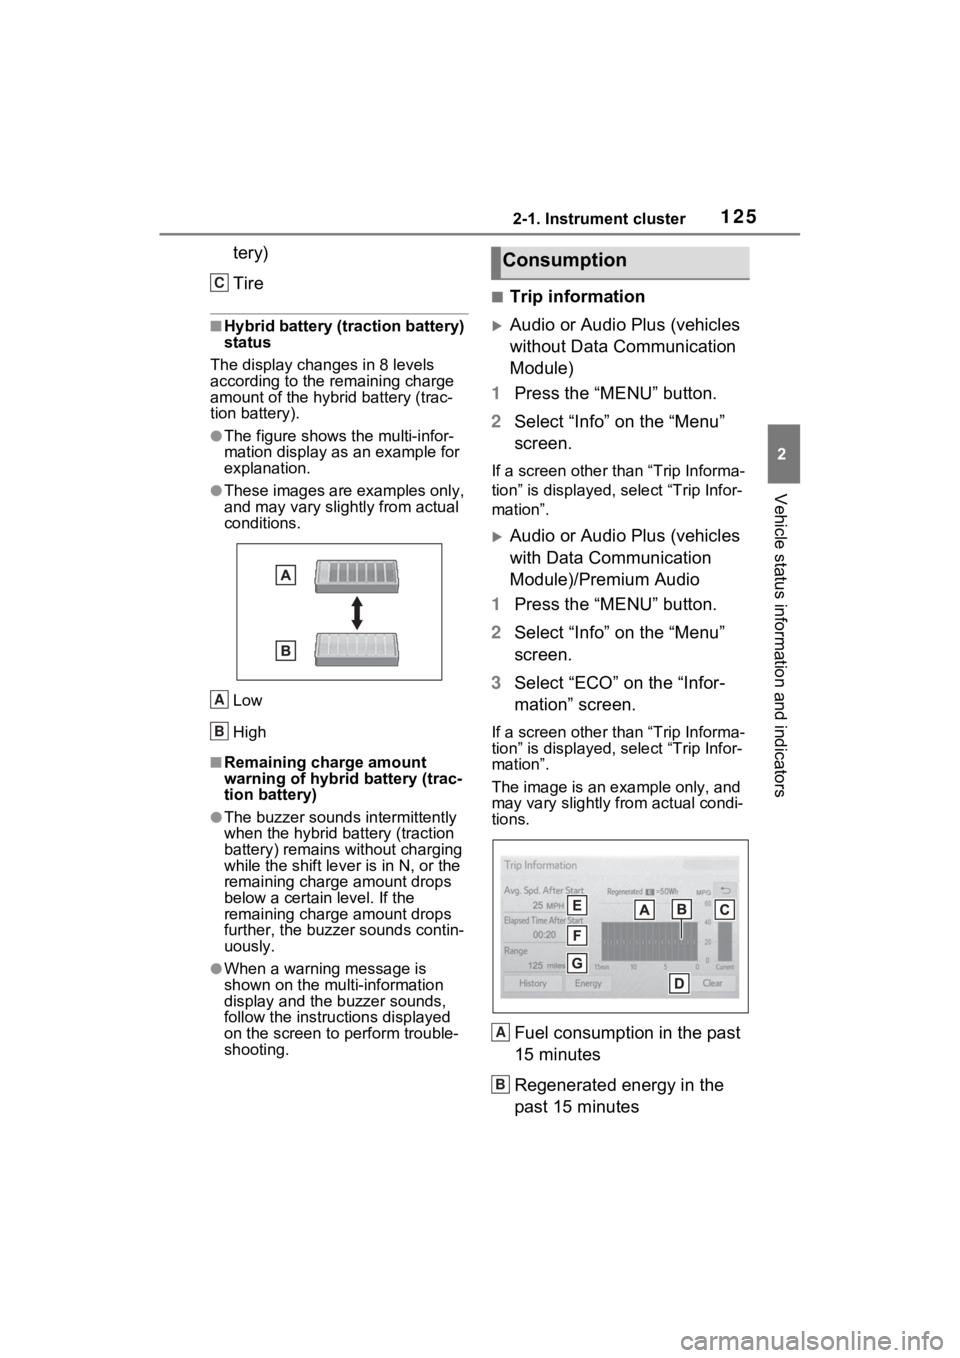
tery)
Tire
■Hybrid battery (traction battery)
status
The display changes in 8 levels
according to the remaining charge
amount of the hybrid battery (trac-
tion battery).
●The figure shows the multi-infor-
mation display as an example for
explanation.
●These images are examples only,
and may vary slight ly from actual
conditions.
Low
High
■Remaining charge amount
warning of hybrid battery (trac-
tion battery)
●The buzzer sounds intermittently
when the hybrid battery (traction
battery) remains without charging
while the shift leve r is in N, or the
remaining charge amount drops
below a certain level. If the
remaining charge amount drops
further, the buzzer sounds contin-
uously.
●When a warning message is
shown on the multi-information
display and the buzzer sounds,
follow the instructions displayed
on the screen to p erform trouble-
shooting.
■Trip information
Audio or Audio Plus (vehicles
without Data Communication
Module)
1 Press the “MENU” button.
2 Select “Info” on the “Menu”
screen.
If a screen other than “Trip Informa-
tion” is displayed, select “Trip Infor-
mation”.
Audio or Audio Plus (vehicles
with Data Communication
Module)/Premium Audio
1 Press the “MENU” button.
2 Select “Info” on the “Menu”
screen.
3 Select “ECO” on the “Infor-
mation” screen.
If a screen other than “Trip Informa-
tion” is displayed, select “Trip Infor-
mation”.
The image is an example only, and
may vary slightly from actual condi-
tions.
Fuel consumption in the past
15 minutes
Regenerated energy in the
past 15 minutes
C
A
B
Consumption
A
B
Page 126 of 600
1262-1. Instrument cluster
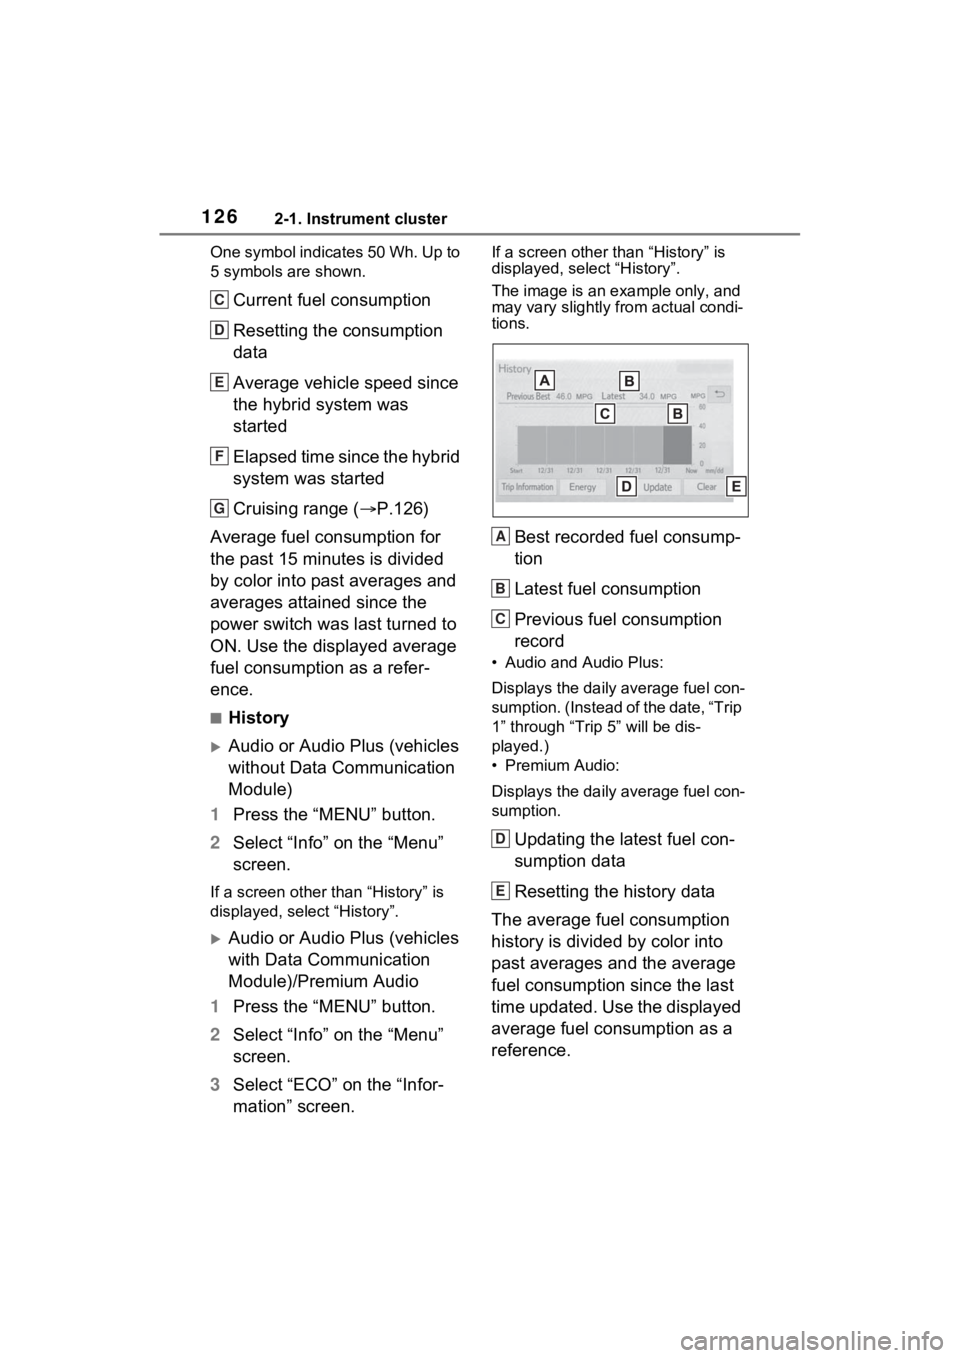
One symbol indicates 50 Wh. Up to
5 symbols are shown.
Current fuel consumption
Resetting the consumption
data
Average vehicle speed since
the hybrid system was
started
Elapsed time since the hybrid
system was started
Cruising range (P.126)
Average fuel consumption for
the past 15 minutes is divided
by color into past averages and
averages attained since the
power switch was last turned to
ON. Use the displayed average
fuel consumption as a refer-
ence.
■History
Audio or Audio Plus (vehicles
without Data Communication
Module)
1 Press the “MENU” button.
2 Select “Info” on the “Menu”
screen.
If a screen other than “History” is
displayed, select “History”.
Audio or Audio Plus (vehicles
with Data Communication
Module)/Premium Audio
1 Press the “MENU” button.
2 Select “Info” on the “Menu”
screen.
3 Select “ECO” on the “Infor-
mation” screen.
If a screen other than “History” is
displayed, select “History”.
The image is an example only, and
may vary slightly from actual condi-
tions.
Best recorded fuel consump-
tion
Latest fuel consumption
Previous fuel consumption
record
• Audio and Audio Plus:
Displays the daily average fuel con-
sumption. (Instead of the date, “Trip
1” through “Trip 5” will be dis-
played.)
• Premium Audio:
Displays the daily average fuel con-
sumption.
Updating the latest fuel con-
sumption data
Resetting the history data
The average fuel consumption
history is divided by color into
past averages and the average
fuel consumption since the last
time updated. Use the displayed
average fuel consumption as a
reference.
C
D
E
F
G
A
B
C
D
E
Page 130 of 600
1293-1. Key information
3
Before driving
■If a message regarding the state
of the electronic key or power
switch mode, etc. is shown
To prevent trapping the electronic
key inside the vehicle, leaving the
vehicle carrying the electronic key
on your person without turning the
power switch to O FF or other pas-
sengers from unintentionally taking
the key out of the vehicle, etc., a
message that prompts the user to
confirm the state of the electronic
key or power switch mode may be
shown on the multi -information dis-
play. In those cases, follow the
instructions on the display immedi-
ately.
■If “Key Battery Low Replace
Key Battery” is displayed on
the multi-information display
The electronic key has a low bat-
tery. Replace the electronic key bat-
tery. ( P.444)
■Replacing the battery
P.444
■Confirmation of the registered
key number
The number of keys already regis-
tered to the vehicle can be con-
firmed. Ask your Toyota dealer for
details.
■If “A New Key has been Regis-
tered Contact Your Dealer for
Details” is displayed on the
multi-information display
This message will be displayed
each time the driver’s door is
opened when the doors are
unlocked from the outside for
approximately 10 days after a new
electronic key has been registered.
If this message is displayed but you
have not had a new electronic key
registered, ask your Toyota dealer
to check if an unknown electronic
key (other than those in your pos-
session) has been registered.
NOTICE
■To prevent key damage
●Do not drop the keys, subject
them to strong shocks or bend
them.
●Do not expose the keys to high
temperatures for long periods of
time.
●Do not get the keys wet or wash
them in an ultrasonic washer,
etc.
●Do not attach m etallic or mag-
netic materials to the keys or
place the keys close to such
materials.
●Do not disassemble the keys.
●Do not attach a s ticker or any-
thing else to the surface of the
electronic key.
●Do not place the keys near
objects that produce magnetic
fields, such as TVs, audio sys-
tems and induction cookers.
●Do not place the keys near
medical electrical equipment
such as low-frequency therapy
equipment or microwave ther-
apy equipment, and do not
receive medical attention with
the keys on your person.
■Carrying the electronic key
on your person
Carry the electronic key 3.9 in.
(10 cm) or more away from elec-
tric appliances that are turned on.
Radio waves emitte d from electric
appliances within 3.9 in. (10 cm)
of the electronic key may interfere
with the key, cau sing the key to
not function properly.
■In case of a smart key system
malfunction or other key-
related problems
P.502
Page 168 of 600
1673-2. Opening, closing and locking the doors
3
Before driving
●When the electronic key is in con-
tact with, or is covered by the fol-
lowing metallic objects
• Cards to which al uminum foil is
attached
• Cigarette boxes that have alumi-
num foil inside
• Metallic wallets or bags
• Coins
• Hand warmers made of metal
• Media such as CDs and DVDs
●When other wireless key (that
emits radio waves) is being used
nearby
●When carrying the electronic key
together with the following devices
that emit radio waves
• Portable radio, cellular phone, cordless phone or other wireless
communication devices
• Another vehicle’s electronic key or a wireless key that emits radio
waves
• Personal computers or personal digital assistants (PDAs)
• Digital audio players
• Portable game systems
●If window tint with a metallic con-
tent or metallic objects are
attached to the rear window
●When the electronic key is placed
near a battery charger or elec-
tronic devices
●When the vehicle is parked in a
pay parking spot where radio
waves are emitted.
■Note for the entry function
●Even when the electronic key is
within the effective range (detec-
tion areas), the system may not
operate properly in the following
cases:
• The electronic key is too close to the window or outside door han-
dle, near the ground, or in a high
place when the doors are locked
or unlocked.
• The electronic key is on the instru- ment panel or floor, or in the door
pockets or glove box when the
hybrid system is s tarted or power switch modes are changed.
●Do not leave the electronic key on
top of the instrument panel or near
the door pockets when exiting the
vehicle. Depending on the radio
wave reception conditions, it may
be detected by the antenna out-
side the cabin and the door will
become lockable from the outside,
possibly trapping the electronic
key inside the vehicle.
●As long as the electronic key is
within the effective range, the
doors may be locked or unlocked
by anyone. However, only the
doors detecting the electronic key
can be used to unlock the vehicle.
●Even if the electro
nic key is not
inside the vehicle, it may be possi-
ble to start the hybrid system if the
electronic key is near the window.
●The doors may unlock if a large
amount of water splashes on the
door handle, such as in the rain or
in a car wash when the electronic
key is within the effective range.
(The doors will au tomatically be
locked after approximately 60 sec-
onds if the doors are not opened
and closed.)
●If the wireless remote control is
used to lock the doors when the
electronic key is near the vehicle,
there is a possib ility that the door
may not be unlocked by the entry
function. (Use the wireless remote
control to unlock the doors.)
●Touching the door lock sensor
while wearing gloves may delay or
prevent lock operation. Remove
the gloves and touch the lock sen-
sor again.
●When the lock operation is per-
formed using the lock sensor, rec-
ognition signals will be shown up
to two consecutive times. After
this, no recognition signals will be
given.
●If the door handle becomes wet
while the electronic key is within
the effective range, the door may
Page 238 of 600
2374-2. Driving procedures
4
Driving
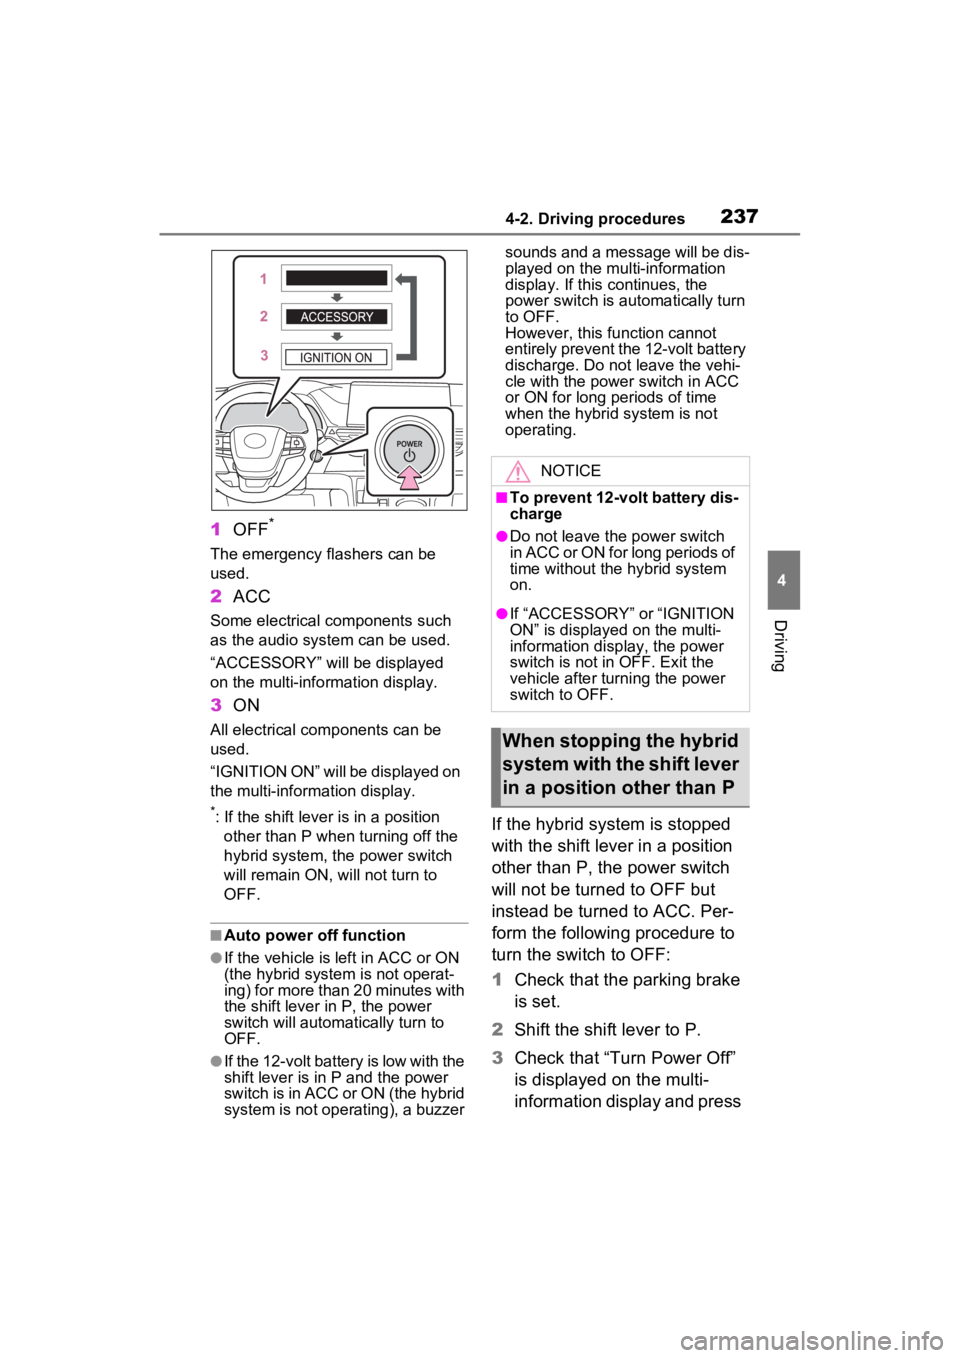
1OFF*
The emergency flashers can be
used.
2ACC
Some electrical components such
as the audio system can be used.
“ACCESSORY” will be displayed
on the multi-info rmation display.
3ON
All electrical com ponents can be
used.
“IGNITION ON” will be displayed on
the multi-inform ation display.
*: If the shift lever is in a position
other than P when turning off the
hybrid system, the power switch
will remain ON, will not turn to
OFF.
■Auto power off function
●If the vehicle is left in ACC or ON
(the hybrid system is not operat-
ing) for more than 20 minutes with
the shift lever in P, the power
switch will automatically turn to
OFF.
●If the 12-volt battery is low with the
shift lever is in P and the power
switch is in ACC or ON (the hybrid
system is not operating), a buzzer sounds and a message will be dis-
played on the multi-information
display. If this continues, the
power switch is automatically turn
to OFF.
However, this function cannot
entirely prevent the 12-volt battery
discharge. Do not leave the vehi-
cle with the power switch in ACC
or ON for long periods of time
when the hybrid system is not
operating.
If the hybrid system is stopped
with the shift lever in a position
other than P, the power switch
will not be turned to OFF but
instead be turned to ACC. Per-
form the following procedure to
turn the switch to OFF:
1
Check that the parking brake
is set.
2 Shift the shift lever to P.
3 Check that “Turn Power Off”
is displayed on the multi-
information display and press
NOTICE
■To prevent 12-volt battery dis-
charge
●Do not leave the power switch
in ACC or ON for long periods of
time without the hybrid system
on.
●If “ACCESSORY” or “IGNITION
ON” is displayed on the multi-
information display, the power
switch is not in OFF. Exit the
vehicle after turning the power
switch to OFF.
When stopping the hybrid
system with the shift lever
in a position other than P
Page 286 of 600
2854-5. Using the driving support systems
4
Driving
This function operates when all of
the following cond itions are met.
• Setting for “Sway Warning” in of the multi-information display is
set to “ON”. ( P.104)
• Vehicle speed is approximately 32 mph (50 km/h) or more.
• Width of traffic lane is approxi- mately 9.8 ft. ( 3 m) or more.
• No system malfunctions are detected. ( P.287)
●Lane centering function
This function oper ates when all of
the following cond itions are met.
• LTA is turned on.
• Setting for “Steering Assist” and
“Lane Center” in of the multi-
information display are set to
“ON”. ( P.104)
• This function recognizes white (yellow) lane lines or the position
of a preceding vehicle (except
when the preceding vehicle is
small, such as a motorcycle).
• The dynamic radar cruise control
with full-speed range is operating
in vehicle-to-vehic le distance con-
trol mode.
• Width of traffic lane is approxi-
mately 10 to 13 ft. (3 to 4 m).
• Turn signal lever is not operated.
• Vehicle is not being driven around a sharp curve.
• No system malfunctions are detected. ( P.287)
• Vehicle does not accelerate or decelerate by a fixed amount or
more.
• Steering wheel is not operated with a steering force level suitable
for changing lanes.
• ABS, VSC, TRAC and PCS are not operating.
• TRAC or VSC is not turned off.
• Hands off steering wheel warning
is not displayed. ( P.286)
• The vehicle is being driven in the
center of a lane.
• Steering assist function is not operating.
■Temporary cancelation of func-
tions
●When operation conditions are no
longer met, a function may be
temporarily canceled. However,
when the operation conditions are
met again, operation of the func-
tion is automatically restored.
( P.284)
●If the operation conditions
( P.284) are no longer met while
the lane centering function is
operating, the steering wheel may
vibrate and the buzzer may sound
to indicate that the function has
been temporarily canceled. How-
ever, if the “Steering wheel vibra-
tion” customization setting is set to
“On”, the system will notify the
driver by vibrating the steering
wheel instead of sounding the
buzzer.
■Steering assist function/lane
centering function
●Depending on the vehicle speed,
lane departure situation, road con-
ditions, etc., the driver may not
feel the function is operating or
the function may not operate at
all.
●The steering control of the func-
tion is overridden by the driver’s
steering wheel operation.
●Do not attempt to test the opera-
tion of the steering assist function.
■Lane departure alert function
●The warning buzzer may be diffi-
cult to hear due to external noise,
audio playback, etc. Also, it may
be difficult to fee l steering wheel
vibrations due to the road condi-
tions, etc.
●If the edge of the course* is not
clear or straight, the lane depar-
ture alert function may not oper-
ate.
●Vehicle with BSM: It may not be
possible for the system to deter-
mine if there is a danger of a colli-
Page 304 of 600
3034-5. Using the driving support systems
4
Driving
tion//RCTA function will be
enabled automatically.
■Outside rear view mirror indica-
tors visibility
In strong sunlight, the outside rear
view mirror indicato r may be difficult
to see.
■Hearing the RCTA buzzer
The RCTA buzzer may be difficult to
hear over loud noises such as high
audio volume.
■When “Blind Spot Monitor
Unavailable” or “Rear Cross
Traffic Alert Unavailable” is
shown on the multi-information
display
The sensor voltage has become
abnormal, or water, snow, mud,
etc., may be built up in the vicinity of
the sensor area of the rear bumper.
( P.303)
Removing the water, snow, mud,
etc., from the vicinity of the sensor
area should retur n it to normal.
Also, the sensor may not function
normally when used in extremely
hot or cold weather.
■When “Blind Spot Monitor Mal-
function Visit Your Dealer” or
“Rear Cross Traffic Alert Mal-
function Visit Your Dealer” is
shown on the multi-information
display
There may be a sensor malfunction
or misaligned. Have the vehicle
inspected at a Toyota dealer.
■Customization
Some functions can be customized.
( P.548)
WARNING
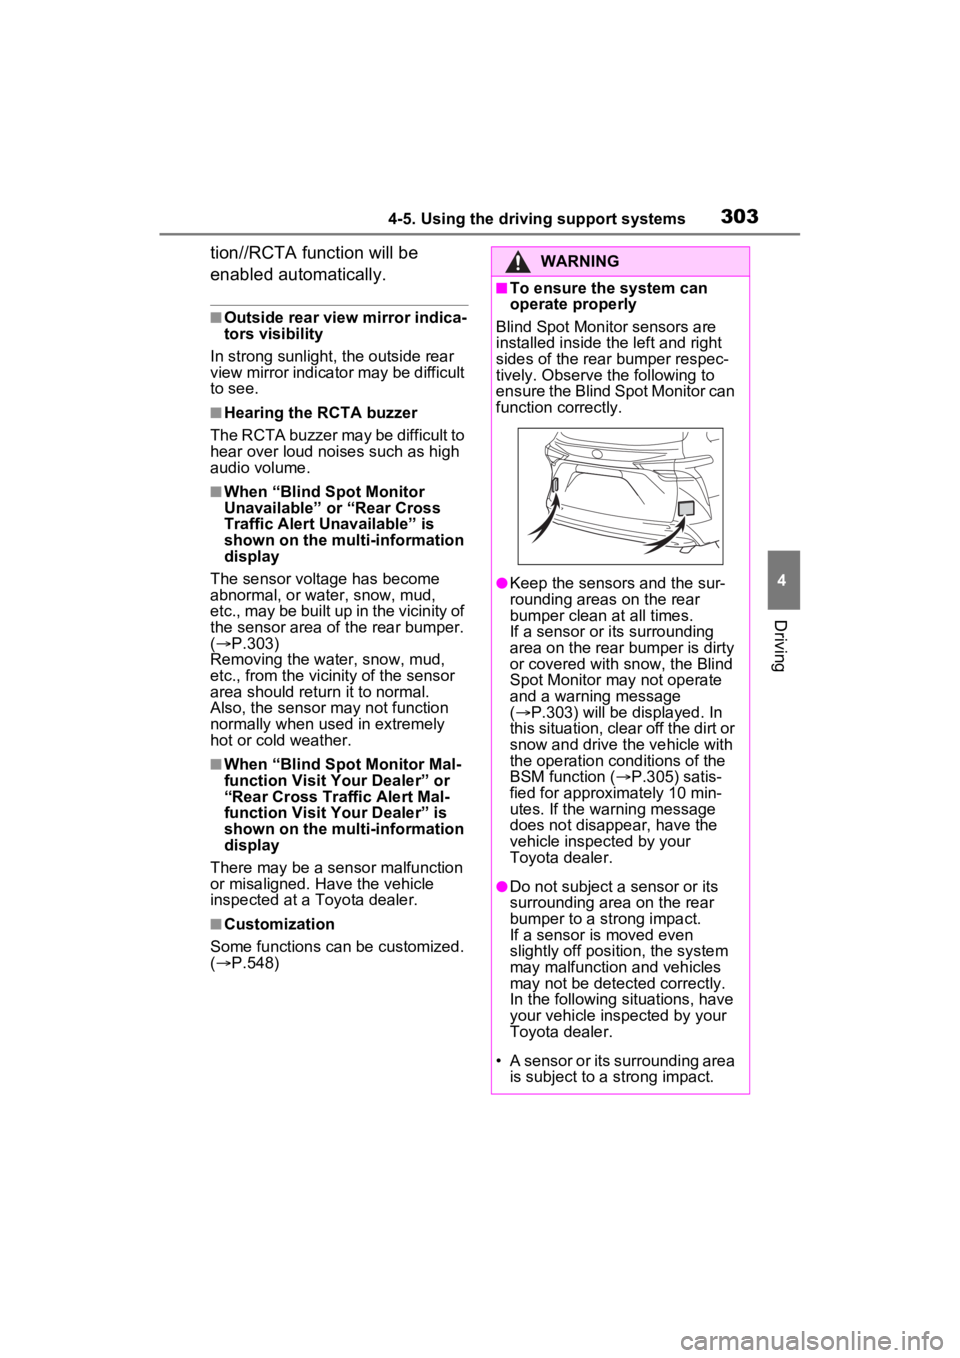
■To ensure the system can
operate properly
Blind Spot Monitor sensors are
installed inside t he left and right
sides of the rear bumper respec-
tively. Observe the following to
ensure the Blind Spot Monitor can
function correctly.
●Keep the sensors and the sur-
rounding areas on the rear
bumper clean at all times.
If a sensor or its surrounding
area on the rear bumper is dirty
or covered with snow, the Blind
Spot Monitor may not operate
and a warning message
( P.303) will be displayed. In
this situation, clear off the dirt or
snow and drive the vehicle with
the operation conditions of the
BSM function ( P.305) satis-
fied for approximately 10 min-
utes. If the warning message
does not disappear, have the
vehicle inspected by your
Toyota dealer.
●Do not subject a sensor or its
surrounding area on the rear
bumper to a strong impact.
If a sensor is moved even
slightly off position, the system
may malfunction and vehicles
may not be detected correctly.
In the following si tuations, have
your vehicle inspected by your
Toyota dealer.
• A sensor or its surrounding area is subject to a strong impact.
Page 308 of 600
3074-5. Using the driving support systems
4
Driving
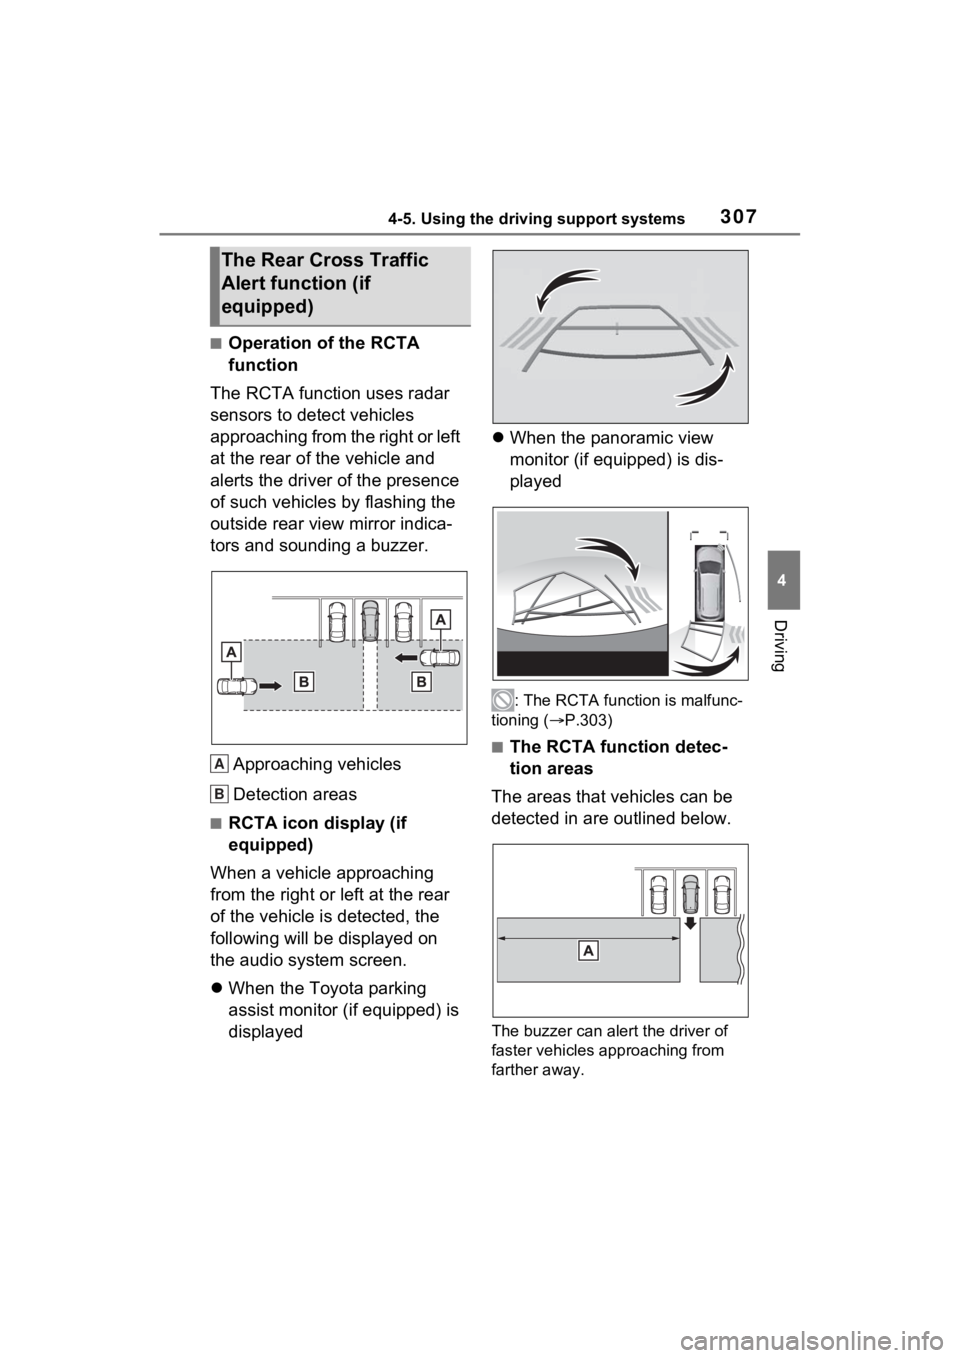
■Operation of the RCTA
function
The RCTA function uses radar
sensors to detect vehicles
approaching from the right or left
at the rear of the vehicle and
alerts the driver of the presence
of such vehicles by flashing the
outside rear view mirror indica-
tors and sounding a buzzer.
Approaching vehicles
Detection areas
■RCTA icon display (if
equipped)
When a vehicle approaching
from the right or left at the rear
of the vehicle is detected, the
following will be displayed on
the audio system screen.
When the Toyota parking
assist monitor (if equipped) is
displayed
When the panoramic view
monitor (if equipped) is dis-
played
: The RCTA functi on is malfunc-
tioning ( P.303)
■The RCTA function detec-
tion areas
The areas that vehicles can be
detected in are outlined below.
The buzzer can alert the driver of
faster vehicles approaching from
farther away.
The Rear Cross Traffic
Alert function (if
equipped)
A
B
Page 312 of 600
3114-5. Using the driving support systems
4
Driving
*: If equipped
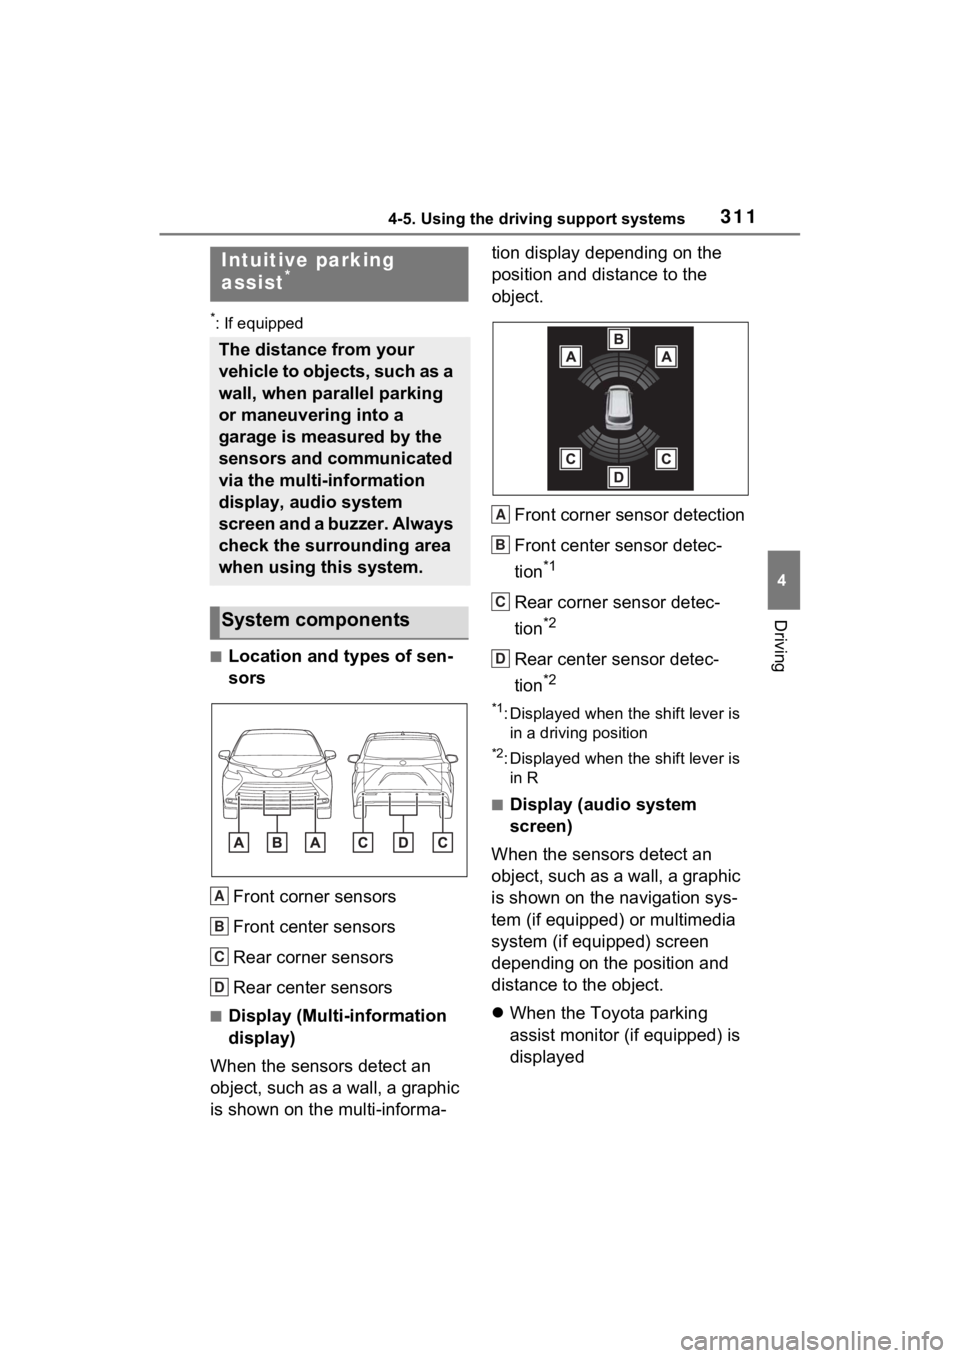
■Location and types of sen-
sorsFront corner sensors
Front center sensors
Rear corner sensors
Rear center sensors
■Display (Multi-information
display)
When the sensors detect an
object, such as a wall, a graphic
is shown on the multi-informa- tion display depending on the
position and distance to the
object.
Front corner sensor detection
Front center sensor detec-
tion
*1
Rear corner sensor detec-
tion
*2
Rear center sensor detec-
tion
*2
*1: Displayed when the shift lever is in a driving position
*2: Displayed when the shift lever is in R
■Display (audio system
screen)
When the sensors detect an
object, such as a wall, a graphic
is shown on the navigation sys-
tem (if equipped) or multimedia
system (if equipped) screen
depending on the position and
distance to the object.
When the Toyota parking
assist monitor (if equipped) is
displayed
Intuitive parking
assist*
The distance from your
vehicle to objects, such as a
wall, when parallel parking
or maneuvering into a
garage is measured by the
sensors and communicated
via the multi-information
display, audio system
screen and a buzzer. Always
check the surrounding area
when using this system.
System components
A
B
C
D
A
B
C
D