TOYOTA SUPRA 1986 Service Repair Manual
Manufacturer: TOYOTA, Model Year: 1986, Model line: SUPRA, Model: TOYOTA SUPRA 1986Pages: 878, PDF Size: 20 MB
Page 531 of 878
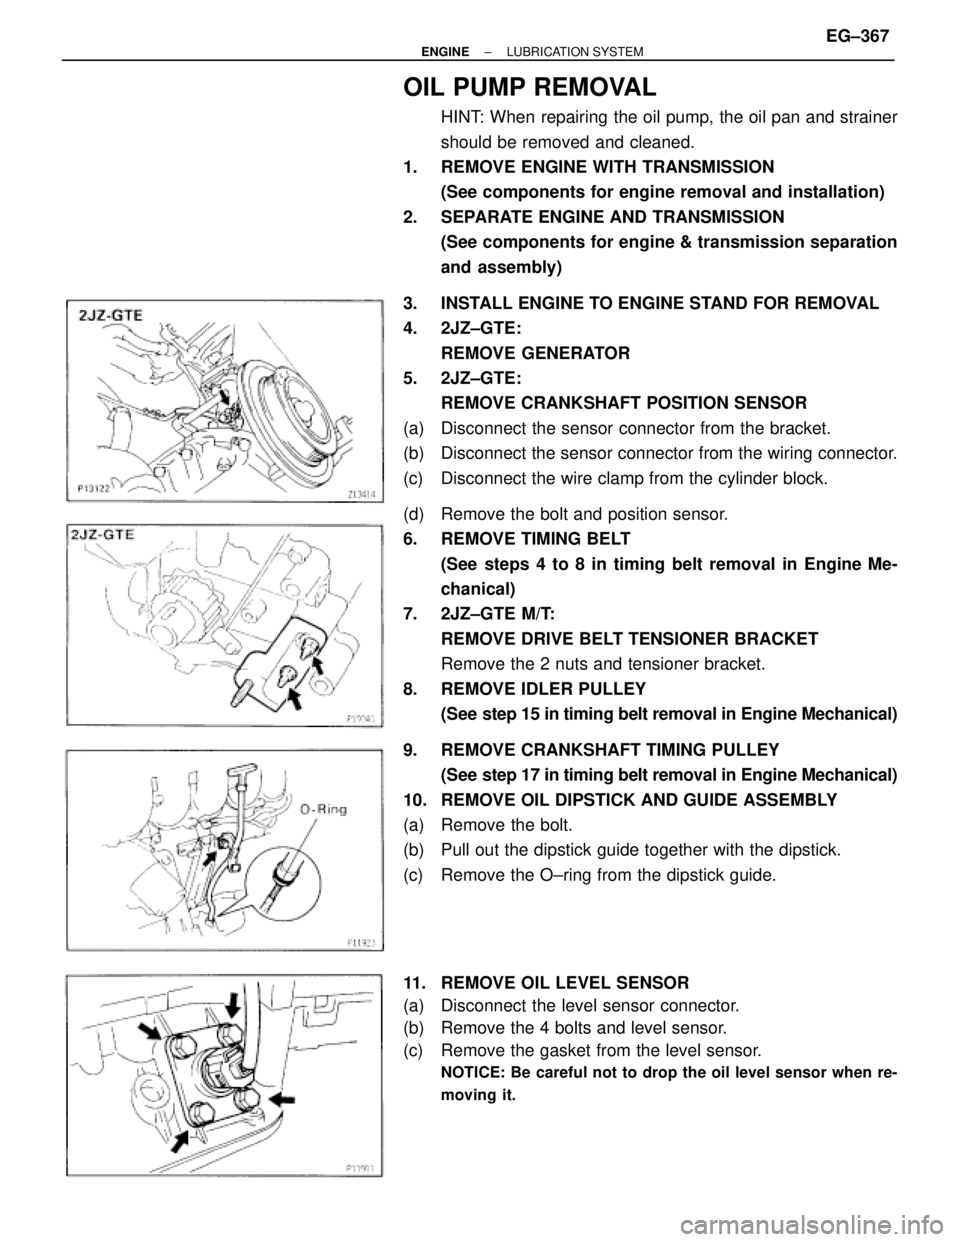
OIL PUMP REMOVAL
HINT: When repairing the oil pump, the oil pan and strainer
should be removed and cleaned.
1. REMOVE ENGINE WITH TRANSMISSION
(See components for engine removal and installation)
2. SEPARATE ENGINE AND TRANSMISSION
(See components for engine & transmission separation
and assembly)
3. INSTALL ENGINE TO ENGINE STAND FOR REMOVAL
4. 2JZ±GTE:
REMOVE GENERATOR
5. 2JZ±GTE:
REMOVE CRANKSHAFT POSITION SENSOR
(a) Disconnect the sensor connector from the bracket.
(b) Disconnect the sensor connector from the wiring connector.
(c) Disconnect the wire clamp from the cylinder block.
(d) Remove the bolt and position sensor.
6. REMOVE TIMING BELT
(See steps 4 to 8 in timing belt removal in Engine Me-
chanical)
7. 2JZ±GTE M/T:
REMOVE DRIVE BELT TENSIONER BRACKET
Remove the 2 nuts and tensioner bracket.
8. REMOVE IDLER PULLEY
(See step 15 in timing belt removal in Engine Mechanical)
9. REMOVE CRANKSHAFT TIMING PULLEY
(See step 17 in timing belt removal in Engine Mechanical)
10. REMOVE OIL DIPSTICK AND GUIDE ASSEMBLY
(a) Remove the bolt.
(b) Pull out the dipstick guide together with the dipstick.
(c) Remove the O±ring from the dipstick guide.
11. REMOVE OIL LEVEL SENSOR
(a) Disconnect the level sensor connector.
(b) Remove the 4 bolts and level sensor.
(c) Remove the gasket from the level sensor.
NOTICE: Be careful not to drop the oil level sensor when re-
moving it.
± ENGINELUBRICATION SYSTEMEG±367
Page 532 of 878
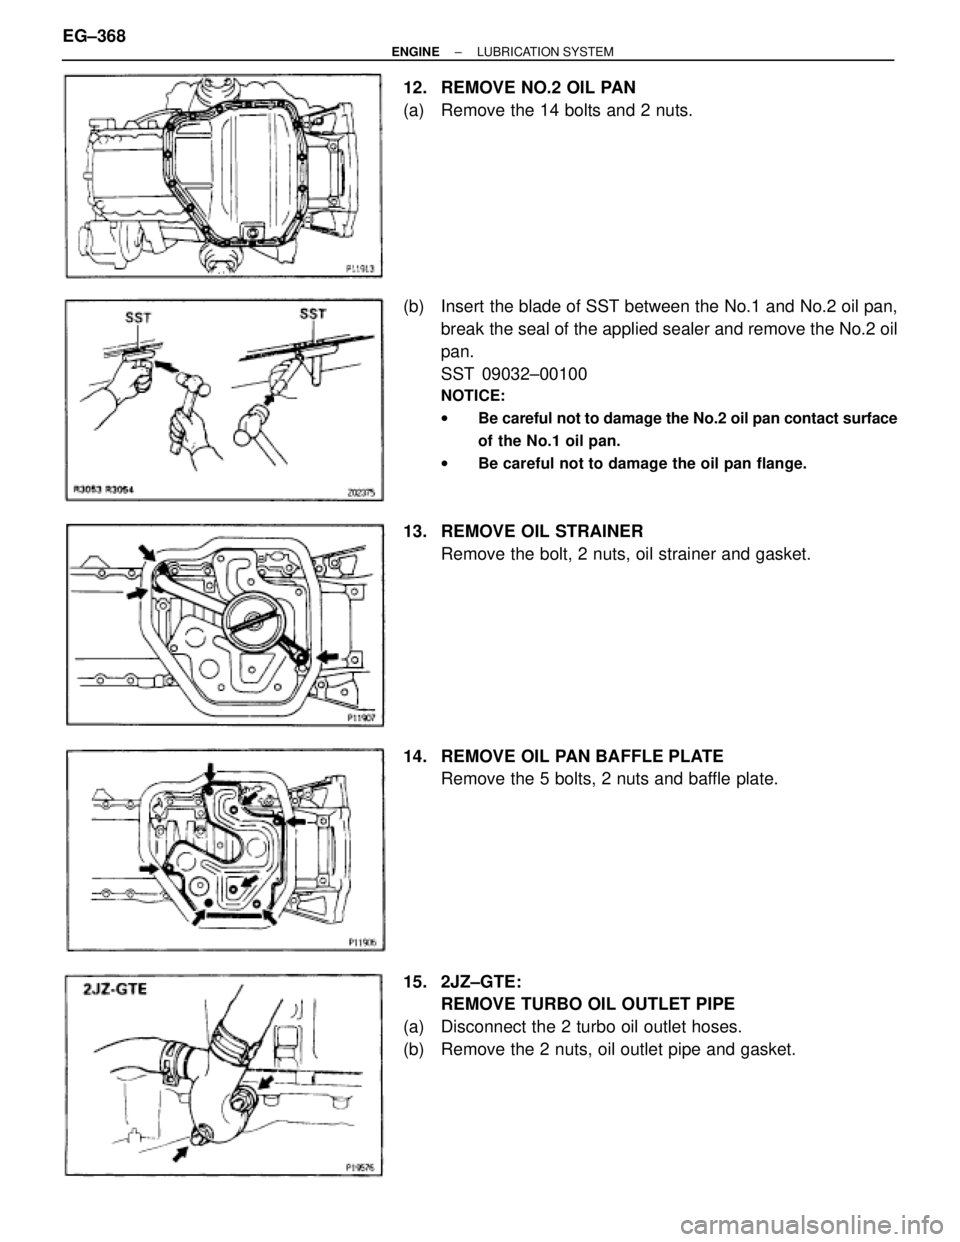
12. REMOVE NO.2 OIL PAN
(a) Remove the 14 bolts and 2 nuts.
(b) Insert the blade of SST between the No.1 and No.2 oil pan,
break the seal of the applied sealer and remove the No.2 oil
pan.
SST 09032±00100
NOTICE:
wBe careful not to damage the No.2 oil pan contact surface
of the No.1 oil pan.
wBe careful not to damage the oil pan flange.
13. REMOVE OIL STRAINER
Remove the bolt, 2 nuts, oil strainer and gasket.
14. REMOVE OIL PAN BAFFLE PLATE
Remove the 5 bolts, 2 nuts and baffle plate.
15. 2JZ±GTE:
REMOVE TURBO OIL OUTLET PIPE
(a) Disconnect the 2 turbo oil outlet hoses.
(b) Remove the 2 nuts, oil outlet pipe and gasket. EG±368
± ENGINELUBRICATION SYSTEM
Page 533 of 878
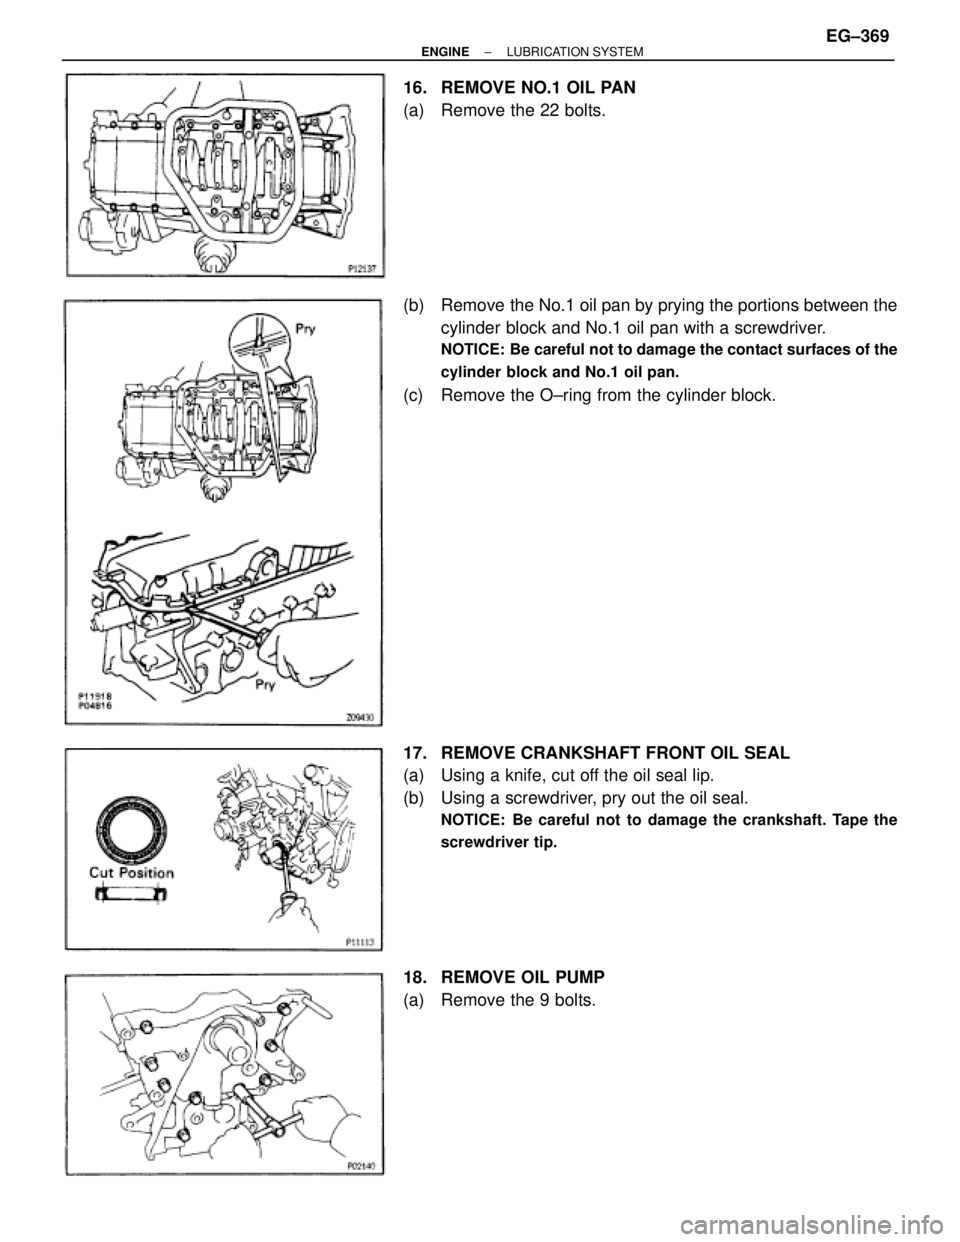
16. REMOVE NO.1 OIL PAN
(a) Remove the 22 bolts.
(b) Remove the No.1 oil pan by prying the portions between the
cylinder block and No.1 oil pan with a screwdriver.
NOTICE: Be careful not to damage the contact surfaces of the
cylinder block and No.1 oil pan.
(c) Remove the O±ring from the cylinder block.
17. REMOVE CRANKSHAFT FRONT OIL SEAL
(a) Using a knife, cut off the oil seal lip.
(b) Using a screwdriver, pry out the oil seal.
NOTICE: Be careful not to damage the crankshaft. Tape the
screwdriver tip.
18. REMOVE OIL PUMP
(a) Remove the 9 bolts.
± ENGINELUBRICATION SYSTEMEG±369
Page 534 of 878
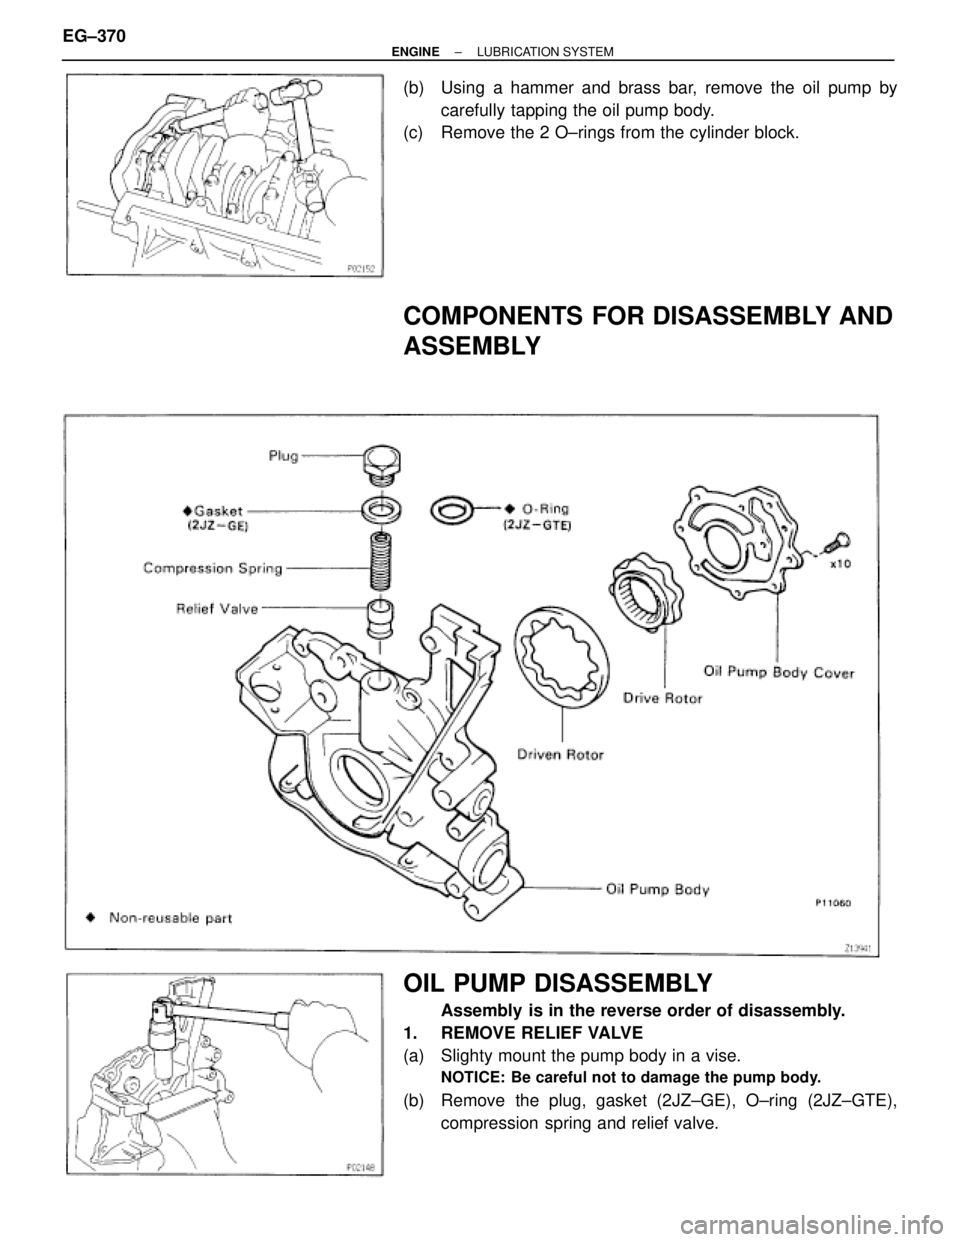
(b) Using a hammer and brass bar, remove the oil pump by
carefully tapping the oil pump body.
(c) Remove the 2 O±rings from the cylinder block.
COMPONENTS FOR DISASSEMBLY AND
ASSEMBLY
OIL PUMP DISASSEMBLY
Assembly is in the reverse order of disassembly.
1. REMOVE RELIEF VALVE
(a) Slighty mount the pump body in a vise.
NOTICE: Be careful not to damage the pump body.
(b) Remove the plug, gasket (2JZ±GE), O±ring (2JZ±GTE),
compression spring and relief valve. EG±370
± ENGINELUBRICATION SYSTEM
Page 535 of 878
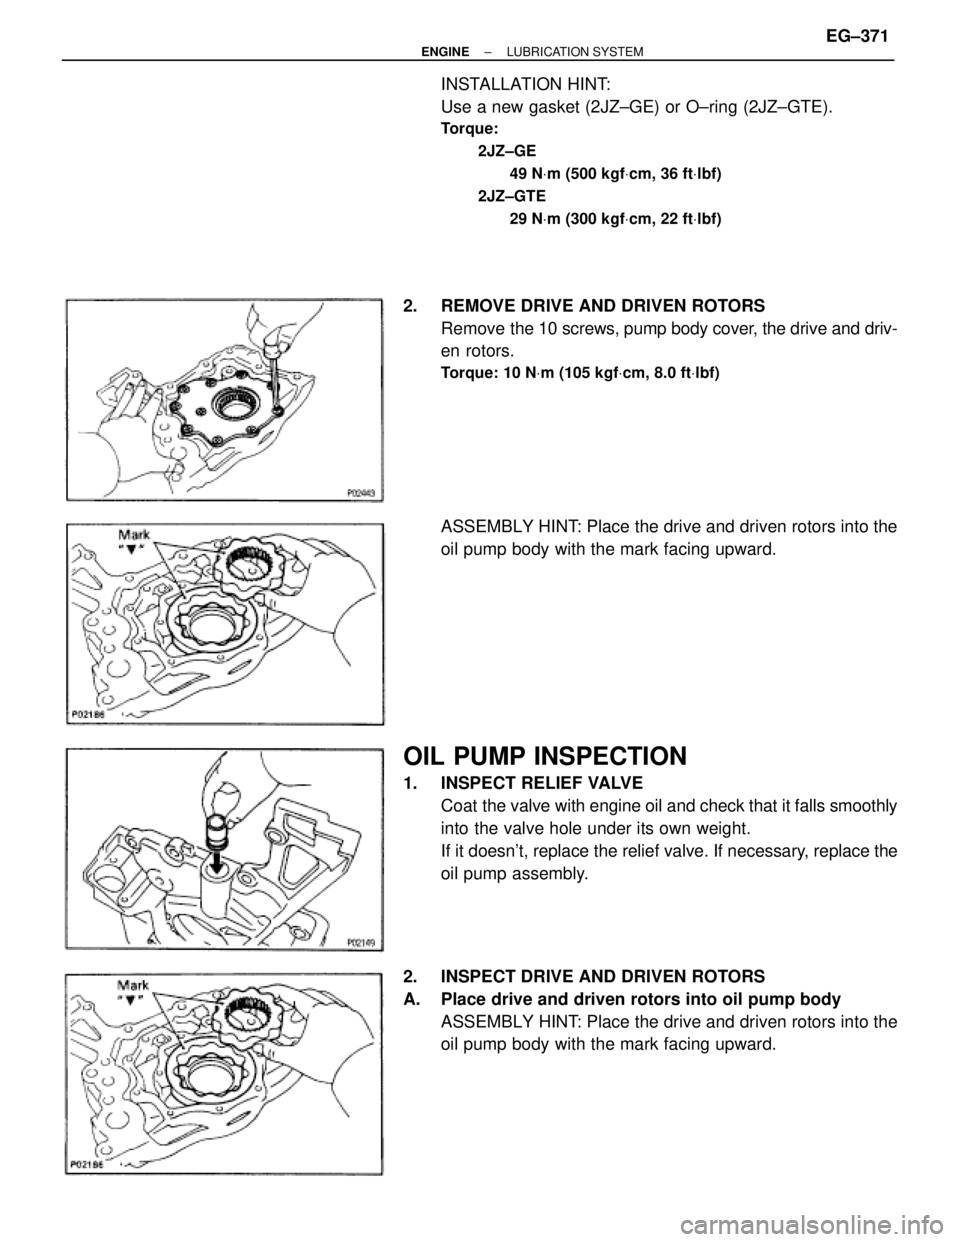
INSTALLATION HINT:
Use a new gasket (2JZ±GE) or O±ring (2JZ±GTE).
Torque:
2JZ±GE
49 NVm (500 kgfVcm, 36 ftVlbf)
2JZ±GTE
29 NVm (300 kgfVcm, 22 ftVlbf)
2. REMOVE DRIVE AND DRIVEN ROTORS
Remove the 10 screws, pump body cover, the drive and driv-
en rotors.
Torque: 10 NVm (105 kgfVcm, 8.0 ftVlbf)
ASSEMBLY HINT: Place the drive and driven rotors into the
oil pump body with the mark facing upward.
OIL PUMP INSPECTION
1. INSPECT RELIEF VALVE
Coat the valve with engine oil and check that it falls smoothly
into the valve hole under its own weight.
If it doesn't, replace the relief valve. If necessary, replace the
oil pump assembly.
2. INSPECT DRIVE AND DRIVEN ROTORS
A. Place drive and driven rotors into oil pump body
ASSEMBLY HINT: Place the drive and driven rotors into the
oil pump body with the mark facing upward.
± ENGINELUBRICATION SYSTEMEG±371
Page 536 of 878
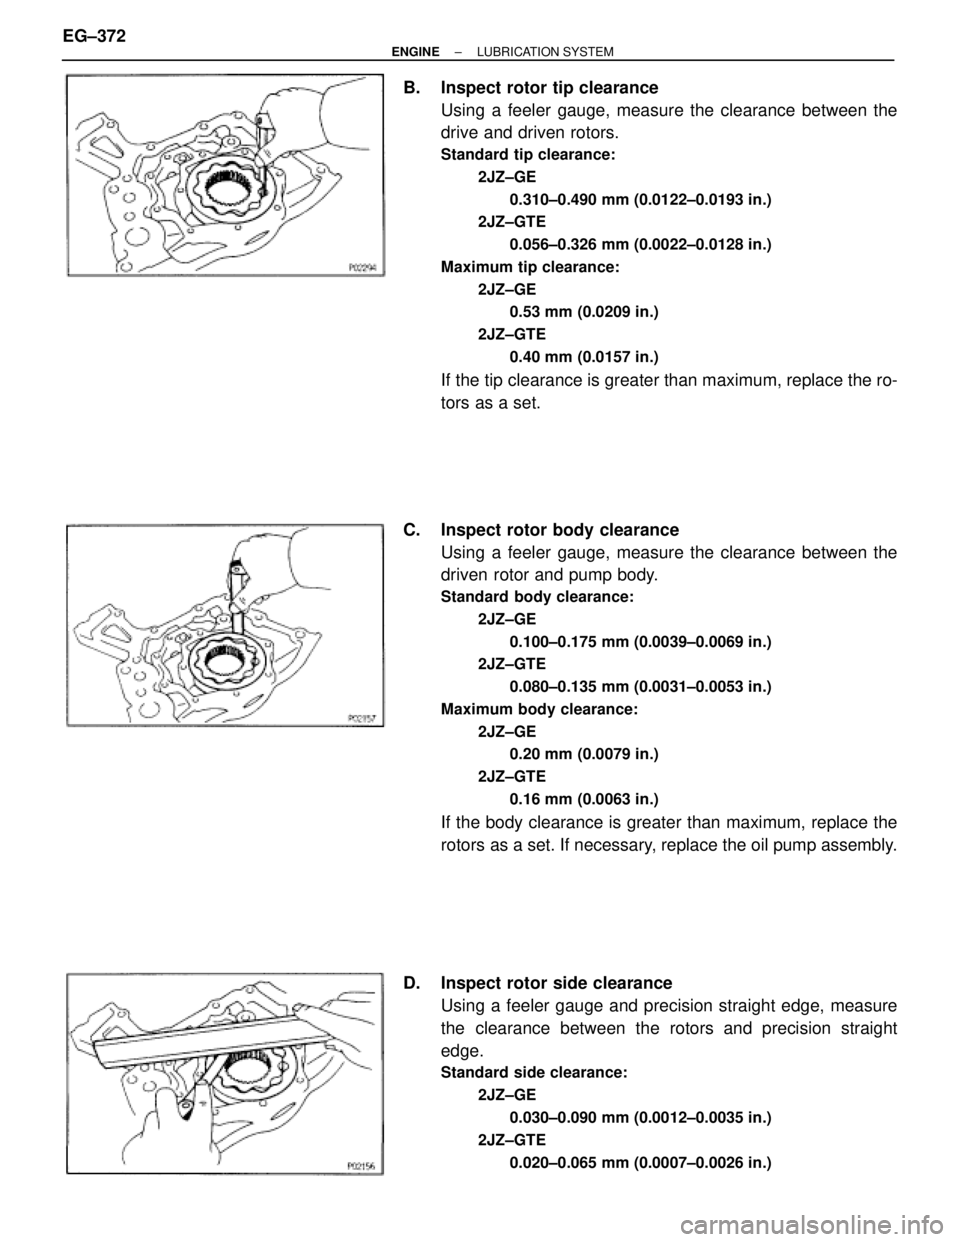
B. Inspect rotor tip clearance
Using a feeler gauge, measure the clearance between the
drive and driven rotors.
Standard tip clearance:
2JZ±GE
0.310±0.490 mm (0.0122±0.0193 in.)
2JZ±GTE
0.056±0.326 mm (0.0022±0.0128 in.)
Maximum tip clearance:
2JZ±GE
0.53 mm (0.0209 in.)
2JZ±GTE
0.40 mm (0.0157 in.)
If the tip clearance is greater than maximum, replace the ro-
tors as a set.
C. Inspect rotor body clearance
Using a feeler gauge, measure the clearance between the
driven rotor and pump body.
Standard body clearance:
2JZ±GE
0.100±0.175 mm (0.0039±0.0069 in.)
2JZ±GTE
0.080±0.135 mm (0.0031±0.0053 in.)
Maximum body clearance:
2JZ±GE
0.20 mm (0.0079 in.)
2JZ±GTE
0.16 mm (0.0063 in.)
If the body clearance is greater than maximum, replace the
rotors as a set. If necessary, replace the oil pump assembly.
D. Inspect rotor side clearance
Using a feeler gauge and precision straight edge, measure
the clearance between the rotors and precision straight
edge.
Standard side clearance:
2JZ±GE
0.030±0.090 mm (0.0012±0.0035 in.)
2JZ±GTE
0.020±0.065 mm (0.0007±0.0026 in.)
EG±372± ENGINELUBRICATION SYSTEM
Page 537 of 878
Maximum side clearance:
2JZ±GE
0.12 mm (0.0047 in.)
2JZ±GTE
0.10 mm (0.0039 in.)
If the side clearance is greater than maximum, replace the ro-
tors as a set. If necessary, replace the oil pump assembly.
E. Remove drive and driven rotors
OIL PUMP INSTALLATION
1. INSTALL OIL PUMP
(a) Remove any old packing (FIPG) material and be careful not
to drop any oil on the contact surfaces of the oil pump and
cylinder block.
wUsing a razor blade gasket scraper, remove all the old
packing (FIPG) material from the gasket surfaces and
sealing groove.
wThoroughly clean all components to remove all the
debris.
wUsing a non±residue solvent, clean both sealing
surfaces.
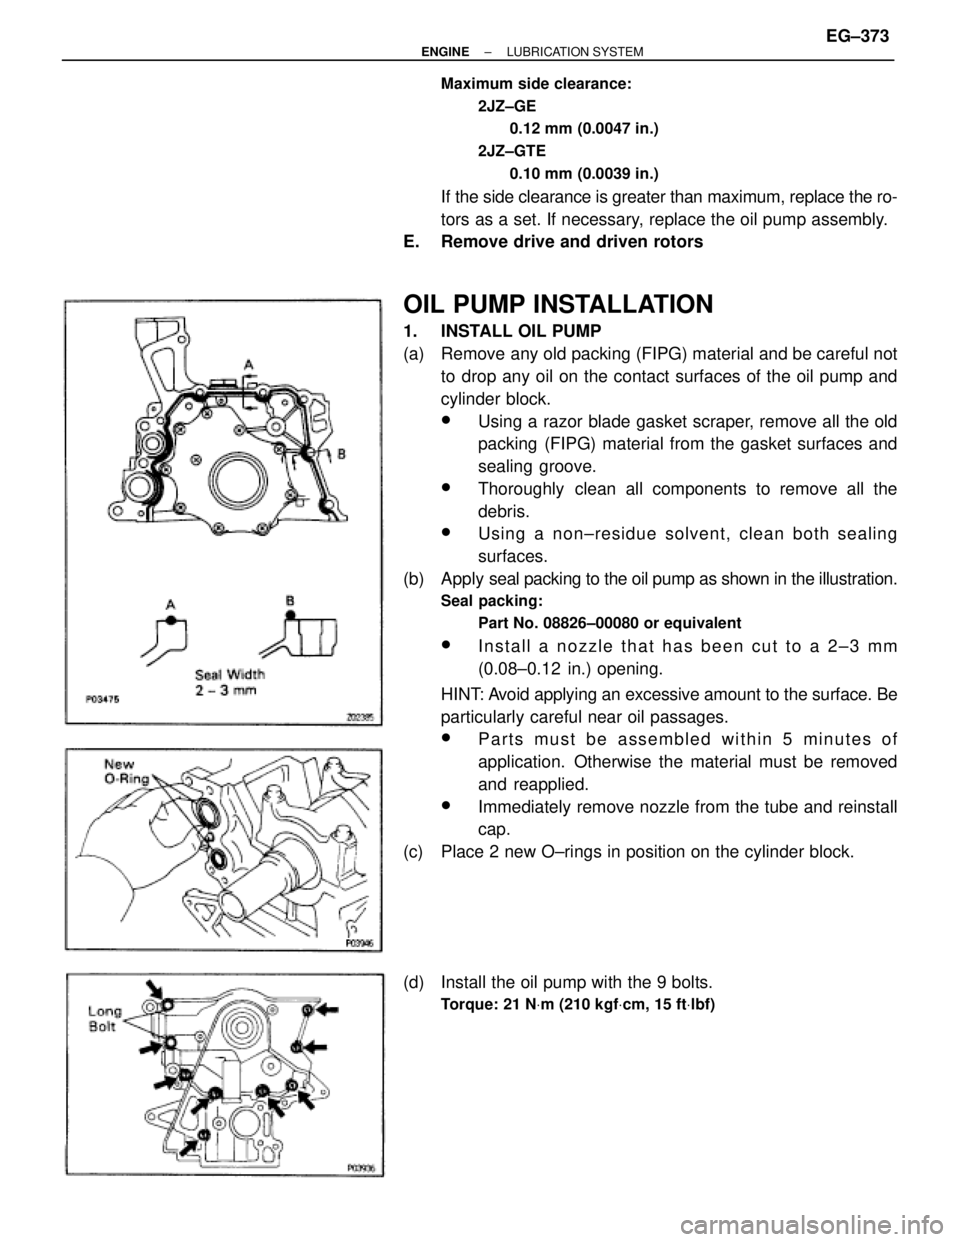
(b) Apply seal packing to the oil pump as shown in the illustration.
Seal packing:
Part No. 08826±00080 or equivalent
wInstall a nozzle that has been cut to a 2±3 mm
(0.08±0.12 in.) opening.
HINT: Avoid applying an excessive amount to the surface. Be
particularly careful near oil passages.
wParts must be assembled within 5 minutes of
application. Otherwise the material must be removed
and reapplied.
wImmediately remove nozzle from the tube and reinstall
cap.
(c) Place 2 new O±rings in position on the cylinder block.
(d) Install the oil pump with the 9 bolts.
Torque: 21 NVm (210 kgfVcm, 15 ftVlbf)
± ENGINELUBRICATION SYSTEMEG±373
Page 538 of 878
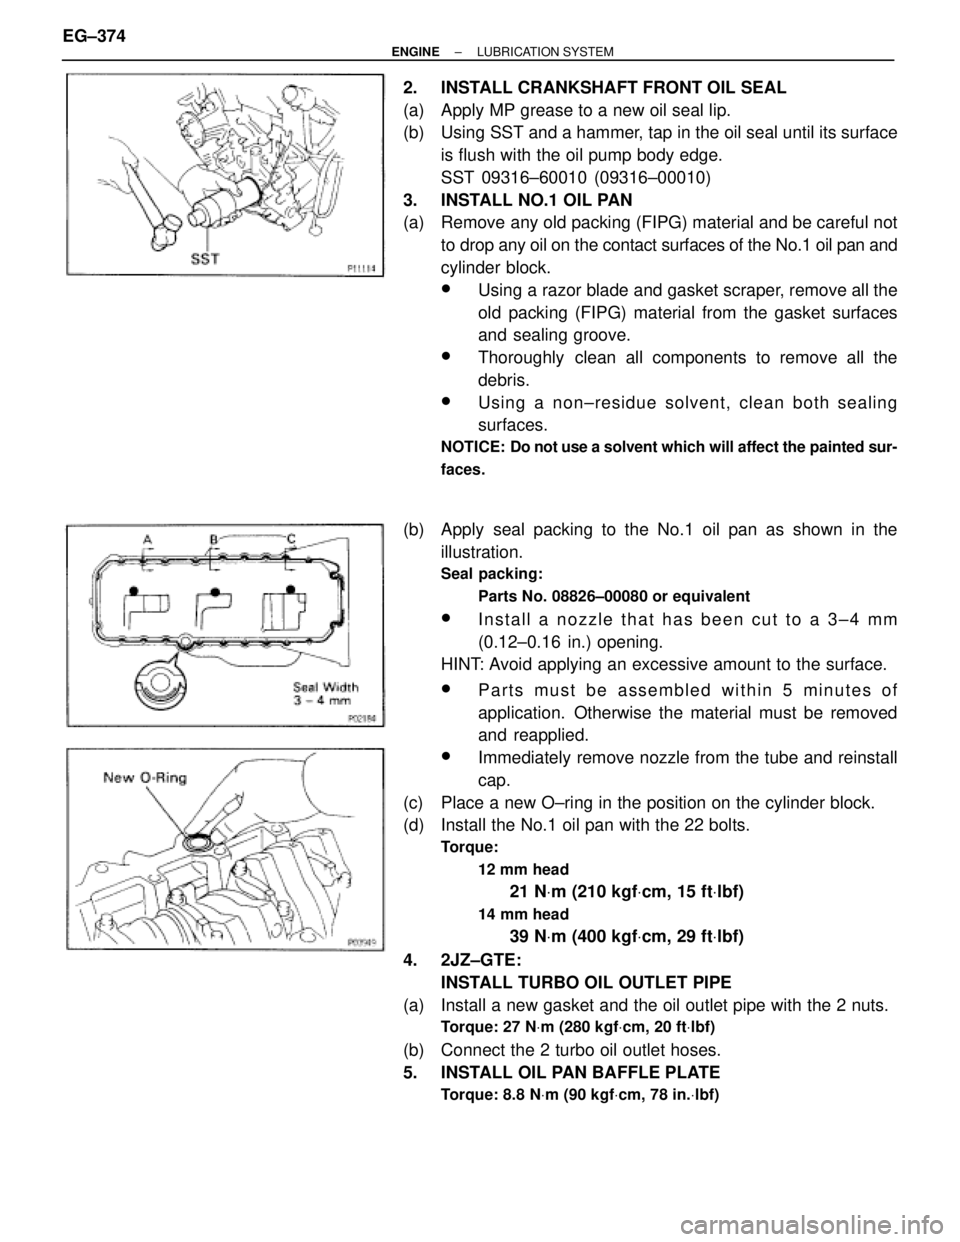
2. INSTALL CRANKSHAFT FRONT OIL SEAL
(a) Apply MP grease to a new oil seal lip.
(b) Using SST and a hammer, tap in the oil seal until its surface
is flush with the oil pump body edge.
SST 09316±60010 (09316±00010)
3. INSTALL NO.1 OIL PAN
(a) Remove any old packing (FIPG) material and be careful not
to drop any oil on the contact surfaces of the No.1 oil pan and
cylinder block.
wUsing a razor blade and gasket scraper, remove all the
old packing (FIPG) material from the gasket surfaces
and sealing groove.
wThoroughly clean all components to remove all the
debris.
wUsing a non±residue solvent, clean both sealing
surfaces.
NOTICE: Do not use a solvent which will affect the painted sur-
faces.
(b) Apply seal packing to the No.1 oil pan as shown in the
illustration.
Seal packing:
Parts No. 08826±00080 or equivalent
wInstall a nozzle that has been cut to a 3±4 mm
(0.12±0.16 in.) opening.
HINT: Avoid applying an excessive amount to the surface.
wParts must be assembled within 5 minutes of
application. Otherwise the material must be removed
and reapplied.
wImmediately remove nozzle from the tube and reinstall
cap.
(c) Place a new O±ring in the position on the cylinder block.
(d) Install the No.1 oil pan with the 22 bolts.
Torque:
12 mm head
21 NVm (210 kgfVcm, 15 ftVlbf)
14 mm head
39 NVm (400 kgfVcm, 29 ftVlbf)
4. 2JZ±GTE:
INSTALL TURBO OIL OUTLET PIPE
(a) Install a new gasket and the oil outlet pipe with the 2 nuts.
Torque: 27 NVm (280 kgfVcm, 20 ftVlbf)
(b) Connect the 2 turbo oil outlet hoses.
5. INSTALL OIL PAN BAFFLE PLATE
Torque: 8.8 NVm (90 kgfVcm, 78 in.Vlbf)
EG±374± ENGINELUBRICATION SYSTEM
Page 539 of 878
6. INSTALL OIL STRAINER
Install a new gasket and the oil strainer with the bolt and 2
nuts.
Torque: 8.8 NVm (90 kgfVcm, 78 in.Vlbf)
7. INSTALL NO.2 OIL PAN
(a) Remove any old packing (FIPG) material and be careful not
to drop any oil on the contact surfaces of the No.1 and No.2
oil pans.
wUsing a razor blade and gasket scraper, remove all the
old packing (FIPG) material from the gasket surfaces
and sealing groove.
wThoroughly clean all components to remove all the
debris.
wUsing a non±residue solvent, clean both sealing
surfaces.
NOTICE: Do not use a solvent which will affect the painted sur-
faces.
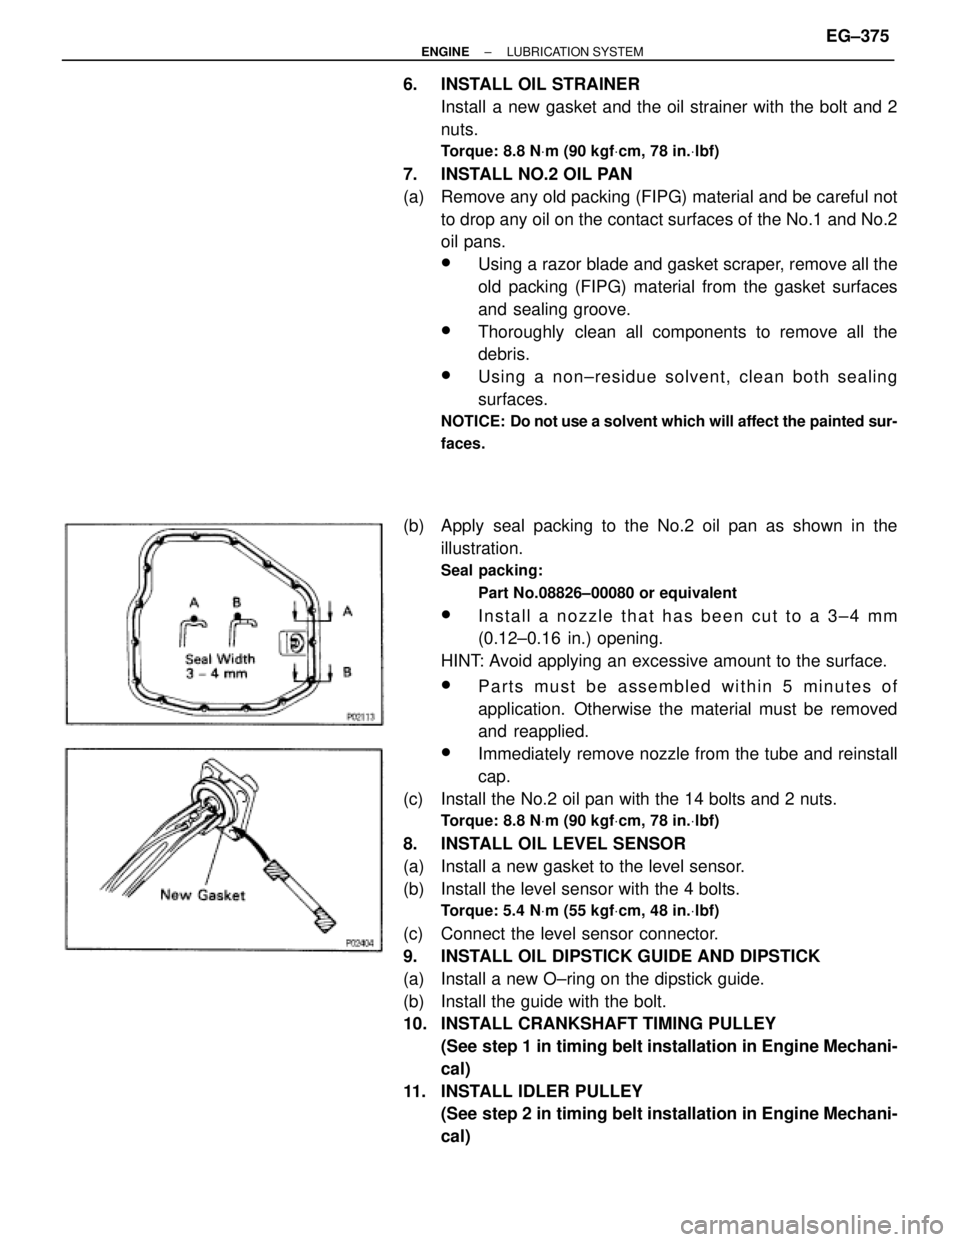
(b) Apply seal packing to the No.2 oil pan as shown in the
illustration.
Seal packing:
Part No.08826±00080 or equivalent
wInstall a nozzle that has been cut to a 3±4 mm
(0.12±0.16 in.) opening.
HINT: Avoid applying an excessive amount to the surface.
wParts must be assembled within 5 minutes of
application. Otherwise the material must be removed
and reapplied.
wImmediately remove nozzle from the tube and reinstall
cap.
(c) Install the No.2 oil pan with the 14 bolts and 2 nuts.
Torque: 8.8 NVm (90 kgfVcm, 78 in.Vlbf)
8. INSTALL OIL LEVEL SENSOR
(a) Install a new gasket to the level sensor.
(b) Install the level sensor with the 4 bolts.
Torque: 5.4 NVm (55 kgfVcm, 48 in.Vlbf)
(c) Connect the level sensor connector.
9. INSTALL OIL DIPSTICK GUIDE AND DIPSTICK
(a) Install a new O±ring on the dipstick guide.
(b) Install the guide with the bolt.
10. INSTALL CRANKSHAFT TIMING PULLEY
(See step 1 in timing belt installation in Engine Mechani-
cal)
11. INSTALL IDLER PULLEY
(See step 2 in timing belt installation in Engine Mechani-
cal)
± ENGINELUBRICATION SYSTEMEG±375
Page 540 of 878
12. 2JZ±GTE M/T:
INSTALL DRIVE BELT TENSIONER BRACKET
Torque: 27 NVm (280 kgfVcm, 20 ftVlbf)
13. INSTALL TIMING BELT
(See step 3 in timing belt installation in Engine Mechani-
cal)
14. 2JZ±GTE:
INSTALL CRANKSHAFT POSITION SENSOR
Torque: 8.8 NVm (90 kgfVcm, 78 in.Vlbf)
15. 2JZ±GTE:
INSTALL GENERATOR
16. REMOVE ENGINE STAND FROM ENGINE
17. ASSEMBLY ENGINE AND TRANSMISSION
(See components for engine removal & transmission
separation and assembly)
18. INSTALL ENGINE WITH TRANSMISSION
(See components for engine removal and installation)
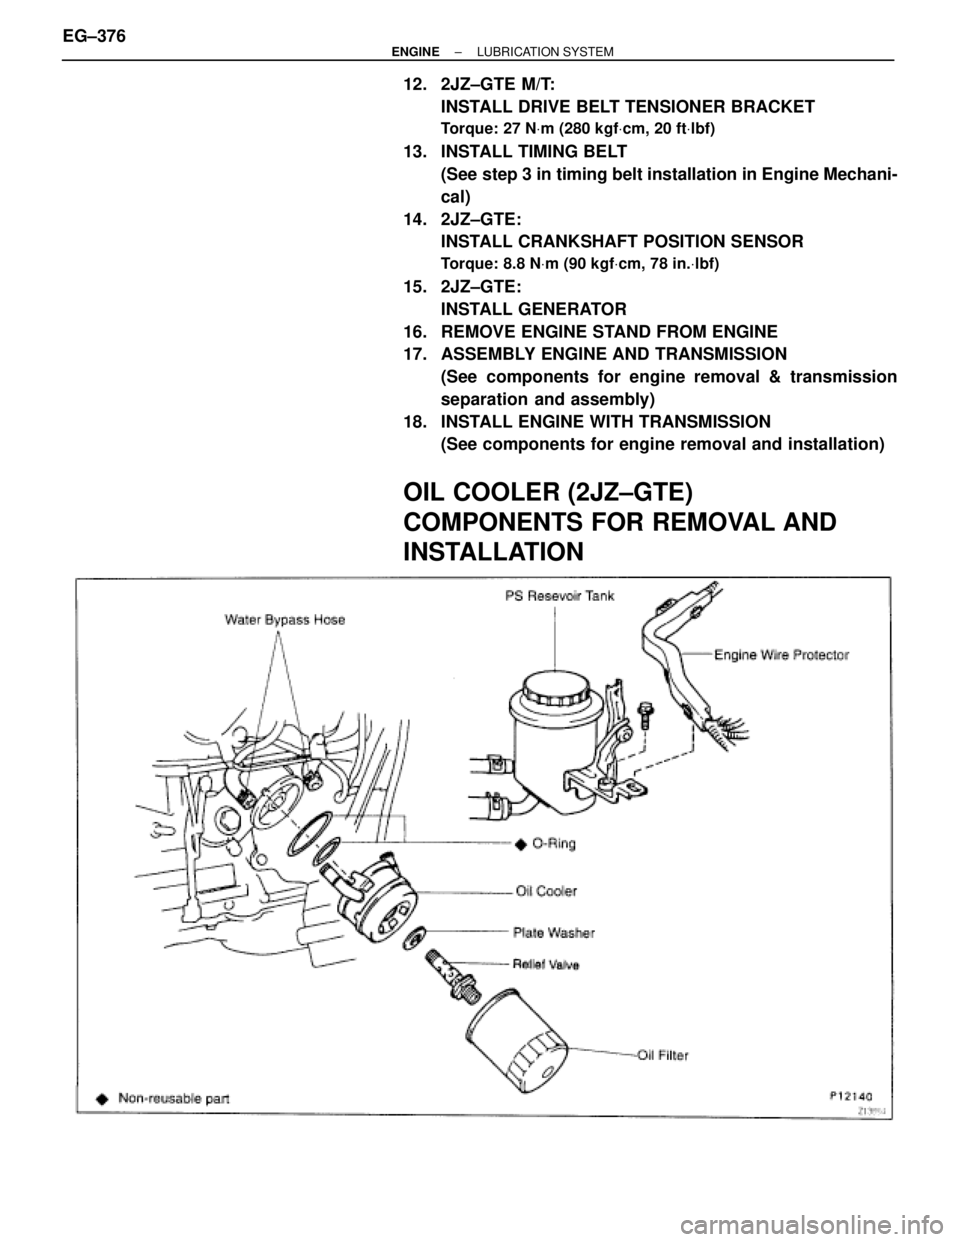
OIL COOLER (2JZ±GTE)
COMPONENTS FOR REMOVAL AND
INSTALLATION
EG±376± ENGINELUBRICATION SYSTEM