low beam TOYOTA SUPRA 1996 Owners Manual
[x] Cancel search | Manufacturer: TOYOTA, Model Year: 1996, Model line: SUPRA, Model: TOYOTA SUPRA 1996Pages: 188, PDF Size: 3.84 MB
Page 46 of 188

44
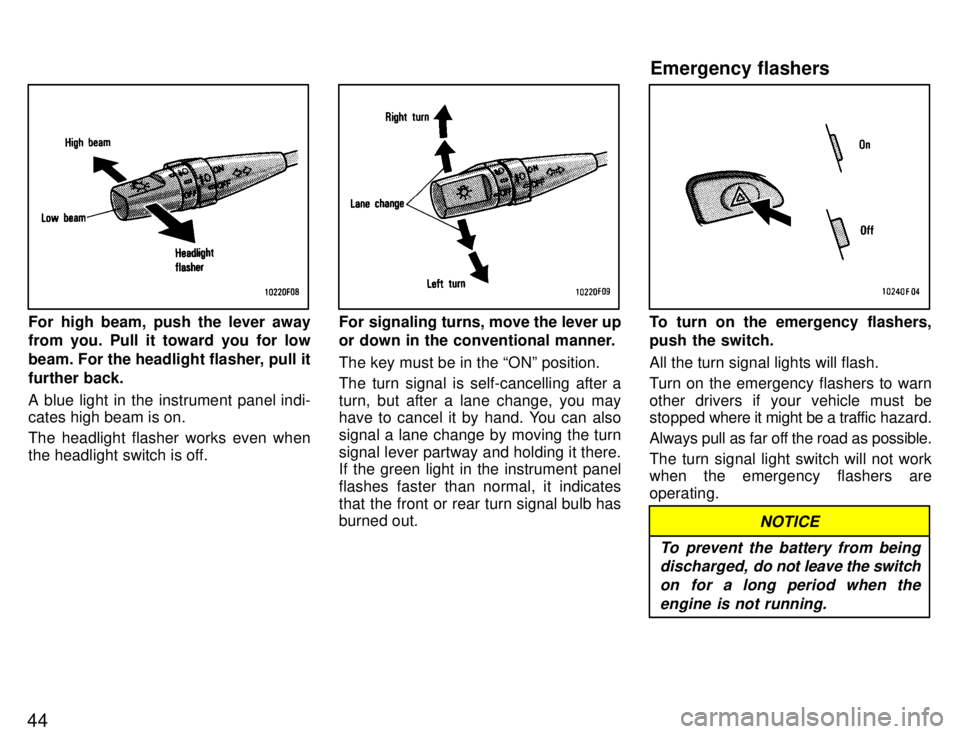
For high beam, push the lever away from you. Pull it toward you for low
beam. For the headlight flasher, pull it
further back.
A blue light in the instrument panel indi-
cates high beam is on.
The headlight flasher works even when
the headlight switch is off.For signaling turns, move the lever up
or down in the conventional manner. The key must be in the ONº position.
The turn signal is self-cancelling after a
turn, but after a lane change, you may
have to cancel it by hand. You can also
signal a lane change by moving the turn
signal lever partway and holding it there.
If the green light in the instrument panel
flashes faster than normal, it indicates
that the front or rear turn signal bulb has burned out.To turn on the emergency flashers,
push the switch. All the turn signal lights will flash.
Turn on the emergency flashers to warn other drivers if your vehicle must be
stopped where it might be a traf fic hazard.
Always pull as far off the road as possible.
The turn signal light switch will not work
when the emergency flashers are operating.
NOTICE
To prevent the battery from being discharged, do not leave the switch
on for a long period when the engine is not running.
Emergency flashers
Page 47 of 188

45
To adjust the brightness of the instru-
ment panel lights, turn the knob.To turn on the front fog lights, twist the
knob of the headlight and turn signal
switch lever. They will come on when
the headlights are turned on lowbeam.To turn on the interior light, push the switch.
With the central switch pushed on the
DOORº side, both lights come on wheneither of the side doors is opened. The lights remain on for a certain time after both doors are closed.
Instrument panel light control Front fog lights Interior lights
Page 171 of 188

169
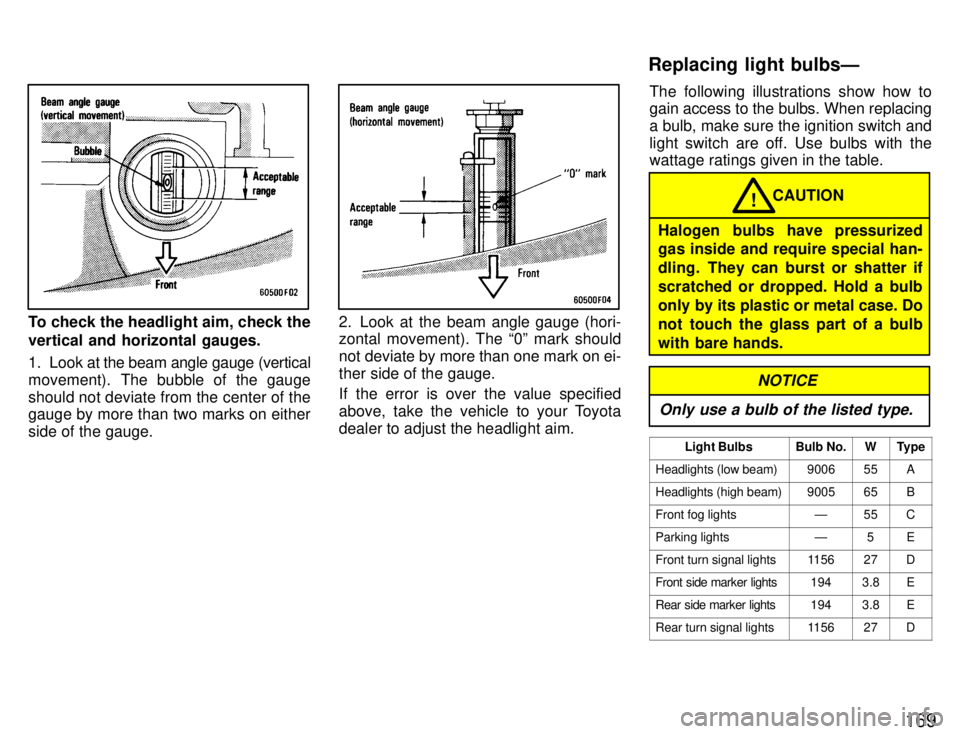
To check the headlight aim, check the vertical and horizontal gauges.
1. Look at the beam angle gauge (vertical
movement). The bubble of the gauge
should not deviate from the center of the gauge by more than two marks on either side of the gauge.2. Look at the beam angle gauge (hori- zontal movement). The 0º mark should
not deviate by more than one mark on ei-
ther side of the gauge.
If the error is over the value specified
above, take the vehicle to your Toyota
dealer to adjust the headlight aim. The following illustrations show how to
gain access to the bulbs. When replacing
a bulb, make sure the ignition switch and
light switch are off. Use bulbs with the wattage ratings given in the table.
Halogen bulbs have pressurized
gas inside and require special han-
dling. They can burst or shatter ifscratched or dropped. Hold a bulb
only by its plastic or metal case. Do
not touch the glass part of a bulb
with bare hands.
CAUTION
!
NOTICE
Only use a bulb of the listed type.
Light BulbsBulb No.WType
Headlights (low beam)900655A
Headlights (high beam)900565B
Front fog lightsÐ55C
Parking lightsÐ5E
Front turn signal lights115627D
Front side marker lights1943.8E
Rear side marker lights1943.8E
Rear turn signal lights115627D
Replacing light bulbsÐ
Page 172 of 188

170Light Bulbs
Bulb No.WType
Stop and tail lights115727/8D
Back-up lights115627D
License plate lightsÐ5E
Interior lightsÐ8D
Glovebox lightÐ1.2E
Luggage compartment lightÐ5F
A: HB4 halogen bulbs B: HB3 halogen bulbs C: H3 halogen bulbsD: Single end bulbs
E: Wedge base bulbs F: Double end bulbs
1. Open the hood.
RIGHT SIDE HEADLIGHT: Release the
clips of the air cleaner and remove the
air cleaner cover.2. Unplug the connector while de-
pressing the lock release. If the connector is tight, wiggle it.
ÐHeadlights (low beam)
Page 186 of 188

18424. RAD NO.1 20 A:
Radio cassette tape
player
25. HEAD (RH) 15 A: Right-hand head-
light
26. HEAD (LH) 15 A: Left-hand head-
light
27. HEAD (RH-LWR) 15 A: Right-hand
headlight (low beam)
28. HEAD (LH-LWR) 15 A: Left-hand
headlight (low beam)
29. HEAD (RH-UPR) 15 A: Right-hand
headlight (high beam)
30. HEAD (LH-UPR) 15 A: Left-hand
headlight (high beam)
31. DRL 7.5 A: Daytime running light sys-
tem
32. 30 A: Spare fuse
33. 7.5 A: Spare fuse
34. 15 A: Spare fuse
35. OBD-II 7.5 A: On-board diagnosis
system
Fuses (type B)
36. DOOR 30 A: Power window, power
door lock system, theft deterrent system
37. DEFOG 30 A: Rear window defogger
Fuses (type C)
38. ALT 120 A: Charging system
39. MAIN 50 A: Starter system, head-
lights
40. HTR 50 A: Air conditioning system
41. FAN 30 A: Electric cooling fan 42. ABS NO.1 60 A:
Anti-lock brake sys-
tem, traction control system
43. AM1 50 A: Electronic ignition system/
distributor ignition system
44. AM1 60 A: Electronic ignition system/
distributor ignition system
45. POWER 60 A: PANELº, STOPº,
TAILº, ECU-B, DEFOGº and DOORº fuses