display TOYOTA TACOMA 2010 Owners Manual (in English)
[x] Cancel search | Manufacturer: TOYOTA, Model Year: 2010, Model line: TACOMA, Model: TOYOTA TACOMA 2010Pages: 532, PDF Size: 15.03 MB
Page 4 of 532

TABLE OF CONTENTSIndex
4
3-5. Using the storage features
List of storage features....... 302
• Glove box ......................... 302
• Console boxes ................. 303
• Cup holders ...................... 304
• Bottle holders ................... 306
• Auxiliary boxes ................. 307
• Overhead console ............ 309
3-6. Other interior features
Sun visors .......................... 310
Vanity mirrors ..................... 311
Clock .................................. 312
Outside temperature display
(vehicles with accessory
meter) ............................... 313
Cigarette lighter .................. 314
Power outlet (12V DC) ....... 315
Power outlet (115V AC) ..... 316
Seatback table ................... 322
Floor mat ............................ 323
Luggage compartment
features ............................ 324
Garage door opener box .... 333
Compass (vehicles with
accessory meter).............. 337
4-1. Maintenance and care
Cleaning and protecting
the vehicle exterior ........... 344
Cleaning and protecting
the vehicle interior ............ 3474-2. Maintenance
Maintenance
requirements .................... 350
General maintenance ......... 352
Emission inspection and
maintenance (I/M)
programs .......................... 355
4-3. Do-it-yourself maintenance
Do-it-yourself service
precautions ....................... 356
Hood ................................... 360
Engine compartment .......... 362
Tires.................................... 378
Tire inflation pressure ......... 386
Wheels................................ 391
Air conditioning filter ........... 393
Wireless remote control
battery .............................. 396
Checking and replacing
fuses ................................. 398
Light bulbs .......................... 408
5-1. Essential information
Emergency flashers ............ 420
If your vehicle needs to be
towed ................................ 421
If you think something is
wrong ................................ 427
Fuel pump shut off
system .............................. 428
Event data recorder ............ 429
4Maintenance and care
5When trouble arises
Page 13 of 532
13
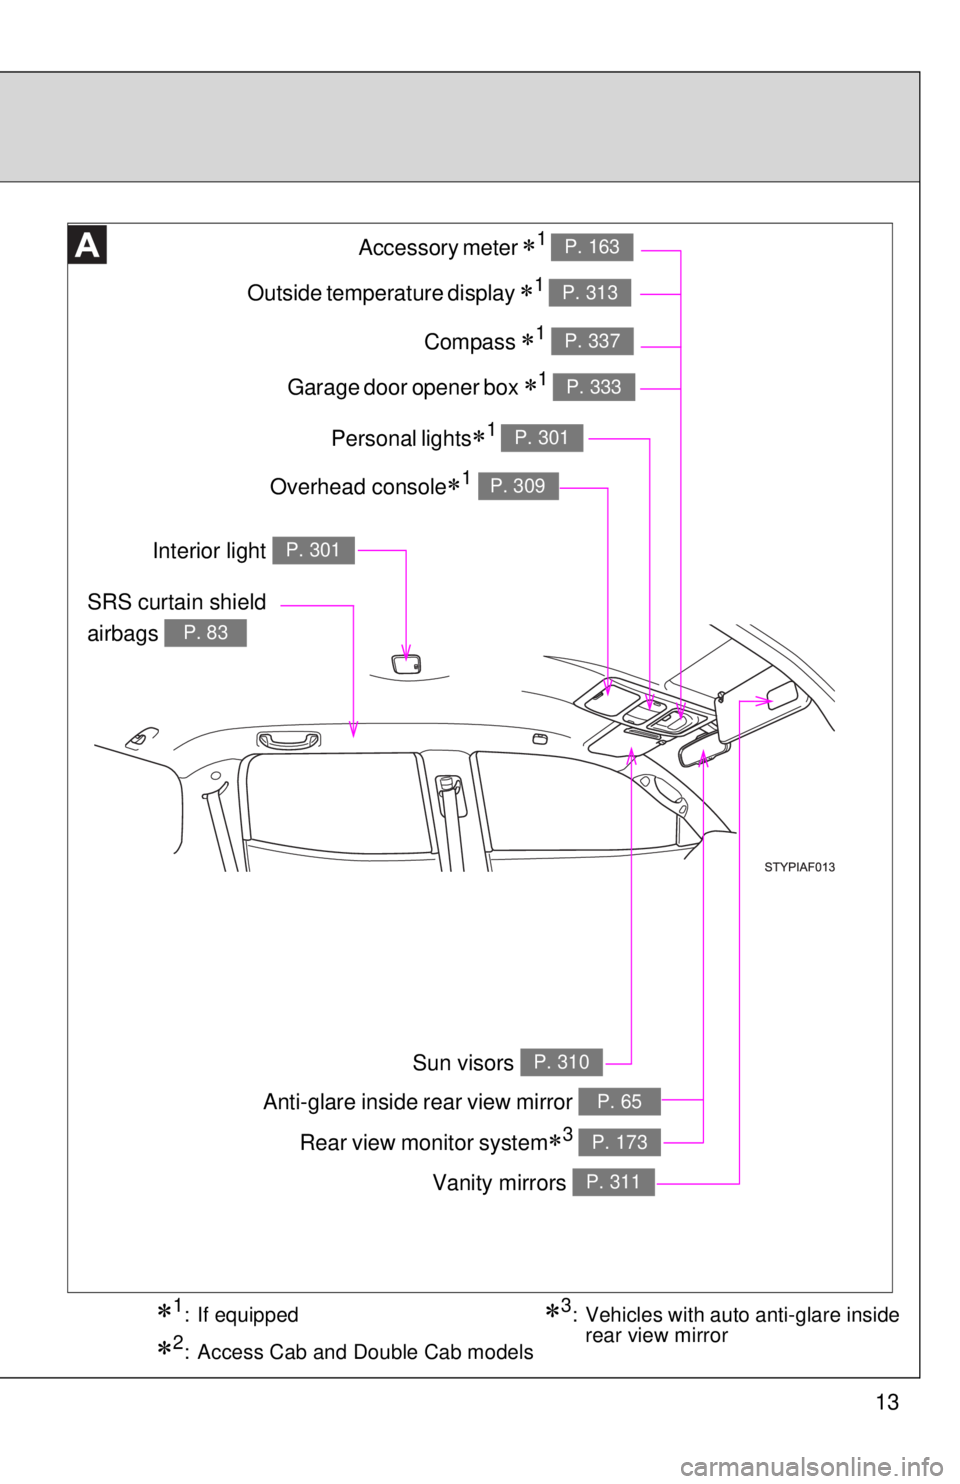
Anti-glare inside rear view mirror P. 65
Sun visors P. 310
SRS curtain shield
airbags
P. 83
Vanity mirrors P. 311
Interior light P. 301
Rear view monitor system3 P. 173
Overhead console1 P. 309
Garage door opener box 1 P. 333
Compass 1 P. 337
Personal lights1 P. 301
Outside temperature display 1 P. 313
Accessory meter 1 P. 163
3: Vehicles with auto anti-glare inside
rear view mirror1: If equipped
2: Access Cab and Double Cab models
Page 112 of 532
112
1-7. Safety information
Installing child restraints
Follow the child restraint system manufacturer’s instructions. Firmly
secure child restraints to the seats using the LATCH anchors or a
seat belt. Attach the top tether strap when installing a child restraint.
The lap/shoulder belt can be used if your child restraint system is
not compatible with the LATCH (Lower Anchors and Tethers for Chil-
dren) system.
■Using the LATCH anchors
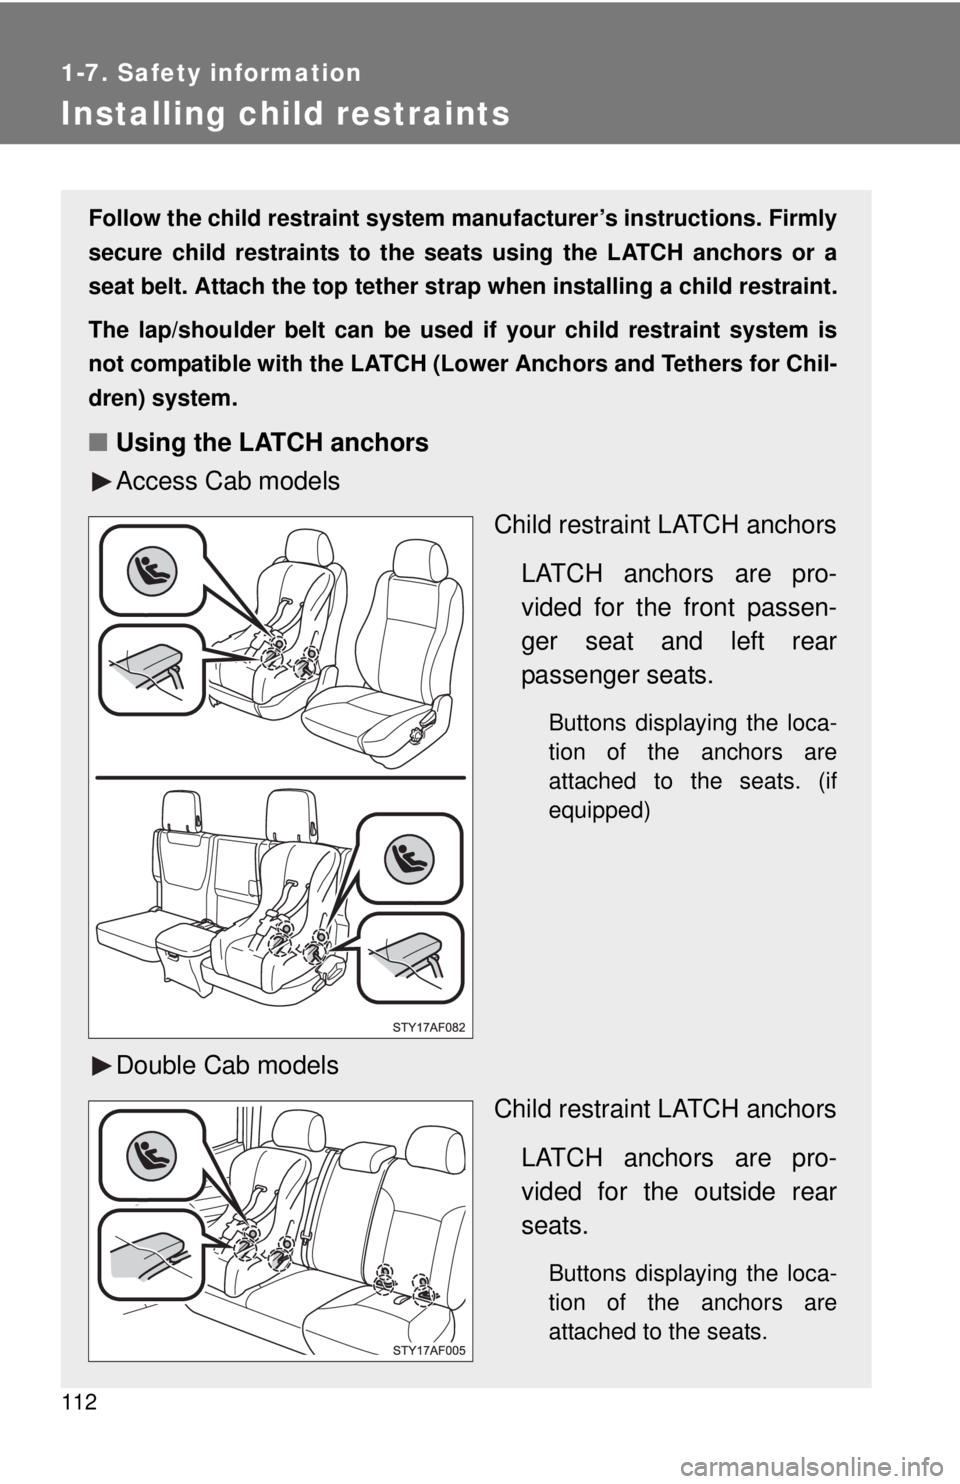
Access Cab models
Child restraint LATCH anchors
LATCH anchors are pro-
vided for the front passen-
ger seat and left rear
passenger seats.
Buttons displaying the loca-
tion of the anchors are
attached to the seats. (if
equipped)
Double Cab models
Child restraint LATCH anchors
LATCH anchors are pro-
vided for the outside rear
seats.
Buttons displaying the loca-
tion of the anchors are
attached to the seats.
Page 157 of 532
157
2
When driving
2-2. Gauges and meters
Gauges and meters
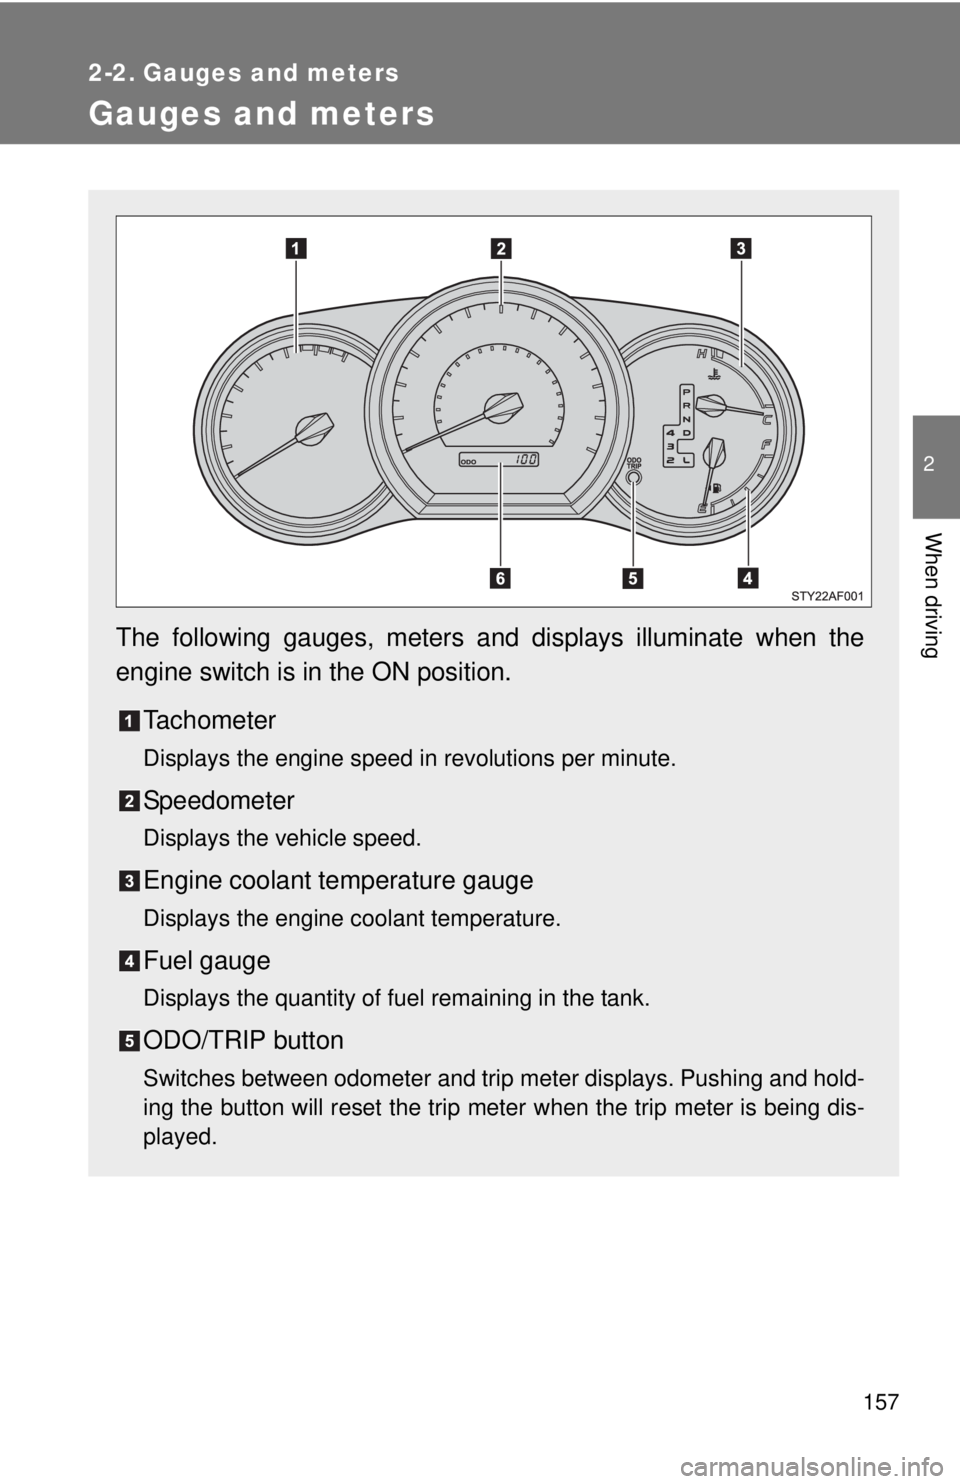
The following gauges, meters and displays illuminate when the
engine switch is in the ON position.
Tachometer
Displays the engine speed in revolutions per minute.
Speedometer
Displays the vehicle speed.
Engine coolant temperature gauge
Displays the engine coolant temperature.
Fuel gauge
Displays the quantity of fuel remaining in the tank.
ODO/TRIP button
Switches between odometer and trip meter displays. Pushing and hold-
ing the button will reset the trip meter when the trip meter is being dis-
played.
Page 158 of 532
158 2-2. Gauges and meters
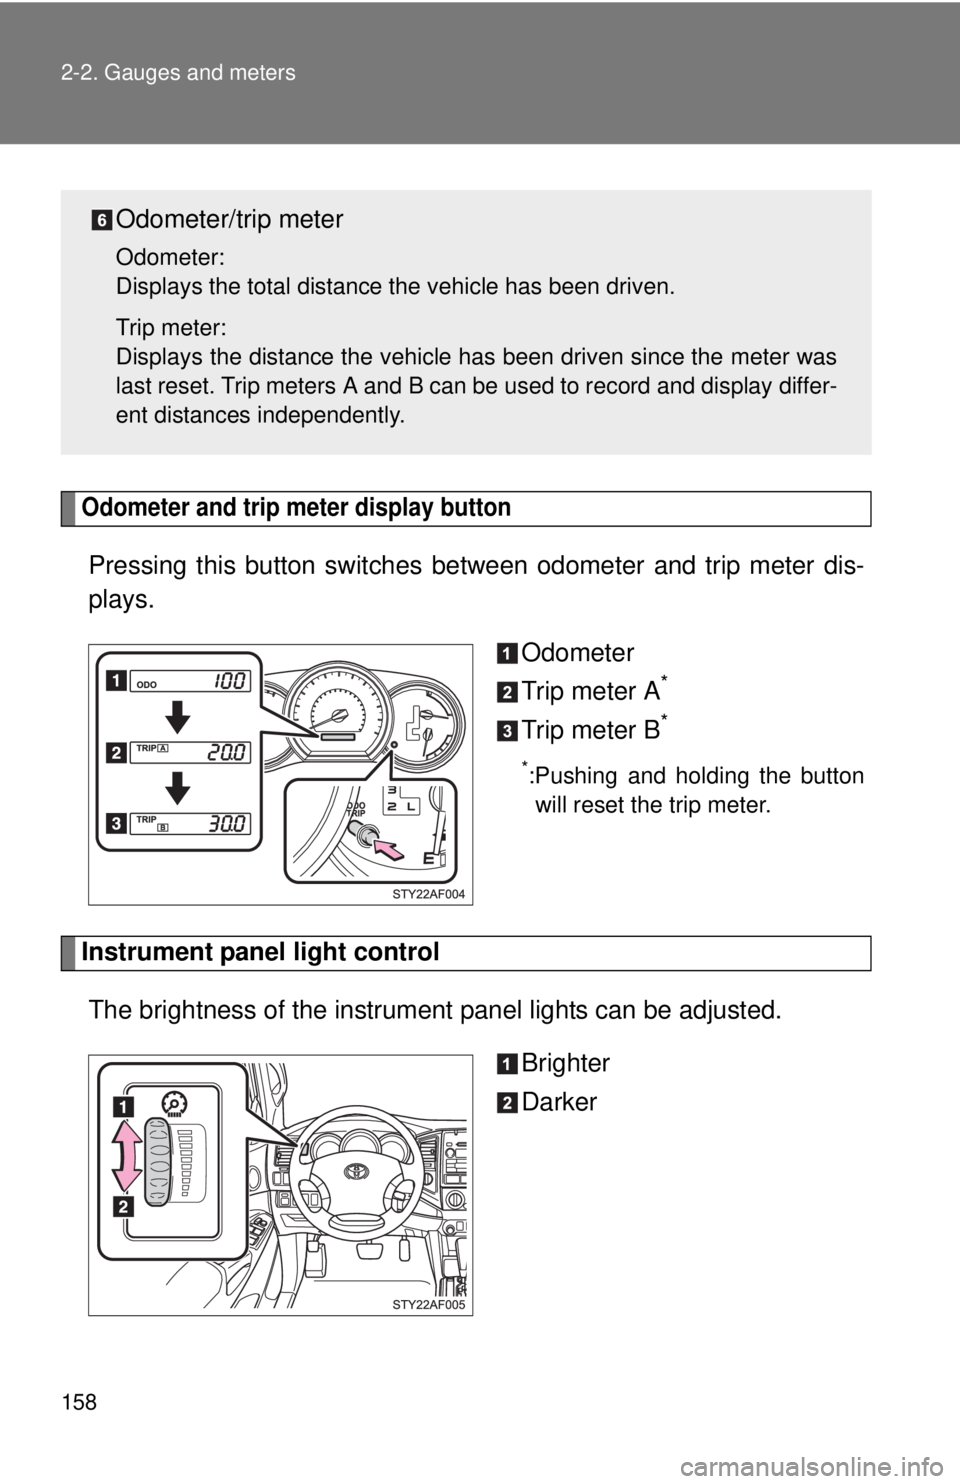
Odometer and trip meter display button
Pressing this button switches between odometer and trip meter dis-
plays.
Odometer
Trip meter A
*
Trip meter B*
*:Pushing and holding the button
will reset the trip meter.
Instrument panel light control
The brightness of the instrument panel lights can be adjusted.
Brighter
Darker
Odometer/trip meter
Odometer:
Displays the total distance the vehicle has been driven.
Trip meter:
Displays the distance the vehicle has been driven since the meter was
last reset. Trip meters A and B can be used to record and display differ-
ent distances independently.
Page 163 of 532
163
2-2. Gauges and meters
2
When driving
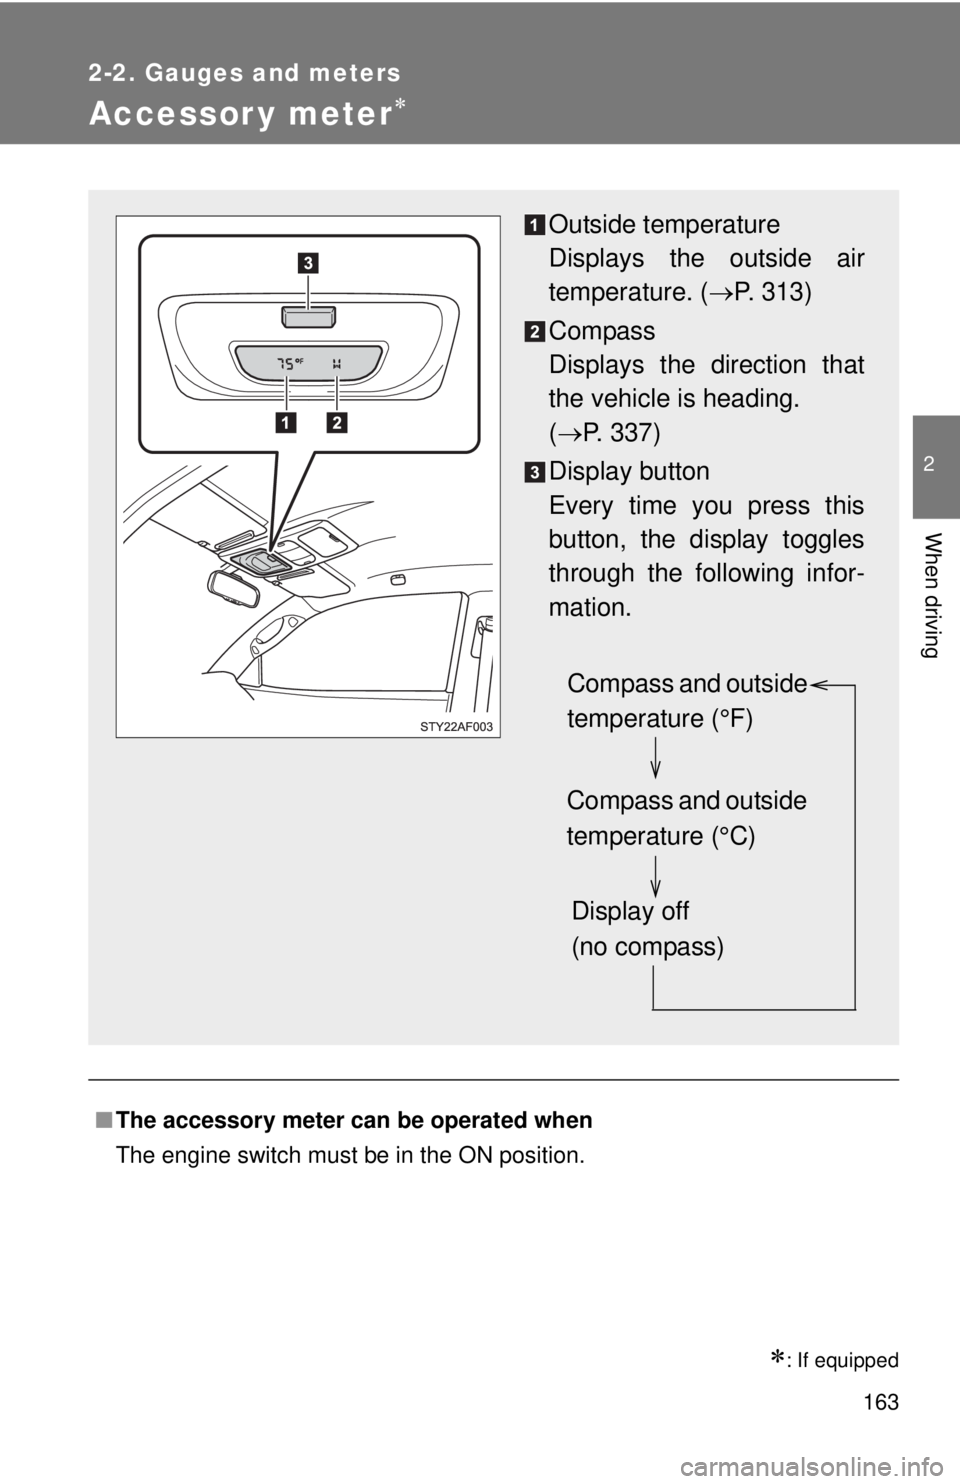
Accessor y meter
: If equipped
■The accessory meter can be operated when
The engine switch must be in the ON position.
Outside temperature
Displays the outside air
temperature. (P. 313)
Compass
Displays the direction that
the vehicle is heading.
(P. 337)
Display button
Every time you press this
button, the display toggles
through the following infor-
mation.
Compass and outside
temperature (°F)
Compass and outside
temperature (°C)
Display off
(no compass)
Page 173 of 532
173
2-4. Using other driving systems
2
When driving
Rear view monitor system (vehicles with auto anti-glare inside rear view mirror)
■The rear view monitor system can be operated when
The shift lever is in R and engine switch is ON.
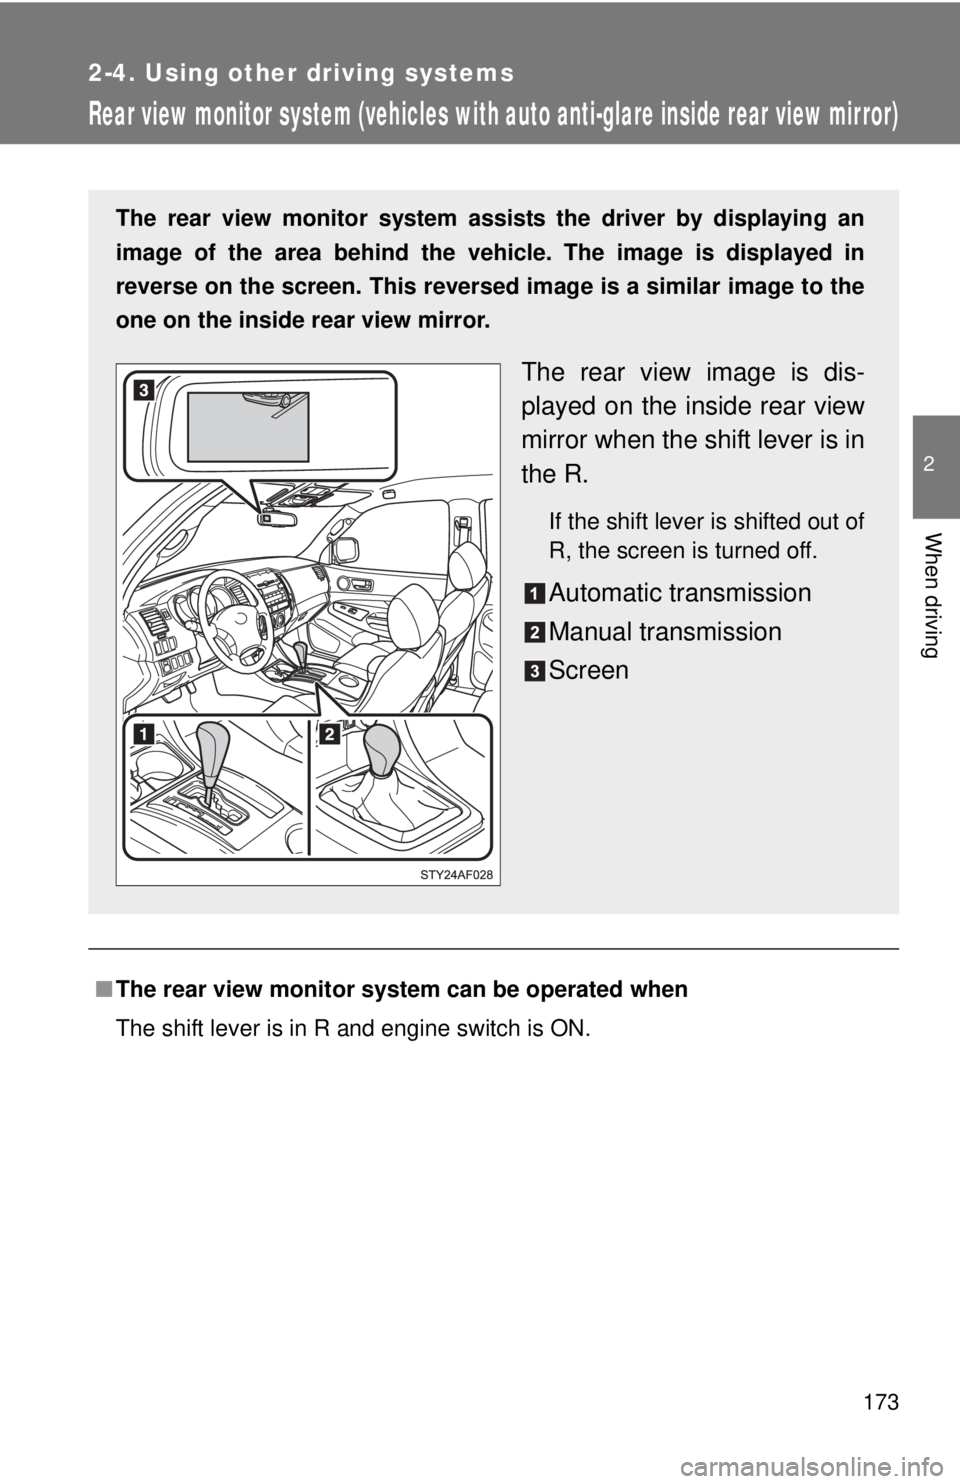
The rear view monitor system assists the driver by displaying an
image of the area behind the vehicle. The image is displayed in
reverse on the screen. This reversed image is a similar image to the
one on the inside rear view mirror.
The rear view image is dis-
played on the inside rear view
mirror when the shift lever is in
the R.
If the shift lever is shifted out of
R, the screen is turned off.
Automatic transmission
Manual transmission
Screen
Page 174 of 532
174 2-4. Using other driving systems
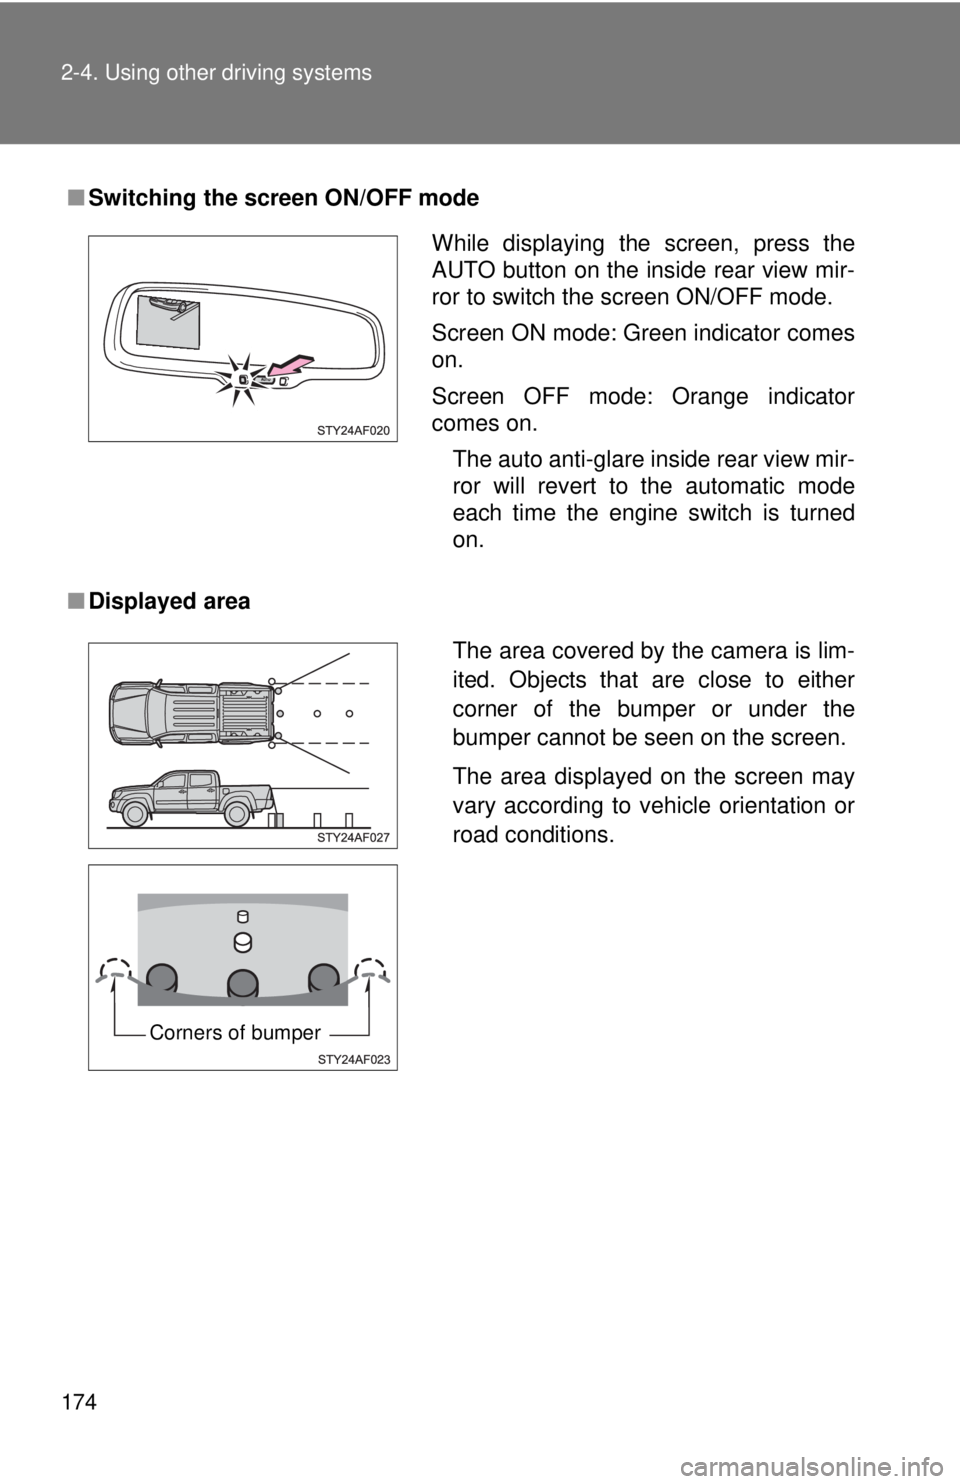
■Switching the screen ON/OFF mode
■Displayed area
While displaying the screen, press the
AUTO button on the inside rear view mir-
ror to switch the screen ON/OFF mode.
Screen ON mode: Green indicator comes
on.
Screen OFF mode: Orange indicator
comes on.
The auto anti-glare inside rear view mir-
ror will revert to the automatic mode
each time the engine switch is turned
on.
The area covered by the camera is lim-
ited. Objects that are close to either
corner of the bumper or under the
bumper cannot be seen on the screen.
The area displayed on the screen may
vary according to vehicle orientation or
road conditions.
Corners of bumper
Page 176 of 532
176 2-4. Using other driving systems
CAUTION
■When using the rear view monitor system, observe the following pre-
cautions to avoid an accident that could result in death or serious inju-
ries.
●Never depend solely on the monitor system when reversing.
●Always check visually and with the mirrors to confirm your intended path is
clear.
●Depicted distances between objects and flat surfaces differ from actual
distances.
●Do not use the system if the tailgate open.
■Conditions which may affect the rear view monitor system
●If the back of the vehicle has been hit, the camera’s position and mounting
angle may have changed. Have the vehicle inspected by your Toyota
dealer.
●Rapid temperature changes, such as when hot water is poured on the
vehicle in cold weather, may cause the system to function abnormally.
●If the camera lens is dirty, it cannot transmit a clear image. Rinse with
water and wipe with a soft cloth. If extremely dirty, wash with a mild
cleanser and rinse.
●The displayed image may be darker and moving images may be slightly
distorted when the system is cold.
NOTICE
●As the camera has a water proof construction, do not detach, disassemble
or modify it. This may cause incorrect operation.
●If the camera lens becomes dirty, it cannot transmit a clear image. If water
droplets, snow, or mud adhere to the lens, rinse with water and wipe with a
soft cloth. If the lens is extremely dirty, wash it with a mild cleanser and rinse.
Page 227 of 532
Interior and exterior
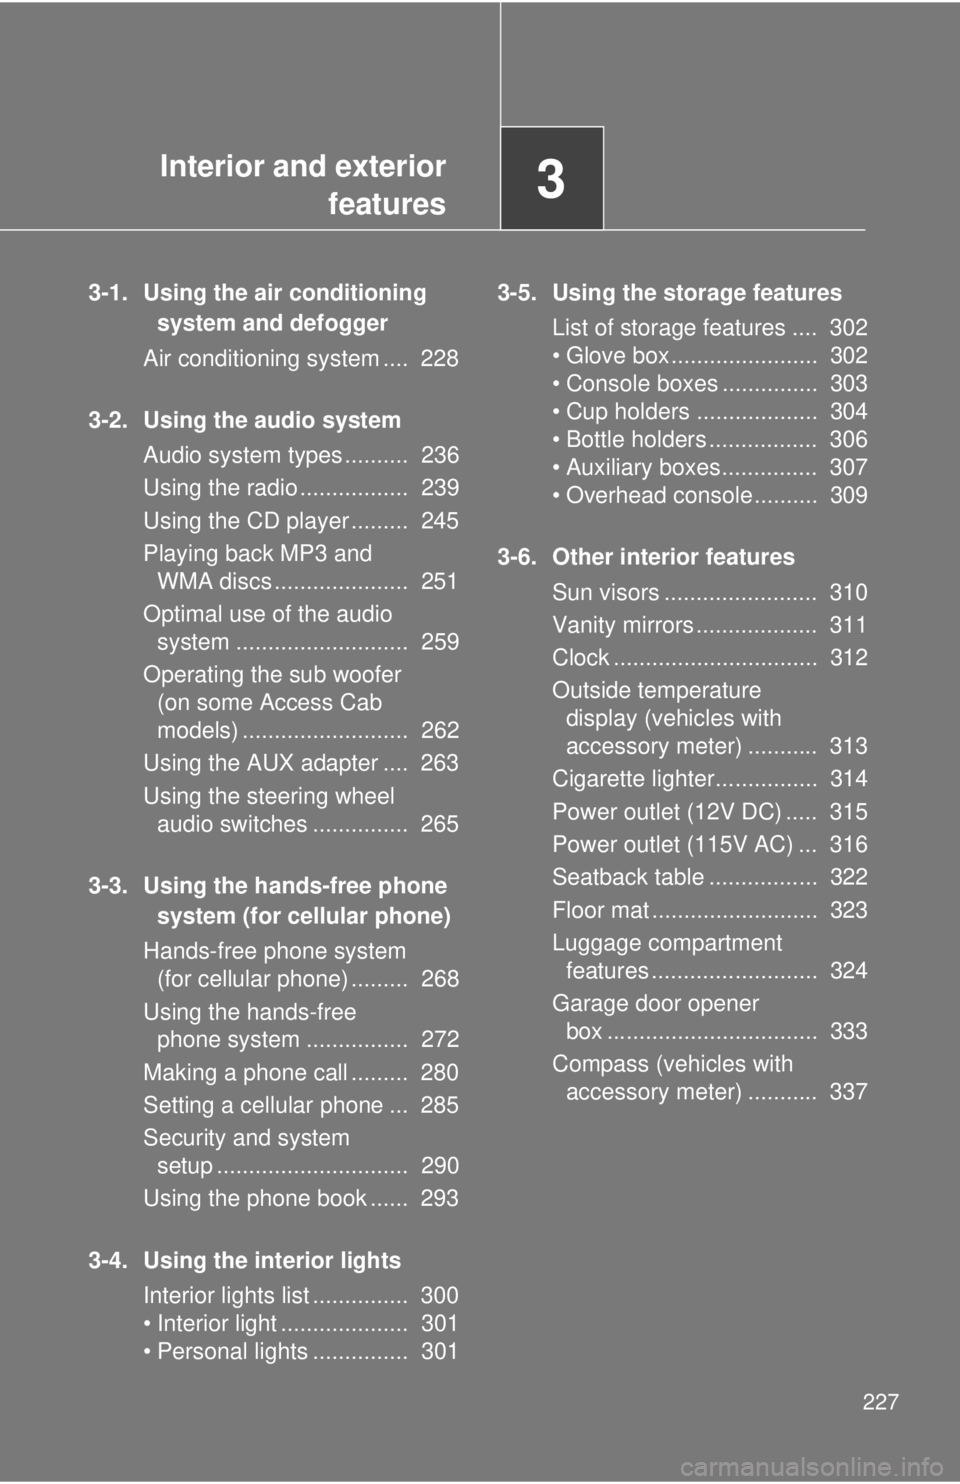
features3
227
3-1. Using the air conditioning
system and defogger
Air conditioning system .... 228
3-2. Using the audio system
Audio system types .......... 236
Using the radio ................. 239
Using the CD player ......... 245
Playing back MP3 and
WMA discs ..................... 251
Optimal use of the audio
system ........................... 259
Operating the sub woofer
(on some Access Cab
models) .......................... 262
Using the AUX adapter .... 263
Using the steering wheel
audio switches ............... 265
3-3. Using the hands-free phone
system (for cellular phone)
Hands-free phone system
(for cellular phone) ......... 268
Using the hands-free
phone system ................ 272
Making a phone call ......... 280
Setting a cellular phone ... 285
Security and system
setup .............................. 290
Using the phone book ...... 293
3-4. Using the interior lights
Interior lights list ............... 300
• Interior light .................... 301
• Personal lights ............... 3013-5. Using the storage features
List of storage features .... 302
• Glove box....................... 302
• Console boxes ............... 303
• Cup holders ................... 304
• Bottle holders ................. 306
• Auxiliary boxes ............... 307
• Overhead console .......... 309
3-6. Other interior features
Sun visors ........................ 310
Vanity mirrors ................... 311
Clock ................................ 312
Outside temperature
display (vehicles with
accessory meter) ........... 313
Cigarette lighter................ 314
Power outlet (12V DC) ..... 315
Power outlet (115V AC) ... 316
Seatback table ................. 322
Floor mat .......................... 323
Luggage compartment
features .......................... 324
Garage door opener
box ................................. 333
Compass (vehicles with
accessory meter) ........... 337