headlights TOYOTA TACOMA 2015 Owners Manual (in English)
[x] Cancel search | Manufacturer: TOYOTA, Model Year: 2015, Model line: TACOMA, Model: TOYOTA TACOMA 2015Pages: 590, PDF Size: 10.75 MB
Page 6 of 590
6
Pictorial indexExterior
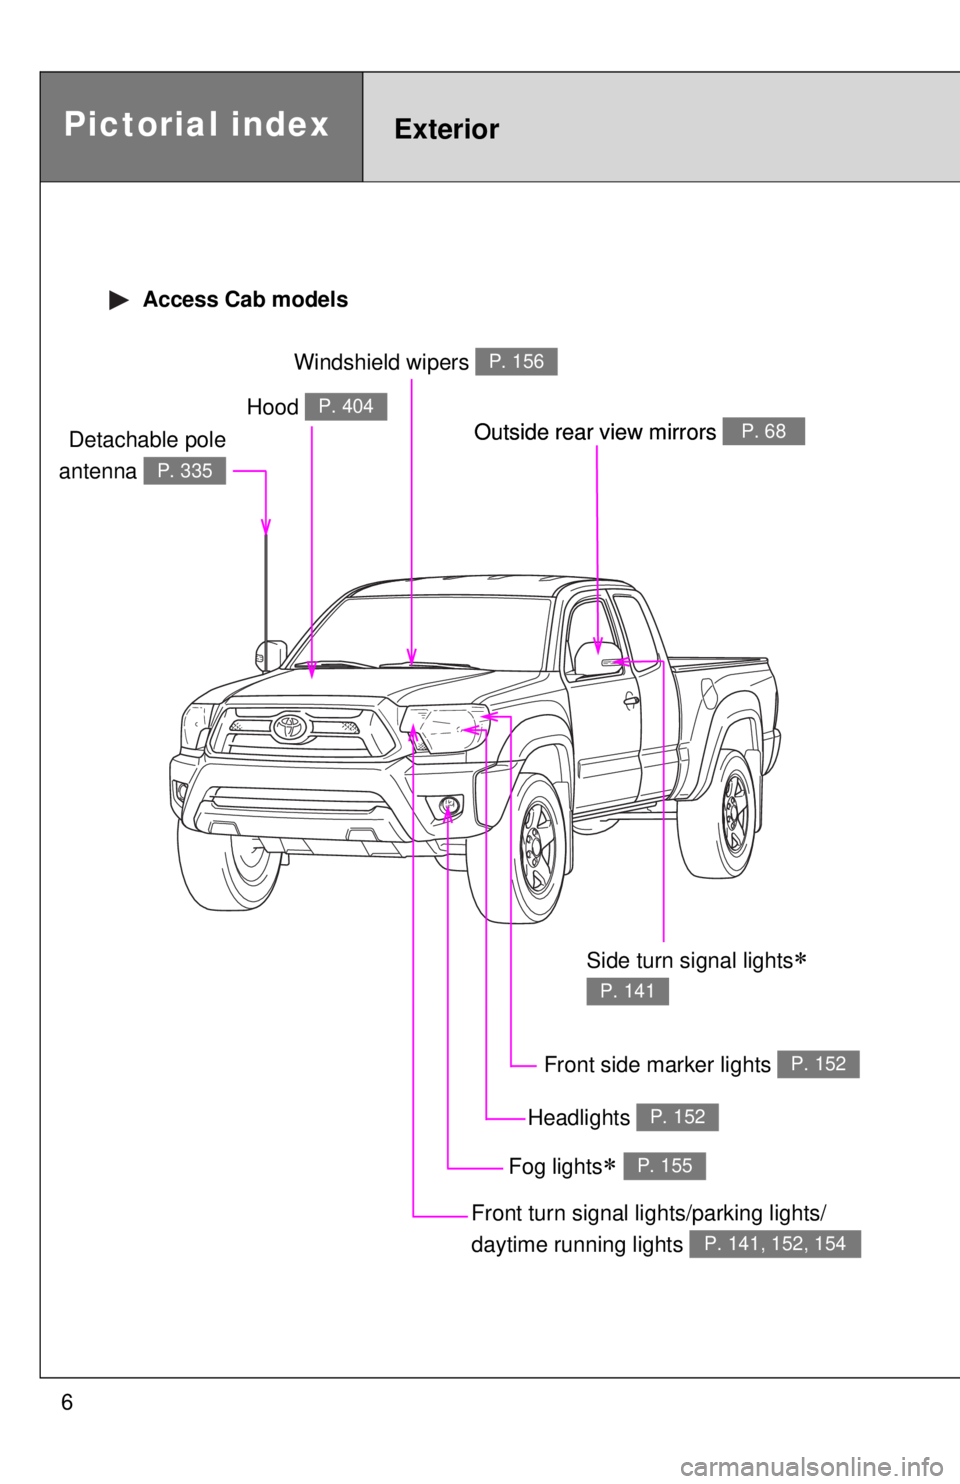
Access Cab models
Headlights P. 152
Hood P. 404
Windshield wipers P. 156
Front side marker lights P. 152
Outside rear view mirrors P. 68
Front turn signal lights/parking lights/
daytime running lights
P. 141, 152, 154
Fog lights P. 155
Outside rear view mirrors P. 68
Side turn signal lights
P. 141
Detachable pole
antenna
P. 335
Page 8 of 590
8
Pictorial indexExterior
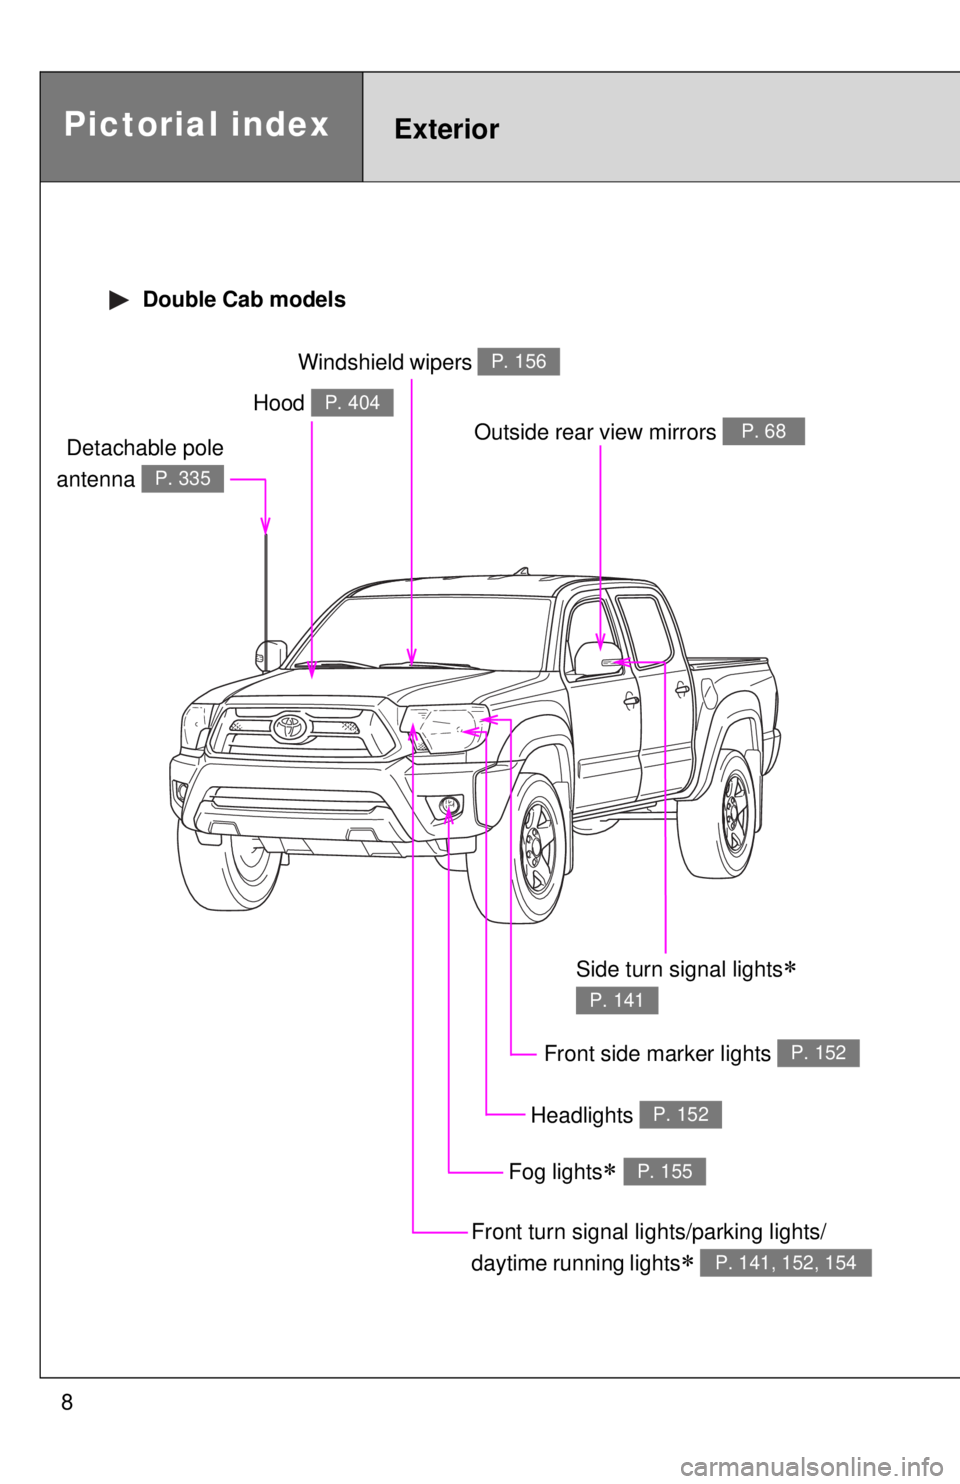
Double Cab models
Headlights P. 152
Hood P. 404
Windshield wipers P. 156
Front side marker lights P. 152
Outside rear view mirrors P. 68
Front turn signal lights/parking lights/
daytime running lights
P. 141, 152, 154
Fog lights P. 155
Side turn signal lights
P. 141
Detachable pole
antenna
P. 335
Page 64 of 590
64
1-3. Adjustable components (seats, mirrors, steering wheel)
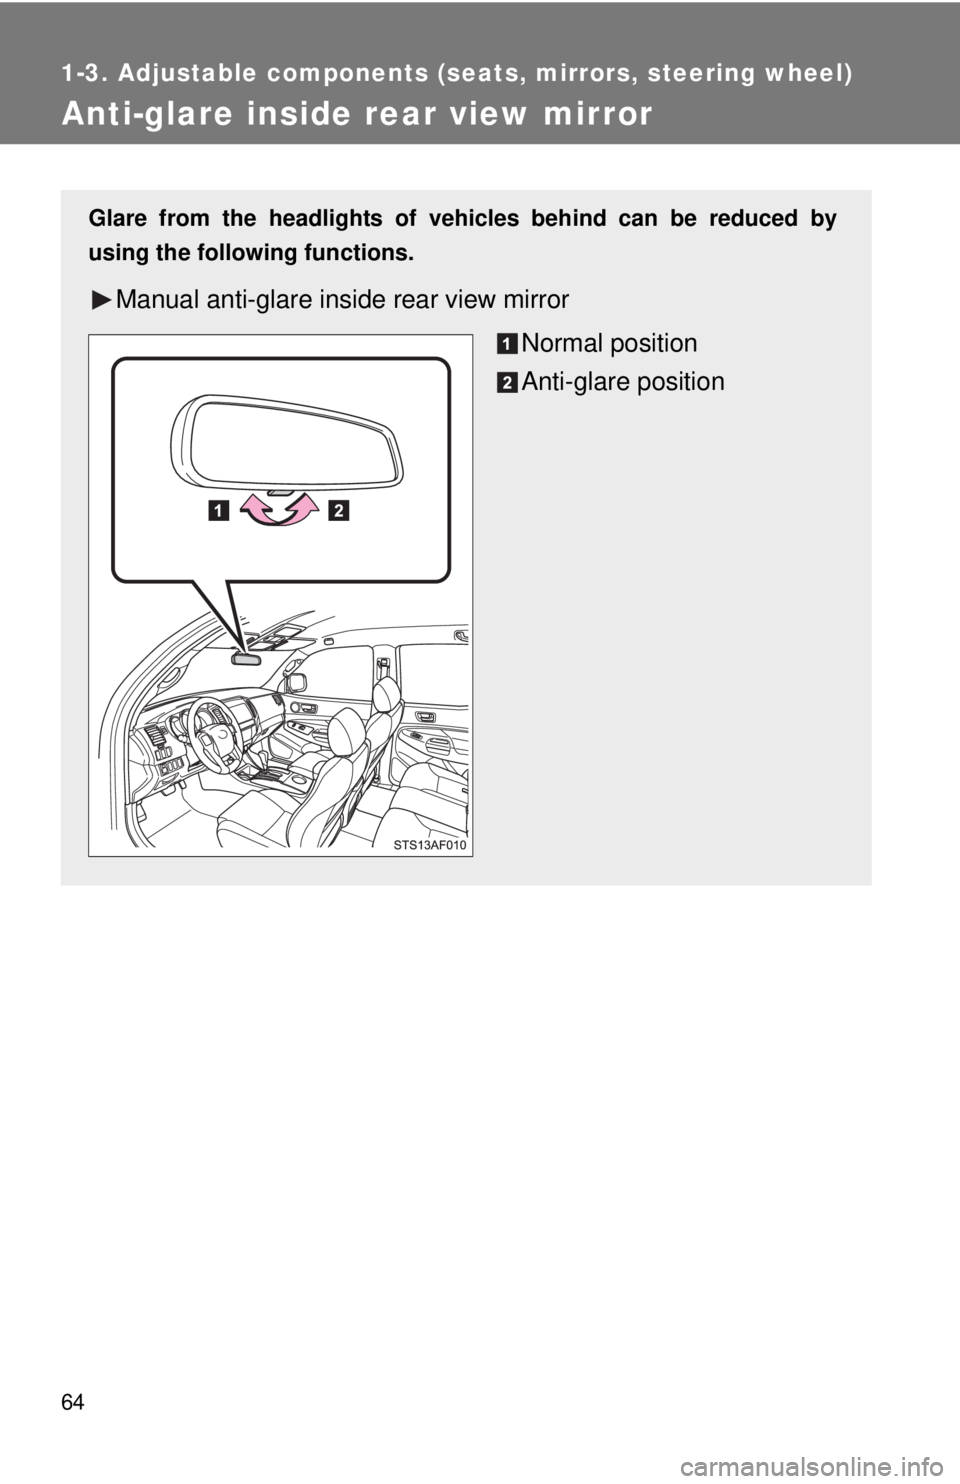
Anti-glare inside rear view mirror
Glare from the headlights of vehicles behind can be reduced by
using the following functions.
Manual anti-glare inside rear view mirrorNormal position
Anti-glare position
Page 65 of 590
65
1-3. Adjustable components (s
eats, mirrors, steering wheel)
1
Before driving
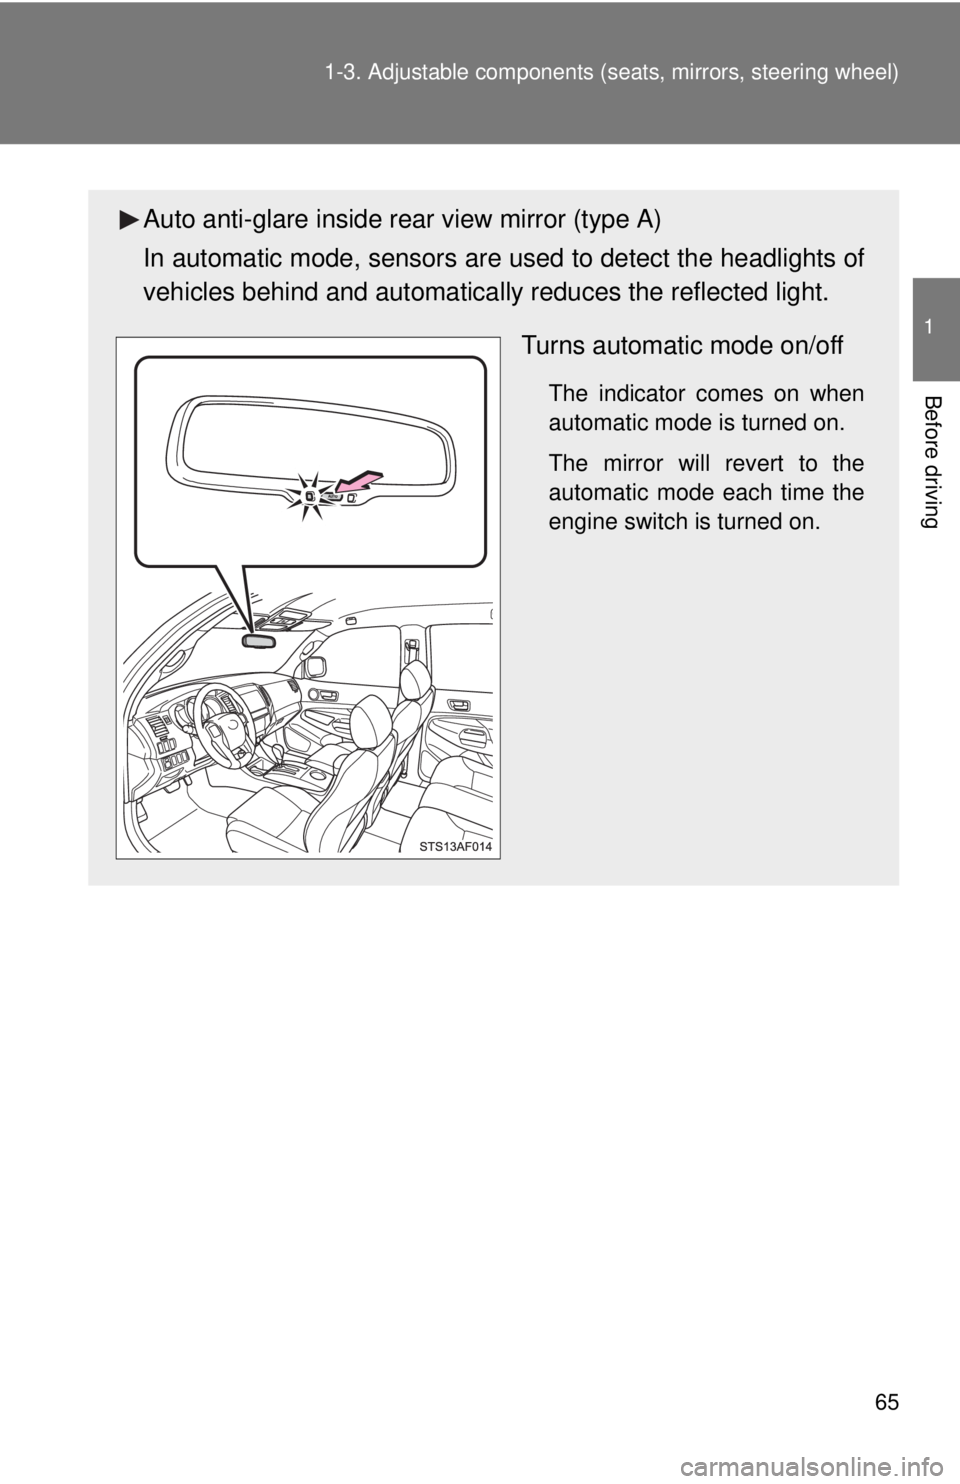
Auto anti-glare inside rear view mirror (type A)
In automatic mode, sensors are used to detect the headlights of
vehicles behind and automatical ly reduces the reflected light.
Turns automatic mode on/off
The indicator comes on when
automatic mode is turned on.
The mirror will revert to the
automatic mode each time the
engine switch is turned on.
Page 66 of 590
66 1-3. Adjustable components (seats, mirrors, steering wheel)
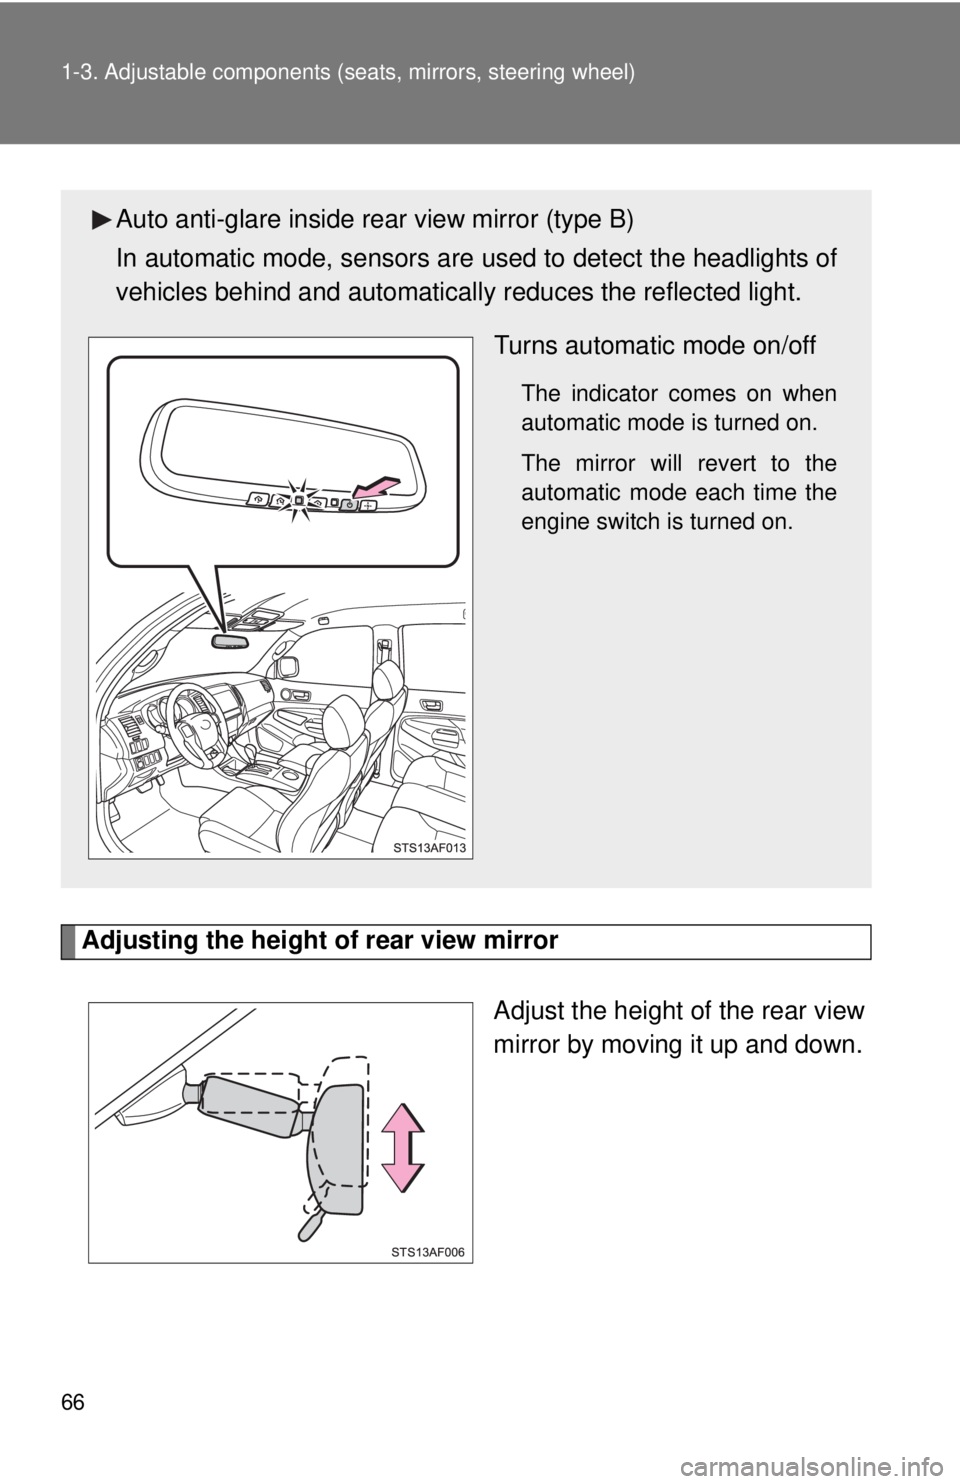
Adjusting the height of rear view mirror
Adjust the height of the rear view
mirror by moving it up and down.
Auto anti-glare inside rear view mirror (type B)
In automatic mode, sensors are used to detect the headlights of
vehicles behind and automatical ly reduces the reflected light.
Turns automatic mode on/off
The indicator comes on when
automatic mode is turned on.
The mirror will revert to the
automatic mode each time the
engine switch is turned on.
Page 152 of 590
152
2-3. Operating the lights and wipers
Headlight switch
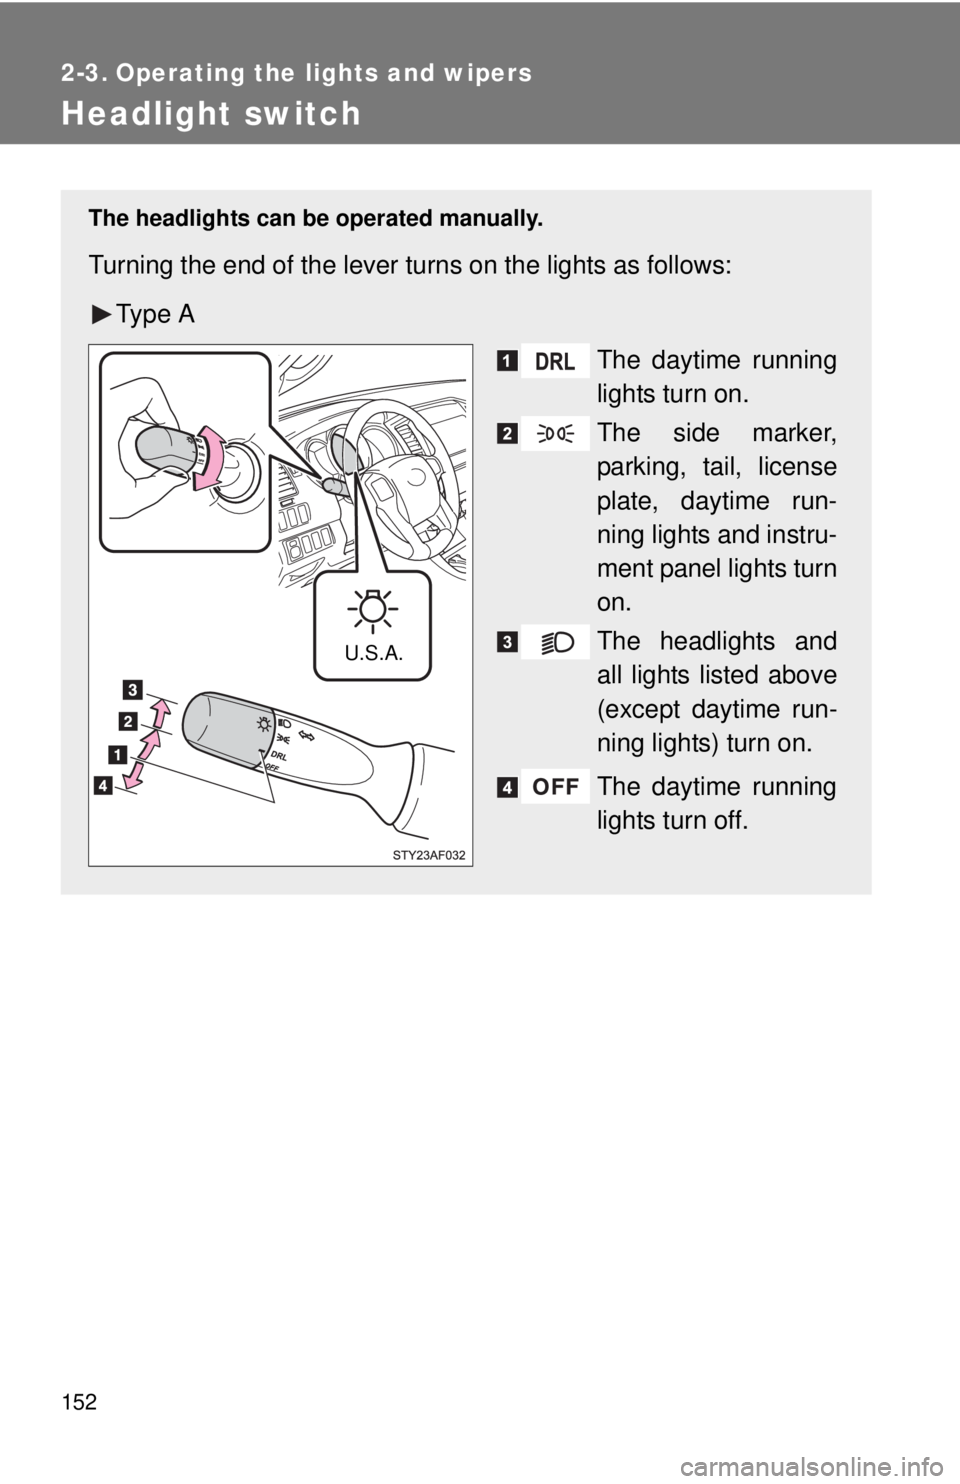
The headlights can be operated manually.
Turning the end of the lever turns on the lights as follows:Ty p e A The daytime running
lights turn on.
The side marker,
parking, tail, license
plate, daytime run-
ning lights and instru-
ment panel lights turn
on.
The headlights and
all lights listed above
(except daytime run-
ning lights) turn on.
The daytime running
lights turn off.
U.S.A.
Page 153 of 590
153
2-3. Operating the lights and wipers
2
When driving
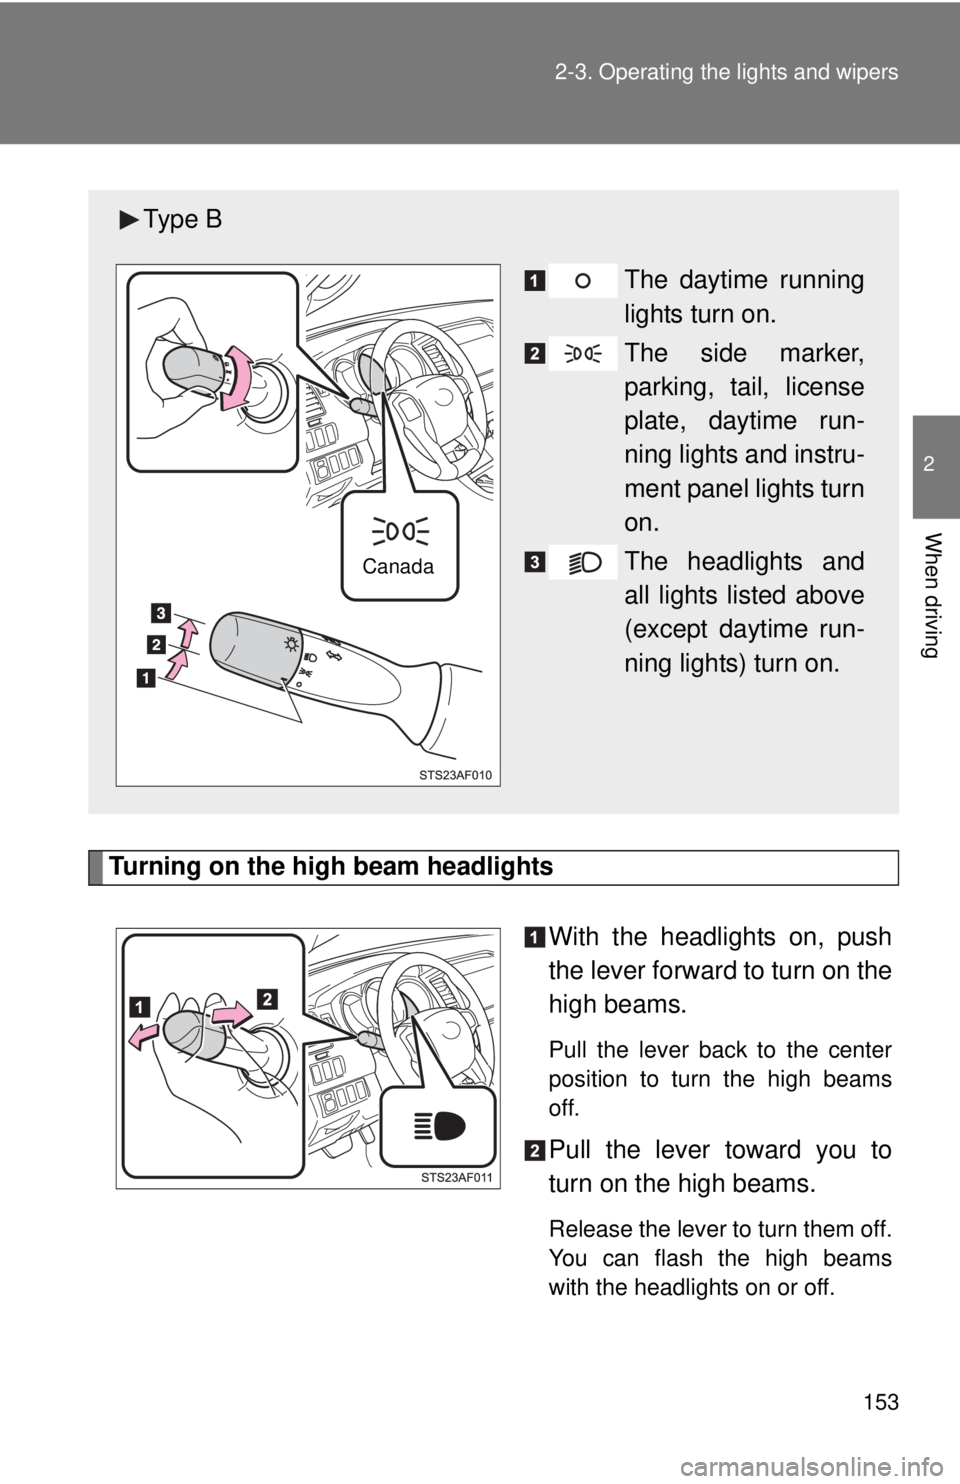
Turning on the high beam headlights
With the headlights on, push
the lever forward to turn on the
high beams.
Pull the lever back to the center
position to turn the high beams
off.
Pull the lever toward you to
turn on the high beams.
Release the lever to turn them off.
You can flash the high beams
with the headlights on or off.
Ty p e B The daytime running
lights turn on.
The side marker,
parking, tail, license
plate, daytime run-
ning lights and instru-
ment panel lights turn
on.
The headlights and
all lights listed above
(except daytime run-
ning lights) turn on.
Canada
Page 154 of 590
154 2-3. Operating the lights and wipers
■Daytime running light system
●To make your vehicle more visible to other drivers, the front turn signal
lights turn on automatically whenever the engine is started and the park-
ing brake is released. Daytime running lights are not designed for use at
night.
Type A: Daytime running lights can be turned off by operating the switch.
● Compared to turning on the headlights, the daytime running light system
offers greater durability and consumes less electricity, so it can help
improve fuel economy.
■ Automatic light off system
Opening the driver’s door with the engine switch in the ACC or LOCK posi-
tion will turn the headlights and tail lights off.
To turn the lights on again, turn the engine switch to the ON position, or turn
the headlight switch off once and then back to the or position.
NOTICE
■To prevent battery discharge
Do not leave the lights on longer than necessary when the engine is not run-
ning.
Page 155 of 590
155
2-3. Operating the lights and wipers
2
When driving
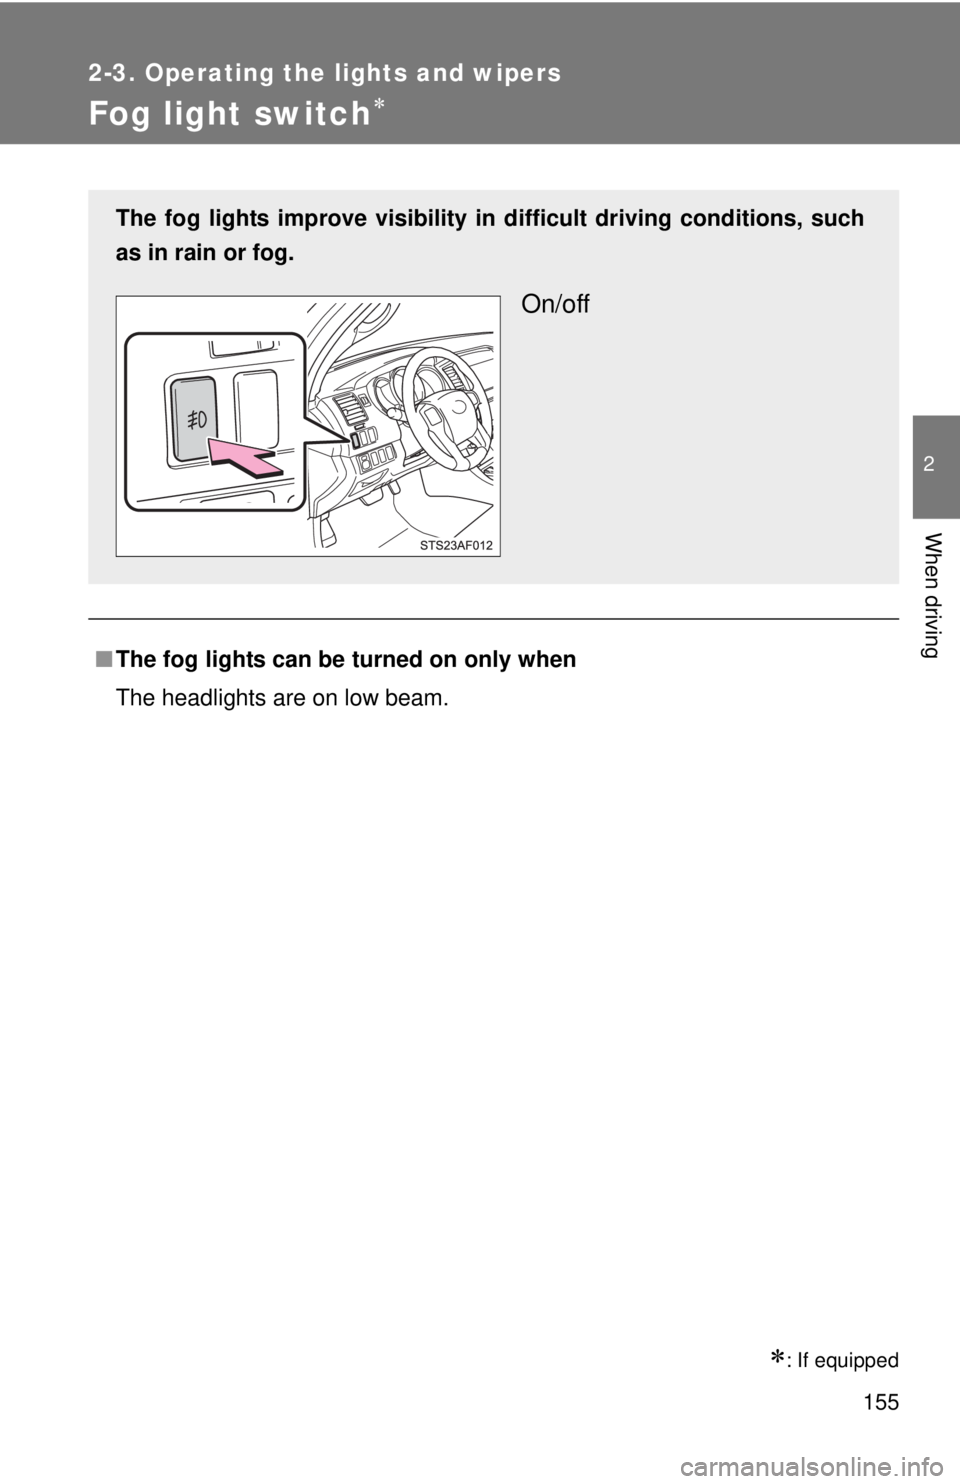
Fog light switch
: If equipped
■The fog lights can be turned on only when
The headlights are on low beam.
The fog lights improve visibility in difficult driving conditions, such
as in rain or fog.
On/off
Page 173 of 590

173
2-4. Using other
driving systems
2
When driving
Things you should know
■ If you notice any symptoms
If you notice any of the following symptoms, refer to the likely
cause and the solution, and re-check.
If the symptom is not resolved by the solution, have the vehicle
inspected by your Toyota dealer.
SymptomLikely causeSolution
The image
is difficult to
see • The vehicle is in a dark area
• The temperature around the lens
is either high or low
• The outside temperature is low
• There are water droplets on the camera
• It is raining or humid
• Foreign matter (mud, etc.) is adhering to the camera
• There are scratches on the cam- era
• Sunlight or headlights are shining directly into the camera
• The vehicle is under fluorescent lights, sodium lights, mercury
lights, etc. If this happens due
to these causes, it
does not indicate a
malfunction.
Back up while visu-
ally checking the
vehicle’s surround-
ings. (Use the moni-
tor again once
conditions have
been improved.)
To adjust the image
on the rear view
monitor system
screen. (
P. 254)
The image
is blurry Dirt or foreign matter (such as
water droplets, snow, mud etc.) is
adhering to the camera. Rinse the camera
lens with water and
wipe it clean with a
soft cloth.
Wash with a mild
soap if the dirt is
stubborn.
The image
is out of
alignment The camera or surrounding area
has received a strong impact. Have the vehicle
inspected by your
Toyota dealer.