headlights TOYOTA TACOMA 2018 Owners Manual (in English)
[x] Cancel search | Manufacturer: TOYOTA, Model Year: 2018, Model line: TACOMA, Model: TOYOTA TACOMA 2018Pages: 696, PDF Size: 11.72 MB
Page 15 of 696
15Pictorial index
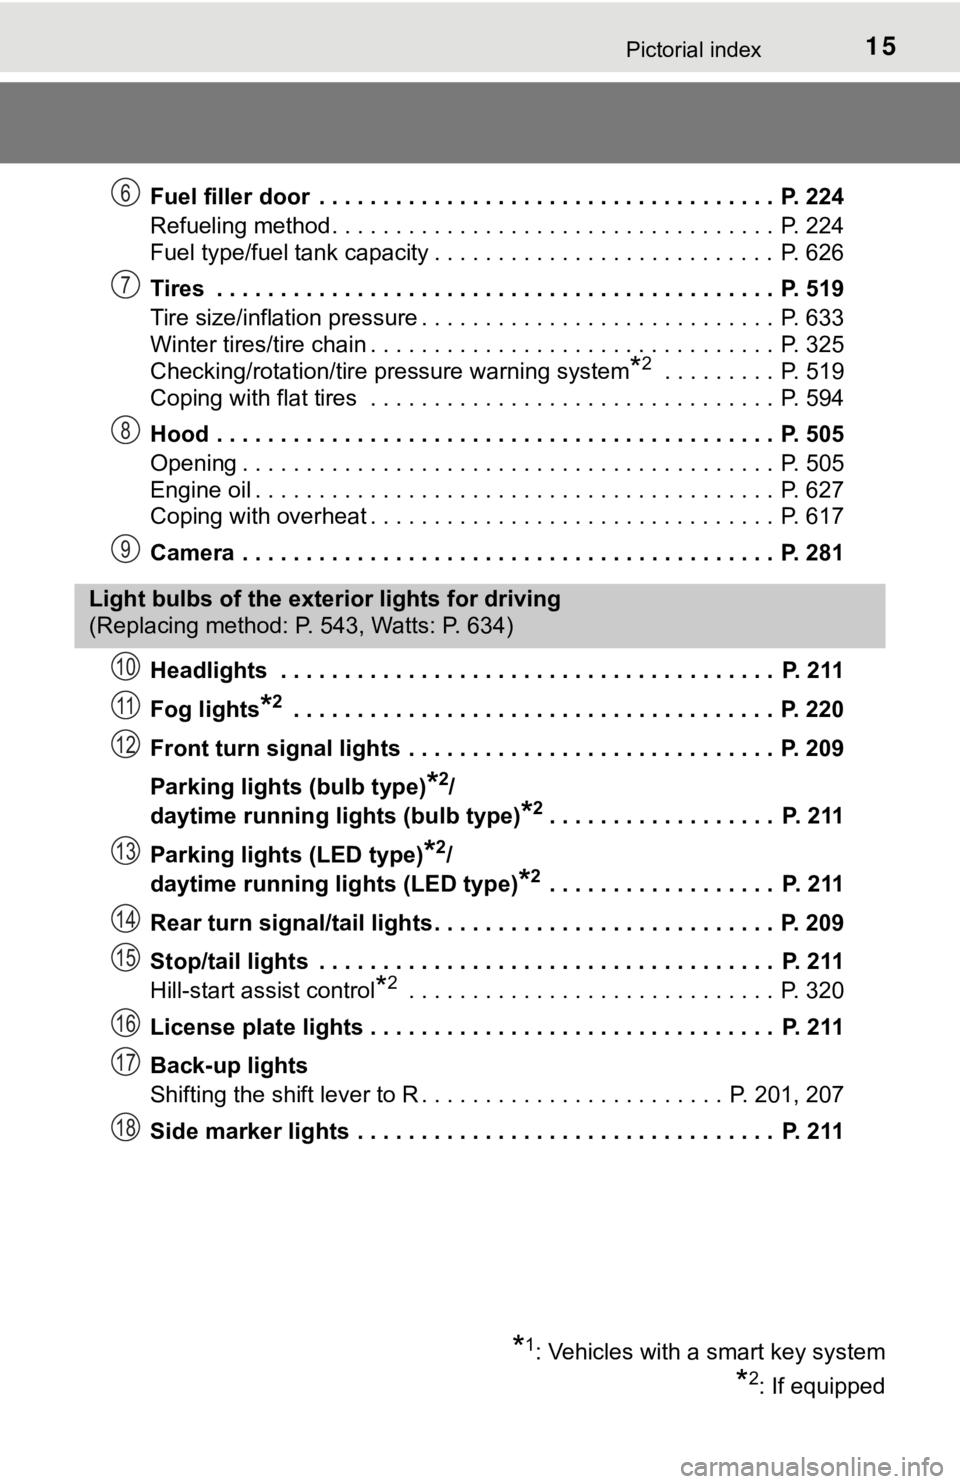
Fuel filler door . . . . . . . . . . . . . . . . . . . . . . . . . . . . . . . . . . . . P. 224
Refueling method . . . . . . . . . . . . . . . . . . . . . . . . . . . . . . . . . . . P. 224
Fuel type/fuel tank capacity . . . . . . . . . . . . . . . . . . . . . . . . . . . P. 626
Tires . . . . . . . . . . . . . . . . . . . . . . . . . . . . . . . . . . . . . . . . . . . . P. 519
Tire size/inflation pressure . . . . . . . . . . . . . . . . . . . . . . . . . . . . P. 633
Winter tires/tire chain . . . . . . . . . . . . . . . . . . . . . . . . . . . . . . . . P. 325
Checking/rotation/tire pressure warning system
*2 . . . . . . . . . P. 519
Coping with flat tires . . . . . . . . . . . . . . . . . . . . . . . . . . . . . . . . P. 594
Hood . . . . . . . . . . . . . . . . . . . . . . . . . . . . . . . . . . . . . . . . . . . . P. 505
Opening . . . . . . . . . . . . . . . . . . . . . . . . . . . . . . . . . . . . . . . . . . P. 505
Engine oil . . . . . . . . . . . . . . . . . . . . . . . . . . . . . . . . . . . . . . . . . P. 627
Coping with overheat . . . . . . . . . . . . . . . . . . . . . . . . . . . . . . . . P. 617
Camera . . . . . . . . . . . . . . . . . . . . . . . . . . . . . . . . . . . . . . . . . . P. 281
Headlights . . . . . . . . . . . . . . . . . . . . . . . . . . . . . . . . . . . . . . . P. 211
Fog lights
*2 . . . . . . . . . . . . . . . . . . . . . . . . . . . . . . . . . . . . . . P. 220
Front turn signal lights . . . . . . . . . . . . . . . . . . . . . . . . . . . . . P. 209
Parking lights (bulb type)
*2/
daytime running lig hts (bulb type)
*2. . . . . . . . . . . . . . . . . . P. 211
Parking lights (LED type)
*2/
daytime running lights (LED type)
*2 . . . . . . . . . . . . . . . . . . P. 211
Rear turn signal/tail lights . . . . . . . . . . . . . . . . . . . . . . . . . . . P. 209
Stop/tail lights . . . . . . . . . . . . . . . . . . . . . . . . . . . . . . . . . . . . P. 211
Hill-start assist control
*2 . . . . . . . . . . . . . . . . . . . . . . . . . . . . . P. 3 20
License plate lights . . . . . . . . . . . . . . . . . . . . . . . . . . . . . . . . P. 211
Back-up lights
Shifting the shift lever to R . . . . . . . . . . . . . . . . . . . . . . . . P. 201, 207
Side marker lights . . . . . . . . . . . . . . . . . . . . . . . . . . . . . . . . . P. 211
6
7
8
9
Light bulbs of the exter ior lights for driving
(Replacing method: P. 543, Watts: P. 634)
*1: Vehicles with a smart key system
*2: If equipped
10
11
12
13
14
15
16
17
18
Page 17 of 696

17Pictorial index
Parking brake . . . . . . . . . . . . . . . . . . . . . . . . . . . . . . . . . . . . . P. 210
Applying/releasing . . . . . . . . . . . . . . . . . . . . . . . . . . . . . . . . . . P. 210
Precautions against winter season . . . . . . . . . . . . . . . . . . . . . P. 326
Warning light/warning buzzer/warning message . . . . . . . P. 567, 580
Turn signal lever . . . . . . . . . . . . . . . . . . . . . . . . . . . . . . . . . . P. 209
Headlight switch . . . . . . . . . . . . . . . . . . . . . . . . . . . . . . . . . . P. 211
Headlights/parking lights/tail lights/daytime running lights . . . . P. 211
Fog lights
*4 . . . . . . . . . . . . . . . . . . . . . . . . . . . . . . . . . . . . . . . P. 220
Windshield wiper and washer switch . . . . . . . . . . . . . . . . . P. 221
Usage . . . . . . . . . . . . . . . . . . . . . . . . . . . . . . . . . . . . . . . . . . . P. 221
Adding washer fluid . . . . . . . . . . . . . . . . . . . . . . . . . . . . . . . . . P. 518
Warning messages
*5. . . . . . . . . . . . . . . . . . . . . . . . . . . . . . . . P. 577
Hood lock release lever. . . . . . . . . . . . . . . . . . . . . . . . . . . . . P. 505
Tilt and telescopic steering lock release lever . . . . . . . . . . P. 140
Air conditioning system . . . . . . . . . . . . . . . . . . . . . . . . P. 426, 432
Usage (manual type)
*4 . . . . . . . . . . . . . . . . . . . . . . . . . . . . . . P. 426
Usage (automatic type)
*4 . . . . . . . . . . . . . . . . . . . . . . . . . . . . P. 432
Entune Audio system
*6. . . . . . . . . . . . . . . . . . . . . . . . . . . . . P. 33 6
*1: Vehicles without a smart key system
*2: Vehicles with a smart key system
*3: Vehicles with an automatic transmission
*4: If equipped
*5: For Canada only
*6: For vehicles with Entune Audio Plus or Entune Premium Audio, refer to
“NAVIGATION AND MULTIMEDIA SYSTEM OWNER’S MANUAL”.
5
6
7
8
9
10
11
Page 142 of 696
1423-4. Adjusting the steering wheel and mirrors
Inside rear view mirror
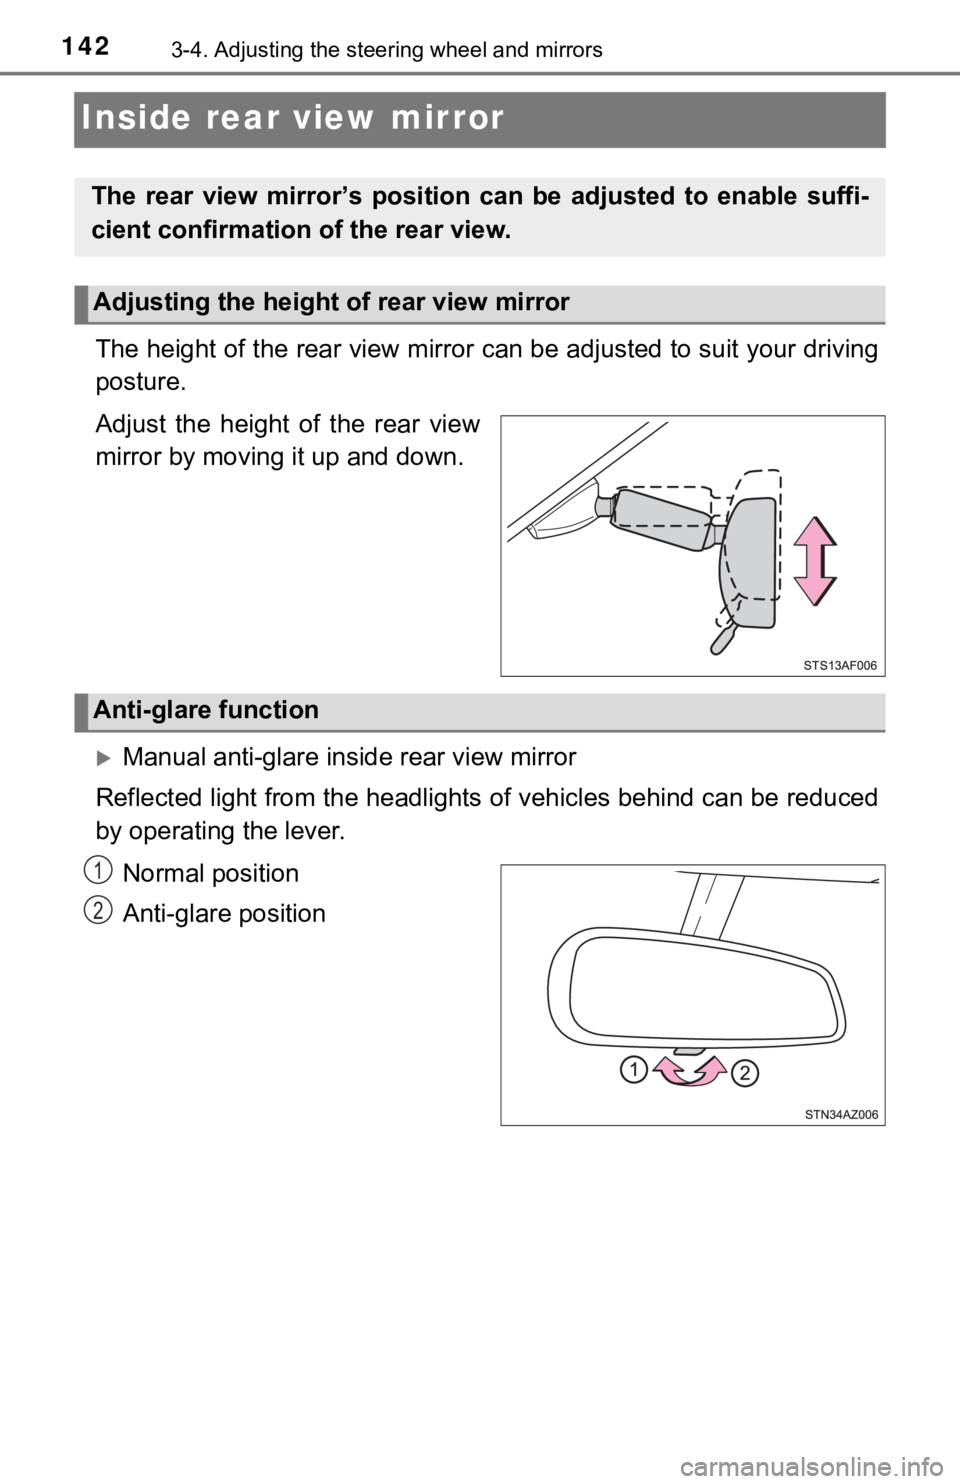
The height of the rear view mirror can be adjusted to suit your driving
posture.
Adjust the height of the rear view
mirror by moving it up and down.
Manual anti-glare inside rear view mirror
Reflected light from the headlights of vehicles behind can be r educed
by operating the lever.
Normal position
Anti-glare position
The rear view mirror’s position ca n be adjusted to enable suffi-
cient confirmation of the rear view.
Adjusting the height of rear view mirror
Anti-glare function
1
2
Page 143 of 696
1433-4. Adjusting the steering wheel and mirrors
3
Operation of each component
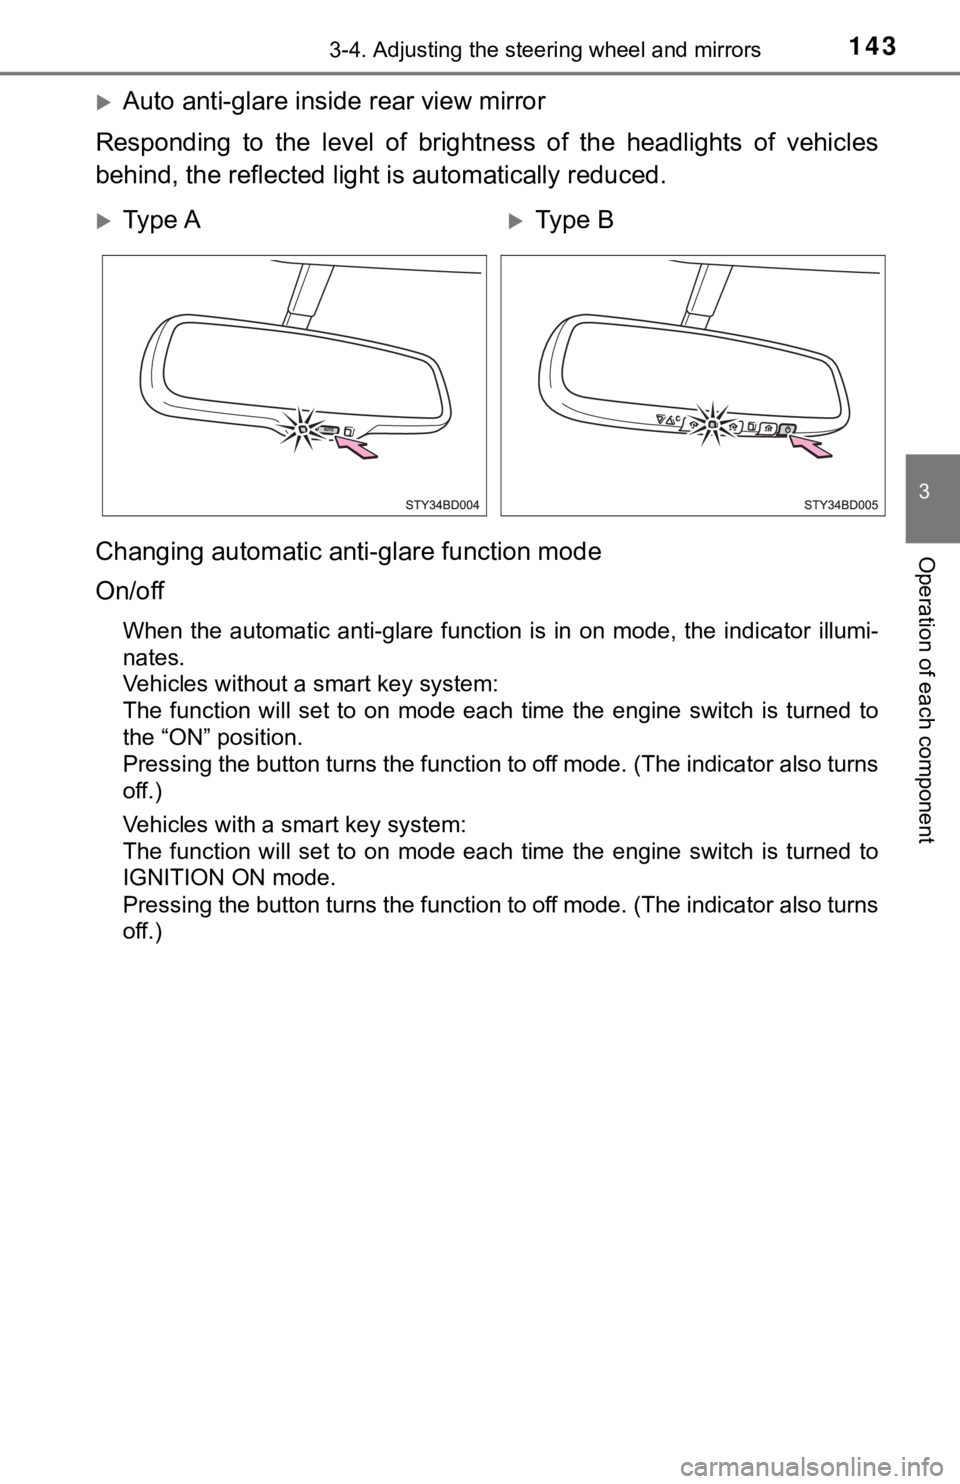
Auto anti-glare insi de rear view mirror
Responding to the level of brightness of the headlights of vehi cles
behind, the reflected light is automatically reduced.
Changing automatic anti- glare function mode
On/off
When the automatic anti-glare function is in on mode, the indicator illumi-
nates.
Vehicles without a smart key system:
The function will set to on mode each time the engine switch is turned to
the “ON” position.
Pressing the button turns the function to off mode. (The indica tor also turns
off.)
Vehicles with a smart key system:
The function will set to on mode each time the engine switch is turned to
IGNITION ON mode.
Pressing the button turns the function to off mode. (The indica tor also turns
off.)
Ty p e AType B
Page 211 of 696
2114-3. Operating the lights and wipers
4
Driving
Headlight switch
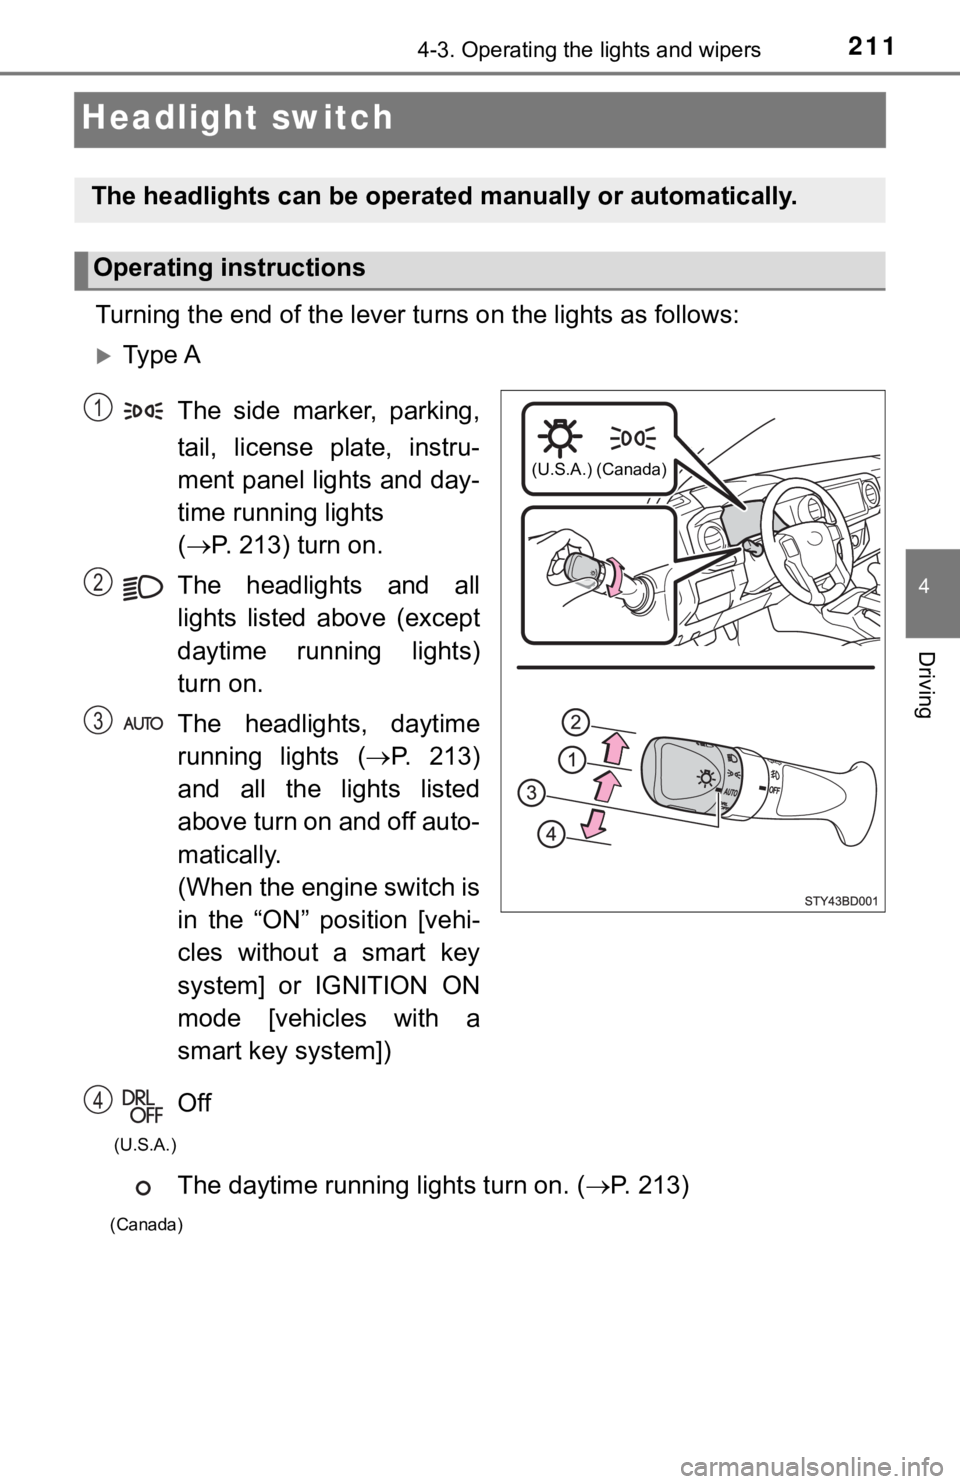
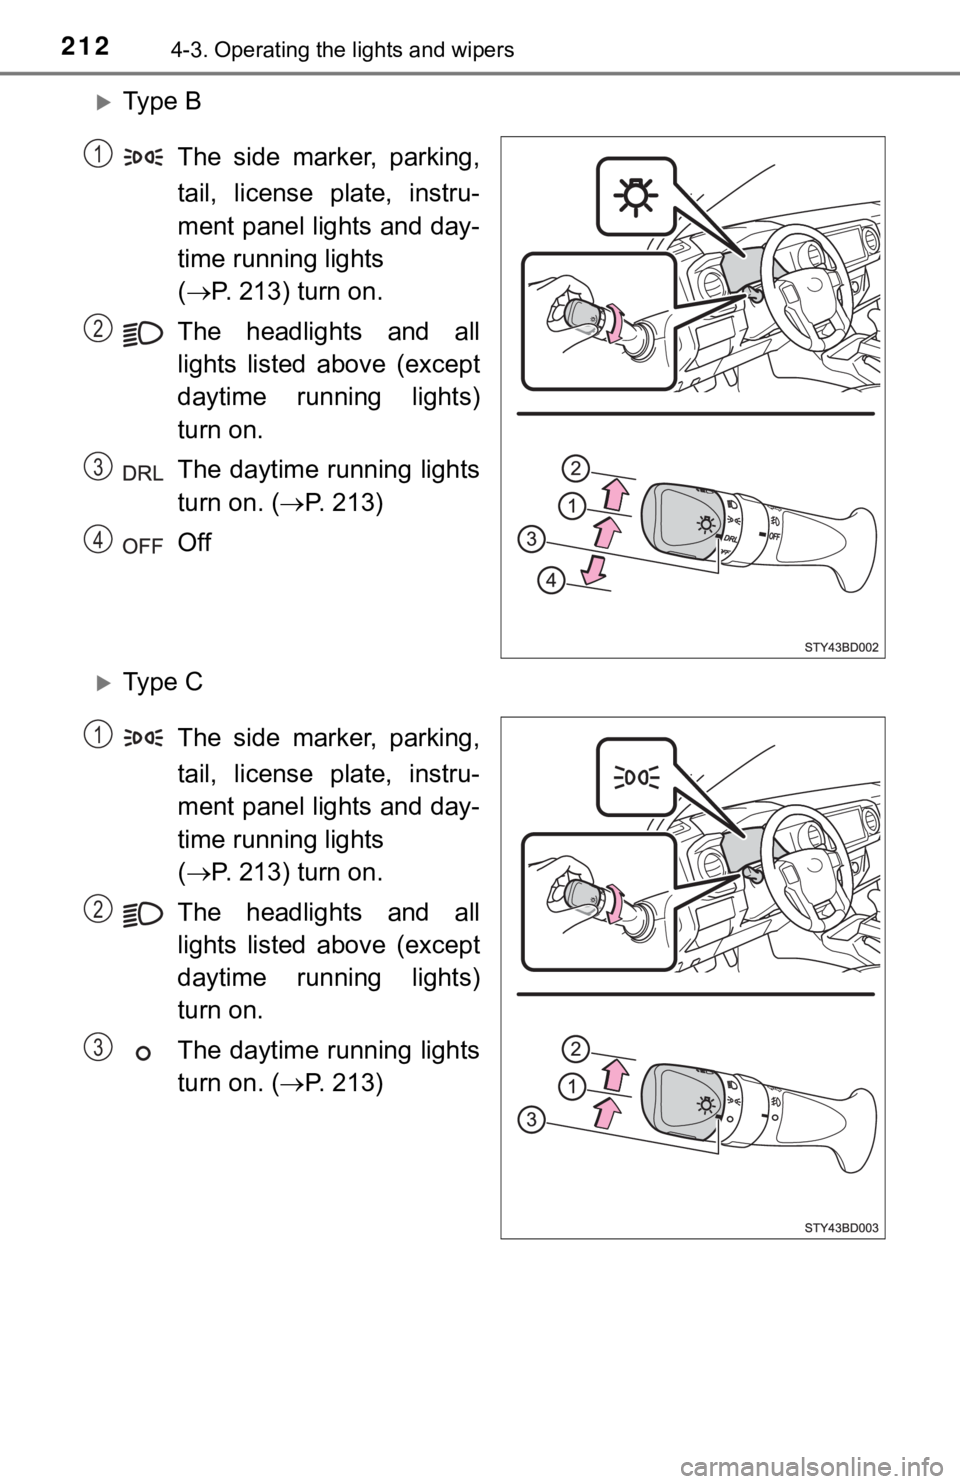
Turning the end of the lever tu rns on the lights as follows:
Ty p e A
The side marker, parking,
tail, license plate, instru-
ment panel lights and day-
time running lights
( P. 213) turn on.
The headlights and all
lights listed above (except
daytime running lights)
turn on.
The headlights, daytime
running lights ( P. 213)
and all the lights listed
above turn on and off auto-
matically.
(When the engine switch is
in the “ON” position [vehi-
cles without a smart key
system] or IGNITION ON
mode [vehicles with a
smart key system])
Off
The daytime running lights turn on. ( P. 2 1 3 )
The headlights can be operated manually or automatically.
Operating instructions
(U.S.A.) (Canada)
1
2
3
4
(U.S.A.)
(Canada)
Page 212 of 696
2124-3. Operating the lights and wipers
Ty p e BThe side marker, parking,
tail, license plate, instru-
ment panel lights and day-
time running lights
( P. 213) turn on.
The headlights and all
lights listed above (except
daytime running lights)
turn on.
The daytime running lights
turn on. ( P. 213)
Off
Ty p e C
The side marker, parking,
tail, license plate, instru-
ment panel lights and day-
time running lights
( P. 213) turn on.
The headlights and all
lights listed above (except
daytime running lights)
turn on.
The daytime running lights
turn on. ( P. 213)
1
2
3
4
1
2
3
Page 213 of 696
2134-3. Operating the lights and wipers
4
Driving
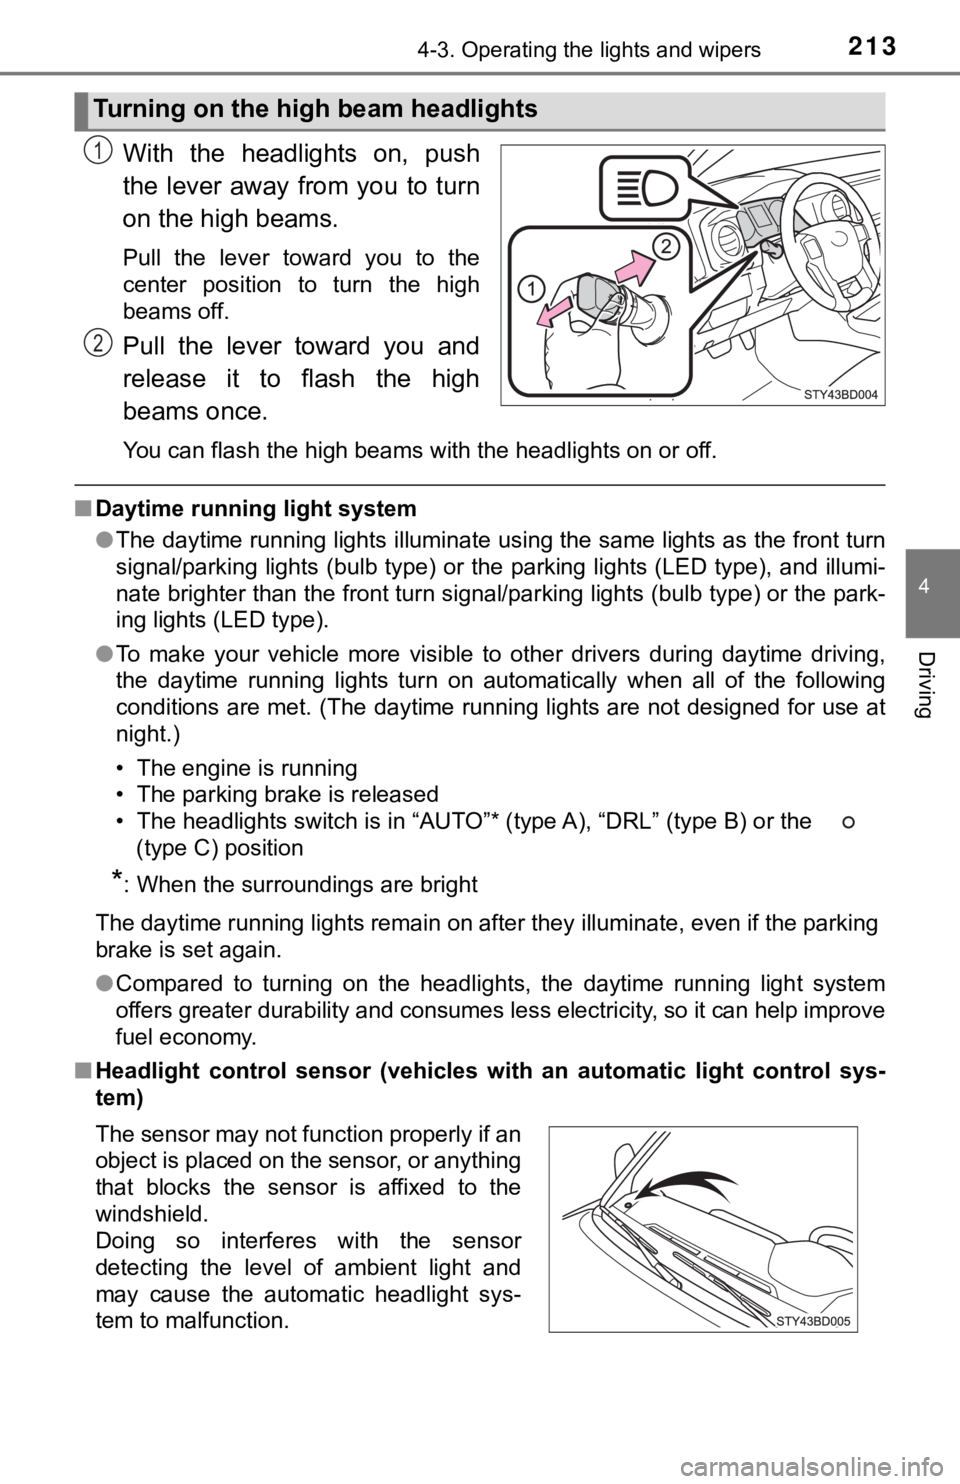
With the headlights on, push
the lever away from you to turn
on the high beams.
Pull the lever toward you to the
center position to turn the high
beams off.
Pull the lever toward you and
release it to flash the high
beams once.
You can flash the high beams with the headlights on or off.
■Daytime running light system
●The daytime running lights illuminate using the same lights as the front turn
signal/parking lights (bulb type) or the parking lights (LED ty pe), and illumi-
nate brighter than the front turn signal/parking lights (bulb t ype) or the park-
ing lights (LED type).
● To make your vehicle more visible to other drivers during dayti me driving,
the daytime running lights turn on automatically when all of th e following
conditions are met. (The daytime running lights are not designe d for use at
night.)
• The engine is running
• The parking brake is released
• The headlights switch is in “AUTO”* (type A), “DRL” (type B) o r the
(type C) position
*: When the surroundings are bright
The daytime running lights remain on after they illuminate, even if the parking
brake is set again.
● Compared to turning on the headlights, the daytime running ligh t system
offers greater durability and consumes less electricity, so it can help improve
fuel economy.
■ Headlight control sensor (vehicl es with an automatic light control sys-
tem)
Turning on the high beam headlights
1
2
The sensor may not function properly if an
object is placed on the sensor, or anything
that blocks the sensor is affixed to the
windshield.
Doing so interferes with the sensor
detecting the level of ambient light and
may cause the automatic headlight sys-
tem to malfunction.
Page 217 of 696

2174-3. Operating the lights and wipers
4
Driving
■High beam automatic turning on or off conditions
●When all of the following conditions are fulfilled, the high be am will be auto-
matically turned on (after approximately 1 second):
• Vehicle speed is above approximately 21 mph (34 km/h).
• The area ahead of the vehicle is dark.
• There are no vehicles ahead with headlights or tail lights turned on.
• There are few streetlights on the road ahead.
● If any of the following conditions are fulfilled, the high beam will be automat-
ically turned off:
• Vehicle speed drops below approximately 17 mph (27 km/h).
• The area ahead of the vehicle is not dark.
• Vehicles ahead have headlights or tail lights turned on.
• There are many streetlights on the road ahead.
■ Camera sensor detection information
●The high beam may not be automatically turned off in the following situa-
tions:
• When oncoming vehicles suddenly appear from a curve
• When the vehicle is cut off in front of by another vehicle
• When vehicles ahead are hidden from sight due to repeated curv es, road
dividers or roadside trees
• When vehicles ahead appear from the faraway lane on wide road
• When vehicles ahead have no lights
● The high beam may be turned off if a vehicle ahead that is usin g fog lights
without using the headlights is detected.
● House lights, street lights, traffic signals, and illuminated billboards or signs
may cause the high beam to switch to the low beams, or the low beams to
remain on.
● The following factors may affect the amount of time taken to tu rn the high
beam on or off:
• The brightness of headlights, fog lights, and tail lights of v ehicles ahead
• The movement and direction of vehicles ahead
• When a vehicle ahead only has operational lights on one side
• When a vehicle ahead is a two-wheeled vehicle
• The condition of the road (gradient, curve, condition of the r oad surface,
etc.)
• The number of passengers and amount of luggage
Page 218 of 696

2184-3. Operating the lights and wipers
●The high beam may be turned on or off when the driver does not expect it.
● Bicycles or similar objects may not be detected.
● In the situations shown below, the system may not be able to accurately
detect surrounding brightness levels. This may cause the low be ams to
remain on or the high beams to cause problems for pedestrians, vehicles
ahead or other parties. In these cases, manually switch between the high
and low beams.
• In bad weather (rain, snow, fog, sandstorms, etc.)
• The windshield is obscured by fog, mist, ice, dirt, etc.
• The windshield is cracked or damaged.
• The camera sensor is deformed or dirty.
• The camera sensor temperature is extremely high.
• Surrounding brightness levels are equal to those of headlights , tail lights
or fog lights.
• Vehicles ahead have headlights that are either switched off, d irty, are
changing color, or are not aimed properly.
• When driving through an area of intermittently changing brightness and
darkness.
• When frequently and repeatedly driving ascending/descending roads, or roads with rough, bumpy or uneven surfaces (such as stone-paved
roads, gravel tracks, etc.).
• When frequently and repeatedly taking curves or driving on a w inding
road.
• There is a highly reflective object ahead of the vehicle, such as a sign or a mirror.
• The back of a vehicle ahead is highly reflective, such as a co ntainer on a
truck.
• The vehicle’s headlights are damaged or dirty.
• The vehicle is listing or tilting, due to a flat tire, a trailer being towed etc.
• The high beam and low beam are repeatedly being switched betwe en in
an abnormal manner.
• The driver believes that the high beam may be causing problems or dis-
tress to other drivers or pedestrians nearby.
Page 219 of 696

2194-3. Operating the lights and wipers
4
Driving
■Temporarily lowering sensor sensitivity
The sensitivity of the sensor can be temporarily lowered.
Turn the engine switch to the “LOCK” position (vehicles without a smart key
system) or off (vehicles with a smart key system) while the fol lowing condi-
tions are met.
• The headlight switch is in or (if equipped).
• The headlight switch lever is in high beam position.
• Automatic High Beam switch is on.
Turn the engine switch to the “ON” position (vehicles without a smart key
system) or IGNITION ON mode (vehicles with a smart key system).
Within 30 seconds after , repeat pulling the headlight switch lever to the
original position then pushing it to the high beam position qui ckly 10 times,
then leave the lever in high beam position.
If the sensitivity is changed, the Automatic High Beam indicato r is turn on
and off 3 times.
Automatic High Beam (headlights) may turn on even the vehicle i s stopped.
■ If “Headlight System Malfunction. Visit Your Dealer.” is displayed on the
multi-information display
The system may be malfunctioning. Have the vehicle inspected by your
Toyota dealer.
1
2
32
4