bulb TOYOTA tC 2015 Owners Manual (in English)
[x] Cancel search | Manufacturer: TOYOTA, Model Year: 2015, Model line: tC, Model: TOYOTA tC 2015Pages: 492, PDF Size: 9.55 MB
Page 4 of 492

TABLE OF CONTENTSIndex
4
tC_OM_OM21054U_(U)
4-1. Maintenance and careCleaning and protecting the vehicle exterior ........... 274
Cleaning and protecting the vehicle interior ............ 278
4-2. Maintenance Maintenance requirements .................... 281
General maintenance ......... 284
Emission inspection and maintenance (I/M)
programs .......................... 288
4-3. Do-it-yourself maintenance Do-it-yourself service precautions ...................... 289
Hood................................... 294
Positioning a floor jack ....... 296
Engine compartment .......... 298
Tires ................................... 314
Tire inflation pressure......... 325
Wheels ............................... 329
Wireless remote control/ electronic key battery ....... 332
Checking and replacing fuses ................. 338
Light bulbs .......................... 349 5-1. Essential information
Emergency flashers ............ 362
If your vehicle needs to be towed ........................... 363
If you think something is wrong ............................ 372
Fuel pump shut off system .............................. 373
5-2. Steps to take in an emergency If a warning light turns on or a warning buzzer
sounds... .......................... 374
If you have a flat tire ........... 392
If the engine will not start .................................. 406
If the shift lever cannot be shifted from P (automatic
transmission) .................... 409
If you lose your keys ........... 410
If the electronic key does not operate properly ......... 411
If the vehicle battery is discharged .................... 415
If your vehicle overheats..... 419
If the vehicle becomes stuck ................................. 422
If your vehicle has to be stopped in an
emergency........................ 424
4Maintenance and care5When trouble arises
Page 187 of 492
187
2-1. Driving procedures
2
When driving
tC_OM_OM21054U_(U)
Tur n signal lever
■Turn signals can be operated when
Vehicles without a smart key system
The engine switch is in the “ON” position.
Vehicles with a smart key system
The “ENGINE START STOP” switch is in IGNITION ON mode.
■ If the indicator flashes faster than usual
Check that a light bulb in the front or rear turn signal lights has not burned
out.
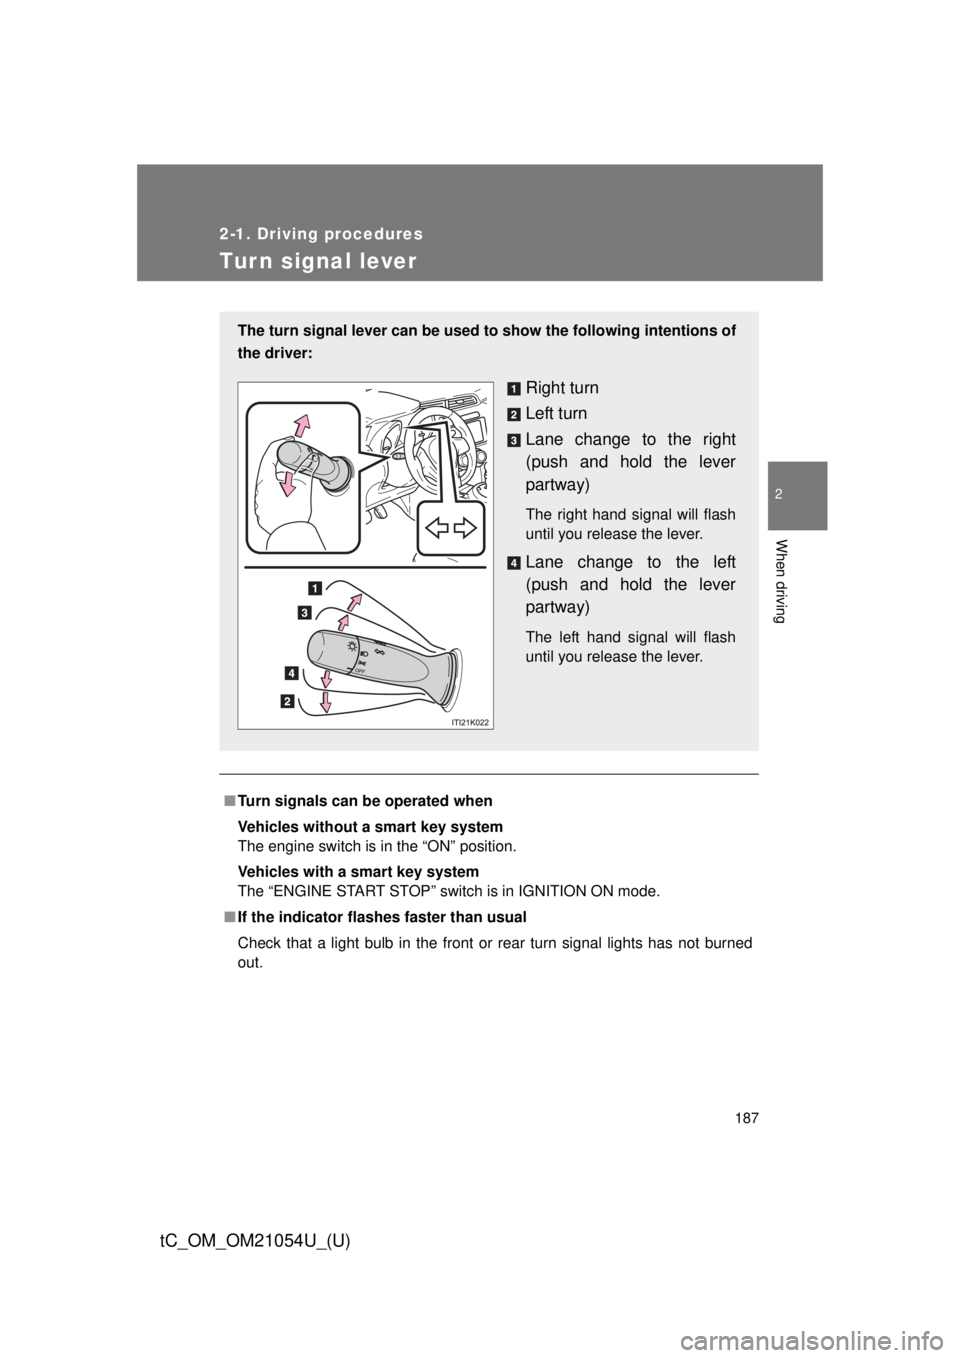
The turn signal lever can be used to show the following intentions of
the driver:
Right turn
Left turn
Lane change to the right
(push and hold the lever
partway)
The right hand signal will flash
until you release the lever.
Lane change to the left
(push and hold the lever
partway)
The left hand signal will flash
until you release the lever.
Page 273 of 492
Maintenance and care4
273
tC_OM_OM21054U_(U)
4-1. Maintenance and careCleaning and protecting the vehicle exterior......... 274
Cleaning and protecting the vehicle interior.......... 278 4-2. Maintenance
Maintenance requirements .................. 281
General maintenance....... 284
Emission inspection and maintenance (I/M)
programs........................ 288
4-3. Do-it-yourself maintenance Do-it-yourself service precautions .................... 289
Hood ................................ 294
Positioning a floor jack ..... 296
Engine compartment ........ 298
Tires ................................. 314
Tire inflation pressure ...... 325
Wheels ............................. 329
Wireless remote control/ electronic key battery ..... 332
Checking and replacing fuses ............... 338
Light bulbs........................ 349
Page 291 of 492
291
4-3. Do-it-yourself maintenance
4
Maintenance and care
tC_OM_OM21054U_(U)
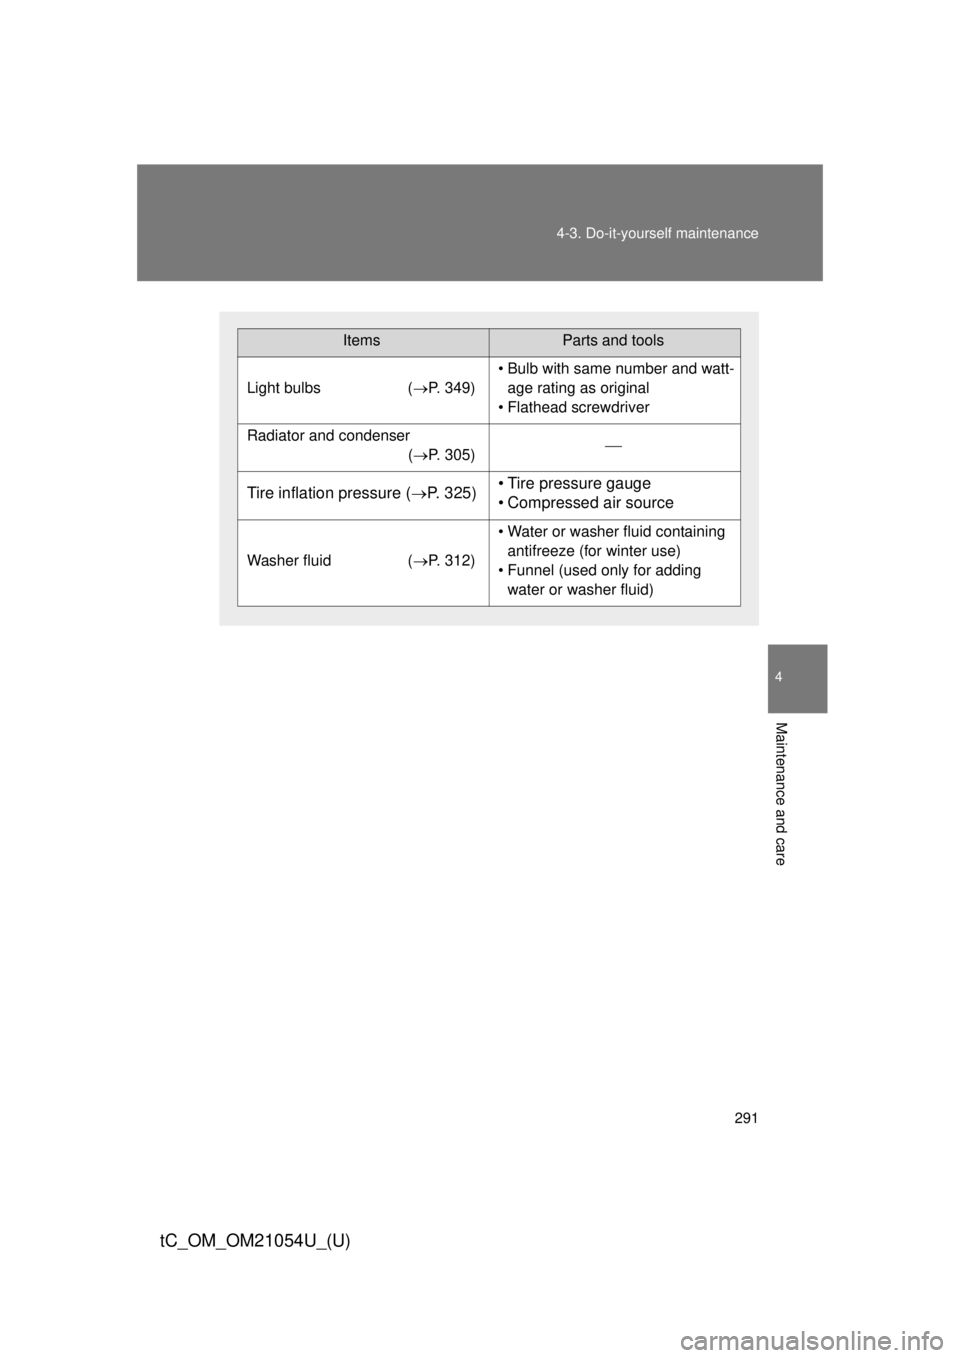
ItemsParts and tools
Light bulbs
(P. 349)
• Bulb with same number and watt-
age rating as original
• Flathead screwdriver
Radiator and condenser (P. 305)
Tire inflation pressure ( P. 325)• Tire pressure gauge
• Compressed air source
Washer fluid (P. 312)
• Water or washer fluid containing
antifreeze (for winter use)
• Funnel (used only for adding water or washer fluid)
Page 348 of 492

348 4-3. Do-it-yourself maintenance
tC_OM_OM21054U_(U)
■After a fuse is replaced
●If the lights do not turn on even after the fuse has been replaced, a bulb
may need replacement. ( P. 349)
● If the replaced fuse blows again, have the vehicle inspected by your
Scion dealer.
■ If there is an overload in the circuits
The fuses are designed to blow, protecting the wiring harness from damage.
CAUTION
■To prevent system breakdowns and vehicle fire
Observe the following precautions.
Failing to do so may cause damage to the vehicle, and possibly a fire or
injury.
●Never use a fuse of a higher amperage rating than that indicated, or use
any other object in place of a fuse.
● Always use a genuine Scion fuse or equivalent.
Never replace a fuse with a wire, even as a temporary fix.
● Do not modify the fuse or the fuse box.
NOTICE
■Before replacing fuses
Have the cause of electrical overload determined and repaired by your Scion
dealer, as soon as possible.
Page 349 of 492
349
4-3. Do-it-yourself maintenance
4
Maintenance and care
tC_OM_OM21054U_(U)
Light bulbs
You may replace the following bulbs by yourself. The difficulty level
of replacement varies depending on the bulb. If necessary bulb
replacement seems difficult to perf orm, contact your Scion dealer.
For more information about replacing other light bulbs, contact your
Scion dealer.
■ Preparing for light bulb replacement
Check the wattage of the light bulb to be replaced. ( P. 438)
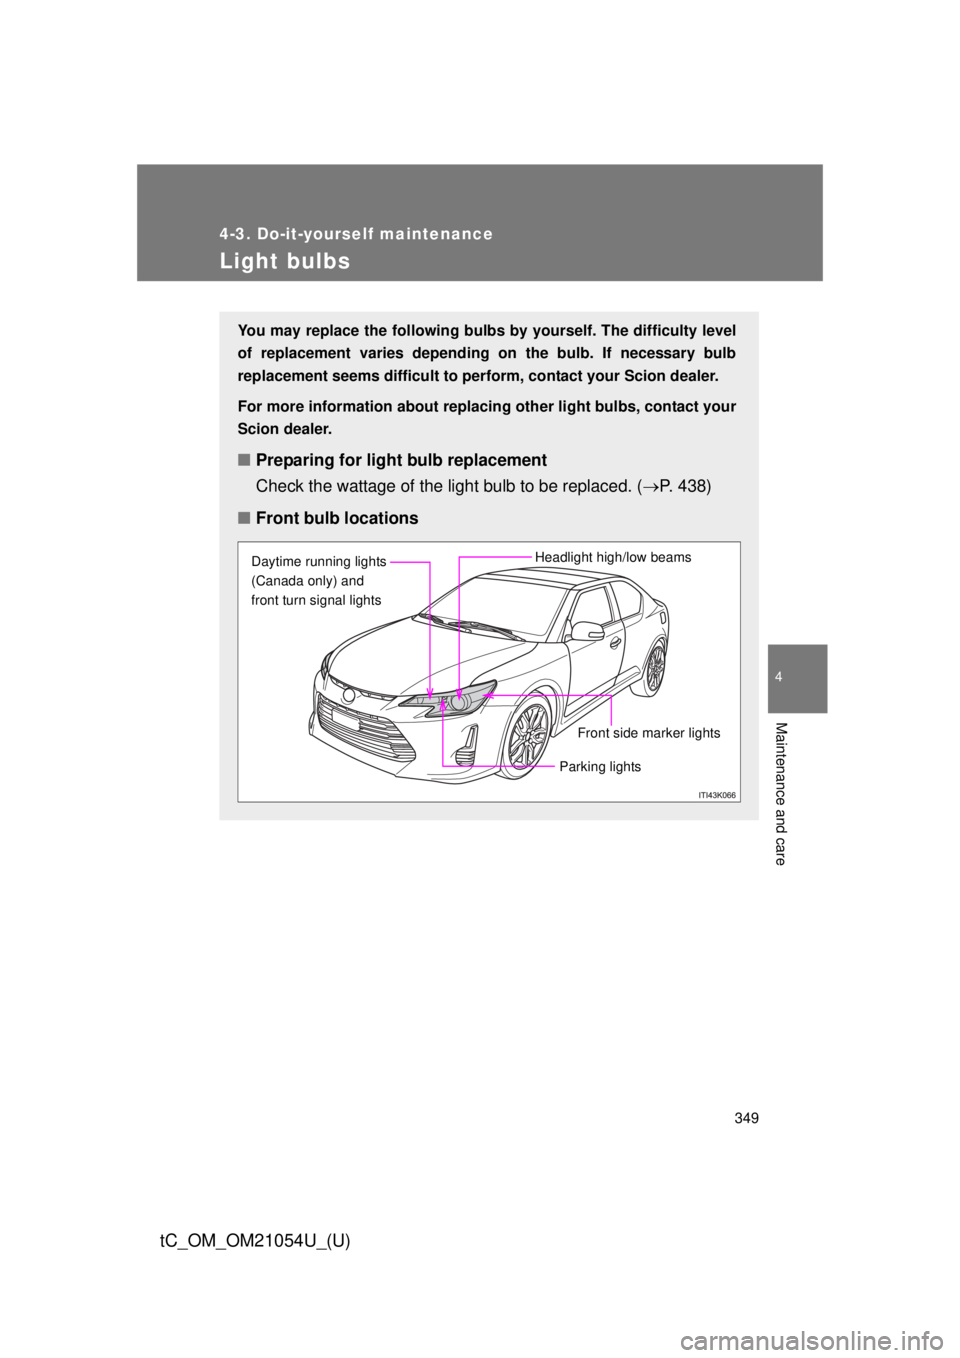
■ Front bulb locations
Front side marker lights
Headlight high/low beams
Daytime running lights
(Canada only) and
front turn signal lights
Parking lights
Page 350 of 492
350 4-3. Do-it-yourself maintenance
tC_OM_OM21054U_(U)
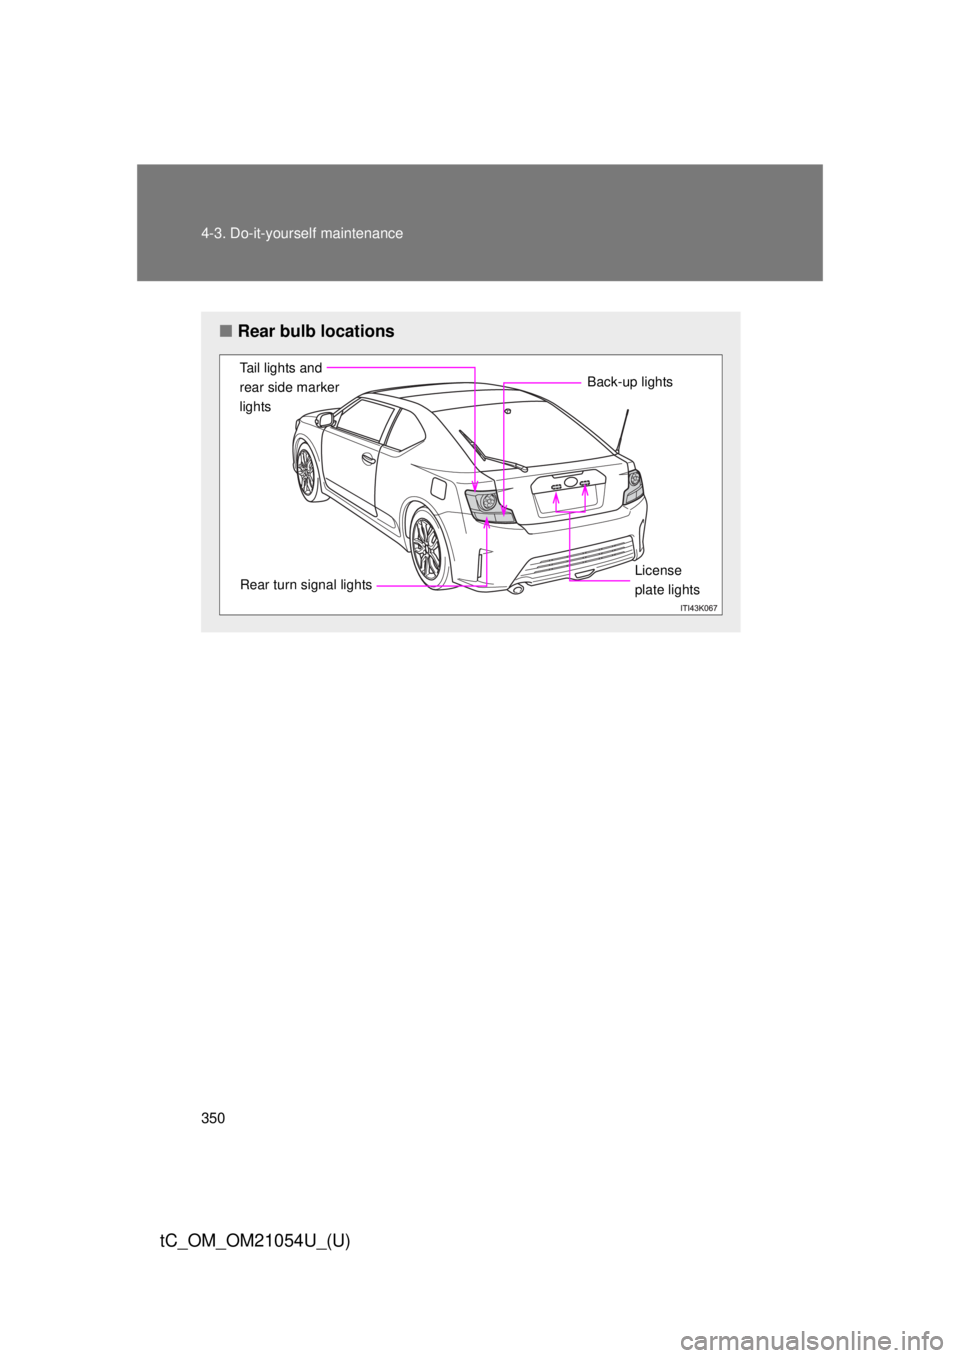
■Rear bulb locations
Tail lights and
rear side marker
lights
Rear turn signal lights Back-up lightsLicense
plate lights
Page 351 of 492
351
4-3. Do-it-yourself maintenance
4
Maintenance and care
tC_OM_OM21054U_(U)
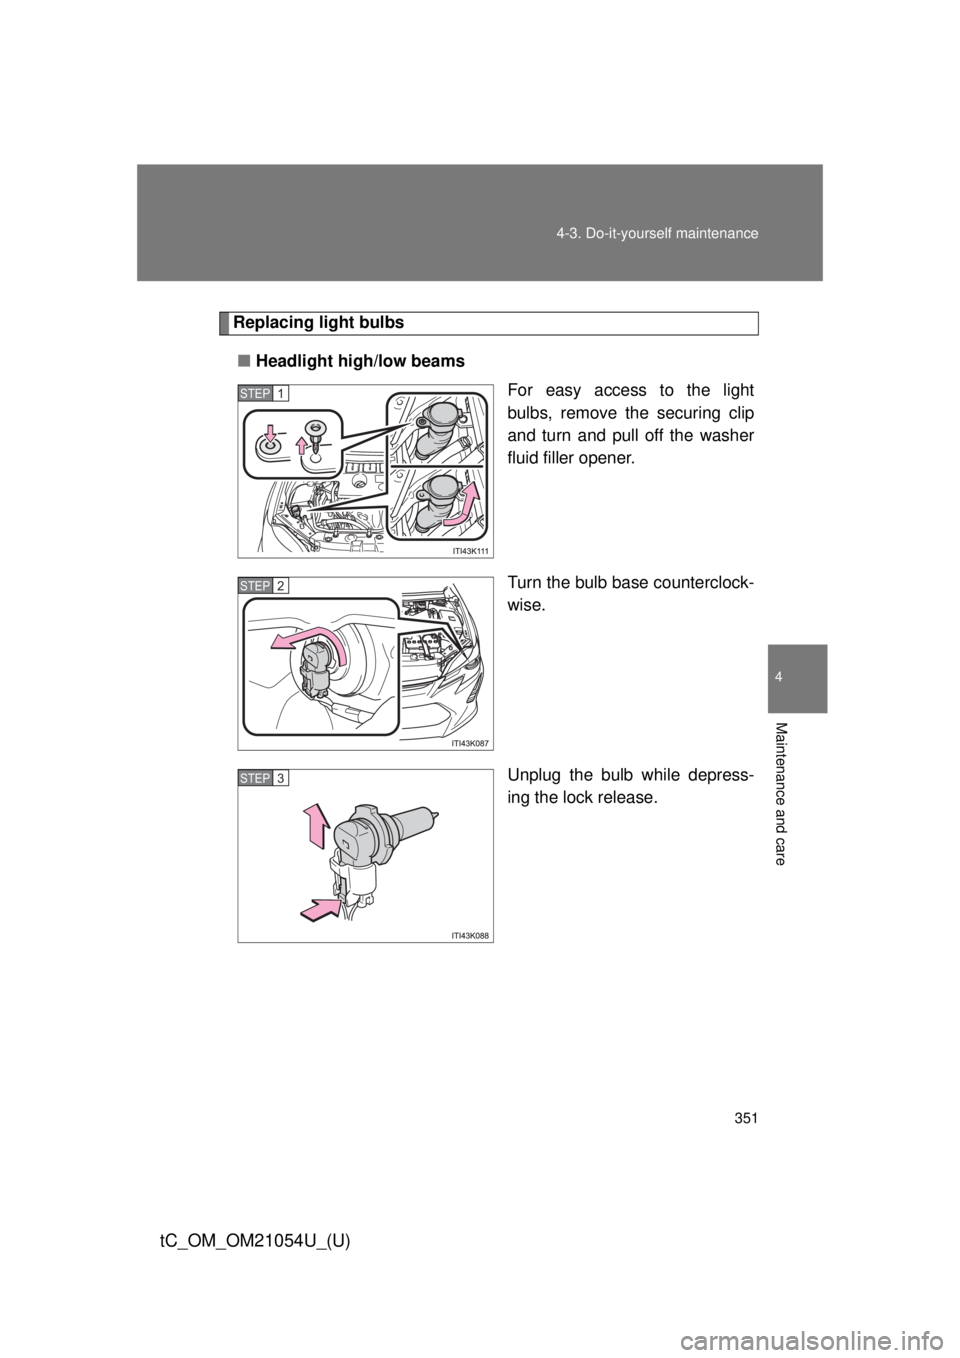
Replacing light bulbs
■ Headlight high/low beams
For easy access to the light
bulbs, remove the securing clip
and turn and pull off the washer
fluid filler opener.
Turn the bulb base counterclock-
wise.
Unplug the bulb while depress-
ing the lock release.
STEP 1
STEP 2
STEP 3
Page 352 of 492
352 4-3. Do-it-yourself maintenance
tC_OM_OM21054U_(U)
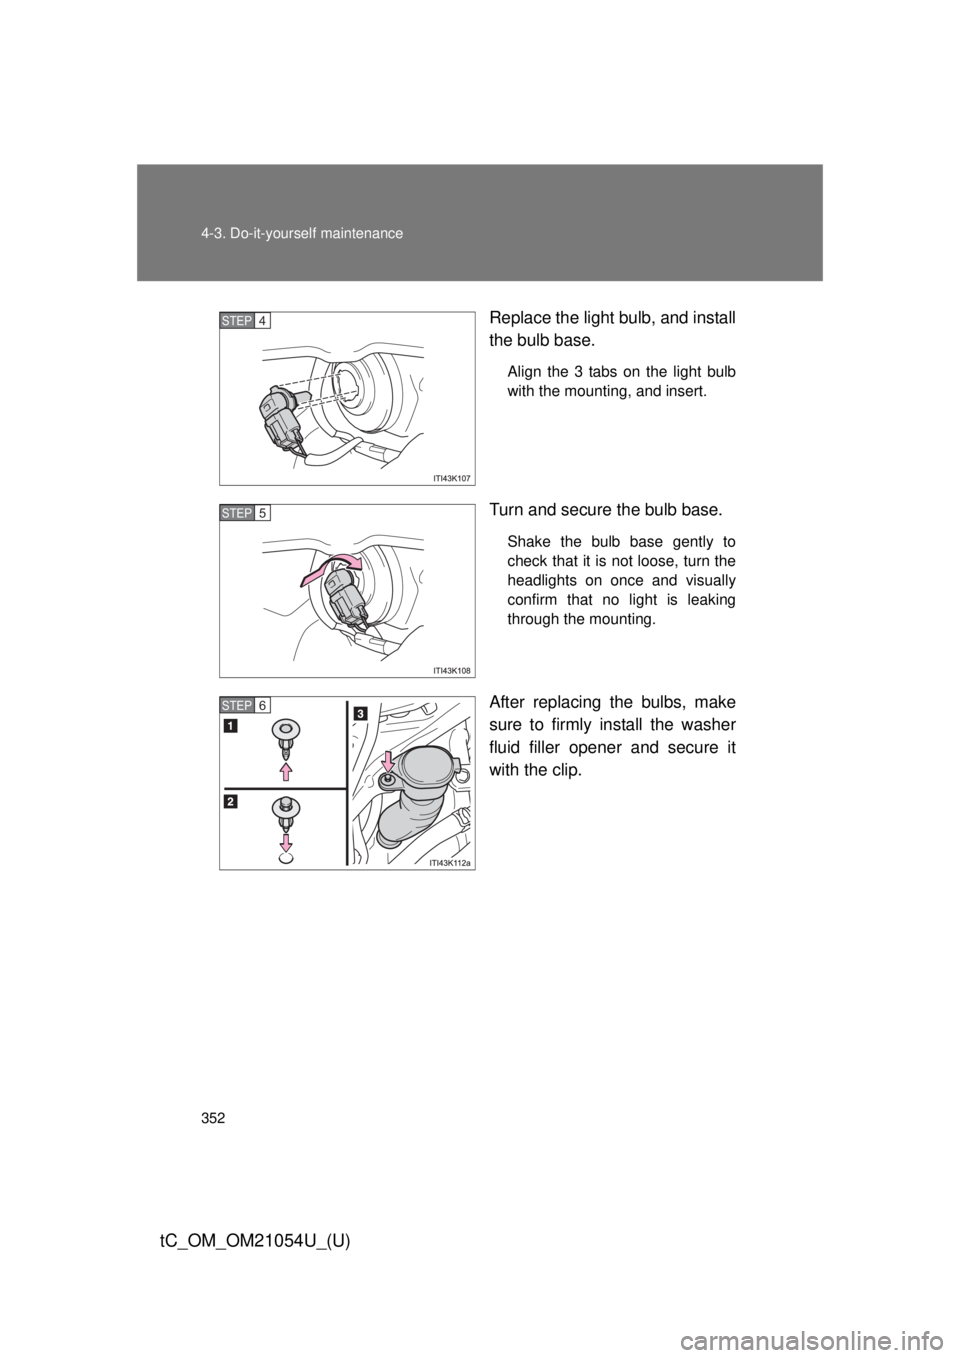
Replace the light bulb, and install
the bulb base.
Align the 3 tabs on the light bulb
with the mounting, and insert.
Turn and secure the bulb base.
Shake the bulb base gently to
check that it is not loose, turn the
headlights on once and visually
confirm that no light is leaking
through the mounting.
After replacing the bulbs, make
sure to firmly install the washer
fluid filler opener and secure it
with the clip.
STEP 4
STEP 5
STEP 6
Page 353 of 492
353
4-3. Do-it-yourself maintenance
4
Maintenance and care
tC_OM_OM21054U_(U)
■
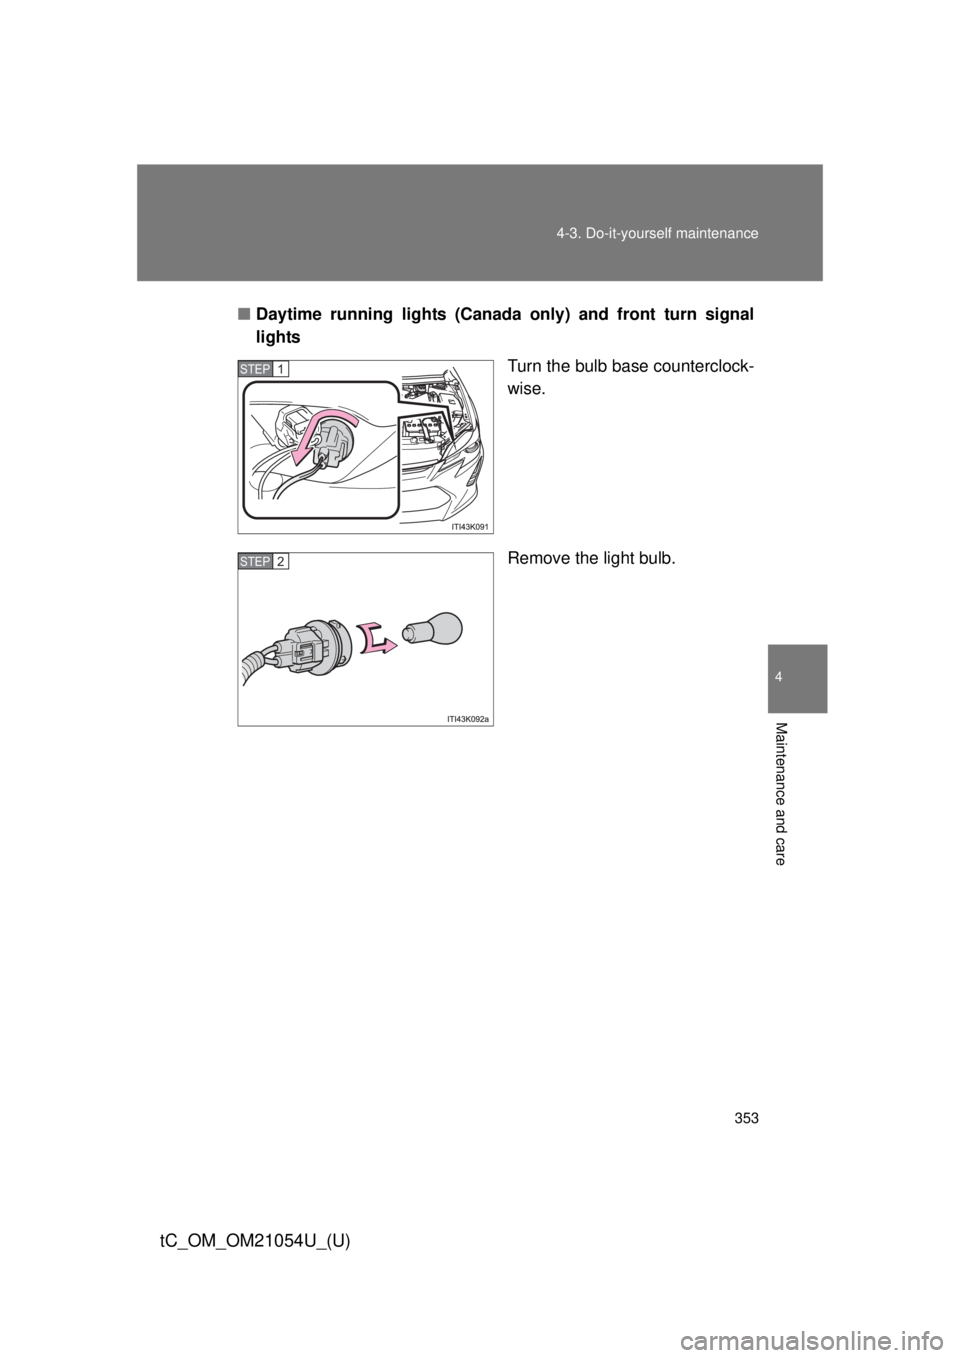
Daytime running lights (Canada only) and front turn signal
lights
Turn the bulb base counterclock-
wise.
Remove the light bulb.
STEP 1
STEP 2