ABS TOYOTA TERCEL 1985 Repair Manual
[x] Cancel search | Manufacturer: TOYOTA, Model Year: 1985, Model line: TERCEL, Model: TOYOTA TERCEL 1985Pages: 885, PDF Size: 64.52 MB
Page 481 of 885
FA.1
FRONT AXLE AND
SUSPENSION
TROUBLESHOOTING
FRONT WHEEL ALIGNMENT
AXLE HUB
FRONT DRIVE SHAFT
FRONT SHOCK ABSORBER
FRONT SUSPENSION
Ball Joints
Lower Arm
Stabilizer Bar
Page
FA-2
FA.3
FA.23
FA-24
FA-7
FA.13
F4.19
FA-23
F4.27
Page 482 of 885
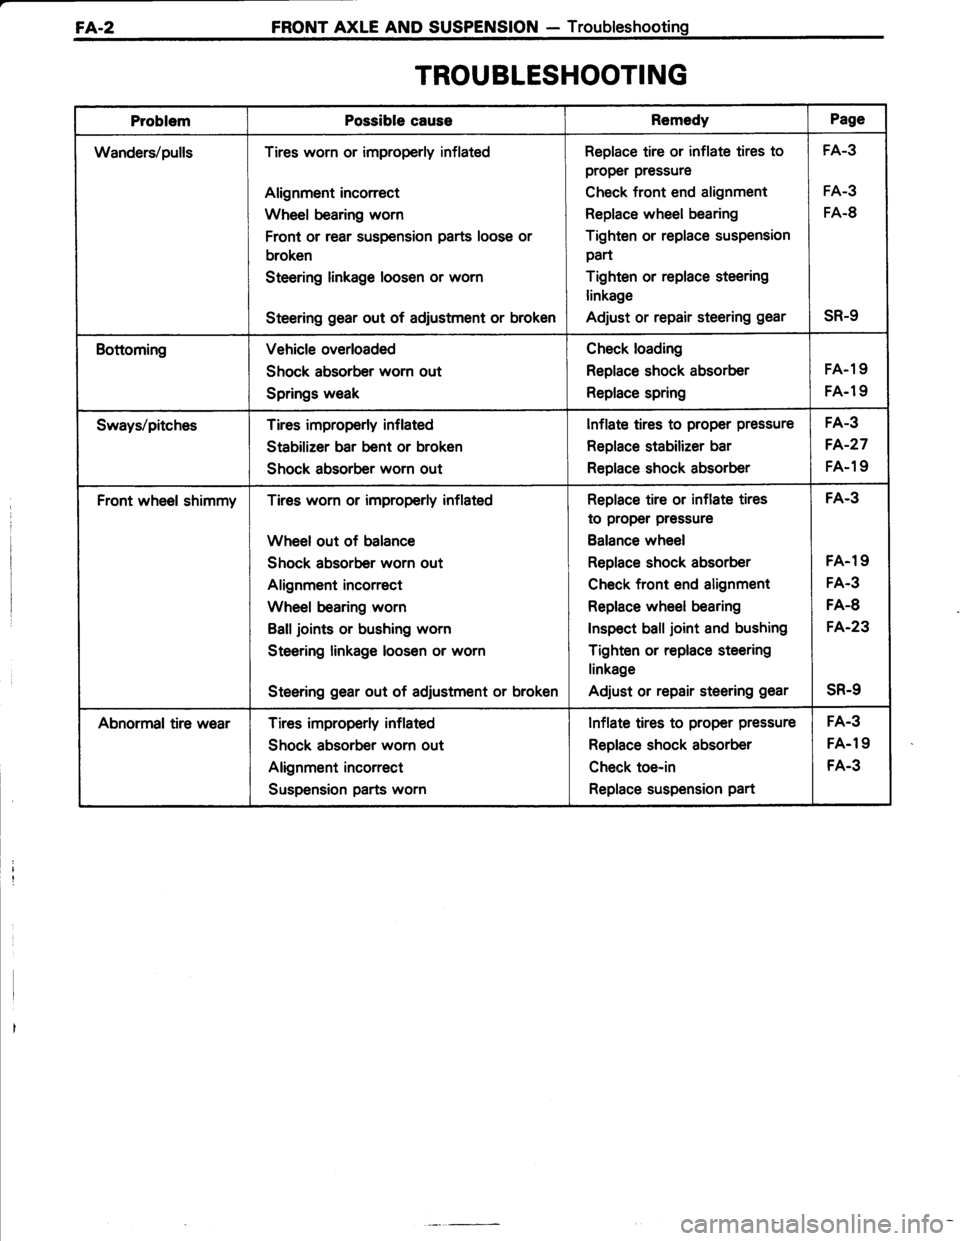
FA.2FRONT AXLE AND SUSPENSION - Troubleshooting
TROUBLESHOOTING
ProblemPossible caussRemedyPage
Wanders/pullsTires worn or improperly inflated
Alignment incorrect
Wheel bearing worn
Front or rear suspension parts loose or
broken
Steering linkage loosen or worn
Steering gear out of adjustment or broken
Replace tire or inflate tires to
proper pressure
Check front end alignment
Replace wheel bearing
Tighten or replace suspension
part
Tighten or replace steering
linkage
Adjust or repair steering gear
FA-3
FA-3
FA.8
sR-9
BottomingVehicle overloaded
Shock absorber worn out
Springs weak
Check loading
Replace shock absorber
Replace spring
FA.19
FA.l9
Sways/pitchesTires improperly inflated
Stabilizer bar bent or broken
Shock absorber worn out
lnflate tires to proper pressure
Replace stabilizer bar
Replace shock absorber
FA-3
FA-27
FA-19
Front wheel shimmyTires worn or improperly inflated
Wheel out of balance
Shock absorber worn out
Alignment incorrect
Wheel bearing worn
Balljoints or bushing worn
Steering linkage loosen or worn
Steering gear out of adjustment or broken
Replace tire or inflate tires
to proper pressure
Balance wheel
Replace shock absorber
Check front end alignment
Replace wheel bearing
Inspect ball joint and bushing
Tighten or replace steering
linkage
Adjust or repair steering gear
FA-3
FA-19
FA.3
FA-8
FA.23
sR-9
Abnormal tire wearTires improperly inflated
Shock absorber worn out
Alignment incorrect
Suspension parts worn
Inflate tires to proper pressure
Replace shock absorber
Check toe-in
Replace suspension part
FA.3
FA-19
FA.3
Page 483 of 885
FRONT AXLE AND SUSPENSION - Front Wheel AlignmentFA-3
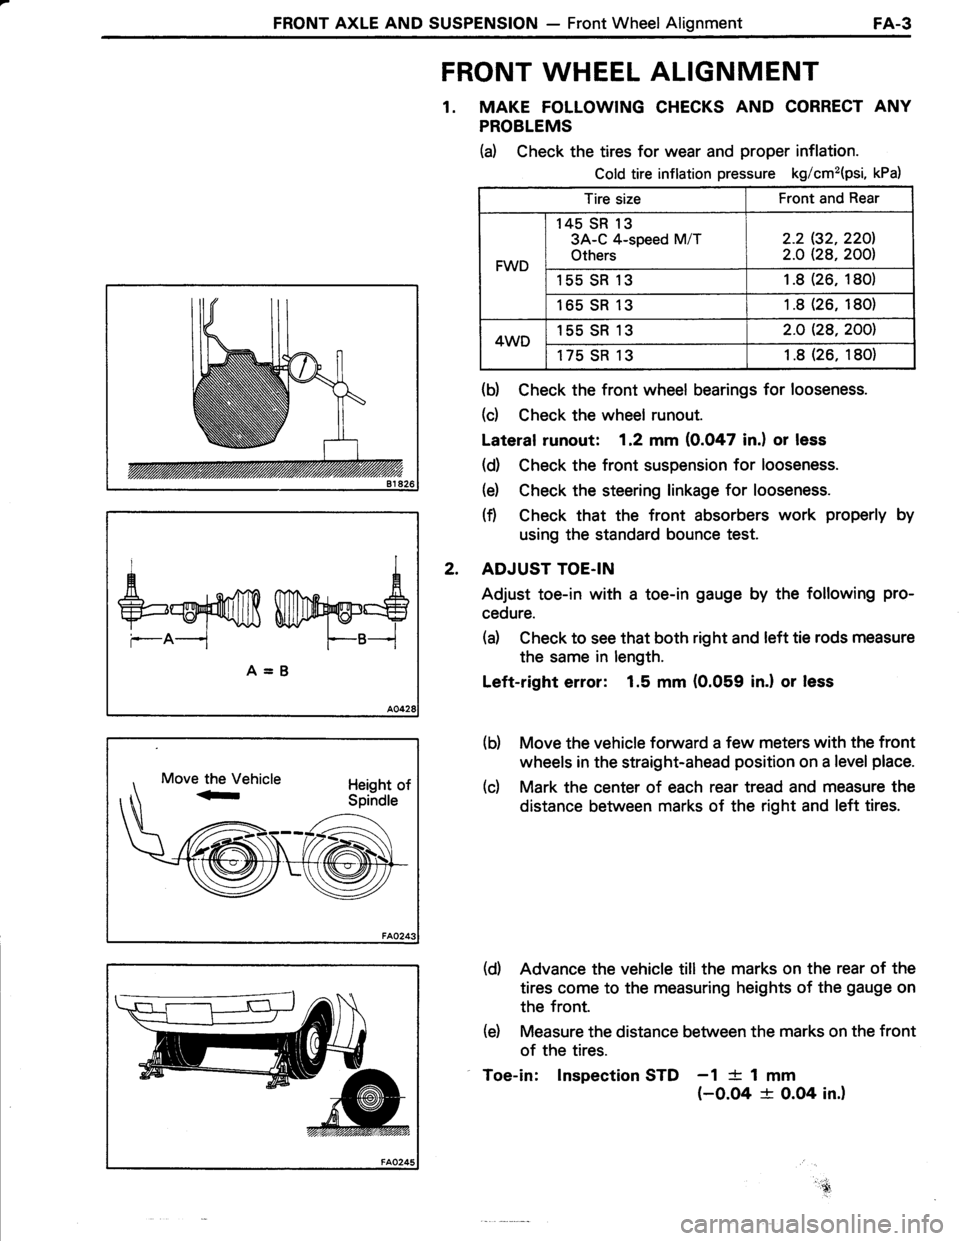
FRONT WHEEL ALIGNMENT
1. MAKE FOLLOWING CHECKS AND CORRECT ANY
PROBLEMS
(d Check the tires for wear and proper inflation.
Cold tire inflation pressure kg/cm2(psi, kPa)
Tire sizeFront and Rear
FWD
145 SR 13
3A-C 4-speed M/T
Others
2.2 (32.220l.
2.O Q8,2001
155 SR 131.8(26. 180)
165 SR131 .8 (26, 180)
4WD155 SR 132.O Q8,2001
175 SR 131 .8 (26. 180)
(b) Check the front wheel bearings for looseness.
(d Check the wheel runout.
Lateral runout: 1.2 mm (0.047 in.) or less
(d) Check the front suspension for looseness.
(e) Check the steering linkage for looseness.
(f) Check that the front absorbers work properly by
using the standard bounce test.
ADJUST TOE.IN
Adjust toe-in with a toe-in gauge by the following pro-
cedure.
(d Check to see that both right and left tie rods measure
the same in length.
Left-right error: 1.5 mm (0.059 in.l or less
Move the vehicle forward a few meters with the front
wheels in the straight-ahead position on a level place.
Mark the center of each rear tread and measure the
distance between marks of the right and left tires.
(d) Advance the vehicle till the marks on the rear of the
tires come to the measuring heights of the gauge on
the front.
(e) Measure the distance between the marks on the front
of the tires.
Toe-in: lnspection STD -1 {- 1 mm(-0.O4 + O.O4 in.)
AA
+=ruf,ffi Wry@=S
--A-- F--B--i
A=B
2.
(b)
(c)
!,.-!'ru,
Page 485 of 885
FRONT AXLE AND SUSPENSION - Front Wheel AlignmentFA-5
Front Rear (FWDI
Rear (4WD)
More Camber
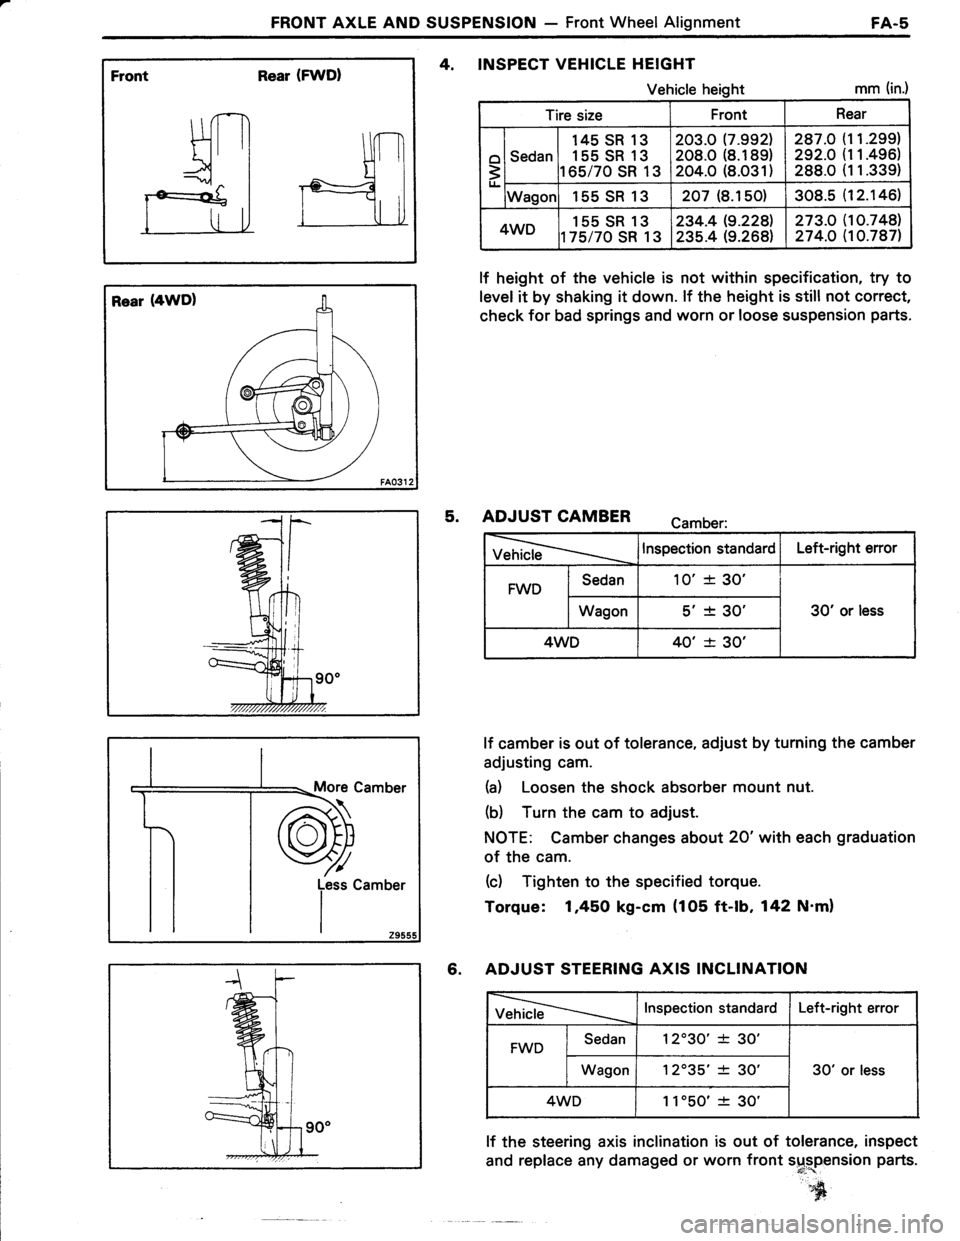
4, INSPECT VEHICLE HEIGHT
Vehicle heightmm (in.)
lf height of the vehicle is not within specification, try to
level it by shaking it down. lf the height is still not correct,
check for bad springs and worn or loose suspension parts.
5. ADJUST CAMBER camber:
VehicleInspection standardLeft-right error
FWDSedan10'+ 30'
30' or lessWagons'� + 30'�
4WD40' -t- 30'
lf camber is out of tolerance, adjust by turning the camber
adjusting cam.
(a) Loosen the shock absorber mount nut.
(b) Turn the cam to adjust.
NOTE: Camber changes about 20'with each graduation
of the cam.
(c) Tighten to the specified torque.
Torque: 1,45O kg-cm {105 ft-lb, 142 N'm)
6. ADJUST STEERING AXIS INCLINATION
VehicleInspection standardLeft-right error
FWDSedan12'30'�* 30'
30' or lessWagon12035'�+ 30'�
4WD1 1'50'� -t- 30'
lf the steering axis inclination is out of tolerance, inspect
and replace any damaged or worn front s$rplnsion parts.
s[
Tire sizeFrontRear
o
3
Sedan
145 SR 13
155 SR 13
165/70 SR 13
203.0 17.9921208.0 (8.189)
204.0 (8.O31)
287.O
292.O
288.0
1 1.299)
11.496)
1 1.339)
Wagor155SR13207 (8.150)308.512.146l.
4WD155 SR 13
t75/70 SR 13
234.419.2281
235.4 (9.268)273.O274.O
10.748)10.787)
Page 488 of 885
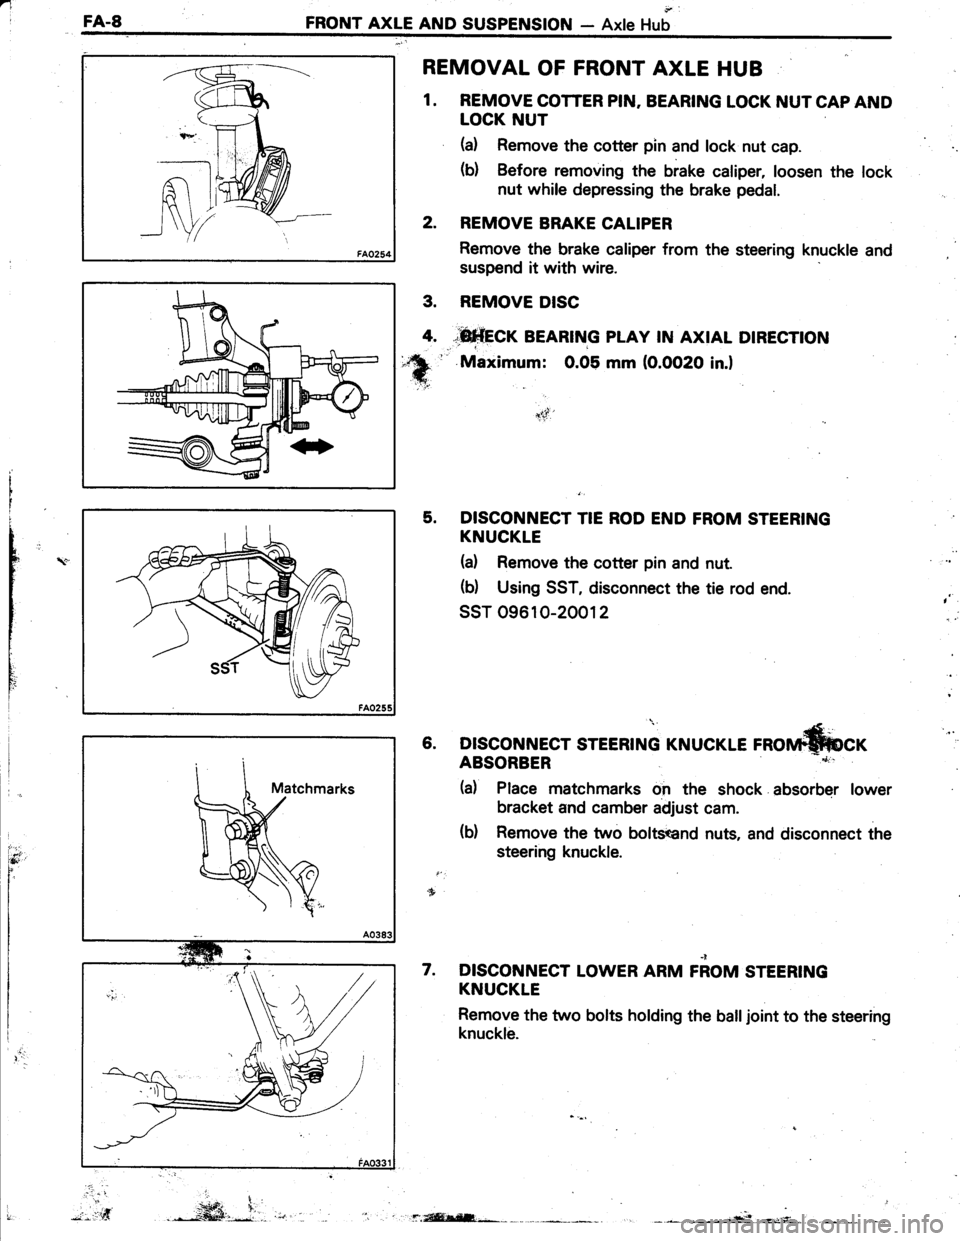
nIFA.8FRONT AXLE AND SUSPENSION- Axle Hub
REMOVAL OF FRONT AXLE HUB
1. REMOVE COTTER PIN. BEARING LOCK NUT CAP AND
LOCK NUT
(a) Remove the cotter pin and lock nut cap.
(b) Before removing the brake caliper, loosen the lock
nut while depressing the brake pedal.
2. REMOVE BRAKE CALIPER
Remove the brake caliper from the steering knuckle and
suspend it with wire.
REMOVE DISC
*fi*frcr BEARTNG pLAy rN AxtAL DtREcnoN
'' Maximum: 0.05 mm (O.OO2O in.l
5. DISCONNECT TIE ROD END FROM STEERING
KNUCKLE
(d Remove the cotter pin and nut.
(b) Using SST, disconnect the tie rod end.
ssT 09610-20012
(Le rnorrn*fucr6. DISCONNECT STEERING KNUCI
nC
t
rY
I
ItI
Ili
,
)t-5f'
ABSORBER
(d Place matchmarks on the shock absorber lower
bracket and camber adjust cam.
(b) Remove the two boltsend nuts, and disconnect the
steering knuckle.
DISCONNECT LOWER ARM FiOM STEERING
KNUCKLE
Remove the two bolts holding the balljoint to the steering
knuckle.
7.
.. ...t
3.
4.
".-*ffi,i.,.*f.isEl;-*r: .
Page 491 of 885
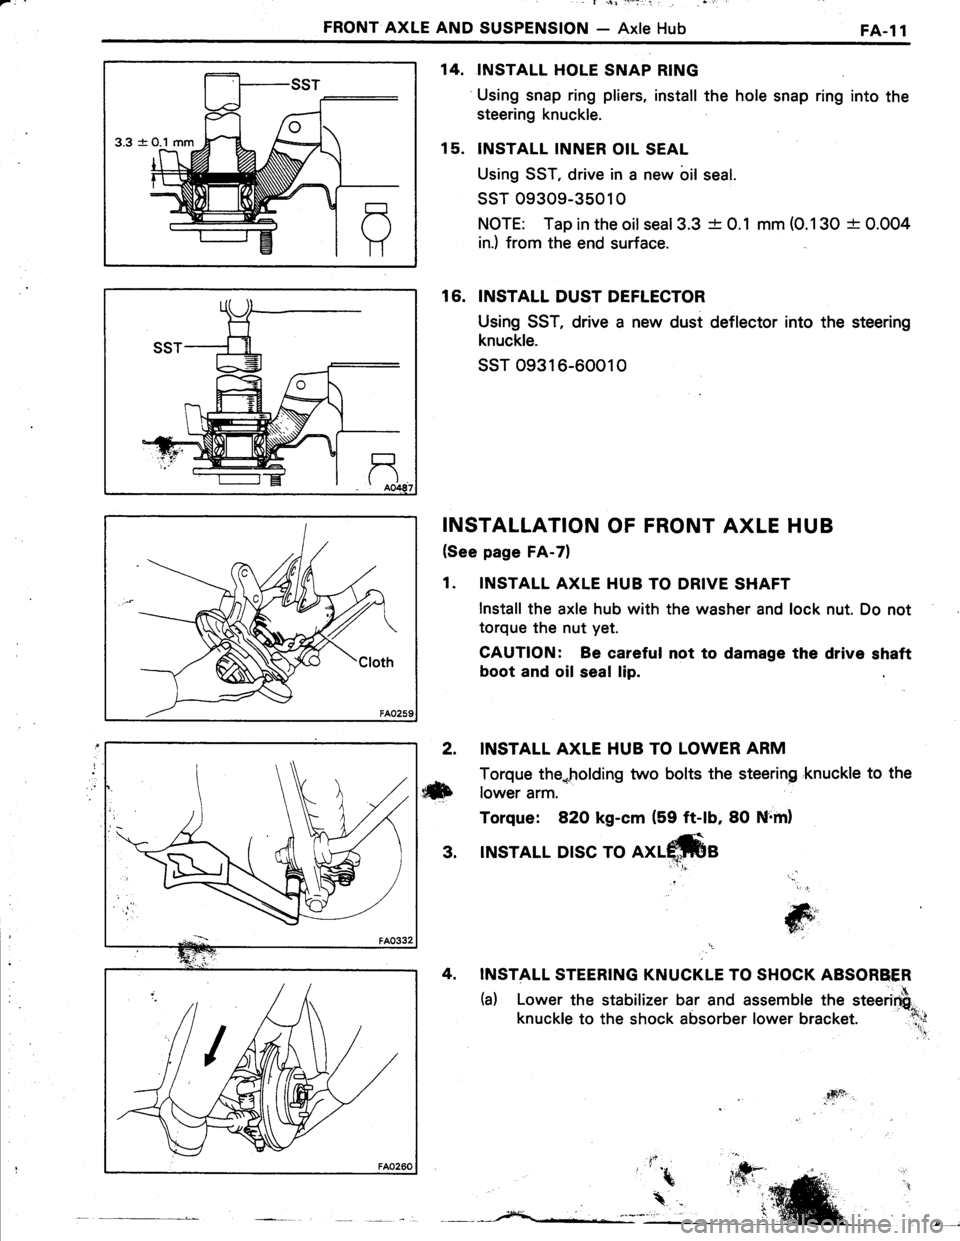
_ l +l i'-:r': : '
FRONT AXLE AND SUSPENSION - Axle HubFA-l1
3.3 -+
INSTALL HOLE SNAP RING
Using snap ring pliers, install the hole snap ring into the
steering knuckle.
INSTALL INNER OIL SEAL
Using SST, drive in a new bil seal.
ssT 09309-35010
NOTE: Tap in the oilseal3.3 -t- 0.1 mm (O.130 + 0.004
in.) from the end surface.
16. INSTALL DUST DEFLECTOR
Using SST, drive a new dust deflector into the steering
knuckle.
ssT o9316-60010
INSTALLATION OF FRONT AXLE HUB
(See page FA-7)
1. INSTALL AXLE HUB TO DRIVE SHAFT
lnstall the axle hub with the washer and lock nut. Do not
torque the nut yet.
CAUTION: Be careful not to damage the drive shaft
boot and oil seal lip.
14.
15.
2. INSTALL AXLE HUB TO LOWER ARM
Torque the*holding two bolts the steering 'knuckle to the
ilxb rower arm.
Torque: 82O kg-cm (59 ft-lb, 80 Nrml
3. INSTALL DISC TO
INSTALL STEERING KNUCKLE TO SHOCK ABSORBER
(a) Lower the stabilizer bar and assemble the steerirfi"
knuckle to the shock absorber lower bracket. :l;;
'' .!
jG;','
T6i'
4sft
Page 493 of 885
![TOYOTA TERCEL 1985 Repair Manual FRONT AXLE AND SUSPENSION - Front Drive ShaftFA.13
FRONT DRIVE SHAFT
REMOVAL OF FRONT DRIVE SHAFT
Shock Absorber
Stiffener Plate(Left Side Only)
ffi-:
\R---\x+.
Tie Rod End---€
lRgrcm ITi-|b,T.mi] : TOYOTA TERCEL 1985 Repair Manual FRONT AXLE AND SUSPENSION - Front Drive ShaftFA.13
FRONT DRIVE SHAFT
REMOVAL OF FRONT DRIVE SHAFT
Shock Absorber
Stiffener Plate(Left Side Only)
ffi-:
\R---\x+.
Tie Rod End---€
lRgrcm ITi-|b,T.mi] :](/img/14/57472/w960_57472-492.png)
FRONT AXLE AND SUSPENSION - Front Drive ShaftFA.13
FRONT DRIVE SHAFT
REMOVAL OF FRONT DRIVE SHAFT
Shock Absorber
Stiffener Plate(Left Side Only)
ffi-:
\R---\x+.
Tie Rod End---€
lRgrcm ITi-|b,T.mi] : Tishtening torque
O : Non-reusable part
Disc Brake Caliper
1.900 {137, 186}Lower Arm
.t.
1. REMOVE STEERING KNUCKE AND
AXLE HUB WITHOUT DISCONNECTING
LOWER ARM
(See step 1 to 6 and 8 on page FA-81
2. REMOVE FRONT DRIVE SHAFT
(a) Remove the stiffener plate from the transaxle as-
sembly and"engine (left side only).
(b) Using SST.and a hammer, tap out the front drive
shaft.
ssr 09648-16010
k
Page 499 of 885
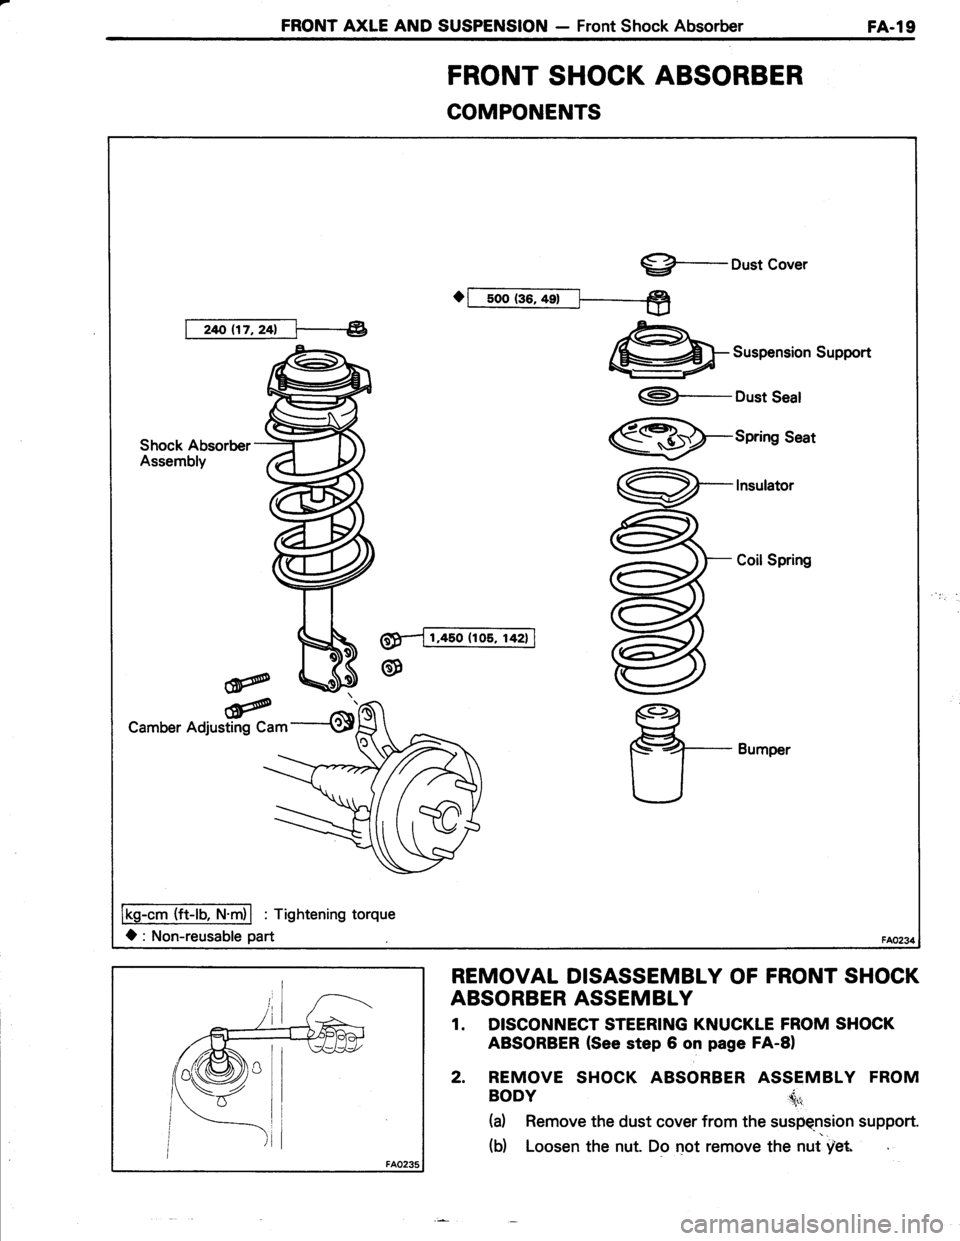
FRONT AXLE AND SUSPENSION - Front Shock AbsorberFA-l9
FRONT SHOCK ABSORBER
COMPONENTS
REMOVAL DISASSEMBLY OF FRONT SHOCK
ABSORBER ASSEMBLY
1. DISCONNECT STEERING KNUCKLE FROM SHOCK
ABSORBER (See step 6 on page FA-81
2. REMOVE SHOCK ABSORBER ASSEMBLY FROM
BODY ii.
(d Remove the dust cover from the suspqnsion support.
(b) Loosen the nut. Do not remove the nut yH"
$-Dust Cover
o@
g--ZA-r-a
/:A-F Suspension S upport
Ef
@-Dust Seat
@-sprinsseat
W
: Tightening torque
| : Non-reusable part
CoilSpring
(ft-lb. N.m)
Page 500 of 885
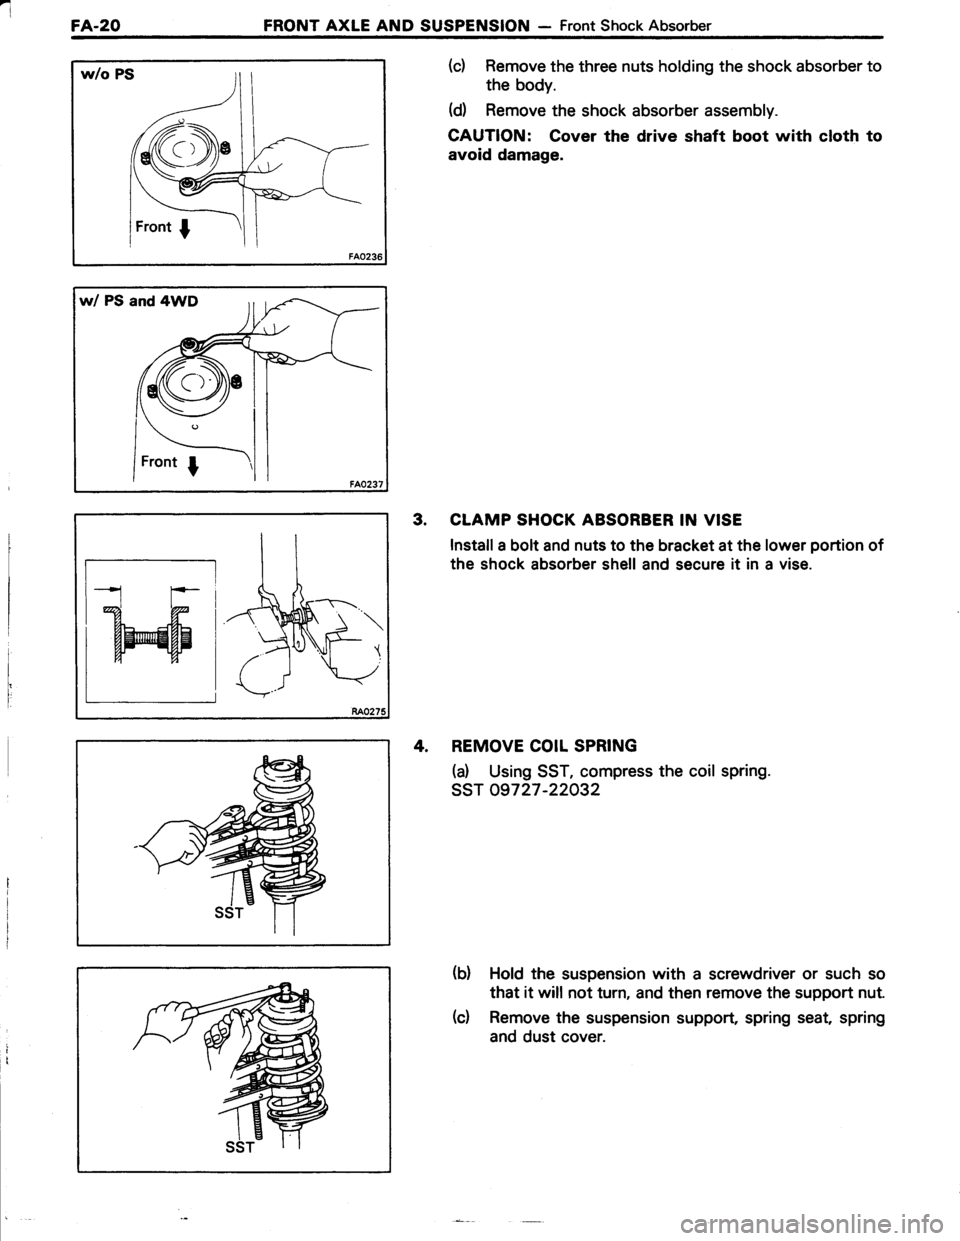
FA-20FRONT AXLE AND SUSPENSION - Front Shock Absorber
w/o PS
w/ PS and 4WD
(c) Remove the three nuts holding the shock absorber to
the body.
(d Remove the shock absorber assembly.
CAUTION: Cover the drive shaft boot with cloth to
avoid damage.
3. CLAMP SHOCK ABSORBER IN VISE
Install a bolt and nuts to the bracket at the lower portion of
the shock absorber shell and secure it in a vise.
4, REMOVE COIL SPRING
(d Using SST, compress the coil spring.
ssr 09727 -22032
(b) Hold the suspension with a screwdriver or such so
that it will not turn, and then remove the support nut.
(c) Remove the suspension support, spring seat, spring
and dust cover.
tr-;
W
Page 501 of 885
FRONT AXLE AND SUSPENSION - Front Shock AbsorberFA.21
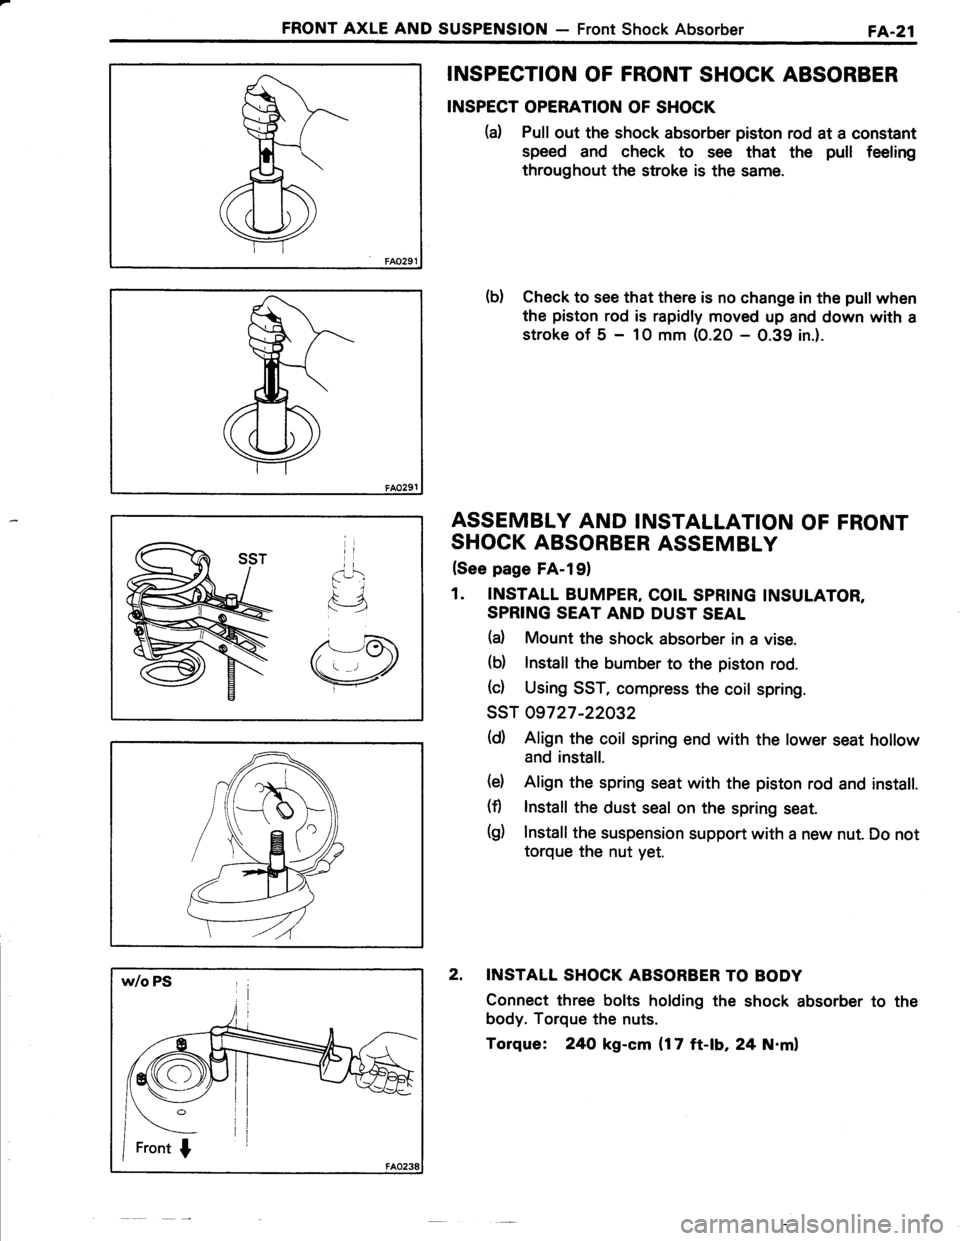
INSPECTION OF FRONT SHOCK ABSORBER
INSPECT OPERATION OF SHOCK
(d Pull out the shock absorber piston rod at a constant
speed and check to see that the pull feeling
throughout the stroke is the same.
b) Check to see that there is no change in the pull when
the piston rod is rapidly moved up and down with a
stroke of 5 - 1O mm (0.20 - 0.39 in.).
ASSEMBLY AND INSTALLATION OF FRONT
SHOCK ABSORBER ASSEMBLY
(See page FA-l91
1. INSTALL BUMPER, COIL SPRING INSULATOR,
SPRING SEAT AND DUST SEAL
(d Mount the shock absorber in a vise.
(b) lnstall the bumber to the piston rod.
(c) Using SST, compress the coil spring.
ssT 09727 -22032
(d) Align the coil spring end with the lower seat hollow
and install.
(d Align the spring seat with the piston rod and install.
(fl lnstall the dust seal on the spring seat.
(g) Install the suspension support with a new nut. Do not
torque the nut yet.
2. INSTALL SHOCK ABSORBER TO BODY
Connect three bolts holding the shock absorber to the
body. Torque the nuts.
Torque: 24O kg-cm {17 ft-lb, 24 N.ml