brake pads TOYOTA TERCEL 1985 Repair Manual
[x] Cancel search | Manufacturer: TOYOTA, Model Year: 1985, Model line: TERCEL, Model: TOYOTA TERCEL 1985Pages: 885, PDF Size: 64.52 MB
Page 561 of 885
BR-2BRAKE SYSTEM - Precautions, Troubleshooting
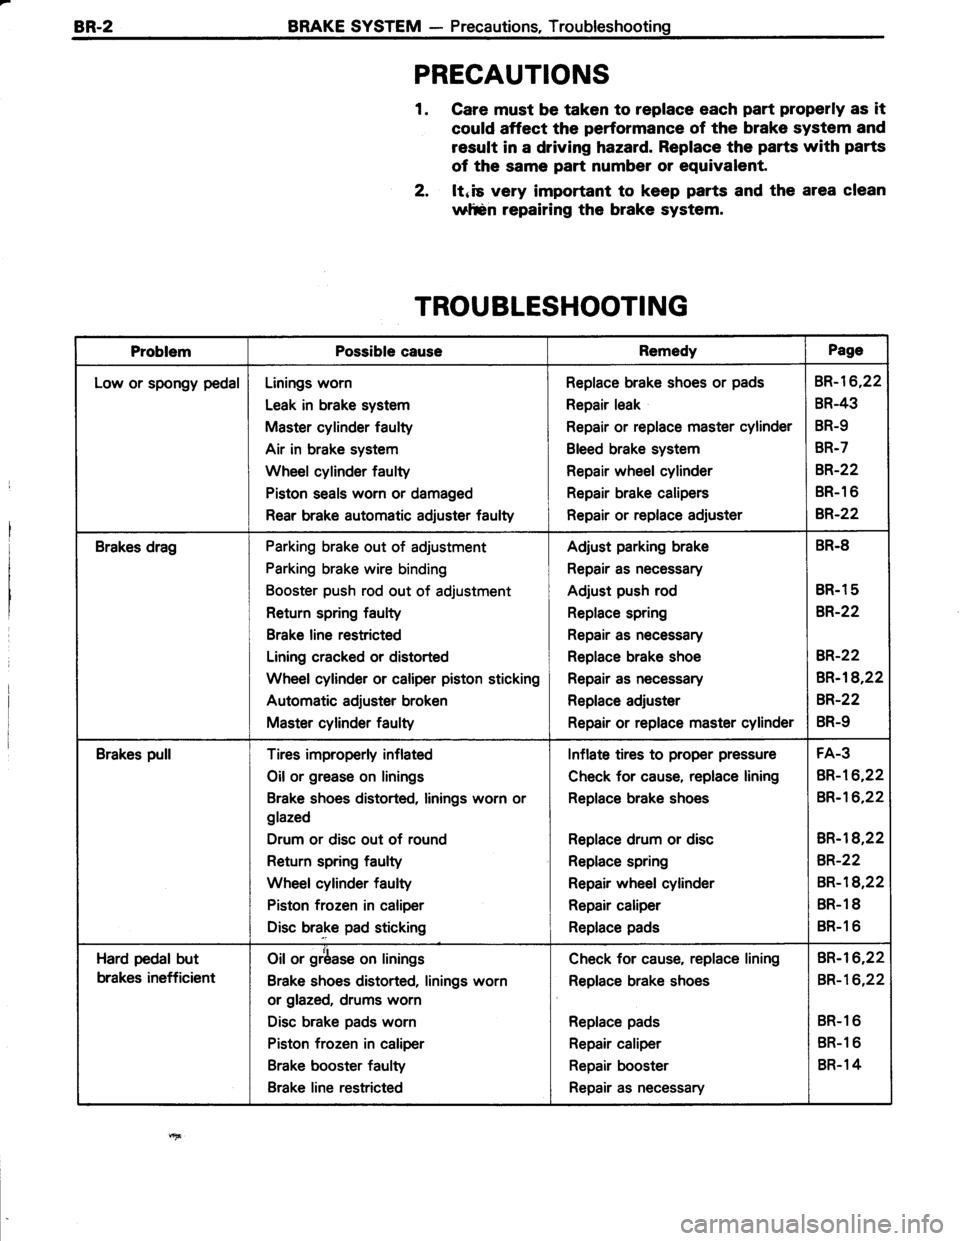
PRECAUTIONS
1. Care must be taken to replace each part properly as it
could affect the performance of the brake system and
result in a driving hazard. Replace the parts with parts
of the same part number or equivalent.
2, ltnis very important to keep parts and the area clean
wltsn repairing the brake system.
TROUBLESHOOTING
ProblemPossible causeRemedyPage
Low or spongy pedalLinings worn
Leak in brake system
Master cylinder faulty
Air in brake system
Wheel cylinder faulty
Piston seals worn or damaged
Rear brake automatic adiuster faulty
Replace brake shoes or pads
Repair leak
Repair or replace master cylinder
Bleed brake system
Repair wheel cylinder
Repair brake calipers
Repair or replace adjuster
BR-16,22
BR-43
BR-9
BR-7
8R.22
BR-1 6
B,R.22
Brakes dragParking brake out of adjustment
Parking brake wire binding
Booster push rod out of adjustment
Return spring faulty
Brake line restricted
Lining cracked or distorted
Wheel cylinder or caliper piston sticking
Automatic adjuster broken
Master cylinder faulty
Adjust parking brake
Repair as necessary
Adjust push rod
Replace spring
Repair as necessary
Replace brake shoe
Repair as necessary
Replace adjuster
Repair or replace master cylinder
BR.8
BR.1 5
BR-22
BR-22
BR-18,22
BR-22
BR-9
Brakes pullTires improperly inflated
Oil or grease on linings
Brake shoes distorted, linings worn or
glazed
Drum or disc out of round
Return spring faulty
Wheel cylinder faulty
Piston frozen in caliper
Disc brake pad sticking
Inflate tires to proper pressure
Check for cause, replace lining
Replace brake shoes
Replace drum or disc
Replace spring
Repair wheel cylinder
Repair caliper
Replace pads
FA-3
BR-16,22
BR-16,22
BR-l8,22
BR-22
BR-18,22
BR.1 8
BR-1 6
Hard pedal but
brakes inefficient
Oil or grbase on linings
Brake shoes distorted, linings worn
or glazed, drums worn
Disc brake pads worn
Piston frozen in caliper
Brake booster faulty
Brake line restricted
Check for cause, replace lining
Replace brake shoes
Replace pads
Repair caliper
Repair booster
Repair as necessary
BR-I6,22
BR-16,22
BR-1 6
BR-1 6
BR.1 4
Page 563 of 885
BR-4 BRAKE SYSTEM - Troubleshooting
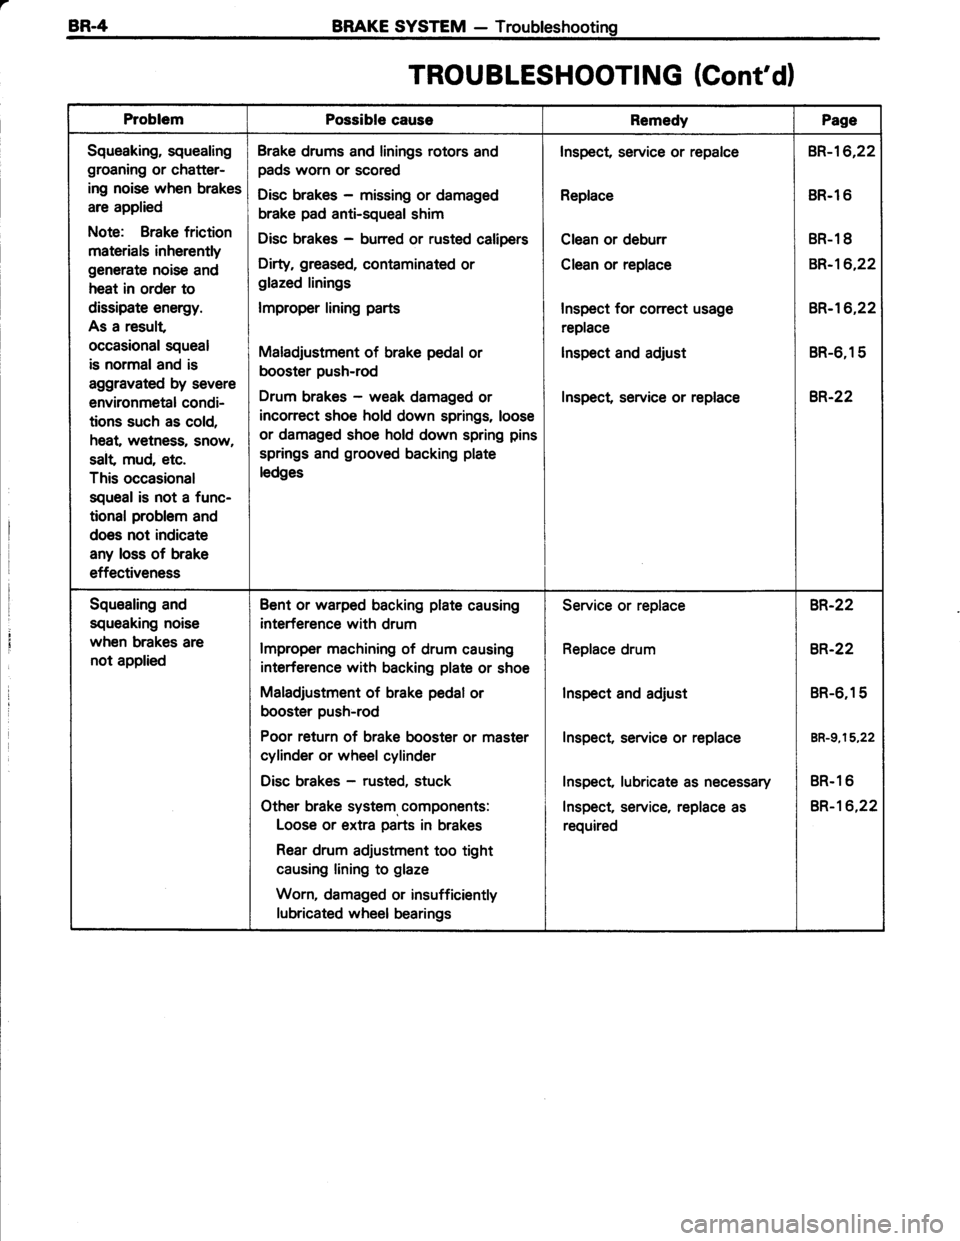
TROU BLESHOOTI NG (Cont'd)
ProblemPossible causeRemedyPage
Squeaking, squealing
groaning or chatter-
ing noise when brakes
are applied
Note: Brake friction
materials inherently
generate noise and
heat in order to
dissipate energy.
As a result
occasional squeal
is normaland is
aggravated by severe
environmetal condi-
tions such as cold,
heat, wetness, snow,
salt mud, etc.
This occasional
squeal is not a func-
tional problem and
does not indicate
any loss of brake
effectiveness
Brake drums and linings rotors and
pads worn or scored
Disc brakes - missing or damaged
brake pad anti-squeal shim
Disc brakes - burred or rusted calipers
Dirty, greased, contaminated or
glazed linings
lmproper lining parts
Maladjustment of brake pedal or
booster push-rod
Drum brakes - weak damaged or
incorrect shoe hold down springs, loose
or damaged shoe hold down spring pins
springs and grooved backing plate
ledges
Inspect, service or repalce
Replace
Clean or deburr
Clean or replace
Inspect for conect usage
replace
lnspect and adjust
Inspect service or replace
BR-16,22
BR.l 6
BR-1 8
BR-16,22
BR-'�t6,22
BR-6,15
8R.22
Squealing and
squeaking noise
when brakes are
not applied
Bent or warped backing plate causing
interference with drum
lmproper machining of drum causing
interference with backing plate or shoe
Maladjustment of brake pedal or
booster push-rod
Poor return of brake booster or master
cylinder or wheel cylinder
Disc brakes - rusted, stuck
Other brake system, components:
Loose or extra parts in brakes
Rear drum adjustment too tight
causing lining to glaze
Worn, damaged or insufficiently
lubricated wheel bearings
Service or replace
Replace drum
Inspect and adjust
Inspect, service or replace
Inspect lubricate as necessary
Inspect, service, replace as
required
BR-22
8R.22
BR-6,15
BR-g,15,22
BR.1 6
BR-16,22
Page 575 of 885
BR-l6BRAKE SYSTEM - Front Brake
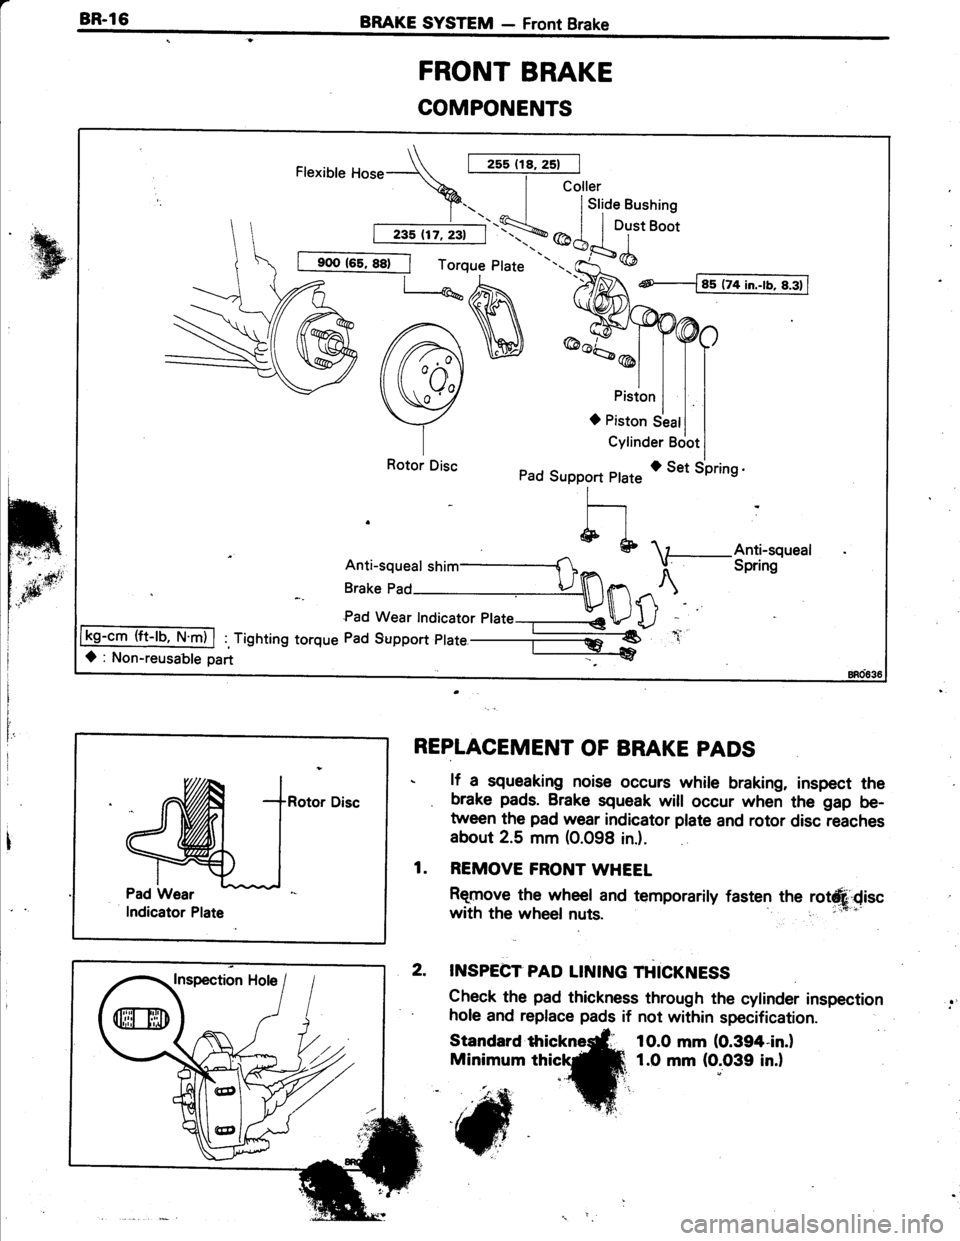
FRONT BRAKE
COMPONENTS
I
IREPLACEMENT OF BRAKE PADS
. lf a squeaking noise occurs while braking, inspect the
. brake pads. Brake squeak will occur when the gap be-
tween the pad wear indicator plate and rotor disc reaches
about 2.5 mm (0.098 in.).
1. REMOVE FRONT WHEET
Rqmove the wheel and temporarily fasten the rotdfu discwith the wheel nuts. ;:E "'
2. INSPECT PAD LINING THICKNESS
Check the pad thickness through the cylinder inspection' hole and replace pads if not within specification.
Standard
Minimum
1O.0 mm (0.394-in.l
1.0 mm (0.039 in.)
\_ [-5s ntzst IFlexible Hose--\\>.;lco
Ja-- |I 'r fa-l
235 117,231
900 165,88)j Torque Plate
Leh
A\H)
Rotor Disc
Anti-squeal shim __Anti-squeal
I Spring
-cm (ft-lb, N.m)
8ao?36
Page 576 of 885
l'-
BRAKE SYSTEM - Front Brake
,ritl t'i'.ihffi:ir ''$,8R.17
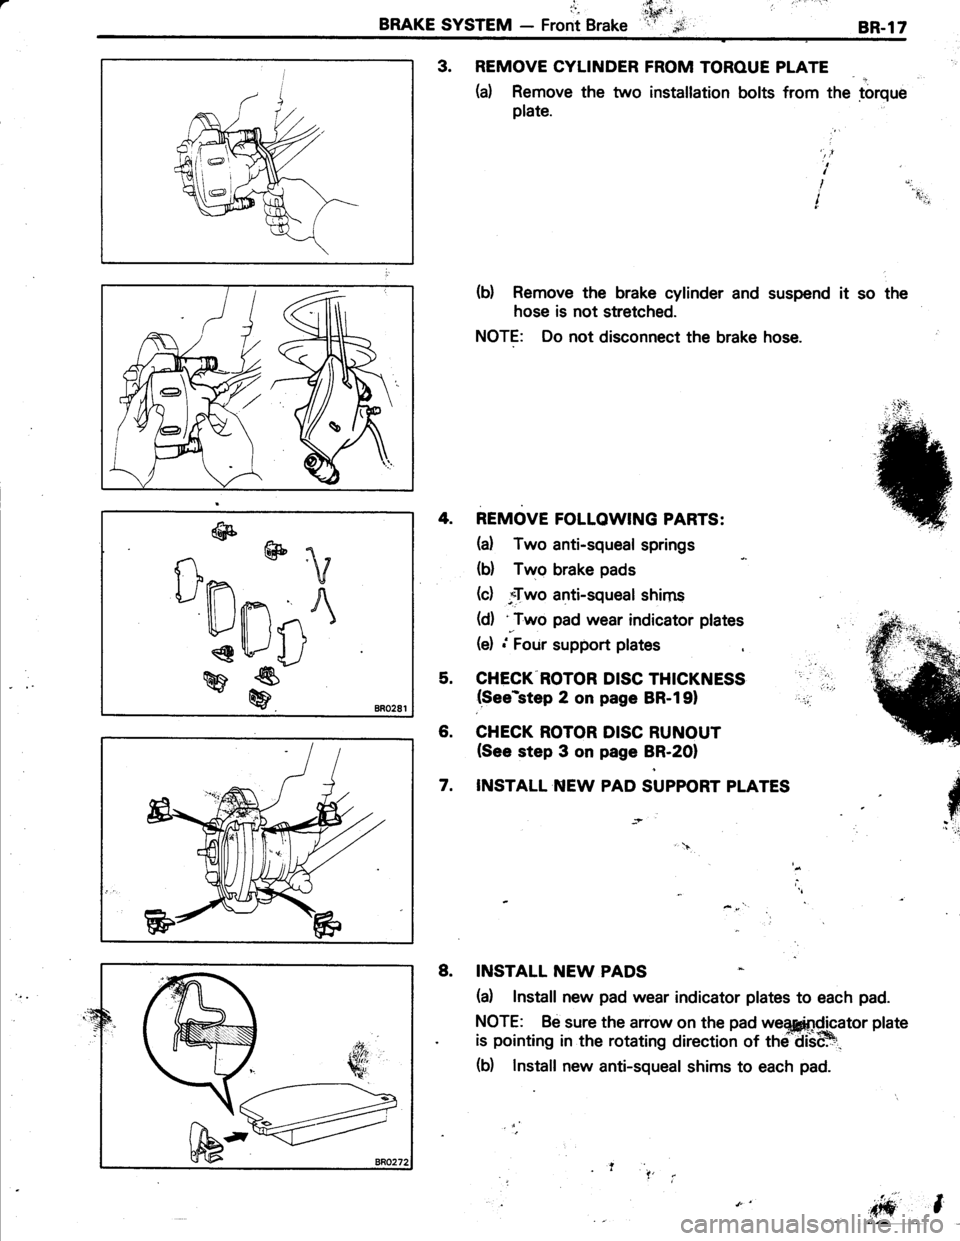
3. REMOVE CYLINDER FROM TOROUE PLATE
(a) Remove the two installation bolts from the torque
plate.
(b) Remove the brake cylinder and suspend it so the
hose is not stretched.
NOTE: Do not disconnect the brake hose.
't'l'|
I
,t'r
REMOVE FOLLOWING PARTS:
(a) Two anti-squeal springs
(b) Two brake pads
(d ."Two anti-squeal shims
(d) 'Two pad wear indicator plates
(e) .'FoUr support plates
CHECK ROTOR DISC THICKNESS(See*step 2 on page BR-l91
CHECK ROTOR DISC RUNOUT(See step 3 on page BR-2OI
INSTALL NEW PAD SUPPORT PLATES
4.
5.
6.
7.
$
INSTALL NEW PADS
(a) Install new pad wear indicator plates to each pad.
NOTE: Be sure the arrow on the pad we*fiQicator plate
is pointing in the rotating direction of thd diiHt_
(b) Install new anti-squeal shims to each pad.
iffi
8.
@
n @
ilPnn
- )\
tPlll i{1q
4J
w
# BRo281
l'l
Page 577 of 885
BR-l8BRAKE SYSTEM - Front Brake
'- t.t
d[
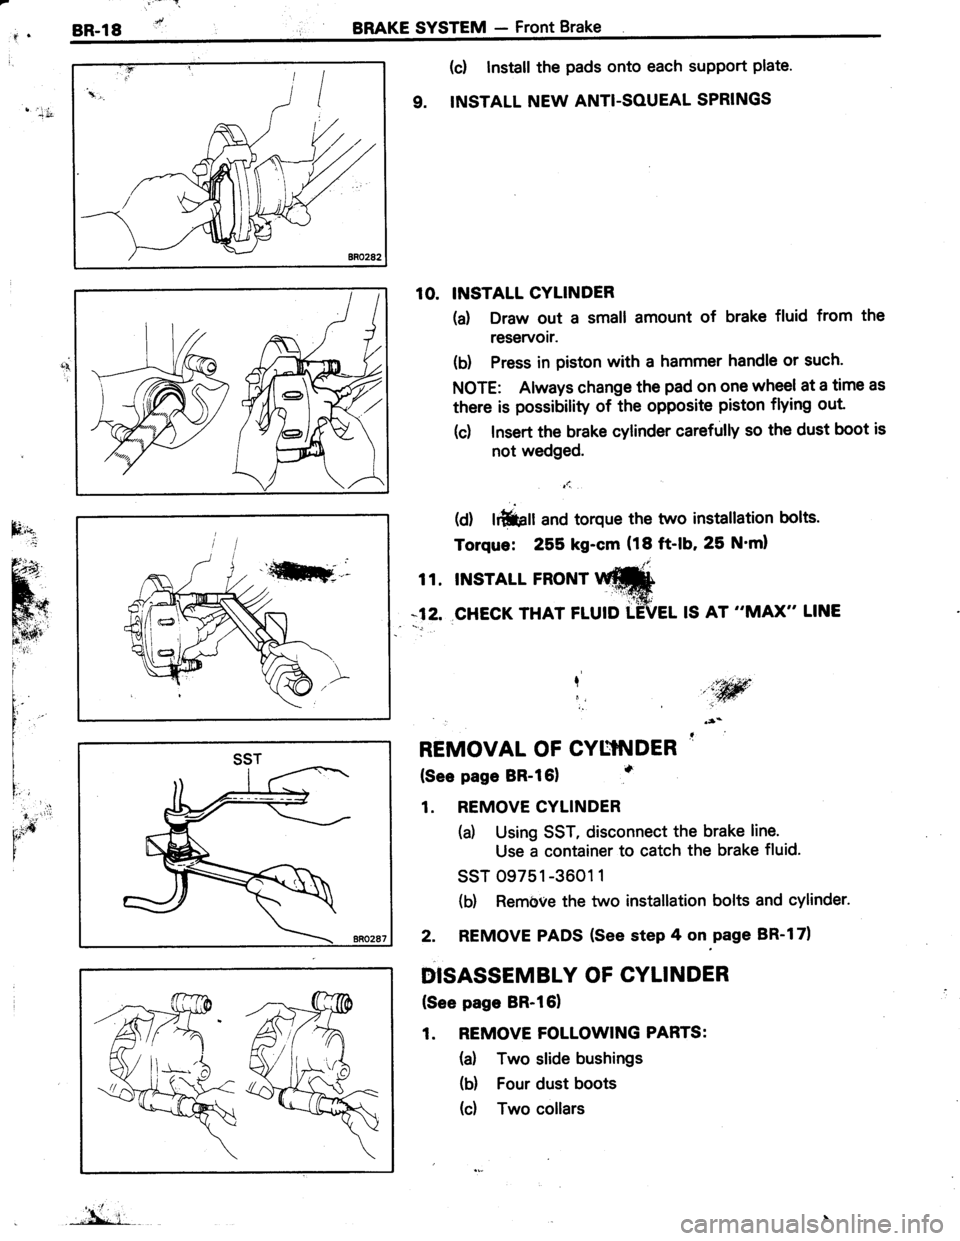
(c! Install the pads onto each support plate'
9. INSTALL NEW ANTI-SOUEAL SPRINGS
10. INSTALL CYLINDER
(d Draw out a small amount of brake fluid from the
reservoir.
(b) Press in piston with a hammer handle or such.
NOTE: Always change the pad on one wheel at a time as
there is possibility of the opposite piston flying out
(c) Insert the brake cylinder carefully so the dust boot is
not wedged.
t1.,
(d) lrfiiprr and torque the two instatlation bolts.
Torque: 255 kg-cm (18 ft-lb, 25 N'ml
t t. tNsrArL FRoNr Itr#
*12. CHECK THAT FLUID TEVEL IS AT "MAX" LINE
I,iw,i
REMOVAL OF CYUTNDER '
(See page BR-l61
1. REMOVE CYLINDER
(a) Using SST, disconnect the brake line.
Use a container to catch the brake fluid.
ssT 09751 -3601 1
(b) Rembve the two installation bolts and cylinder.
2. REMOVE PADS (See step 4 on.page BR-l71
DISASSEMBLY OF CYLINDER
(See page BR-l61
1. REMOVE FOLLOWING PARTS:
(a) Two slide bushings
(b) Four dust boots
(d Two collars
I'idr
SST
"'L i-
Page 580 of 885
BRAKE SYSTEM - Front BrakeBR-2;1,,,":l-.,
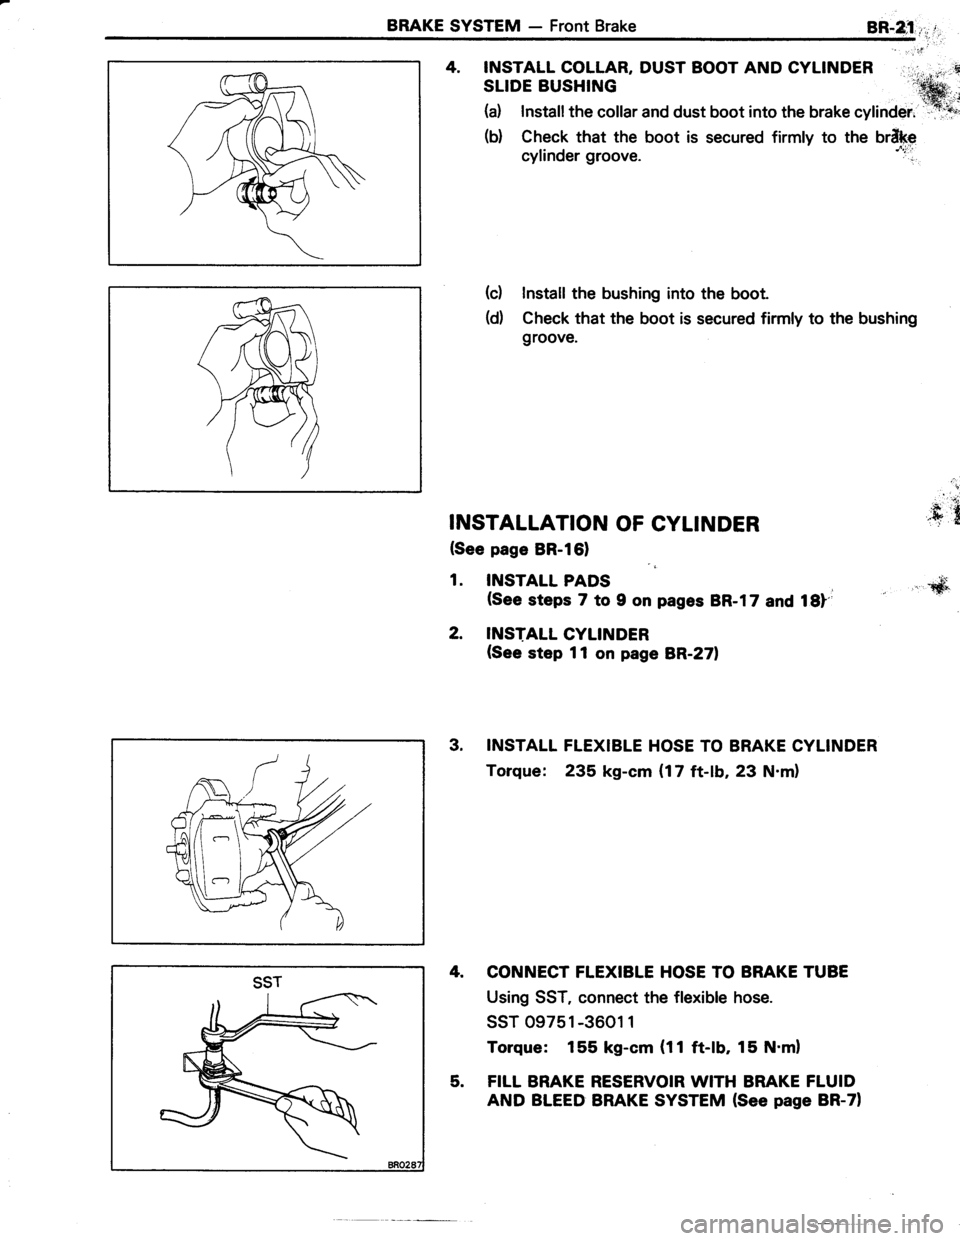
4. INSTALL COLLAR, DUST BOOT AND CYLINDER
SLIDE BUSHING
(a) Installthe collar and dust boot into the brake "VlinOer.'"'f,.@,*;
(b) Check that the boot is secured firmly to the brlkp
cylinder groove. ';1"t,
(c) Install the bushing into the boot.
(d) Check that the boot is secured firmly to the bushing
groove.
t:' t;
INSTALLATION OF CYLINDER JS .t
(See page BR-l61
1. INSTALL PADS ,,,\$,(See steps 7 to 9 on pag6s BR-17 and 18)-i
2. INSTALL CYLINDER(See step 11 on page BR-271
3. INSTALL FLEXIBLE HOSE TO BRAKE CYLINDER
Torque: 235 kg-cm (17 ft-lb, 23 N.m)
4. CONNECT FLEXIBLE HOSE TO BRAKE TUBE
Using SST, connect the flexible hose.
ssT 09751 -3601 1
Torque: 155 kg-cm (11 ft-lb, 15 N.ml
5. FILL BRAKE RESERVOIR WITH BRAKE FLUID
AND BLEED BRAKE SYSTEM (See page BR-71
SST