TOYOTA TUNDRA 2009 2.G Owners Manual
TUNDRA 2009 2.G
TOYOTA
TOYOTA
https://www.carmanualsonline.info/img/14/6829/w960_6829-0.png
TOYOTA TUNDRA 2009 2.G Owners Manual
Trending: language, engine, change wheel, garage door opener, seats, trailer, door lock
Page 561 of 672
5
When trouble arises
561
5-2. Steps to take in an emergency
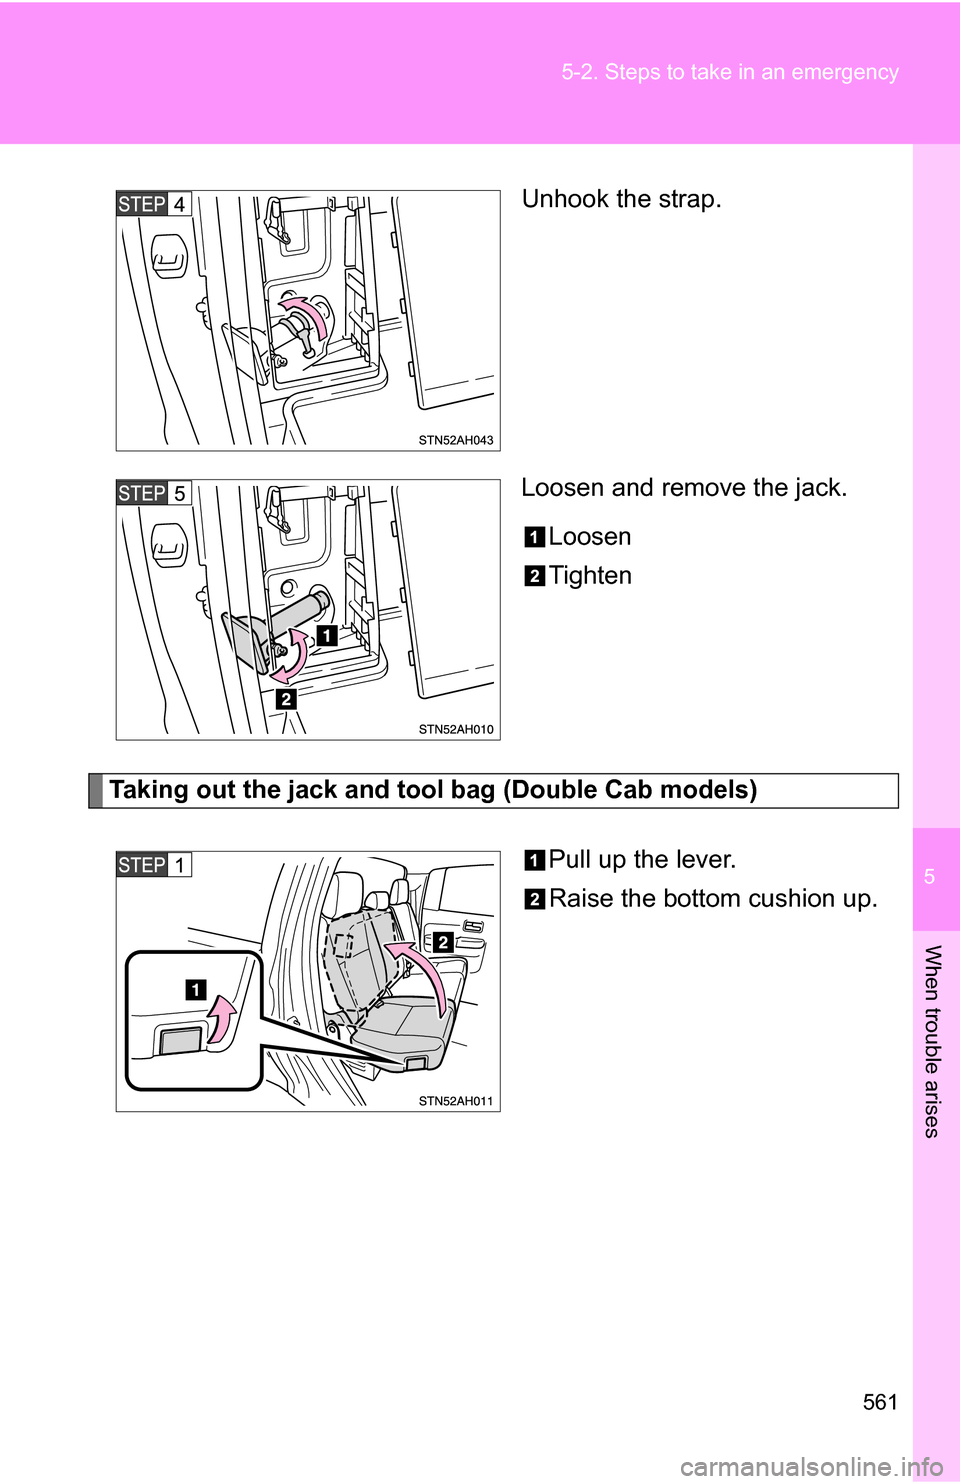
Unhook the strap.
Loosen and remove the jack.
Loosen
Tighten
Taking out the jack and tool bag (Double Cab models)
Pull up the lever.
Raise the bottom cushion up.
Page 562 of 672
562 5-2. Steps to take in an emergency
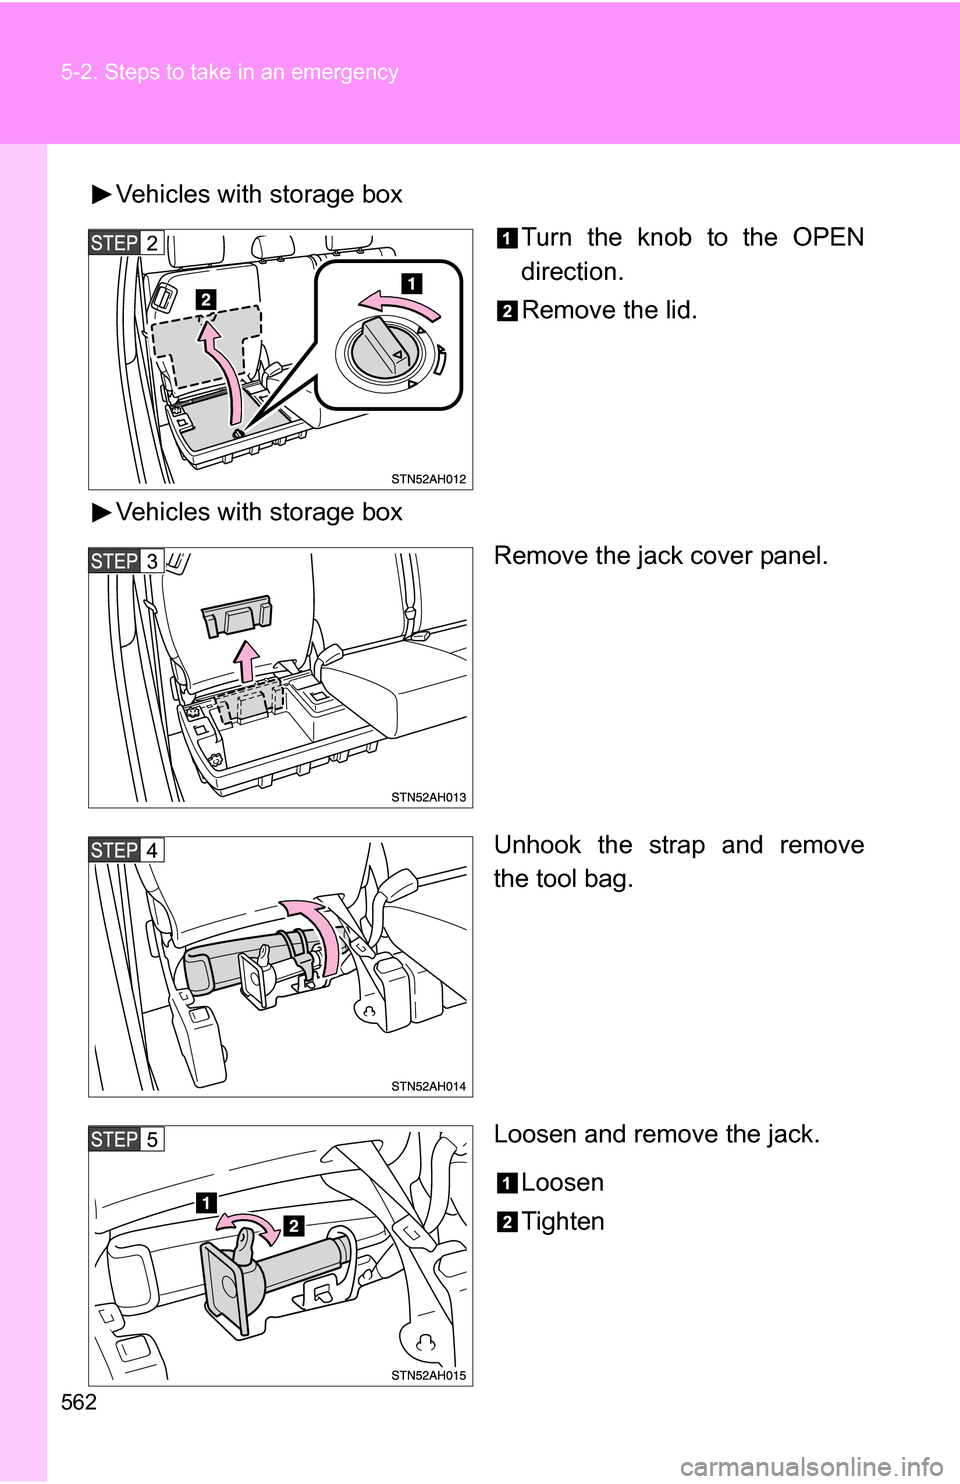
Vehicles with storage boxTurn the knob to the OPEN
direction.
Remove the lid.
Vehicles with storage box Remove the jack cover panel.
Unhook the strap and remove
the tool bag.
Loosen and remove the jack.
Loosen
Tighten
Page 563 of 672
5
When trouble arises
563
5-2. Steps to take in an emergency
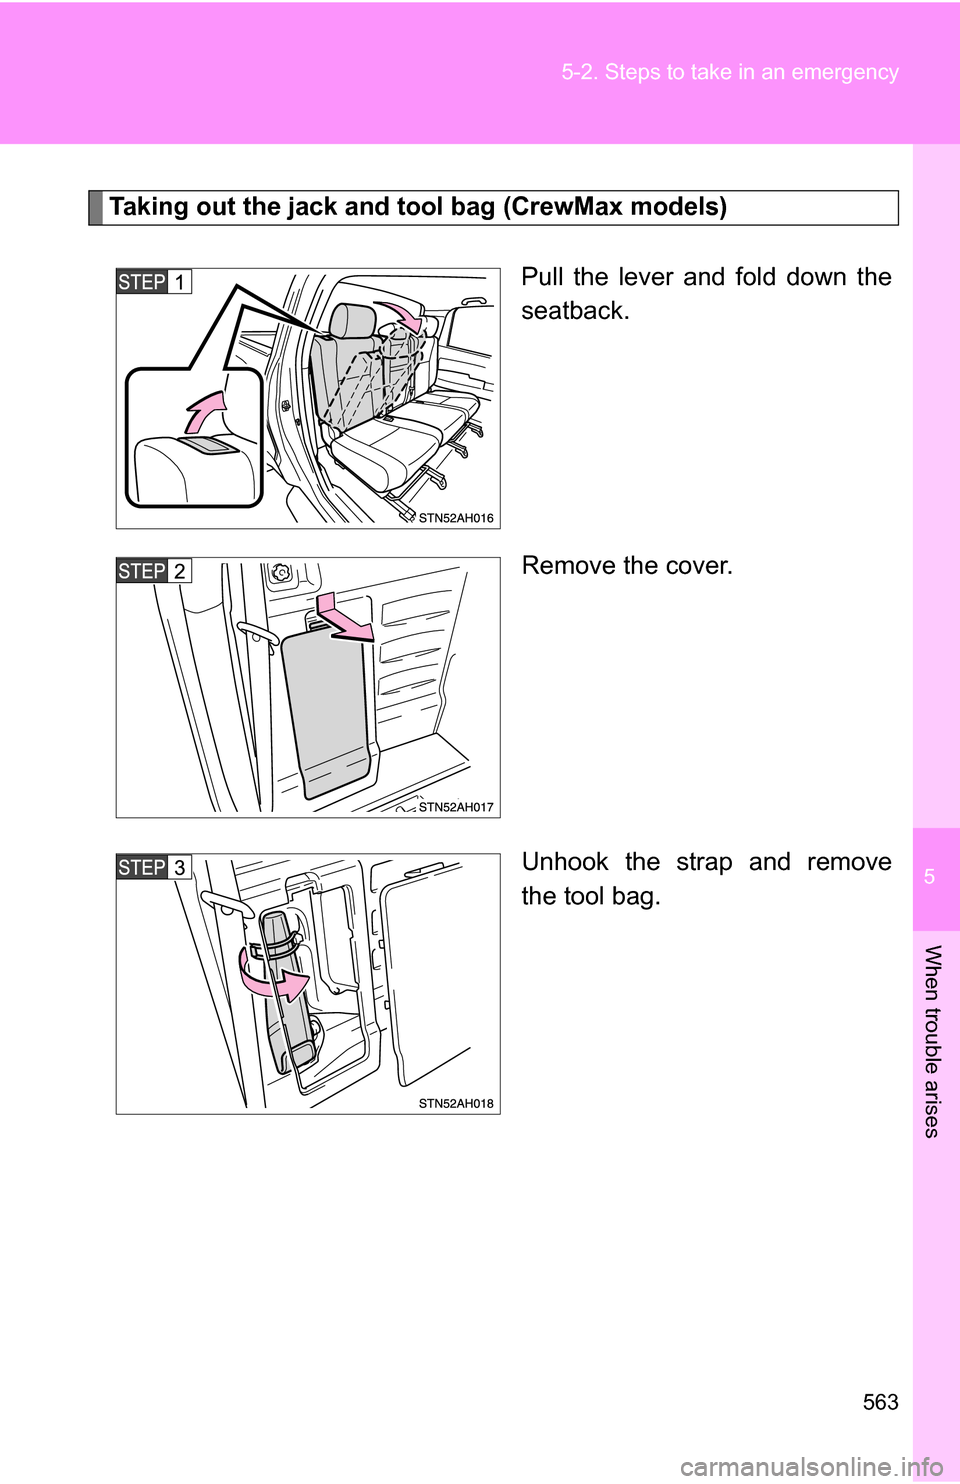
Taking out the jack and t
ool bag (CrewMax models)
Pull the lever and fold down the
seatback.
Remove the cover.
Unhook the strap and remove
the tool bag.
Page 564 of 672
564 5-2. Steps to take in an emergency
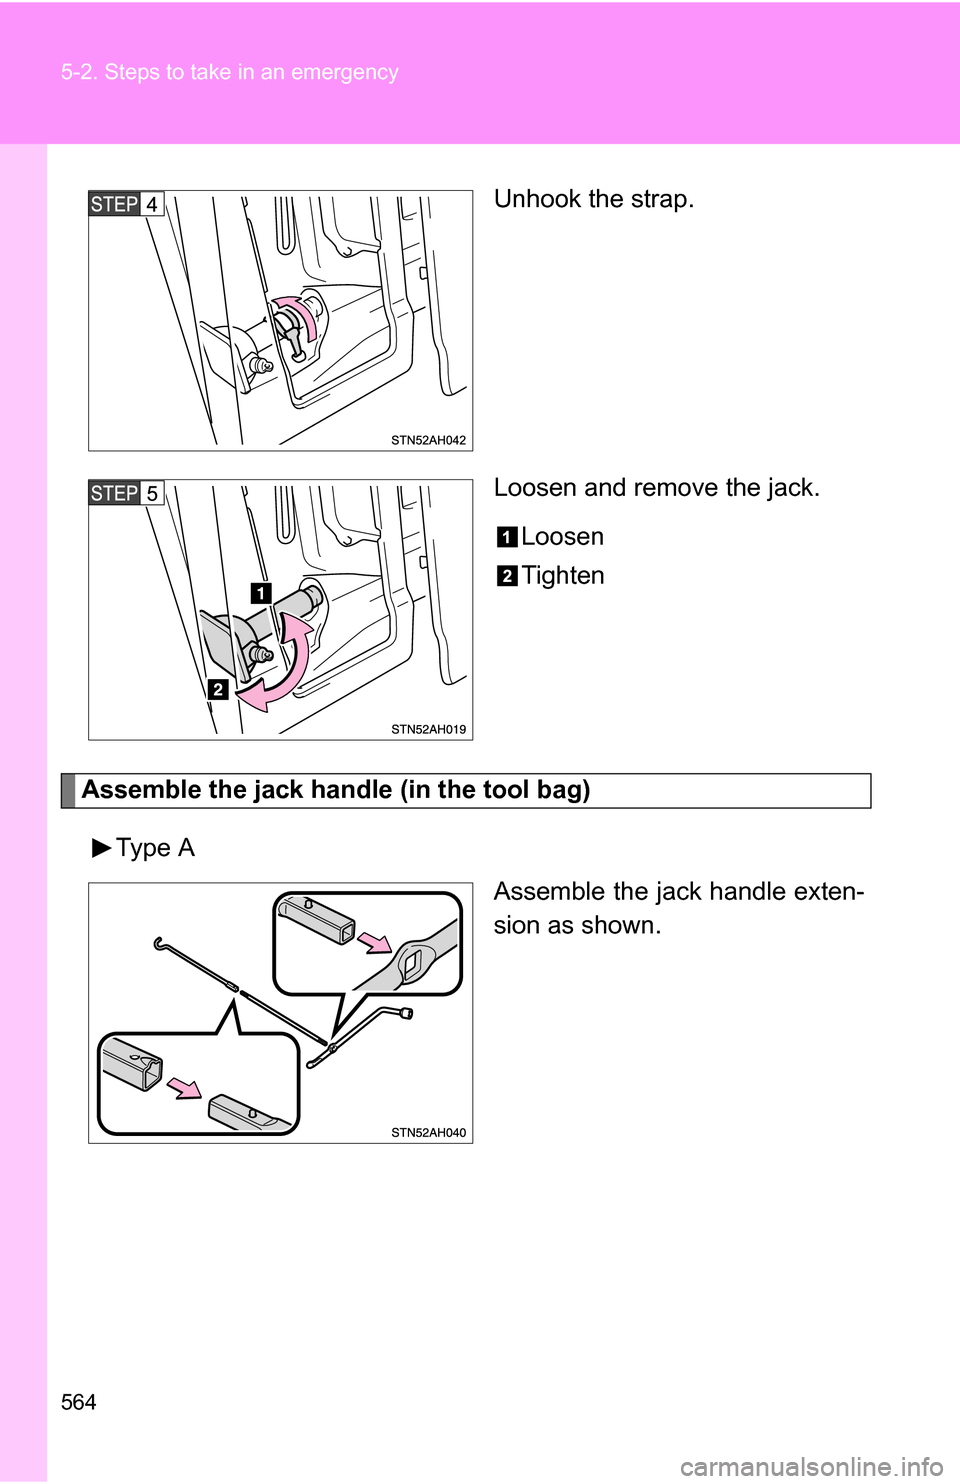
Unhook the strap.
Loosen and remove the jack.Loosen
Tighten
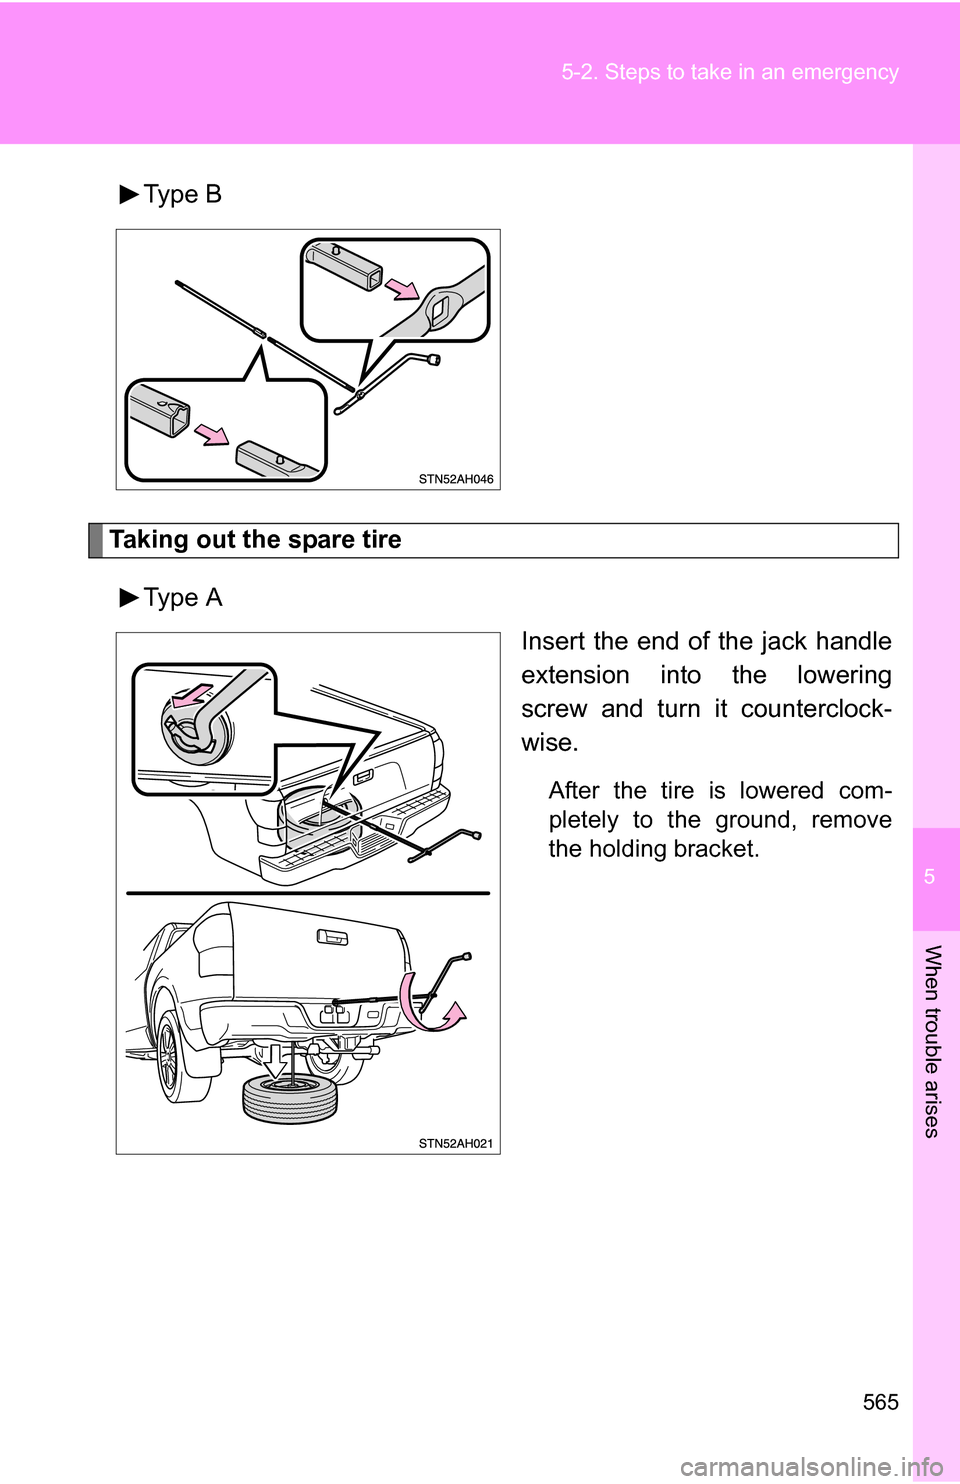
Assemble the jack handle (in the tool bag)
Type A Assemble the jack handle exten-
sion as shown.
Page 565 of 672
5
When trouble arises
565
5-2. Steps to take in an emergency
Type B
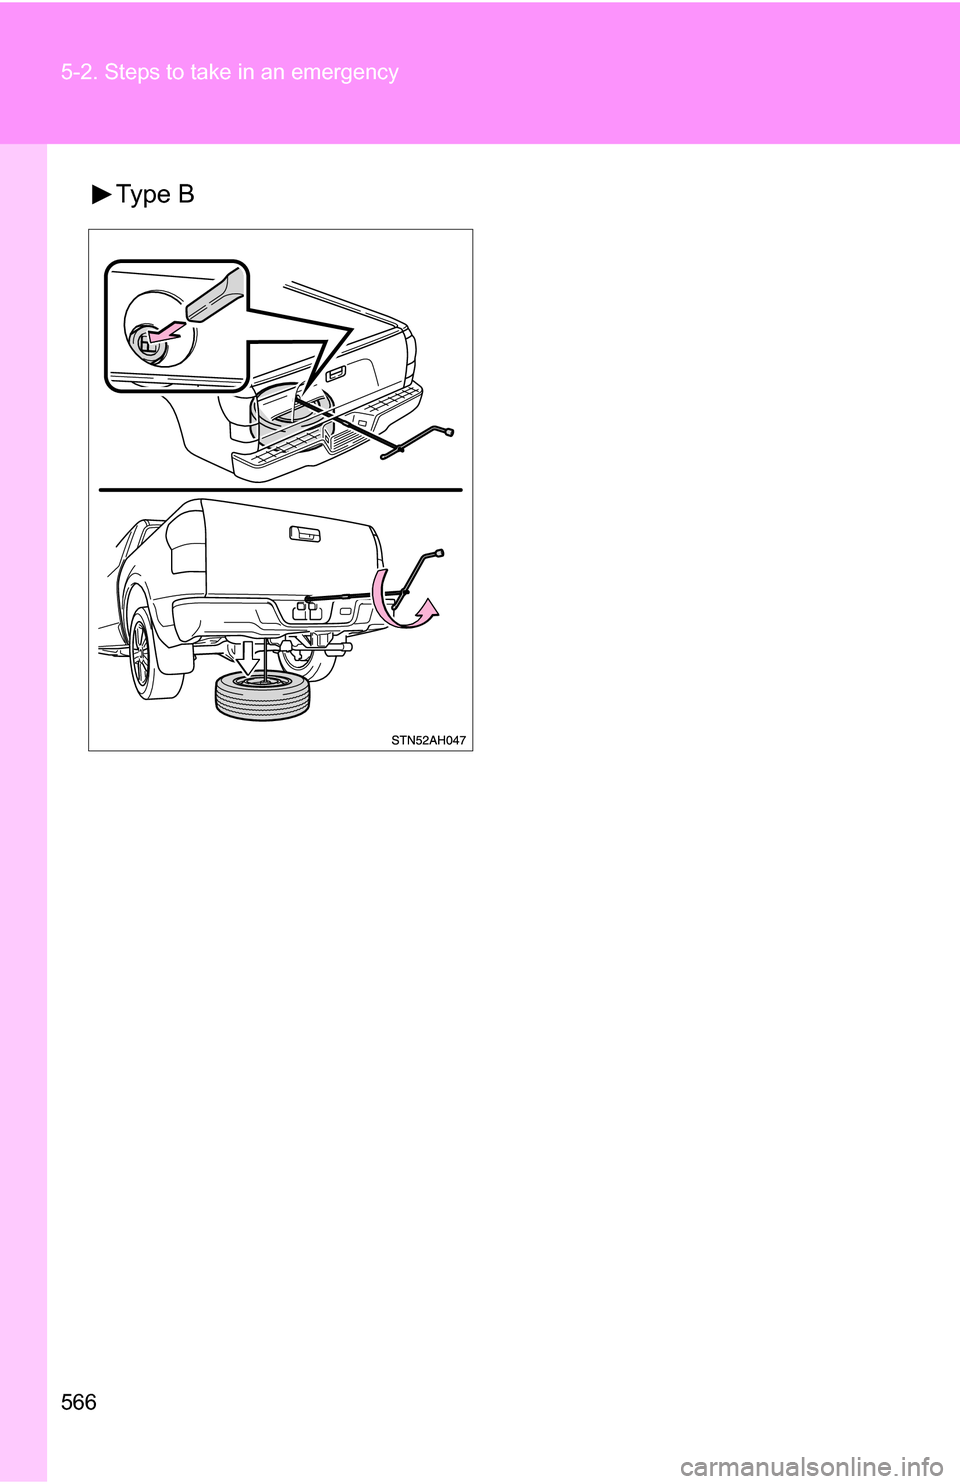
Taking out the spare tire
Type A Insert the end of the jack handle
extension into the lowering
screw and turn it counterclock-
wise.
After the tire is lowered com-
pletely to the ground, remove
the holding bracket.
Page 566 of 672
566 5-2. Steps to take in an emergency
Type B
Page 567 of 672
5
When trouble arises
567
5-2. Steps to take in an emergency
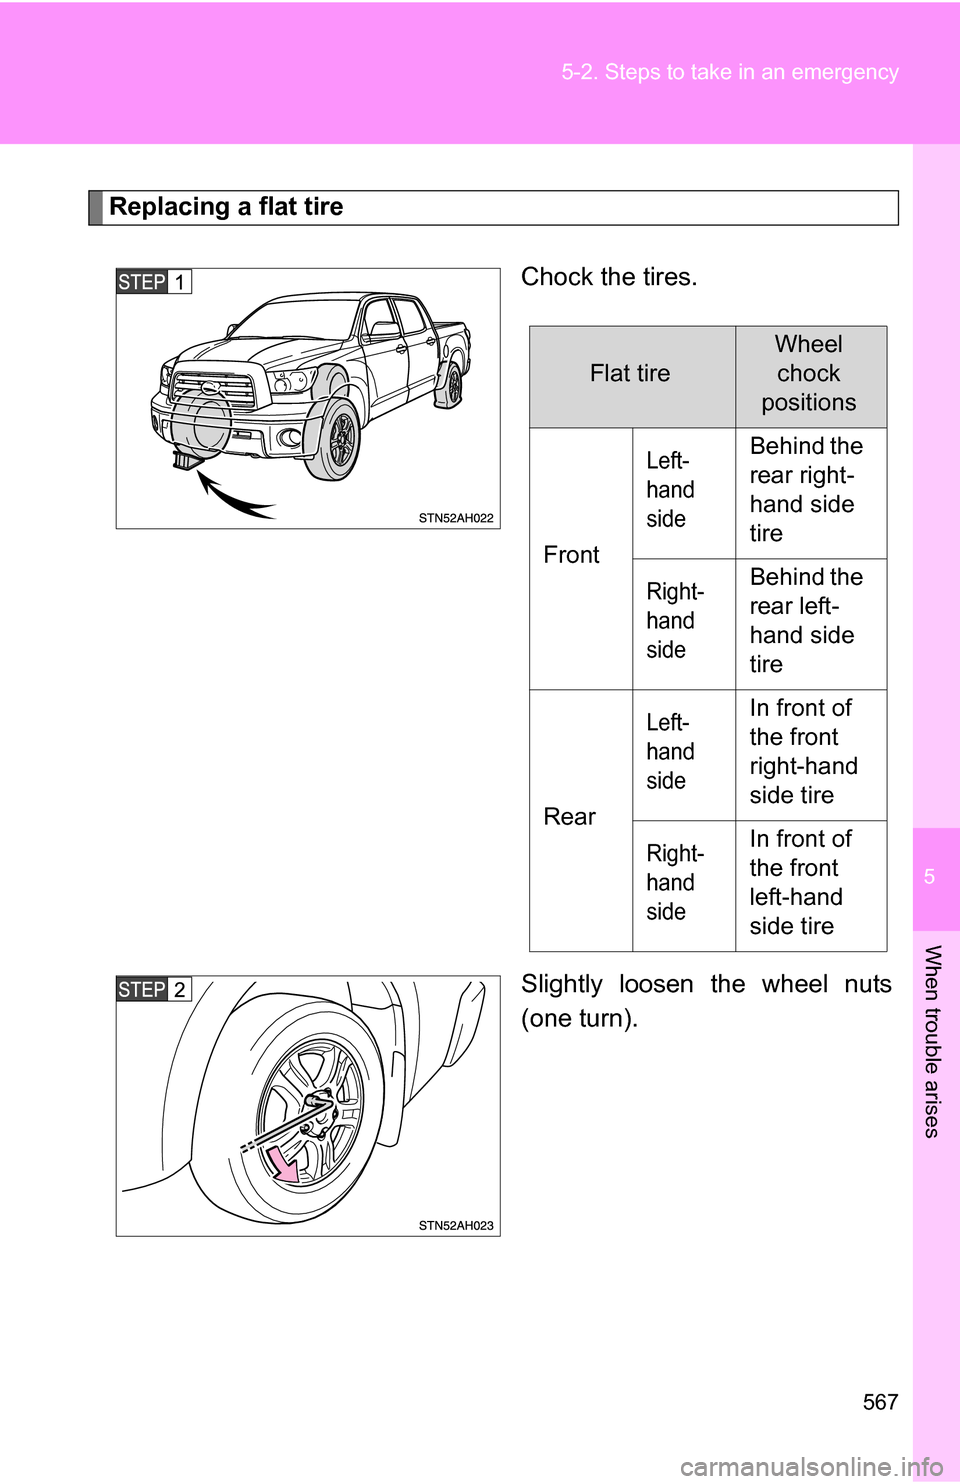
Replacing a flat tire
Chock the tires.
Slightly loosen the wheel nuts
(one turn).
Flat tire
Wheelchock
positions
Front
Left-
hand
sideBehind the
rear right-
hand side
tire
Right-
hand
sideBehind the
rear left-
hand side
tire
Rear
Left-
hand
sideIn front of
the front
right-hand
side tire
Right-
hand
sideIn front of
the front
left-hand
side tire
Page 568 of 672
568 5-2. Steps to take in an emergency
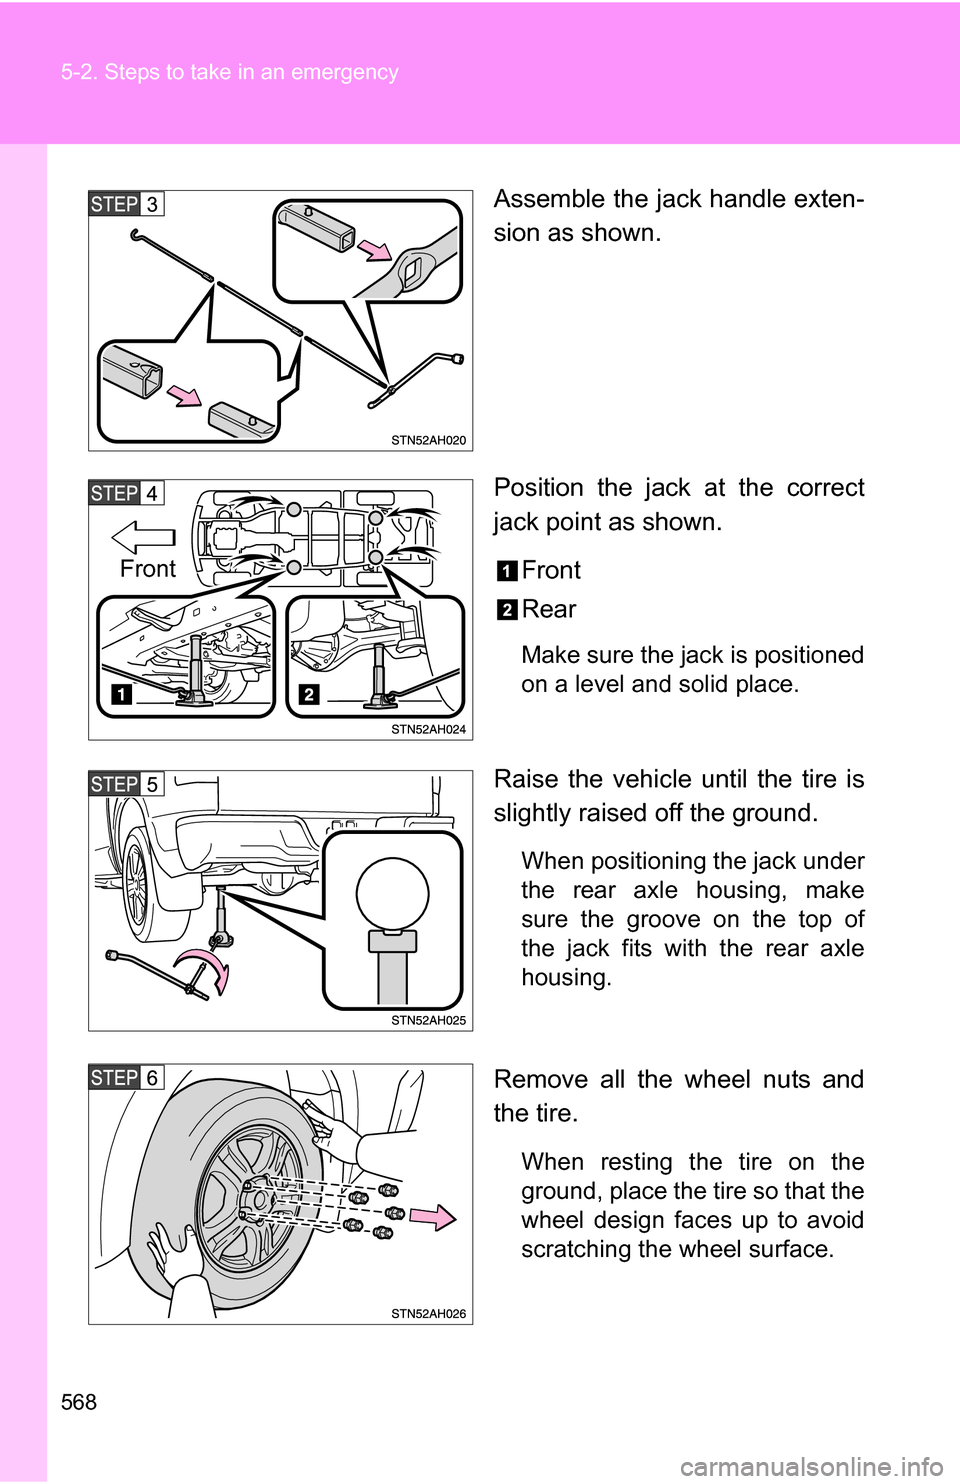
Assemble the jack handle exten-
sion as shown.
Position the jack at the correct
jack point as shown.Front
Rear
Make sure the jack is positioned
on a level and solid place.
Raise the vehicle until the tire is
slightly raised off the ground.
When positioning the jack under
the rear axle housing, make
sure the groove on the top of
the jack fits with the rear axle
housing.
Remove all the wheel nuts and
the tire.
When resting the tire on the
ground, place the tire so that the
wheel design faces up to avoid
scratching the wheel surface.
Front
Page 569 of 672
5
When trouble arises
569
5-2. Steps to take in an emergency
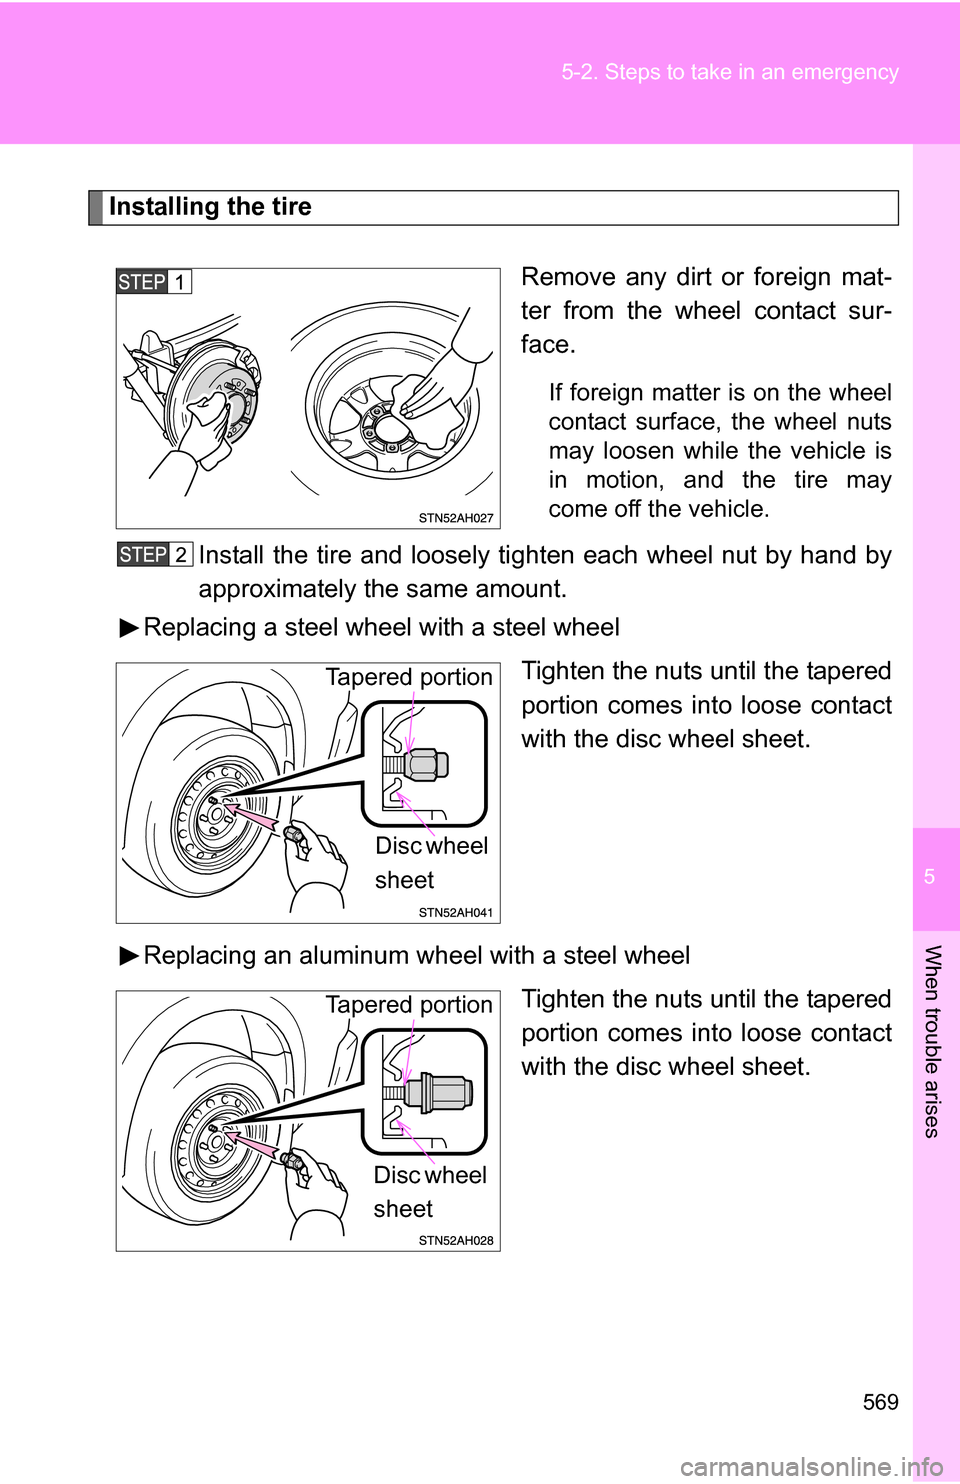
Installing the tire
Remove any dirt or foreign mat-
ter from the wheel contact sur-
face.
If foreign matter is on the wheel
contact surface, the wheel nuts
may loosen while the vehicle is
in motion, and the tire may
come off the vehicle.
Install the tire and loosely tighten each wheel nut by hand by
approximately the same amount.
Replacing a steel wheel with a steel wheel
Tighten the nuts until the tapered
portion comes into loose contact
with the disc wheel sheet.
Replacing an aluminum wheel with a steel wheel Tighten the nuts until the tapered
portion comes into loose contact
with the disc wheel sheet.
Tapered portion
Disc wheel
sheet
Tapered portion
Disc wheel
sheet
Page 570 of 672
570 5-2. Steps to take in an emergency
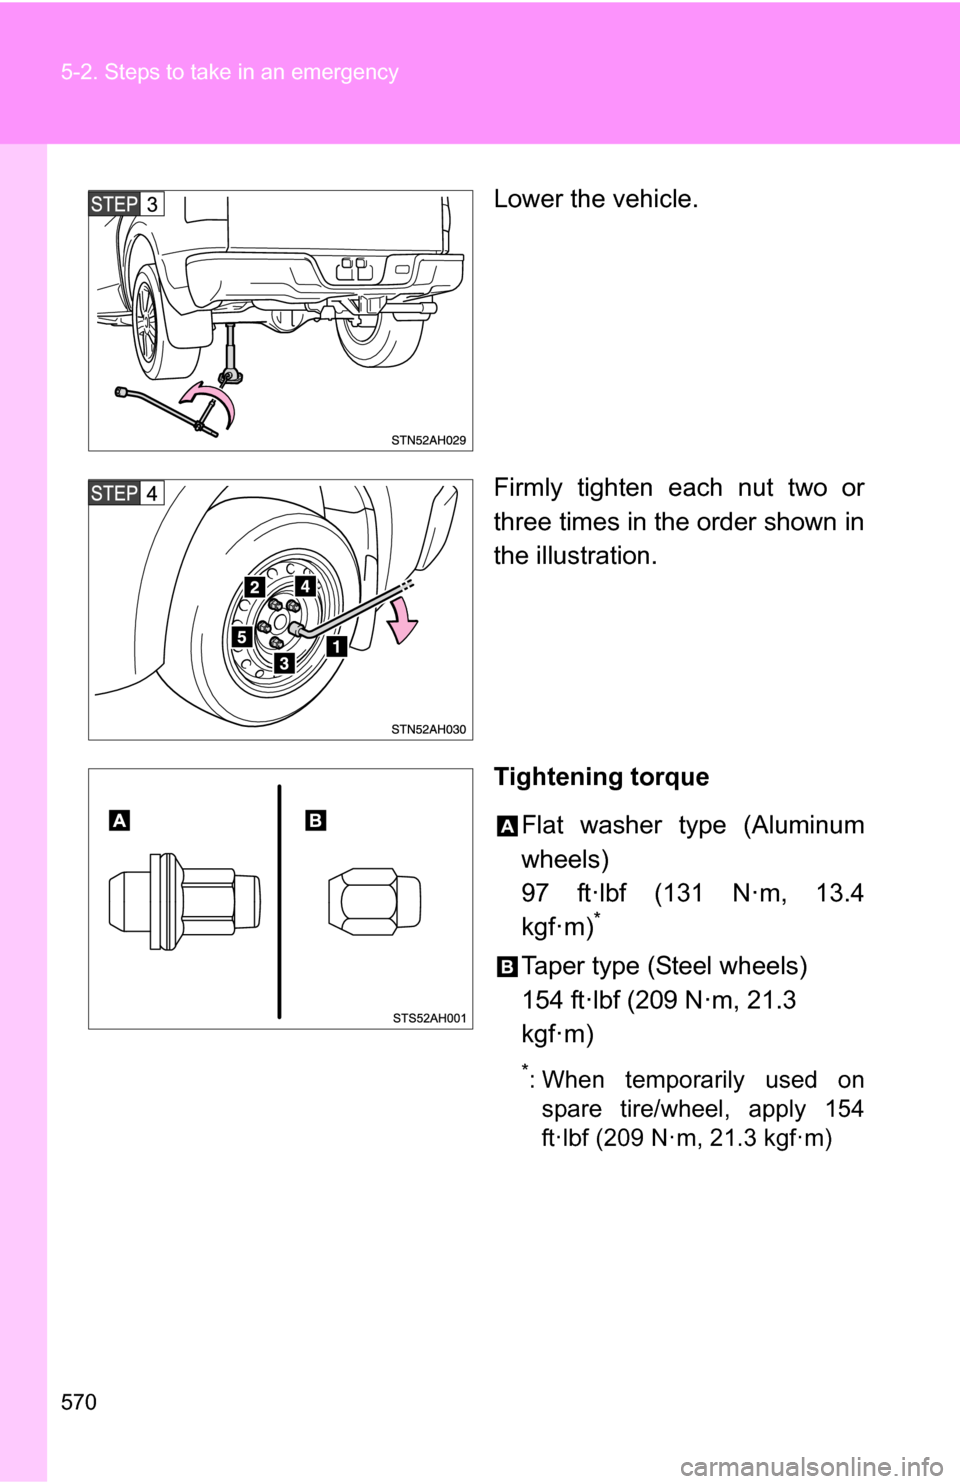
Lower the vehicle.
Firmly tighten each nut two or
three times in the order shown in
the illustration.
Tightening torqueFlat washer type (Aluminum
wheels)
97 ft·lbf (131 N·m, 13.4
kgf·m)
*
Taper type (Steel wheels)
154 ft·lbf (209 N·m, 21.3
kgf·m)
*: When temporarily used onspare tire/wheel, apply 154
ft·lbf (209 N·m, 21.3 kgf·m)
Trending: check engine light, turn signal bulb, steering, fuel cap, clock setting, clock reset, rear view mirror
