ECO mode TOYOTA TUNDRA 2009 2.G Owners Manual
[x] Cancel search | Manufacturer: TOYOTA, Model Year: 2009, Model line: TUNDRA, Model: TOYOTA TUNDRA 2009 2.GPages: 672, PDF Size: 14.85 MB
Page 44 of 672
44
1-2. Opening, closing and locking the doors
Wireless remote control (if equipped)
■Operation signals
A buzzer sounds and the emergency flashers flash to indicate that the doors
have been locked/unlocked. (Locked: Once; Unlocked: Twice)
■ Panic mode
■ Door lock buzzer
If a door is not fully closed, a buzzer sounds for 10 seconds if an attempt to
lock the door is made. Fully close the door to stop the buzzer, and lock the
vehicle once more.
■ Wireless remote control battery depletion
The standard battery life is 1 to 2 years. (The battery becomes depleted
even if the wireless remote control is not used.) If the wireless remot\
e control
function does not operate, the battery may be depleted. Replace the battery
when necessary. ( P. 510)
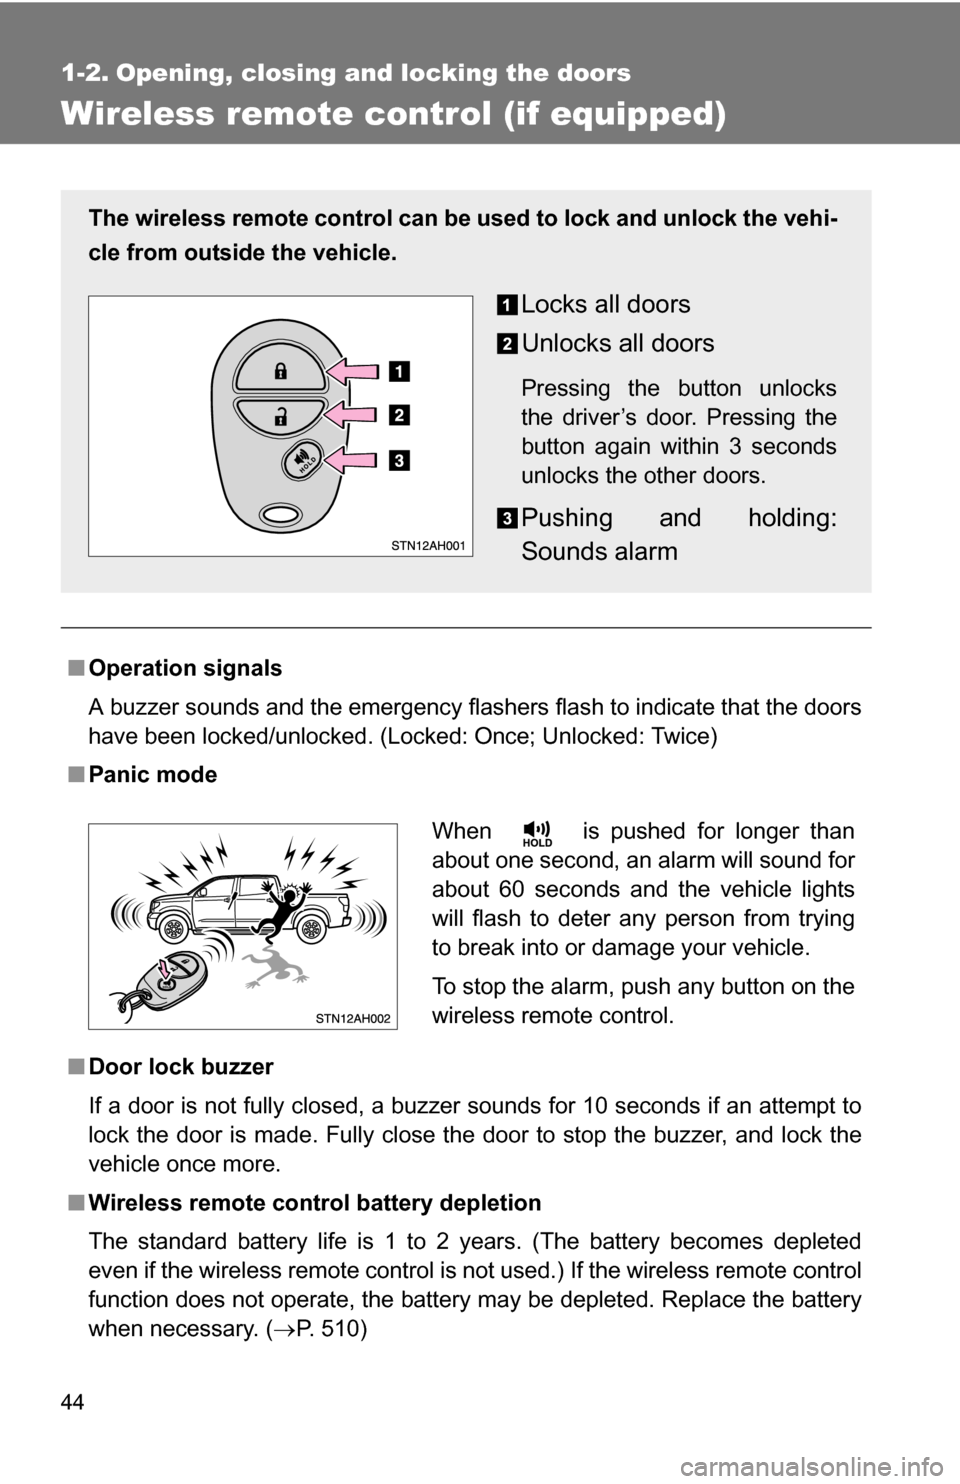
The wireless remote control can be used to lock and unlock the vehi-
cle from outside the vehicle.
Locks all doors
Unlocks all doors
Pressing the button unlocks
the driver’s door. Pressing the
button again within 3 seconds
unlocks the other doors.
Pushing and holding:
Sounds alarm
When is pushed for longer than
about one second, an alarm will sound for
about 60 seconds and the vehicle lights
will flash to deter any person from trying
to break into or damage your vehicle.
To stop the alarm, push any button on the
wireless remote control.
Page 92 of 672
92 1-3. Adjustable components (seats, mirrors, steering wheel)
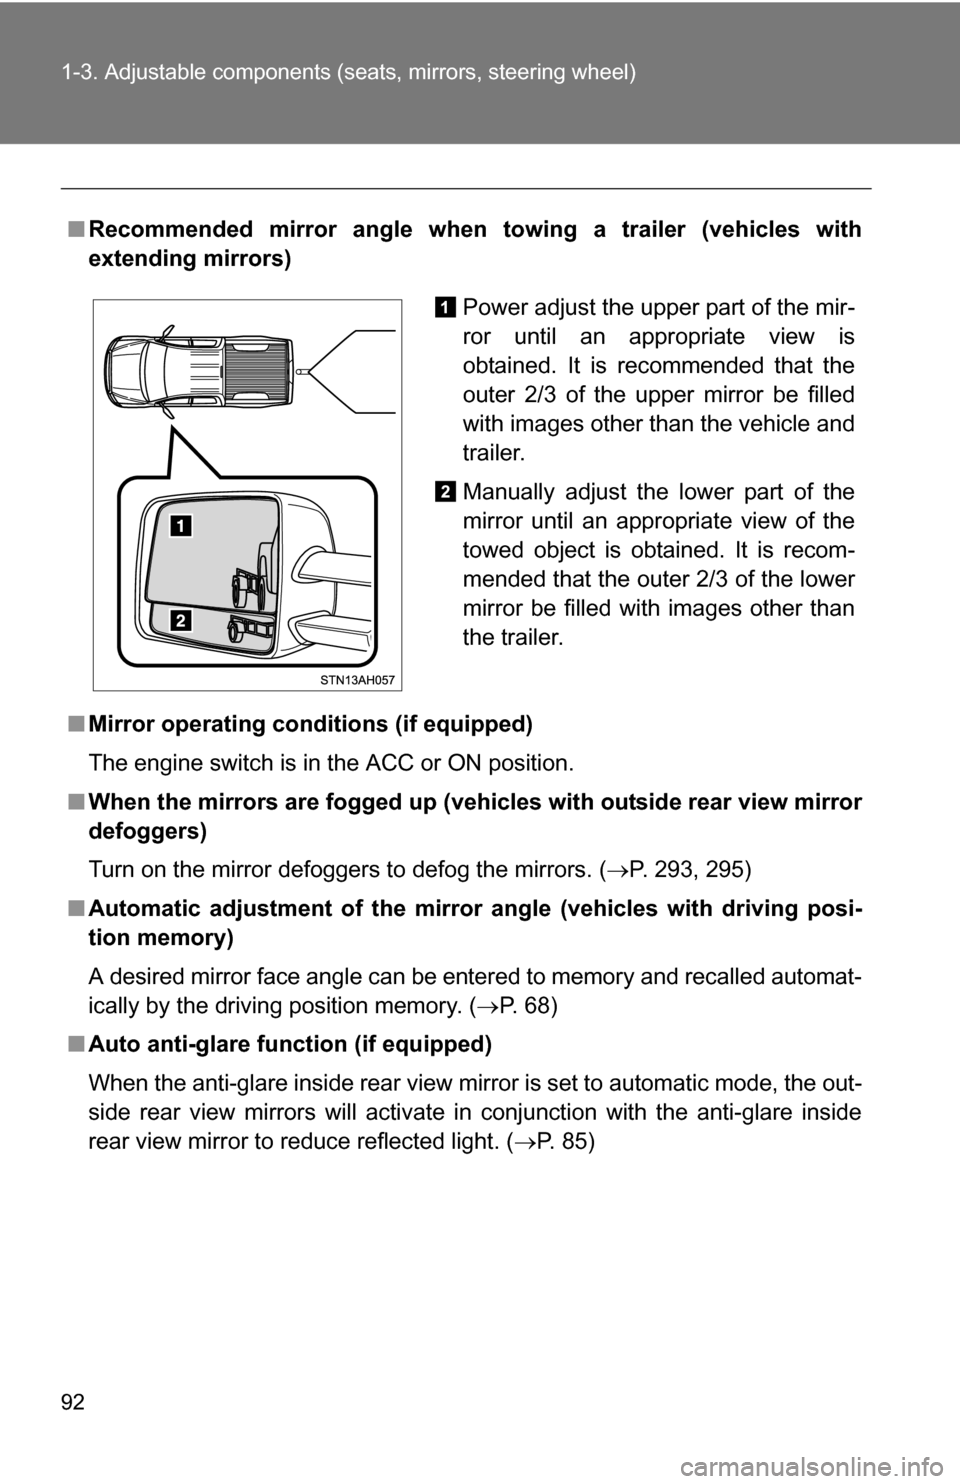
■Recommended mirror angle when towing a trailer (vehicles with
extending mirrors)
■ Mirror operating conditions (if equipped)
The engine switch is in the ACC or ON position.
■ When the mirrors are fogged up (veh icles with outside rear view mirror
defoggers)
Turn on the mirror defoggers to defog the mirrors. ( P. 293, 295)
■ Automatic adjustment of the mirror angle (vehicles with driving posi-
tion memory)
A desired mirror face angle can be entered to memory and recalled automat-
ically by the driving position memory. ( P. 6 8 )
■ Auto anti-glare function (if equipped)
When the anti-glare inside rear view mirror is set to automatic mode, the out-
side rear view mirrors will activate in conjunction with the anti-glare inside
rear view mirror to reduce reflected light. ( P. 85)
Power adjust the upper part of the mir-
ror until an appropriate view is
obtained. It is recommended that the
outer 2/3 of the upper mirror be filled
with images other than the vehicle and
trailer.
Manually adjust the lower part of the
mirror until an appropriate view of the
towed object is obtained. It is recom-
mended that the outer 2/3 of the lower
mirror be filled with images other than
the trailer.
Page 97 of 672
97
1
1-4. Opening and closing the windows and moon roof
Before driving
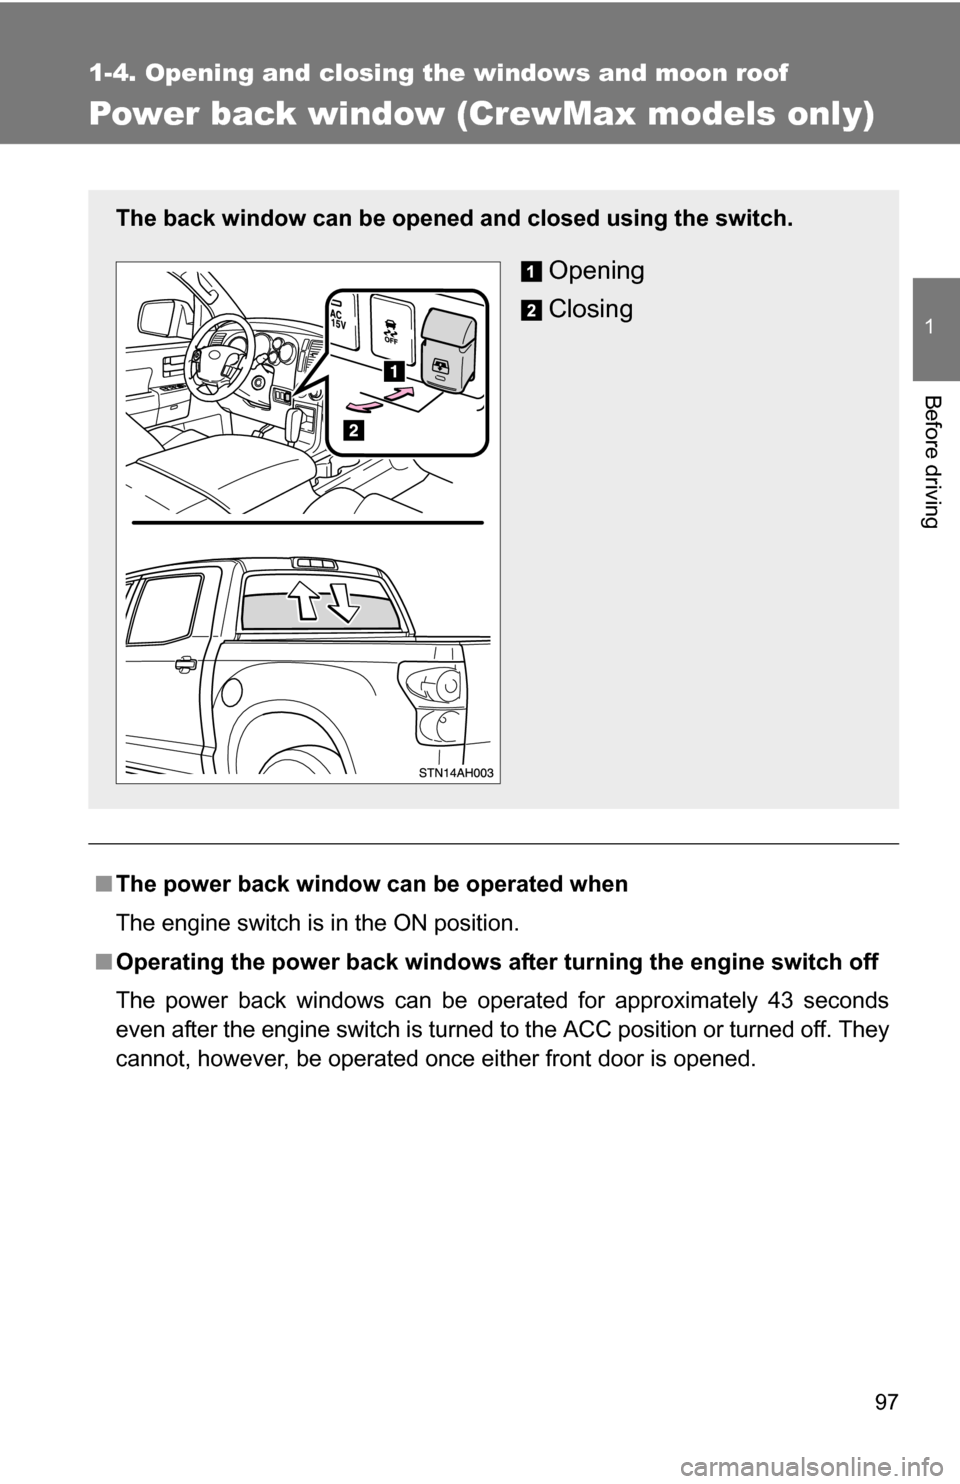
Power back window (CrewMax models only)
■The power back window can be operated when
The engine switch is in the ON position.
■ Operating the power back windows after turning the engine switch off
The power back windows can be operated for approximately 43 seconds
even after the engine switch is turned to the ACC position or turned off. They
cannot, however, be operated once either front door is opened.
The back window can be opened and closed using the switch.
Opening
Closing
Page 111 of 672
111
1-6. Theft deterrent system
1
Before driving
■
Items to check before locking the vehicle
To prevent unexpected triggering of the alarm and vehicle theft, make sure
of the following.
●Nobody is in the vehicle.
● The windows and moon roof are closed before the alarm is set.
● No valuables or other personal items are left in the vehicle.
■ Triggering of the alarm
The alarm may be triggered in the following situations.
(Stopping the alarm deactivates the alarm system.)
●A person inside the vehicle opens a door or hood.
● The battery is recharged or replaced when the vehicle is locked.
■ Panic mode
P. 4 4
■ When the battery is disconnected
Be sure to cancel the alarm system.
If the battery is discharged before canceling the alarm, the system may be
triggered when the battery is reconnected.
Page 142 of 672
142 1-7. Safety information
CAUTION
■Child restraint precautions
●Regular Cab models: A forward-facing child restraint system which
belongs to a passenger risk group should never be installed on the right
passenger seat with the passenger airbag off switch in the AUTO position,
because the force of the deploying airbag could cause death or serious
injury to the child in forward seating position. ( P. 128)
● Regular Cab models (Bench type seat): Do not install a child restraint sys-
tem on the center seat if it interferes with driving operations such as
changing the shift lever position. In this case, install the child restraint sys-
tem on the right passenger seat.
● Do not use the seat belt extender when installing a child restraint system
on the front or rear passenger seat. If installing a child restraint system
with the seat belt extender connected to the seat belt, the seat belt will not
securely hold the child restraint system, which could cause death or seri-
ous injury to the child or other passengers in the event of collision.
● Do not allow the child to lean his/her head or any part of his/her body
against the door or the area of the sea t, front and rear pillars or roof side
rail from which the side airbags or curtain shield airbags deploy even if the
child is seated in the child restraint system. It is dangerous if the side air-
bags and curtain shield airbags inflate, and the force of the rapid inflation
could cause death or serious injury to the child.
● Make sure you have complied with all installation instructions provided by
the child restraint manufacturer and that the system is properly secured. If
it is not secured properly, it may cause death or serious injury to the child
in the event of a sudden stop or accident.
■ Child restraint lock function belt precaution
Do not allow children to play with the child restraint lock function belt. If the
belt becomes twisted around a child’s neck, it will not be possible to pull the
belt out leading to choking or other serious injuries that could result in death.
If this occurs and the buckle cannot be unfastened, scissors should be used
to cut the belt.
Page 227 of 672
227
2-4. Using other driving systems
2
When driving
AUTO LSD system
The AUTO LSD system aids traction by using the traction control
system to control engine performance and braking when one of the
rear wheels begins to spin.
The system should be used only wh en one of the rear wheels spin-
ning occurs in a ditch or rough surface.
■ System operation
The system can be used on 2W D models and in 2WD mode on
4WD models.
The system is activated when dr iving at a speed under 62 mph
(100 km/h).
The AUTO LSD system will be
activated with the following
two procedures.
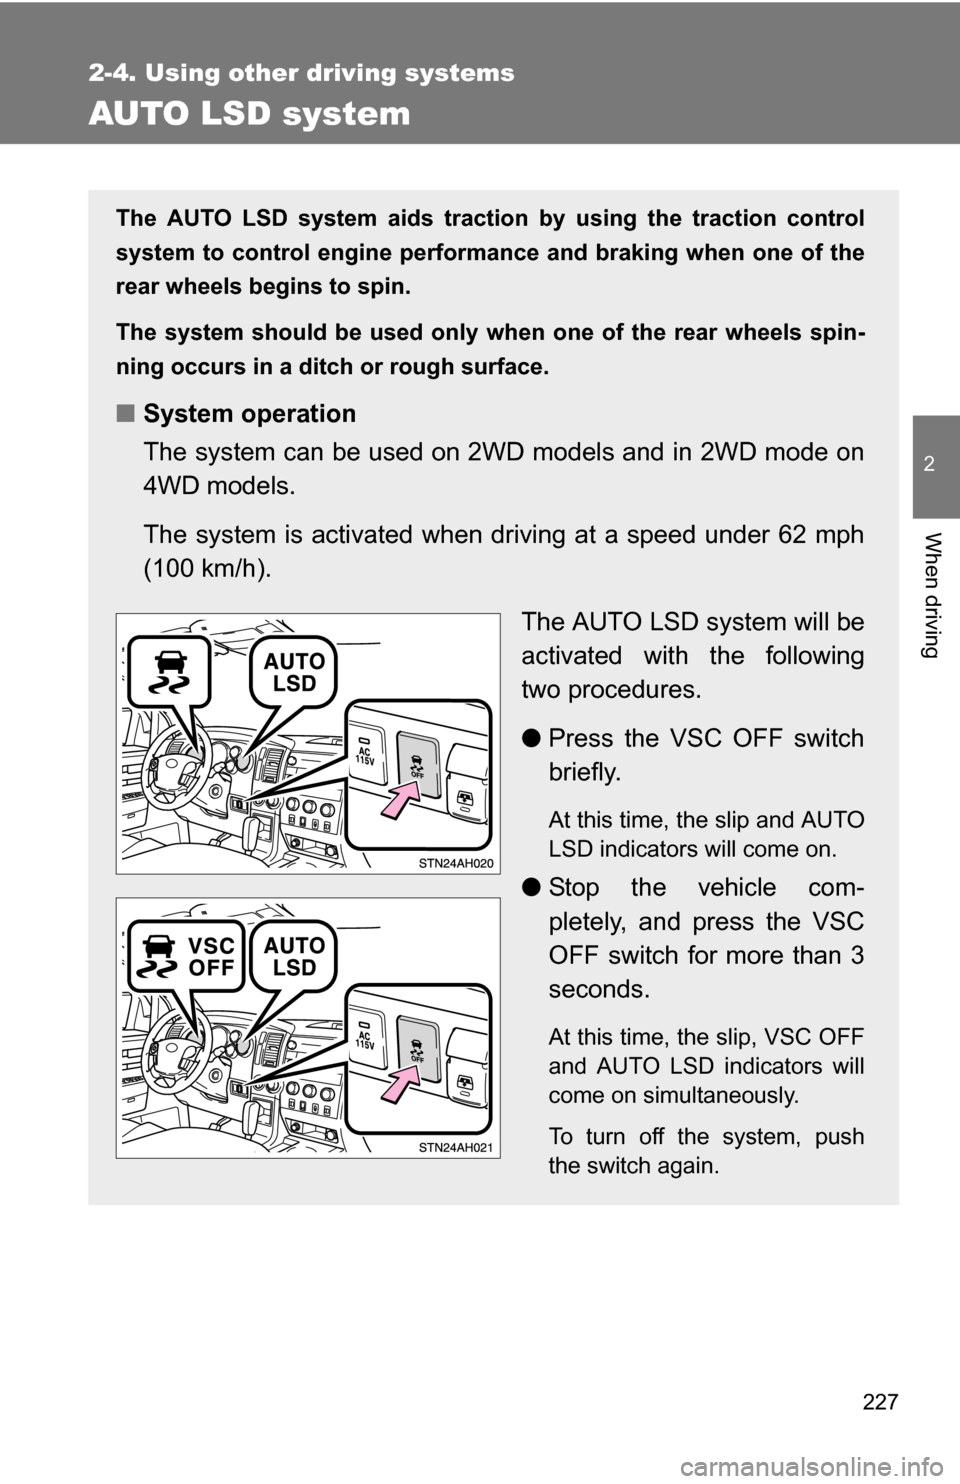
●Press the VSC OFF switch
briefly.
At this time, the slip and AUTO
LSD indicators will come on.
●Stop the vehicle com-
pletely, and press the VSC
OFF switch for more than 3
seconds.
At this time, the slip, VSC OFF
and AUTO LSD indicators will
come on simultaneously.
To turn off the system, push
the switch again.
Page 232 of 672
232 2-4. Using other driving systems
To disable VSC and/or TRAC (2WD models and 2WD mode on 4WD models)
If the vehicle gets stuck in fresh snow or mud, VSC and TRAC may
reduce power from the engine to the wheels. You may need to turn
the system off to enable you to rock the vehicle in order to free it.
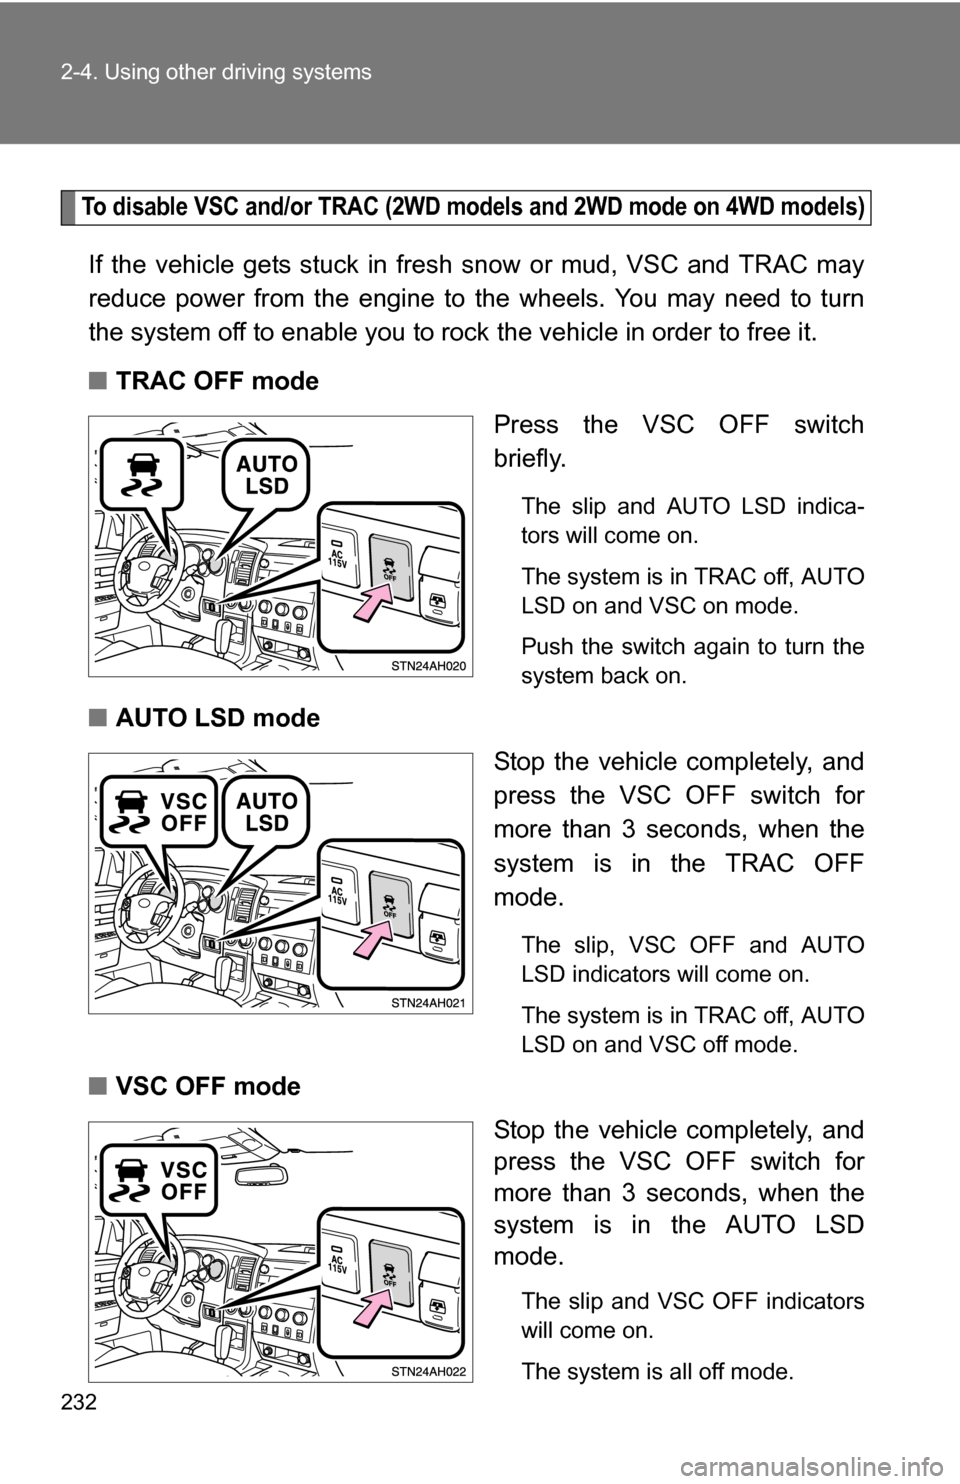
■ TRAC OFF mode
Press the VSC OFF switch
briefly.
The slip and AUTO LSD indica-
tors will come on.
The system is in TRAC off, AUTO
LSD on and VSC on mode.
Push the switch again to turn the
system back on.
■AUTO LSD mode
Stop the vehicle completely, and
press the VSC OFF switch for
more than 3 seconds, when the
system is in the TRAC OFF
mode.
The slip, VSC OFF and AUTO
LSD indicators will come on.
The system is in TRAC off, AUTO
LSD on and VSC off mode.
■VSC OFF mode
Stop the vehicle completely, and
press the VSC OFF switch for
more than 3 seconds, when the
system is in the AUTO LSD
mode.
The slip and VSC OFF indicators
will come on.
The system is all off mode.
Page 233 of 672
233
2-4. Using other
driving systems
2
When driving
To disable VSC and A-TRAC (4WD mode on 4WD models)
If the vehicle gets stuck in fresh snow or mud, VSC may reduce
power from the engine to the wheels. You may need to turn VSC and
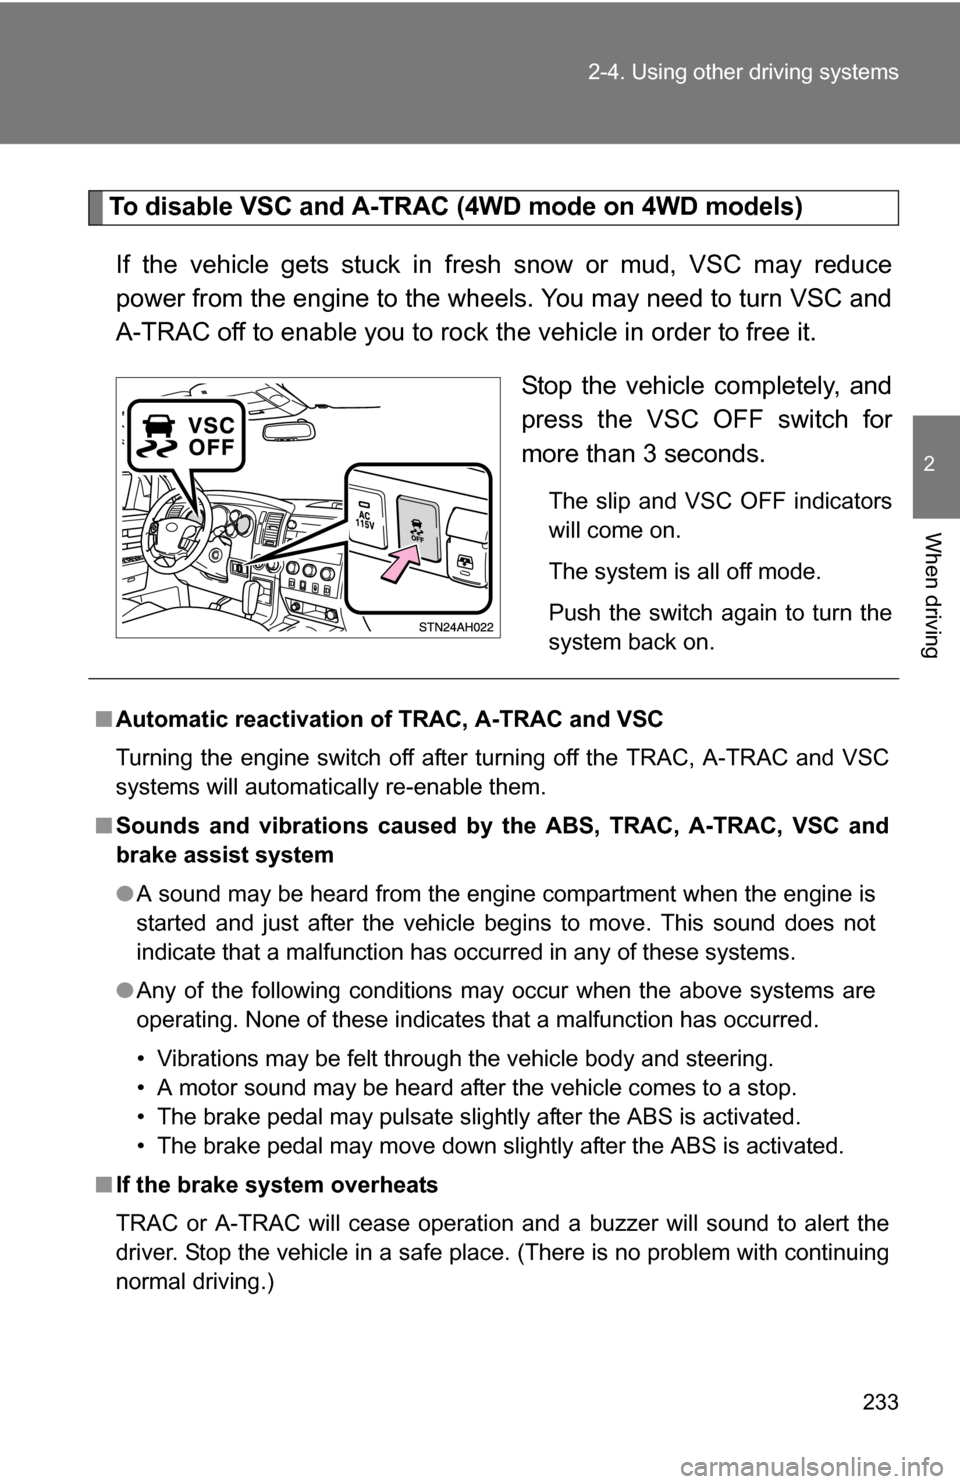
A-TRAC off to enable you to rock the vehicle in order to free it. Stop the vehicle completely, and
press the VSC OFF switch for
more than 3 seconds.
The slip and VSC OFF indicators
will come on.
The system is all off mode.
Push the switch again to turn the
system back on.
■Automatic reactivation of TRAC, A-TRAC and VSC
Turning the engine switch off after turning off the TRAC, A-TRAC and VSC
systems will automatically re-enable them.
■ Sounds and vibrations caused by the ABS, TRAC, A-TRAC, VSC and
brake assist system
●A sound may be heard from the engine compartment when the engine is
started and just after the vehicle begins to move. This sound does not
indicate that a malfunction has occurred in any of these systems.
● Any of the following conditions may occur when the above systems are
operating. None of these indicates that a malfunction has occurred.
• Vibrations may be felt through the vehicle body and steering.
• A motor sound may be heard after the vehicle comes to a stop.
• The brake pedal may pulsate slightly after the ABS is activated.
• The brake pedal may move down slightly after the ABS is activated.
■ If the brake system overheats
TRAC or A-TRAC will cease operation and a buzzer will sound to alert the
driver. Stop the vehicle in a safe place. (There is no problem with continuing
normal driving.)
Page 248 of 672
248 2-5. Driving information
Regulations on the use of snow chains● Regulations regarding the use of tire chains vary according to loca-
tion and type of road. Always check local regu lations before install-
ing chains.
● Install the chains on the rear tires.
● Retighten the chains after drivi ng 1/4 - 1/2 mile (0.5 - 1.0 km).
■Snow chain installation
Observe the following precautions when installing and removing chains.
●Install and remove tire chains in a safe location.
● Install tire chains on the rear tires only. Do not install tire chains on the
front tires.
● Install tire chains following the instructions provided in the accompanying
instructions.
CAUTION
■Driving with snow tires
Observe the following precautions to reduce the risk of accidents.
Failing to do so may result in a loss of vehicle control and cause death or
serious injury.
●Use tires of the size specified for your vehicle.
● Maintain the recommended level of air pressure.
● Do not drive in excess of 75 mph (120 km/h) regardless of the type of
snow tires being used.
● Snow tires should be installed on all wheels.
● 4WD models:
Do not mix tires of different makes, models, tread patterns or treadwear.
Page 269 of 672
269
2-5. Driving information
2
When driving
CAUTION
■
Tongue load or king pin weight
●A recommended tongue load or king pin weight varies in accordance with
the types of trailers or towing as described below.
● In order to ensure the recommended values shown below, the trailer must
be loaded by referring to the following instructions.
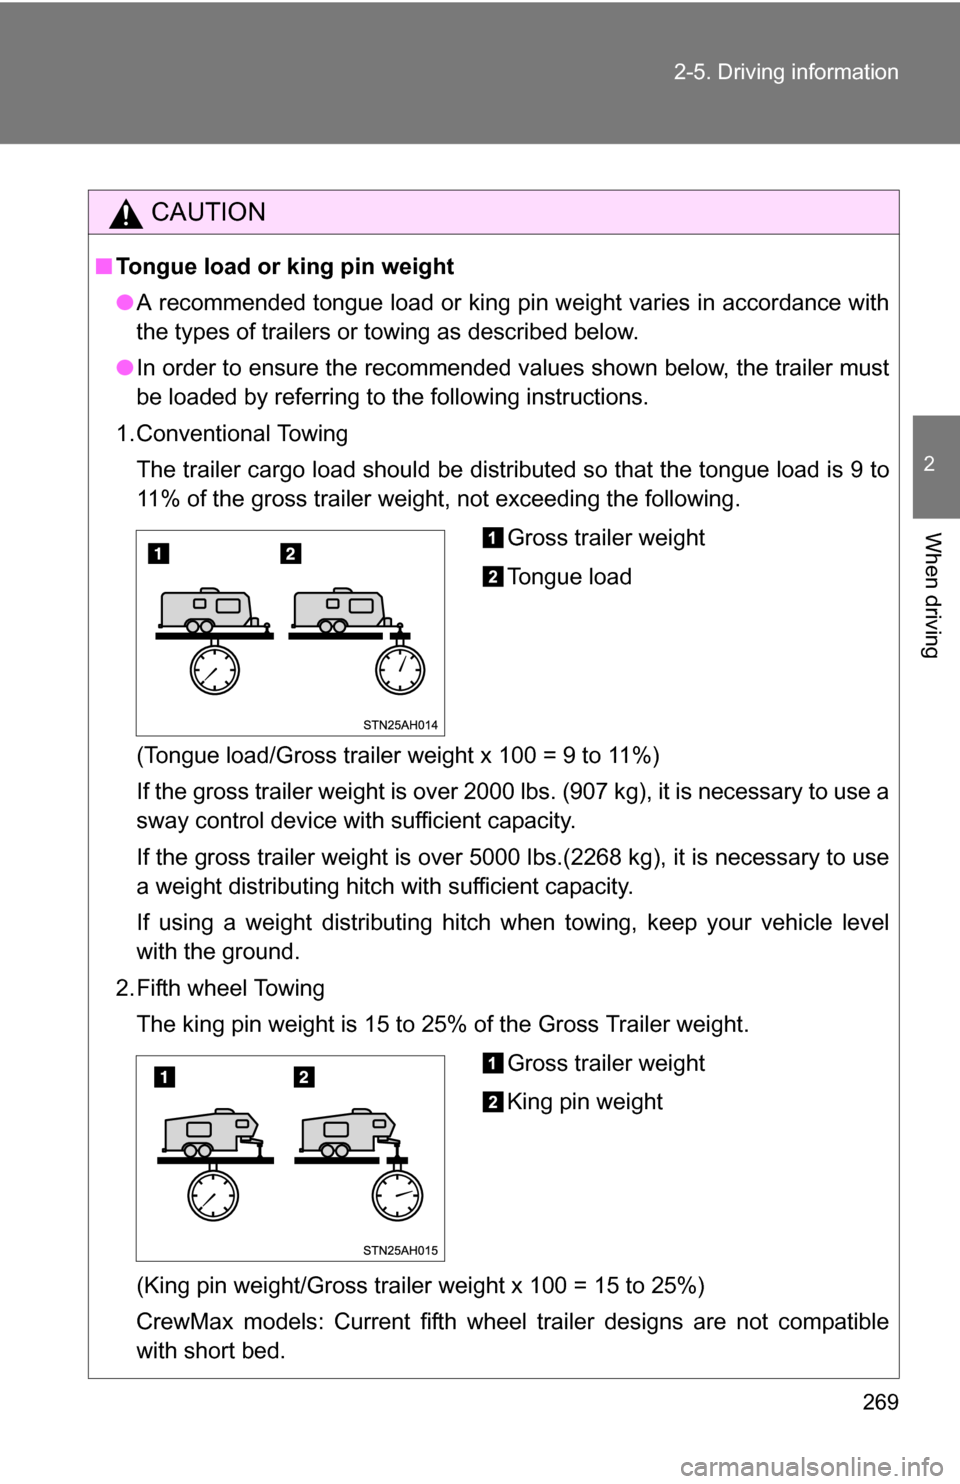
1. Conventional Towing The trailer cargo load should be distributed so that the tongue load is 9 to
11% of the gross trailer weight, not exceeding the following.
(Tongue load/Gross trailer weight x 100 = 9 to 11%)
If the gross trailer weight is over 2000 lbs. (907 kg), it is necessary to use a
sway control device with sufficient capacity.
If the gross trailer weight is over 5000 lbs.(2268 kg), it is necessary to use
a weight distributing hitch with sufficient capacity.
If using a weight distributing hitch when towing, keep your vehicle level
with the ground.
2. Fifth wheel Towing The king pin weight is 15 to 25% of the Gross Trailer weight.
(King pin weight/Gross trailer weight x 100 = 15 to 25%)
CrewMax models: Current fifth wheel trailer designs are not compatible
with short bed.
Gross trailer weight
Tongue load
Gross trailer weight
King pin weight