key TOYOTA TUNDRA 2010 2.G Owner's Manual
[x] Cancel search | Manufacturer: TOYOTA, Model Year: 2010, Model line: TUNDRA, Model: TOYOTA TUNDRA 2010 2.GPages: 724, PDF Size: 13.74 MB
Page 146 of 724
146 1-7. Safety information
CAUTION
■Child restraint precautions
●Regular Cab models (Bench type seat): Never install a rear-facing child
restraint system on the center seat even if the passenger airbag off switch
is in the OFF position. In the event of an accident, the force of the rapid
inflation of the driver airbag could cause death or serious injury to the
child.
● Double Cab and CrewMax models: A forward-facing child restraint system
may be installed on the front passenger seat only when it is unavoidable.
A child restraint system that requires a top tether strap should not be used
in the front passenger seat since there is no top tether strap anchor for the
front passenger seat. Adjust the seatback as upright as possible and
always move the seat as far back as possible even if the AIR BAG OFF
indicator light is illuminated, because the front passenger airbag could
inflate with considerable speed and force. Otherwise, the child may be
killed or seriously injured.
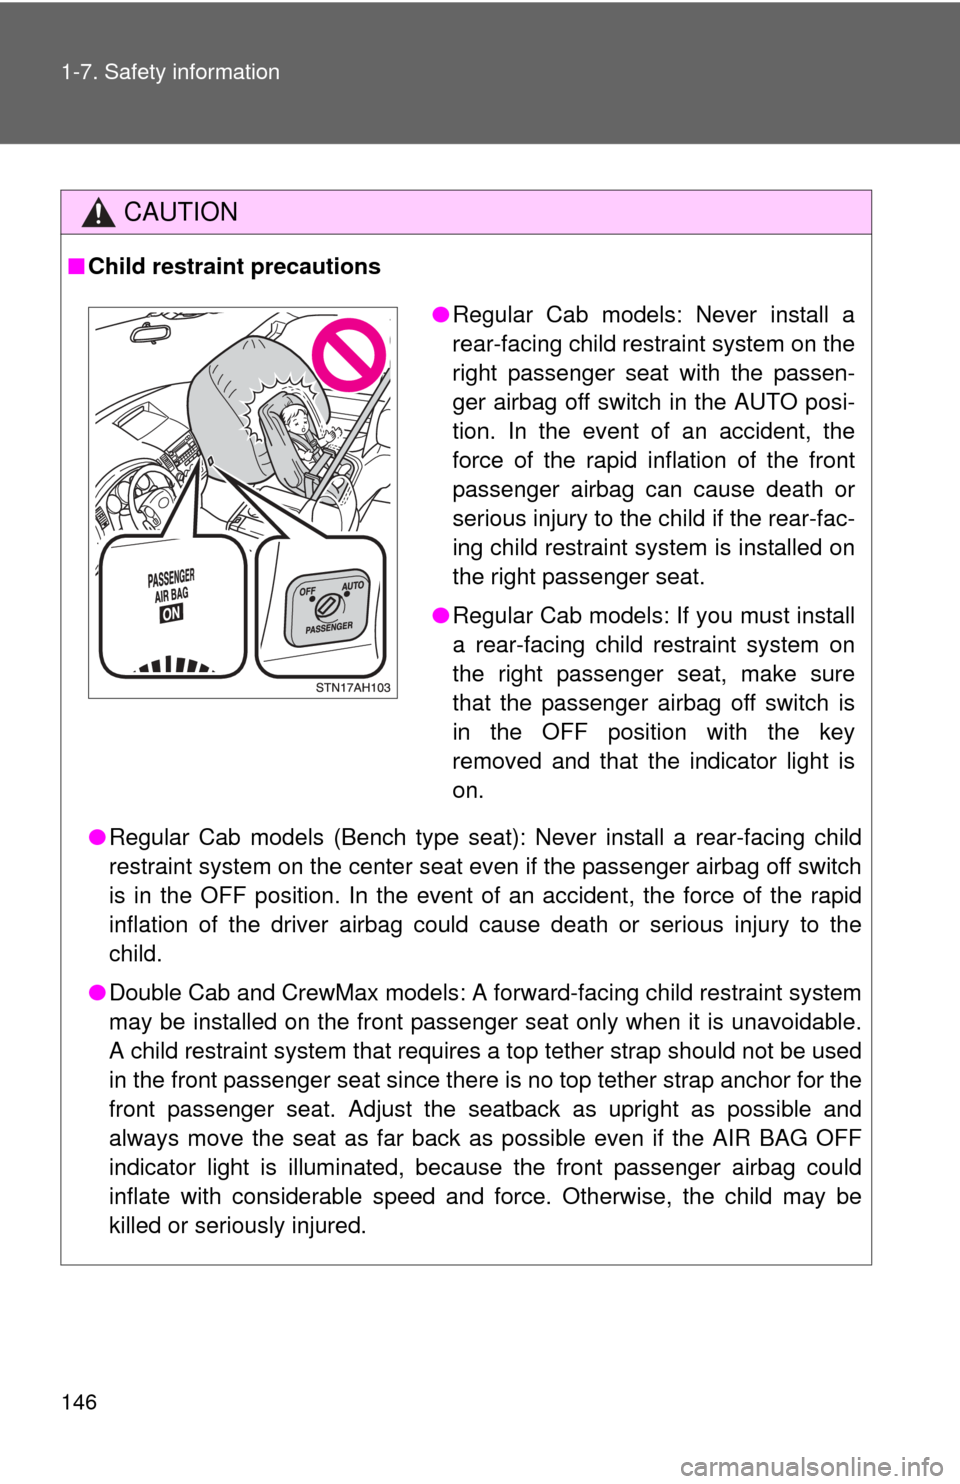
●Regular Cab models: Never install a
rear-facing child restraint system on the
right passenger seat with the passen-
ger airbag off switch in the AUTO posi-
tion. In the event of an accident, the
force of the rapid inflation of the front
passenger airbag can cause death or
serious injury to the child if the rear-fac-
ing child restraint system is installed on
the right passenger seat.
● Regular Cab models: If you must install
a rear-facing child restraint system on
the right passenger seat, make sure
that the passenger airbag off switch is
in the OFF position with the key
removed and that the indicator light is
on.
Page 151 of 724
151
1-7. Safety information
1
Before driving
Installing the child restraint system on the right passenger seat
(Regular Cab models)
When you install a child restraint system which belongs to a passen-
ger risk group on the right passenger seat, do the following proce-
dure.
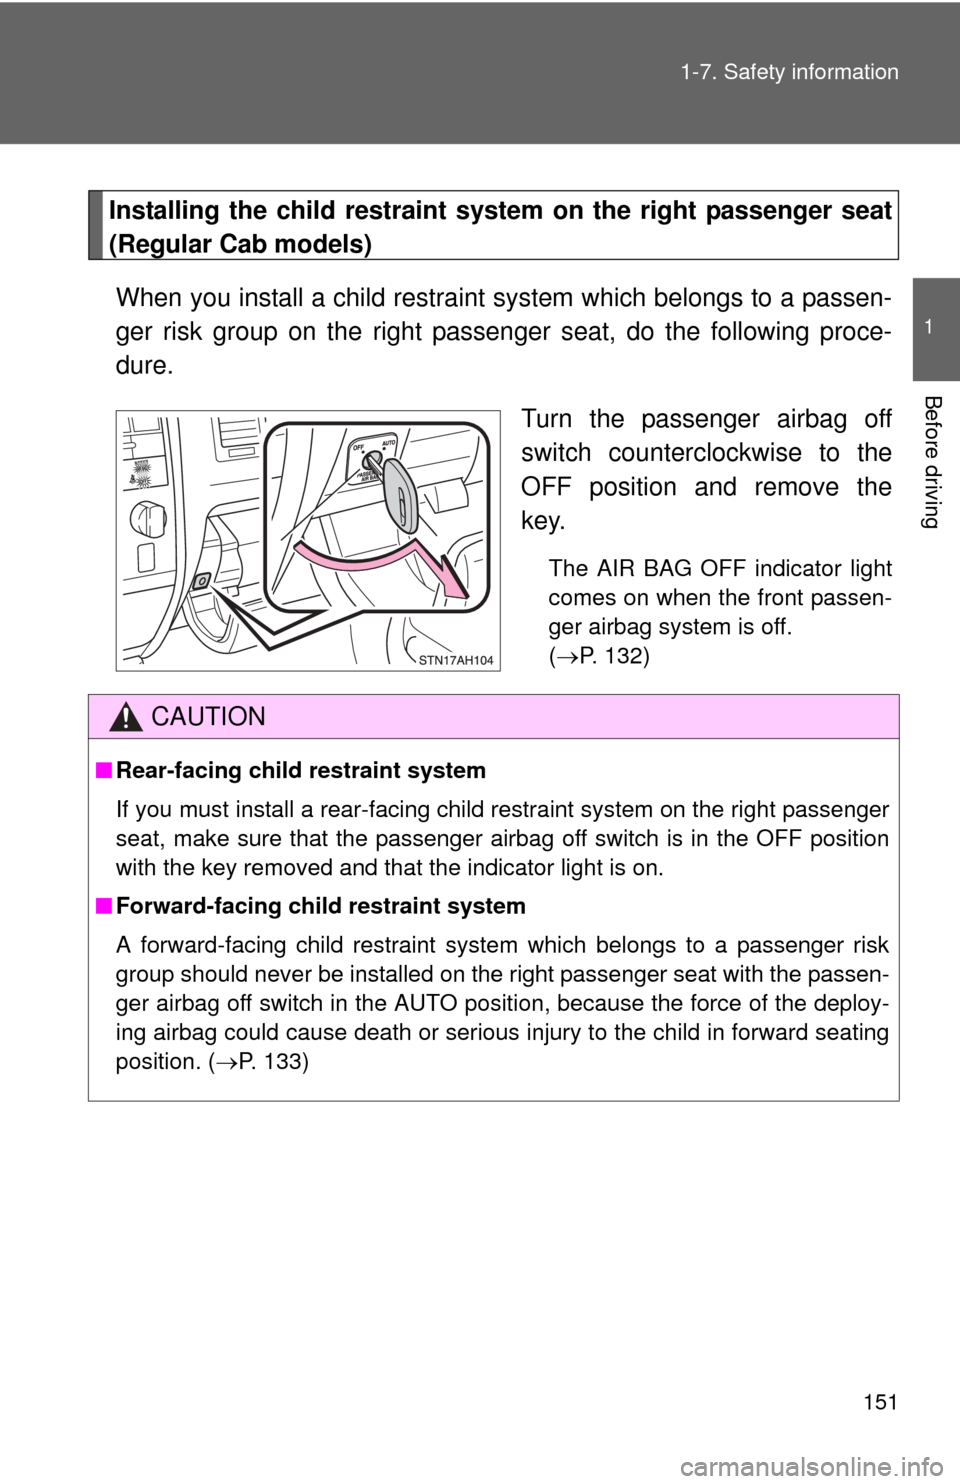
Turn the passenger airbag off
switch counterclockwise to the
OFF position and remove the
key.
The AIR BAG OFF indicator light
comes on when the front passen-
ger airbag system is off.
(P. 132)
CAUTION
■ Rear-facing child restraint system
If you must install a rear-facing child restraint system on the right passenger
seat, make sure that the passenger airbag off switch is in the OFF position
with the key removed and that the indicator light is on.
■ Forward-facing child restraint system
A forward-facing child restraint system which belongs to a passenger risk
group should never be installed on the right passenger seat with the passen-
ger airbag off switch in the AUTO position, because the force of the deploy-
ing airbag could cause death or serious injury to the child in forward seating
position. ( P. 133)
Page 174 of 724
174
2-1. Driving procedures
Driving the vehicle
The following procedures should be observed to ensure safe driv-
ing.
■ Starting the engine ( P. 183)
■ Driving
With the brake pedal depressed, shift the shift lever to D. ( P. 186)
Release the parking brake. ( P. 192)
Gradually release the brake pedal and gently depress the
accelerator pedal to accelerate the vehicle.
■ Stopping
With the shift lever in D, depress the brake pedal.
If necessary, set the parking brake.
When the vehicle is stopped for an extended period of time, shift
the shift lever to P or N. ( P. 186)
■Parking the vehicle
With the shift lever in D, depress the brake pedal.
Set the parking brake. ( P. 192)
Shift the shift lever to P. ( P. 186)
When parking on a hill, if necessary, block the wheels.
Turn the engine switch off to stop the engine.
Lock the door, making sure that you have the key on your
person.
Page 183 of 724
183
2-1. Driving procedures
2
When driving
Engine (ignition) switch
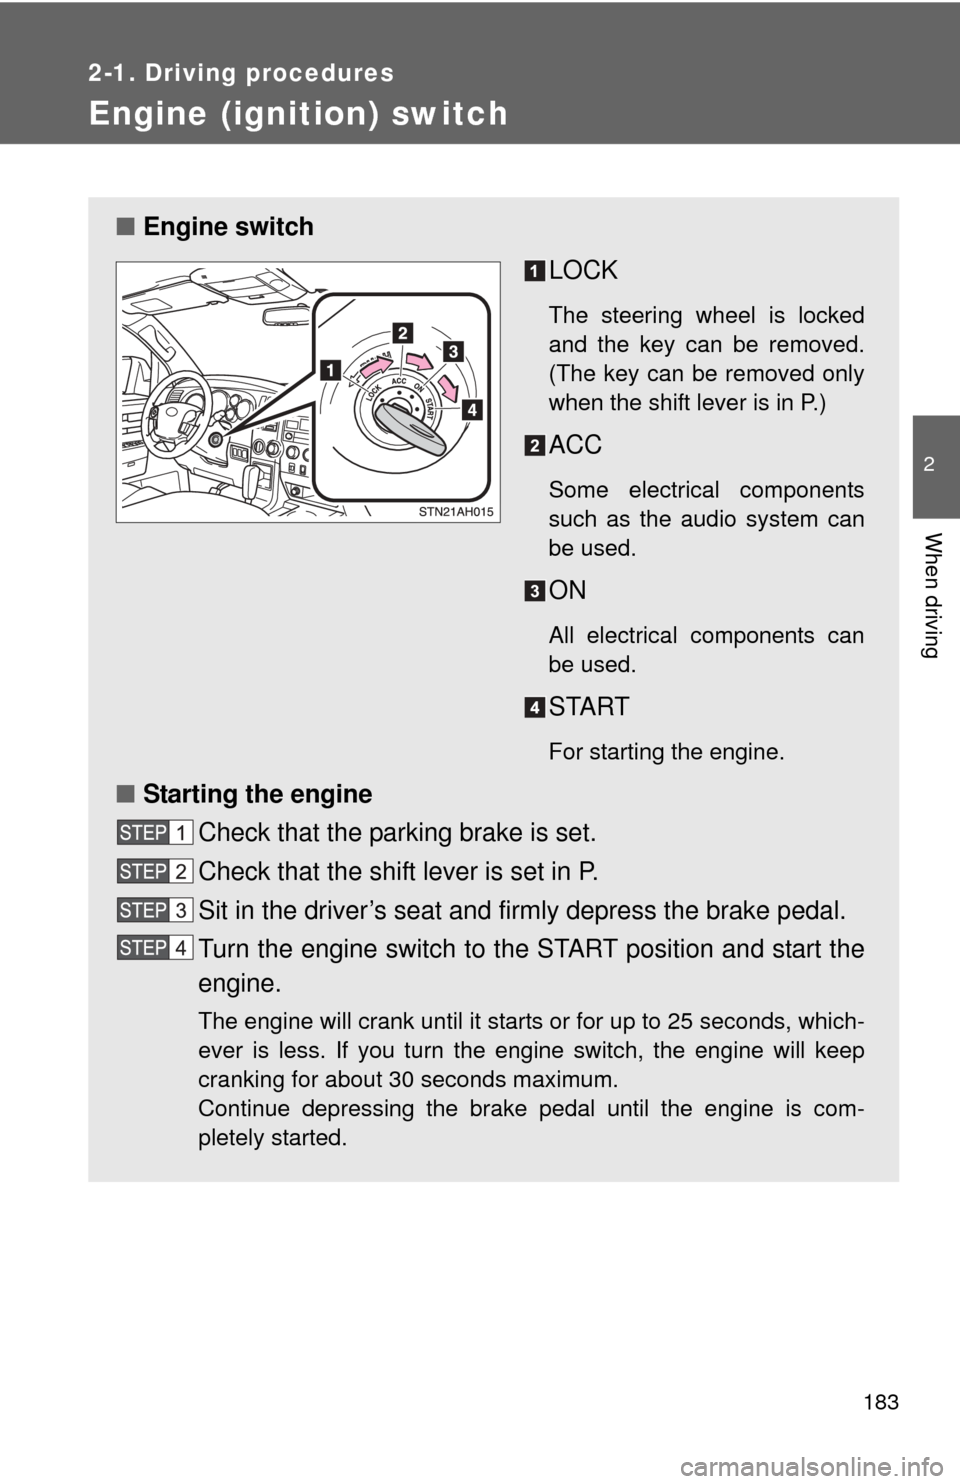
■Engine switch
LOCK
The steering wheel is locked
and the key can be removed.
(The key can be removed only
when the shift lever is in P.)
ACC
Some electrical components
such as the audio system can
be used.
ON
All electrical components can
be used.
START
For starting the engine.
■Starting the engine
Check that the parking brake is set.
Check that the shift lever is set in P.
Sit in the driver’s seat and firmly depress the brake pedal.
Turn the engine switch to the START position and start the
engine.
The engine will crank until it starts or for up to 25 seconds, which-
ever is less. If you turn the engine switch, the engine will keep
cranking for about 30 seconds maximum.
Continue depressing the brake pedal until the engine is com-
pletely started.
Page 184 of 724
184 2-1. Driving procedures
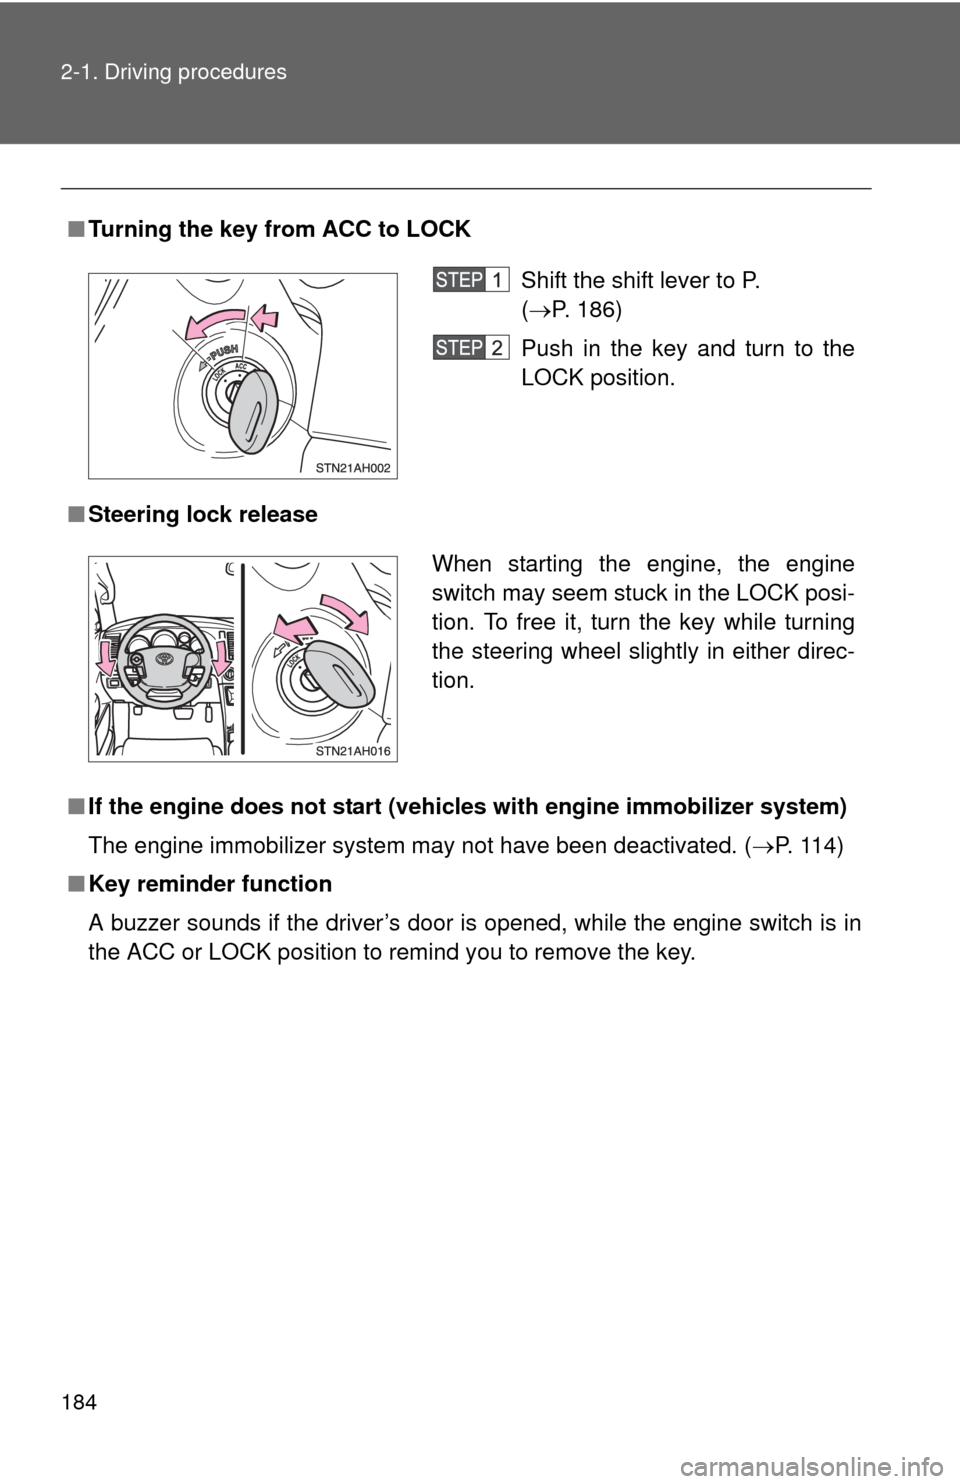
■Turning the key from ACC to LOCK
■ Steering lock release
■ If the engine does not start (vehic les with engine immobilizer system)
The engine immobilizer system may not have been deactivated. ( P. 114)
■ Key reminder function
A buzzer sounds if the driver’s door is opened, while the engine switch is in
the ACC or LOCK position to remind you to remove the key.
Shift the shift lever to P.
(P. 186)
Push in the key and turn to the
LOCK position.
When starting the engine, the engine
switch may seem stuck in the LOCK posi-
tion. To free it, turn the key while turning
the steering wheel slightly in either direc-
tion.
Page 206 of 724
206 2-2. Instrument cluster
Average Speed
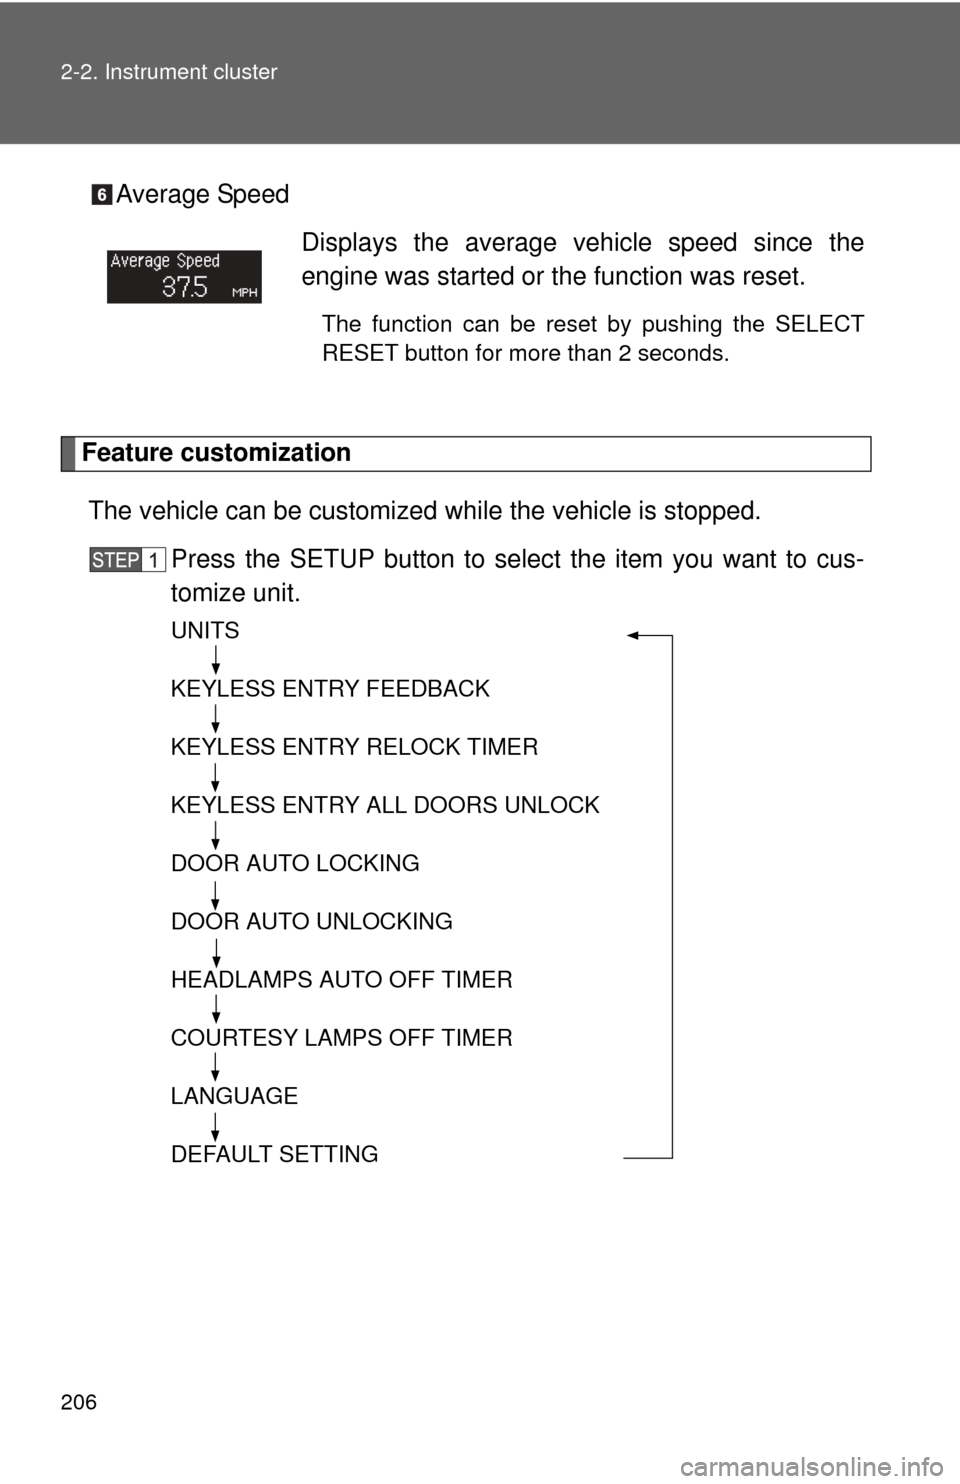
Feature customizationThe vehicle can be customized while the vehicle is stopped.
Press the SETUP button to select the item you want to cus-
tomize unit.
UNITS
KEYLESS ENTRY FEEDBACK
KEYLESS ENTRY RELOCK TIMER
KEYLESS ENTRY ALL DOORS UNLOCK
DOOR AUTO LOCKING
DOOR AUTO UNLOCKING
HEADLAMPS AUTO OFF TIMER
COURTESY LAMPS OFF TIMER
LANGUAGE
DEFAULT SETTING
Displays the average vehicle speed since the
engine was started or the function was reset.
The function can be reset by pushing the SELECT
RESET button for more than 2 seconds.
Page 207 of 724

207
2-2. Instrument cluster
2
When driving
Press the SELECT RESET butt
on to customize the items.
ItemsScreen textSelect in this order
To select
US (ENGLISH)
or METRIC
(P. 208)
UNITS
Door lock/
unlock warning
functionKEYLESS ENTRY
FEEDBACK
Time for auto-
matic door lock
functionKEYLESS ENTRY
RELOCK TIMER
Double switch
operation to
unlock all the
doorsKEYLESS ENTRY
ALL DOORS
UNLOCK
Automatic door
locking functionDOOR AUTO
LOCKING
Automatic door
unlocking func-
tionDOOR AUTO
UNLOCKING
Time period
before lights
turn off (if a door
is opened and
closed, and
engine switch is
in ACC or
LOCK)
HEADLAMPS AUTO
OFF TIMER
Time period
before lights
turn offCOURTESY LAMPS
OFF TIMER
Selecting the
languageLANGUAGE
METRIC
US (ENGLISH)
LAMPS + TONE*LAMPS
TONE
OFF
60 SECONDS*120 SECONDS
30 SECONDS OFF
2 PRESSES*1 PRESS
SHIFT OUT
OF PARKABOVE 12 MPH*
(20 km/h)
OFF
SHIFT TO PARK*DRIVER DOOR
OPEN
OFF
30 SECONDS*60 SECONDS
90 SECONDS
0 SECONDS
15 SECONDS*30 SECONDS
8 SECONDS
ENGLISH FRENCH
SPANISH
Page 366 of 724
366 3-3. Using the Bluetooth® audio system
Using the Bluetooth® audio system for the first time
Before using the Bluetooth
® audio system, it is necessary to register
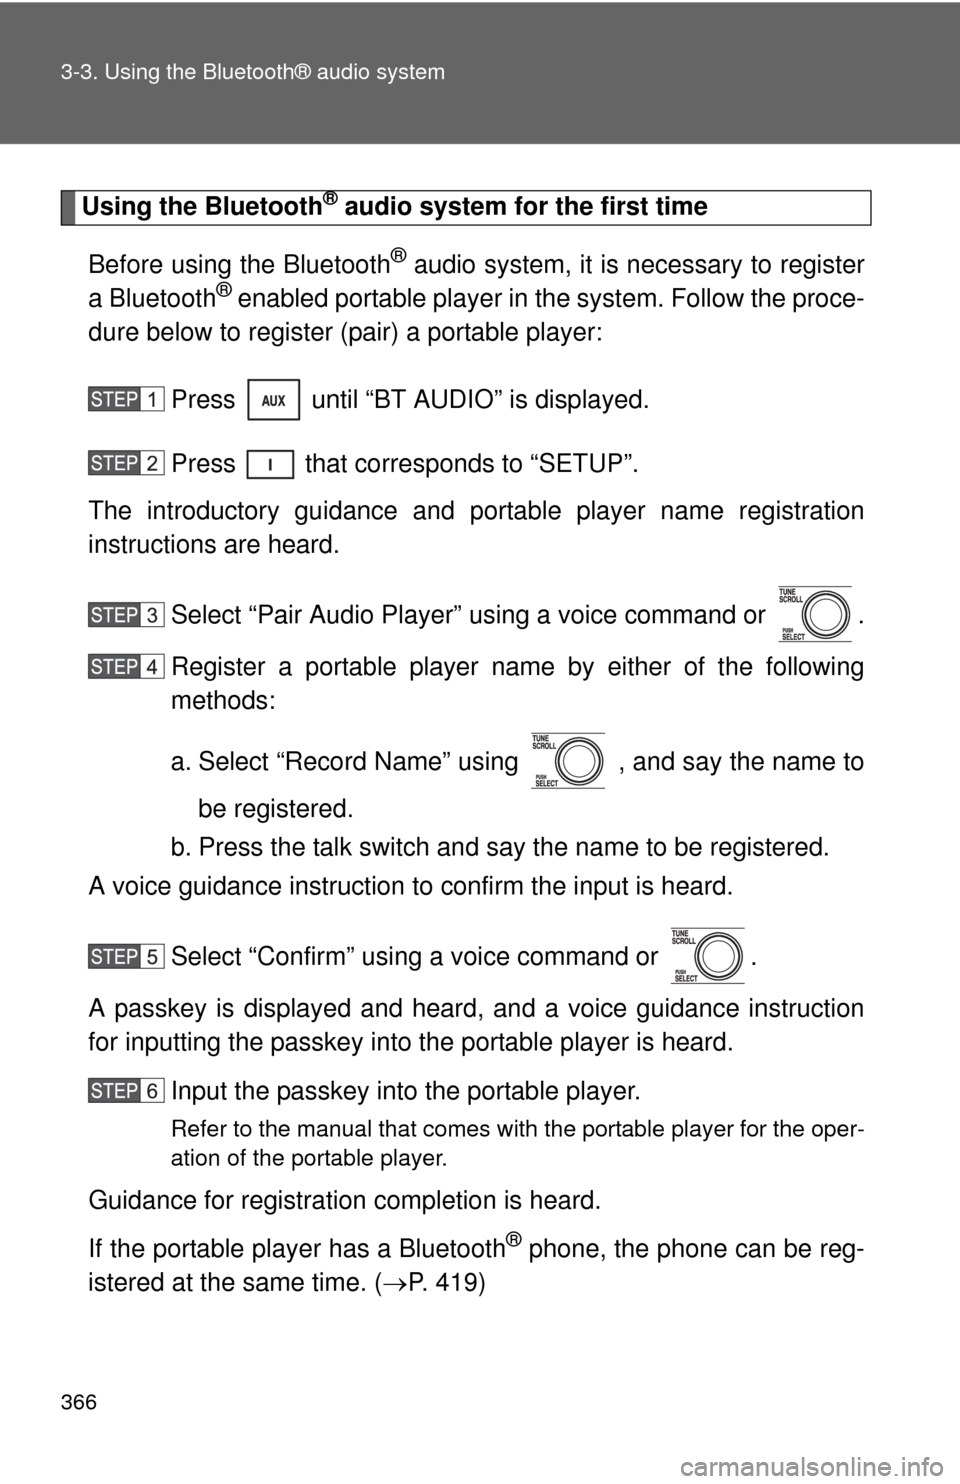
a Bluetooth® enabled portable player in the system. Follow the proce-
dure below to register (pair) a portable player:
Press until “BT AUDIO” is displayed.
Press that corresponds to “SETUP”.
The introductory guidance and port able player name registration
instructions are heard.
Select “Pair Audio Player” using a voice command or .
Register a portable player nam e by either of the following
methods:
a. Select “Record Name” using , and say the name to
be registered.
b. Press the talk switch and say the name to be registered.
A voice guidance instruction to confirm the input is heard.
Select “Confirm” using a voice command or .
A passkey is displayed and heard, and a voice guidance instruction
for inputting the passkey into the portable player is heard. Input the passkey into the portable player.
Refer to the manual that comes with the portable player for the oper-
ation of the portable player.
Guidance for registration completion is heard.
If the portable player has a Bluetooth
® phone, the phone can be reg-
istered at the same time. ( P. 419)
Page 367 of 724
367
3-3. Using the Bluetooth® audio system
3
Interior and exterior features
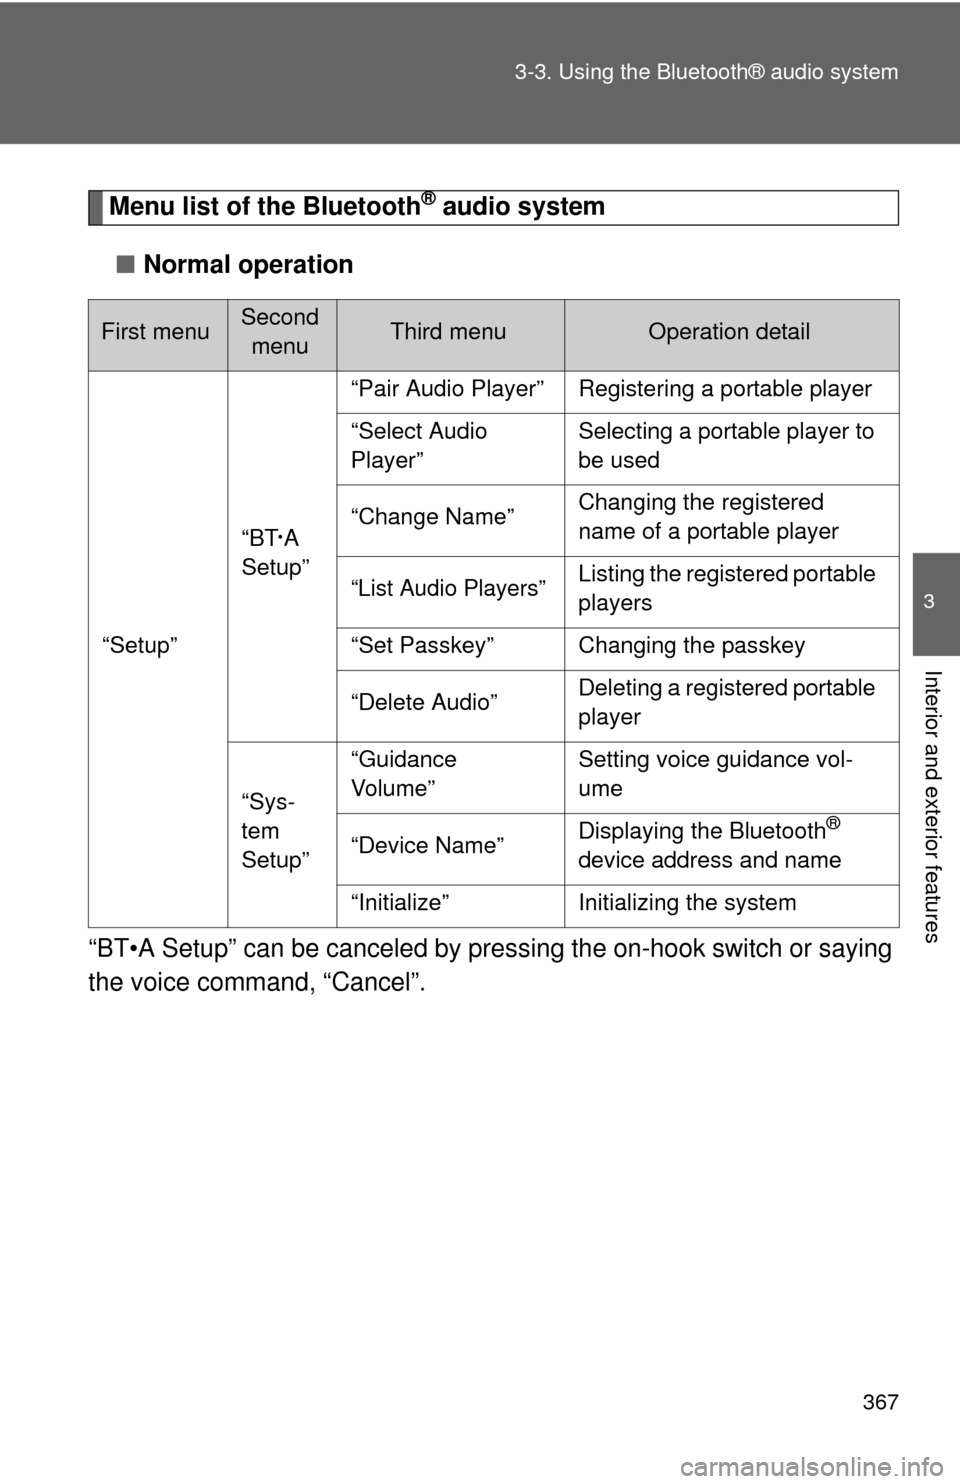
Menu list of the Bluetooth® audio system
■ Normal operation
“BT•A Setup” can be canceled by pres sing the on-hook switch or saying
the voice comm and, “Cancel”.
First menuSecond
menuThird menuOperation detail
“Setup” “BT
•A
Setup” “Pair Audio Player” Registering a portable player
“Select Audio
Player”
Selecting a portable player to
be used
“Change Name” Changing the registered
name of a portable player
“List Audio Players”Listing the registered portable
players
“Set Passkey” Changing the passkey
“Delete Audio” Deleting a registered portable
player
“Sys-
tem
Setup” “Guidance
Vo l u m e”
Setting voice guidance vol-
ume
“Device Name” Displaying the Bluetooth
®
device address and name
“Initialize” Initializing the system
Page 368 of 724
368 3-3. Using the Bluetooth® audio system
■When using a voice command
For numbers, say a combination of single digits from zero to nine.
Say the command correctly and clearly.
■ The system may not recognize your voice in the following situations:
●When driving on rough roads
● When driving at high speeds
● When air is blowing out of the vents onto the microphone
● When the air conditioning fan emits a loud noise
■ Operations that cannot be performed while driving
● Operating the system with
● Registering a portable player to the system
■ Changing the passkey
P. 374