TOYOTA TUNDRA 2014 2.G Owners Manual
TUNDRA 2014 2.G
TOYOTA
TOYOTA
https://www.carmanualsonline.info/img/14/6838/w960_6838-0.png
TOYOTA TUNDRA 2014 2.G Owners Manual
Trending: fuel reserve, engine oil capacity, sport mode, cooling, wheelbase, dimensions, warning light
Page 331 of 576
3315-11. Bluetooth®
5
Multimedia
NOTICE
■When leaving the vehicle
Do not leave your portable audio player or cellular phone in the vehicle. The
inside of the vehicle may become hot, causing damage to the portable
audio player or cellular phone.
Page 332 of 576
3325-12. Antenna
Antenna
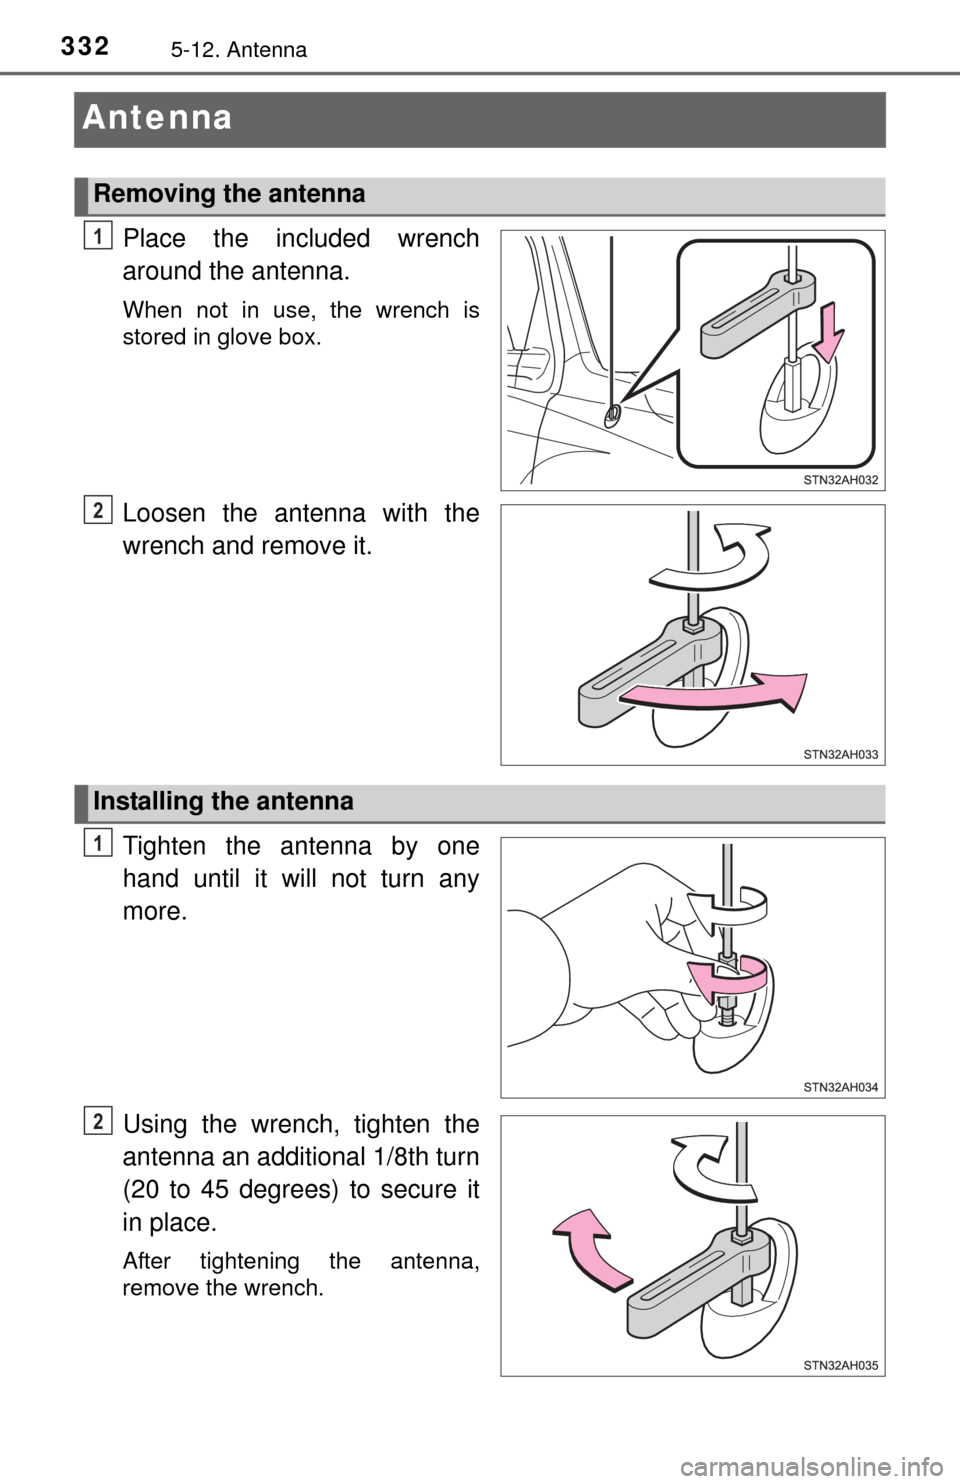
Place the included wrench
around the antenna.
When not in use, the wrench is
stored in glove box.
Loosen the antenna with the
wrench and remove it.
Tighten the antenna by one
hand until it will not turn any
more.
Using the wrench, tighten the
antenna an additional 1/8th turn
(20 to 45 degrees) to secure it
in place.
After tightening the antenna,
remove the wrench.
Removing the antenna
1
2
Installing the antenna
1
2
Page 333 of 576
3335-12. Antenna
5
Multimedia
■About the wrench
After using the included wrench, store it in the glove box for safekeeping.
NOTICE
■To avoid damaging the antenna
Remove the antenna in the following situations.
● When using an automatic carwash.
● When the antenna will touch the ceiling of a garage, etc.
● When covering the vehicle with a car cover.
■ Removing the antenna
● For normal driving, make sure the antenna is installed.
● When removing the antenna to use an automatic carwash, etc., be careful
not to lose the antenna. Also, make sure to reinstall the antenna before
driving the vehicle.
■ Using the wrench
● When installing or removing the antenna, use the included wrench.
● Be careful not to scratch or damage the vehicle body with the wrench.
● Do not over-tighten the antenna.
Over-tightening may damage the antenna.
● Do not use any tools other than the included wrench to install or remove
the antenna.
Otherwise damage may result on the antenna’s finish.
Page 334 of 576
Page 335 of 576

335
6Interior features
6-1. Using the air conditioning system
Manual air conditioning system............................. 336
Automatic air conditioning system............................. 343
Seat heaters/ seat ventilators ................ 350
6-2. Using the interior lights Interior lights list ................ 353• Personal/interior lightsmain switch ................... 354
• Personal/interior
lights ............................. 354
• Cargo lamp main switch ............................ 355 6-3. Using the storage features
List of storage features ..... 356• Glove box...................... 358
• Console box (front separated type seat) ..... 359
• Card holder ................... 360
• Map holder (front bench type seat) ........... 362
• Pen holder .................... 363
• Tissue pocket................ 364
• Overhead console......... 365
• Cup holders .................. 366
• Bottle holders ................ 368
• Auxiliary boxes (front bench type seat) ........... 369
• Storage box .................. 371
Luggage compartment features ........................... 373
6-4. Other interior features Other interior features ....... 374• Sun visors ..................... 374
• Vanity mirrors................ 374
• Clock ............................. 375
• Outside temperature display........................... 376
• Power outlets ................ 377
• Armrest ......................... 379
• Assist grips ................... 380
Garage door opener.......... 381
Compass ........................... 387
Page 336 of 576
3366-1. Using the air conditioning system
Manual air conditioning system
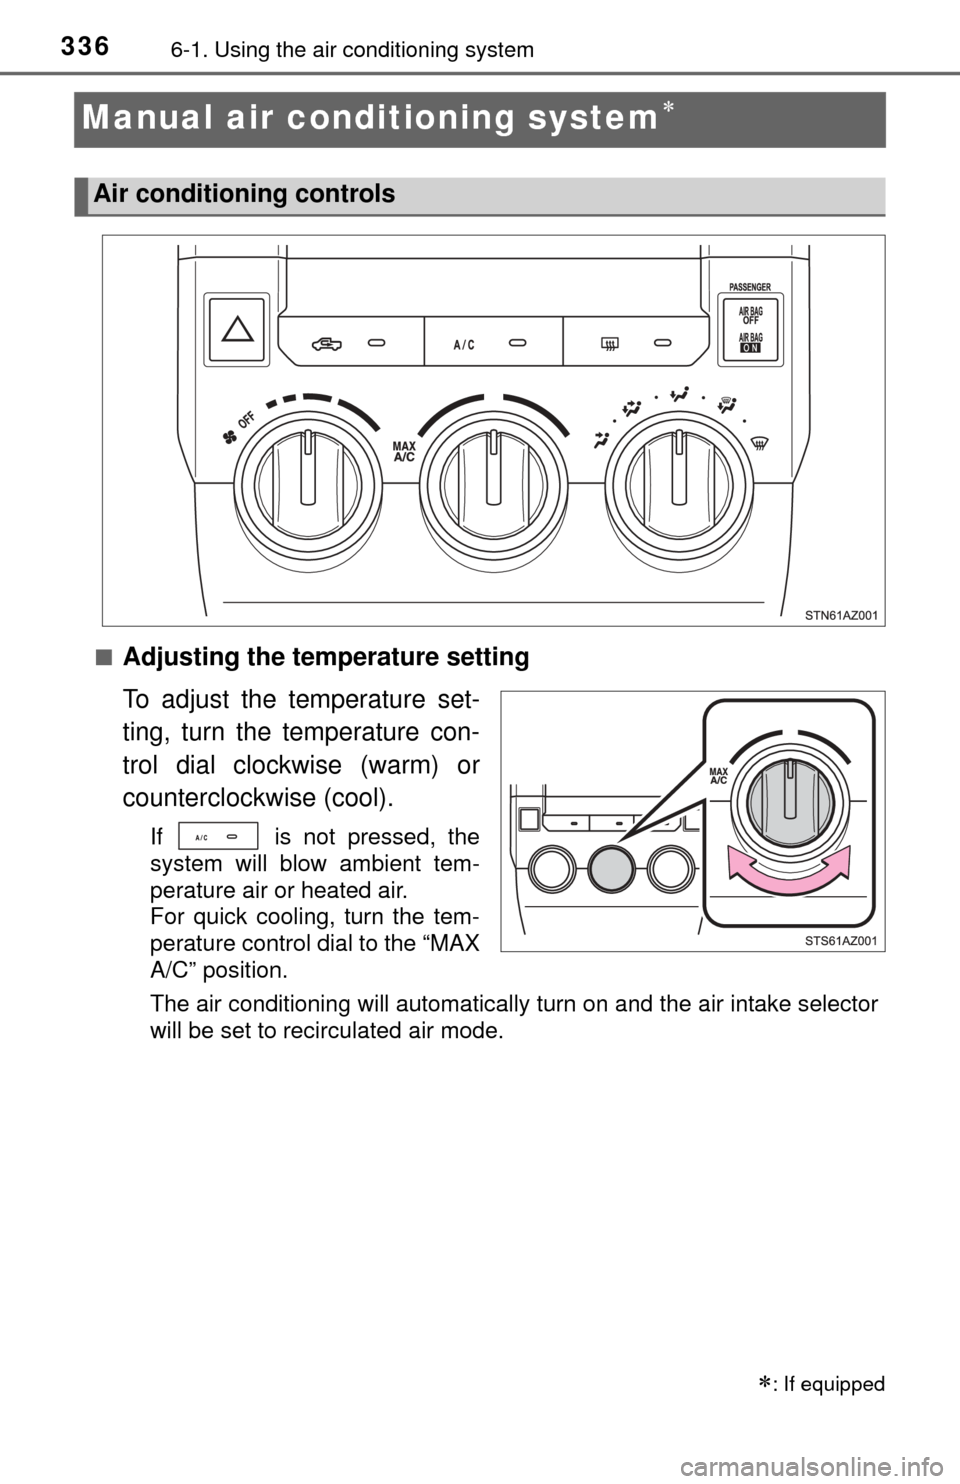
■Adjusting the temperature setting
To adjust the temperature set-
ting, turn the temperature con-
trol dial clockwise (warm) or
counterclockwise (cool).
If is not pressed, the
system will blow ambient tem-
perature air or heated air.
For quick cooling, turn the tem-
perature control dial to the “MAX
A/C” position.
The air conditioning will automatically turn on and the air intake selector
will be set to recirculated air mode.
: If equipped
Air conditioning controls
Page 337 of 576
3376-1. Using the air conditioning system
6
Interior features
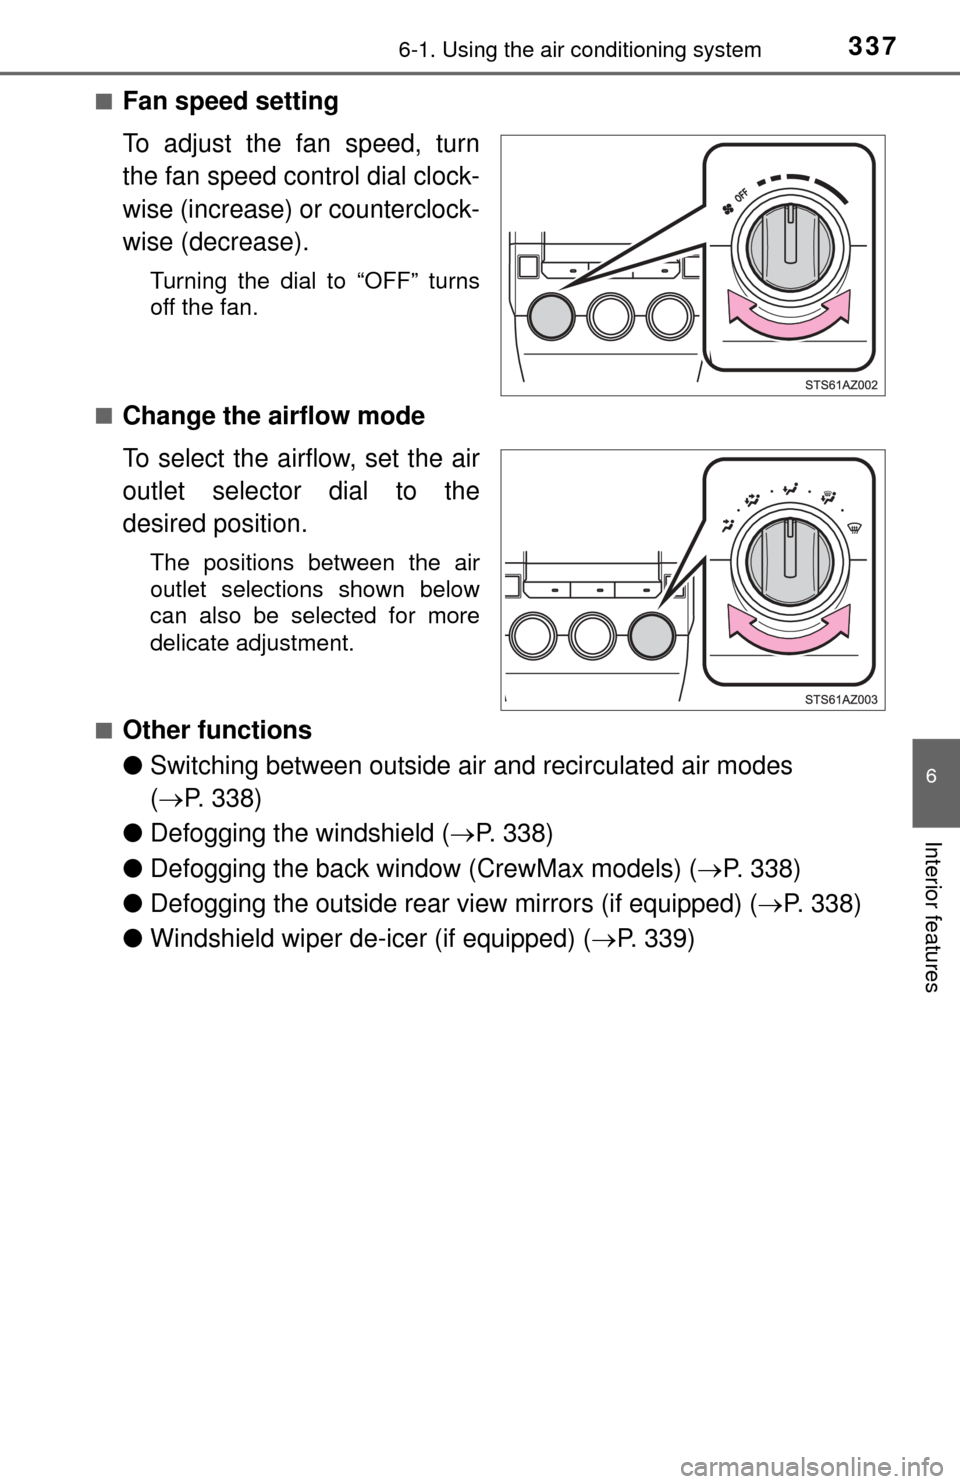
■Fan speed setting
To adjust the fan speed, turn
the fan speed control dial clock-
wise (increase) or counterclock-
wise (decrease).
Turning the dial to “OFF” turns
off the fan.
■
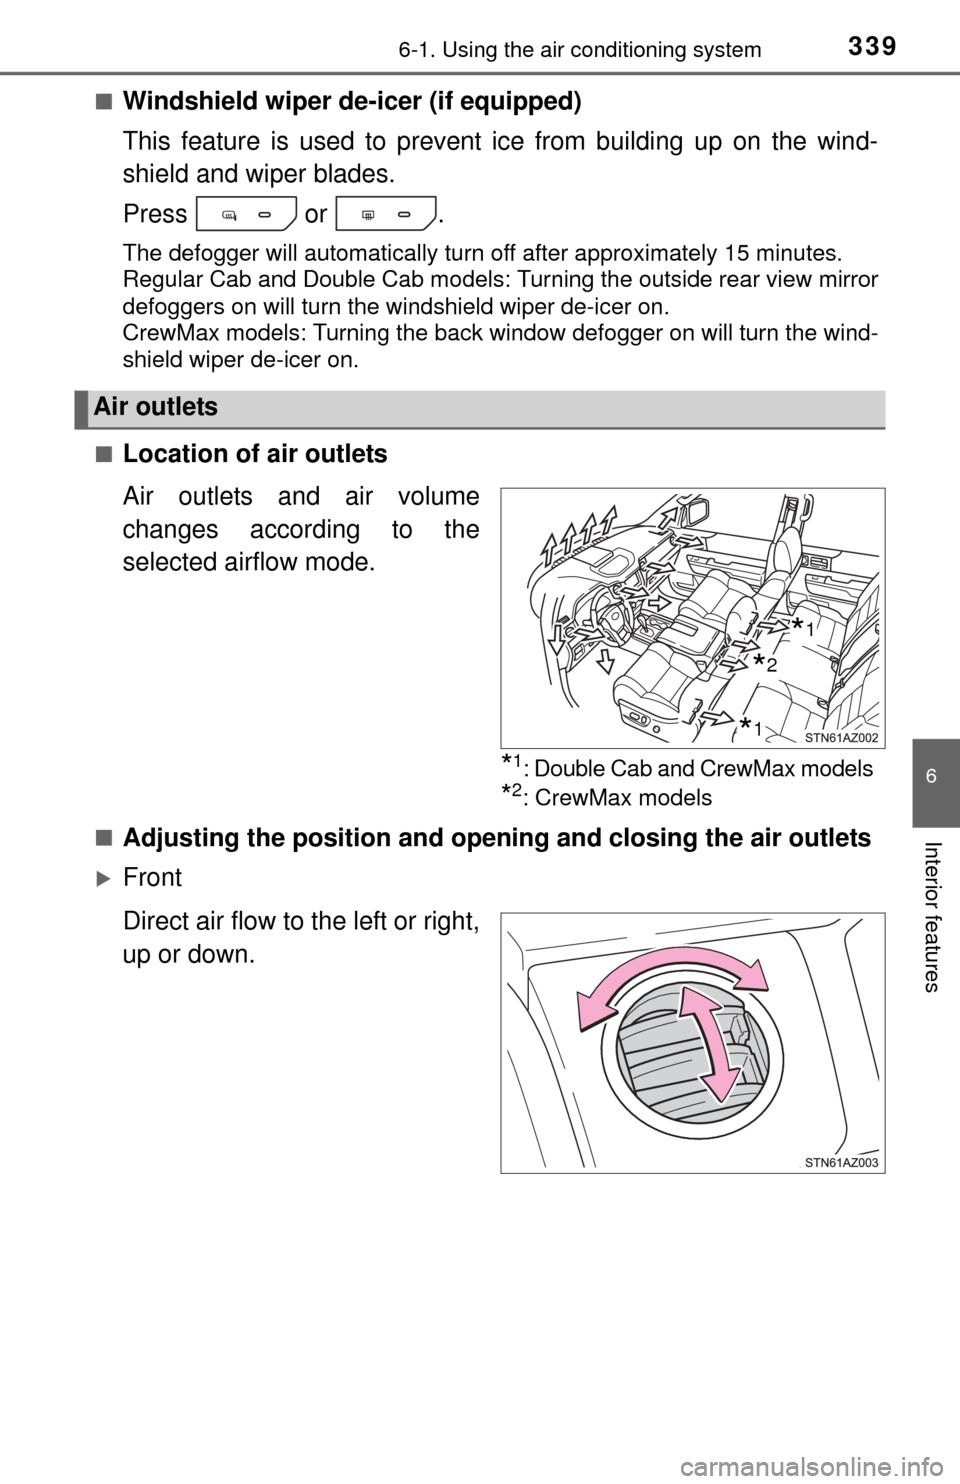
Change the airflow mode
To select the airflow, set the air
outlet selector dial to the
desired position.
The positions between the air
outlet selections shown below
can also be selected for more
delicate adjustment.
■
Other functions
● Switching between outside air and recirculated air modes
( P. 338)
● Defogging the windshield ( P. 338)
● Defogging the back window (CrewMax models) ( P. 338)
● Defogging the outside rear view mirrors (if equipped) ( P. 338)
● Windshield wiper de-icer (if equipped) ( P. 339)
Page 338 of 576
3386-1. Using the air conditioning system
■Switching between outside air and recirculated air modes
Press .
The mode switches between outside air mode (introduces air from
outside the vehicle) (indicator off) and recirculated air mode (recy-
cles air inside the vehicle) (indicator on) each time the button is
pressed.
■Defogging the windshield
Defoggers are used to defog the windshield and front side win-
dows.
Set the air outlet selector dial to position.
Set the outside/recirculated air mode button to outside air mode if the recir-
culated air mode is used. (It may switch automatically.)
To defog the windshield and the side windows early, turn the air flow and
temperature up.
■
Defogging the back window (CrewMax models)
Defogger is used to defog the back window.
Press .
The defogger will automatically turn off after approximately 15 minutes.
■
Defogging the outside rear view mirrors (if equipped)
Defogger is used to defog to remove raindrops, dew and frost from
the outside rear view mirrors.
Press or .
The defogger will automatically turn off after approximately 15 minutes.
CrewMax models: Turning the back window defogger on will turn the out-
side rear view mirror defoggers on.
Other functions
Page 339 of 576
3396-1. Using the air conditioning system
6
Interior features
■Windshield wiper de-icer (if equipped)
This feature is used to prevent ice from building up on the wind-
shield and wiper blades.
Press or .
The defogger will automatically turn off after approximately 15 minutes.
Regular Cab and Double Cab models: Turning the outside rear view mirror
defoggers on will turn the windshield wiper de-icer on.
CrewMax models: Turning the back window defogger on will turn the wind-
shield wiper de-icer on.
[
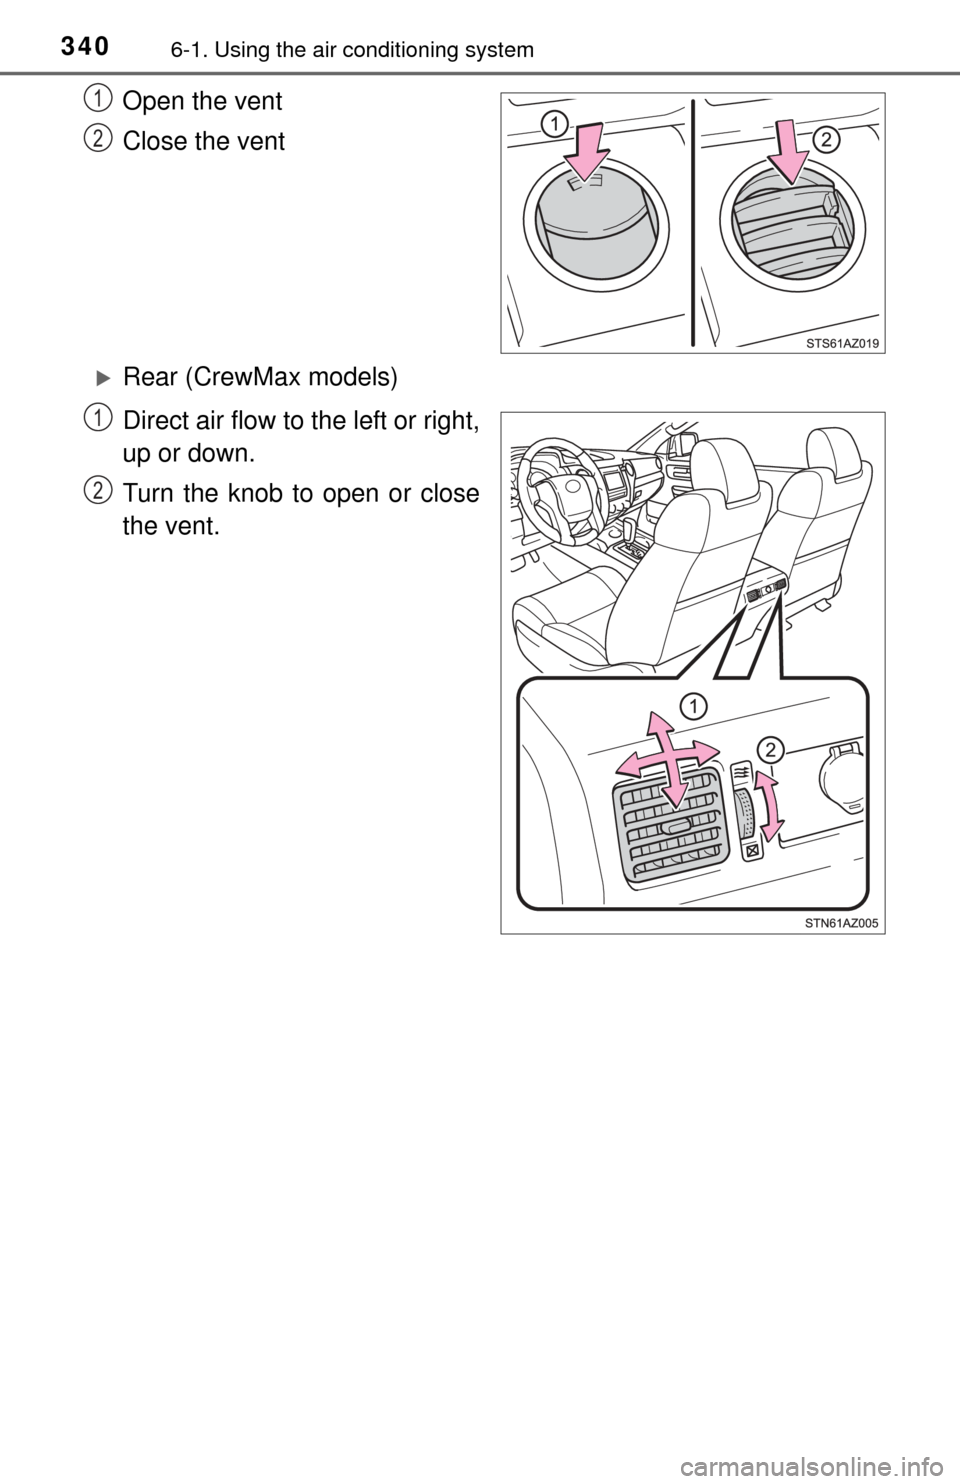
■Location of air outlets
Air outlets and air volume
changes according to the
selected airflow mode.
*1: Double Cab and CrewMax models
*2: CrewMax models
■
Adjusting the position and open ing and closing the air outlets
Front
Direct air flow to the left or right,
up or down.
Air outlets
*2
*1
*1
Page 340 of 576
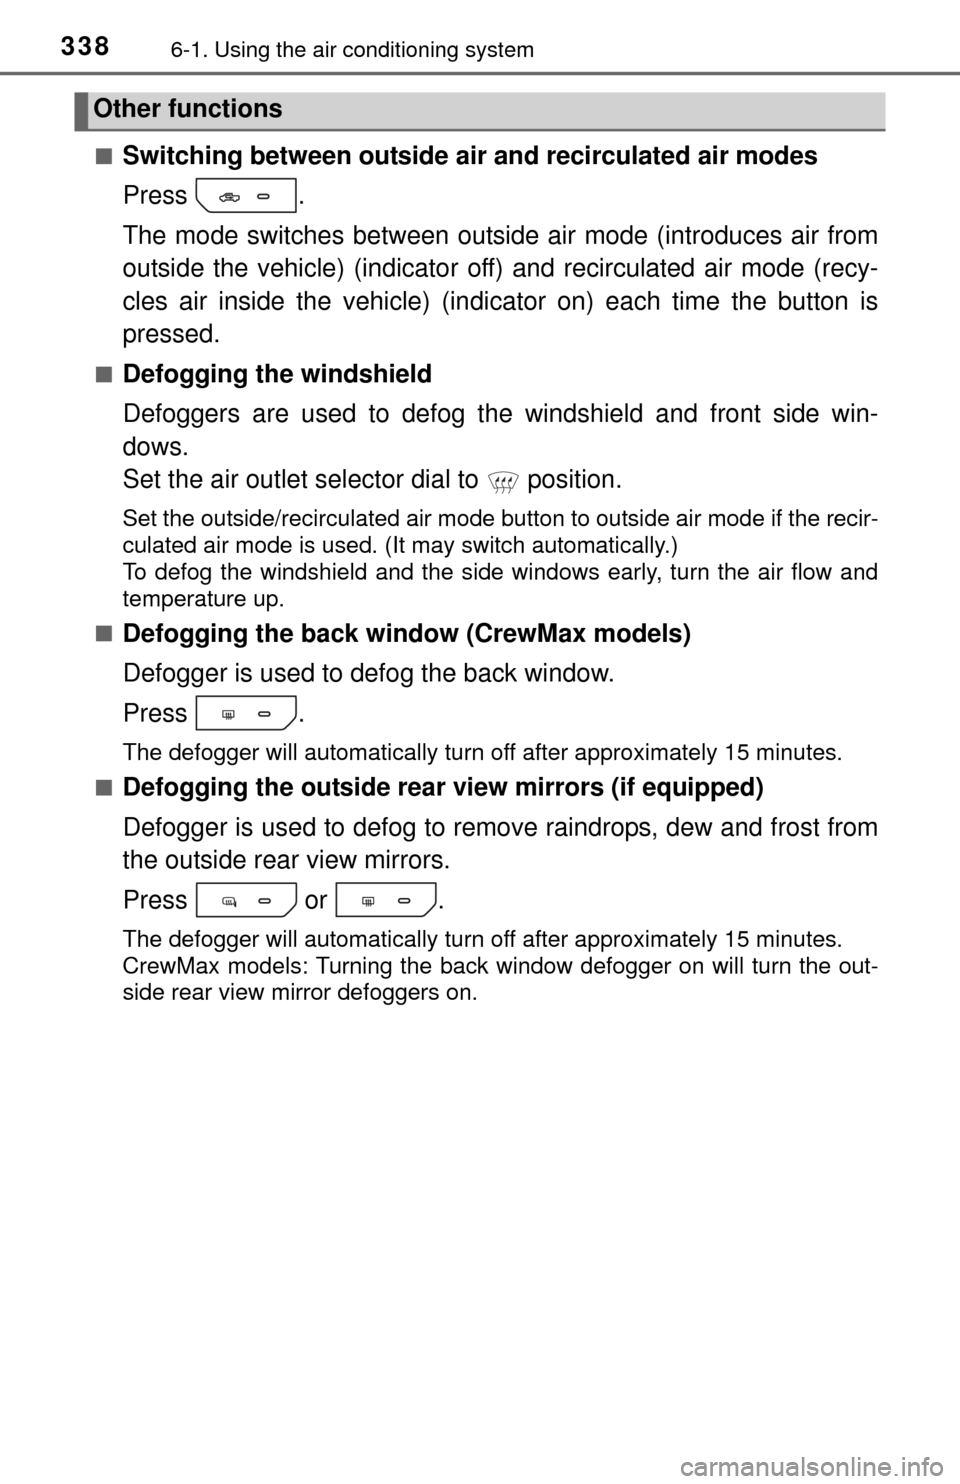
3406-1. Using the air conditioning system
Open the vent
Close the vent
Rear (CrewMax models)
Direct air flow to the left or right,
up or down.
Turn the knob to open or close
the vent.
1
2
1
2
Trending: oil change, 4WD, stop start, headlights, jump start terminals, tailgate, immobilizer
