Location TOYOTA TUNDRA 2017 2.G Owners Manual
[x] Cancel search | Manufacturer: TOYOTA, Model Year: 2017, Model line: TUNDRA, Model: TOYOTA TUNDRA 2017 2.GPages: 588, PDF Size: 10.76 MB
Page 10 of 588

10
This vehicle is equipped with an event data recorder (EDR). The main pur-
pose of an EDR is to record, in certain crash or near crash-like situations,
such as an air bag deployment or hitting a road obstacle, data that will assist
in understanding how a vehicle’s systems performed. The EDR is designed to
record data related to vehicle dynamics and safety systems for a short period
of time, typically 30 seconds or less.
The EDR in this vehicle is designed to record such data as:• How various systems in your vehicle were operating;
• Whether or not the driver and passenger safety belts were buckled/fas-tened;
• How far (if at all) the driver was depressing the accelerator and/or brake
pedal; and,
• How fast the vehicle was traveling.
These data can help provide a better understanding of the circumstances in
which crashes and injuries occur.
NOTE: EDR data are recorded by your vehicle only if a non-trivial crash situ-
ation occurs; no data are recorded by the EDR under normal driving condi-
tions and no personal data (e.g., name, gender, age, and crash location) are
recorded. However, other parties, such as law enforcement, could combine
the EDR data with the type of personally identifying data routinely acquired
during a crash investigation.
To read data recorded by an EDR, special equipment is required, and access
to the vehicle or the EDR is needed. In addition to the vehicle manufacturer,
other parties, such as law enforcement, that have the special equipment, can
read the information if they have access to the vehicle or the EDR.
●Disclosure of the EDR data
Toyota will not disclose the data recorded in an EDR to a third party except
when:
• An agreement from the vehicle’s owner (or the lessee for a leased vehi- cle) is obtained
• In response to an official request by the police, a court of law or a govern-
ment agency
• For use by Toyota in a lawsuit
However, if necessary, Toyota may:
• Use the data for research on vehicle safety performance
• Disclose the data to a third party for research purposes without disclosing information about the specific vehicle or vehicle owner
Event data recorder
Page 61 of 588
611-1. For safe use
1
For safety and security
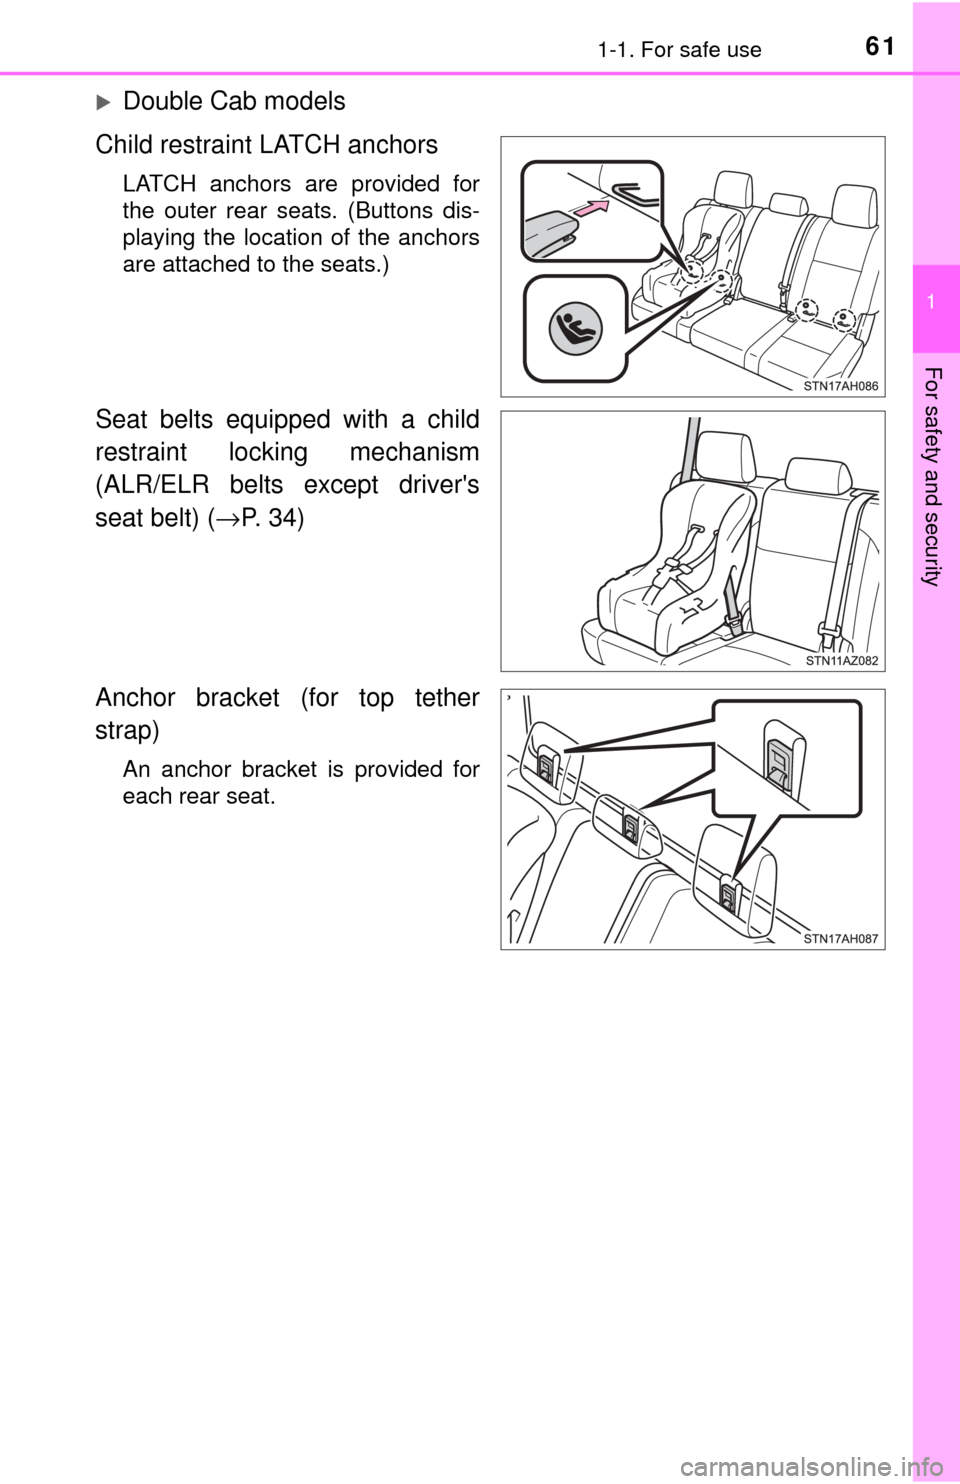
Double Cab models
Child restraint LATCH anchors
LATCH anchors are provided for
the outer rear seats. (Buttons dis-
playing the location of the anchors
are attached to the seats.)
Seat belts equipped with a child
restraint locking mechanism
(ALR/ELR belts except driver's
seat belt) ( →P. 34)
Anchor bracket (for top tether
strap)
An anchor bracket is provided for
each rear seat.
Page 62 of 588
621-1. For safe use
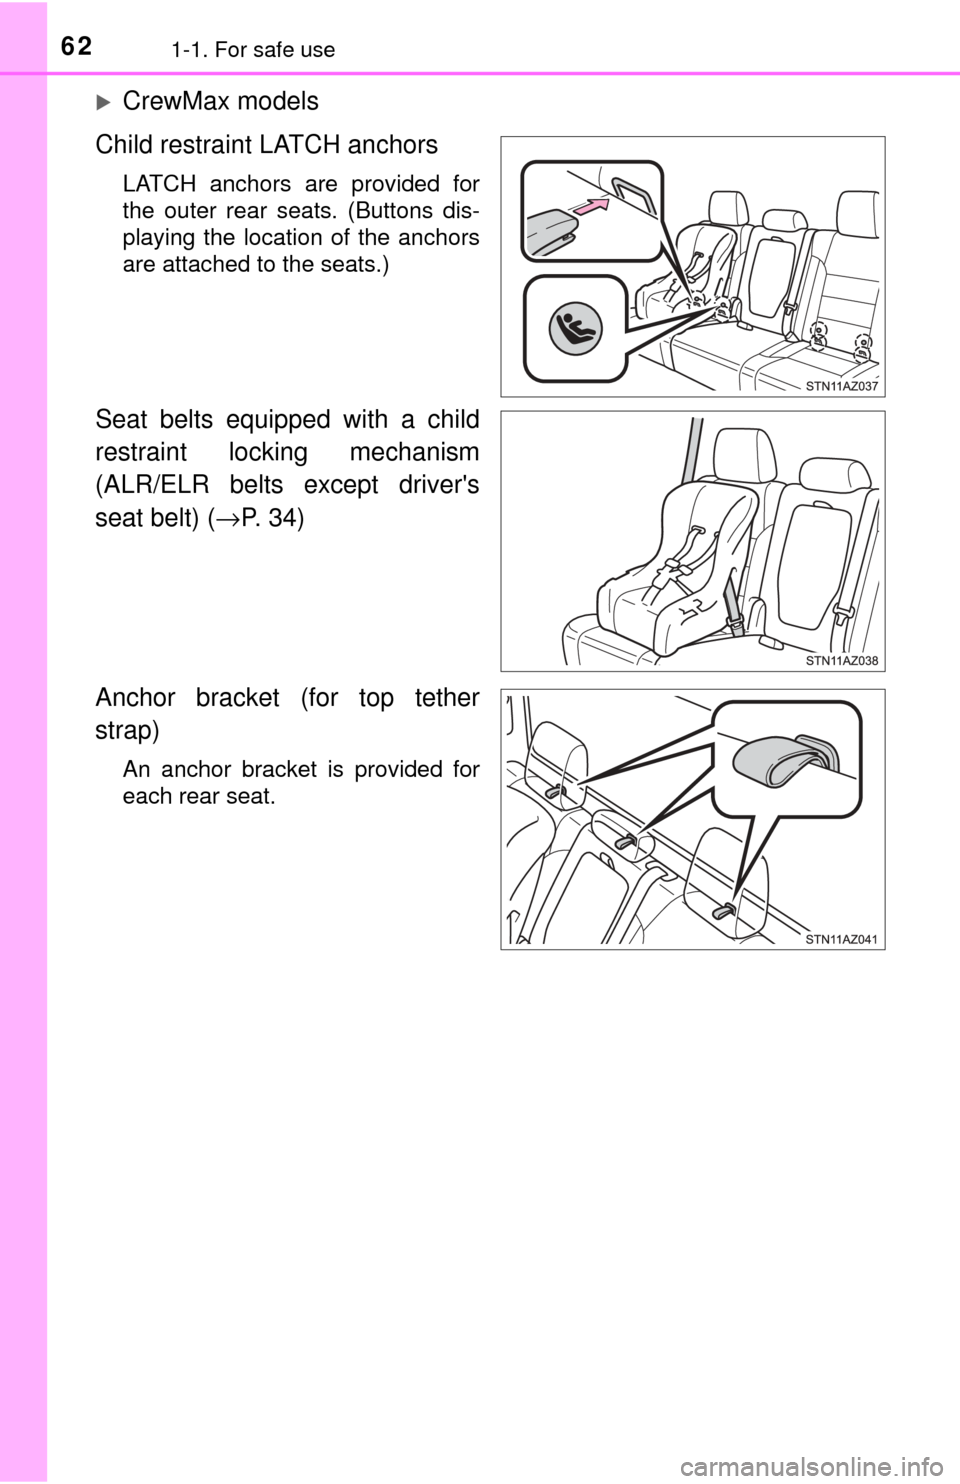
CrewMax models
Child restraint LATCH anchors
LATCH anchors are provided for
the outer rear seats. (Buttons dis-
playing the location of the anchors
are attached to the seats.)
Seat belts equipped with a child
restraint locking mechanism
(ALR/ELR belts except driver's
seat belt) ( →P. 34)
Anchor bracket (for top tether
strap)
An anchor bracket is provided for
each rear seat.
Page 148 of 588

1484-1. Before driving
CAUTION
Observe the following precautions.
Failure to do so may result in death or serious injury.
■When starting the vehicle
Always keep your foot on the brake pedal while stopped with the engine
running. This prevents the vehicle from creeping.
■ When driving the vehicle
● Do not drive if you are unfamiliar with the location of the brake and ac\
cel-
erator pedals to avoid depressing the wrong pedal.
• Accidentally depressing the accelerator pedal instead of the brake
pedal will result in sudden acceleration that may lead to an accident.
• When backing up, you may twist your body around, leading to difficulty
in operating the pedals. Make sure to operate the pedals properly.
• Make sure to keep a correct driving posture even when moving the vehicle only slightly. This allows you to depress the brake and accelera-
tor pedals properly.
• Depress the brake pedal using your right foot. Depressing the brake
pedal using your left foot may delay response in an emergency, result-
ing in an accident.
● Do not drive the vehicle over or stop the vehicle near flammable materials.
The exhaust system and exhaust gases can be extremely hot. These hot
parts may cause a fire if there is any flammable material nearby.
● During normal driving, do not turn off the engine. Turning the engine off
while driving will not cause loss of steering or braking control, but the
power assist to these systems will be lost. This will make it more difficult to
steer and brake, so you should pull over and stop the vehicle as soon as it
is safe to do so.
However, in the event of an emergency, such as if it becomes impossible
to stop the vehicle in the normal way: →P. 467
● Use engine braking (downshift) to maintain a safe speed when driving
down a steep hill.
Using the brakes continuously may cause the brakes to overheat and lose
effectiveness. ( →P. 184)
● Do not adjust the positions of the steering wheel, the seat, or the inside or
outside rear view mirrors while driving.
Doing so may result in a loss of vehicle control.
● Always check that all passengers’ arms, heads or other parts of their body
are not outside the vehicle.
Page 155 of 588

1554-1. Before driving
4
Driving
CAUTION
■Things that must not be carried in the luggage compartment
The following things may cause a fire if loaded in the luggage compart-
ment:
●Receptacles containing gasoline
●Aerosol cans
■Storage precautions
Observe the following precautions.
Failure to do so may prevent the pedals from being depressed properly,
may block the driver’s vision, or may result in items hitting the driver or
passengers, possibly causing an accident.
●Do not stack anything behind the front seats higher than the seat-
backs.
●Do not place cargo or luggage in or on the following locations.
• At the feet of the driver
• On the front passenger or rear seats (when stacking items)
• On the instrument panel
• On the dashboard
• On the auxiliary box or tray that has no lid
●Secure all items in the occupant compartment.
●Never allow anyone to ride in the rear deck. It is not designed for pas-
sengers. They should ride in thei r seats with their seat belts properly
fastened. Otherwise, they are much more likely to suffer death or seri-
ous bodily injury, in the event of sudden braking, sudden swerving or
an accident.
■Capacity and distribution
●Do not exceed the maximum axle weight rating or the total vehicle
weight rating.
●Even if the total load of occupant’s weight and the cargo load is less
than the total load capacity, do not apply the load unevenly. Improper
loading may cause deterioration of steering or braking control which
may cause death or serious injury.
Page 247 of 588
2474-6. Driving tips
4
Driving
Regulations regarding the use of tire chains vary depending on loca-
tion and type of road. Always check local regulations before installing
chains.
■ Tire chain installation
Observe the following precautions when installing and removing chains:
●Install and remove tire chains in a safe location.
● Install tire chains on the rear tires. Do not install tire chains on the front tires.
● Install tire chains on rear tires as tightly as possible. Retighten chai\
ns after
driving 1/4 ⎯ 1/2 mile (0.5 ⎯ 1.0 km).
● Install tire chains following the instructions provided with the tire ch\
ains.
Regulations on the use of tire chains
CAUTION
■Driving with snow tires
Observe the following precautions to reduce the risk of accidents.
Failure to do so may result in a loss of vehicle control and cause death or
serious injury.
● Use tires of the specified size.
● Maintain the recommended level of air pressure.
● Do not drive in excess of 75 mph (120 km/h), regardless of the type of
snow tires being used.
● Use snow tires on all, not just some wheels.
● 4WD models: Do not mix tires of different makes, models, tread patterns
or treadwear.
■ Driving with tire chains
Observe the following precautions to reduce the risk of accidents.
Failure to do so may result in the vehicle being unable to be driven safely,
and may cause death or serious injury.
● Do not drive in excess of the speed limit specified for the tire chains being
used, or 30 mph (50 km/h), whichever is lower.
● Avoid driving on bumpy road surfaces or over potholes.
● Avoid sudden acceleration, abrupt steering, sudden braking and shifting
operations that cause sudden engine braking.
● Slow down sufficiently before entering a curve to ensure that vehicle con-
trol is maintained.
Page 349 of 588
3496-1. Using the air conditioning system
6
Interior features
■Windshield wiper de-icer (if equipped)
This feature is used to prevent ice from building up on the wind-
shield and wiper blades.
Press or .
The defogger will automatically turn off after approximately 15 minutes.
Regular Cab and Double Cab models: Turning the outside rear view mirror
defoggers on will turn the windshield wiper de-icer on.
CrewMax models: Turning the back window defogger on will turn the wind-
shield wiper de-icer on.
■
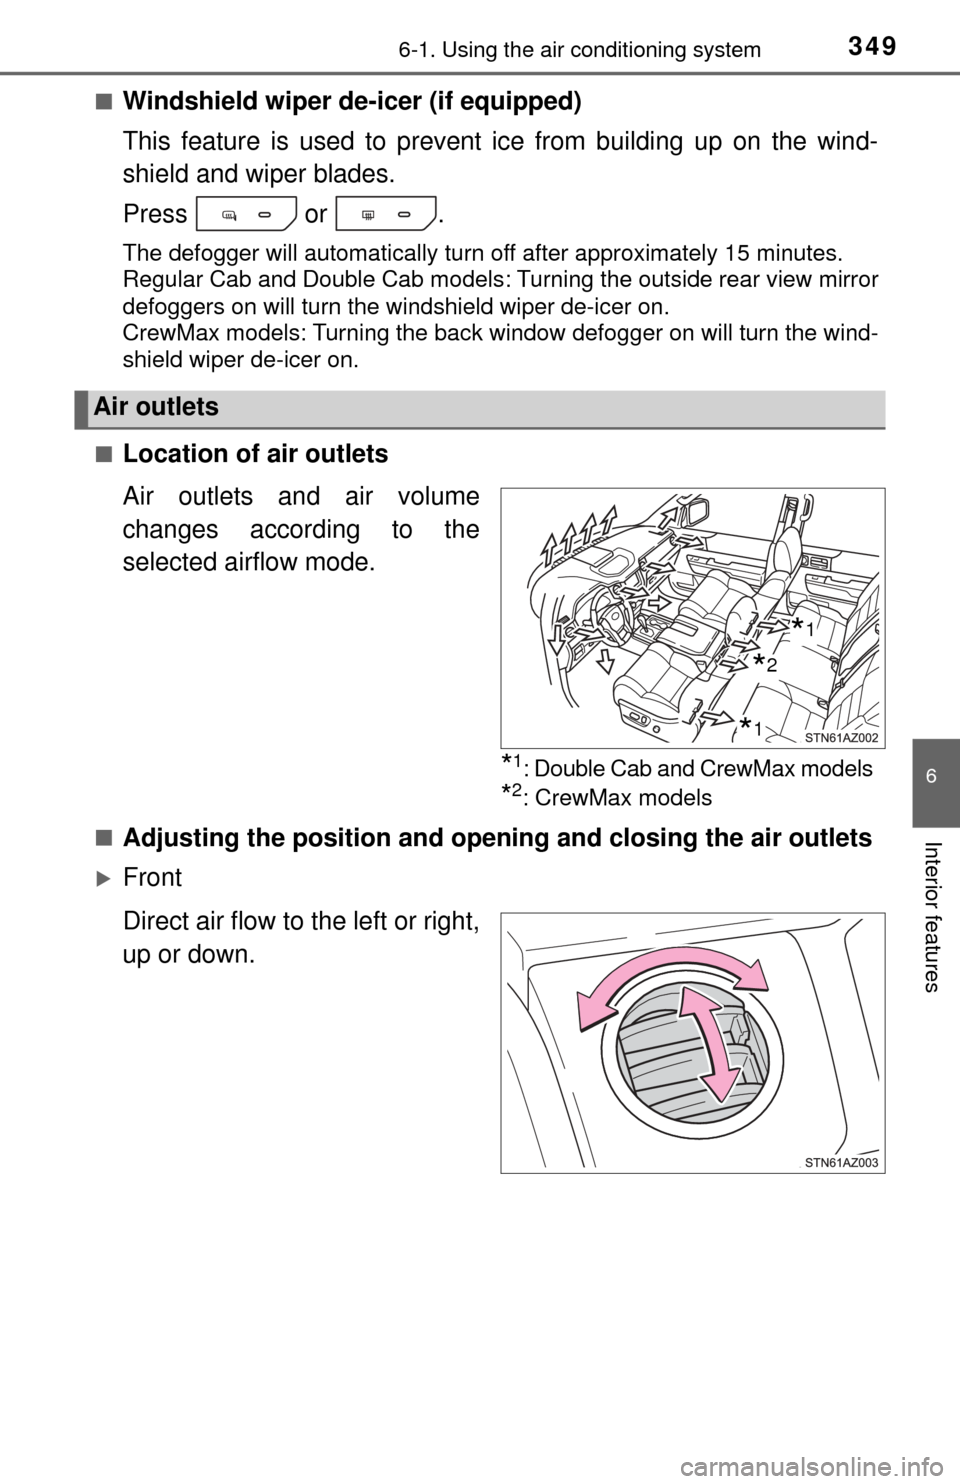
Location of air outlets
Air outlets and air volume
changes according to the
selected airflow mode.
*1: Double Cab and CrewMax models
*2: CrewMax models
■
Adjusting the position and open ing and closing the air outlets
Front
Direct air flow to the left or right,
up or down.
Air outlets
*2
*1
*1
Page 356 of 588
3566-1. Using the air conditioning system
■Windshield wiper de-icer (if equipped)
This feature is used to prevent ice from building up on the wind-
shield and wiper blades.
Press or .
The defogger will automatically turn off after approximately 15 minutes.
Regular Cab and Double Cab models: Turning the outside rear view mirror
defoggers on will turn the windshield wiper de-icer on.
CrewMax models: Turning the back window defogger on will turn the wind-
shield wiper de-icer on.
■
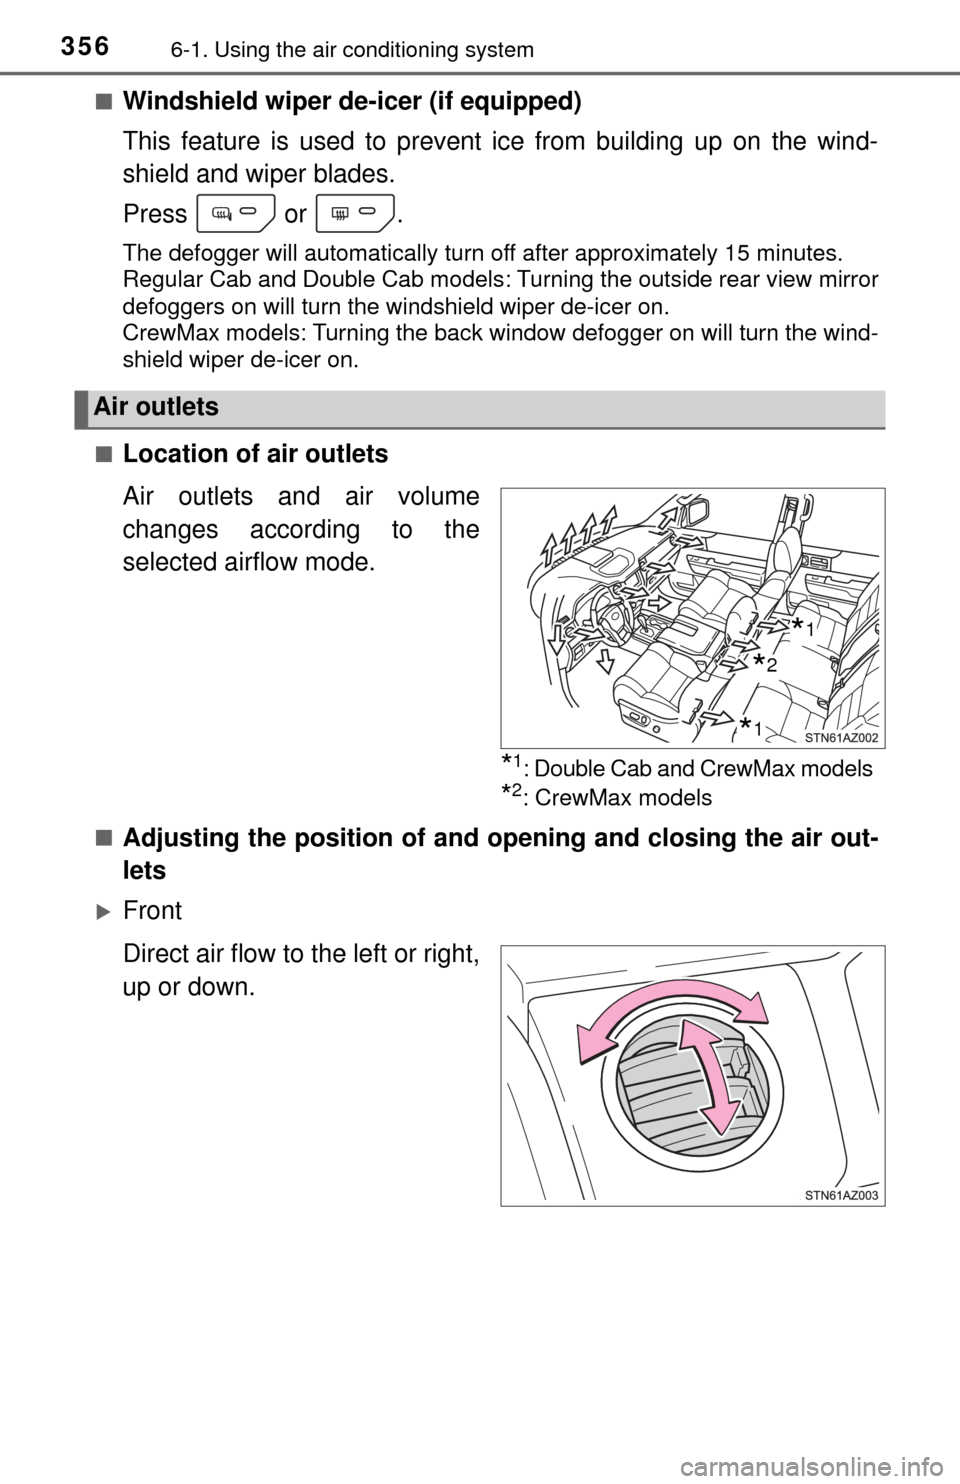
Location of air outlets
Air outlets and air volume
changes according to the
selected airflow mode.
*1: Double Cab and CrewMax models
*2: CrewMax models
■
Adjusting the position of and opening and closing the air out-
lets
Front
Direct air flow to the left or right,
up or down.
Air outlets
*2
*1
*1
Page 393 of 588
3936-4. Using the other interior features
6
Interior features
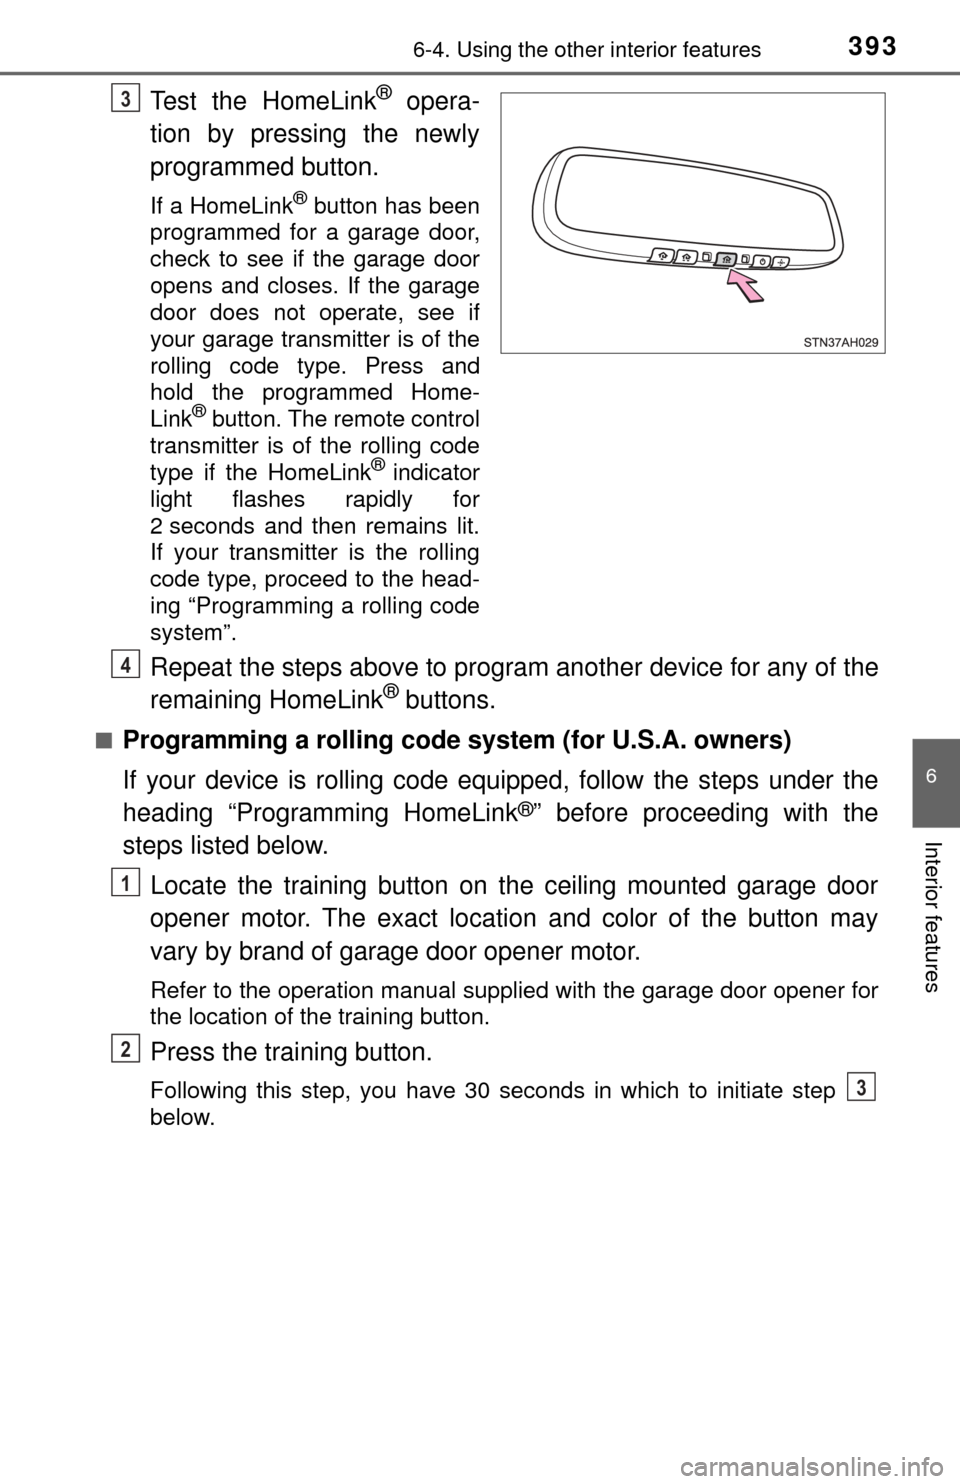
Test the HomeLink® opera-
tion by pressing the newly
programmed button.
If a HomeLink® button has been
programmed for a garage door,
check to see if the garage door
opens and closes. If the garage
door does not operate, see if
your garage transmitter is of the
rolling code type. Press and
hold the programmed Home-
Link
® button. The remote control
transmitter is of the rolling code
type if the HomeLink
® indicator
light flashes rapidly for
2 seconds and then remains lit.
If your transmitter is the rolling
code type, proceed to the head-
ing “Programming a rolling code
system”.
Repeat the steps above to program another device for any of the
remaining HomeLink® buttons.
■Programming a rolling code sys tem (for U.S.A. owners)
If your device is rolling code eq uipped, follow the steps under the
heading “Programming HomeLink
®” before proceeding with the
steps listed below.
Locate the training button on the ceiling mounted garage door
opener motor. The exact location and color of the button may
vary by brand of garage door opener motor.
Refer to the operation manual supplied with the garage door opener for
the location of the training button.
Press the training button.
Following this step, you have 30 seconds in which to initiate step
below.
3
4
1
2
3
Page 426 of 588
4267-3. Do-it-yourself maintenance
Tires
Check if the treadwear indicators are showing on the tires. Also check
the tires for uneven wear, such as excessive wear on one side of the
tread.
Check the spare tire condition and pressure if not rotated.
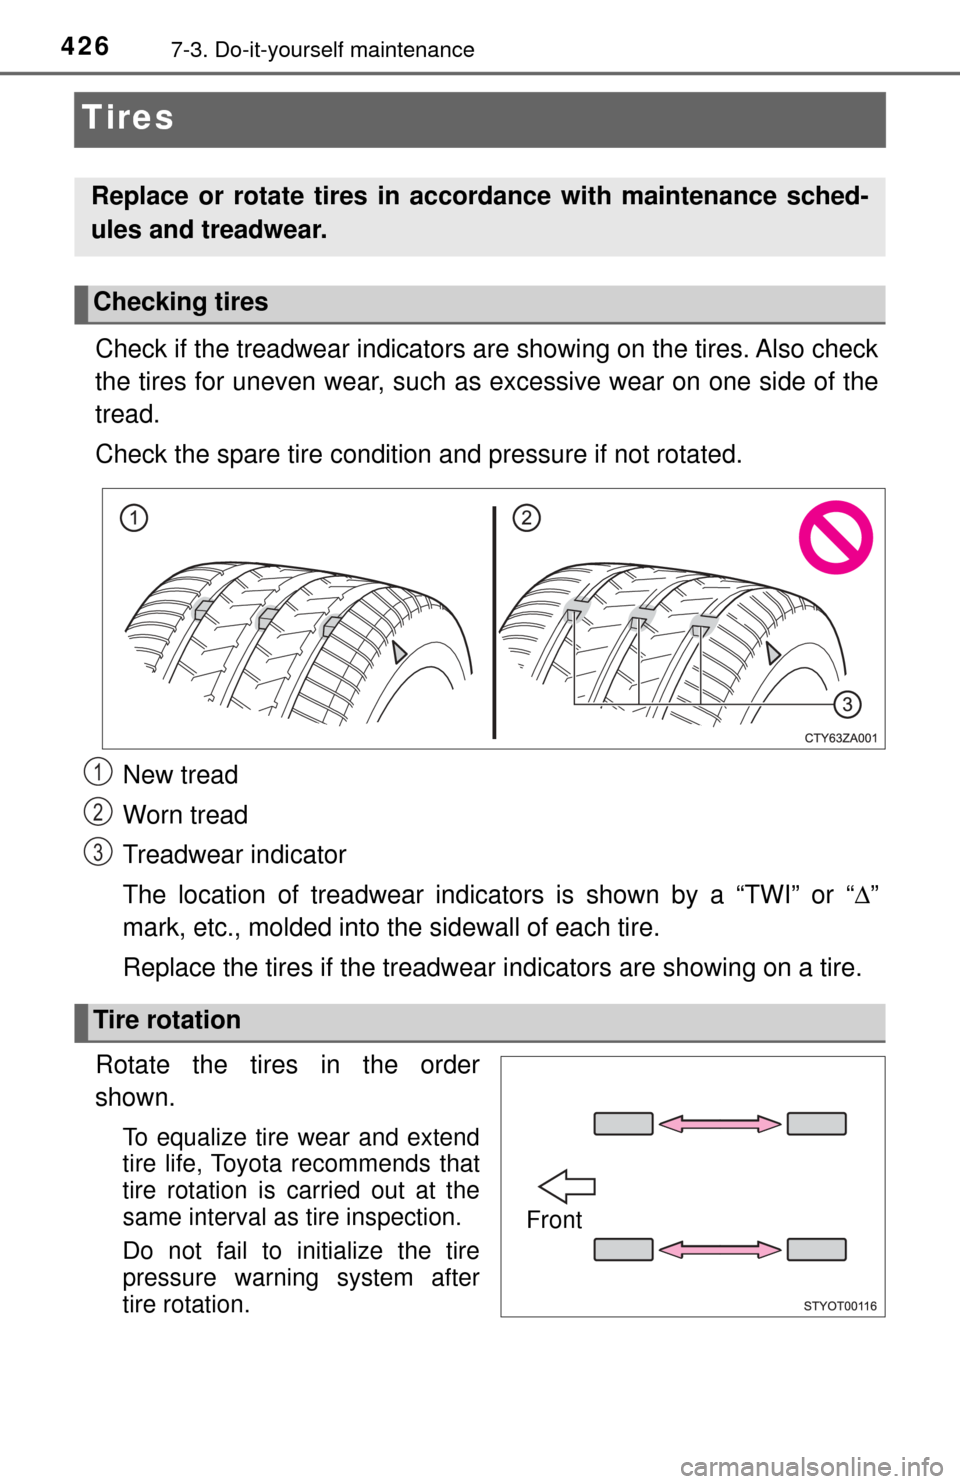
New tread
Worn tread
Treadwear indicator
The location of treadwear indicators is shown by a “TWI” or “ \b”
mark, etc., molded into the sidewall of each tire.
Replace the tires if the treadwear indicators are showing on a tire.
Rotate the tires in the order
shown.
To equalize tire wear and extend
tire life, Toyota recommends that
tire rotation is carried out at the
same interval as tire inspection.
Do not fail to initialize the tire
pressure warning system after
tire rotation.
Replace or rotate tires in accordance with maintenance sched-
ules and treadwear.
Checking tires
1
2
3
Tire rotation
Front