steering wheel adjustment TOYOTA TUNDRA 2017 2.G Owners Manual
[x] Cancel search | Manufacturer: TOYOTA, Model Year: 2017, Model line: TUNDRA, Model: TOYOTA TUNDRA 2017 2.GPages: 588, PDF Size: 10.76 MB
Page 113 of 588

1133-3. Adjusting the seats
3
Operation of each component
■Power easy access system (vehicles with driving position memory)
The driver’s seat and steering wheel move in accordance with engine switch
position and the driver’s seat belt condition. ( →P. 116)
CAUTION
■When adjusting the seat position
● Take care when adjusting the seat position to ensure that other passen-
gers are not injured by the moving seat.
● Do not put your hands under the seat or near the moving parts to avoid
injury.
Fingers or hands may become jammed in the seat mechanism.
■ Seat adjustment
● To reduce the risk of sliding under the lap belt during a collision, do not
recline the seat more than necessary.
If the seat is too reclined, the lap belt may slide past the hips and apply
restraint forces directly to the abdomen, or your neck may contact the
shoulder belt, increasing the risk of death or serious injury in the event of
an accident.
Adjustments should not be made while driving as the seat may unexpect-
edly move and cause the driver to lose control of the vehicle.
● Manual seat type only: After adjusting the seat, make sure that the seat is
locked in position.
■ When adjusting the seat positions
Make sure to leave enough space around the feet so they do not get stuck.
Page 118 of 588

1183-3. Adjusting the seats
■To stop the position recall operation part-way through
Perform any of the following:
● Press the “SET” button.
● Press button “1” or “2”.
● Operate any of the seat adjustment switches (only cancels seat position
recall).
● Operate the tilt and telescopic steering control switch (only cancels steering
wheel position recall).
■ Seat positions that can be memorized ( →P. 1 1 1 )
The adjusted positions other than the position adjusted by lumbar support
switch can be recorded.
■ Operating the driving position memory after the key is removed from the
engine switch
Recorded seat positions (except the steering wheel position) can be ac\
tivated
up to 30 seconds after the driver’s door is opened, even if the key is removed
from the engine switch.
■ In order to correctly use the dr iving position memory function
If a seat position is already in the furthest possible position and the seat is
operated in the same direction, the recorded position may be slightly different
when it is recalled.
Page 119 of 588
1193-3. Adjusting the seats
3
Operation of each component
A desired driving position can be recalled linked with the unlocking of
the door.
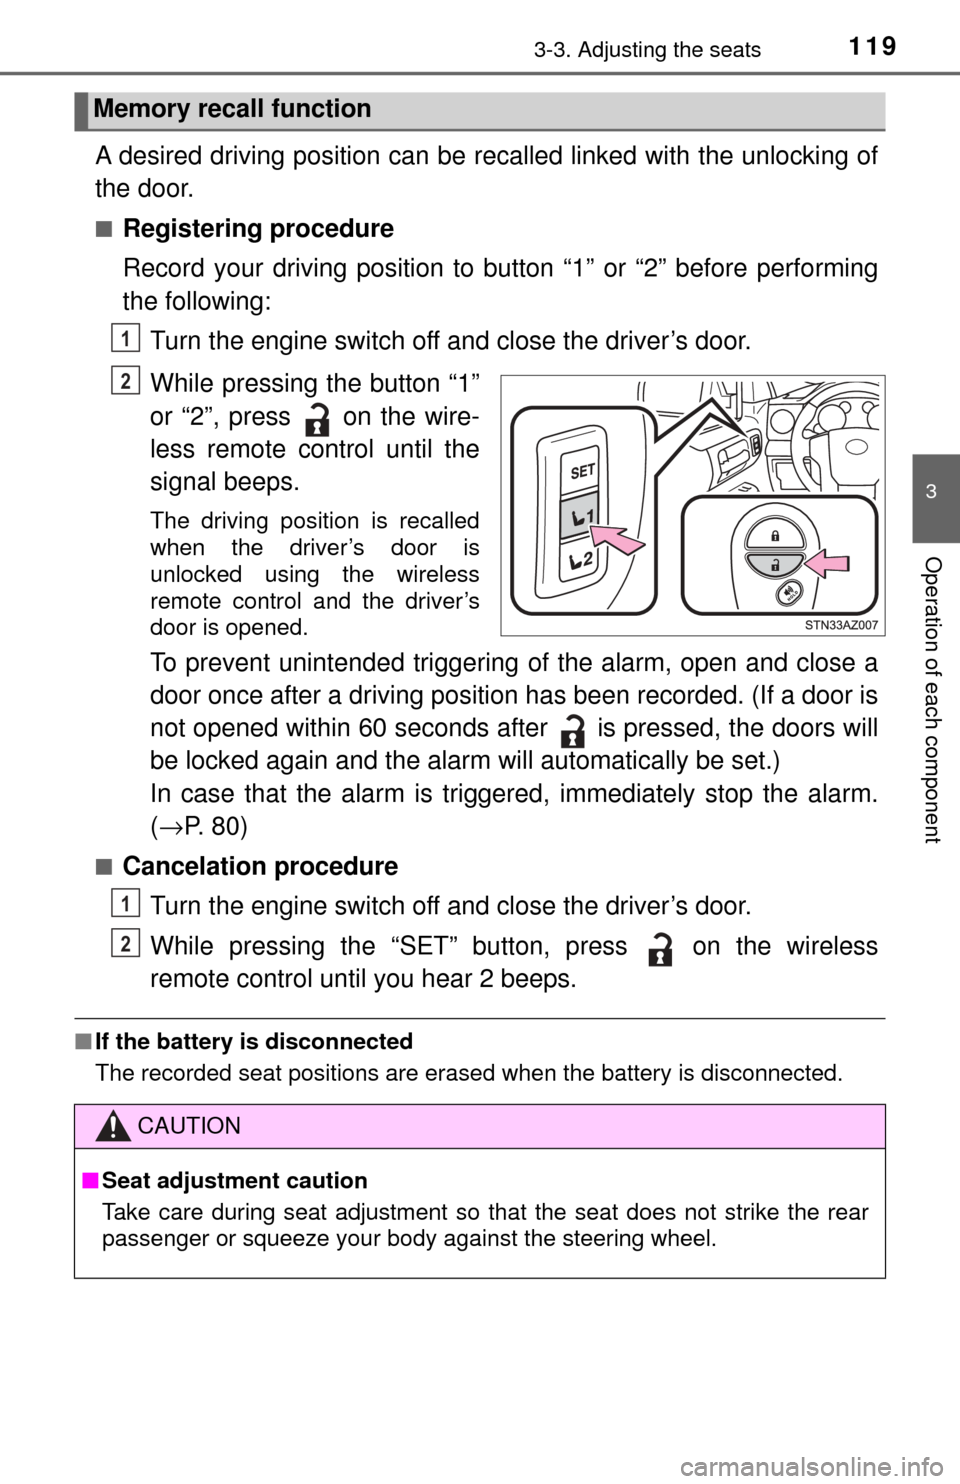
■Registering procedure
Record your driving position to button “1” or “2” before performing
the following: Turn the engine switch off and close the driver’s door.
While pressing the button “1”
or “2”, press on the wire-
less remote control until the
signal beeps.
The driving position is recalled
when the driver’s door is
unlocked using the wireless
remote control and the driver’s
door is opened.
To prevent unintended triggering of the alarm, open and close a
door once after a driving position has been recorded. (If a door is
not opened within 60 seconds after is pressed, the doors will
be locked again and the alarm will automatically be set.)
In case that the alarm is triggered, immediately stop the alarm.
( → P. 80)
■Cancelation procedure
Turn the engine switch off and close the driver’s door.
While pressing the “SET” button, press on the wireless
remote control until you hear 2 beeps.
■If the battery is disconnected
The recorded seat positions are erased when the battery is disconnected.\
Memory recall function
1
2
CAUTION
■Seat adjustment caution
Take care during seat adjustment so that the seat does not strike the rear
passenger or squeeze your body against the steering wheel.
1
2
Page 124 of 588
1243-4. Adjusting the steering wheel and mirrors
Steering wheel
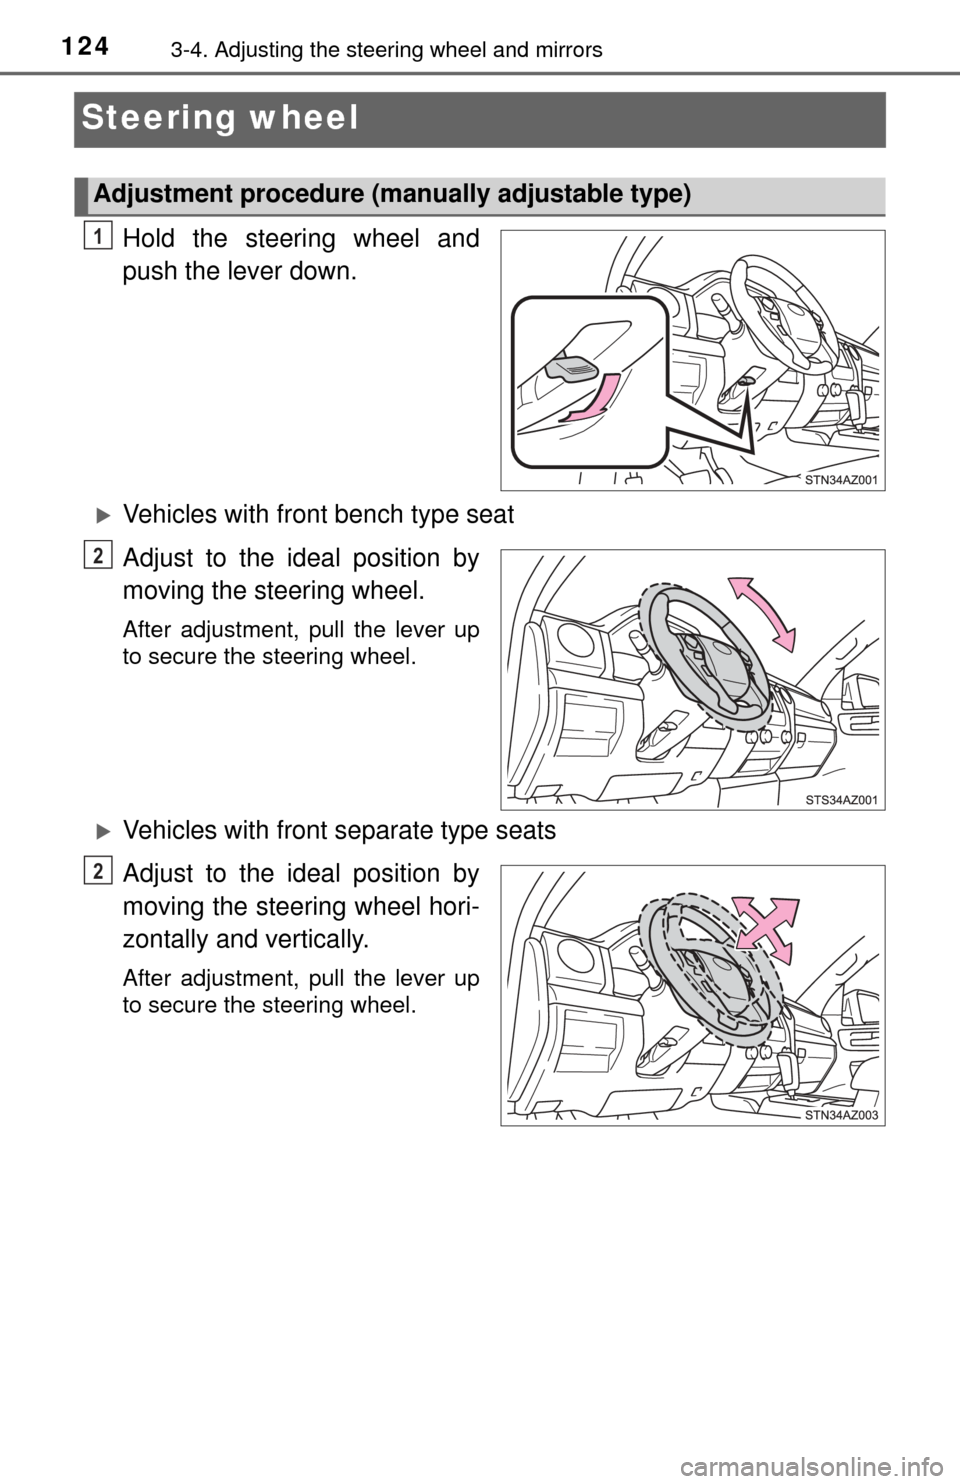
Hold the steering wheel and
push the lever down.
Vehicles with front bench type seat
Adjust to the ideal position by
moving the steering wheel.
After adjustment, pull the lever up
to secure the steering wheel.
Vehicles with front separate type seats
Adjust to the ideal position by
moving the steering wheel hori-
zontally and vertically.
After adjustment, pull the lever up
to secure the steering wheel.
Adjustment procedure (manually adjustable type)
1
2
2
Page 125 of 588
1253-4. Adjusting the steering wheel and mirrors
3
Operation of each component
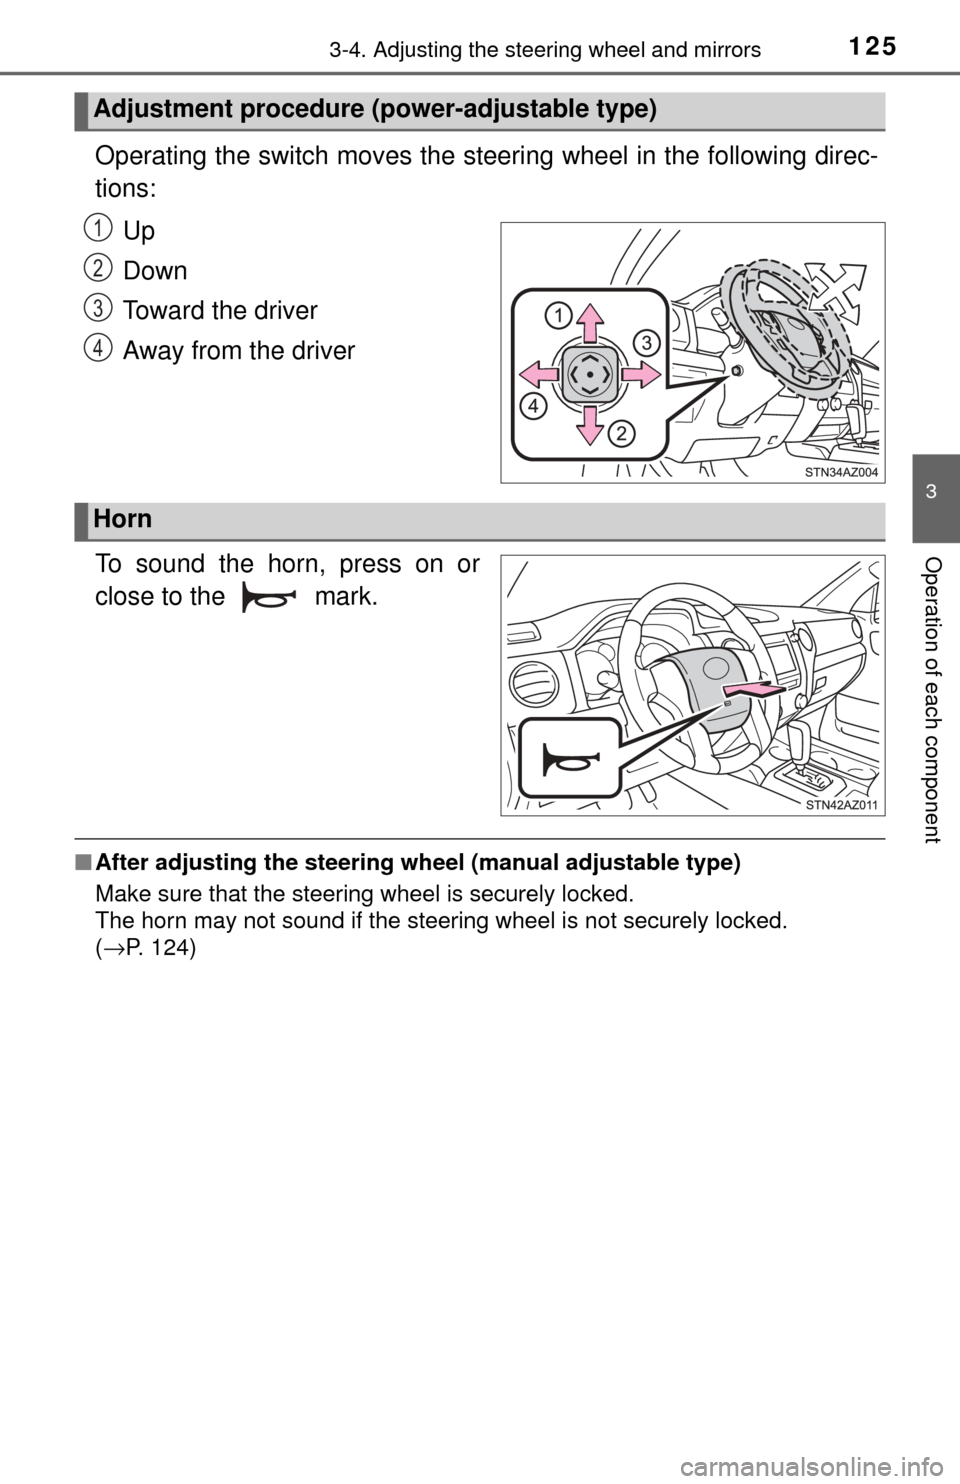
Operating the switch moves the steering wheel in the following direc-
tions:Up
Down
Toward the driver
Away from the driver
To sound the horn, press on or
close to the mark.
■ After adjusting the steering wh eel (manual adjustable type)
Make sure that the steering wheel is securely locked.
The horn may not sound if the steering wheel is not securely locked.
( →P. 124)
Adjustment procedure (power-adjustable type)
1
2
3
4
Horn
Page 126 of 588
1263-4. Adjusting the steering wheel and mirrors
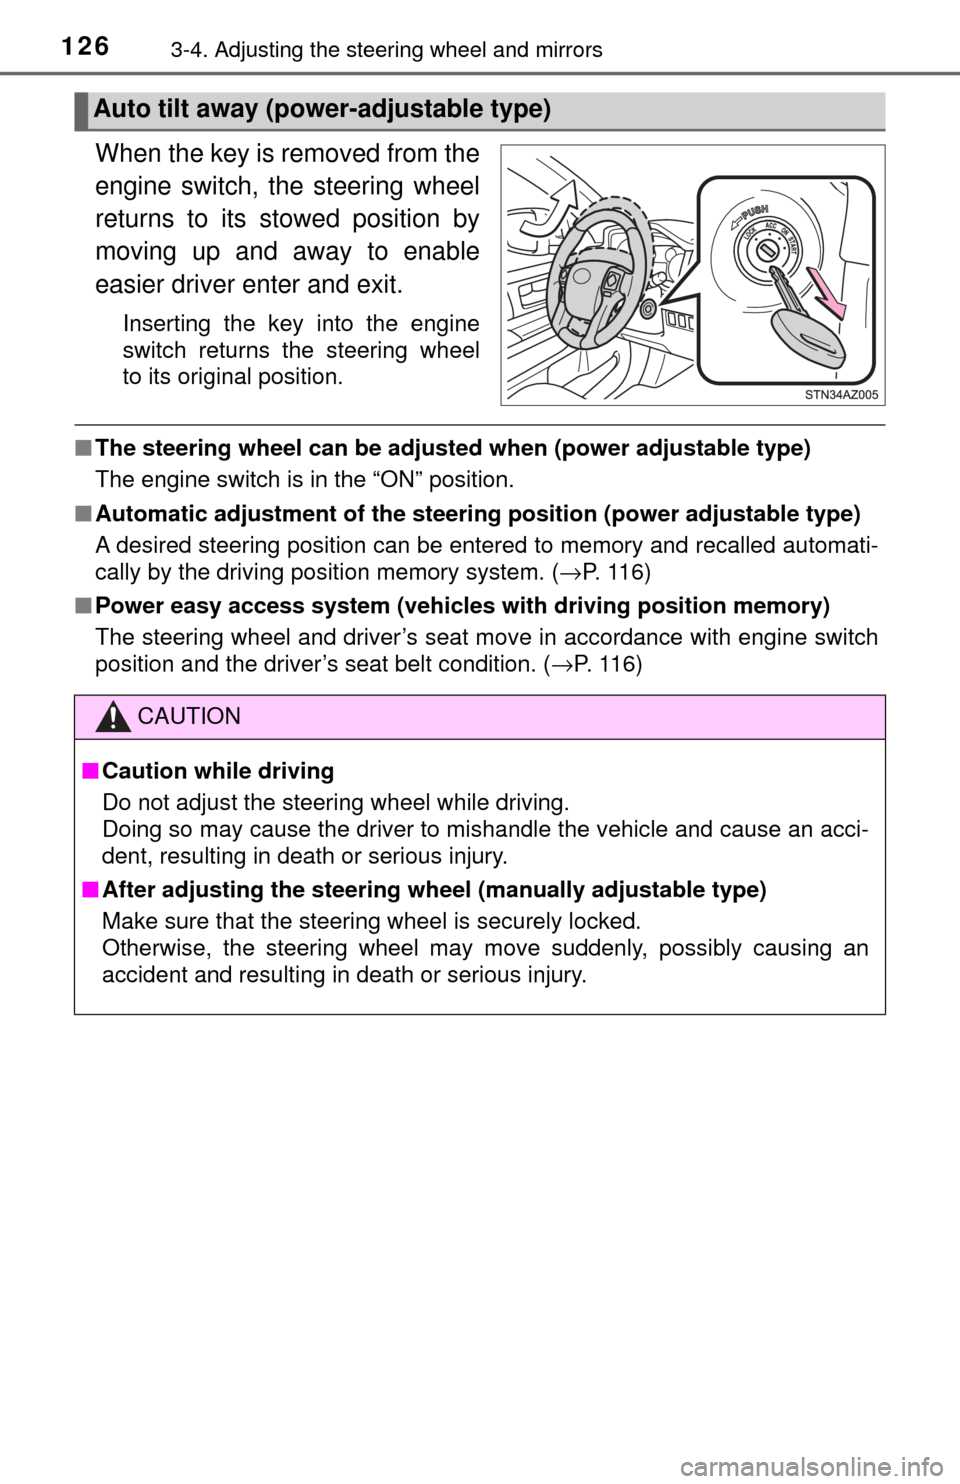
When the key is removed from the
engine switch, the steering wheel
returns to its stowed position by
moving up and away to enable
easier driver enter and exit.
Inserting the key into the engine
switch returns the steering wheel
to its original position.
■The steering wheel can be adjusted when (power adjustable type)
The engine switch is in the “ON” position.
■ Automatic adjustment of the steering position (power adjustable type)
A desired steering position can be entered to memory and recalled automati-
cally by the driving position memory system. ( →P. 116)
■ Power easy access system (vehicles with driving position memory)
The steering wheel and driver’s seat move in accordance with engine switch
position and the driver’s seat belt condition. ( →P. 116)
Auto tilt away (power-adjustable type)
CAUTION
■Caution while driving
Do not adjust the steering wheel while driving.
Doing so may cause the driver to mishandle the vehicle and cause an acci-
dent, resulting in death or serious injury.
■ After adjusting the steering wheel (manually adjustable type)
Make sure that the steering wheel is securely locked.
Otherwise, the steering wheel may move suddenly, possibly causing an
accident and resulting in death or serious injury.
Page 130 of 588
1303-4. Adjusting the steering wheel and mirrors
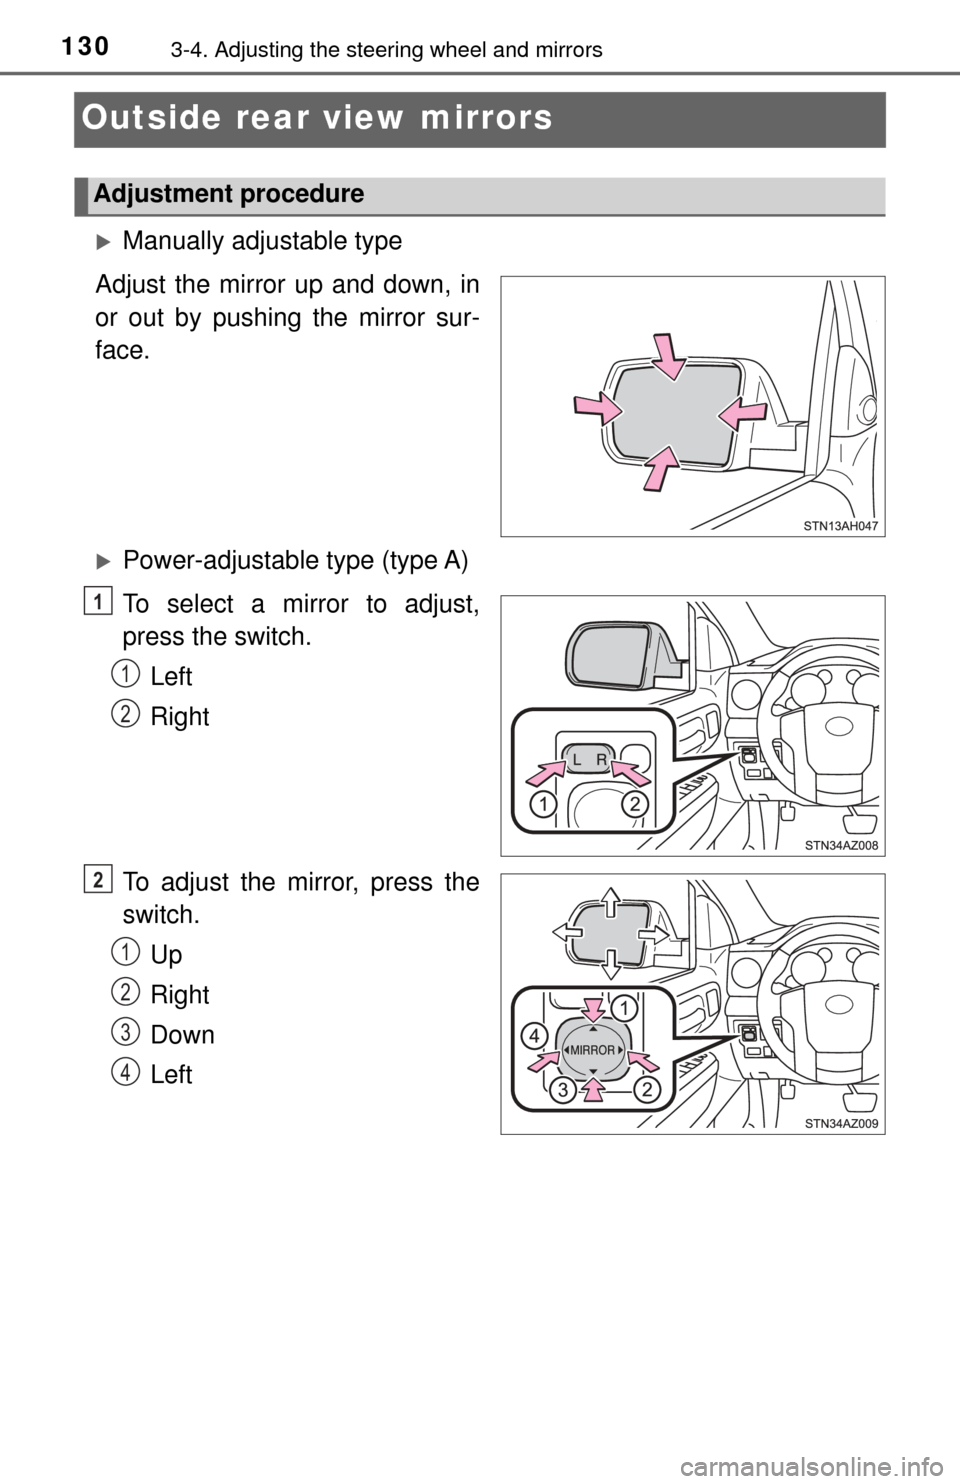
Outside rear view mirrors
Manually adjustable type
Adjust the mirror up and down, in
or out by pushing the mirror sur-
face.
Power-adjustable type (type A)
To select a mirror to adjust,
press the switch. Left
Right
To adjust the mirror, press the
switch. Up
Right
Down
Left
Adjustment procedure
1
1
2
2
1
2
3
4
Page 133 of 588

1333-4. Adjusting the steering wheel and mirrors
3
Operation of each component
■Mirror operating conditions (power-adjustable type)
The engine switch is in the “ACC” or “ON” position.
■ When the mirrors are fogg ed up (vehicles with outside rear view mirror
defoggers)
Turn on the mirror defoggers to defog the mirrors. ( →P. 348, 355)
■ Automatic adjustment of the mirror angle (vehicles with driving position
memory)
A desired mirror face angle can be entered to memory and recalled automati-
cally by the driving position memory. ( →P. 116)
■ Auto anti-glare function (if equipped)
When the anti-glare inside rear view mirr or is set to automatic mode, the out-
side rear view mirrors will activate in conjunction with the anti-glare inside
rear view mirror to reduce reflected light. ( →P. 128)
CAUTION
■Important points while driving
Observe the following precautions while driving.
Failure to do so may result in loss of control of the vehicle and cause an
accident, resulting in death or serious injury.
● Do not adjust the mirrors while driving.
● Do not drive with the mirrors folded.
● Both the driver and passenger side mirrors must be extended and properly
adjusted before driving.
■ When a mirror is moving (power-adjustable type)
To avoid personal injury and mirror malfunction, be careful not to get your
hand caught by the moving mirror.
■ When the mirror defoggers are oper ating (vehicles with outside rear
view mirror defoggers)
Do not touch the rear view mirror surfaces, as they can become very hot
and burn you.
Page 480 of 588

4808-2. Steps to take in an emergency
CAUTION
■If both the ABS and the brake system warning lights remain on
Stop your vehicle in a safe place immediately and contact your Toyota
dealer. The vehicle will become extremely unstable during braking, and the
ABS system may fail, which could cause an accident resulting in death or
serious injury.
■ If the tire pressure warning light comes on
Be sure to observe the following precautions. Failure to do so could cause a
loss of vehicle control and result in death or serious injury.
● Stop your vehicle in a safe place as soon as possible. Adjust the tire infla-
tion pressure immediately.
● If the tire pressure warning light comes on even after tire inflation pressure
adjustment, it is probable that you have a flat tire. Check the tires. If a tire
is flat, change it with the spare tire and have the flat tire repaired by the
nearest Toyota dealer.
● Avoid abrupt maneuvering and braking. If the vehicle tires deteriorate, you
could lose control of the steering wheel or the brakes.
■ If a blowout or sudden air leakage should occur
The tire pressure warning system may not activate immediately.
■
Maintenance of the tires
Each tire, including the spare (if provided), should be checked monthly
when cold and inflated to the inflation pressure recommended by the
vehicle manufacturer on the vehicle placard or tire inflation pressure
label (tire and load information label) . (If your vehicle has tires of a dif-
ferent size than the size indicated on the vehicle placard or tire inflation
pressure label [tire and load information label], you should determine
the proper tire inflation pressure for those tires.)
As an added safety feature, your vehicle has been equipped with a tire
pressure monitoring system (TPMS-ti re pressure warning system) that
illuminates a low tire pre ssure telltale (tire pressure warning light) when
one or more of your tires is significantly under-inflated. Accordingly,
when the low tire pressure telltale (tire pressure warning light) illumi-
nates, you should stop and check your tires as soon as possible, and
inflate them to the proper pressure. Driving on a significantly under-
inflated tire causes the tire to overheat and can lead to tire failure.
Under-inflation also reduces fuel effi ciency and tire tread life, and may
affect the vehicle’s hand ling and stopping ability.
Page 583 of 588

583Alphabetical index
Seats, Rear ............................... 114Adjustment precautions ........ 115
Child seats/child restraint system installation ................ 60
Cleaning................................ 404
Head restraints ..................... 120
Raising the bottom cushion ............................... 114
Sensor Automatic headlight
system ......... ....................... 195
Inside rear view mirror .......... 129
Intuitive parking assist .......... 207
Service reminder indicators ..... 84
Shift lever ................................. 184 Automatic transmission......... 184
If the shift lever
cannot be shifted from P .... 188
Shift lock system ..................... 188
Side airbags ............................... 39
Side doors ................................ 100
Side marker lights ................... 193
Light switch ........................... 193
Replacing light bulbs..... 454, 459
Wattage ................................ 528
Side mirrors ............................. 130 Adjusting and folding ............ 130
BSM (Blind spot monitor) ...... 222
Mirror position memory ......... 116
Side turn signal lights ............. 191 Replacing light bulbs..... 454, 459
Turn signal lever ................... 191
Wattage ................................ 528
Snow tires ................................ 247
Spare tire .................................. 486
Inflation pressure .................. 526
Replacing .............................. 486
Storage location .................... 487
Spark plug ................................ 523
Specifications .......................... 510 Speedometer.............................. 88
Steering
Column lock release ............. 183
Steering wheel Adjustment.................... 124, 125
Steering wheel position memory ................. 116
Steering wheel audio switches
*
Stop lights Replacing light bulbs ............ 459
Wattage ................................ 528
Storage box.............................. 381
Storage feature ........................ 366
Stuck If the vehicle becomes stuck ................................... 507
Sun visors ................................ 384
Switches Back window defogger
switch ......................... 348, 355
BSM (Blind spot monitor) main switch ........................ 222
Cargo lamp main switch ....... 365
Cruise control switch ............ 204
“DISP” button .......................... 91
Door lock switch ................... 103
Driving position memory switches ............................. 116
Emergency flashers switch ... 466
Engine switch ....................... 182
Fog light switch ..................... 196
Front-wheel drive control switch ................................. 230
Garage door opener
switches ............................. 391
Ignition switch ....................... 182
Intuitive parking assist .......... 207
Light switches ....................... 193
Moon roof switches............... 141
*: Refer to “NAVIGATION AND MULTIMEDIA SYSTEM OWNER
’S MANUAL”.