engine TOYOTA TUNDRA 2019 Accessories, Audio & Navigation (in English)
[x] Cancel search | Manufacturer: TOYOTA, Model Year: 2019, Model line: TUNDRA, Model: TOYOTA TUNDRA 2019Pages: 282, PDF Size: 6.64 MB
Page 30 of 282
30
1. BASIC INFORMATION BEFORE OPERATION
1. INITIAL SCREEN
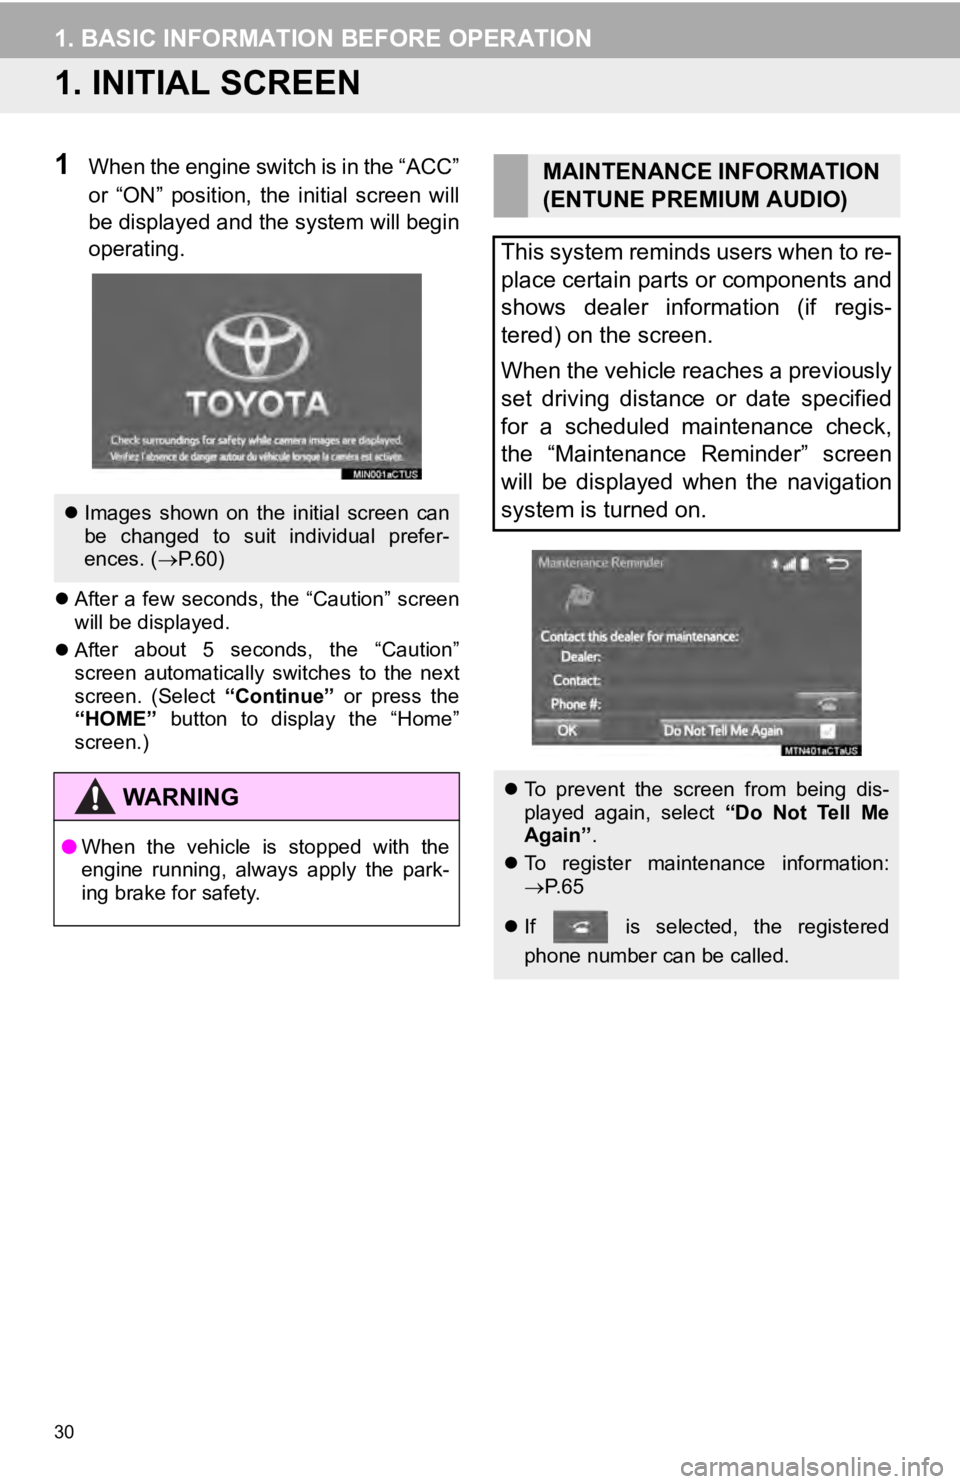
1When the engine switch is in the “ACC”
or “ON” position, the initial screen will
be displayed and the system will begin
operating.
After a few seconds, the “Caution” screen
will be displayed.
After about 5 seconds, the “Caution”
screen aut
omatically switches to the next
screen. (Select “Continue” or press the
“HOME” button to display the “Home”
screen.)
Images shown on the initial screen can
be changed to suit individual prefer-
ences. ( P.60)
WA R N I N G
● When the vehicle is stopped with the
engine running, always apply the park-
ing brake for safety.
MAINTENANCE INFORMATION
(ENTUNE PREMIUM AUDIO)
This system reminds users when to re-
place certain parts or components and
shows dealer information (if regis-
tered) on the screen.
When the vehicle reaches a previously
set driving distance or date specified
for a scheduled maintenance check,
the “Maintenance Reminder” screen
will be displayed when the navigation
system is turned on.
To prevent the screen from being dis-
played again, select “Do Not Tell Me
Again” .
To register maintenance information:
P. 6 5
If is selected, the registered
phone number can be called.
Page 40 of 282
40
1. BASIC INFORMATION BEFORE OPERATION
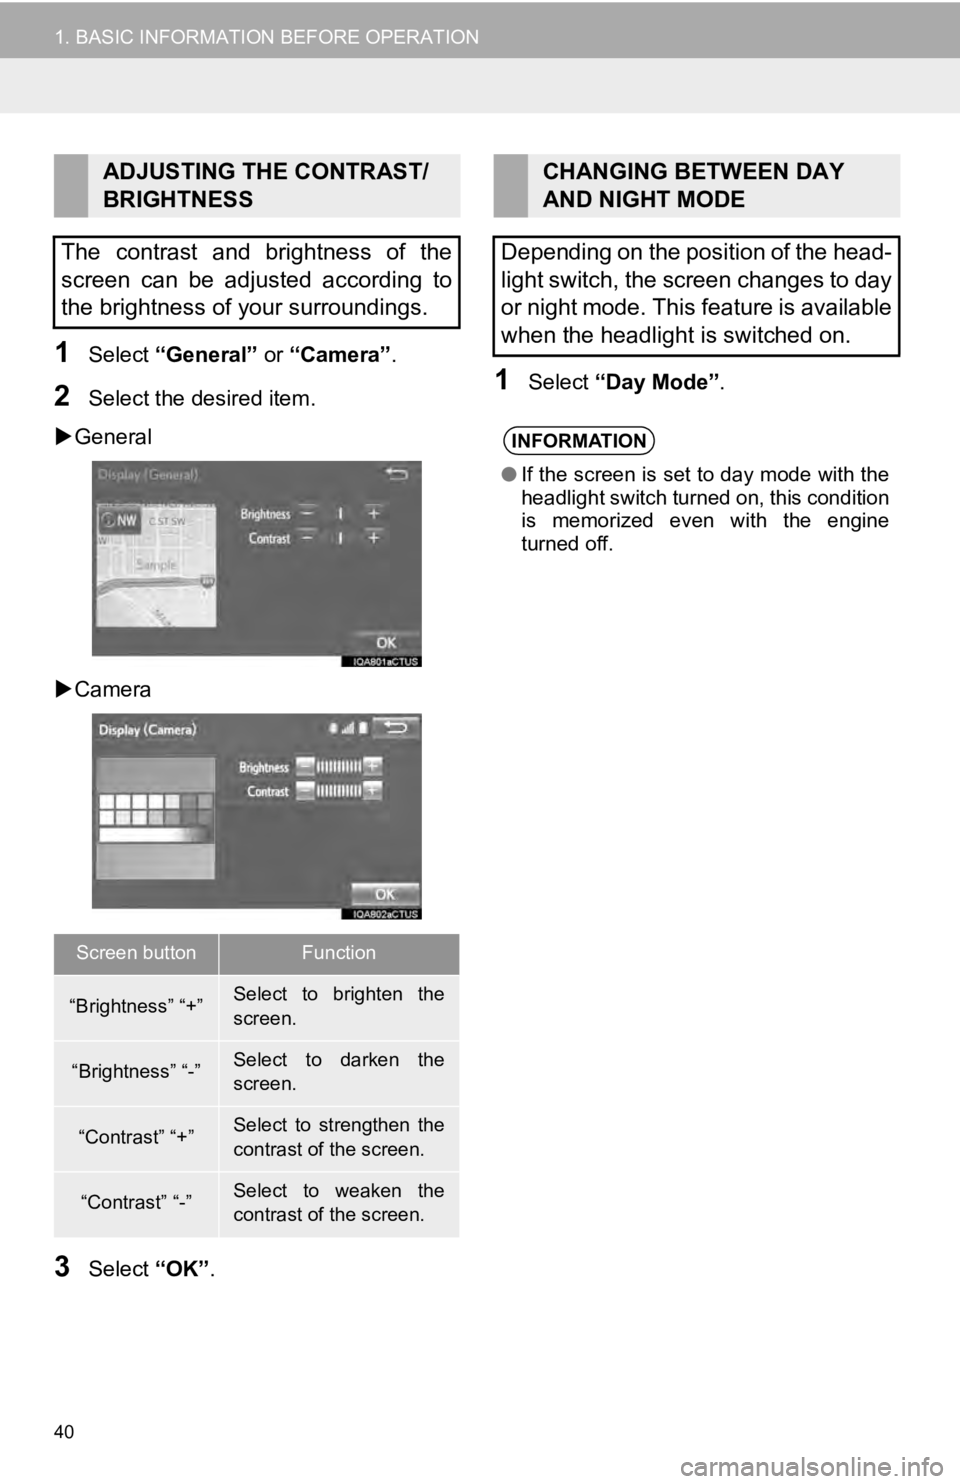
1Select “General” or “Camera” .
2Select the desired item.
General
Camera
3Select “OK”.
1Select “Day Mode” .
ADJUSTING THE CONTRAST/
BRIGHTNESS
The contrast and brightness of the
screen can be adjusted according to
the brightness of your surroundings.
Screen buttonFunction
“Brightness” “+”Select to brighten the
screen.
“Brightness” “-”Select to darken the
screen.
“Contrast” “+”Select to strengthen the
contrast of the screen.
“Contrast” “-”Select to weaken the
contrast of the screen.
CHANGING BETWEEN DAY
AND NIGHT MODE
Depending on the position of the head-
light switch, the screen changes to day
or night mode. This feature is available
when the headlight is switched on.
INFORMATION
● If the screen is set to day mode with the
headlight switch turned on, this condition
is memorized even with the engine
turned off.
Page 53 of 282
53
2. Bluetooth® SETTINGS
BASIC FUNCTION
2
■AUTO CONNECTION MODE
When the engine switch is in the “ACC” or
“ON” position, the system searches for a
nearby registered device.
The system will connect with the regis
-
t
ered device that was last connected, if it
i s
nearby.
■CONNECTING MANUALLY
1Follow the steps in “CONNECTING A
Bluetooth
® DEVICE” from “STEP 2”.
(P.52 )
*: Bluetooth is a registered trademark of
Bluetoo th
SIG, Inc.
■RECONNECTING THE Bluetooth®
PHONE
If the system is attempting to connect to a
Bluetooth® phone and the Bluetooth®
phone is turned off and then back on, the
system will attempt to reconnect.
INFORMATION
● It may take time if the device connection
is carried out during Bluetooth® audio
playback.
● Depending on the type of Bluetooth
®
device being connected, it may be nec-
essary to perform additional steps on
the device.
To turn auto connection mode on, set
“Bluetooth* Power” to on. ( P.55)
Leave the Bluetooth
® device in a loca-
tion where the connection can be es-
tablished.
When the auto connection has failed or
“Bluetooth* Power” is turned off, it is
necessary to connect Bluetooth
® man-
ually.
If a Bluetooth® phone is disconnected
due to poor reception from the
Bluetooth
® network when the engine
switch is in the “ACC” or “ON” position,
the system automatically reconnects
the Bluetooth
® phone.
Page 60 of 282
60
3. OTHER SETTINGS
■TRANSFERRING IMAGES
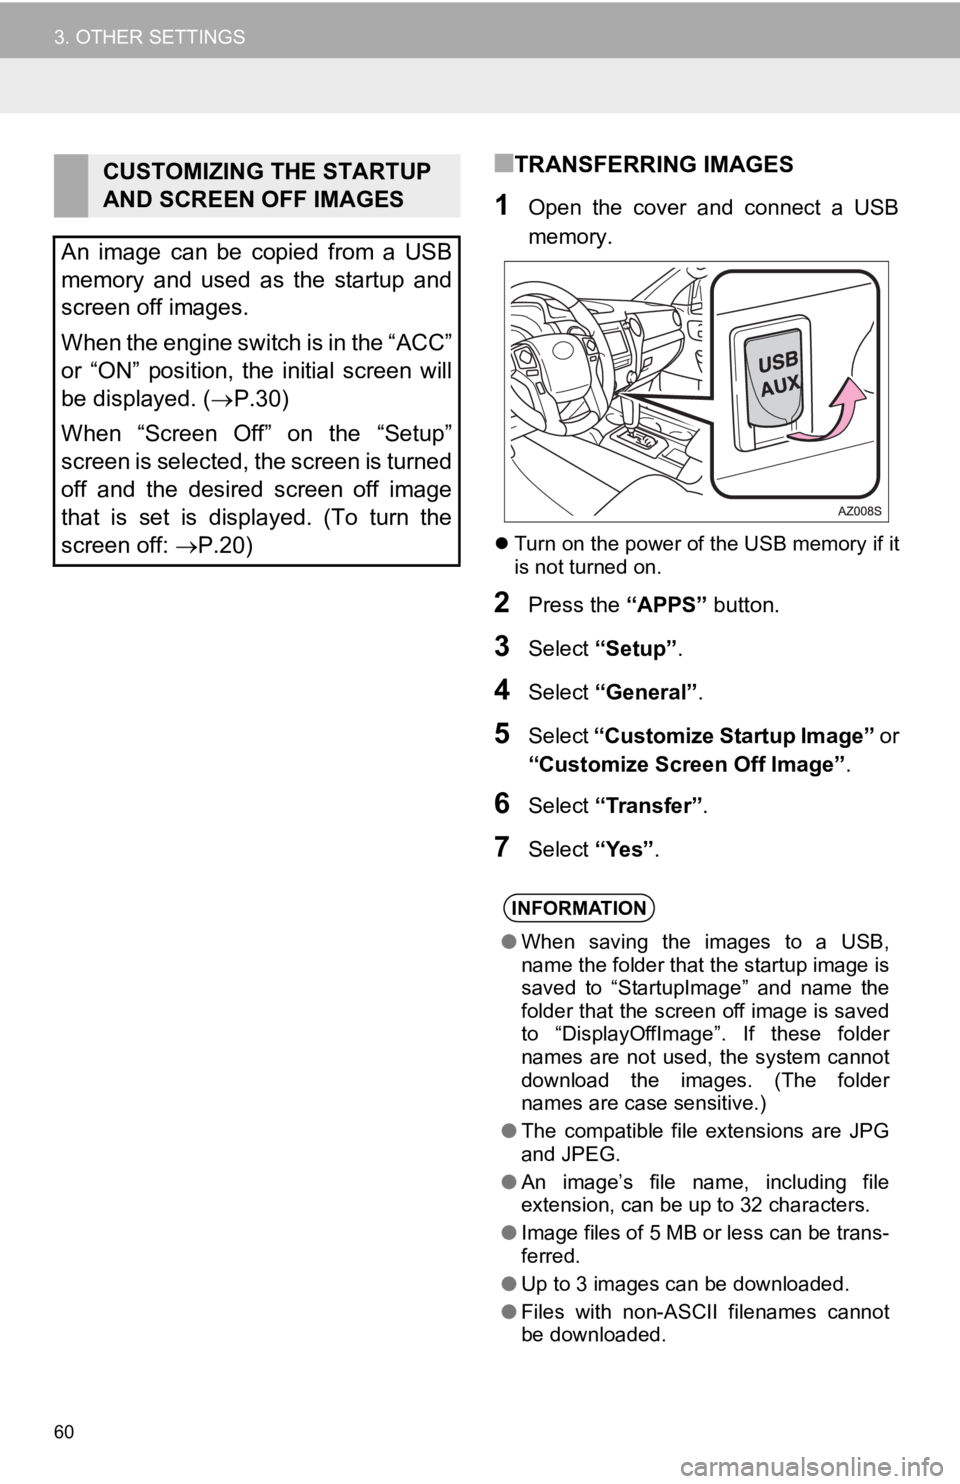
1Open the cover and connect a USB
memory.
Turn on the power of the USB memory if it
is not turned on.
2Press the “APPS” button.
3Select “Setup”.
4Select “General” .
5Select “Customize Startup Image” or
“Customize Screen Off Image” .
6Select “Transfer” .
7Select “Yes”.
CUSTOMIZING THE STARTUP
AND SCREEN OFF IMAGES
An image can be copied from a USB
memory and used as the startup and
screen off images.
When the engine switch is in the “ACC”
or “ON” position, the initial screen will
be displayed. ( P.30)
When “Screen Off” on the “Setup”
screen is selected, the screen is turned
off and the desired screen off image
that is set is displayed. (To turn the
screen off: P.20)
INFORMATION
● When saving the images to a USB,
name the folder that the startup image is
saved to “StartupImage” and name the
folder that the screen off image is saved
to “DisplayOffImage”. If these folder
names are not used, the system cannot
download the images. (The folder
names are case sensitive.)
● The compatible file extensions are JPG
and JPEG.
● An image’s file name, including file
extension, can be up to 32 characters.
● Image files of 5 MB or less can be trans-
ferred.
● Up to 3 images can be downloaded.
● Files with non-ASCII filenames cannot
be downloaded.
Page 61 of 282
61
3. OTHER SETTINGS
BASIC FUNCTION
2
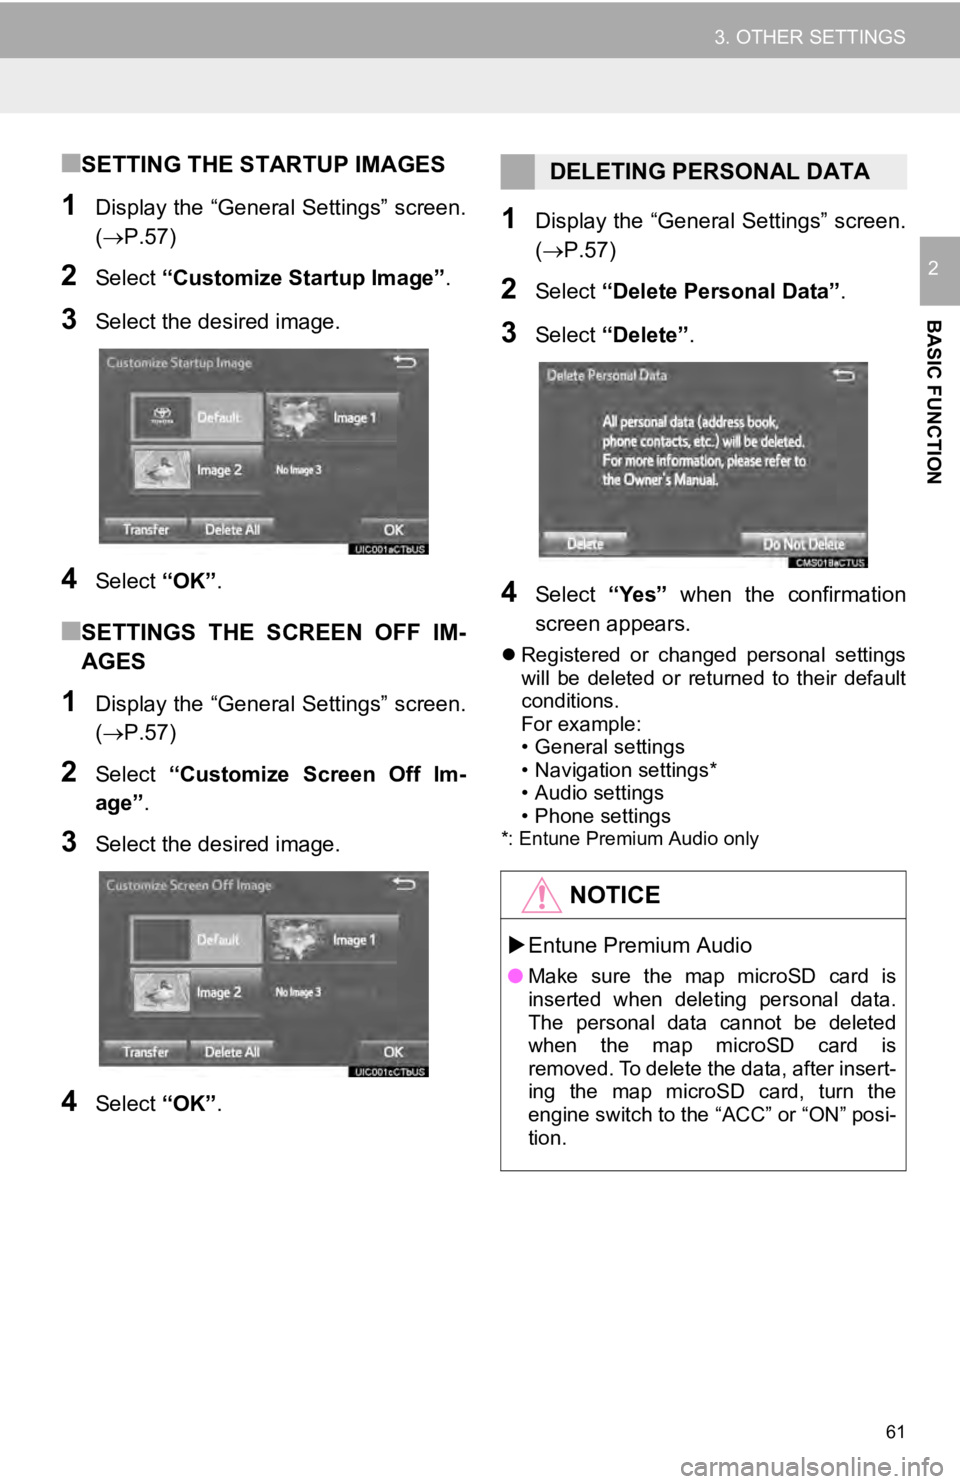
■SETTING THE STARTUP IMAGES
1Display the “General Settings” screen.
(P.57 )
2Select “Customize Startup Image” .
3Select the desired image.
4Select “OK”.
■SETTINGS THE SCREEN OFF IM-
AGES
1Display the “General Settings” screen.
(P.57 )
2Select “Customize Screen Off Im -
age” .
3Select the desired image.
4Select “OK”.
1Display the “General Settings” screen.
(P.57 )
2Select “Delete Personal Data” .
3Select “Delete” .
4Select “Yes” when the confirmation
screen appears.
Registered or changed personal settings
will be deleted or returned to their default
conditions.
For example:
• General settings
• Navigation settings*
• Audio settings
• Phone settings
*: Entune Premium Audio only
DELETING PERSONAL DATA
NOTICE
Entune Premium Audio
● Make sure the map microSD card is
inserted when deleting personal data.
The personal data cannot be deleted
when the map microSD card is
removed. To delete the data, after insert-
ing the map microSD card, turn the
engine switch to the “ACC” or “ON” posi-
tion.
Page 62 of 282
62
3. OTHER SETTINGS
2. VOICE SETTINGS
1Press the “APPS” button.
2Select “Setup” .
3Select “Voice” .
4Select the items to be set.
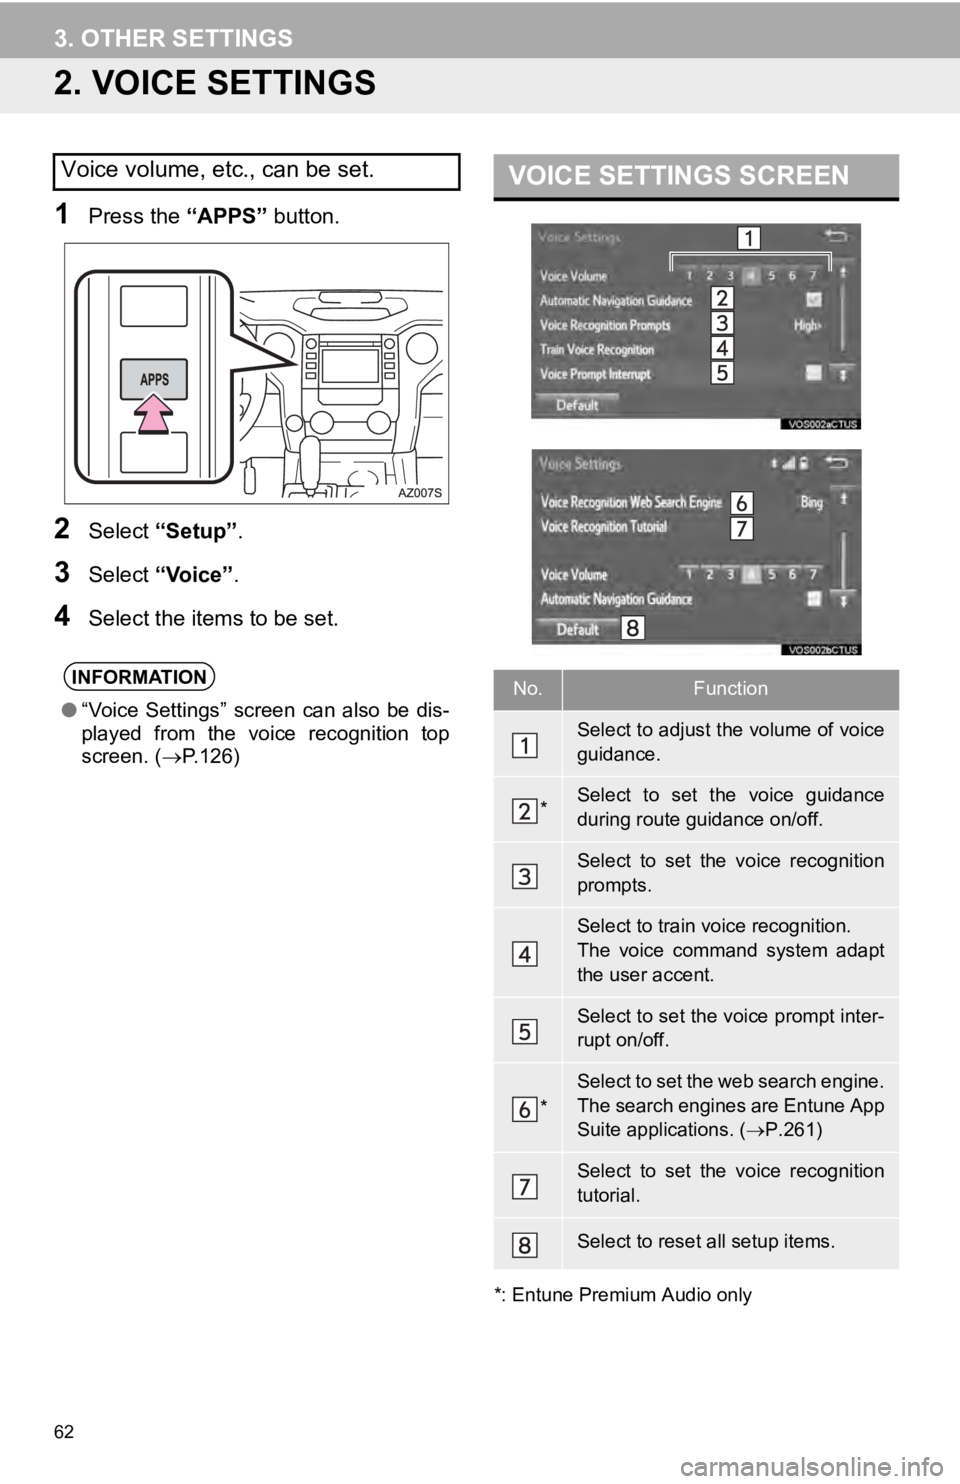
VOICE SETTINGS SCREEN
*: Entune Premium Audio only
Voice volume, etc., can be set.
INFORMATION
●“Voice Settings” screen can also be dis-
played from the voice recognition top
screen. ( P.126)No.Function
Select to adjust the volume of voice
guidance.
*Select to set the voice guidance
during route guidance on/off.
Select to set the voice recognition
prompts.
Select to train voice recognition.
The voice command system adapt
the user accent.
Select to set the voice prompt inter-
rupt on/off.
*
Select to set the web search engine.
The search engines are Entune App
Suite applications. ( P.261)
Select to set the voice recognition
tutorial.
Select to reset all setup items.
Page 72 of 282
72
1. BASIC OPERATION
2. SOME BASICS
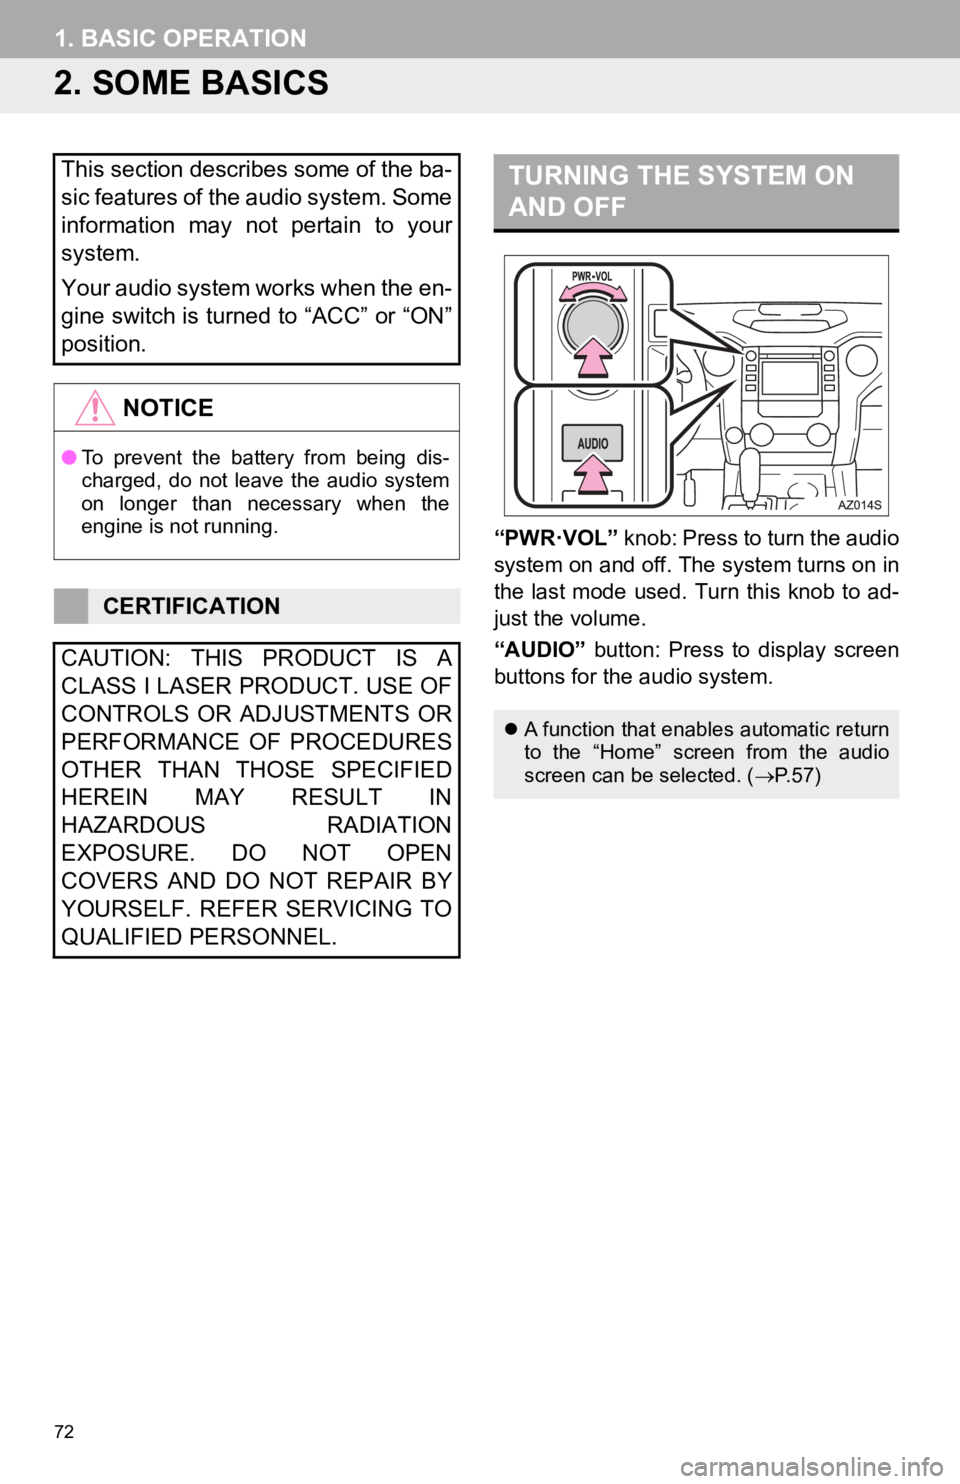
TURNING THE SYSTEM ON
AND OFF
“PWR·VOL” knob: Press to turn the audio
system on and off. The system turns on in
the last mode used. Turn this knob to ad-
just the volume.
“AUDIO” button: Press to display screen
buttons for the audio system.
This section describes some of the ba-
sic features of the audio system. Some
information may not pertain to your
system.
Your audio system works when the en-
gine switch is turned to “ACC” or “ON”
position.
NOTICE
● To prevent the battery from being dis-
charged, do not leave the audio system
on longer than necessary when the
engine is not running.
CERTIFICATION
CAUTION: THIS PRODUCT IS A
CLASS I LASER PRODUCT. USE OF
CONTROLS OR ADJUSTMENTS OR
PERFORMANCE OF PROCEDURES
OTHER THAN THOSE SPECIFIED
HEREIN MAY RESULT IN
HAZARDOUS RADIATION
EXPOSURE. DO NOT OPEN
COVERS AND DO NOT REPAIR BY
YOURSELF. REFER SERVICING TO
QUALIFIED PERSONNEL.
A function that enables automatic return
to the “Home” screen from the audio
screen can be selected. ( P. 5 7 )
Page 89 of 282
HOW TO SUBSCRIBE TO XM
Satellite Radio
89
2. RADIO OPERATION
AUDIO SYSTEM
3
To listen to a satellite radio broadcast
in the vehicle, a subscription to the XM
Satellite Radio service is necessary.
An XM Satellite Radio is a tuner de-
signed exclusively to receive broad-
casts provided under a separate
subscription. Availability is limited to
the 48 contiguous U.S. states and
some Canadian provinces.
HOW TO SUBSCRIBE
It is necessary to enter into a separate
service agreement with XM Satellite
Radio in order to receive satellite
broadcast programming in the vehicle.
Additional activation and service sub-
scription fees apply that are not includ-
ed in the purchase price of the vehicle
and digital satellite tuner.
For complete information on subscrip-
tion rates and terms, or to subscribe to
XM Satellite Radio:
U.S.A.
Refer to
www.siriusxm.com or call
1-800-967-2346.
Canada
Refer to www.xmradio.ca
or call
1-877-209-0079.
NOTICE
● XM Radio Services Legal Disclaimers
and Warnings
• Fees and Taxes Subscription fee,
taxes, one time activation fee, and
other fees may apply. Subscription fee
is consumer only. All fees and pro-
gramming subject to change.
Subscriptions subject to Customer
Agreement available at www.siri-
usxm.com. (U.S.A.) or www.xmra-
dio.ca (Canada) XM service only
available in the 48 contiguous United
States and Canada.
Explicit Language NoticeChannels
with frequent explicit language are indi-
cated with an “XL” preceding the chan-
nel name. Channel blocking is
available for XM Satellite Radio receiv-
ers by notifying XM at;
U.S.A. Customers:
Visit www.siriusxm.com or calling
1-800-967-2346
Canadian Customers:
Visit www.xmradio.ca or calling
1-877-209-0079
● It is prohibited to copy, decompile, disas-
semble, reverse engineer, hack, manip-
ulate, or otherwise make available any
technology or software incorporated in
receivers compatible with the XM Satel-
lite Radio System or that support the XM
website, the Online Service or any of its
content. Furthermore, the AMBE
® voice
compression software included in this
product is protected by intellectual prop-
erty rights including patent rights, copy-
rights, and trade secrets of Digital Voice
Systems, Inc.
● Note: this applies to XM receivers only
and not XM Ready devices.
Page 107 of 282
●Do not operate the player’s controls or connect to the Bluetooth® audio system while driv -
ing.
● Your audio unit is fitted with Bluetooth
® antennas. People with implantable cardiac pace -
makers, cardiac resynchronization therapy-pacemakers or implant able cardioverter
defibrillators should maintain a reasonable distance between th emselves and the Blue-
tooth
® antennas. The radio waves may affect the operation of such dev ices.
● Before using Bluetooth
® devices, users of any electrical medical device other than
implantable cardiac pacemakers, cardiac resynchronization thera py-pacemakers or
implantable cardioverter defibrillators should consult the manu facturer of the device for
information about its operation under the influence of radio wa ves. Radio waves could
have unexpected effects on the operation of such medical device s.
●Do not leave your portable player in the vehicle. In particular, high temperatures inside
the vehicle may damage the portable player.
●Depending on the Bluetooth® device that is connected to the system, the music may start
playing when selecting
while it is paused. Conversely, the music may pause when
selecting
while it is playing.
● In the following conditions, the system may not function:
● It may take time to connect the phone when Blueto oth
® audio is being played.
● For operating the portable player, see the instruction manual t hat c
omes with it.
● If the Bluetooth
® device is disconnected due to poor reception from the Bluetoot h® net-
work when the engine switch is turned to the “ACC” or “ON” posi tion, t he system auto-
matically reconnects the portable player.
● If the system is attempting to connect to a Bluetooth
® device and the Bluetooth® device is
turned off and then bac k on, the system will attempt to reconne ct.
● Bluetooth
® device information is registered when the Bluetooth® device is connected to
the Blueto oth® audio system. When selling or disposing of the vehicle, remove the
Blueto oth® audio information from the system. (P. 6 1 )
107
3. MEDIA OPERATION
AUDIO SYSTEM
3
WA R N I N G
NOTICE
INFORMATION
• The Bluetooth® device is turned off.
• The Bluetooth
® device is not connected.
• The Bluetooth
® device has a low battery.
Page 141 of 282
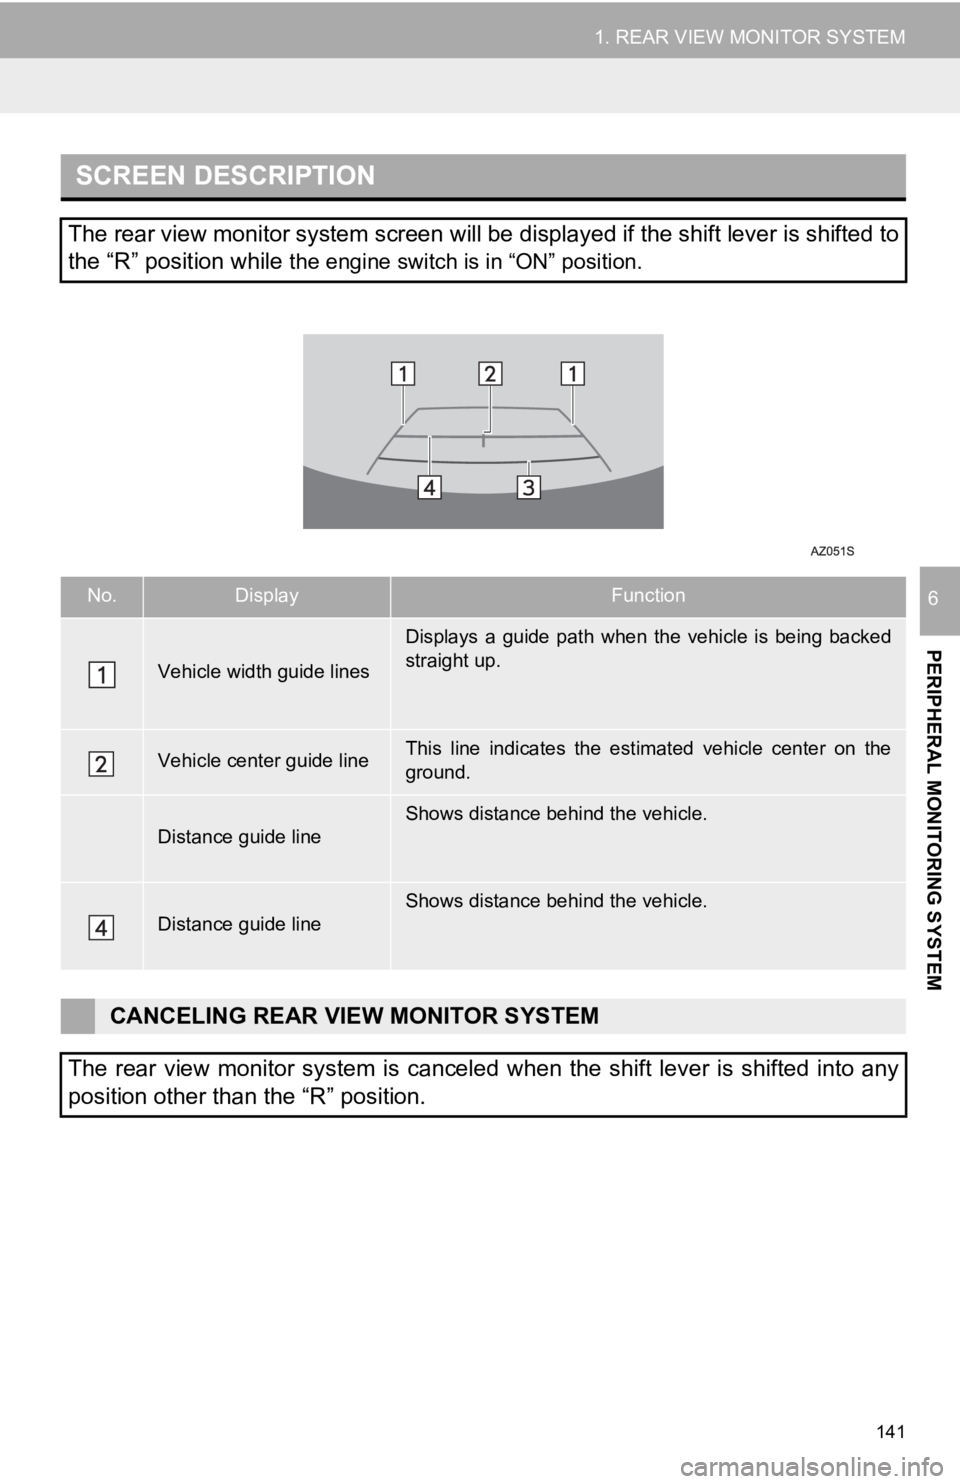
SCREEN DESCRIPTION
No.DisplayFunction
The displayed width is wider than the actual vehicle
width.
Displays a point approximately 1.5 ft. (0.5 m) (red) from
the edge of the bumper.
Displays a point approximatel y 3 ft. (1 m) (blue) from
the edge of the bumper.
141
1. REAR VIEW MONITOR SYSTEM
PERIPHERAL MONITORING SYSTEM
6
The rear view monitor system screen will be displayed if the sh ift lever is shifted to
the “R” position while
the engine switch is in “ON” position.
Vehicle width guide lines
Displays a guide path when t he vehicle is being backed
straight up.
Vehicle center guide lineThis line indicates the estimated vehicle center on the
ground.
Distance guide lineShows distance behind the vehicle.
Distance guide lineShows distance behind the vehicle.
CANCELING REAR VIEW MONITOR SYSTEM
The rear view monitor system is canceled when the shift lever i s shifted into any
position other than the “R” position.