TOYOTA TUNDRA 2019 Owners Manual (in English)
Manufacturer: TOYOTA, Model Year: 2019, Model line: TUNDRA, Model: TOYOTA TUNDRA 2019Pages: 672, PDF Size: 14.1 MB
Page 111 of 672
1113-1. Key information
3
Operation of each component
■If you lose your keys
New genuine key can be made by your Toyota dealer using the other key and
the key number stamped on your key number plate.
Keep the plate in a safe place such as your wallet, not in the vehicle.
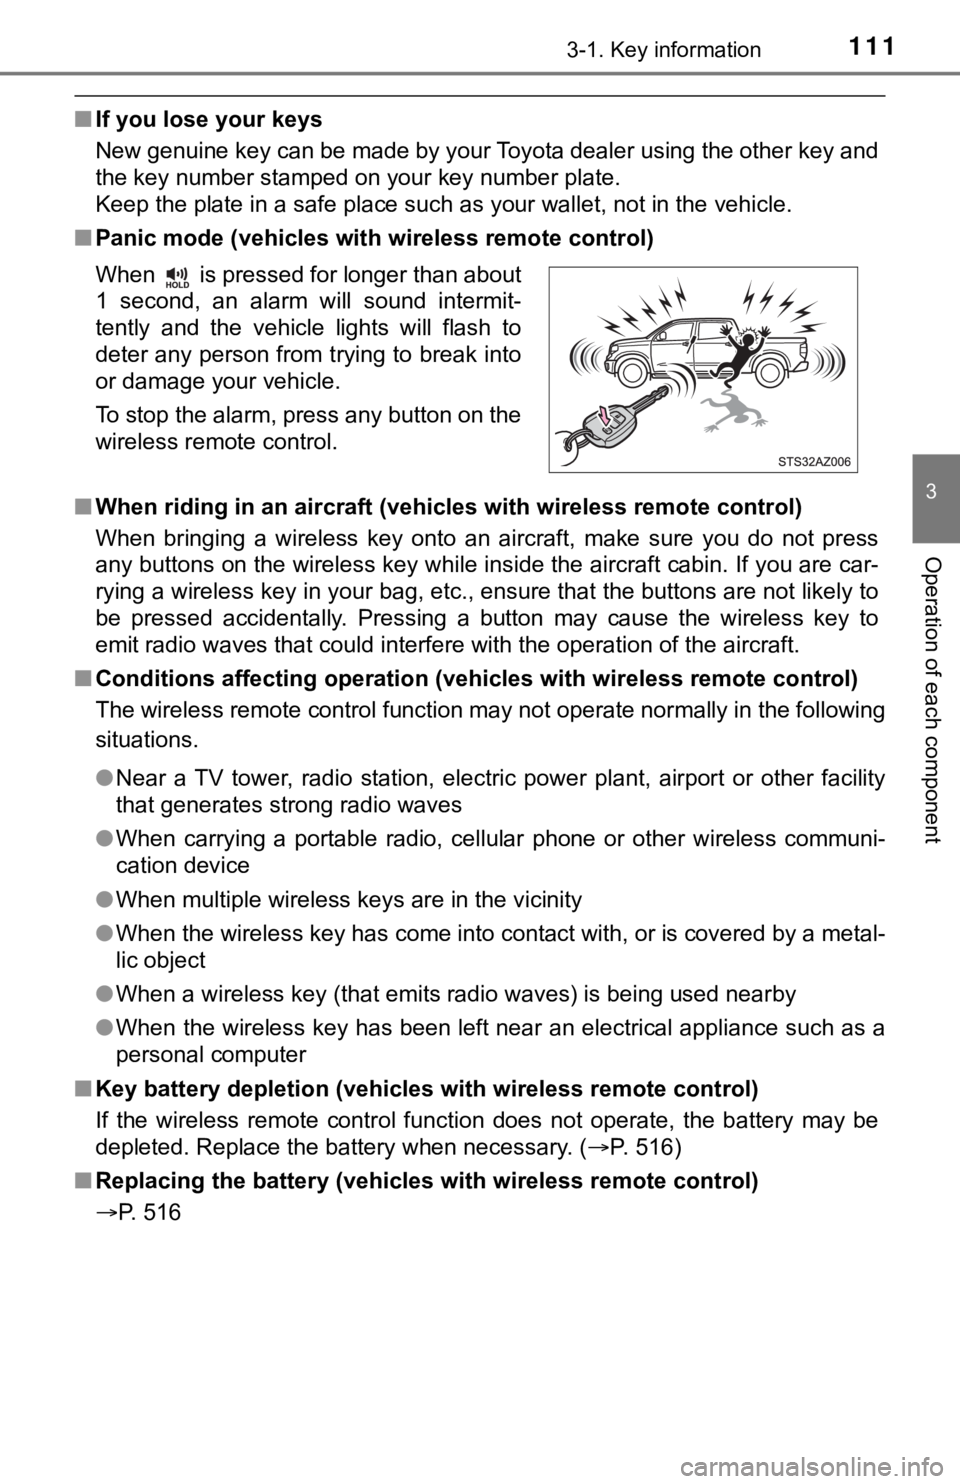
■ Panic mode (vehicles with wireless remote control)
■ When riding in an aircraft (vehic les with wireless remote control)
When bringing a wireless key onto an aircraft, make sure you do not press
any buttons on the wireless key while inside the aircraft cabin . If you are car-
rying a wireless key in your bag, etc., ensure that the buttons are not likely to
be pressed accidentally. Pressing a button may cause the wirele ss key to
emit radio waves that could interfere with the operation of the aircraft.
■ Conditions affecting operation (vehicles with wireless remote c ontrol)
The wireless remote control function may not operate normally i n the following
situations.
● Near a TV tower, radio station, electric power plant, airport o r other facility
that generates strong radio waves
● When carrying a portable radio, cellular phone or other wireles s communi-
cation device
● When multiple wireless keys are in the vicinity
● When the wireless key has come into contact with, or is covered by a metal-
lic object
● When a wireless key (that emits radio waves) is being used near by
● When the wireless key has been left near an electrical applianc e such as a
personal computer
■ Key battery depletion (vehicles with wireless remote control)
If the wireless remote control function does not operate, the b attery may be
depleted. Replace the battery when necessary. ( P. 516)
■ Replacing the battery (vehicles with wireless remote control)
P. 516 When is pressed for longer than about
1 second, an alarm will sound intermit-
tently and the vehicle lights will flash to
deter any person from trying to break into
or damage your vehicle.
To stop the alarm, press any button on the
wireless remote control.
Page 112 of 672

1123-1. Key information
■Certification for wireless remote control (vehicles with wireless remote
control)
For vehicles sold in the U.S.A.
FCC ID: GQ4-52T
FCC ID: GQ4-49R
NOTE:
This device complies with part 15 of the FCC Rules. Operation is subject to
the following two conditions: (1) This device may not cause har mful interfer-
ence, and (2) this device must accept any interference received, including
interference that may cause undesired operation.
FCC WARNING:
Changes or modifications not expressly approved by the party re sponsible for
compliance could void the user’s authority to operate the equip ment.
The FCC ID/IC Certification number is affixed inside the equipment. You can
find the ID/number when replacing the battery.
For vehicles sold in Canada
NOTE:
This device complies with Industry Canada’s license-exempt RSSs . Opera-
tion is subject to the following two conditions: (1) This devic e may not cause
interference; and (2) This device must accept any interference, including
interference that may cause undesired operation of the device.
The FCC ID/IC Certification number is affixed inside the equipment. You can
find the ID/number when replacing the battery.
NOTE:
Le présent appareil est conforme aux CNR d’Industrie Canada app licables
aux appareils radio exempts de licence. L’exploitation est auto risée aux deux
conditions suivantes:(1) l’appareil ne doit pas produire de bro uillage; (2) l’util-
isateur de l’appareil doit accepter tout brouillage radioélectr ique subi, même
si le brouillage est susceptible d’en compromettre le fonctionn ement.
L’identification FCC/Ie numéro d’accréditation IC est apposé(e) à l’intérieur
de l’appareil.
Page 113 of 672
1133-1. Key information
3
Operation of each component
■Customization that can be configured at Toyota dealer
Settings (e.g. unlocking function using a key) can be changed.
(Customizable features: P. 623)
NOTICE
■To prevent key damage
● Do not drop the keys, subject them to strong shocks or bend them.
● Do not expose the keys to high temperatures for long periods of time.
● Do not get the keys wet or wash them in an ultrasonic washer, e tc.
● Do not attach metallic or magnetic materials to the keys or place the keys
close to such materials.
● Do not disassemble the keys.
● Do not attach a sticker or anything else to the surface of the key.
● Do not place the keys near objects that produce magnetic fields , such as
TVs, audio systems and induction cookers, or medical electrical equip-
ment, such as low-frequency therapy equipment.
Page 114 of 672
1143-2. Opening, closing and locking the doors
Side doors
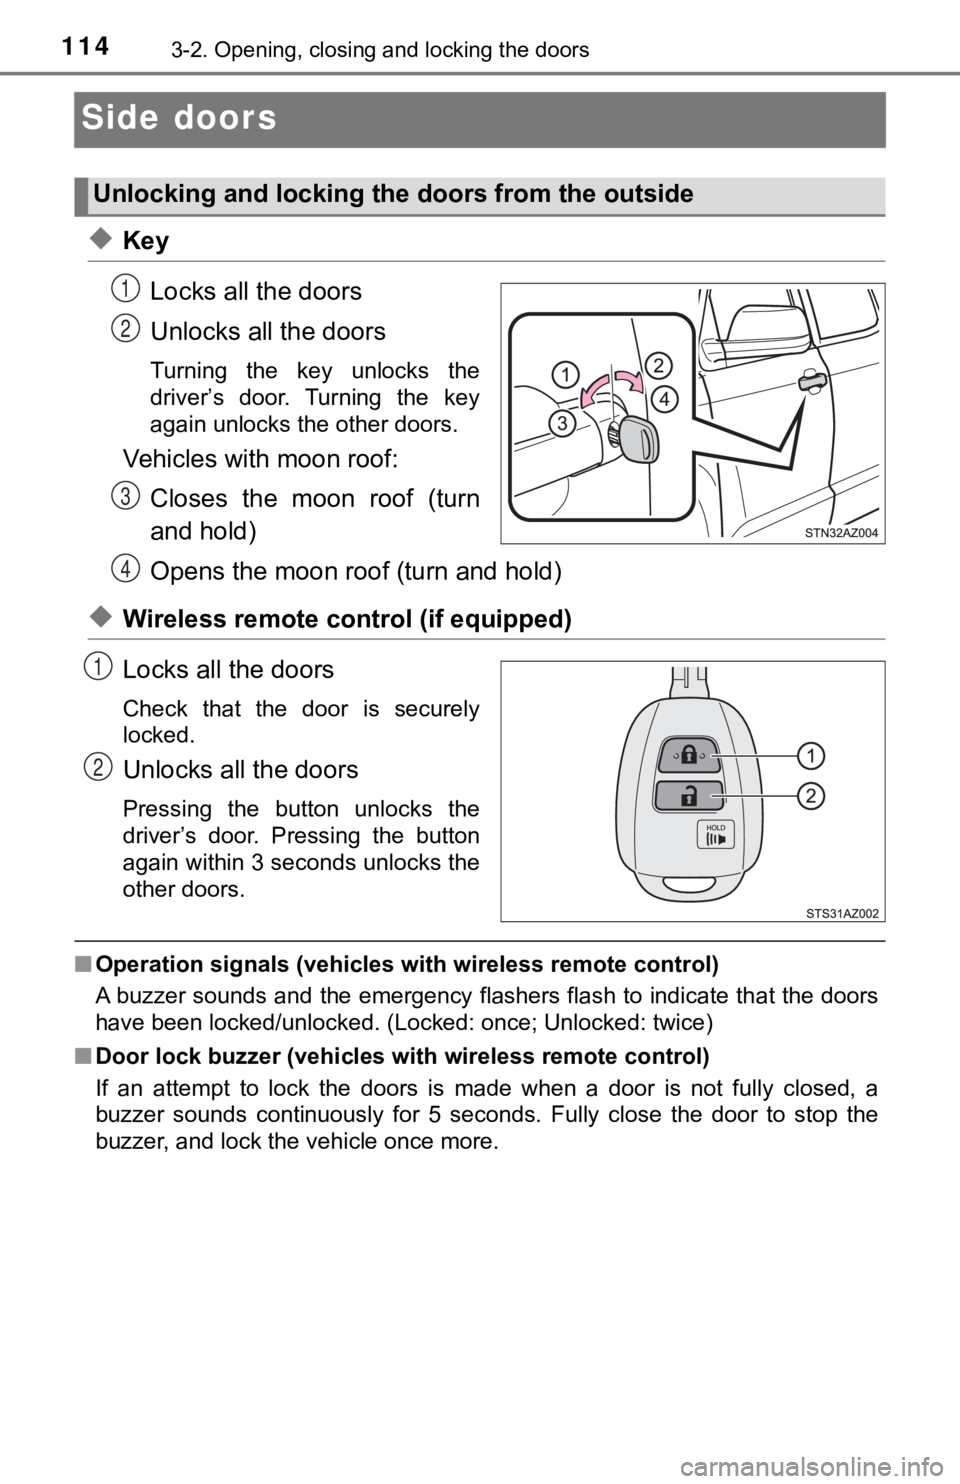
◆KeyLocks all the doors
Unlocks all the doors
Turning the key unlocks the
driver’s door. Turning the key
again unlocks the other doors.
Vehicles with moon roof:Closes the moon roof (turn
and hold)
Opens the moon roof (turn and hold)
◆Wireless remote control (if equipped)
Locks all the doors
Check that the door is securely
locked.
Unlocks all the doors
Pressing the button unlocks the
driver’s door. Pressing the button
again within 3 seconds unlocks the
other doors.
■Operation signals (vehicles with wireless remote control)
A buzzer sounds and the emergency flashers flash to indicate th at the doors
have been locked/unlocked. (Locked: once; Unlocked: twice)
■ Door lock buzzer (vehicles wi th wireless remote control)
If an attempt to lock the doors is made when a door is not full y closed, a
buzzer sounds continuously for 5 seconds. Fully close the door to stop the
buzzer, and lock the vehicle once more.
Unlocking and locking the doors from the outside
1
2
3
4
1
2
Page 115 of 672
1153-2. Opening, closing and locking the doors
3
Operation of each component
■Security feature (vehicles with wireless remote control)
If a door is not opened within approximately 60 seconds after t he vehicle is
unlocked, the security feature automatically locks the vehicle again.
■ Alarm (if equipped)
Using the wireless remote control to lock the doors will set th e alarm system.
( P. 85)
■
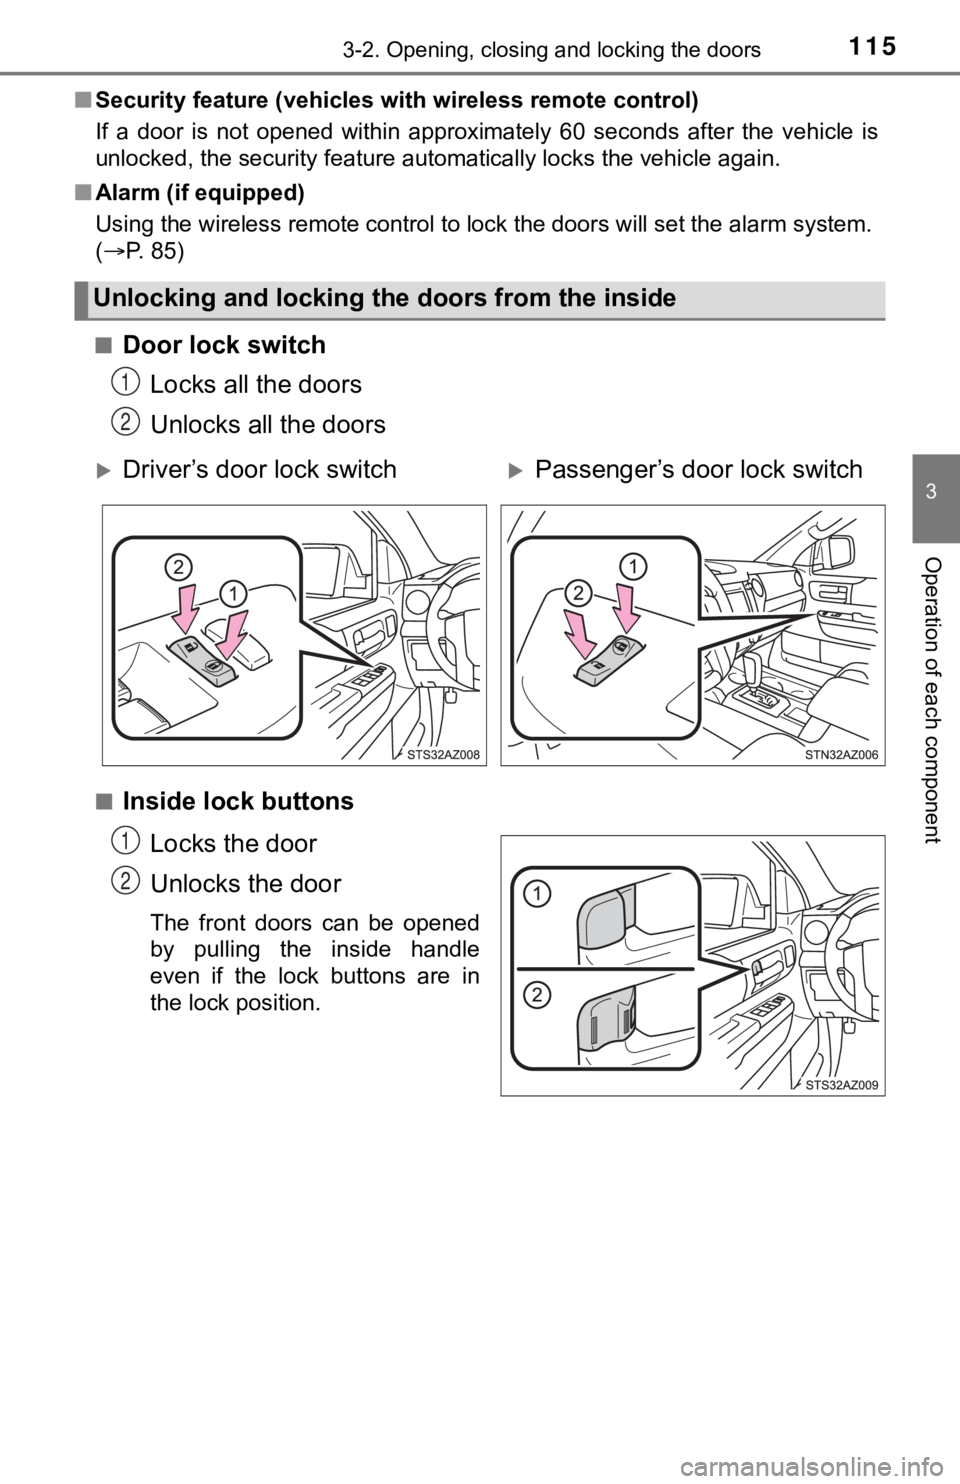
Door lock switch Locks all the doors
Unlocks all the doors
■Inside lock buttons
Locks the door
Unlocks the door
The front doors can be opened
by pulling the inside handle
even if the lock buttons are in
the lock position.
Unlocking and locking the doors from the inside
1
2
Driver’s door lock switchPassenger’s door lock switch
1
2
Page 116 of 672
1163-2. Opening, closing and locking the doors
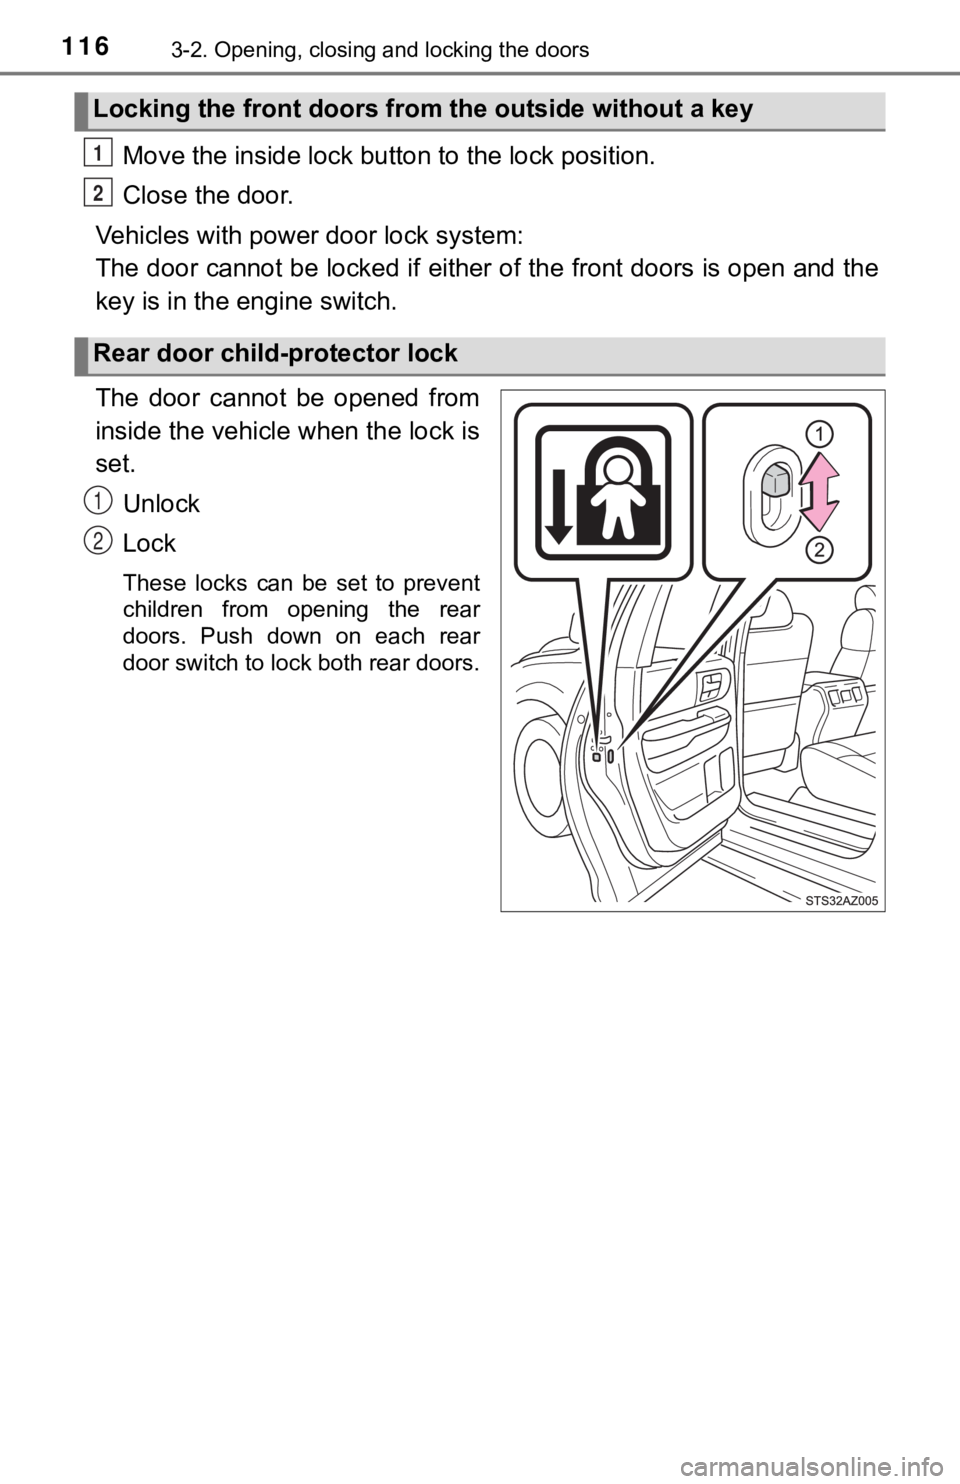
Move the inside lock button to the lock position.
Close the door.
Vehicles with power door lock system:
The door cannot be locked if either of the front doors is open and the
key is in the engine switch.
The door cannot be opened from
inside the vehicle when the lock is
set.
Unlock
Lock
These locks can be set to prevent
children from opening the rear
doors. Push down on each rear
door switch to lock both rear doors.
Locking the front doors from the outside without a key
Rear door child-protector lock
1
2
1
2
Page 117 of 672
1173-2. Opening, closing and locking the doors
3
Operation of each component
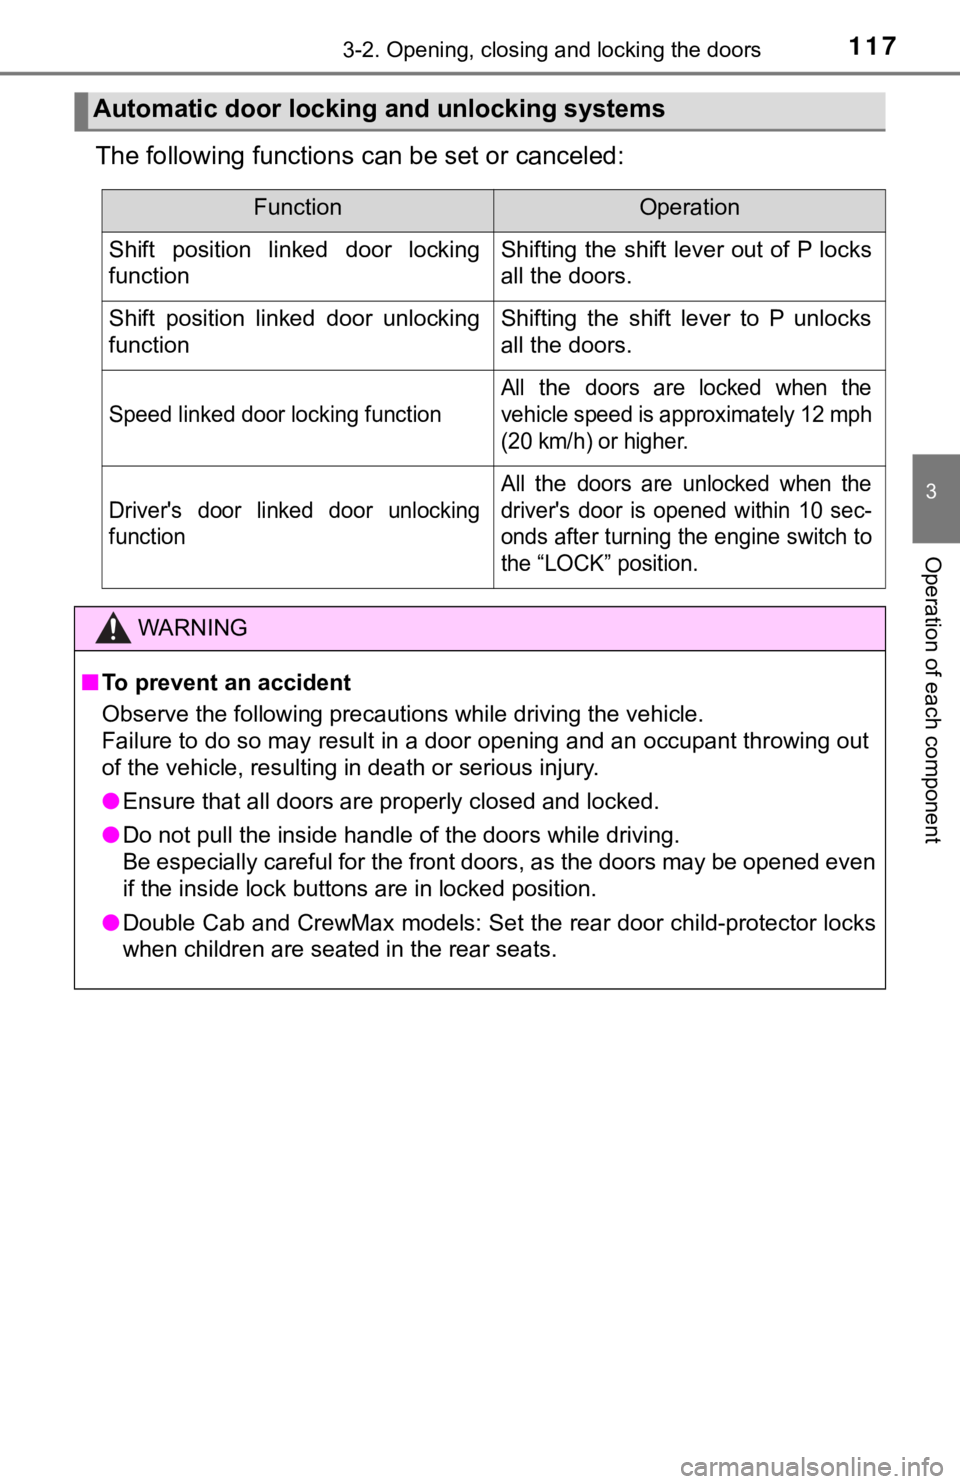
The following functions can be set or canceled:
Automatic door locking and unlocking systems
FunctionOperation
Shift position linked door locking
functionShifting the shift lever out of P locks
all the doors.
Shift position linked door unlocking
functionShifting the shift lever to P unlocks
all the doors.
Speed linked door locking function
All the doors are locked when the
vehicle speed is approximately 12 mph
(20 km/h) or higher.
Driver's door linked door unlocking
function
All the doors are unlocked when the
driver's door is opened within 10 sec-
onds after turning the engine switch to
the “LOCK” position.
WARNING
■ To prevent an accident
Observe the following precautions while driving the vehicle.
Failure to do so may result in a door opening and an occupant throwing out
of the vehicle, resulting in death or serious injury.
● Ensure that all doors are properly closed and locked.
● Do not pull the inside handle of the doors while driving.
Be especially careful for the front doors, as the doors may be opened even
if the inside lock buttons are in locked position.
● Double Cab and CrewMax models: Set the rear door child-protecto r locks
when children are seated in the rear seats.
Page 118 of 672
1183-2. Opening, closing and locking the doors
Tailgate
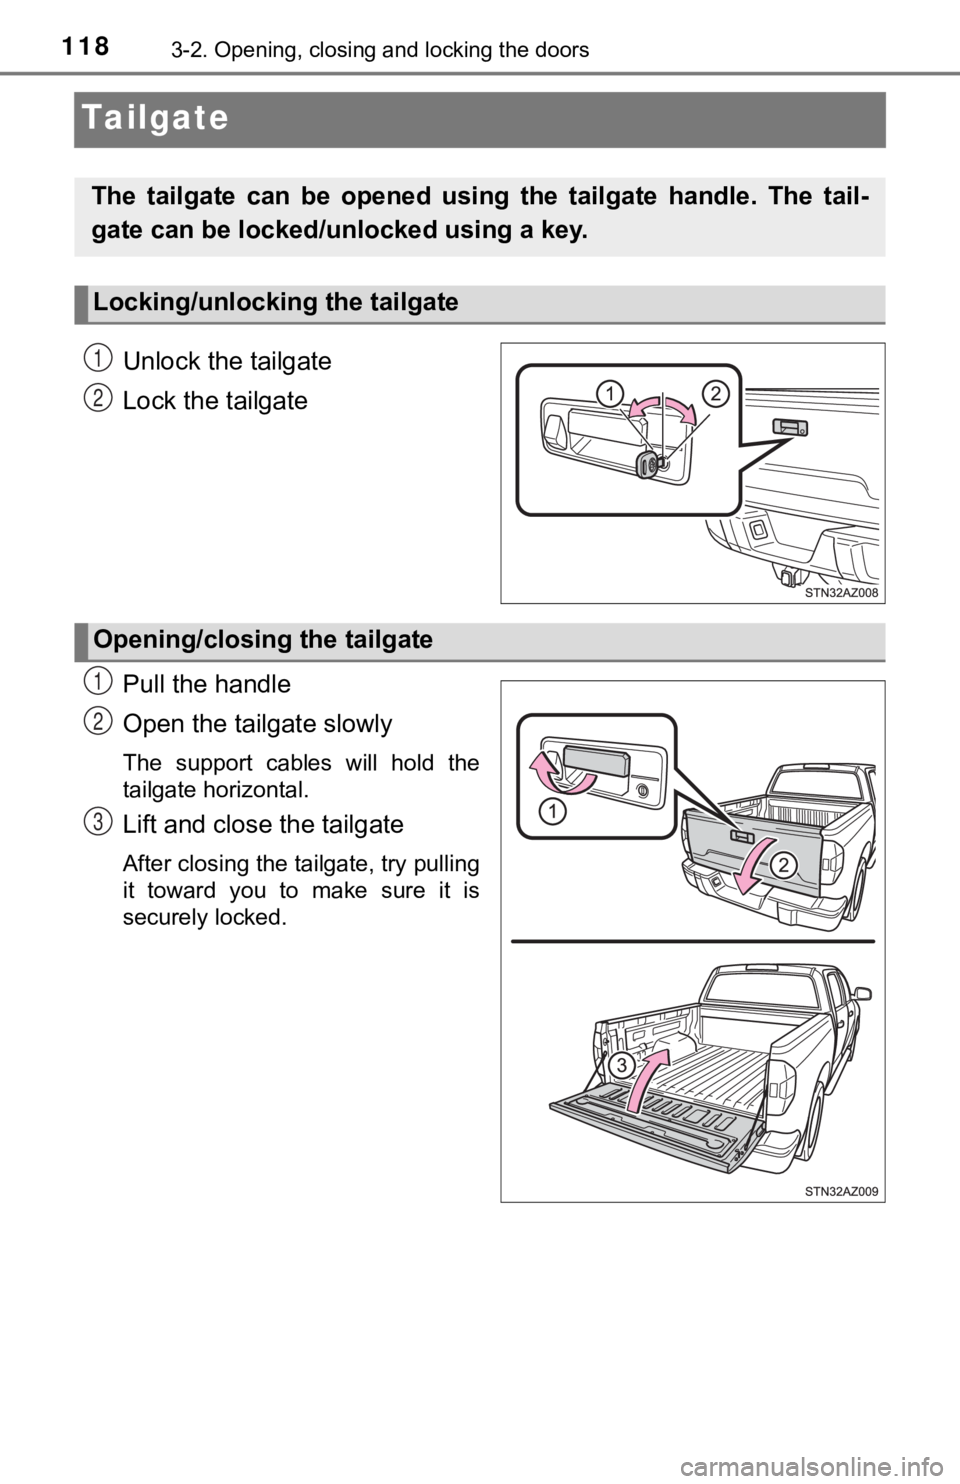
Unlock the tailgate
Lock the tailgate
Pull the handle
Open the tailgate slowly
The support cables will hold the
tailgate horizontal.
Lift and close the tailgate
After closing the tailgate, try pulling
it toward you to make sure it is
securely locked.
The tailgate can be opened using the tailgate handle. The tail-
gate can be locked/ unlocked using a key.
Locking/unlocking the tailgate
1
2
Opening/closing the tailgate
1
2
3
Page 119 of 672
1193-2. Opening, closing and locking the doors
3
Operation of each component
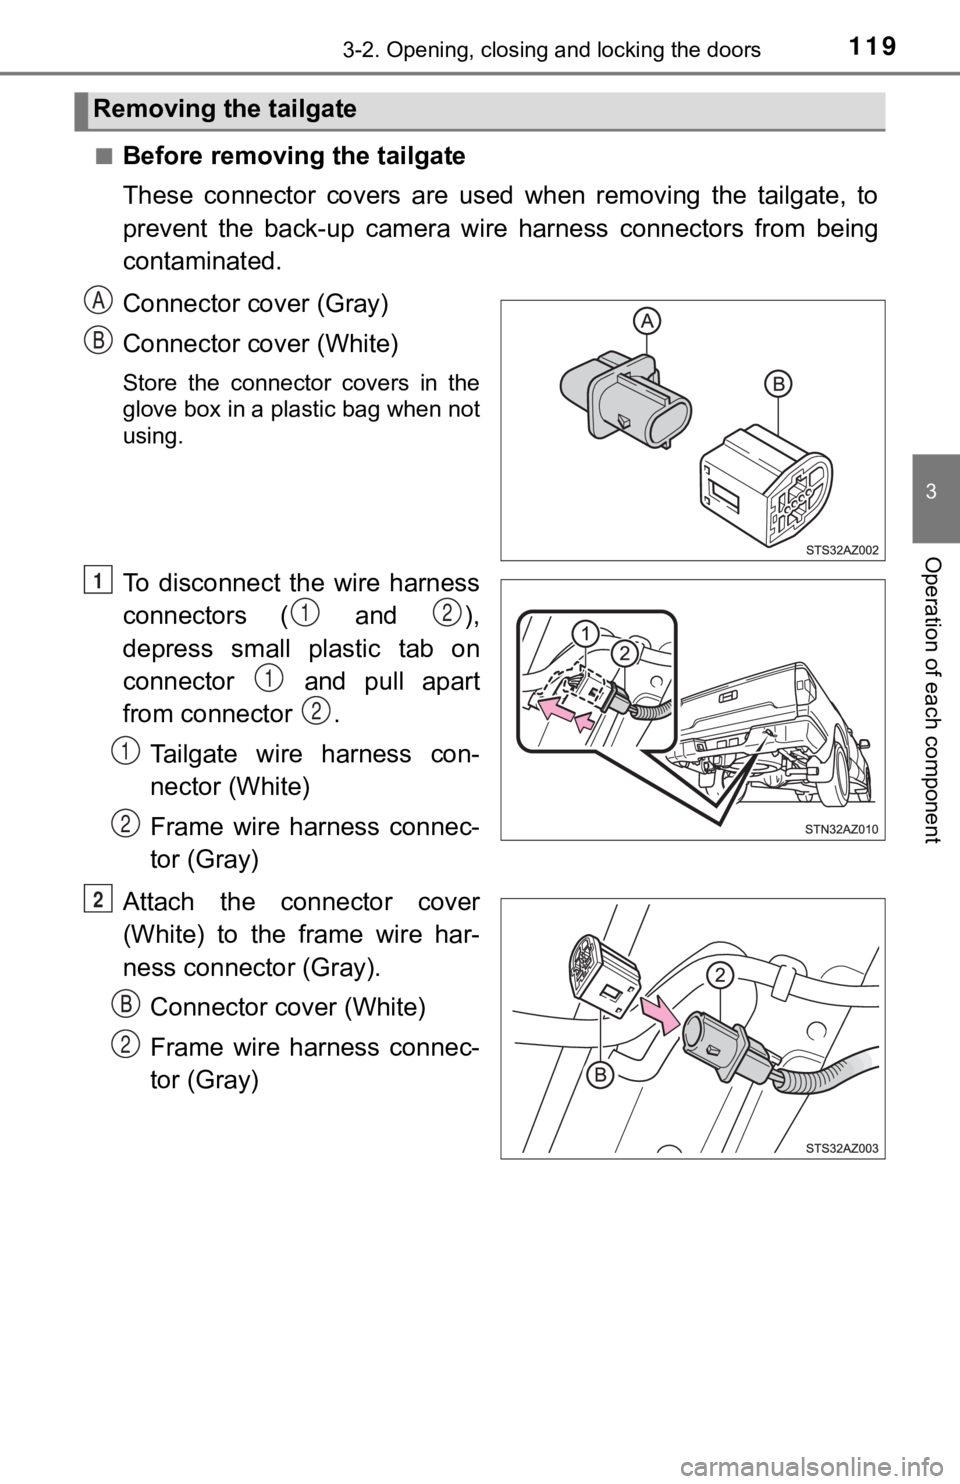
■Before removing the tailgate
These connector covers are used when removing the tailgate, to
prevent the back-up camera wire harness connectors from being
contaminated.
Connector cover (Gray)
Connector cover (White)
Store the connector covers in the
glove box in a plastic bag when not
using.
To disconnect the wire harness
connectors ( and ),
depress small plastic tab on
connector and pull apart
from connector .
Tailgate wire harness con-
nector (White)
Frame wire harness connec-
tor (Gray)
Attach the connector cover
(White) to the frame wire har-
ness connector (Gray). Connector cover (White)
Frame wire harness connec-
tor (Gray)
Removing the tailgate
1
12
1
2
1
2
2
2
Page 120 of 672
1203-2. Opening, closing and locking the doors
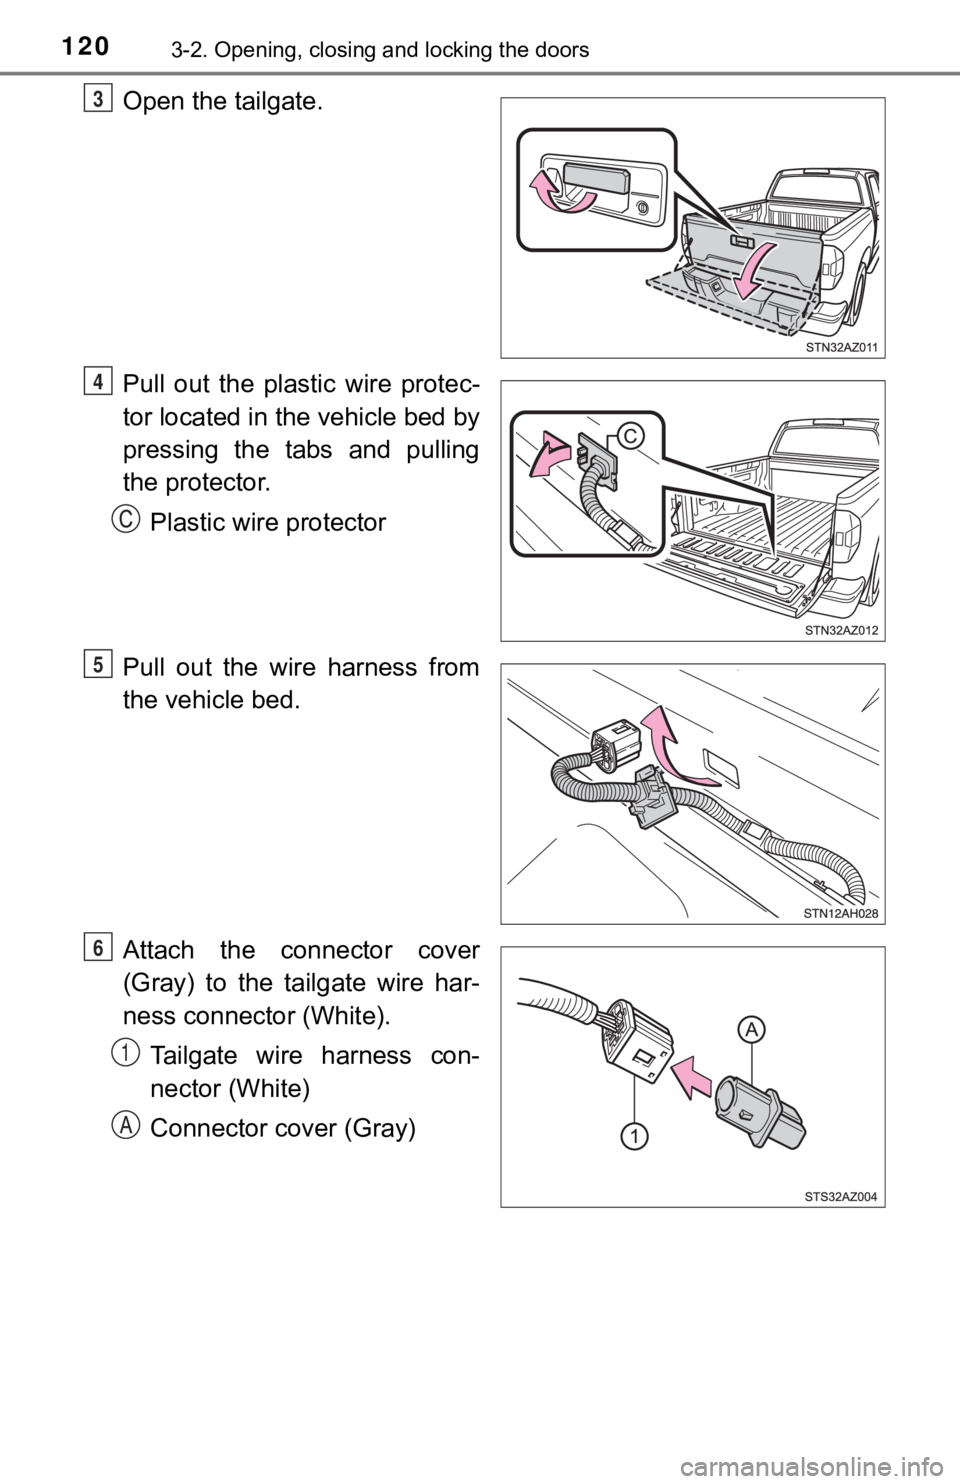
Open the tailgate.
Pull out the plastic wire protec-
tor located in the vehicle bed by
pressing the tabs and pulling
the protector.Plastic wire protector
Pull out the wire harness from
the vehicle bed.
Attach the connector cover
(Gray) to the tailgate wire har-
ness connector (White). Tailgate wire harness con-
nector (White)
Connector cover (Gray)3
4
5
6
1