turn signal TOYOTA TUNDRA 2019 (in English) User Guide
[x] Cancel search | Manufacturer: TOYOTA, Model Year: 2019, Model line: TUNDRA, Model: TOYOTA TUNDRA 2019Pages: 672, PDF Size: 14.1 MB
Page 248 of 672
2484-5. Using the driving support systems
■Operation conditio ns of each function
● Lane departure alert function
This function operates when all of the following conditions are met.
• LDA is turned on.
• Vehicle speed is approximately 32 mph (50 km/h) or more.
• System recognizes white (yellow) lines.
• Width of traffic lane is approximately 9.8 ft. (3 m) or more.
• Turn signal lever is not operated.
• Vehicle is driven on a straight road or around a gentle curve with a radius
of more than approximately 492 ft. (150 m).
• No system malfunctions are detected. ( P. 250)
● Vehicle sway warning function
This function operates when all of the following conditions are met.
• Setting for “
Warning” in screen of the multi-information display is
set to on. ( P. 101)
• Vehicle speed is approximately 32 mph (50 km/h) or more.
• Width of traffic lane is approximately 9.8 ft. (3 m) or more.
• No system malfunctions are detected. ( P. 250)
■ Temporary cancellation of functions
When the operation conditions are no longer met, a function may be tempo-
rarily canceled. However, when the operation conditions are met again, oper-
ation of the function is automatically restored. ( P. 248)
■ Lane departure alert function
The warning buzzer may be difficult to hear due to external noi se, audio play-
back, etc.
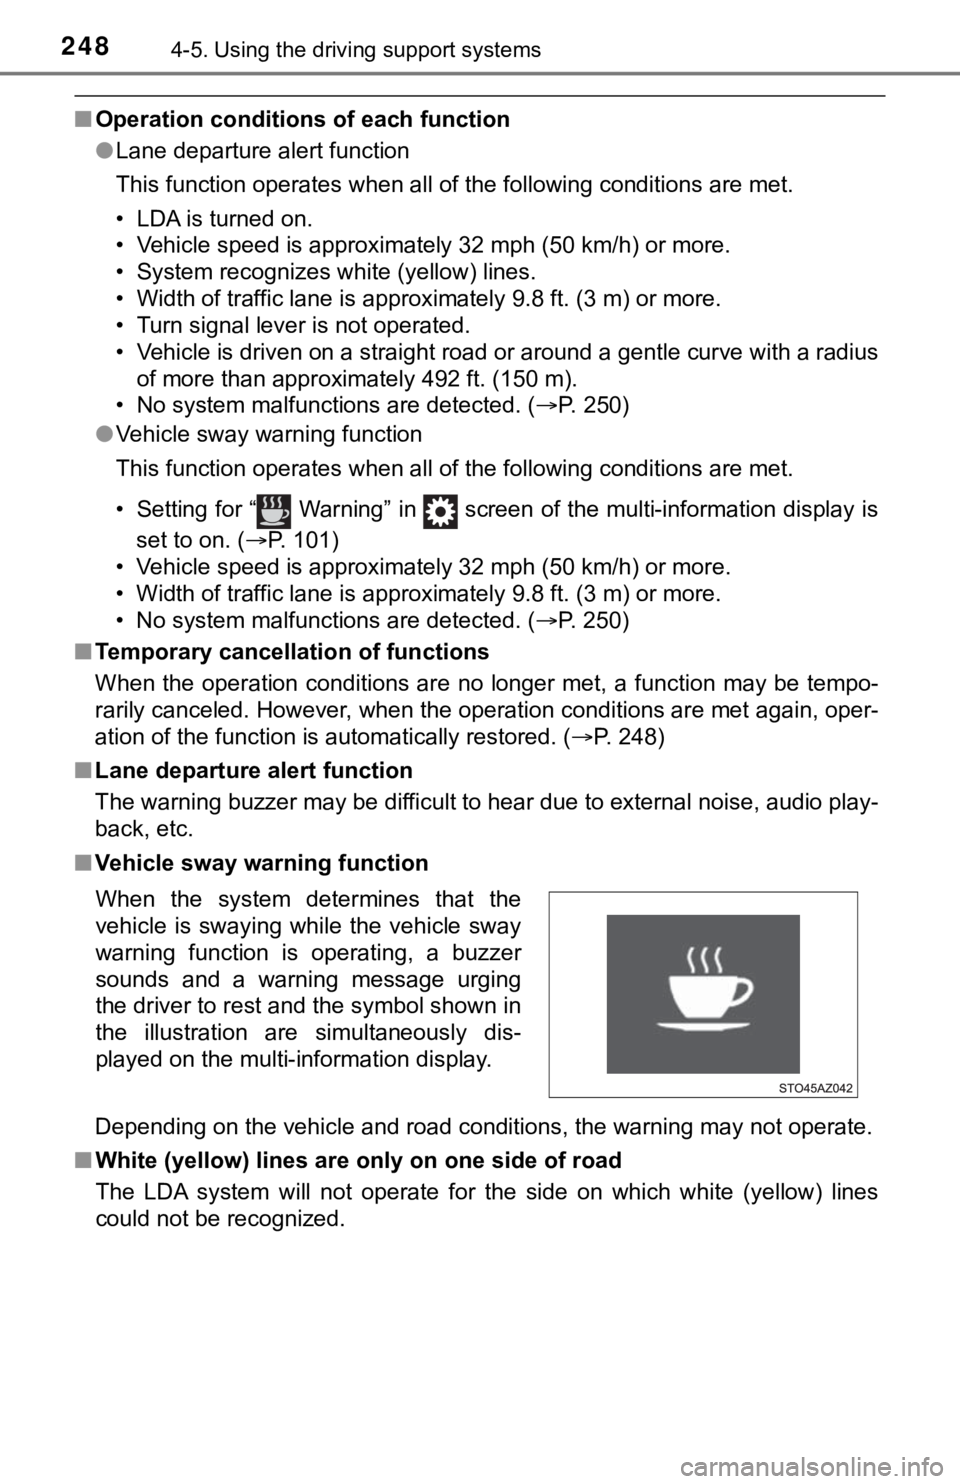
■ Vehicle sway warning function
Depending on the vehicle and road conditions, the warning may n ot operate.
■ White (yellow) lines are on ly on one side of road
The LDA system will not operate for the side on which white (ye llow) lines
could not be recognized. When the system determines that the
vehicle is swaying while the vehicle sway
warning function is operating, a buzzer
sounds and a warning message urging
the driver to rest and the symbol shown in
the illustration are simultaneously dis-
played on the multi-information display.
Page 285 of 672
2854-5. Using the driving support systems
4
Driving
BSM (Blind Spot Monitor)
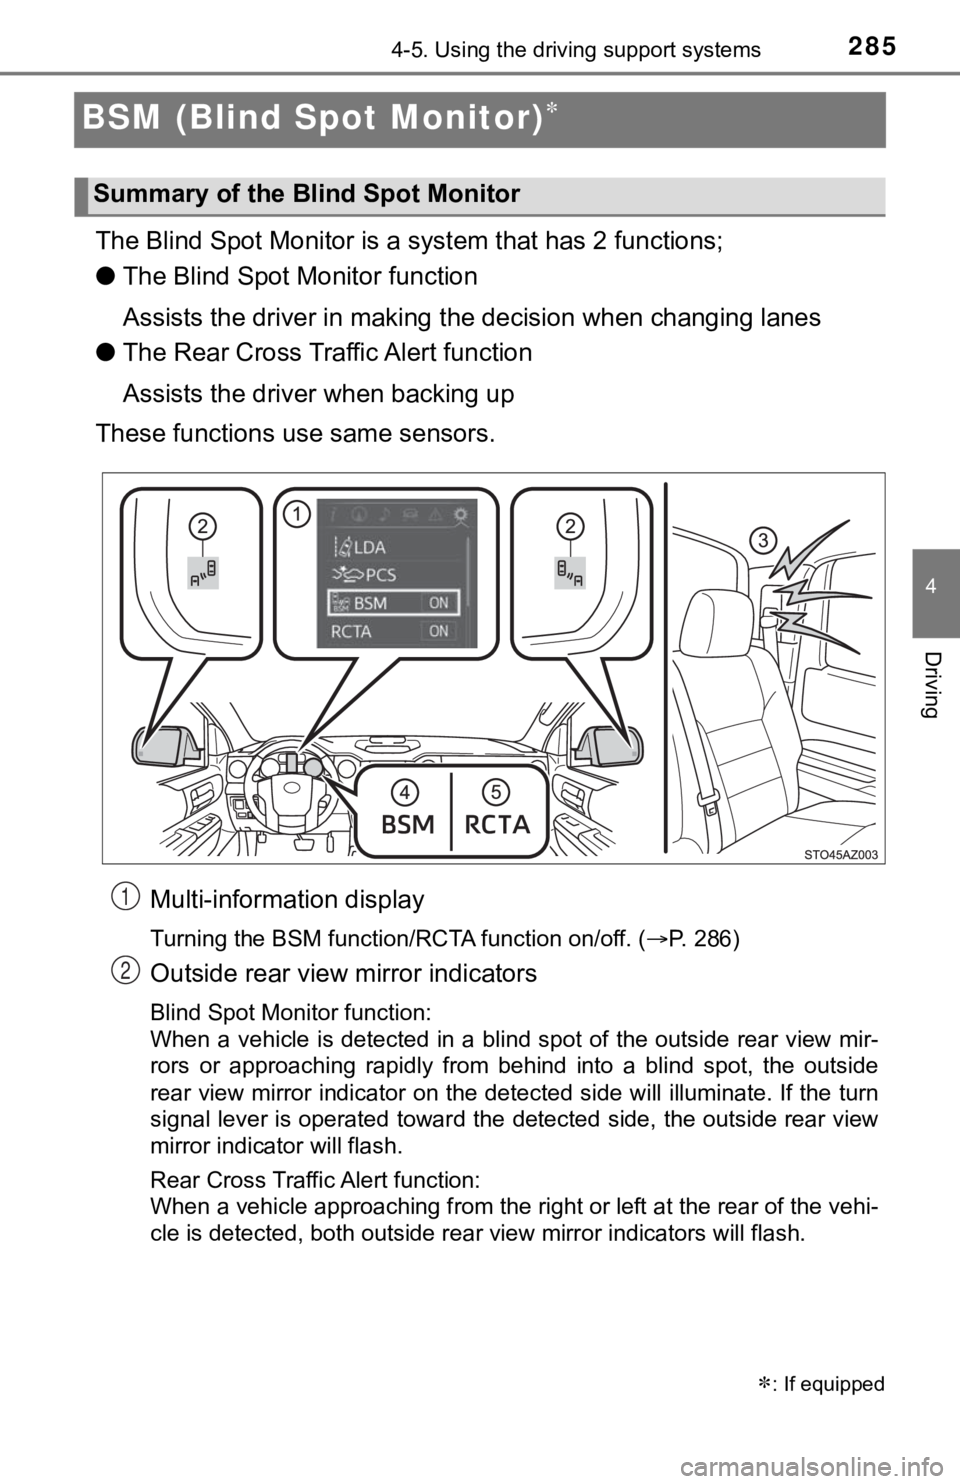
The Blind Spot Monitor is a system that has 2 functions;
● The Blind Spot Monitor function
Assists the driver in making t he decision when changing lanes
● The Rear Cross Traffic Alert function
Assists the driver when backing up
These functions use same sensors.
Multi-information display
Turning the BSM function/RCTA function on/off. ( P. 286)
Outside rear view mirror indicators
Blind Spot Monitor function:
When a vehicle is detected in a blind spot of the outside rear view mir-
rors or approaching rapidly from behind into a blind spot, the outside
rear view mirror indicator on the detected side will illuminate. If the turn
signal lever is operated toward the detected side, the outside rear view
mirror indicator will flash.
Rear Cross Traffic Alert function:
When a vehicle approaching from the right or left at the rear of the vehi-
cle is detected, both outside rear view mirror indicators will flash.
: If equipped
Summary of the Blind Spot Monitor
1
2
Page 341 of 672
3415-4. Using the radio
5
Multimedia
Search for desired stations by turning the “TUNE·SCROLL” knob or
pressing the “ ” or “ ” button on “SEEK/TRACK”.
Select “(add new)”
To change the preset station to a different one, select and hol d the preset
station.
Select “Yes”.
Select “OK” after setting the new preset station.
■Refreshing the station list
Select “Refresh” on the “Station List” screen.
To cancel the refresh, select “Cancel Refresh”.
■Reception sensitivity
Maintaining perfect radio reception at all times is difficult d ue to the continu-
ally changing position of the antenna, differences in signal st rength and sur-
rounding objects, such as trains, transmitters, etc.
Setting station presets
1
2
3
4
Page 366 of 672
3665-7. Connecting Bluetooth®
When auto connection has failed or “Bluetooth Power” is turned off,
you must connect the Bluetooth® device manually.
Follow the steps in “C onnecting a Bluetooth
® device” from step .
( P. 365)
Registering an additional device
Select “Select Device” on t he “Bluetooth Audio” screen.
For more information: P. 3 6 3
Selecting a registered device
Select “Select Device” on t he “Bluetooth Audio” screen.
For more information: P. 3 6 5
■Reconnecting a Bluetooth® phone
If the system cannot connect due to poor signal strength with the engine
switch in the “ACC” or “ON” position, the system will automatic ally attempt to
reconnect.
If the system is attempting to connect to a Bluetooth
® phone and the Blue-
tooth® phone is turned off and then back on, the system will attempt to recon-
nect.
Manual connection
Connecting a Bluetooth® audio player
1
1
2
1
2
Page 521 of 672
5217-3. Do-it-yourself maintenance
7
Maintenance and care
Light bulbs
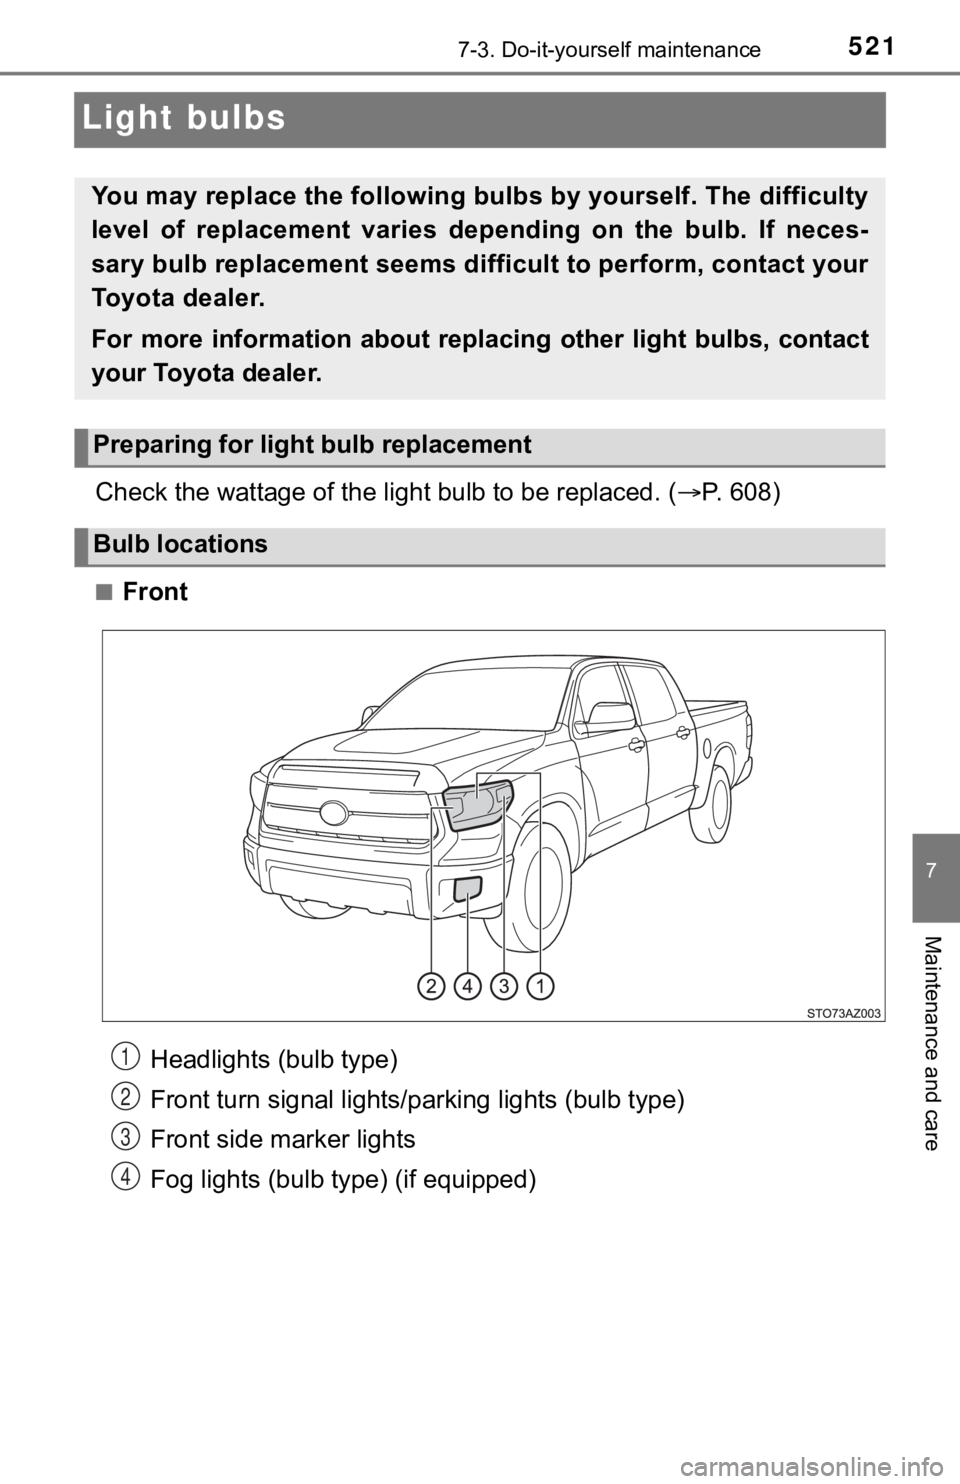
Check the wattage of the light bulb to be replaced. ( P. 608)
■Front
You may replace the following bul bs by yourself. The difficulty
level of replacement varies depending on the bulb. If neces-
sary bulb replacement seems difficult to perform, contact your
To y o t a d e a l e r.
For more information about replacing other light bulbs, contact
your Toyota dealer.
Preparing for light bulb replacement
Bulb locations
Headlights (bulb type)
Front turn signal lights/parking lights (bulb type)
Front side marker lights
Fog lights (bulb type) (if equipped)1
2
3
4
Page 522 of 672
5227-3. Do-it-yourself maintenance
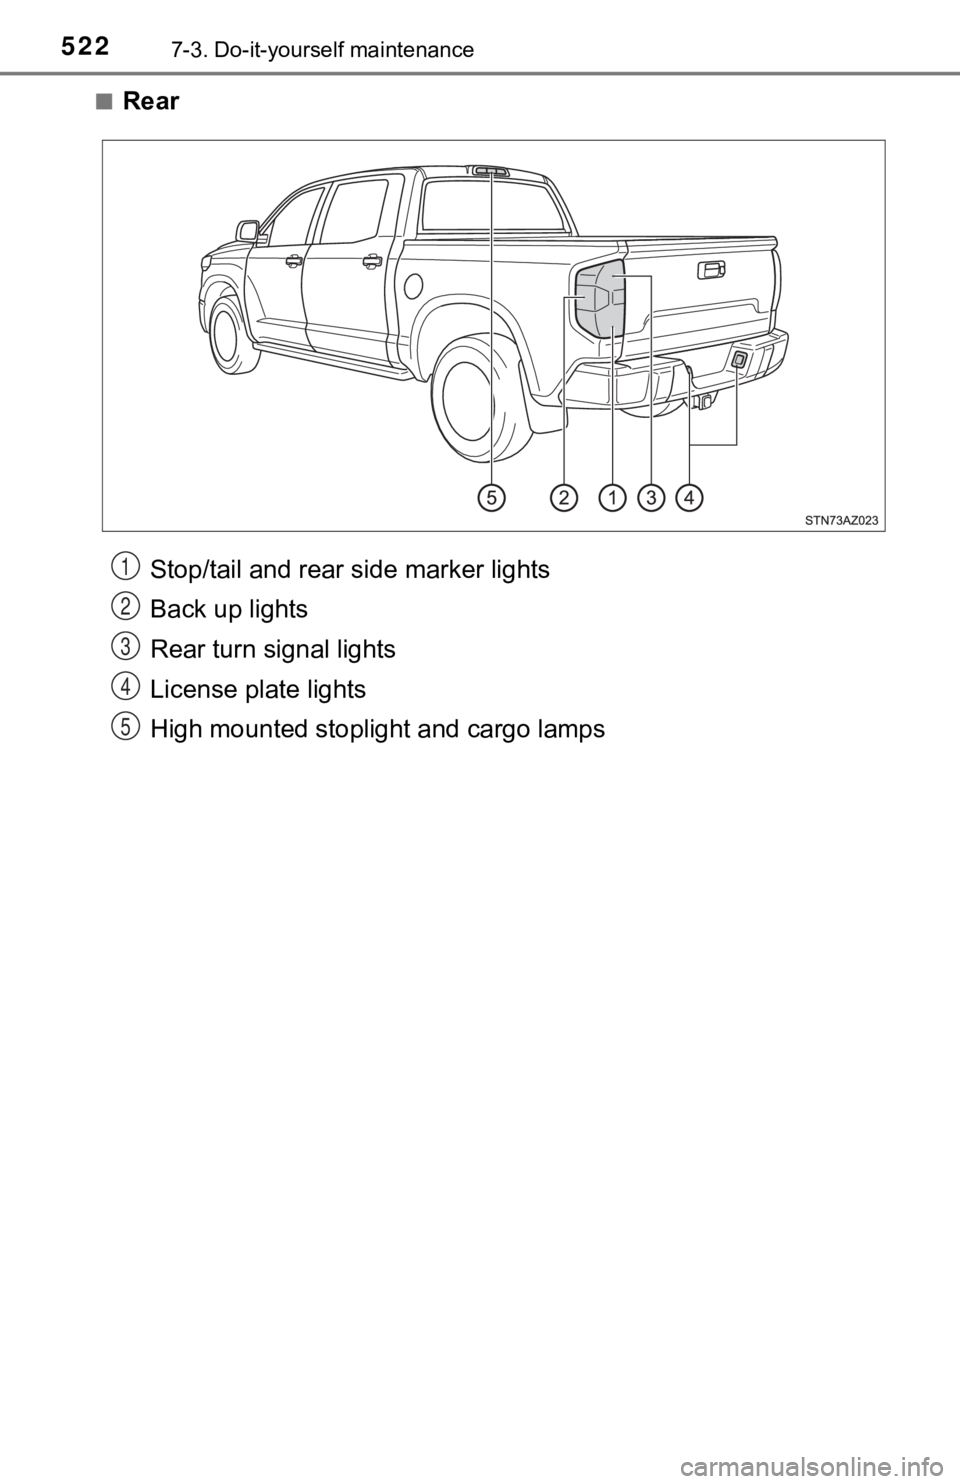
■Rear
Stop/tail and rear side marker lights
Back up lights
Rear turn signal lights
License plate lights
High mounted stoplight and cargo lamps1
2
3
4
5
Page 527 of 672
5277-3. Do-it-yourself maintenance
7
Maintenance and care
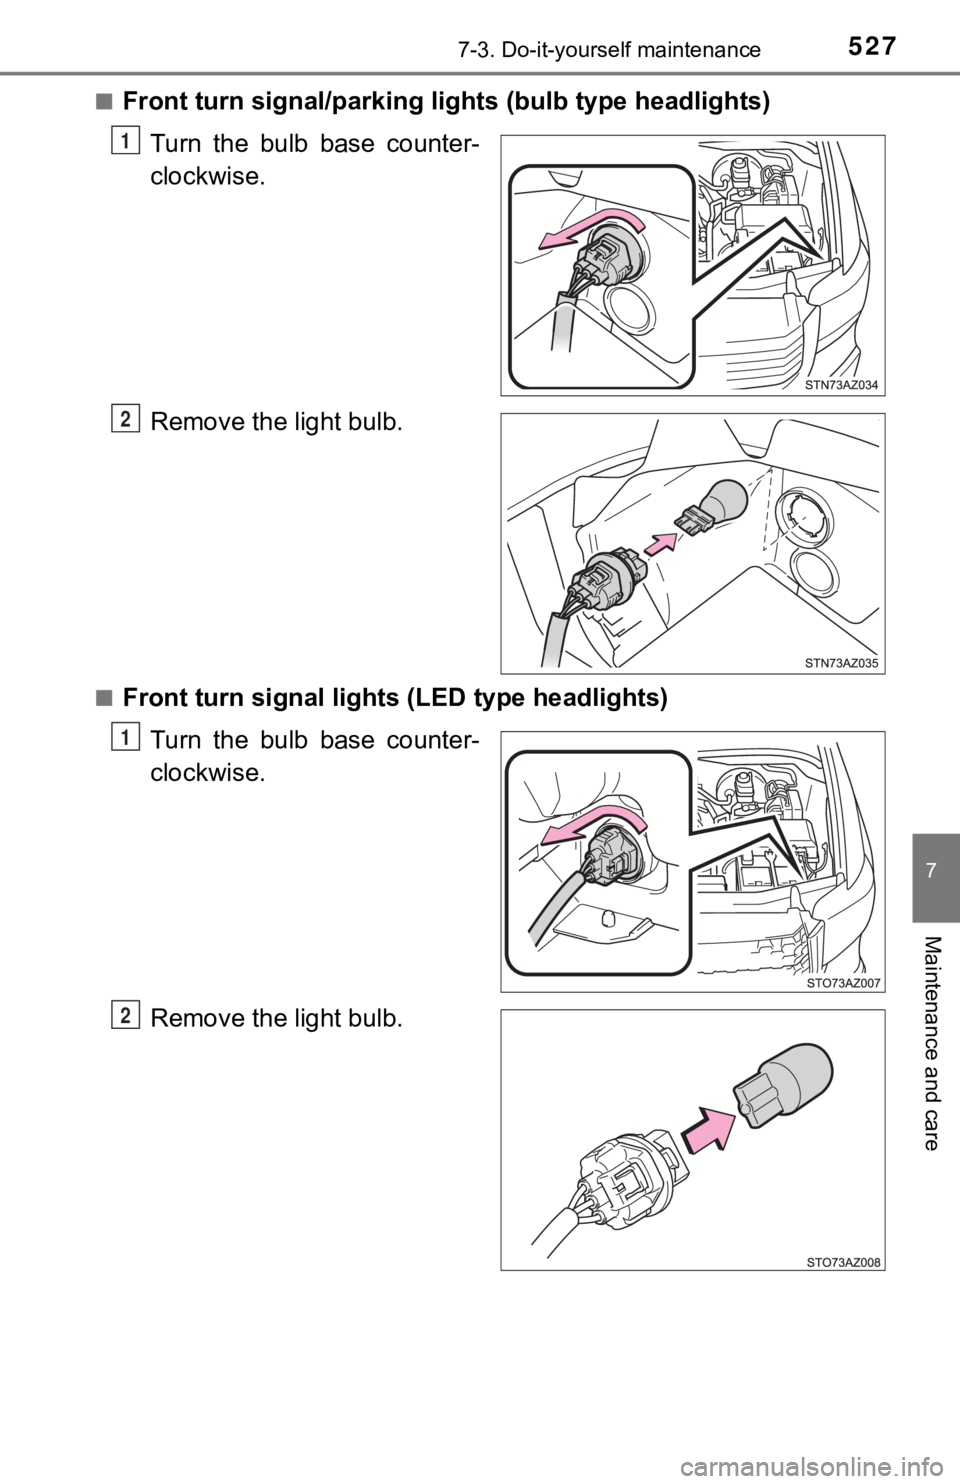
■Front turn signal/parking lights (bulb type headlights)
Turn the bulb base counter-
clockwise.
Remove the light bulb.
■Front turn signal lights (LED type headlights)
Turn the bulb base counter-
clockwise.
Remove the light bulb.
1
2
1
2
Page 532 of 672
5327-3. Do-it-yourself maintenance
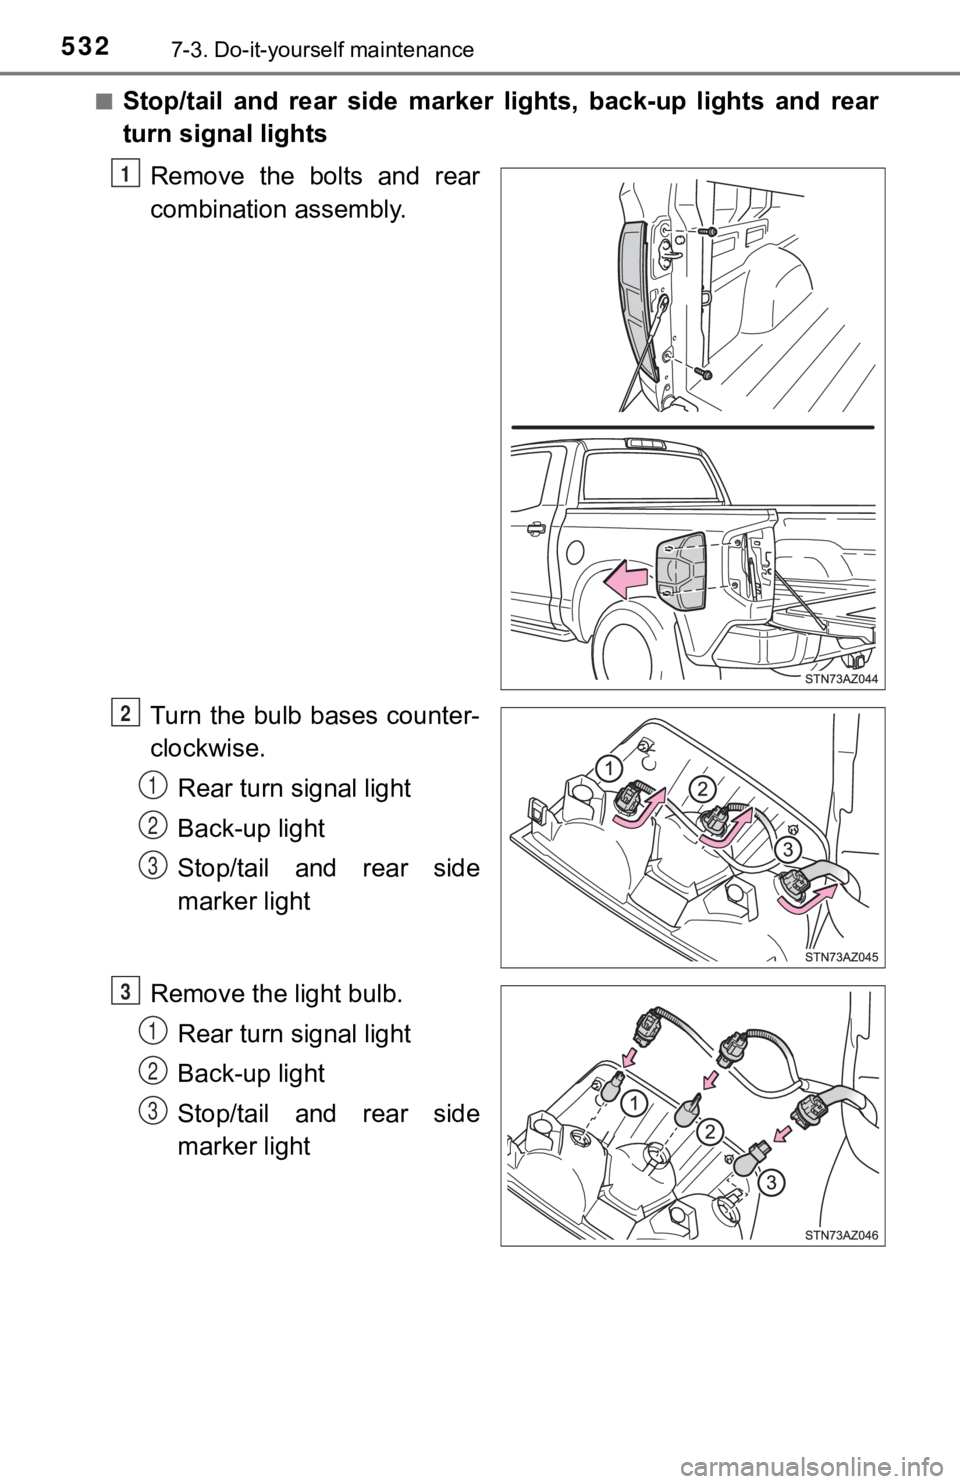
■Stop/tail and rear side marker lights, back-up lights and rear
turn signal lightsRemove the bolts and rear
combination assembly.
Turn the bulb bases counter-
clockwise.Rear turn signal light
Back-up light
Stop/tail and rear side
marker light
Remove the light bulb. Rear turn signal light
Back-up light
Stop/tail and rear side
marker light
1
2
1
2
3
3
1
2
3
Page 534 of 672
5347-3. Do-it-yourself maintenance
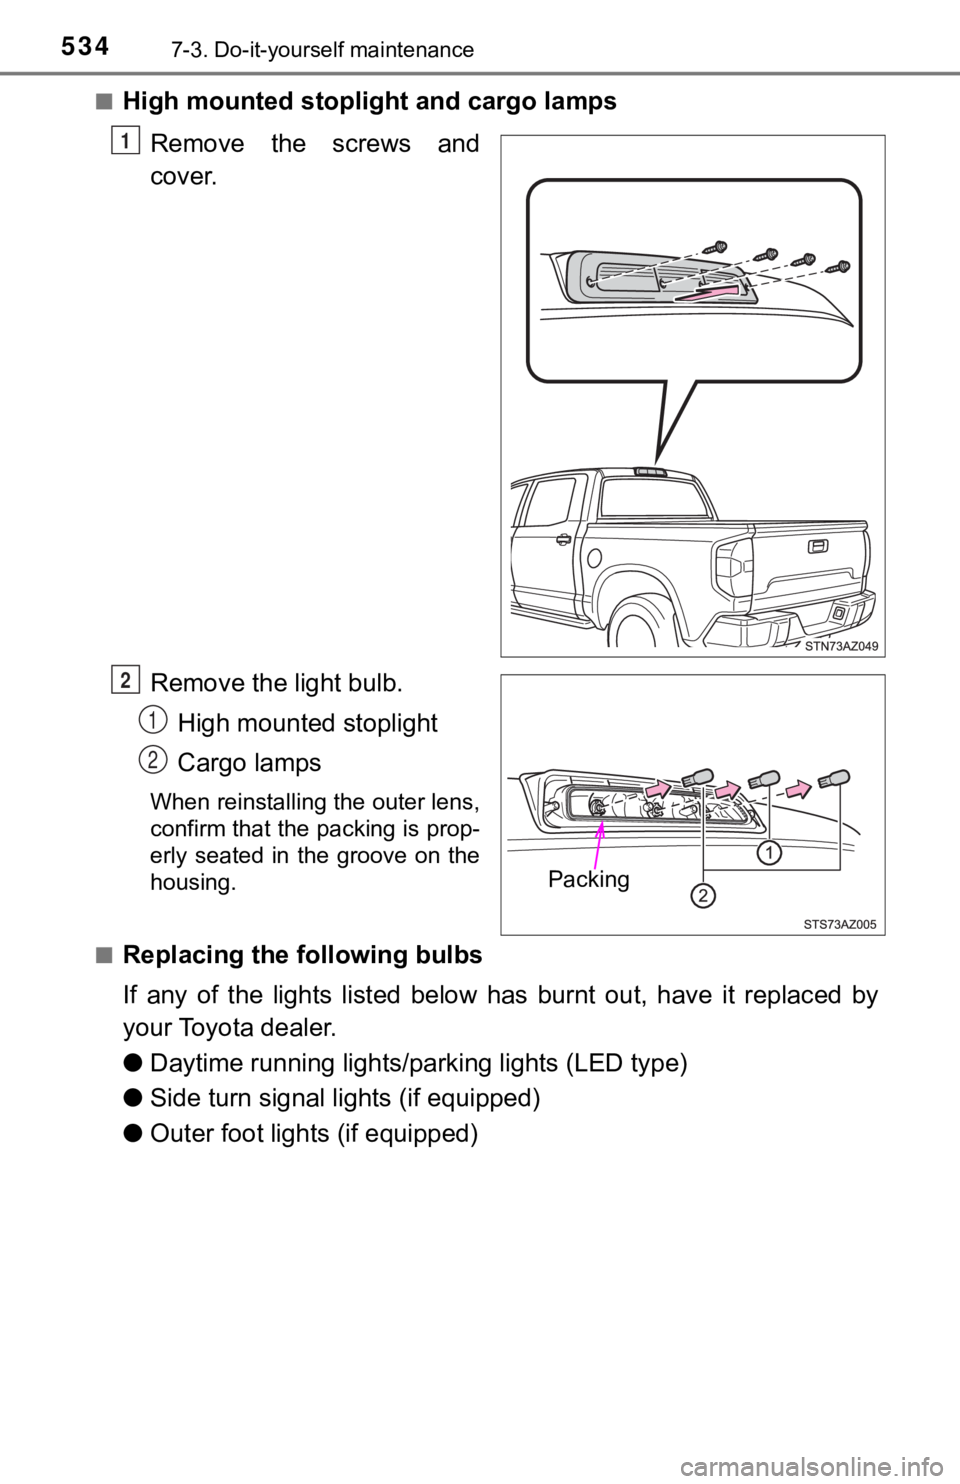
■High mounted stoplight and cargo lamps
Remove the screws and
cover.
Remove the light bulb. High mounted stoplight
Cargo lamps
When reinstalling the outer lens,
confirm that the packing is prop-
erly seated in the groove on the
housing.
■
Replacing the following bulbs
If any of the lights listed below has burnt out, have it replac ed by
your Toyota dealer.
● Daytime running lights/ parking lights (LED type)
● Side turn signal lights (if equipped)
● Outer foot lights (if equipped)
1
Packing
O
1
2
Page 535 of 672
5357-3. Do-it-yourself maintenance
7
Maintenance and care
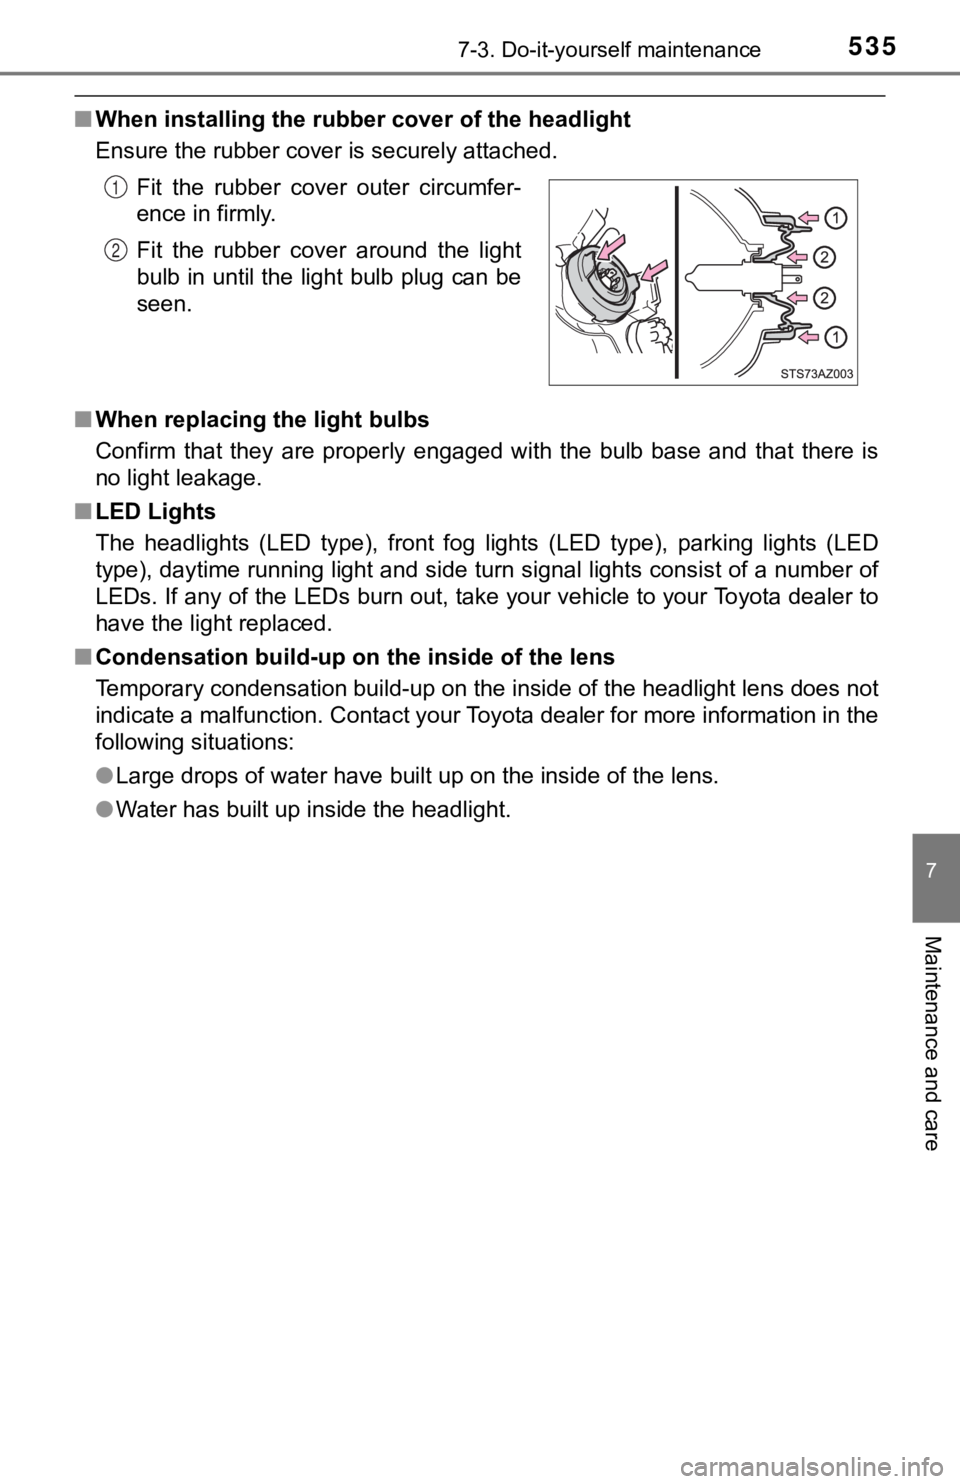
■When installing the rubber cover of the headlight
Ensure the rubber cover is securely attached.
■ When replacing the light bulbs
Confirm that they are properly engaged with the bulb base and that there is
no light leakage.
■ LED Lights
The headlights (LED type), front fog lights (LED type), parking lights (LED
type), daytime running light and side turn signal lights consis t of a number of
LEDs. If any of the LEDs burn out, take your vehicle to your To yota dealer to
have the light replaced.
■ Condensation build-up on the inside of the lens
Temporary condensation build-up on the inside of the headlight lens does not
indicate a malfunction. Contact your Toyota dealer for more information in the
following situations:
● Large drops of water have built up on the inside of the lens.
● Water has built up inside the headlight.Fit the rubber cover outer circumfer-
ence in firmly.
Fit the rubber cover around the light
bulb in until the light bulb plug can be
seen.
1
2