wheel TOYOTA TUNDRA 2019 (in English) User Guide
[x] Cancel search | Manufacturer: TOYOTA, Model Year: 2019, Model line: TUNDRA, Model: TOYOTA TUNDRA 2019Pages: 672, PDF Size: 14.1 MB
Page 46 of 672

461-1. For safe use
■If the SRS airbags deploy (inflate)
●Slight abrasions, burns, bruising etc., may be sustained from S RS airbags,
due to the extremely high speed deployment (inflation) by hot g ases.
● A loud noise and white powder will be emitted.
● Parts of the airbag module (steering wheel hub, airbag cover an d inflator) as
well as the front seats, parts of the front and rear pillars an d roof side rails,
may be hot for several minutes. The airbag itself may also be hot.
● The windshield may crack.
■ SRS airbag deployment condi tions (SRS front airbags)
● The SRS front airbags will deploy in the event of an impact tha t exceeds the
set threshold level (the level of force corresponding to an app roximately
12 - 18 mph [20 - 30 km/h] frontal collision with a fixed wall that does not
move or deform).
However, this threshold velocity will be considerably higher in the following
situations:
• If the vehicle strikes an object, such as a parked vehicle or sign pole, which
can move or deform on impact
• If the vehicle is involved in an underride collision, such as a collision in
which the front of the vehicle “underrides”, or goes under, the bed of a truck
● Depending on the type of collision, it is possible that only th e seat belt pre-
tensioners will activate.
● The SRS front airbags for the front passenger will not activate if there is no
passenger sitting in the right front passenger seat. However, t he SRS front
airbags for the front passenger may deploy if luggage is put in the seat,
even if the seat is unoccupied. ( P. 50)
■ SRS airbag deployment conditions (SRS side and curtain shield airbags)
● The SRS side and curtain shield airbags will deploy in the even t of an
impact that exceeds the set threshold level (the level of force corresponding
to the impact force produced by an approximately 3300 lb. [1500 kg] vehicle
colliding with the vehicle cabin from a direction perpendicular to the vehicle
orientation at an approximate speed of 12 - 18 mph [20 - 30 km/ h]).
● The SRS curtain shield airbags will deploy in the event of vehi cle rollover.
● The SRS curtain shield airbags may also deploy in the event of a severe
frontal collision.
Page 49 of 672
491-1. For safe use
1
For safety and security
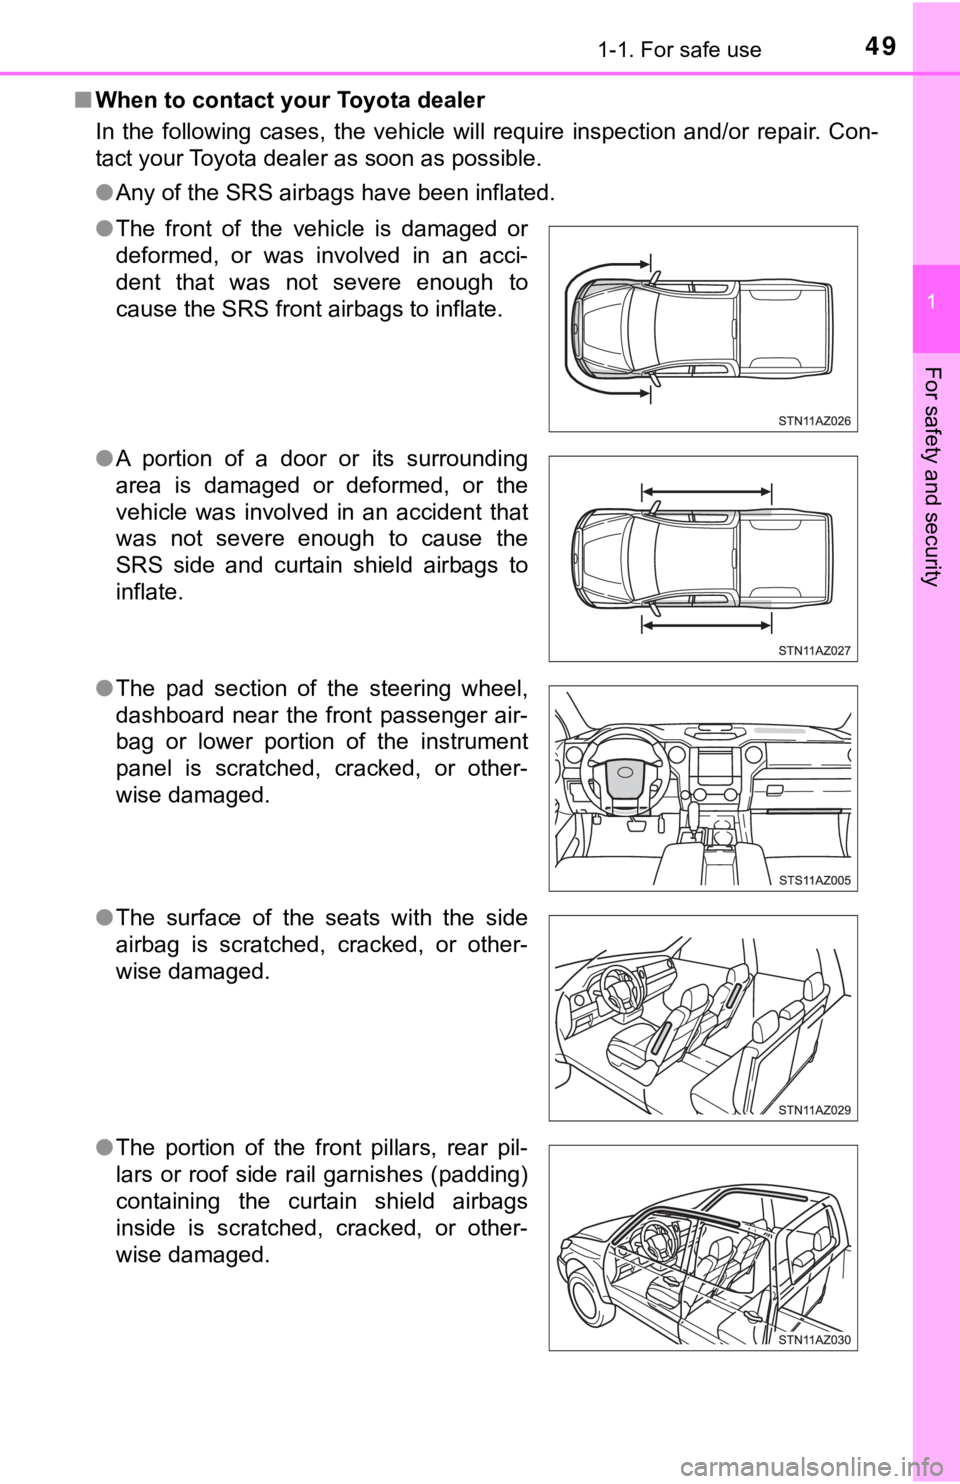
■When to contact your Toyota dealer
In the following cases, the vehicle will require inspection and /or repair. Con-
tact your Toyota dealer as soon as possible.
● Any of the SRS airbags have been inflated.
● The front of the vehicle is damaged or
deformed, or was involved in an acci-
dent that was not severe enough to
cause the SRS front airbags to inflate.
● A portion of a door or its surrounding
area is damaged or deformed, or the
vehicle was involved in an accident that
was not severe enough to cause the
SRS side and curtain shield airbags to
inflate.
● The pad section of the steering wheel,
dashboard near the front passenger air-
bag or lower portion of the instrument
panel is scratched, cracked, or other-
wise damaged.
● The surface of the seats with the side
airbag is scratched, cracked, or other-
wise damaged.
● The portion of the front pillars, rear pil-
lars or roof side rail garnishes (padding)
containing the curtain shield airbags
inside is scratched, cracked, or other-
wise damaged.
Page 109 of 672

109
3
Operation of
each component
3-1. Key information
Keys .................................. 110
3-2. Opening, closing and locking the doors
Side doors ......................... 114
Tailgate ............................. 118
3-3. Adjusting the seats Front seats ........................ 123
Rear seats ......................... 126
Driving position memory (driver’s seat) .................. 128
Head restraints .................. 132
3-4. Adjusting the steering wheel and mirrors
Steering wheel .................. 136
Inside rear view mirror....... 139
Outside rear view mirrors ............................. 142 3-5. Opening, closing the
windows and moon roof
Power windows ................. 147
Back window ..................... 150
Power back window .......... 151
Moon roof .......................... 154
Page 125 of 672

1253-3. Adjusting the seats
3
Operation of each component
■Power easy access system (vehicles with driving position memory )
The driver’s seat and steering wheel move in accordance with en gine switch
position and the driver’s seat belt condition. ( P. 128)
WARNING
■When adjusting the seat position
● Take care when adjusting the seat position to ensure that other passen-
gers are not injured by the moving seat.
● Do not put your hands under the seat or near the moving parts t o avoid
injury.
Fingers or hands may become jammed in the seat mechanism.
■ Seat adjustment
● To reduce the risk of sliding under the lap belt during a collision, do not
recline the seat more than necessary.
If the seat is too reclined, the lap belt may slide past the hi ps and apply
restraint forces directly to the abdomen, or your neck may cont act the
shoulder belt, increasing the risk of death or serious injury in the event of
an accident.
Adjustments should not be made while driving as the seat may un expect-
edly move and cause the driver to lose control of the vehicle.
● Manual seat type only: After adjusting the seat, make sure that the seat is
locked in position.
■ When adjusting the seat positions
Make sure to leave enough space around the feet so they do not get stuck.
Page 128 of 672
1283-3. Adjusting the seats
Driving position memor y (driver’s seat)
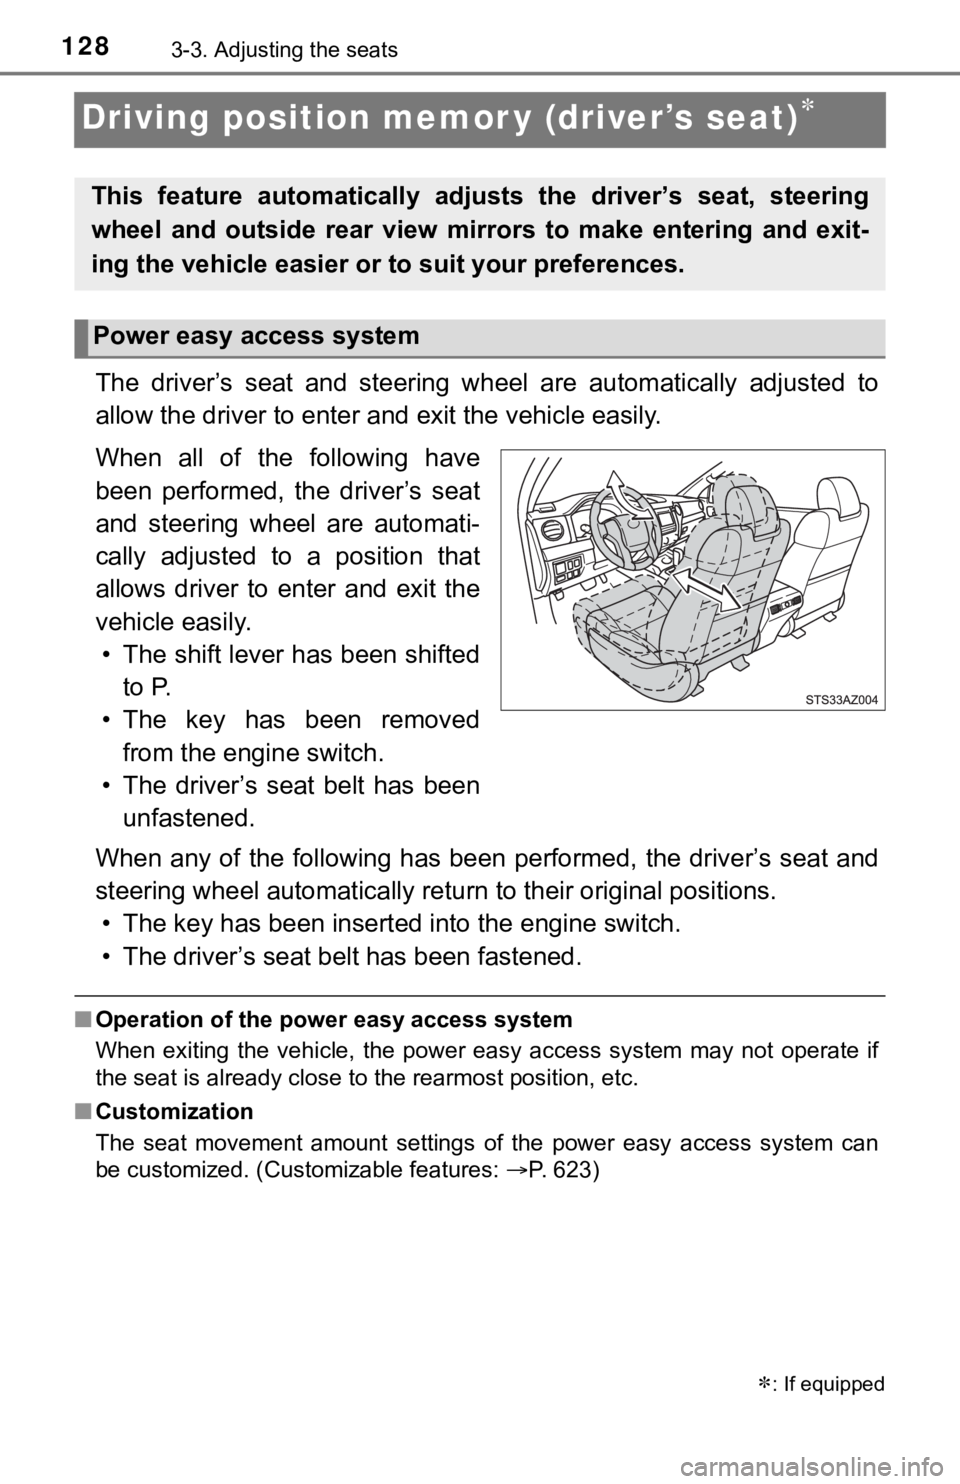
The driver’s seat and steering wheel are automatically adjusted to
allow the driver to enter and exit the vehicle easily.
When all of the following have
been performed, the driver’s seat
and steering wheel are automati-
cally adjusted to a position that
allows driver to enter and exit the
vehicle easily. • The shift lever has been shifted to P.
• The key has been removed from the engine switch.
• The driver’s seat belt has been unfastened.
When any of the following has be en performed, the driver’s seat and
steering wheel automatically ret urn to their original positions.
• The key has been insert ed into the engine switch.
• The driver’s seat b elt has been fastened.
■Operation of the power easy access system
When exiting the vehicle, the power easy access system may not operate if
the seat is already close to the rearmost position, etc.
■ Customization
The seat movement amount settings of the power easy access syst em can
be customized. (Customizable features: P. 623)
: If equipped
This feature automatically adjusts the driver’s seat, steering
wheel and outside rear view mirrors to make entering and exit-
ing the vehicle easier or to suit your preferences.
Power easy access system
Page 129 of 672
1293-3. Adjusting the seats
3
Operation of each component
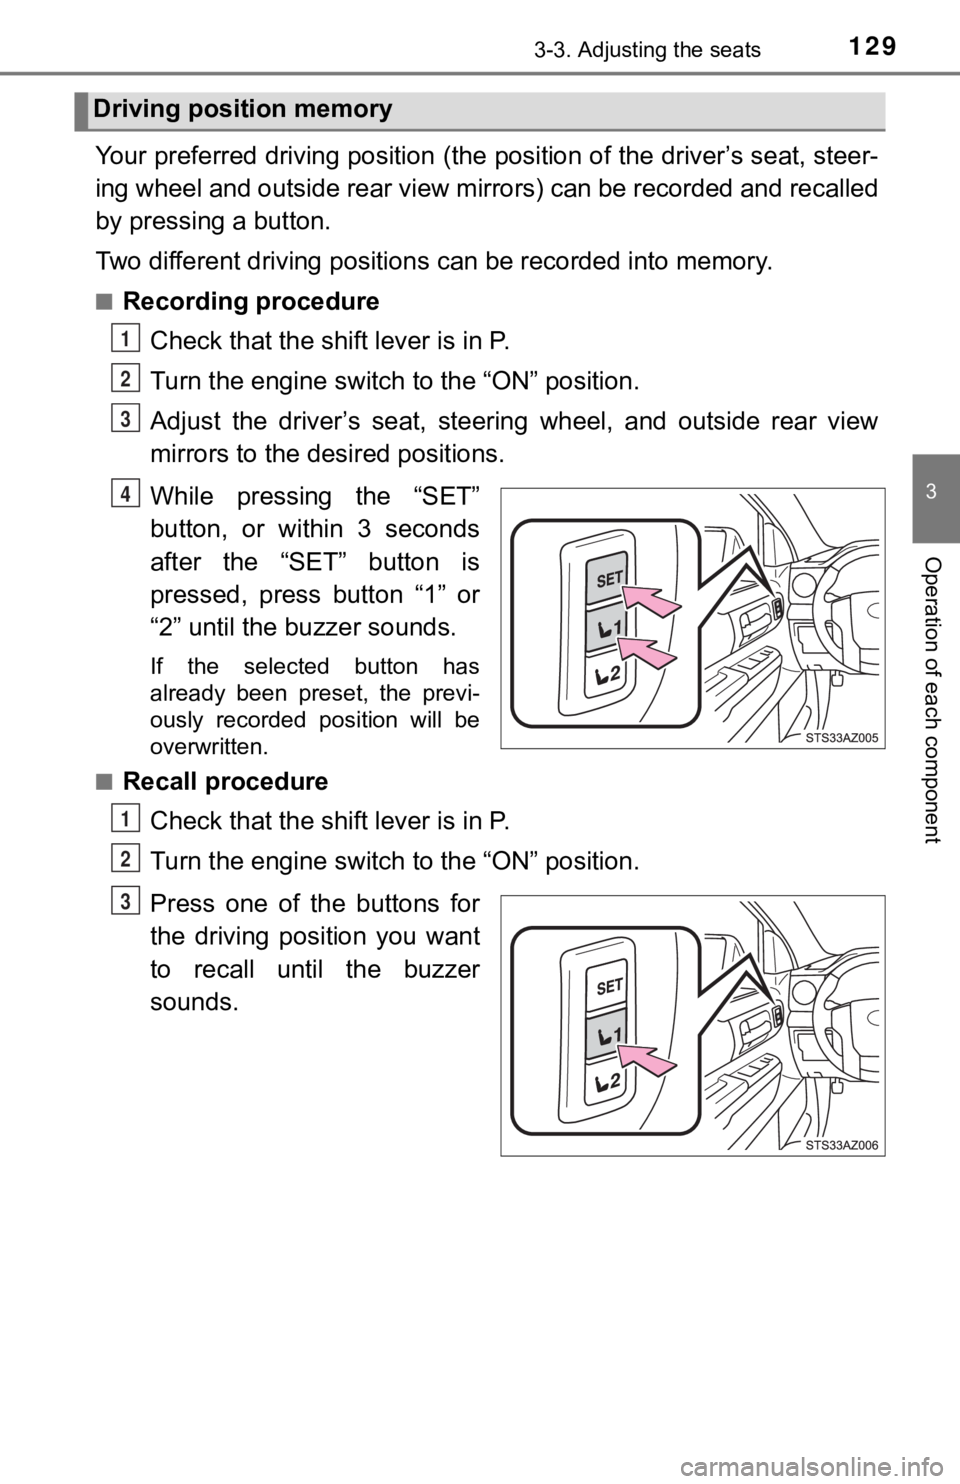
Your preferred driving position (the position of the driver’s seat, steer-
ing wheel and outside rear view mirrors) can be recorded and re called
by pressing a button.
Two different driving positions can be recorded into memory.
■Recording procedure
Check that the shift lever is in P.
Turn the engine switch t o the “ON” position.
Adjust the driver’s seat, steerin g wheel, and outside rear view
mirrors to the desired positions.
While pressing the “SET”
button, or within 3 seconds
after the “SET” button is
pressed, press button “1” or
“2” until the buzzer sounds.
If the selected button has
already been preset, the previ-
ously recorded position will be
overwritten.
■
Recall procedure
Check that the shift lever is in P.
Turn the engine switch t o the “ON” position.
Press one of the buttons for
the driving position you want
to recall until the buzzer
sounds.
Driving position memory
1
2
3
4
1
2
3
Page 130 of 672

1303-3. Adjusting the seats
■To stop the position recall operation part-way through
Perform any of the following:
●Press the “SET” button.
● Press button “1” or “2”.
● Operate any of the seat adjustment switches (only cancels seat position
recall).
● Operate the tilt and telescopic steering control switch (only cancels steering
wheel position recall).
■ Seat positions that can be memorized ( P. 123)
The adjusted seat positions can be recorded except for lumbar s upport posi-
tions.
■ Operating the driving position me mory after the key is removed from the
engine switch
Recorded seat positions (except the steering wheel position) can be activated
up to 30 seconds after the driver’s door is opened, even if the key is removed
from the engine switch.
■ In order to correctly use the dr iving position memory function
If a seat position is already in the furthest possible position and the seat is
operated in the same direction, the recorded position may be sl ightly different
when it is recalled.
Page 131 of 672
1313-3. Adjusting the seats
3
Operation of each component
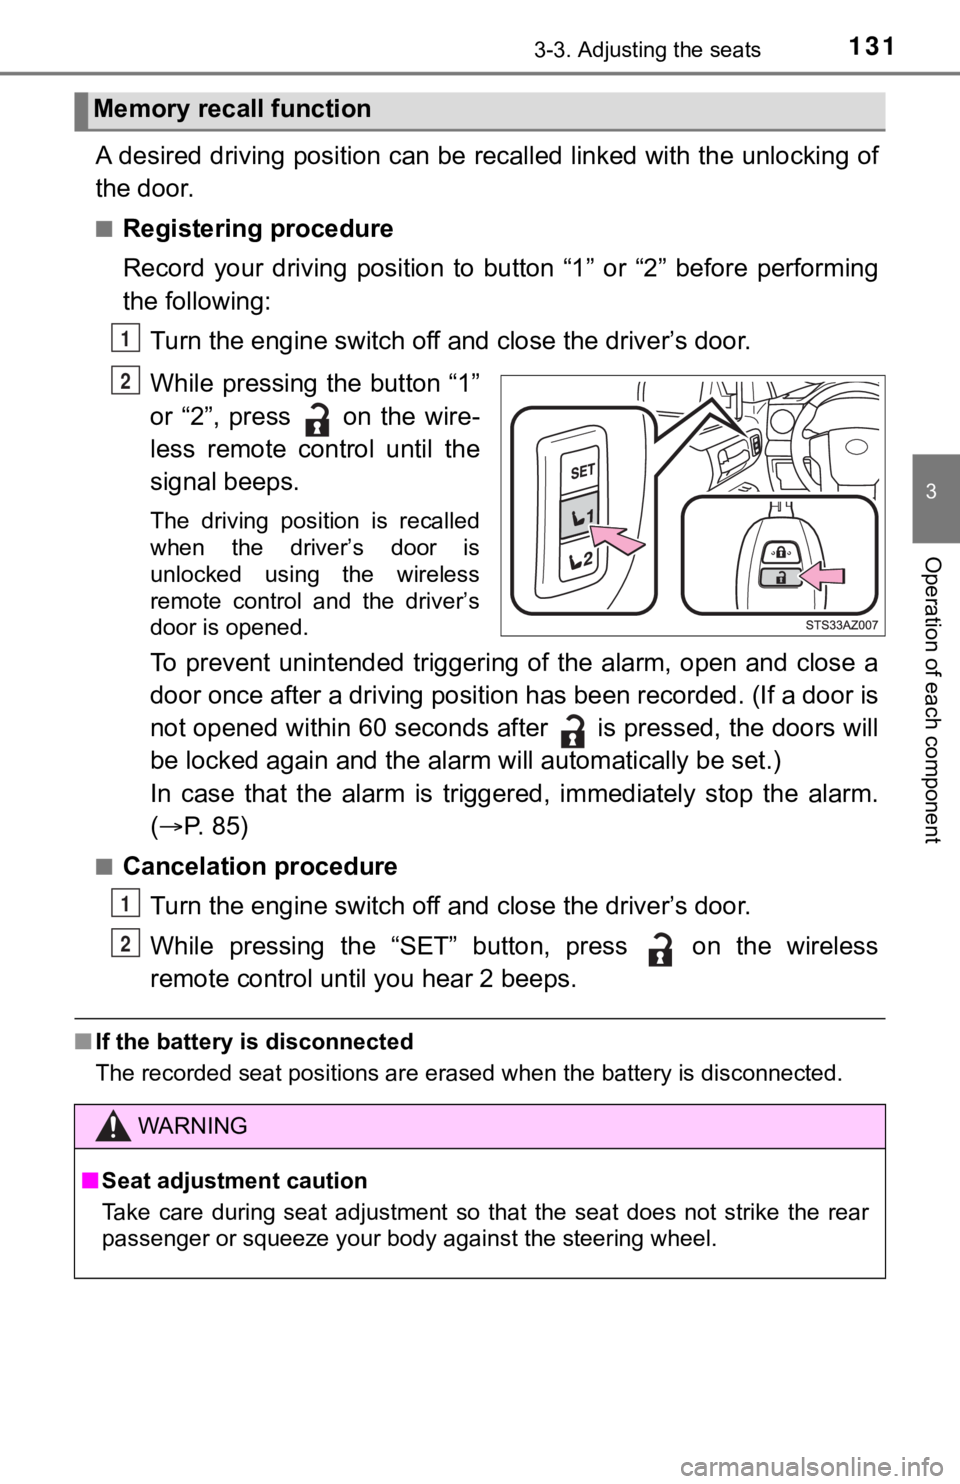
A desired driving position can be recalled linked with the unlo cking of
the door.
■Registering procedure
Record your driving position to button “1” or “2” before perfor ming
the following:
Turn the engine switch off and close the driver’s door.
While pressing the button “1”
or “2”, press on the wire-
less remote control until the
signal beeps.
The driving position is recalled
when the driver’s door is
unlocked using the wireless
remote control and the driver’s
door is opened.
To prevent unintended triggering of the alarm, open and close a
door once after a driving position has been recorded. (If a doo r is
not opened within 60 seconds after is pressed, the doors will
be locked again and the alarm will au tomatically be set.)
In case that the alarm is triggered, immediately stop the alarm .
( P. 85)
■Cancelation procedure
Turn the engine switch off and close the driver’s door.
While pressing the “SET” button, press on the wireless
remote control until you hear 2 beeps.
■ If the battery is disconnected
The recorded seat positions are erased when the battery is disc onnected.
Memory recall function
1
2
WARNING
■Seat adjustment caution
Take care during seat adjustment so that the seat does not stri ke the rear
passenger or squeeze your body against the steering wheel.
1
2
Page 136 of 672
1363-4. Adjusting the steering wheel and mirrors
Steering wheel
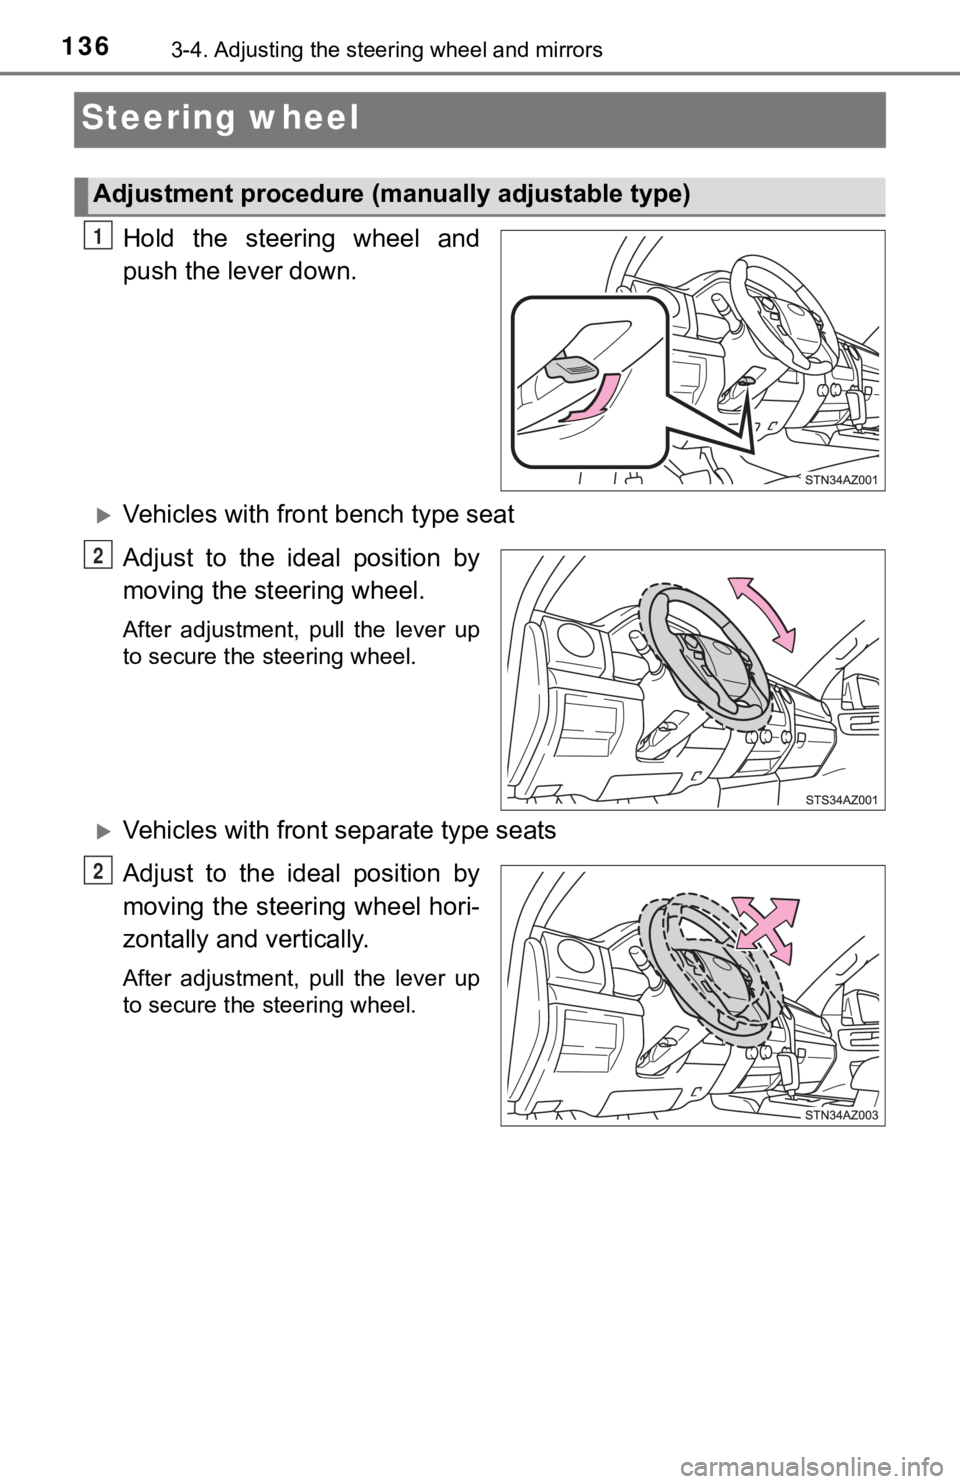
Hold the steering wheel and
push the lever down.
Vehicles with front bench type seat
Adjust to the ideal position by
moving the steering wheel.
After adjustment, pull the lever up
to secure the steering wheel.
Vehicles with front separate type seats
Adjust to the ideal position by
moving the steering wheel hori-
zontally and vertically.
After adjustment, pull the lever up
to secure the steering wheel.
Adjustment procedure (manually adjustable type)
1
2
2
Page 137 of 672
1373-4. Adjusting the steering wheel and mirrors
3
Operation of each component
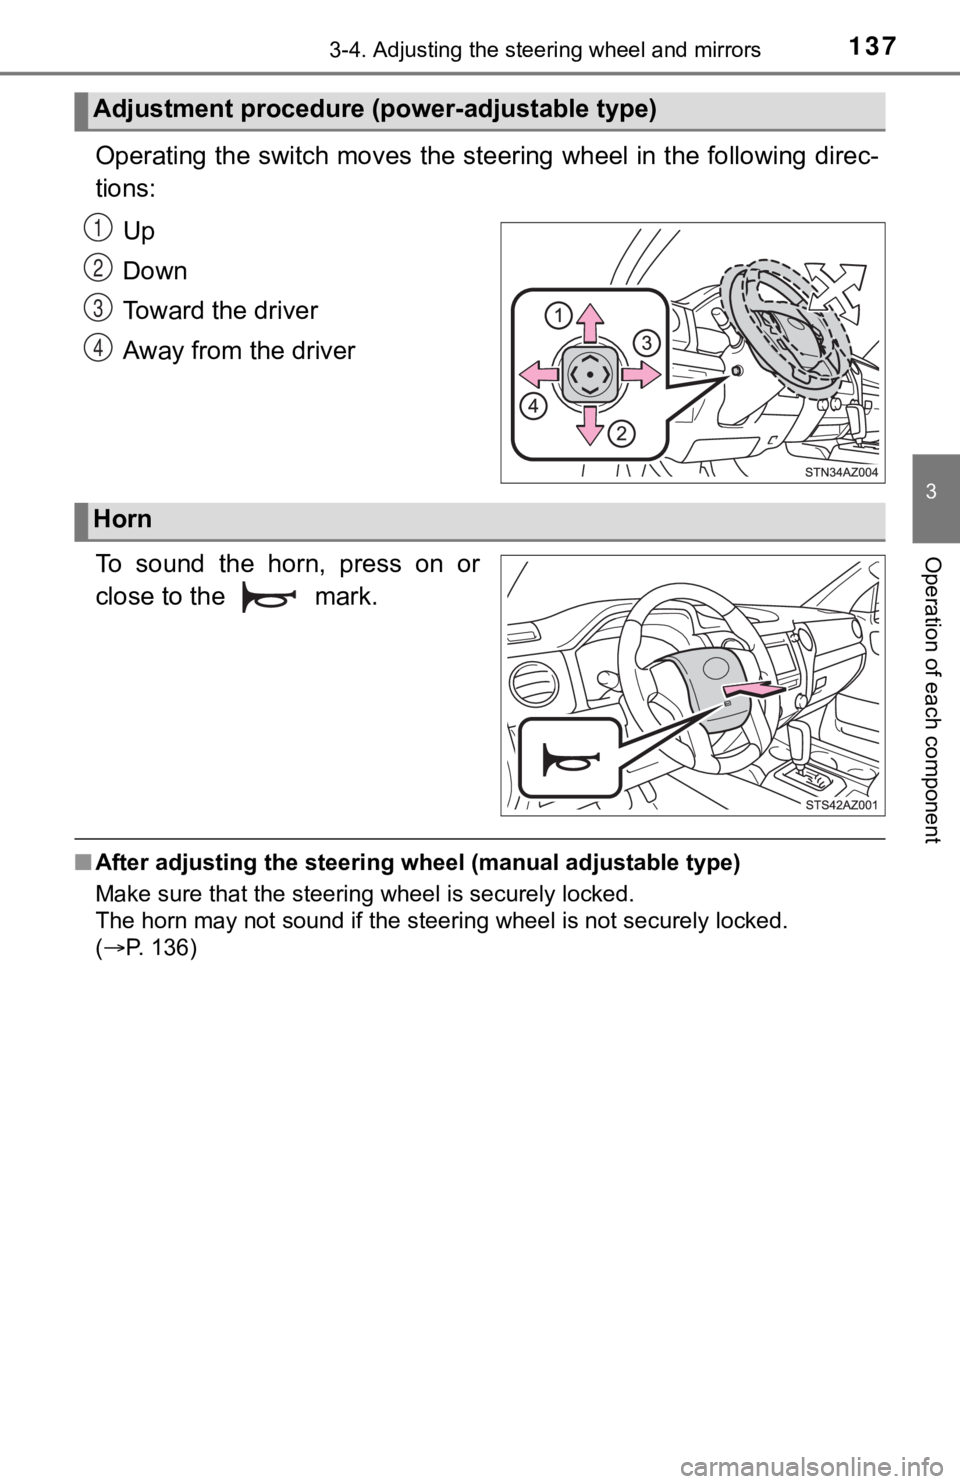
Operating the switch moves the steering wheel in the following direc-
tions:
Up
Down
Toward the driver
Away from the driver
To sound the horn, press on or
close to the mark.
■ After adjusting the steering wheel (manual adjustable type)
Make sure that the steering wheel is securely locked.
The horn may not sound if the steer ing wheel is not securely locked.
( P. 136)
Adjustment procedure (power-adjustable type)
1
2
3
4
Horn