buttons TOYOTA TUNDRA 2019 Owners Manual (in English)
[x] Cancel search | Manufacturer: TOYOTA, Model Year: 2019, Model line: TUNDRA, Model: TOYOTA TUNDRA 2019Pages: 672, PDF Size: 14.1 MB
Page 23 of 672
23Pictorial index
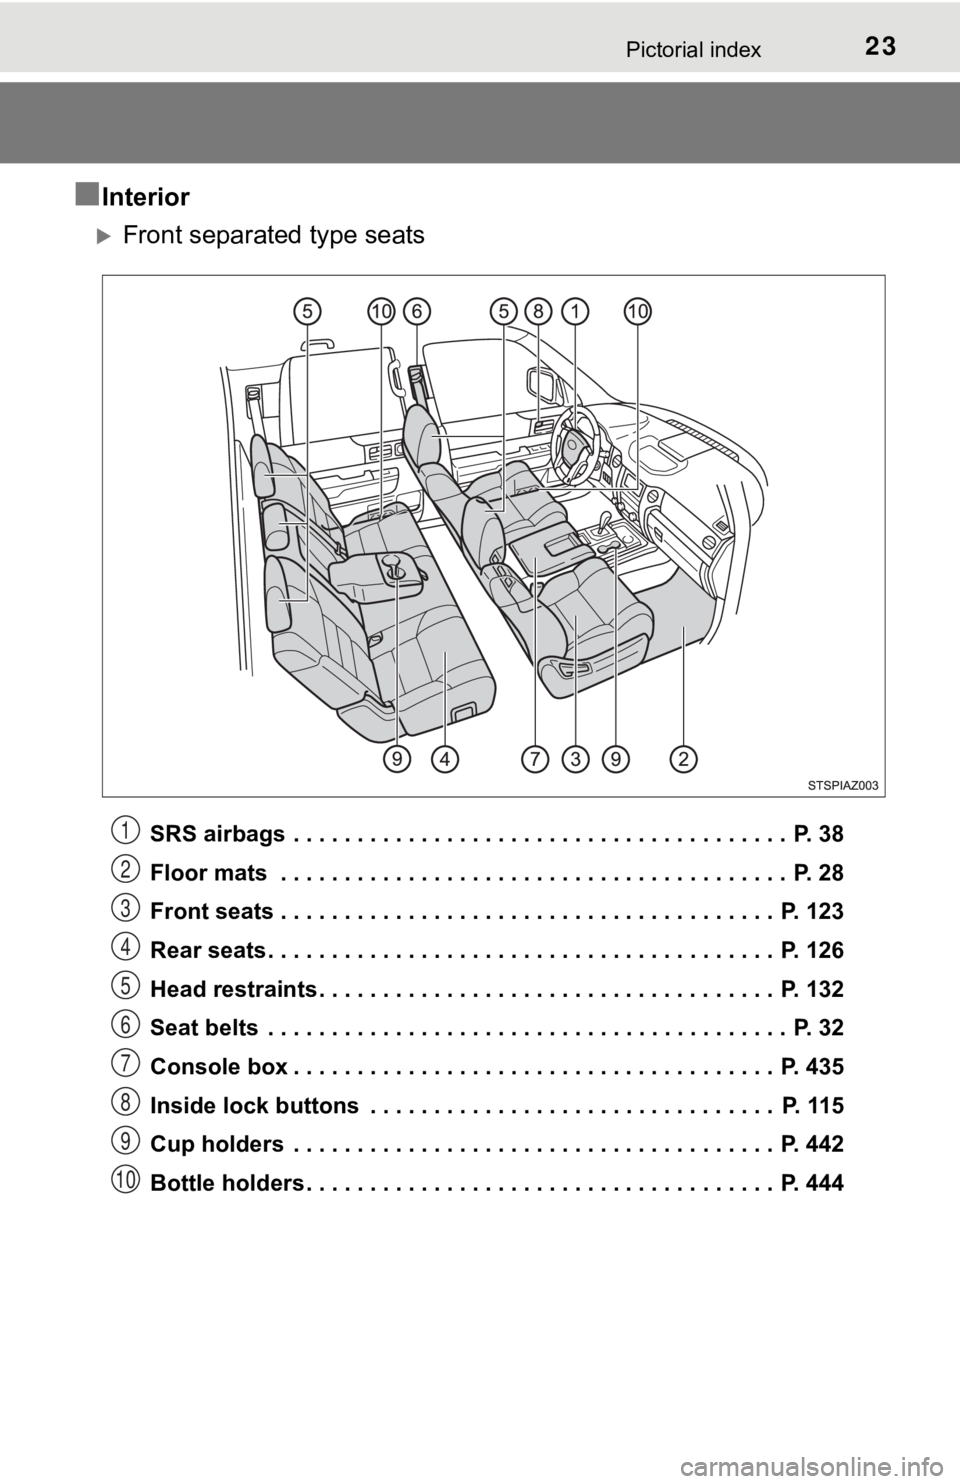
■Interior
Front separated type seats
SRS airbags . . . . . . . . . . . . . . . . . . . . . . . . . . . . . . . . . . . . . . . P. 38
Floor mats . . . . . . . . . . . . . . . . . . . . . . . . . . . . . . . . . . . . . . . . P. 28
Front seats . . . . . . . . . . . . . . . . . . . . . . . . . . . . . . . . . . . . . . . P. 123
Rear seats . . . . . . . . . . . . . . . . . . . . . . . . . . . . . . . . . . . . . . . . P. 126
Head restraints . . . . . . . . . . . . . . . . . . . . . . . . . . . . . . . . . . . . P. 132
Seat belts . . . . . . . . . . . . . . . . . . . . . . . . . . . . . . . . . . . . . . . . . P. 32
Console box . . . . . . . . . . . . . . . . . . . . . . . . . . . . . . . . . . . . . . P. 435
Inside lock buttons . . . . . . . . . . . . . . . . . . . . . . . . . . . . . . . . P. 115
Cup holders . . . . . . . . . . . . . . . . . . . . . . . . . . . . . . . . . . . . . . P. 442
Bottle holders . . . . . . . . . . . . . . . . . . . . . . . . . . . . . . . . . . . . . P. 4441
2
3
4
5
6
7
8
9
10
Page 24 of 672
24Pictorial index
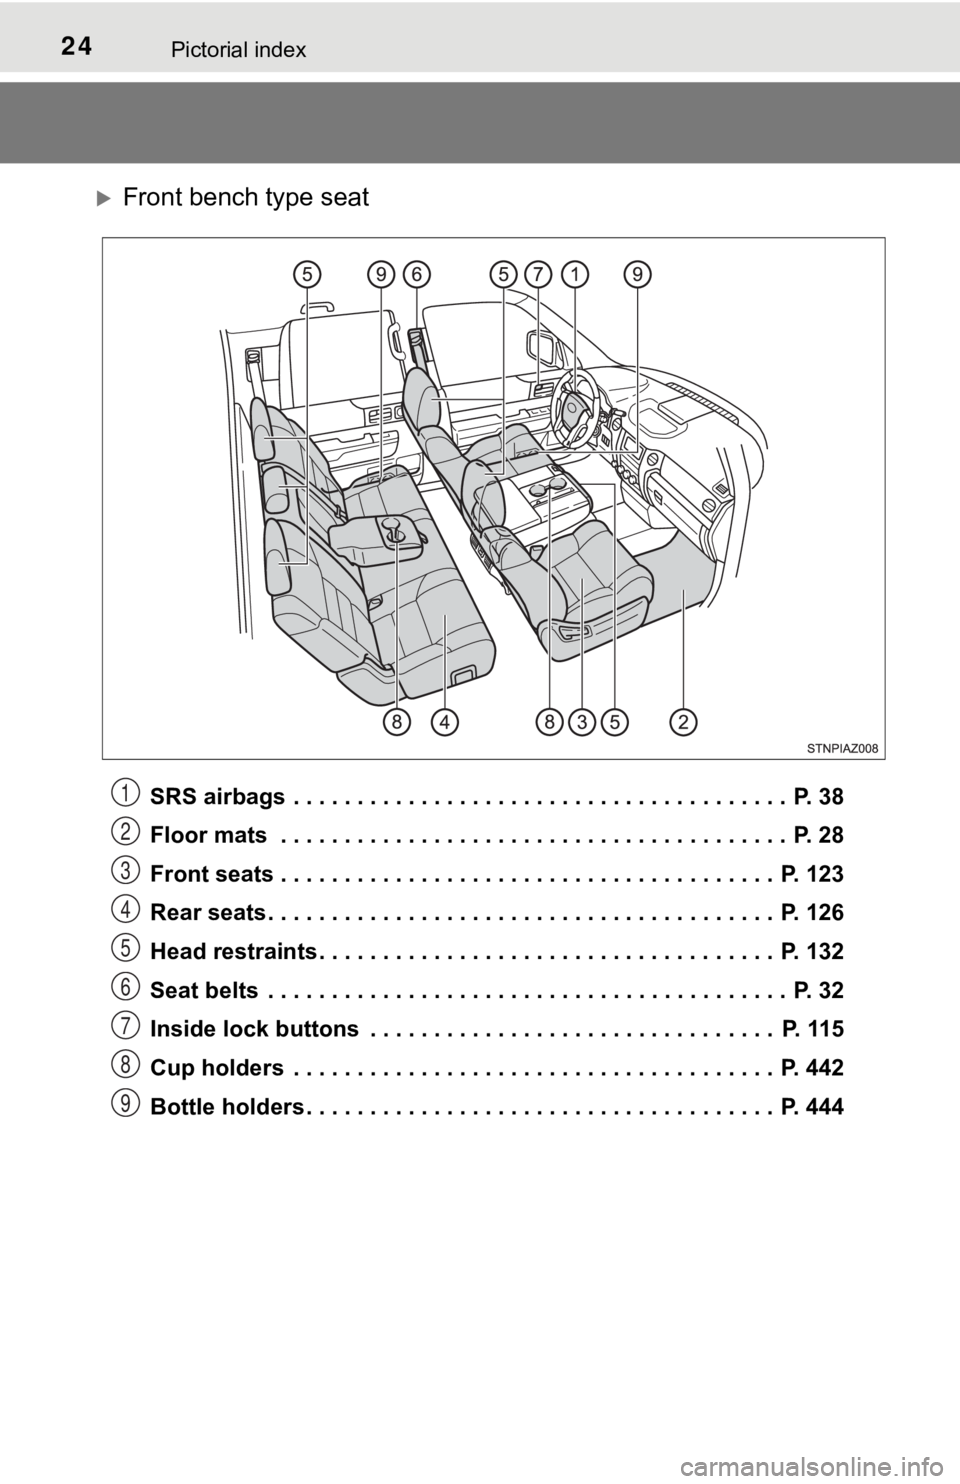
Front bench type seat
SRS airbags . . . . . . . . . . . . . . . . . . . . . . . . . . . . . . . . . . . . . . . P. 38
Floor mats . . . . . . . . . . . . . . . . . . . . . . . . . . . . . . . . . . . . . . . . P. 28
Front seats . . . . . . . . . . . . . . . . . . . . . . . . . . . . . . . . . . . . . . . P. 123
Rear seats . . . . . . . . . . . . . . . . . . . . . . . . . . . . . . . . . . . . . . . . P. 126
Head restraints . . . . . . . . . . . . . . . . . . . . . . . . . . . . . . . . . . . . P. 132
Seat belts . . . . . . . . . . . . . . . . . . . . . . . . . . . . . . . . . . . . . . . . . P. 32
Inside lock buttons . . . . . . . . . . . . . . . . . . . . . . . . . . . . . . . . P. 115
Cup holders . . . . . . . . . . . . . . . . . . . . . . . . . . . . . . . . . . . . . . P. 442
Bottle holders . . . . . . . . . . . . . . . . . . . . . . . . . . . . . . . . . . . . . P. 4441
2
3
4
5
6
7
8
9
Page 60 of 672
601-1. For safe use
Installing child restraints
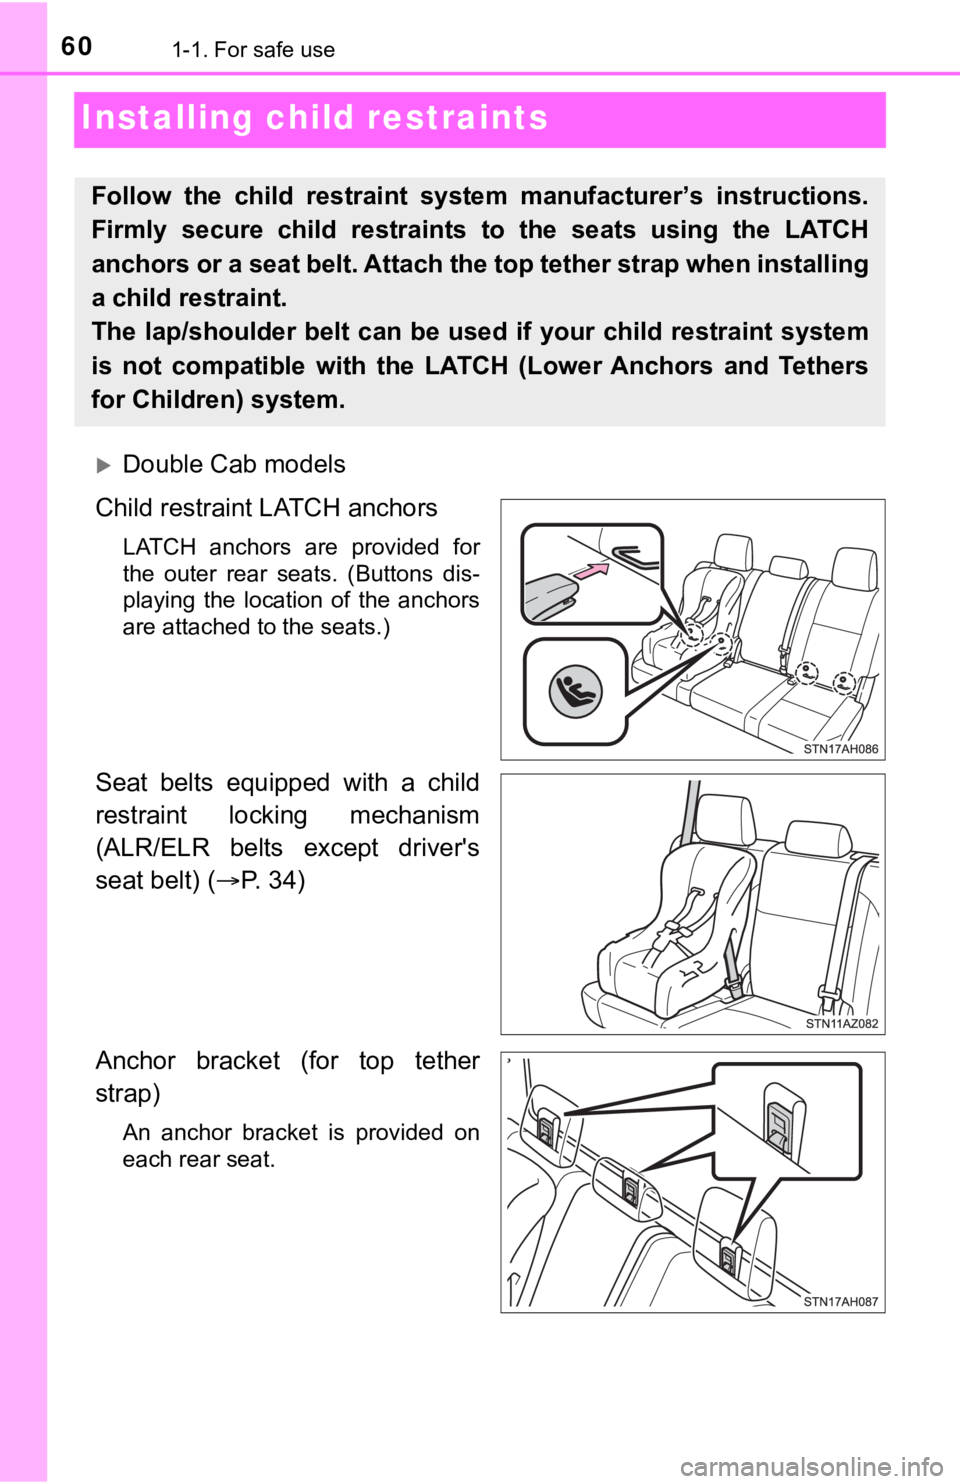
Double Cab models
Child restraint LATCH anchors
LATCH anchors are provided for
the outer rear seats. (Buttons dis-
playing the location of the anchors
are attached to the seats.)
Seat belts equipped with a child
restraint locking mechanism
(ALR/ELR belts except driver's
seat belt) ( P. 34)
Anchor bracket (for top tether
strap)
An anchor bracket is provided on
each rear seat.
Follow the child restraint system manufacturer’s instructions.
Firmly secure child restraints to the seats using the LATCH
anchors or a seat belt. Attach t he top tether strap when installing
a child restraint.
The lap/shoulder belt can be used if your child restraint syste m
is not compatible with the LATCH (Lower Anchors and Tethers
for Children) system.
Page 111 of 672
1113-1. Key information
3
Operation of each component
■If you lose your keys
New genuine key can be made by your Toyota dealer using the other key and
the key number stamped on your key number plate.
Keep the plate in a safe place such as your wallet, not in the vehicle.
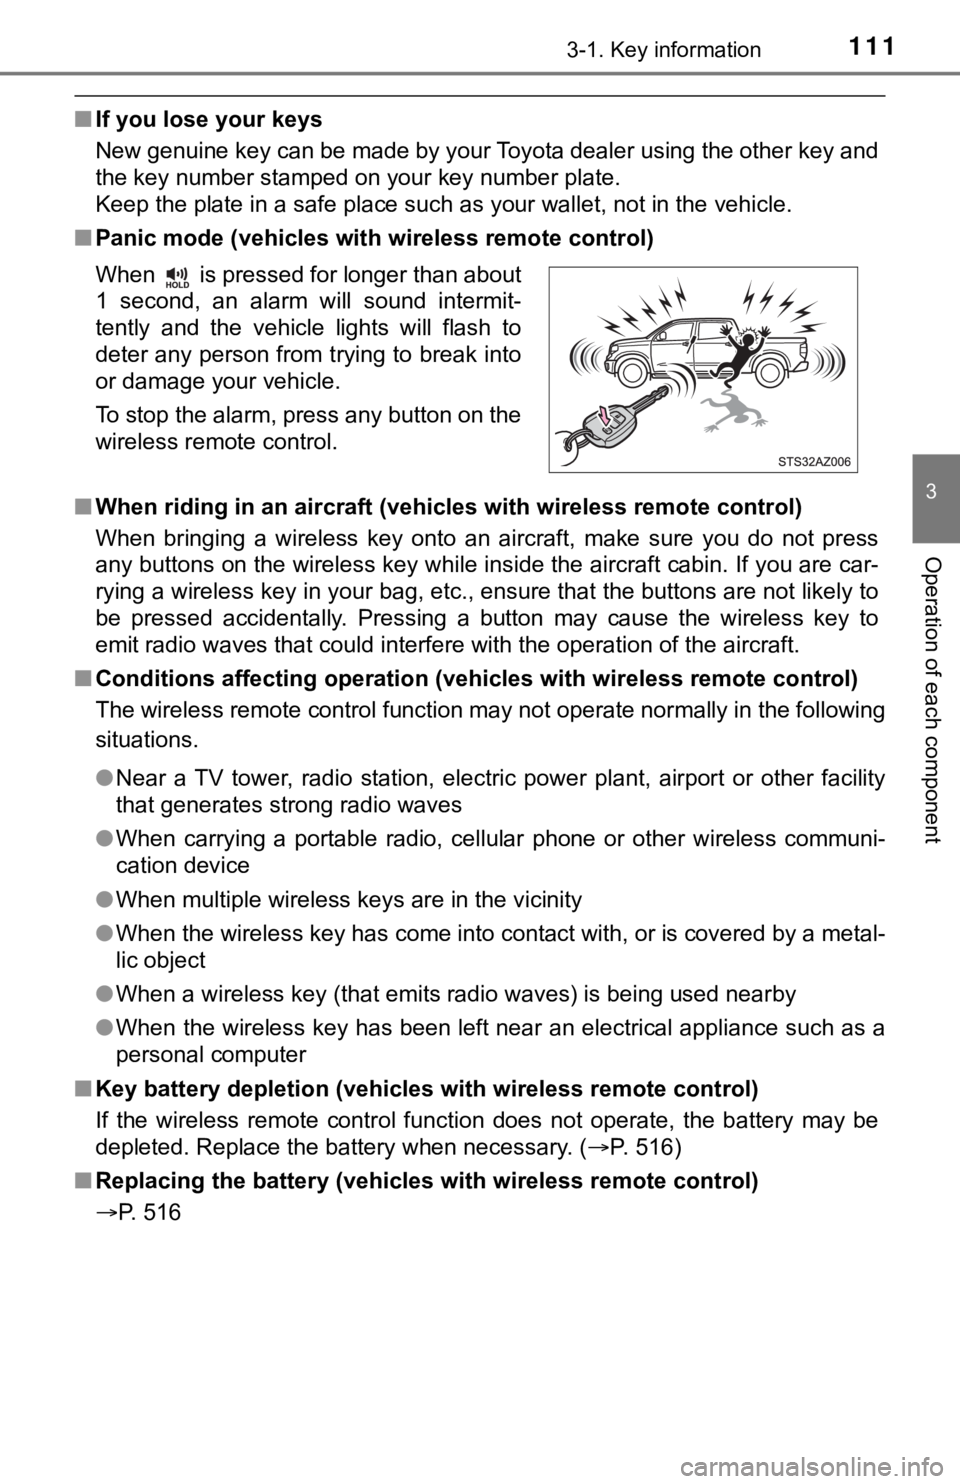
■ Panic mode (vehicles with wireless remote control)
■ When riding in an aircraft (vehic les with wireless remote control)
When bringing a wireless key onto an aircraft, make sure you do not press
any buttons on the wireless key while inside the aircraft cabin . If you are car-
rying a wireless key in your bag, etc., ensure that the buttons are not likely to
be pressed accidentally. Pressing a button may cause the wirele ss key to
emit radio waves that could interfere with the operation of the aircraft.
■ Conditions affecting operation (vehicles with wireless remote c ontrol)
The wireless remote control function may not operate normally i n the following
situations.
● Near a TV tower, radio station, electric power plant, airport o r other facility
that generates strong radio waves
● When carrying a portable radio, cellular phone or other wireles s communi-
cation device
● When multiple wireless keys are in the vicinity
● When the wireless key has come into contact with, or is covered by a metal-
lic object
● When a wireless key (that emits radio waves) is being used near by
● When the wireless key has been left near an electrical applianc e such as a
personal computer
■ Key battery depletion (vehicles with wireless remote control)
If the wireless remote control function does not operate, the b attery may be
depleted. Replace the battery when necessary. ( P. 516)
■ Replacing the battery (vehicles with wireless remote control)
P. 516 When is pressed for longer than about
1 second, an alarm will sound intermit-
tently and the vehicle lights will flash to
deter any person from trying to break into
or damage your vehicle.
To stop the alarm, press any button on the
wireless remote control.
Page 115 of 672
1153-2. Opening, closing and locking the doors
3
Operation of each component
■Security feature (vehicles with wireless remote control)
If a door is not opened within approximately 60 seconds after t he vehicle is
unlocked, the security feature automatically locks the vehicle again.
■ Alarm (if equipped)
Using the wireless remote control to lock the doors will set th e alarm system.
( P. 85)
■
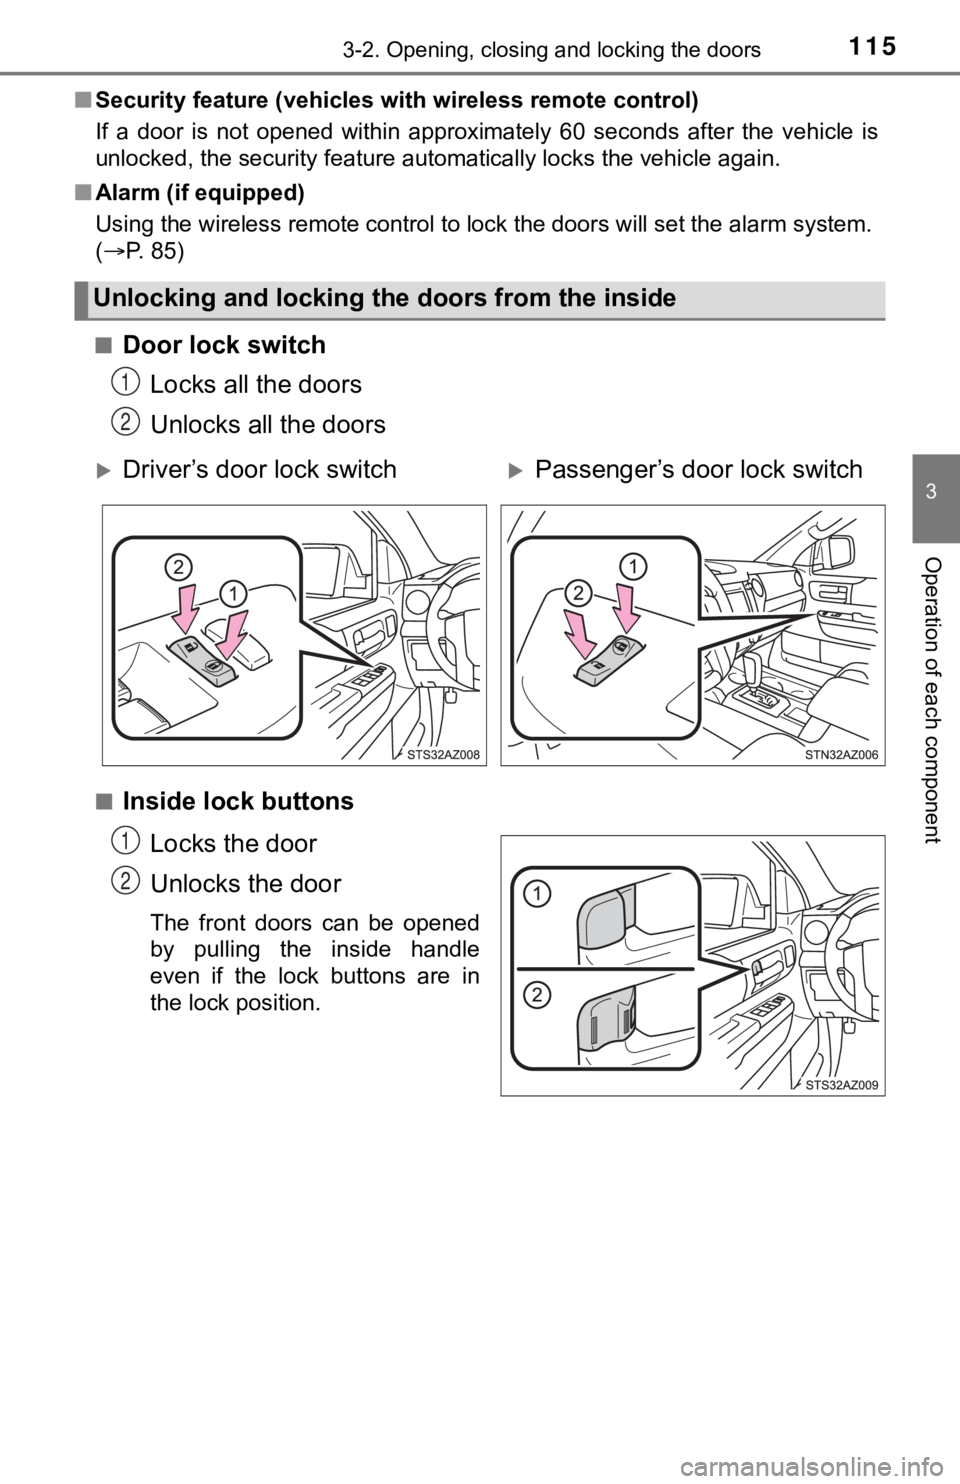
Door lock switch Locks all the doors
Unlocks all the doors
■Inside lock buttons
Locks the door
Unlocks the door
The front doors can be opened
by pulling the inside handle
even if the lock buttons are in
the lock position.
Unlocking and locking the doors from the inside
1
2
Driver’s door lock switchPassenger’s door lock switch
1
2
Page 117 of 672
1173-2. Opening, closing and locking the doors
3
Operation of each component
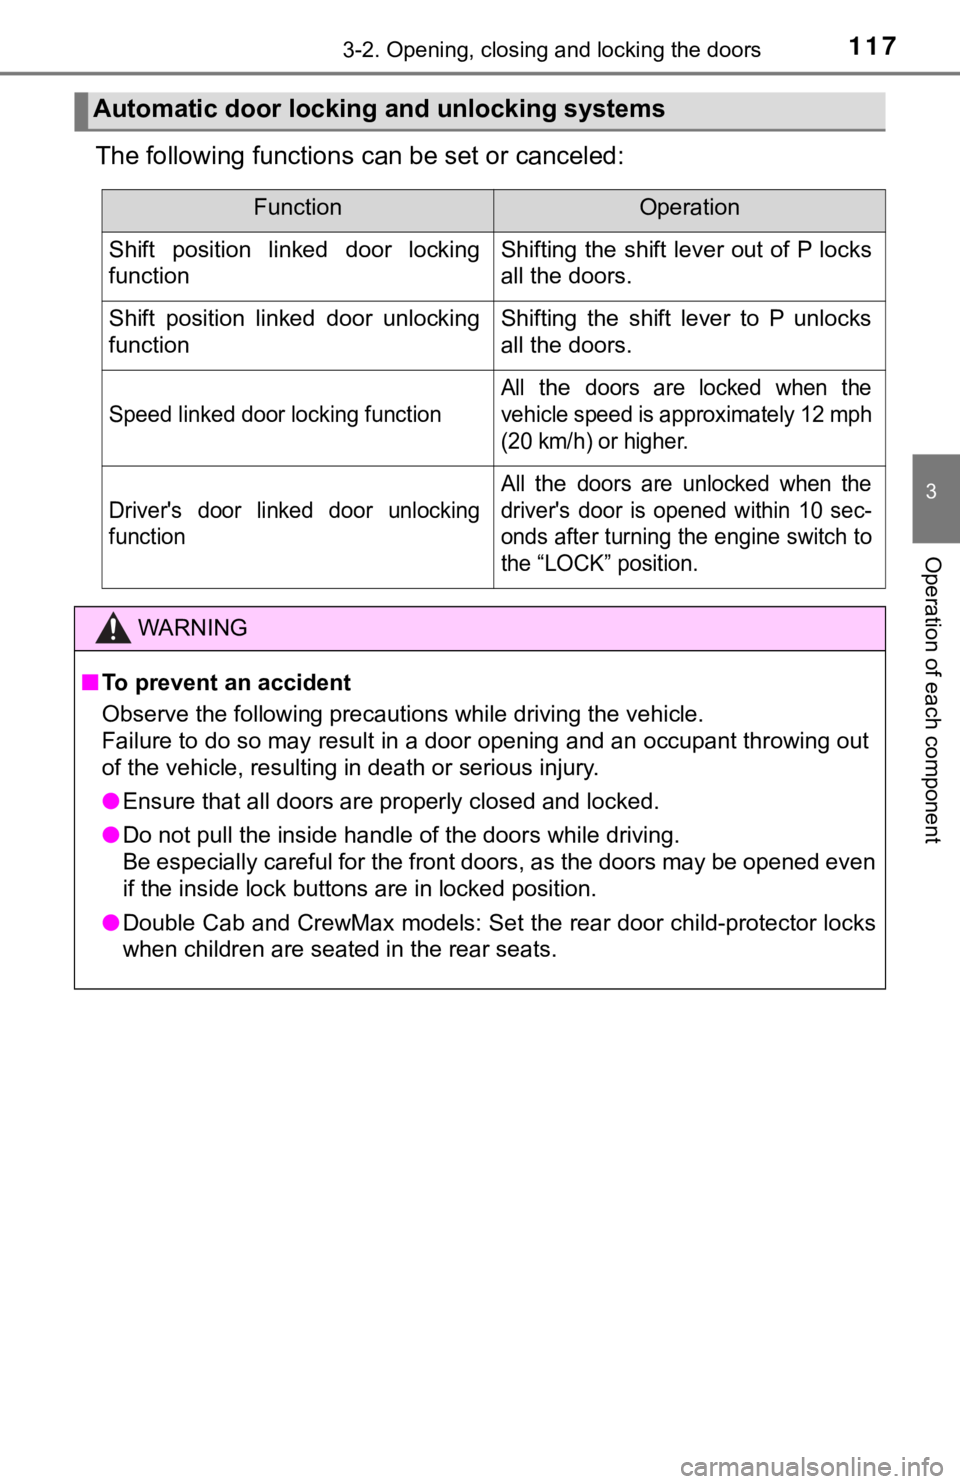
The following functions can be set or canceled:
Automatic door locking and unlocking systems
FunctionOperation
Shift position linked door locking
functionShifting the shift lever out of P locks
all the doors.
Shift position linked door unlocking
functionShifting the shift lever to P unlocks
all the doors.
Speed linked door locking function
All the doors are locked when the
vehicle speed is approximately 12 mph
(20 km/h) or higher.
Driver's door linked door unlocking
function
All the doors are unlocked when the
driver's door is opened within 10 sec-
onds after turning the engine switch to
the “LOCK” position.
WARNING
■ To prevent an accident
Observe the following precautions while driving the vehicle.
Failure to do so may result in a door opening and an occupant throwing out
of the vehicle, resulting in death or serious injury.
● Ensure that all doors are properly closed and locked.
● Do not pull the inside handle of the doors while driving.
Be especially careful for the front doors, as the doors may be opened even
if the inside lock buttons are in locked position.
● Double Cab and CrewMax models: Set the rear door child-protecto r locks
when children are seated in the rear seats.
Page 129 of 672
1293-3. Adjusting the seats
3
Operation of each component
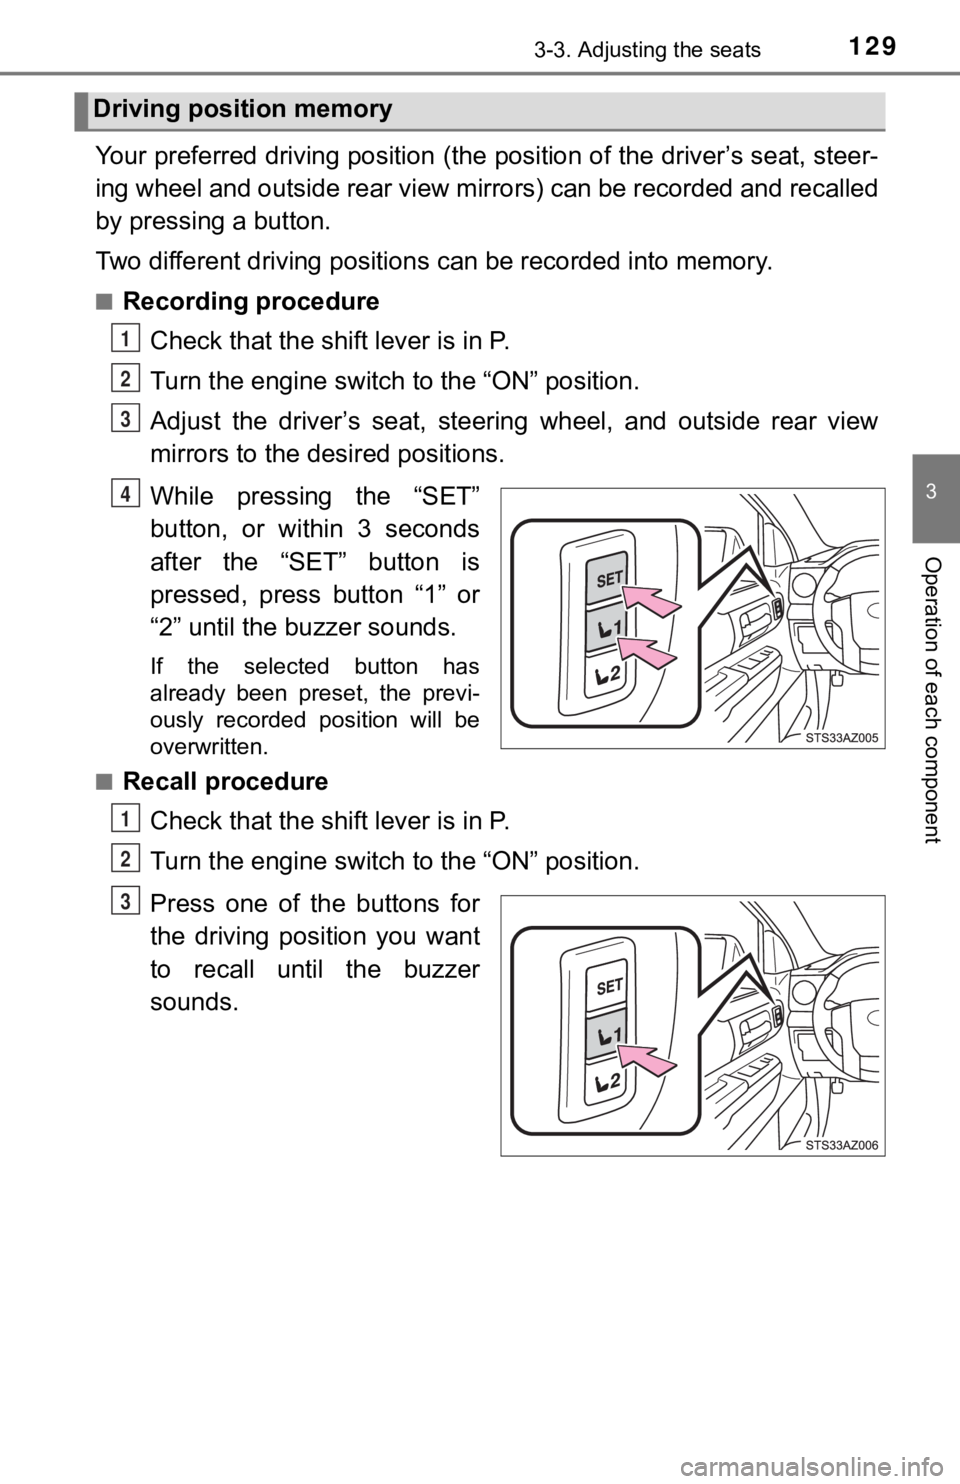
Your preferred driving position (the position of the driver’s seat, steer-
ing wheel and outside rear view mirrors) can be recorded and re called
by pressing a button.
Two different driving positions can be recorded into memory.
■Recording procedure
Check that the shift lever is in P.
Turn the engine switch t o the “ON” position.
Adjust the driver’s seat, steerin g wheel, and outside rear view
mirrors to the desired positions.
While pressing the “SET”
button, or within 3 seconds
after the “SET” button is
pressed, press button “1” or
“2” until the buzzer sounds.
If the selected button has
already been preset, the previ-
ously recorded position will be
overwritten.
■
Recall procedure
Check that the shift lever is in P.
Turn the engine switch t o the “ON” position.
Press one of the buttons for
the driving position you want
to recall until the buzzer
sounds.
Driving position memory
1
2
3
4
1
2
3
Page 133 of 672
1333-3. Adjusting the seats
3
Operation of each component
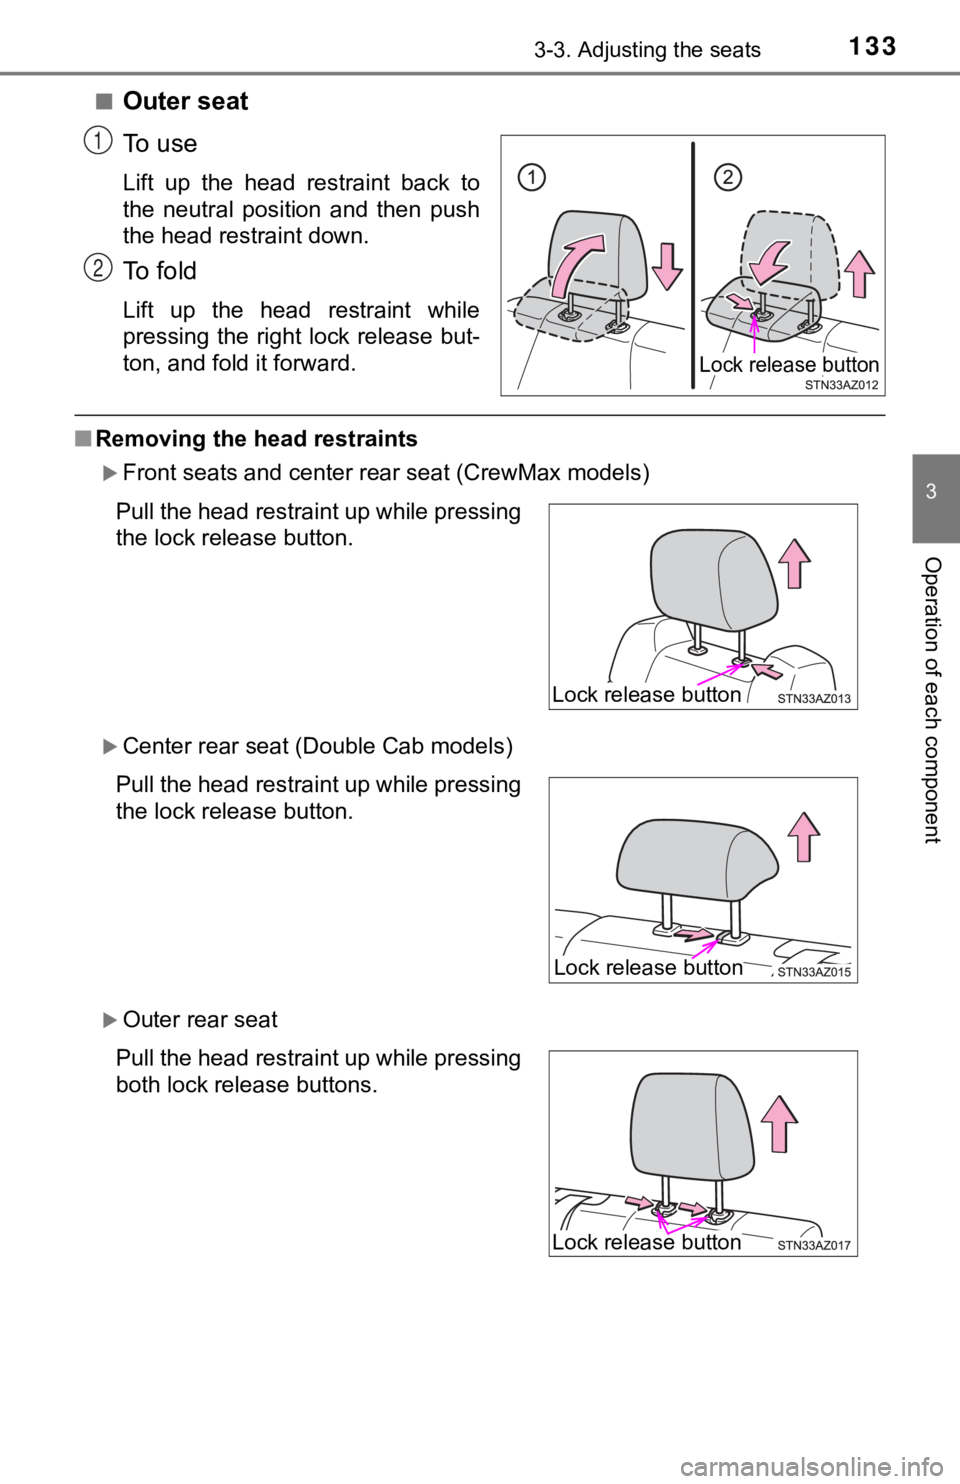
■Outer seat
To u s e
Lift up the head restraint back to
the neutral position and then push
the head restraint down.
To f o l d
Lift up the head restraint while
pressing the right lock release but-
ton, and fold it forward.
■Removing the head restraints
Front seats and center rear seat (CrewMax models)
Center rear seat (Double Cab models)
Outer rear seat
Lock release button
1
2
Pull the head restraint up while pressing
the lock release button.
Pull the head restraint up while pressing
the lock release button.
Pull the head restraint up while pressing
both lock release buttons.
Lock release button
Lock release button
Lock release button
Page 307 of 672
3074-5. Using the driving support systems
4
Driving
Trailer brake controller
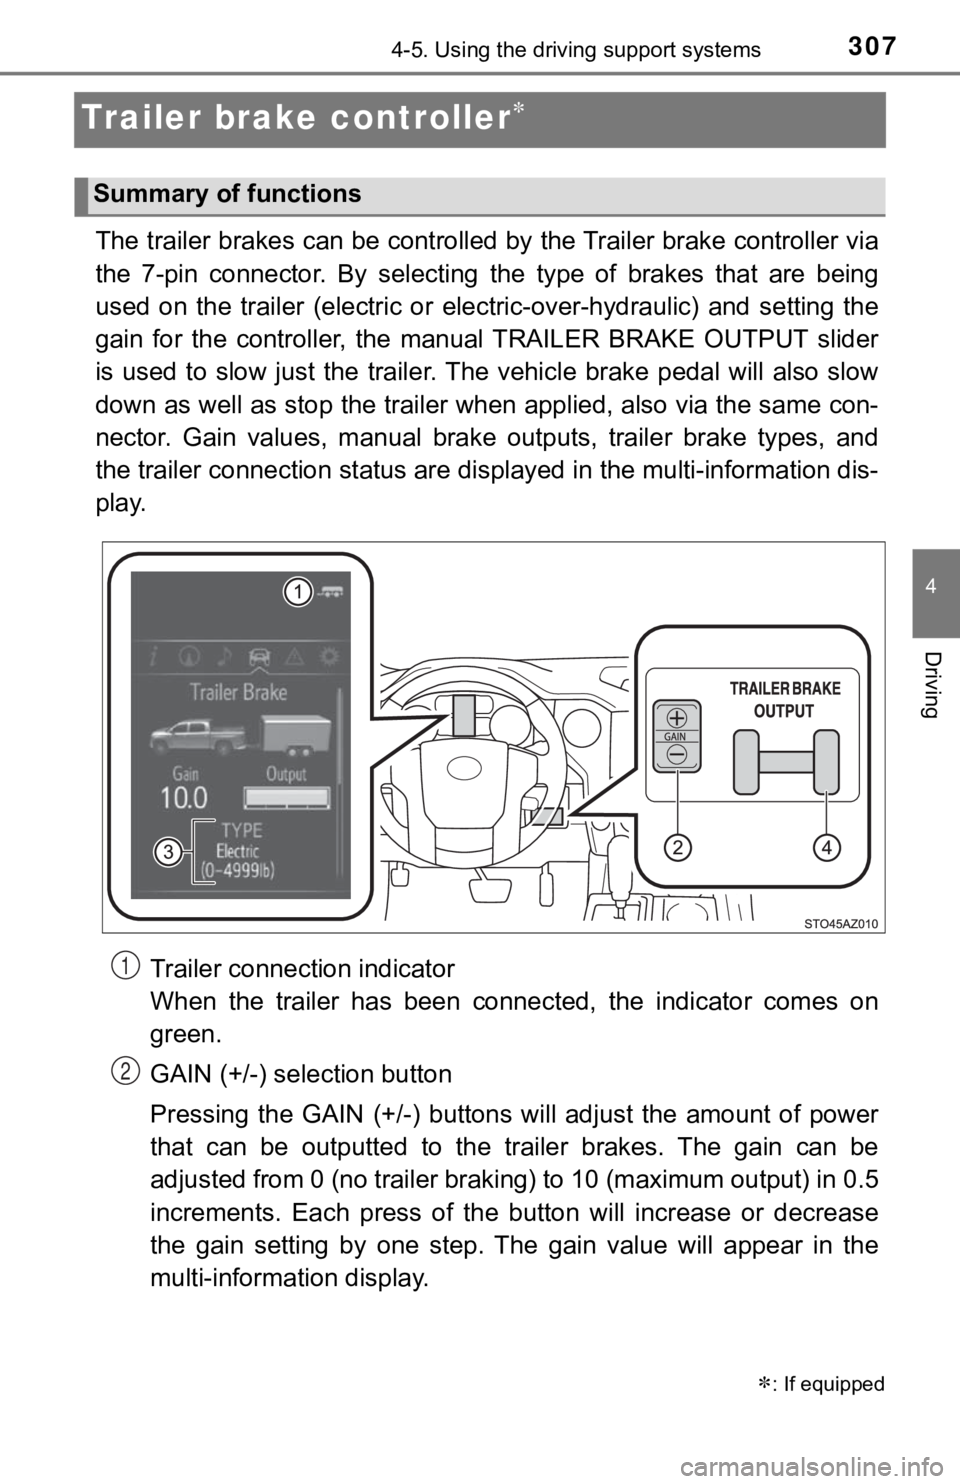
The trailer brakes can be controlled by the Trailer brake controller via
the 7-pin connector. By selecting the type of brakes that are being
used on the trailer (electric or electric-over-hydraulic) and s etting the
gain for the controller, the manual TRAILER BRAKE OUTPUT slider
is used to slow just the traile r. The vehicle brake pedal will also slow
down as well as stop the trailer when applied, also via the sam e con-
nector. Gain values, manual brake outputs, trailer brake types, and
the trailer connection status are displayed in the multi-information dis-
play.
Trailer connection indicator
When the trailer has been connected, the indicator comes on
green.
GAIN (+/-) selection button
Pressing the GAIN (+/-) buttons w ill adjust the amount of power
that can be outputted to the trailer brakes. The gain can be
adjusted from 0 (no trailer braking) to 10 (maximum output) in 0.5
increments. Each press of the bu tton will increase or decrease
the gain setting by one step. The gain value will appear in the
multi-information display.
: If equipped
Summary of functions
1
2
Page 309 of 672
![TOYOTA TUNDRA 2019 Owners Manual (in English) 3094-5. Using the driving support systems
4
Driving
Using the GAIN (+/-) selection
buttons, set a starting gain of
5.0.
While driving 20 - 25 mph [35 - 40 km/h], fully apply the](/img/14/43037/w960_43037-308.png "TOYOTA TUNDRA 2019 Owners Manual (in English) 3094-5. Using the driving support systems
4
Driving
Using the GAIN (+/-) selection
buttons, set a starting gain of
5.0.
While driving 20 - 25 mph [35 - 40 km/h], fully apply the")
3094-5. Using the driving support systems
4
Driving
Using the GAIN (+/-) selection
buttons, set a starting gain of
5.0.
While driving 20 - 25 mph [35 - 40 km/h], fully apply the
manual
TRAILER BRAKE OUTPUT
slider.
Adjust the gain setting, using t he GAIN (+/-) selection buttons , to
either increase or decrease to j ust below the point of trailer wheel
lock-up.
For confirmation, repeat steps and until desired gain setting
is reached (just below point of trailer wheel lock-up).
■ When using the trailer brake control system
Please turn off the intuitive parking assist while towing a tra iler. If left on,
sonar sensors will detect the trailer being towed.
■ When setting the gain
Wheel lock-up occurs when the trailer wheel squeals or tire smo ke occurs.
Trailer wheels may not lock-up while driving heavily loaded trailer. During this
case, adjust the Trailer gain to the highest allowable setting for the towing
condition.
■ When disconnecting and reco nnecting battery terminals
The gain setting data will be reset.
5
6
7
867