ECO mode TOYOTA TUNDRA 2023 Owners Manual
[x] Cancel search | Manufacturer: TOYOTA, Model Year: 2023, Model line: TUNDRA, Model: TOYOTA TUNDRA 2023Pages: 616, PDF Size: 11.14 MB
Page 27 of 616
271-1. For safe use
1
For safety and security
WARNING
Observe the following precautions.
Failure to do so may cause the driver’s floor mat to slip, possibly interfering
with the pedals while driving. An unexpectedly high speed may result or it may
become difficult to stop the vehicle. This could lead to an acc ident, resulting in
death or serious injury.
■ When installing the driver’s floor mat
● Do not use floor mats designed for other models or different model year
vehicles, even if they are Toyota Genuine floor mats.
● Only use floor mats designed for the driver’s seat.
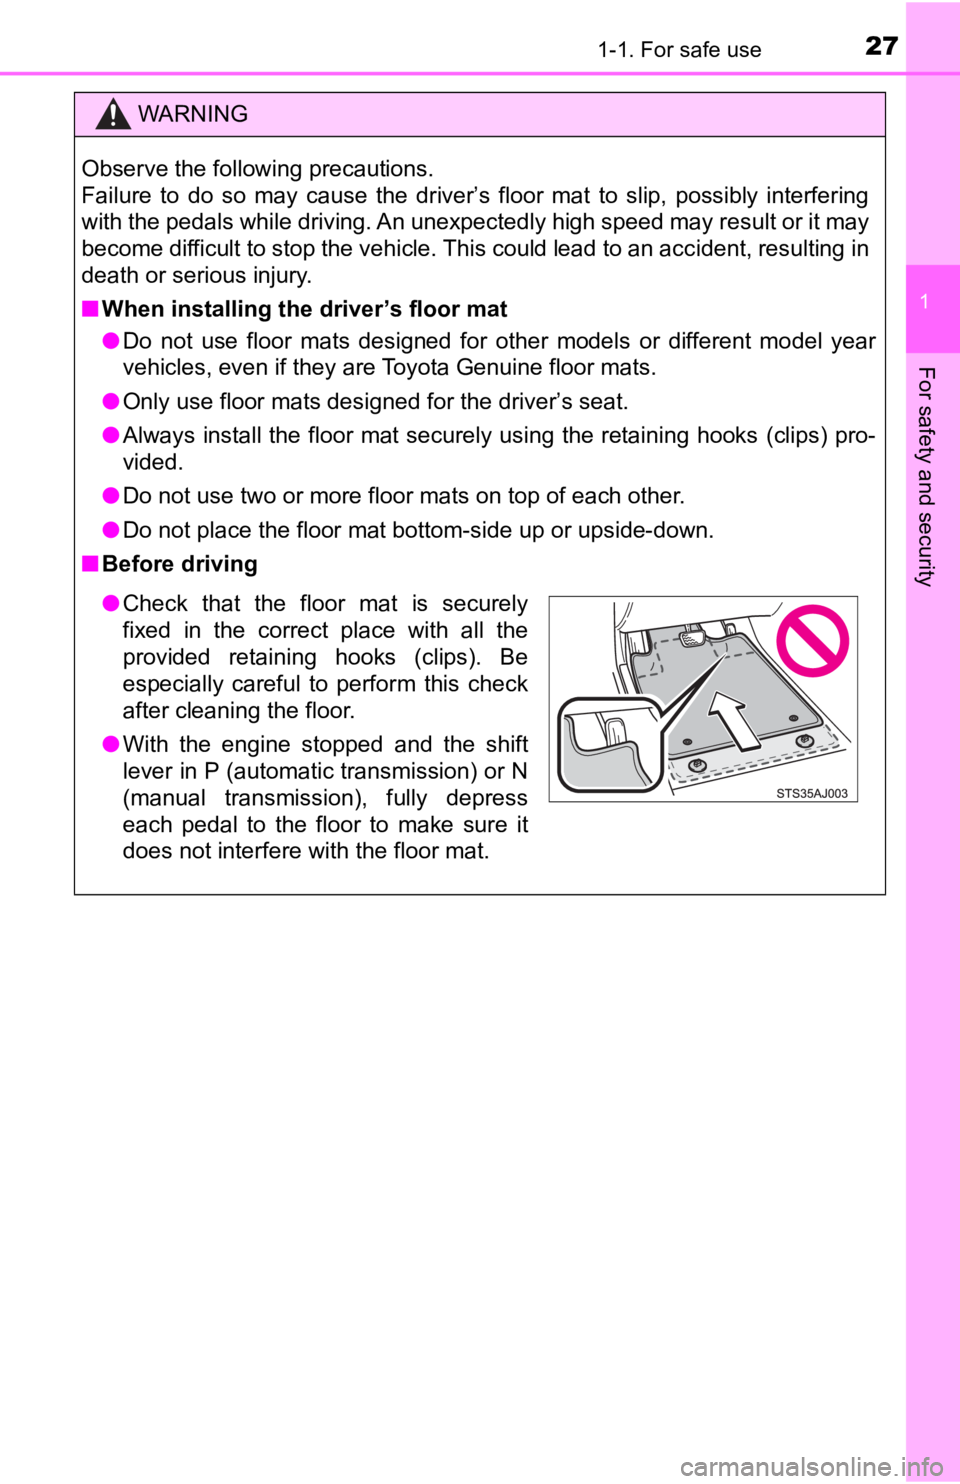
● Always install the floor mat securely using the retaining hooks (clips) pro-
vided.
● Do not use two or more floor mats on top of each other.
● Do not place the floor mat bottom-side up or upside-down.
■ Before driving
● Check that the floor mat is securely
fixed in the correct place with all the
provided retaining hooks (clips). Be
especially careful to perform this check
after cleaning the floor.
● With the engine stopped and the shift
lever in P (automatic transmission) or N
(manual transmission), fully depress
each pedal to the floor to make sure it
does not interfere with the floor mat.
Page 53 of 616
531-1. For safe use
1
For safety and security
Safety information for children
●Vehicles with rear seats: It is recommended that children sit i n the
rear seats to avoid accidental co ntact with the shift lever, wiper
switch, etc.
● Use the rear door child-protector lock (Double Cab models only) or
the window lock switch to avoid children opening the door while
driving or operating the power window accidentally.
● Do not let small children operate equipment which may catch or
pinch body parts, such as the power window, hood, tailgate, sea ts,
etc.
Observe the following precautions when children are in the vehi -
cle.
Use a child restraint system appropriate for the child, until the
child becomes large enough to properly wear the vehicle’s seat
belt.
WARNING
Never leave children unattended in the vehicle, and never allow children to
have or use the key.
Children may be able to start the vehicle or shift the vehicle into neutral.
There is also a danger that children may injure themselves by playing with
the windows, the moon roof or other features of the vehicle. In addition, heat
build-up or extremely cold temperatures inside the vehicle can be fatal to
children.
Page 70 of 616

701-1. For safe use
WARNING
■When installing a child restraint system
● When a booster seat is installed, always ensure that the should er belt is
positioned across the center of the child’s shoulder. The belt should be
kept away from the child’s neck, but not so that it could fall off the child’s
shoulder. Failure to do so may result in death or serious injury in the event
of an accident or a sudden braking.
● Ensure that the belt and plate are securely locked and the seat belt is not
twisted.
● Shake the child restraint system left and right, and forward an d backward
to ensure that it has been securely installed.
● Follow all installation instructions provided by the child restraint system
manufacturer.
● Double Cab models only: When securing some types of child restraint sys-
tems in rear seats, it may not be possible to properly use the seat belts in
positions next to the child restraint without interfering with it or affecting
seat belt effectiveness. Be sure your seat belt fits snugly across your
shoulder and low on your hips. If it does not, or if it interfe res with the child
restraint, move to a different position. Failure to do so may result in death
or serious injury.
● Double Cab models only: When installing the child restraint system with
the head restraint being lowered, be sure to have the top tether strap pass
over the top of the head restraint. If the belt passes below the head
restraint, it is possible that the child restraint system may not be securely
fixed.
If the seat is adjusted, reconfirm the security of the child re straint system.
■ Do not use a seat belt extender
If a seat belt extender is used when installing a child restraint system, the
seat belt will not securely hold the child restraint system, which could cause
death or serious injury to the child or other passengers in the event of a sud-
den braking, sudden swerving or an accident.
■ To correctly attach a child restr aint system to the anchors (vehicles
with rear seats)
When using the LATCH anchors, be sure that there are no foreign objects
around the anchors and that the seat belt is not caught behind the child
restraint system. Make sure the child restraint system is secur ely attached,
or it may cause death or serious injury to the child or other p assengers in
the event of a sudden braking or an accident.
Page 74 of 616
741-2. Emergency assistance
■Safety Connect Services Information
●Phone calls using the vehicle’s Bluetooth® technology will not be possible
when Safety Connect is active and in use.
● Safety Connect is available on select Toyota models (in the con tiguous
United States only). Contact with the Safety Connect response center is
dependent upon the telematics device being in operative conditi on, cellular
connection availability, and GPS satellite signal reception, which can limit
the ability to reach the response center or receive emergency s ervice sup-
port. Enrollment and Telematics Subscription Service Agreement are
required. A variety of subscription terms are available; charge s vary by sub-
scription term selected and location.
● Automatic Collision Notification, Emergency Assistance and Stolen Vehicle
Location are available in the United States, including Hawaii a nd Alaska,
Puerto Rico and Canada, and Enhanced Roadside Assistance are av ailable
in the United States, Puerto Rico and Canada.
● Automatic Collision Notification, Emergency Assistance, Stolen Vehicle and
Enhanced Road Assistance are not available in the U.S. Virgin Islands. For
vehicles first sold in the U.S. Virgin Islands, no Safety Conne ct services will
function in or outside the U.S. Virgin Islands.
● Safety Connect services are not subject to section 255 of the T elecommuni-
cations Act and the device is not TTY compatible.
■ Languages
The Safety Connect response center will offer support in multip le languages.
The Safety Connect system will offer voice prompts in English, Spanish, and
French. Please indicate your language of choice when enrolling.
■ When contacting the response center
You may be unable to contact the response center if the network is busy.
When the engine switch is turned to IGNITION ON mode, the red i ndi-
cator light comes on for 2 seconds then turns off. Afterward, t he green
indicator light comes on, indicat ing that the service is active.
The following indicator light patterns indicate specific system usage
conditions:
● Green indicator light on = Active service
● Green indicator light flashing = Safety Connect call in process
● Red indicator light (except at vehicle start-up) = System malfunction
(contact your Toyota dealer)
● No indicator light (off) = Saf ety Connect service not active
Safety Connect LED light Indicators
Page 88 of 616
881-3. Theft deterrent system
Alar m
The alarm uses light and sound to give an alert when an intrusion is
detected.
The alarm is triggered in the following situations when the ala rm is
set:
● A locked door is unlocked or opened in any way other than using
the entry function, wireless remote control or mechanical key. (The
doors will lock aga in automatically.)
● The hood is opened.
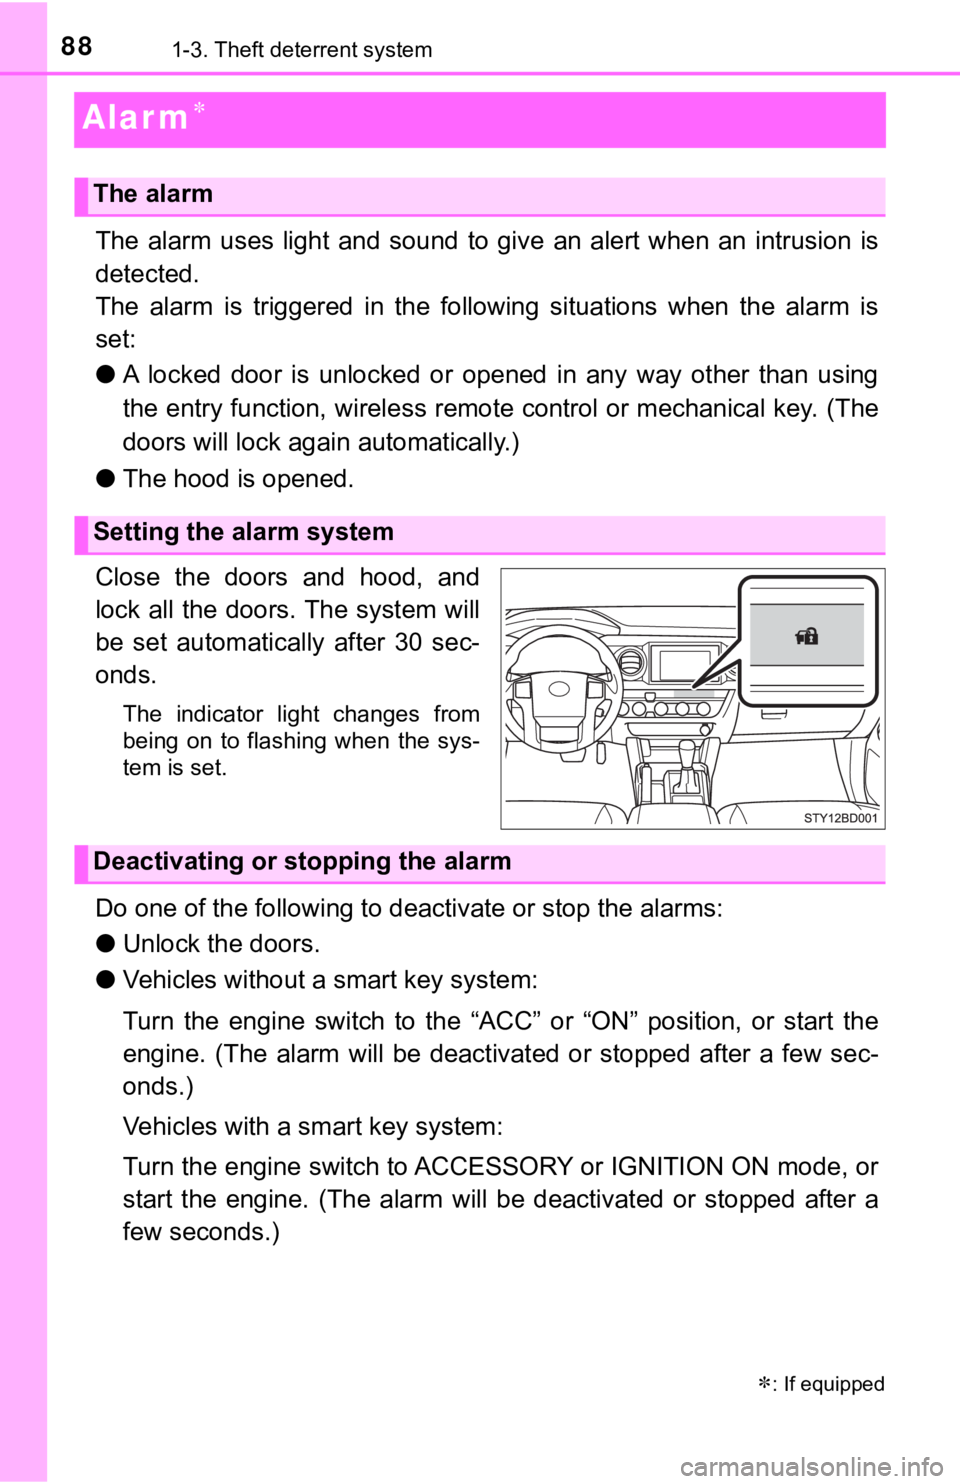
Close the doors and hood, and
lock all the doors. The system will
be set automatically after 30 sec-
onds.
The indicator light changes from
being on to flashing when the sys-
tem is set.
Do one of the following to d eactivate or stop the alarms:
● Unlock the doors.
● Vehicles without a smart key system:
Turn the engine switch to the “ACC” or “ON” position, or start the
engine. (The alarm will be deact ivated or stopped after a few sec-
onds.)
Vehicles with a smart key system:
Turn the engine switch to ACCESSORY or IGNITION ON mode, or
start the engine. (The alarm will be deactivated or stopped after a
few seconds.)
: If equipped
The alarm
Setting the alarm system
Deactivating or stopping the alarm
Page 94 of 616
942. Instrument cluster
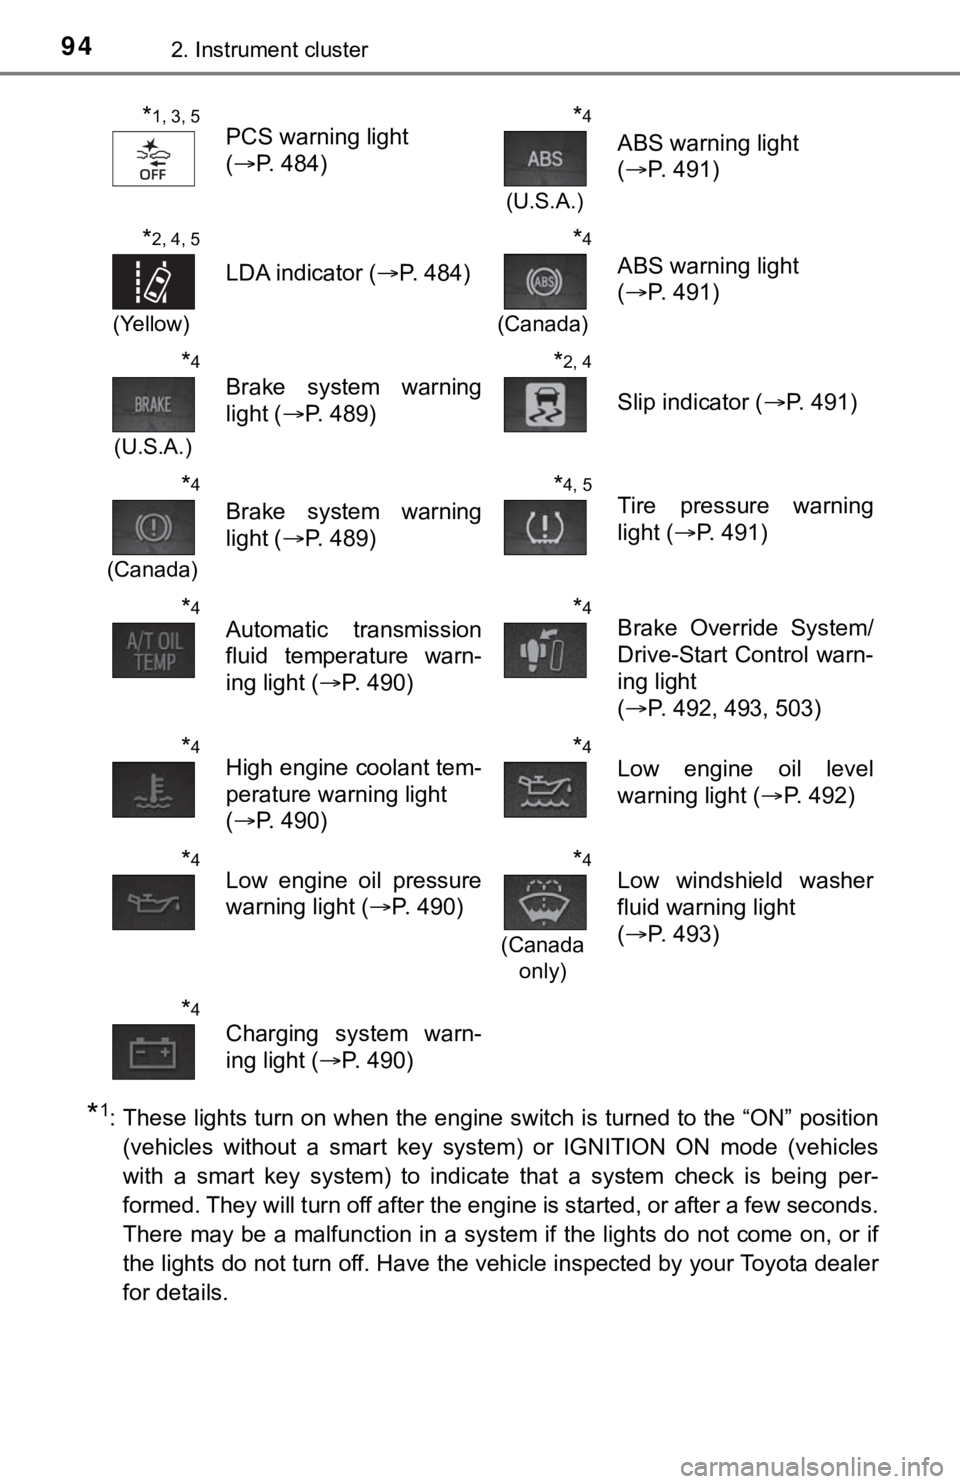
*1: These lights turn on when the engine switch is turned to the “ON” position(vehicles without a smart key system) or IGNITION ON mode (vehi cles
with a smart key system) to indicate that a system check is being per-
formed. They will turn off after the engine is started, or after a few seconds.
There may be a malfunction in a system if the lights do not com e on, or if
the lights do not turn off. Have the vehicle inspected by your Toyota dealer
for details.
*1, 3, 5PCS warning light
( P. 484)*4
(U.S.A.)
ABS warning light
(P. 491)
*2, 4, 5
(Yellow)
LDA indicator ( P. 484)
*4
(Canada)
ABS warning light
(P. 491)
*4
(U.S.A.)
Brake system warning
light ( P. 489)
*2, 4
Slip indicator ( P. 491)
*4
(Canada)
Brake system warning
light (P. 489)
*4, 5Tire pressure warning
light (P. 491)
*4Automatic transmission
fluid temperature warn-
ing light ( P. 490)*4Brake Override System/
Drive-Start Control warn-
ing light
(P. 492, 493, 503)
*4High engine coolant tem-
perature warning light
(P. 490)*4Low engine oil level
warning light ( P. 492)
*4Low engine oil pressure
warning light ( P. 490)*4
(Canada
only)
Low windshield washer
fluid warning light
(P. 493)
*4
Charging system warn-
ing light ( P. 490)
Page 96 of 616
962. Instrument cluster
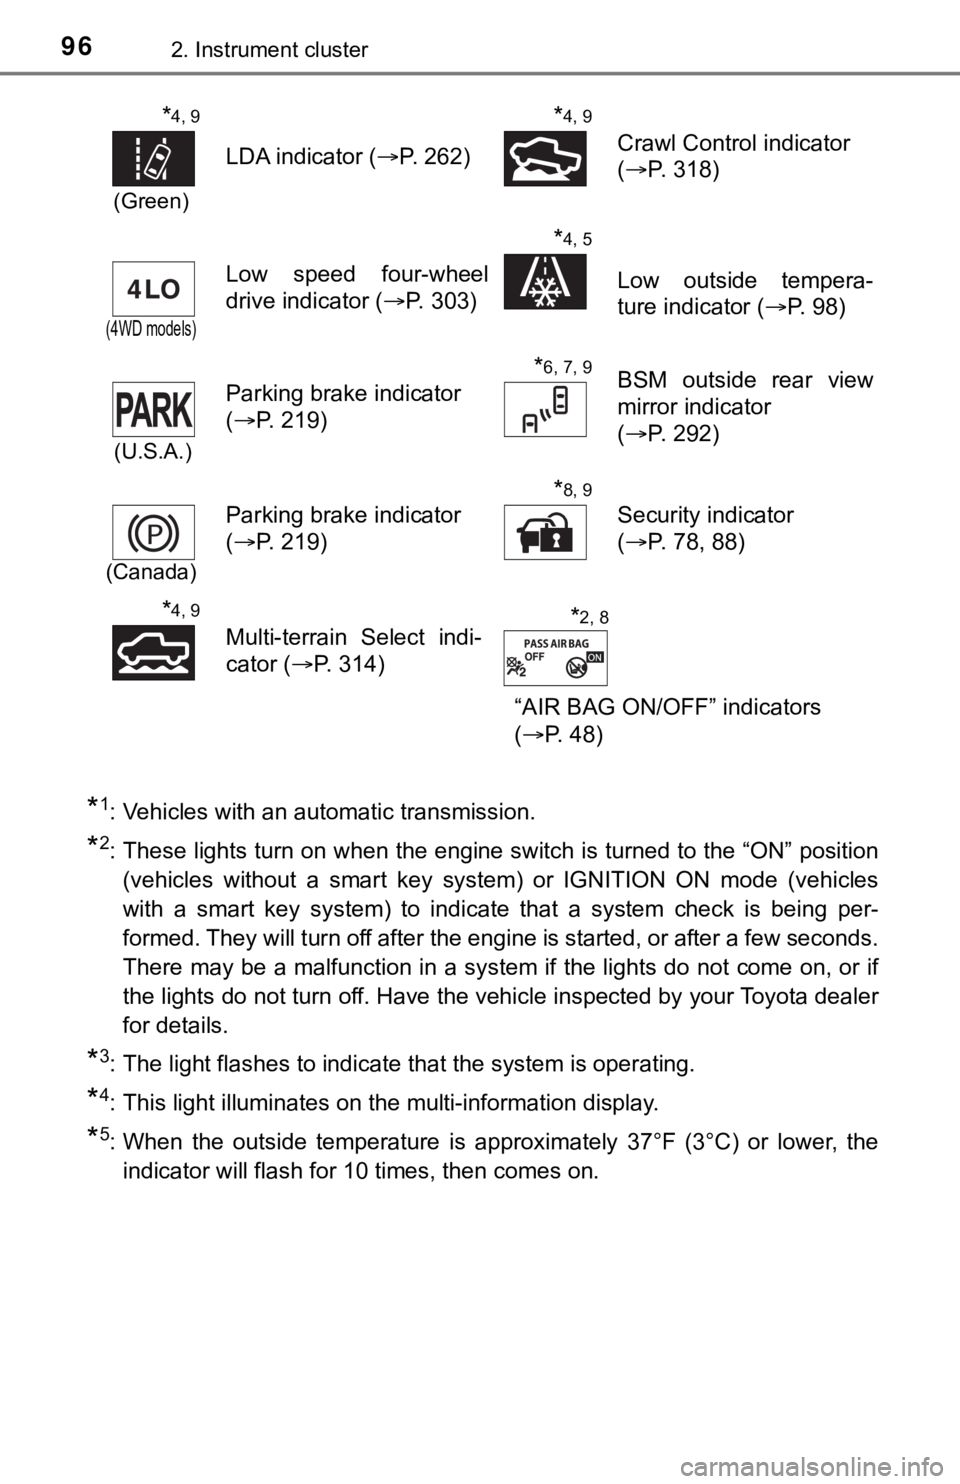
*1: Vehicles with an automatic transmission.
*2: These lights turn on when the engine switch is turned to the “ON” position(vehicles without a smart key system) or IGNITION ON mode (vehi cles
with a smart key system) to indicate that a system check is being per-
formed. They will turn off after the engine is started, or after a few seconds.
There may be a malfunction in a system if the lights do not com e on, or if
the lights do not turn off. Have the vehicle inspected by your Toyota dealer
for details.
*3: The light flashes to indicate that the system is operating.
*4: This light illuminates on the multi-information display.
*5: When the outside temperature is approximately 37°F (3°C) or lo wer, the
indicator will flash for 10 times, then comes on.
*4, 9
(Green)
LDA indicator ( P. 262)
*4, 9
Crawl Control indicator
(P. 318)
(4WD models)
Low speed four-wheel
drive indicator ( P. 303)
*4, 5
Low outside tempera-
ture indicator (P. 98)
(U.S.A.)
Parking brake indicator
(P. 219)
*6, 7, 9BSM outside rear view
mirror indicator
(P. 292)
(Canada)
Parking brake indicator
(P. 219)
*8, 9
Security indicator
(P. 78, 88)
*4, 9
Multi-terrain Select indi-
cator (P. 314)
“AIR BAG ON/OFF” indicators
(P. 48)*2, 8
Page 97 of 616

972. Instrument cluster
2
Instrument cluster
*6: In order to confirm operation, the BSM outside rear view mirror indicatorsilluminate in the following situations:
• When the engine switch is turned to the “ON” position (vehicles without a smart key system) or IGNITION ON mode (vehicles with a smart key
system) while the BSM main switch is set to ON.
• When the BSM main switch is set to ON while the engine switch is in the
“ON” position (vehicles without a smart key system) or IGNITION ON
mode (vehicles with a smart key system).
If the system is functioning correctly, the BSM outside rear vi ew mirror indi-
cators will turn off after a few seconds.
If the BSM outside rear view mirror indicators do not illuminate or do not
turn off, there may be a malfunction in the system.
*7: This light illuminates on the outside rear view mirrors.
*8: This light illuminates on the center panel.
*9: If equipped
*10: The light comes on when the system is turned off.
WARNING
■ If a safety system warning light does not come on
Should a safety system light such as the ABS and SRS warning li ght not
come on when you start the engine, this could mean that these s ystems are
not available to help protect you in an accident, which could result in death
or serious injury. Have the vehicle inspected by your Toyota dealer immedi-
ately if this occurs.
Page 107 of 616

1072. Instrument cluster
2
Instrument cluster
■Setting items
●Setting items are not selectable during driving and cannot be o perated.
Also, the settings screen is temporarily canceled in the follow ing situations.
• A warning message is displayed.
• The vehicle starts off.
● Settings for functions not equipped to the vehicle are not displayed.
● When a function is turned off, the related settings for that fu nction are not
selectable.
■ Pop-up display
In some situations, such as when a switch operation is performe d, a pop-up
display will be temporarily displayed on the multi-information display.
■ When disconnecting and reco nnecting battery terminals
The drive information will be reset.
■ Ending display
When the engine switch is turned off, each of the following wil l be displayed
on the multi-information display, and will extinguish after app roximately
30 seconds.
● Distance traveled
● Average fuel economy
● Distance to empty
■ Tire inflation pressure (vehicles with tire pressure warning sy stem)
● It may take a few minutes to display the tire inflation pressur e after the
engine switch is turned to the “ON” position (vehicles without a smart key
system) or IGNITION ON mode (vehicles with a smart key system). It may
also take a few minutes to display the tire inflation pressure after inflation
pressure has been adjusted.
● “---” may be displayed if the tire position information cannot be determined
due to unfavorable radio wave conditions.
● Tire inflation pressure changes with temperature. The displayed values may
also be different from the values measured using a tire pressur e gauge.
■ Liquid crystal display
P. 100
Page 109 of 616
1092. Instrument cluster
2
Instrument cluster
Fuel consumption information
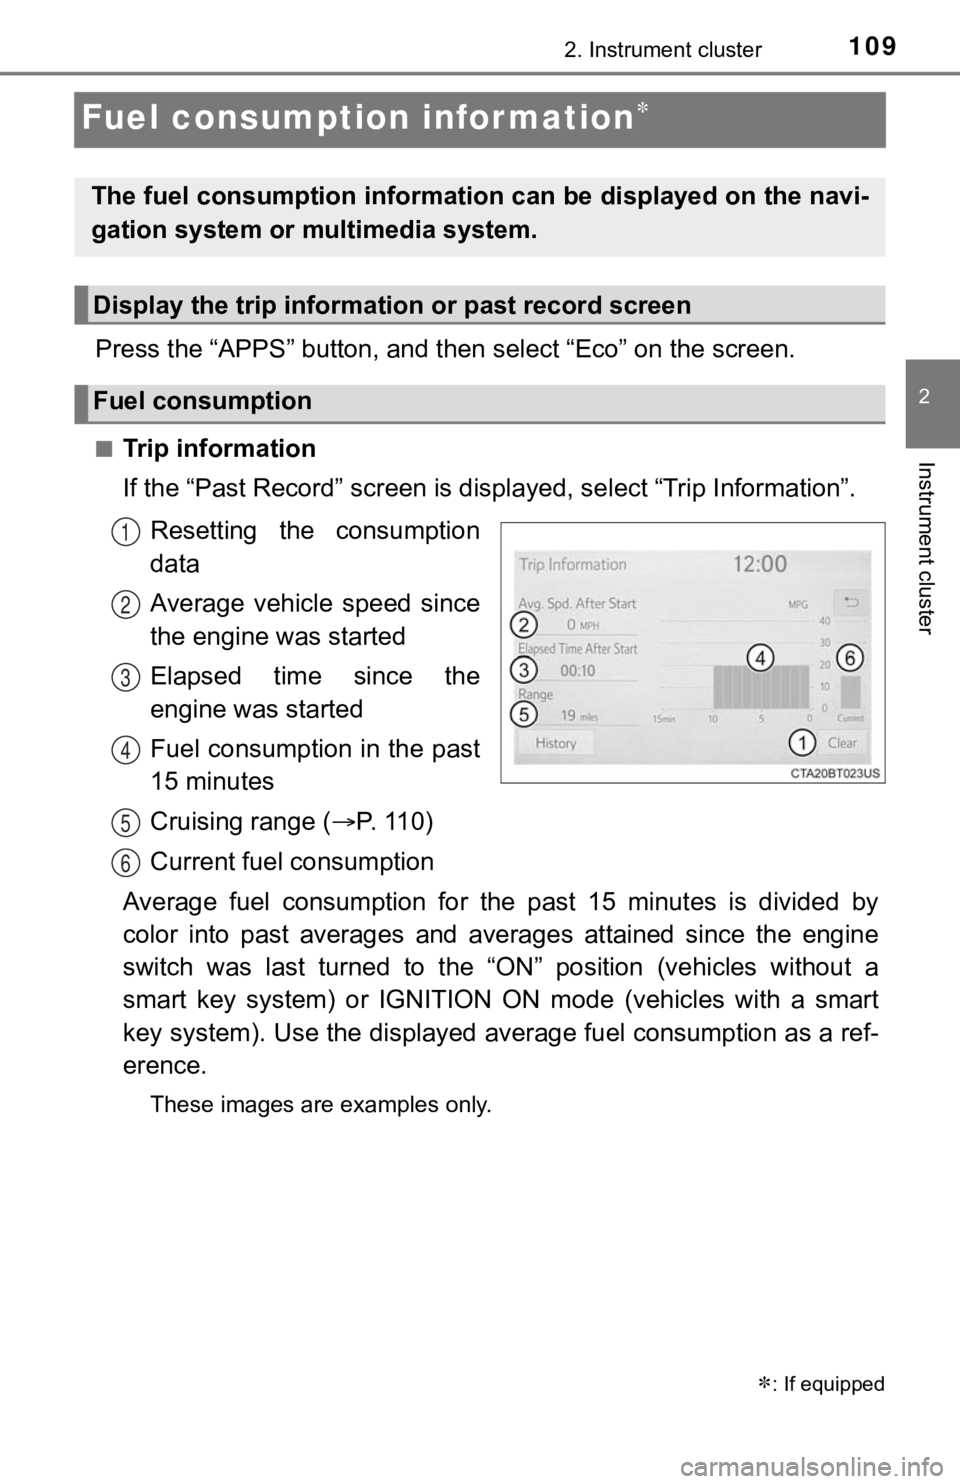
Press the “APPS” button, and then select “Eco” on the screen.
■Trip information
If the “Past Record” screen is displayed, select “Trip Informat ion”.
Resetting the consumption
data
Average vehicle speed since
the engine was started
Elapsed time since the
engine was started
Fuel consumption in the past
15 minutes
Cruising range ( P. 11 0 )
Current fuel consumption
Average fuel consumption for the past 15 minutes is divided by
color into past averages and averages attained since the engine
switch was last turned to the “ON” position (vehicles without a
smart key system) or IGNITION ON mode (vehicles with a smart
key system). Use the displayed a verage fuel consumption as a ref-
erence.
These images are examples only.
: If equipped
The fuel consumption information can be displayed on the navi-
gation system or multimedia system.
Display the trip information or past record screen
Fuel consumption
1
2
3
4
5
6