ECO mode TOYOTA TUNDRA HYBRID 2022 Owner's Guide
[x] Cancel search | Manufacturer: TOYOTA, Model Year: 2022, Model line: TUNDRA HYBRID, Model: TOYOTA TUNDRA HYBRID 2022Pages: 618, PDF Size: 19.91 MB
Page 264 of 618
2644-5. Using the driving support systems
Owners Manual_USA_M0C031_en
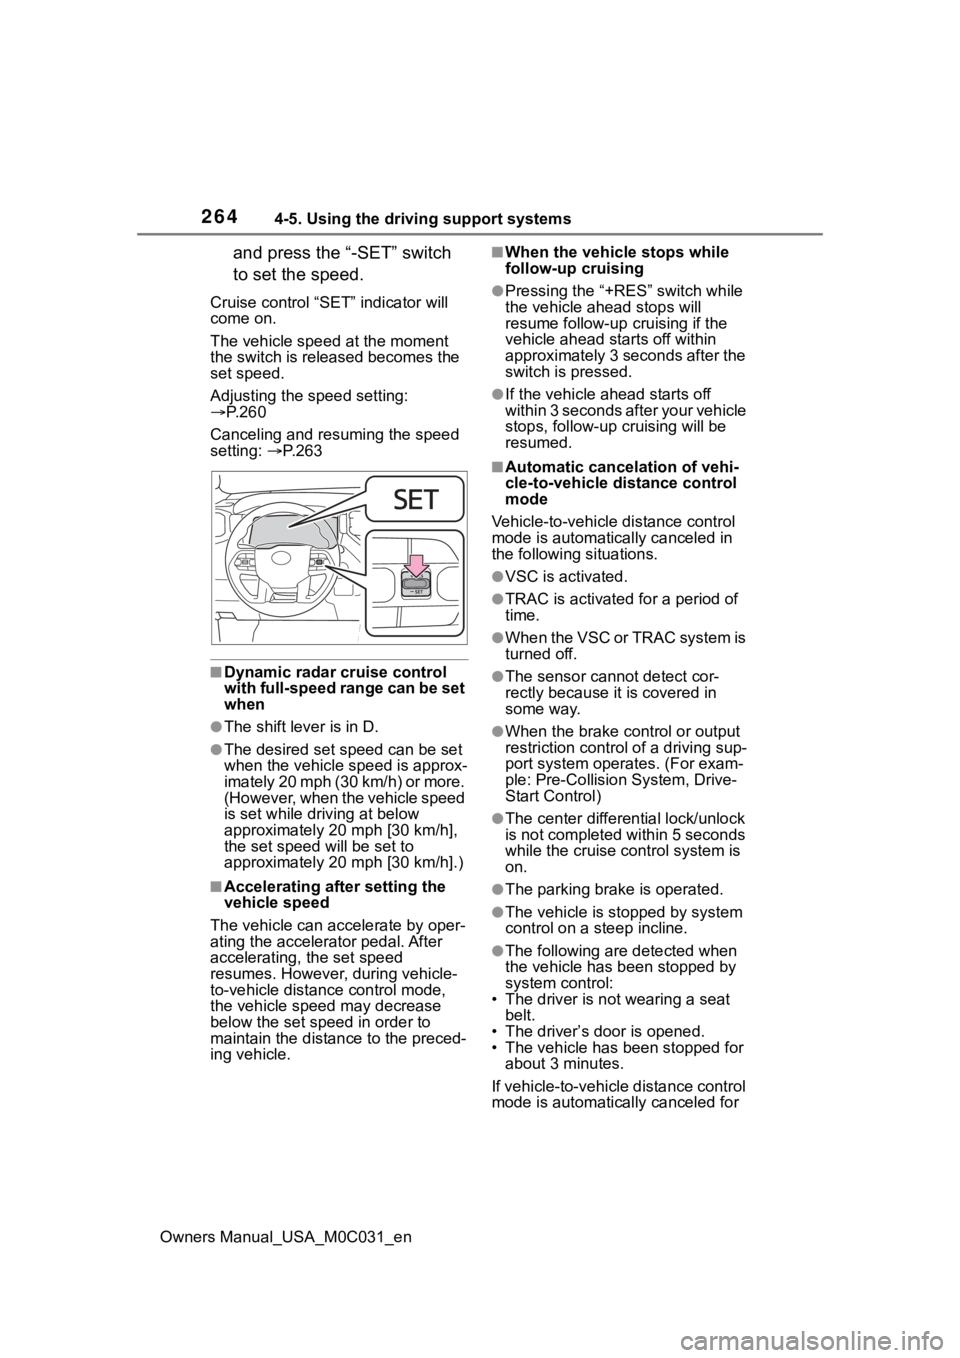
and press the “-SET” switch
to set the speed.
Cruise control “SET” indicator will
come on.
The vehicle speed at the moment
the switch is released becomes the
set speed.
Adjusting the speed setting:
P. 2 6 0
Canceling and resuming the speed
setting: P. 2 6 3
■Dynamic radar cruise control
with full-speed range can be set
when
●The shift lever is in D.
●The desired set speed can be set
when the vehicle speed is approx-
imately 20 mph (30 km/h) or more.
(However, when the vehicle speed
is set while driving at below
approximately 20 mph [30 km/h],
the set speed will be set to
approximately 20 mph [30 km/h].)
■Accelerating after setting the
vehicle speed
The vehicle can accelerate by oper-
ating the accelerator pedal. After
accelerating, the set speed
resumes. However, during vehicle-
to-vehicle distance control mode,
the vehicle spee d may decrease
below the set speed in order to
maintain the distance to the preced-
ing vehicle.
■When the vehicle stops while
follow-up cruising
●Pressing the “+RES” switch while
the vehicle ahead stops will
resume follow-up cruising if the
vehicle ahead starts off within
approximately 3 seconds after the
switch is pressed.
●If the vehicle ahead starts off
within 3 seconds after your vehicle
stops, follow-up c ruising will be
resumed.
■Automatic cancelation of vehi-
cle-to-vehicle d istance control
mode
Vehicle-to-vehicle distance control
mode is automatically canceled in
the following situations.
●VSC is activated.
●TRAC is activated for a period of
time.
●When the VSC or TRAC system is
turned off.
●The sensor cannot detect cor-
rectly because i t is covered in
some way.
●When the brake control or output
restriction control of a driving sup-
port system operates. (For exam-
ple: Pre-Collision System, Drive-
Start Control)
●The center differe ntial lock/unlock
is not completed within 5 seconds
while the cruise control system is
on.
●The parking brake is operated.
●The vehicle is stopped by system
control on a steep incline.
●The following are detected when
the vehicle has been stopped by
system control:
• The driver is not wearing a seat belt.
• The driver’s door is opened.
• The vehicle has been stopped for
about 3 minutes.
If vehicle-to-vehicle distance control
mode is automatically canceled for
Page 265 of 618
2654-5. Using the driving support systems
Owners Manual_USA_M0C031_en
4
Driving
any reasons other than the above,
there may be a malfunction in the
system. Contact your Toyota dealer.
■Automatic cancelation of con-
stant speed control mode
Constant speed control mode is
automatically cance led in the follow-
ing situations:
●Actual vehicle speed is more than
approximately 10 mph (16 km/h)
below the set vehicle speed.
●Actual vehicle speed falls below
approximately 20 mph (30 km/h).
●VSC is activated.
●TRAC is activated for a period of
time.
●When the VSC or TRAC system is
turned off.
●When the brake control or output
restriction control of a driving sup-
port system operates. (For exam-
ple: Pre-Collision System, Drive-
Start Control)
●The center differential lock/unlock
is not completed within 5 seconds
while the cruise con trol system is
on.
●The parking brake is operated.
If constant speed control mode is
automatically canceled for any rea-
sons other than the above, there
may be a malfunction in the system.
Contact your Toyota dealer.
■Brake operation
A brake operation sound may be
heard and the brake pedal response
may change, but the se are not mal-
functions.
■Warning messages and buzzers
for dynamic radar cruise con-
trol with full-speed range
Warning messages and buzzers are
used to indicate a system malfunc-
tion or to inform the driver of the
need for caution while driving. If a
warning message is shown on the
multi-information display, read the
message and follow the instruc- tions.(
P.228, 511)
■When the sensor may not be
correctly detecting the vehicle
ahead
In the case of the following and
depending on the conditions, oper-
ate the brake pedal when decelera-
tion of the system is insufficient or
operate the accelerator pedal when
acceleration is required.
As the sensor may not be able to
correctly detect th ese types of vehi-
cles, the approach warning
( P.263) may not be activated.
●Vehicles that cut in suddenly
●Vehicles traveling at low speeds
●Vehicles that are not moving in the
same lane
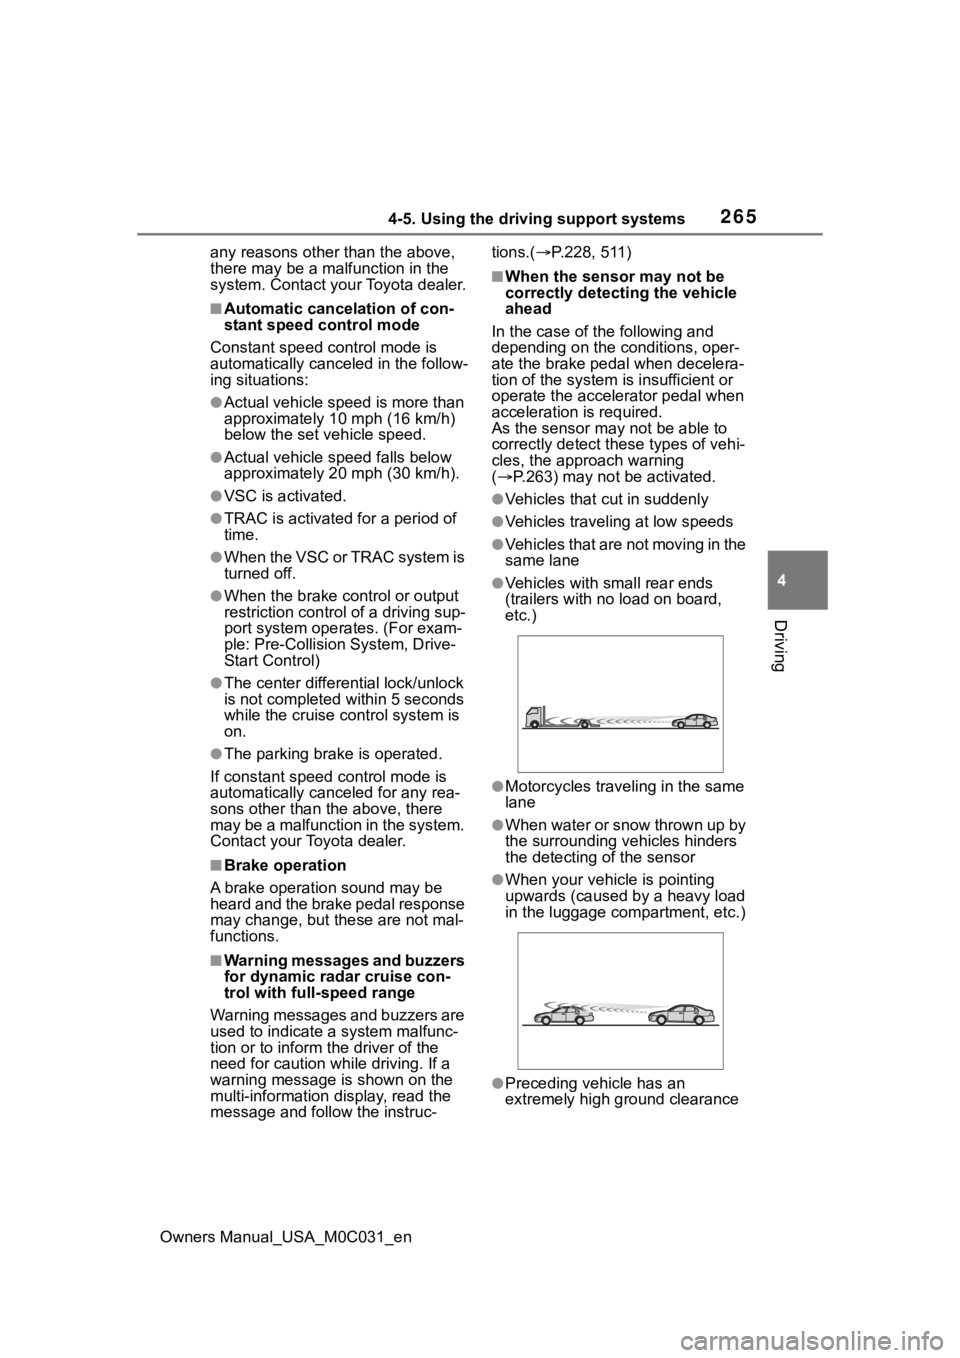
●Vehicles with small rear ends
(trailers with no load on board,
etc.)
●Motorcycles traveling in the same
lane
●When water or snow thrown up by
the surrounding vehicles hinders
the detecting of the sensor
●When your vehicle is pointing
upwards (caused by a heavy load
in the luggage compartment, etc.)
●Preceding vehicle has an
extremely high ground clearance
Page 298 of 618
2984-5. Using the driving support systems
Owners Manual_USA_M0C031_en
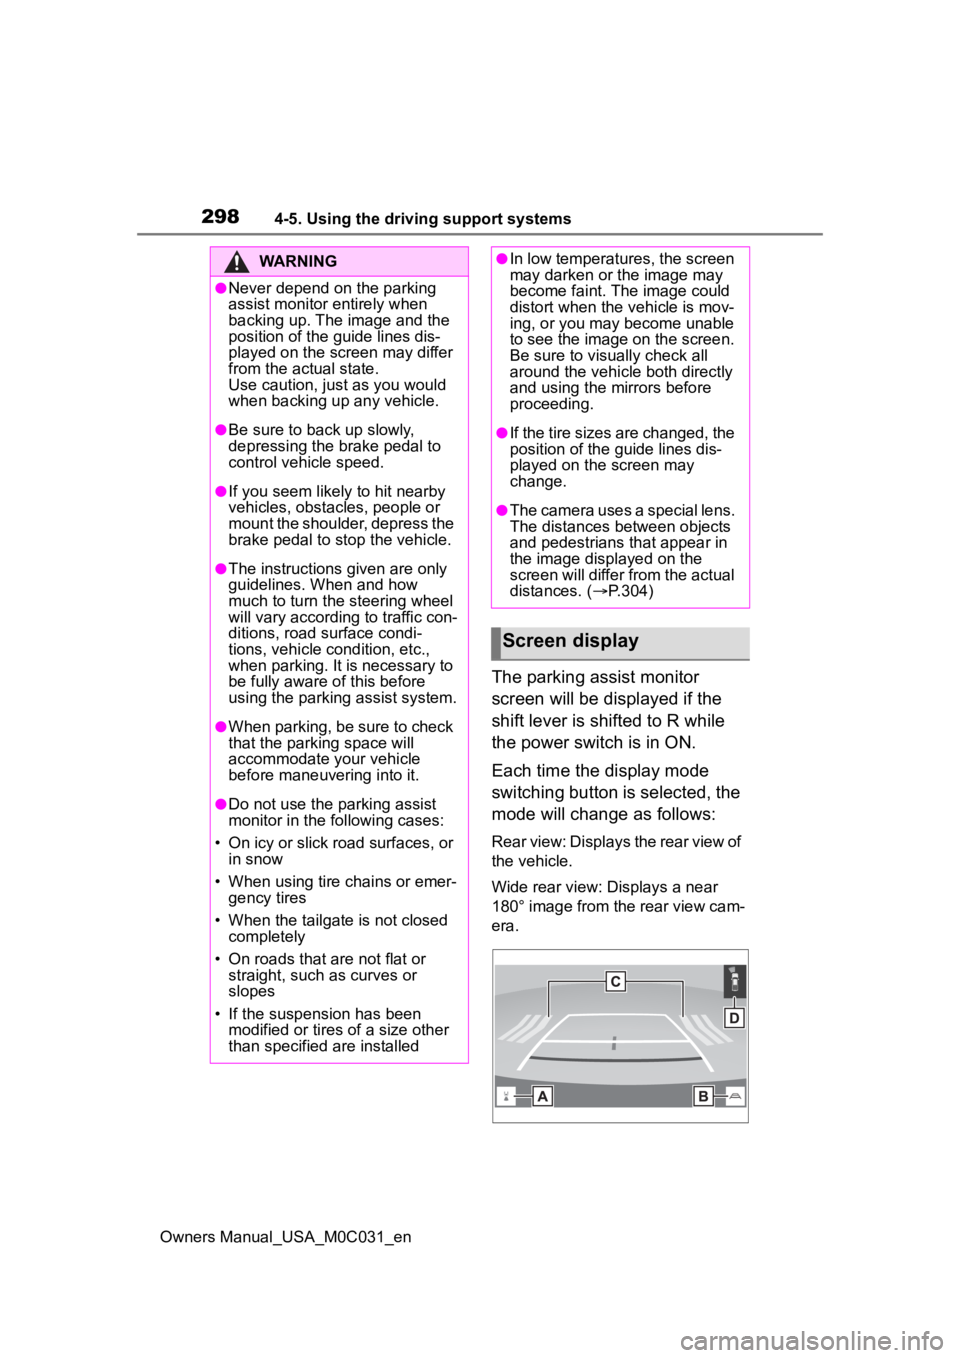
The parking assist monitor
screen will be displayed if the
shift lever is shifted to R while
the power switch is in ON.
Each time the display mode
switching button is selected, the
mode will change as follows:
Rear view: Displays the rear view of
the vehicle.
Wide rear view: Displays a near
180° image from the rear view cam-
era.
WARNING
●Never depend on the parking
assist monitor entirely when
backing up. The image and the
position of the guide lines dis-
played on the screen may differ
from the actual state.
Use caution, just as you would
when backing up any vehicle.
●Be sure to back up slowly,
depressing the brake pedal to
control vehicle speed.
●If you seem likely to hit nearby
vehicles, obstacles, people or
mount the shoulder, depress the
brake pedal to stop the vehicle.
●The instructions given are only
guidelines. When and how
much to turn the steering wheel
will vary according to traffic con-
ditions, road surface condi-
tions, vehicle condition, etc.,
when parking. It is necessary to
be fully aware of this before
using the parking assist system.
●When parking, be sure to check
that the par king space will
accommodate your vehicle
before maneuveri ng into it.
●Do not use the parking assist
monitor in the following cases:
• On icy or slick road surfaces, or in snow
• When using tire chains or emer- gency tires
• When the tailgate is not closed completely
• On roads that are not flat or straight, such as curves or
slopes
• If the suspension has been modified or tires of a size other
than specified are installed
●In low temperatures, the screen
may darken or the image may
become faint. The image could
distort when the vehicle is mov-
ing, or you may become unable
to see the image on the screen.
Be sure to visually check all
around the vehicle both directly
and using the mirrors before
proceeding.
●If the tire sizes are changed, the
position of the guide lines dis-
played on the screen may
change.
●The camera uses a special lens.
The distances between objects
and pedestrians that appear in
the image displayed on the
screen will differ from the actual
distances. ( P.304)
Screen display
Page 300 of 618
3004-5. Using the driving support systems
Owners Manual_USA_M0C031_en
This mode is recommended for
those who are comfortable with
parking the vehicle without the
aid of the estimated course
lines.
Distance guide line display
mode (P.302)
Distance guide lines only are
displayed.
This mode is recommended for
those who are comfortable with
parking the vehicle without the
aid of the guide lines.
Center guide line display
mode ( P.302)
Estimated course lines and
vehicle center line are displayed
which move in accordance with
the operation of the steering
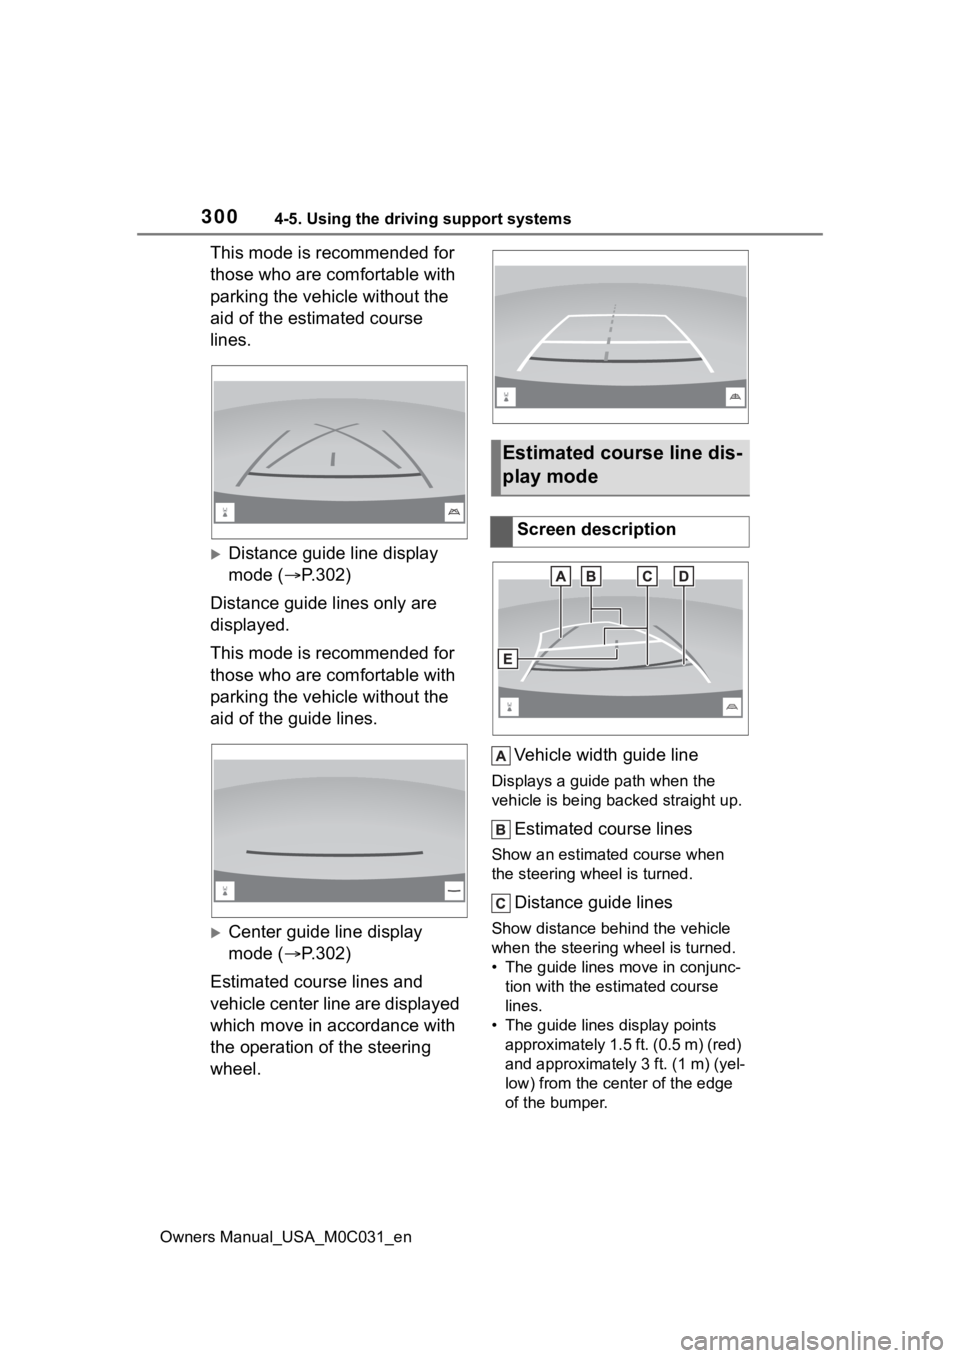
wheel. Vehicle width guide line
Displays a guide path when the
vehicle is being backed straight up.
Estimated course lines
Show an estimated course when
the steering wheel is turned.
Distance guide lines
Show distance behind the vehicle
when the steering wheel is turned.
• The guide lines move in conjunc-
tion with the estimated course
lines.
• The guide lines display points approximately 1.5 ft. (0.5 m) (red)
and approximately 3 ft. (1 m) (yel-
low) from the ce nter of the edge
of the bumper.
Estimated course line dis-
play mode
Screen description
Page 323 of 618
3234-5. Using the driving support systems
Owners Manual_USA_M0C031_en
4
Driving
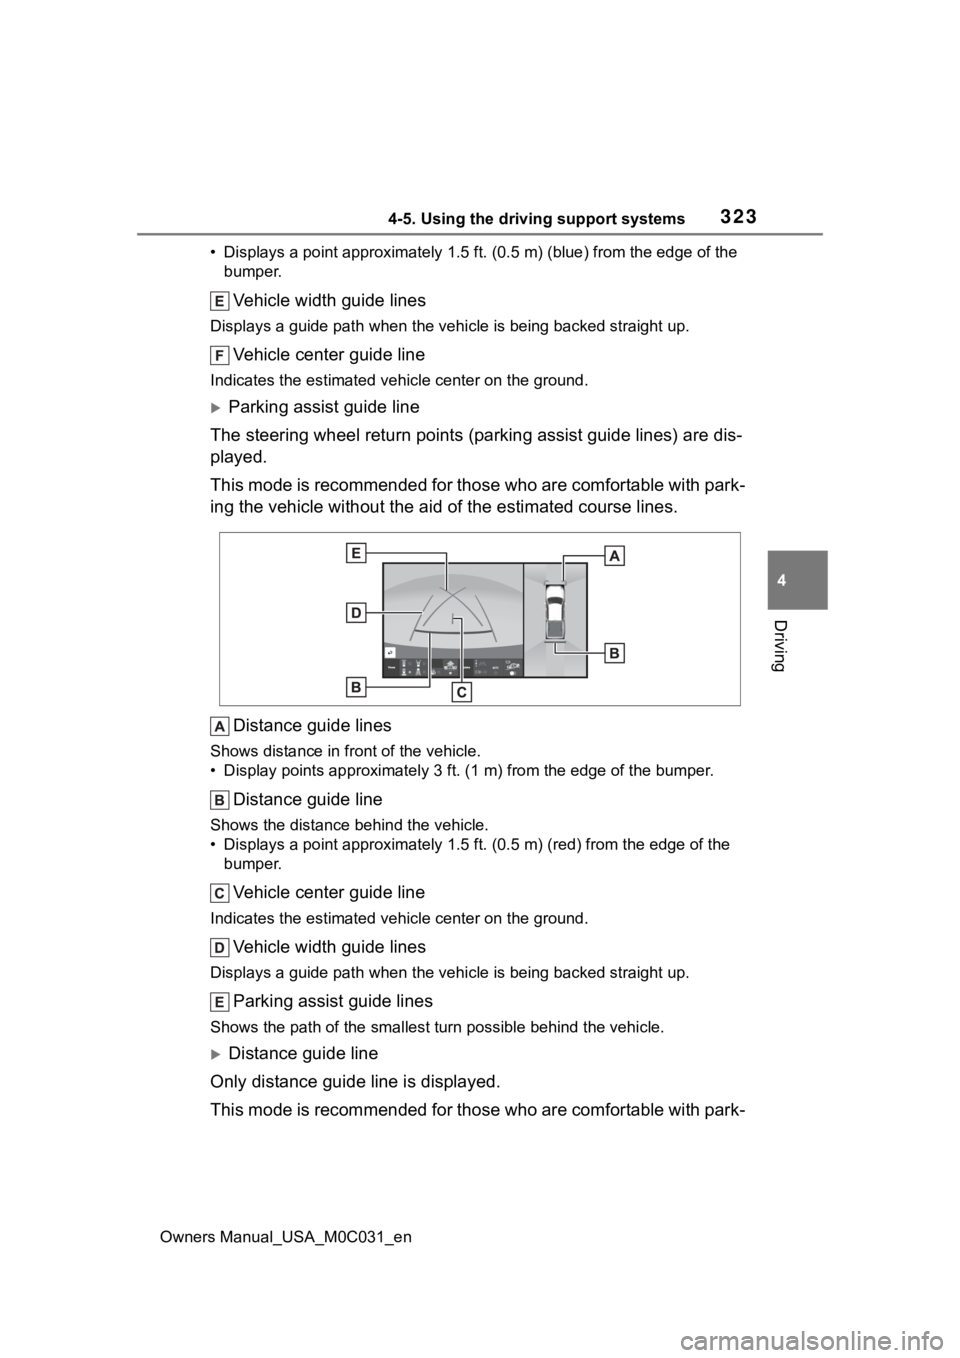
• Displays a point approximately 1.5 ft. (0.5 m) (blue) from the edge of the
bumper.
Vehicle width guide lines
Displays a guide path w hen the vehicle is being backed straight up.
Vehicle center guide line
Indicates the estimated vehicle center on the ground.
Parking assist guide line
The steering wheel return points (parking assist guide lines) are dis-
played.
This mode is recommended for those who are comfortable with par k-
ing the vehicle without the aid of the estimated course lines.
Distance guide lines
Shows distance in front of the vehicle.
• Display points approximately 3 ft. (1 m) from the edge of the bumper.
Distance guide line
Shows the distance behind the vehicle.
• Displays a point approximately 1.5 ft. (0.5 m) (red) from the edge of the
bumper.
Vehicle center guide line
Indicates the estimated ve hicle center on the ground.
Vehicle width guide lines
Displays a guide path when the vehicle is being backed straight up.
Parking assist guide lines
Shows the path of the smallest turn possible behind the vehicle .
Distance guide line
Only distance guide line is displayed.
This mode is recommended for those who are comfortable with par k-
Page 356 of 618
3564-5. Using the driving support systems
Owners Manual_USA_M0C031_enbe displayed, have your vehicle
inspected by your Toyota dealer as
soon as possible.
■When the indicator turns on
Indicates a malfunction in the air
suspension system.
Have the vehicle inspected by your
Toyota dealer immediately. ( P.87,
508)
WARNING
■The electronically modulated
air suspension must be
turned off in the following cir-
cumstances:
Otherwise, the automatic leveling
function may cause the vehicle’s
height to change, and you may
catch part of yo ur body in the
vehicle, resulting in an unex-
pected accident or injury:
●When driving through water
such as shallow streams (Put
the vehicle height in “HI” mode
and turn off the electronically
modulated air suspension. Drive
at 18 mph [30 km/h] or slower.)
●When jacking up the vehicle,
installing tire chains or tying the
vehicle with chains/wires for
transportation via flat bed truck
(Turn the system to the manual
mode and stop the hybrid sys-
tem.)
●When the vehicle must be
towed (Put the vehicle height in
“N” mode and turn the system to
the manual mode.)
●When the vehicle gets stuck
(Turn the system to the manual
mode.)
●When disconnecting a trailer
(Put the vehicle height in “N”
mode and turn the system to the
manual mode.)
■Selecting the correct height
mode
Observe the following precautions
to prevent accidents or injury.
Failure to do so may cause dam-
age to parts of the vehicle, as well
as dangerous handling character-
istics, which may lead to fatal or
injury accidents.
●Before you lower the vehicle’s
height, check under the vehicle
to make sure that no one is
there.
●“HI” mode should only be used
when driving on rough roads, for
example when driving off-road.
Because the vehicle’s center of
gravity will become higher when
in the mode, the vehicle may
become unstable when turning
abruptly, resulting in an acci-
dent.
●Do not select “HI” mode when
you load cargo on the roof lug-
gage carrier.
Because the vehicle’s center of
gravity will become higher when
in the mode, the vehicle may
become unstable when turning
abruptly, resulting in an acci-
dent.
NOTICE
■Be careful in any place where
overhead space is limited.
When changing to a higher mode
or after unloading, the vehicle
height will rise. This may cause
damage to the vehicle.
■Do not select “LO” mode
when driving on bumpy
roads.
If the underbody of the vehicle
touches a rugged road surface,
the vehicle ma y be damaged.
Page 358 of 618
3584-5. Using the driving support systems
Owners Manual_USA_M0C031_enturn on.
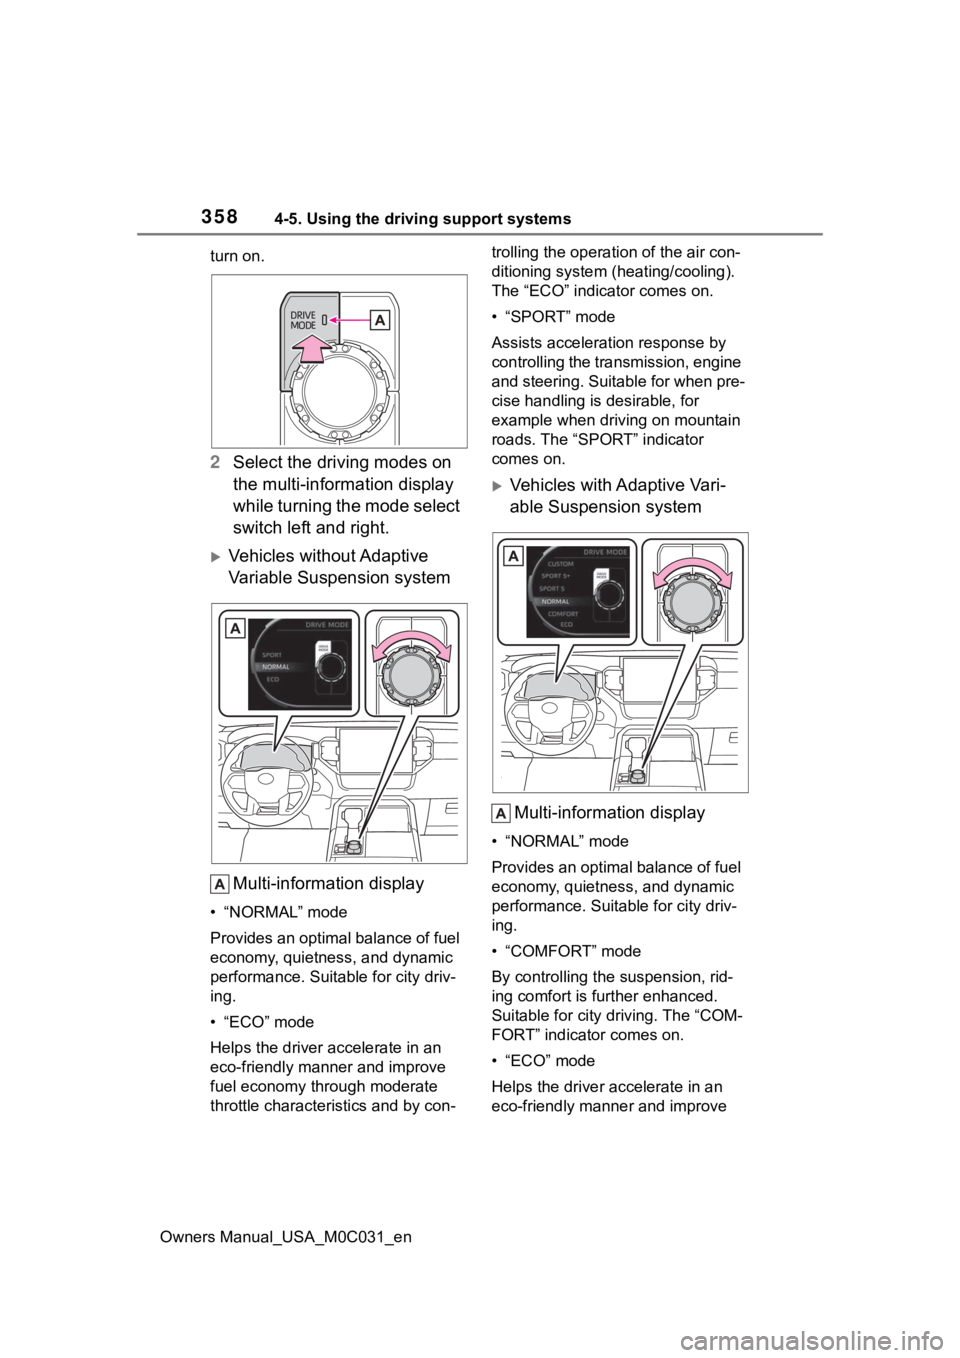
2
Select the driving modes on
the multi-information display
while turning the mode select
switch left and right.
Vehicles without Adaptive
Variable Suspension system
Multi-information display
• “NORMAL” mode
Provides an optimal balance of fuel
economy, quietness, and dynamic
performance. Suitable for city driv-
ing.
•“ECO” mode
Helps the driver a ccelerate in an
eco-friendly manner and improve
fuel economy through moderate
throttle characteri stics and by con- trolling the operation of the air con-
ditioning system (heating/cooling).
The “ECO” indicator comes on.
• “SPORT” mode
Assists acceleration response by
controlling the transmission, engine
and steering. Suitable for when pre-
cise handling is desirable, for
example when driving on mountain
roads. The “SPORT” indicator
comes on.
Vehicles with Adaptive Vari-
able Suspension system
Multi-information display
• “NORMAL” mode
Provides an optimal balance of fuel
economy, quietness, and dynamic
performance. Suitable for city driv-
ing.
• “COMFORT” mode
By controlling the suspension, rid-
ing comfort is further enhanced.
Suitable for city driving. The “COM-
FORT” indicator comes on.
• “ECO” mode
Helps the driver accelerate in an
eco-friendly manner and improve
Page 359 of 618

3594-5. Using the driving support systems
Owners Manual_USA_M0C031_en
4
Driving
fuel economy through moderate
throttle characteri stics and by con-
trolling the operation of the air con-
ditioning system (heating/cooling).
The “ECO” indicator comes on.
• “SPORT S” mode
Assists accelerati on response by
controlling the transmission, engine
and steering. Suitable for when pre-
cise handling is desirable, for
example when driving on mountain
roads. The “SPORT S” indicator
comes on.
• “SPORT S+” mode
Helps to ensure th e controllability
and stability of the vehicle by inte-
grally controlling the steering wheel
and suspensions as well as the
transmission and engine, making it
suitable for sporty driving. The
“SPORT S+” indicator comes on.
• “CUSTOM” mode
Allows you to drive with the power
train, chassis and air conditioning
system functions set to your pre-
ferred settings. Custom mode set-
tings can only be changed on the
drive mode customization display of
multimedia system. The “CUSTOM”
indicator comes on.
■The driving mode select switch
can be operated when
The front-wheel dri ve control switch
is in “2H” and “4H”.
■Operation of the air condition-
ing system in Eco mode
Eco mode controls the heating/cool-
ing operations and fan speed of the
air conditioning system to enhance
fuel efficiency. To improve air condi-
tioning performance, perform the
following operations:
●Adjust the fan speed ( P.400)
●Turn off Eco drive mode ( P.358)
■Automatic deactivation of driv-
ing modes:
Driving mode is deactivated or the
driving mode will be changed to nor-
mal mode in the following condi-
tions:
●After turning the power switch off
and then turning it to on
●When the front-wheel drive control
switch is in “4L” (4WD models
only)
●When the Multi-terrain Select is
turned on (if equipped)
●When the Downhill assist control
system is turned on (if equipped)
●When the “TOW HAUL” mode or
“TOW+” mode is turned on (if
equipped)
■Customization
The Custom mode can be changed.
(Customizable features: P.570)
Page 360 of 618
3604-5. Using the driving support systems
Owners Manual_USA_M0C031_en
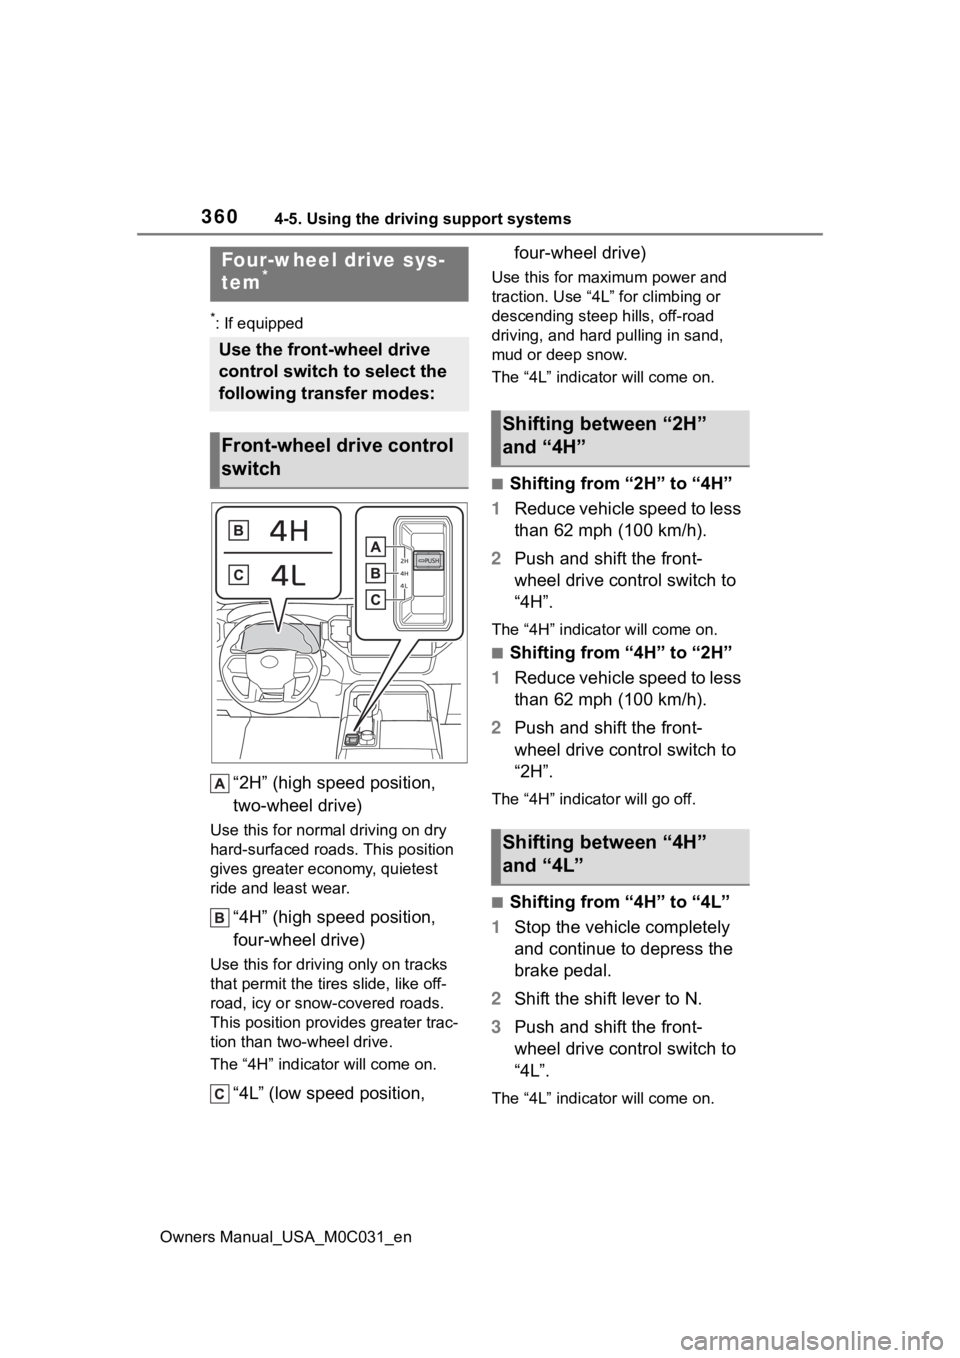
*: If equipped
“2H” (high speed position,
two-wheel drive)
Use this for normal driving on dry
hard-surfaced roads. This position
gives greater economy, quietest
ride and least wear.
“4H” (high speed position,
four-wheel drive)
Use this for drivi ng only on tracks
that permit the tires slide, like off-
road, icy or snow-covered roads.
This position prov ides greater trac-
tion than two-wheel drive.
The “4H” indicat or will come on.
“4L” (low speed position, four-wheel drive)
Use this for maximum power and
traction. Use “4L” for climbing or
descending steep hills, off-road
driving, and hard
pulling in sand,
mud or deep snow.
The “4L” indicat or will come on.
■Shifting from “2H” to “4H”
1 Reduce vehicle speed to less
than 62 mph (100 km/h).
2 Push and shift the front-
wheel drive control switch to
“4H”.
The “4H” indicat or will come on.
■Shifting from “4H” to “2H”
1 Reduce vehicle speed to less
than 62 mph (100 km/h).
2 Push and shift the front-
wheel drive control switch to
“2H”.
The “4H” indicator will go off.
■Shifting from “4H” to “4L”
1 Stop the vehicle completely
and continue to depress the
brake pedal.
2 Shift the shift lever to N.
3 Push and shift the front-
wheel drive control switch to
“4L”.
The “4L” indicat or will come on.
Four-wheel drive sys-
tem*
Use the front-wheel drive
control switch to select the
following transfer modes:
Front-wheel drive control
switch
Shifting between “2H”
and “4H”
Shifting between “4H”
and “4L”
Page 372 of 618
3724-5. Using the driving support systems
Owners Manual_USA_M0C031_en
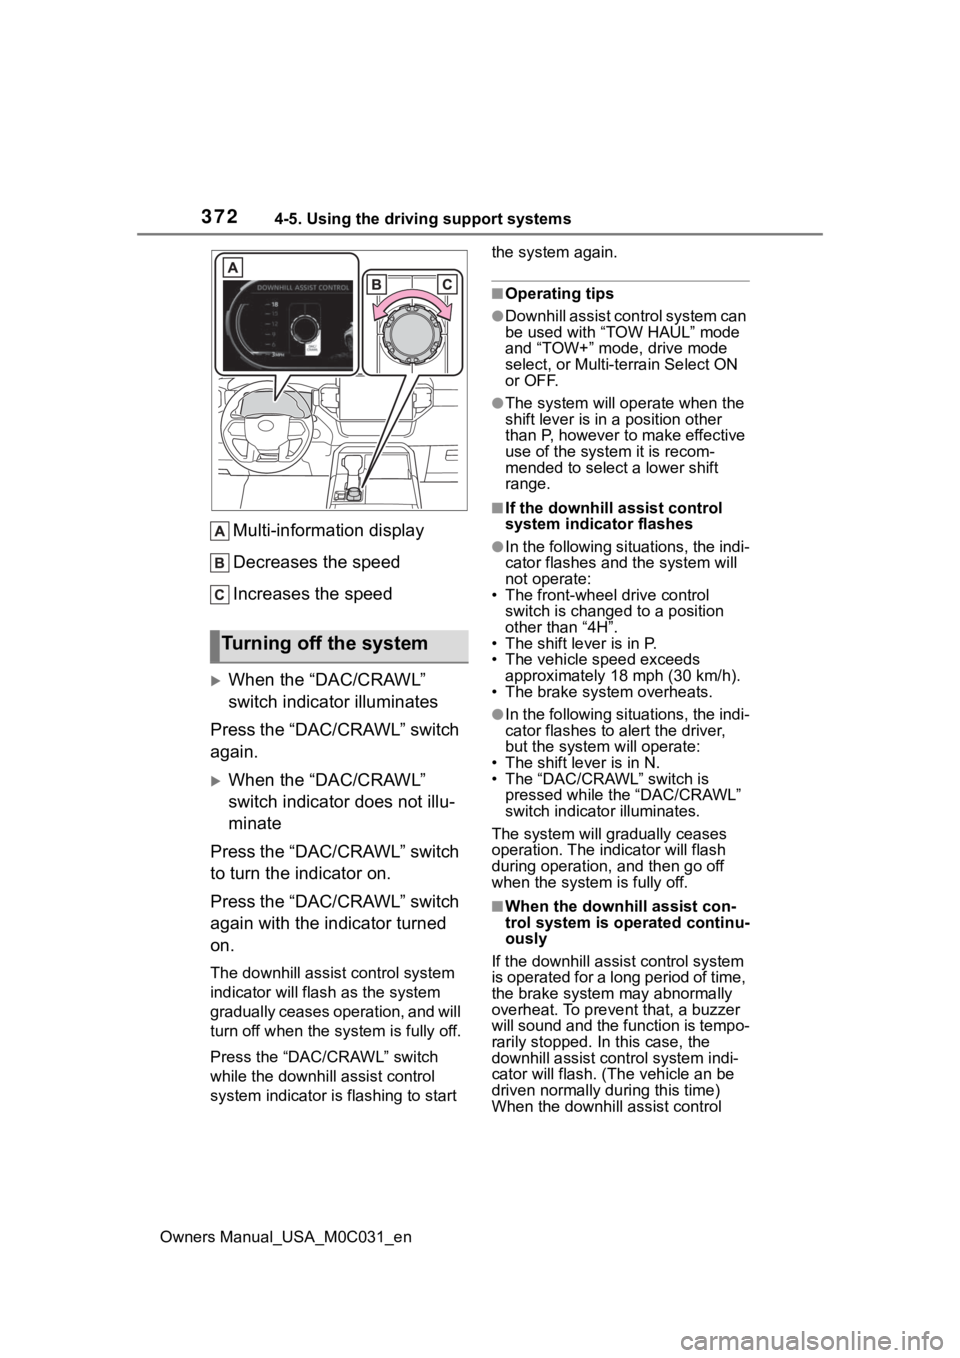
Multi-information display
Decreases the speed
Increases the speed
When the “DAC/CRAWL”
switch indicator illuminates
Press the “DAC/CRAWL” switch
again.
When the “DAC/CRAWL”
switch indicator does not illu-
minate
Press the “DAC/CRAWL” switch
to turn the indicator on.
Press the “DAC/CRAWL” switch
again with the indicator turned
on.
The downhill assist control system
indicator will flash as the system
gradually ceases operation, and will
turn off when the system is fully off.
Press the “DAC/CRAWL” switch
while the downhill assist control
system indicator is flashing to start the system again.
■Operating tips
●Downhill assist con
trol system can
be used with “TOW HAUL” mode
and “TOW+” mode, drive mode
select, or Multi-terrain Select ON
or OFF.
●The system will op erate when the
shift lever is in a position other
than P, however to make effective
use of the system it is recom-
mended to select a lower shift
range.
■If the downhill a ssist control
system indicator flashes
●In the following situ ations, the indi-
cator flashes and the system will
not operate:
• The front-wheel drive control switch is changed to a position
other than “4H”.
• The shift lever is in P.
• The vehicle speed exceeds approximately 18 mph (30 km/h).
• The brake system overheats.
●In the following situ ations, the indi-
cator flashes to alert the driver,
but the system will operate:
• The shift lever is in N.
• The “DAC/CRAWL” switch is pressed while the “DAC/CRAWL”
switch indicator illuminates.
The system will gradually ceases
operation. The indicator will flash
during operation, and then go off
when the system is fully off.
■When the downhill assist con-
trol system is operated continu-
ously
If the downhill assist control system
is operated for a long period of time,
the brake system may abnormally
overheat. To preve nt that, a buzzer
will sound and the function is tempo-
rarily stopped. In this case, the
downhill assist control system indi-
cator will flash. (Th e vehicle an be
driven normally during this time)
When the downhill assist control
Turning off the system