fog light TOYOTA TUNDRA HYBRID 2023 User Guide
[x] Cancel search | Manufacturer: TOYOTA, Model Year: 2023, Model line: TUNDRA HYBRID, Model: TOYOTA TUNDRA HYBRID 2023Pages: 618, PDF Size: 13.67 MB
Page 216 of 618
2164-3. Operating the lights and wipers
Owners Manual_USA_M0C052_ensandstorms, etc.)
• The windshield is obscured by fog, mist, ice, dirt, etc.
• The windshield is cracked or dam- aged
• The front camera is deformed or
dirty
• When the temperature of the front camera is extremely high
• Surrounding brightness levels are equal to those of h eadlights, tail
lights or fog lights
• When headlights or tail lights of vehicles ahead are turned off,
dirty, changing color, or not aimed
properly
• When the vehicle is hit by water, snow, dust, etc. from a preceding
vehicle
• When driving thr ough an area of
intermittently changing brightness
and darkness
• When frequently and repeatedly driving ascending/descending
roads, or roads with rough, bumpy
or uneven surfaces (such as
stone-paved roads, gravel roads,
etc.)
• When frequently and repeatedly taking curves or driving on a wind-
ing road
• There is a highly reflective object
ahead of the vehicle, such as a
sign or mirror
• The back of a vehicle ahead is highly reflective, such as a con-
tainer on a truck
• The vehicle’s headlights are dam- aged or dirty, or are not aimed
properly
• The vehicle is listing or titling due to a flat tire, a trailer being towed,
etc.
• The high beam and low beam are repeatedly being switched
between in an abnormal manner
• The driver believes that the high beam may be causing problems
or distress to other drivers or
pedestrians nearby
■Temporarily lowering sensor
sensitivity
The sensitivity of the sensor can be temporarily lowered.
1
Turn the power s witch off while
the following conditions are met.
●The headlight switch is in or
.
●The headlight switch lever is in
low beam position.
●Automatic High Beam switch is
on.
2 Turn the power switch to ON.
3 Within 60 seconds after step 2,
repeat pushing the headlight
switch lever to the high beam
position then pulling it to the orig-
inal position quickly 10 times,
then leave the lever in the origi-
nal position.
4 If the sensitivity is changed, the
AHB indicator is turn on and off 3
times.
Automatic High Beam (headlights)
may turn on even when the vehicle
is stopped.
■Switching to the high
beams
Push the lever away from you.
The AHB indicator will turn off and
the high beam indi cator will turn on.
Pull the lever to its original position
to activate the Automatic High
Beam system.
Turning the high beams
on/off manually
Page 227 of 618
2274-5. Using the driving support systems
Owners Manual_USA_M0C052_en
4
Driving
■Certification
P.612
WARNING
●Do not attach objects, such as
stickers, transparent stickers,
etc., to the oute r side of the
windshield in fr ont of the front
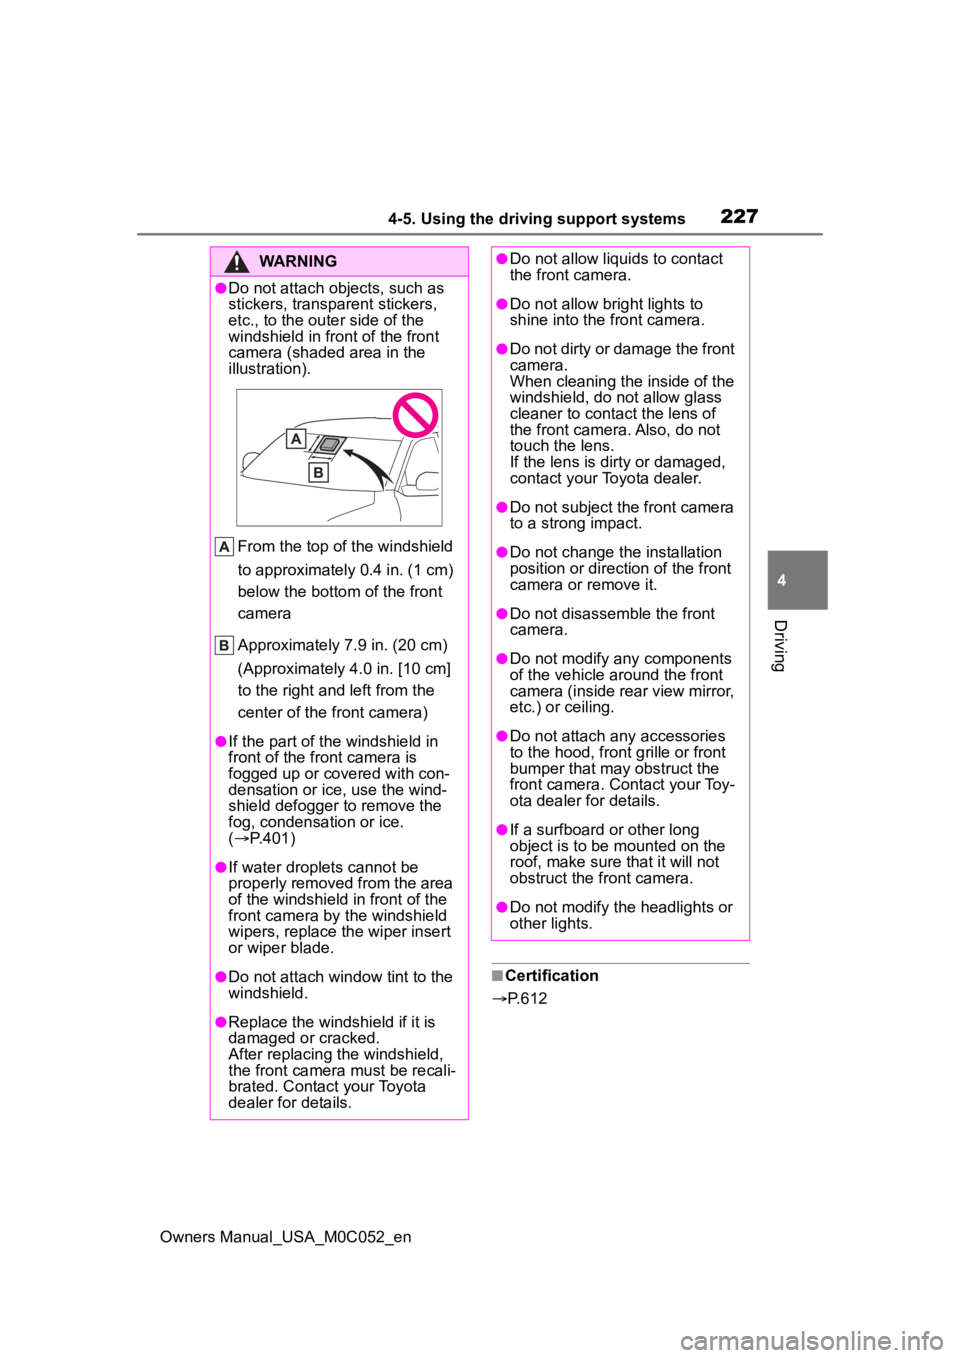
camera (shaded area in the
illustration).
From the top of the windshield
to approximately 0.4 in. (1 cm)
below the bottom of the front
camera
Approximately 7.9 in. (20 cm)
(Approximately 4.0 in. [10 cm]
to the right and left from the
center of the front camera)
●If the part of the windshield in
front of the front camera is
fogged up or covered with con-
densation or ice, use the wind-
shield defogger to remove the
fog, condensation or ice.
( P.401)
●If water droplets cannot be
properly removed from the area
of the windshield in front of the
front camera by the windshield
wipers, replace the wiper insert
or wiper blade.
●Do not attach win dow tint to the
windshield.
●Replace the windshield if it is
damaged or cracked.
After replacing the windshield,
the front camera must be recali-
brated. Contact your Toyota
dealer for details.
●Do not allow liquids to contact
the front camera.
●Do not allow bright lights to
shine into the front camera.
●Do not dirty or damage the front
camera.
When cleaning the inside of the
windshield, do not allow glass
cleaner to contact the lens of
the front camera. Also, do not
touch the lens.
If the lens is dirty or damaged,
contact your Toyota dealer.
●Do not subject the front camera
to a strong impact.
●Do not change the installation
position or direction of the front
camera or remove it.
●Do not disassemble the front
camera.
●Do not modify any components
of the vehicle around the front
camera (inside rear view mirror,
etc.) or ceiling.
●Do not attach any accessories
to the hood, front grille or front
bumper that may obstruct the
front camera. Contact your Toy-
ota dealer for details.
●If a surfboard or other long
object is to be mounted on the
roof, make sure that it will not
obstruct the front camera.
●Do not modify the headlights or
other lights.
Page 228 of 618
2284-5. Using the driving support systems
Owners Manual_USA_M0C052_en
■If a warning message is displayed on the multi-information display
A system may be tempor arily unavailable or there may be a malfu nction in
the system.
●In the following situations, perform the actions specified in t he table. When
the normal operating conditions are detected, the message will disappear
and the system will be come operational.
If the message does not disapp ear, contact your Toyota dealer.
●In the following situations, if the situation has changed (or the vehicle has
been driven for some time) and the normal operating conditions are
detected, the message will disappear and the system will become opera-
tional.
If the message does not disappea r, contact your Toyota dealer.
SituationActions
When the area around a camera is
covered with dirt, moisture (fogged
up, covered with condensation, ice,
etc.), or other foreign matterUsing the wiper and A/C function,
remove the dirt and other attached
matter. ( P.401)
When the temperature around the
front camera is outside of the opera-
tional range, such as when the vehi-
cle is in the sun or in an extremely
cold environment
If the front camera is hot, such as
after the vehicle had been parked in
the sun, use the air conditioning sys-
tem to decrease the temperature
around the front camera.
If a sunshade was used when the
vehicle was parked, depending on its
type, the sunlight reflected from the
surface of the sunshade may cause
the temperature of the front camera
to become excessively high.
If the front camera is cold, such after
the vehicle is parked in an extremely
cold environment, use the air condi-
tioning system to increase the tem-
perature around the front camera.
The area in front o f the front camera
is obstructed, such as when the
hood is open or a sticker is attached
to the part of the win dshield in front
of the front camera.
Close the hood, rem ove the sticker,
etc., to clear the obstruction.
When “Pre-Collisio n System Radar
In Self Calibration Unavailable See
Owner’s Manual” is displayed.Check whether there is attached
materials on the radar sensor and
radar sensor cover, and if there is,
remove it.
Page 229 of 618

2294-5. Using the driving support systems
Owners Manual_USA_M0C052_en
4
Driving
• When the temperature around the radar sensor is outside of the opera-
tional range, such as when the vehicle is in the sun or in an e xtremely cold
environment
• When the front camera cannot d etect objects in front of the vehicle, such
as when driving in the dark, sno w, or fog, or when bright lights are shining
into the front camera
• Depending on the conditions in the vicinity of the vehicle, th e radar may
judge the surrounding environment can not be properly recognize d. In that
case, “Pre-Collision System Unavailable See Owner’s Manual” is dis-
played.
Page 243 of 618
2434-5. Using the driving support systems
Owners Manual_USA_M0C052_en
4
Driving
WARNING
●This vehicle has Automatic
Trailer Detection feature that
can detect certain trailers under
certain conditions. After trailer is
detected, lane centering func-
tion will be disabled. In certain
conditions, there is a possibility
of falsely detecting trailer when
there is no actual trailer. In that
case, lane centering function
will be disabled. To activate lane
centering function, turn power
switch to off and then turn it on
again.
●Following scenes has possibility
of false detection of trailer:
Crowded environments such as
parking lots or camping
grounds, closely following vehi-
cles such traffic jam, drive
through, parallel parking, etc.
●Do not use the lane centering
system and steering assist func-
tion when the vehicle is lifted
unless using a Toyota official lift
up kit up to 4 in. (101 mm),
including tire height. Aftermar-
ket lift kits may degrade system
performance.
■Situations unsuitable for LTA
system
In the following situations, use the
LTA switch to turn the system off.
Failure to do so may lead to an
accident, resulting in death or
serious injury.
●Vehicle is driven on a road sur-
face which is slippery due to
rainy weather, fallen snow,
freezing, etc.
●Vehicle is driven on a snow-cov-
ered road.
●White (yellow) lines are difficult
to see due to rain, snow, fog,
dust, etc.
●Vehicle is driven in a temporary
lane or restricted lane due to
construction work.
●Vehicle is driven in a construc-
tion zone.
●A spare tire, tire chains, etc.,
are equipped.
●When the tires have been
excessively worn, or when the
tire inflation p ressure is low.
●When your vehicles is towing a
trailer or another vehicle, except
when the followin g condition is
met.
• When the other vehicle is a trailer properly attached and
connected to Toyota’s official
TBC ECU. ( P.181)
●When the vehicle is lifted up,
except in the following cases.
• When using a Toyota official lift kit up to 4 in. (101 mm), includ-
ing tire height. Aftermarket lift
kits may degrade system perfor-
mance.
■Preventing LTA system mal-
functions and operations per-
formed by mistake
●Do not modify the headlights or
place stickers, etc., on the sur-
face of the lights.
●Do not modify the suspension,
etc. If the suspension, etc.,
needs to be replaced, contact
your Toyota dealer.
●Do not install or place anything
on the hood or grille. Also, do
not install a gr ille guard (bull
bars, kangaroo bar, etc.).
●If your windshield needs
repairs, contact your Toyota
dealer.
Page 255 of 618

2554-5. Using the driving support systems
Owners Manual_USA_M0C052_en
4
Driving
the windshield near the front cam-
era.
●In inclement weather such as
heavy rain, fog, snow or sand
storms
●Light from an oncoming vehicle,
the sun, etc., enters the front cam-
era.
●The sign is dirty, faded, tilted or
bent.
●The contrast of electronic sign is
low.
●All or part of the sign is hidden by
the leaves of a tree, a pole, etc.
●The sign is only visible to the front
camera for a short amount of time.
●The driving scene (turning, lane
change, etc.) is judged incorrectly.
●If a sign not appropriate for the
currently traveled lane, but the
sign exists directly after a freeway
branches, or in an adjacent lane
just before merging.
●Stickers are attached to the rear of
the preceding vehicle.
●A sign resembling a system com-
patible sign is recognized.
●Side road speed signs may be
detected and displayed (if posi-
tioned in sight of the front camera)
while the vehicle is traveling on
the main road.
●Roundabout exit road speed signs
may be detected and displayed (if
positioned in sight of the front
camera) while traveling on a
roundabout.
●The front of the vehicle is raised or
lowered due to the carried load.
●The surrounding brightness is not
sufficient or changes suddenly.
●When a sign intended for trucks,
etc., is recognized.
●The navigation system map data
is outdated.
●The navigation system is not oper-
ating.
●The speed information displayed
on the meter and on the naviga-
tion system may be different due
to the navigation system using
map data.
■Speed limit sign display
If the power switch was last turned
off while a speed limit sign was dis-
played on the multi-information dis-
play, the same sig n displays again
when the power switch is turned to
ON.
■If “RSA Malfunction Visit Your
Dealer” is shown
The system may be malfunctioning.
Have the vehicle inspected by your
Toyota dealer.
■Customization
Some functions can be customized.
(Customizable features: P.568)
Page 276 of 618
2764-5. Using the driving support systems
Owners Manual_USA_M0C052_en
■The system can be operated
when
●The power switch is in ON.
●Intuitive parking assist function is
on.
●The vehicle speed is less than
about 6 mph (10 km/h).
●A shift position other than P is
selected.
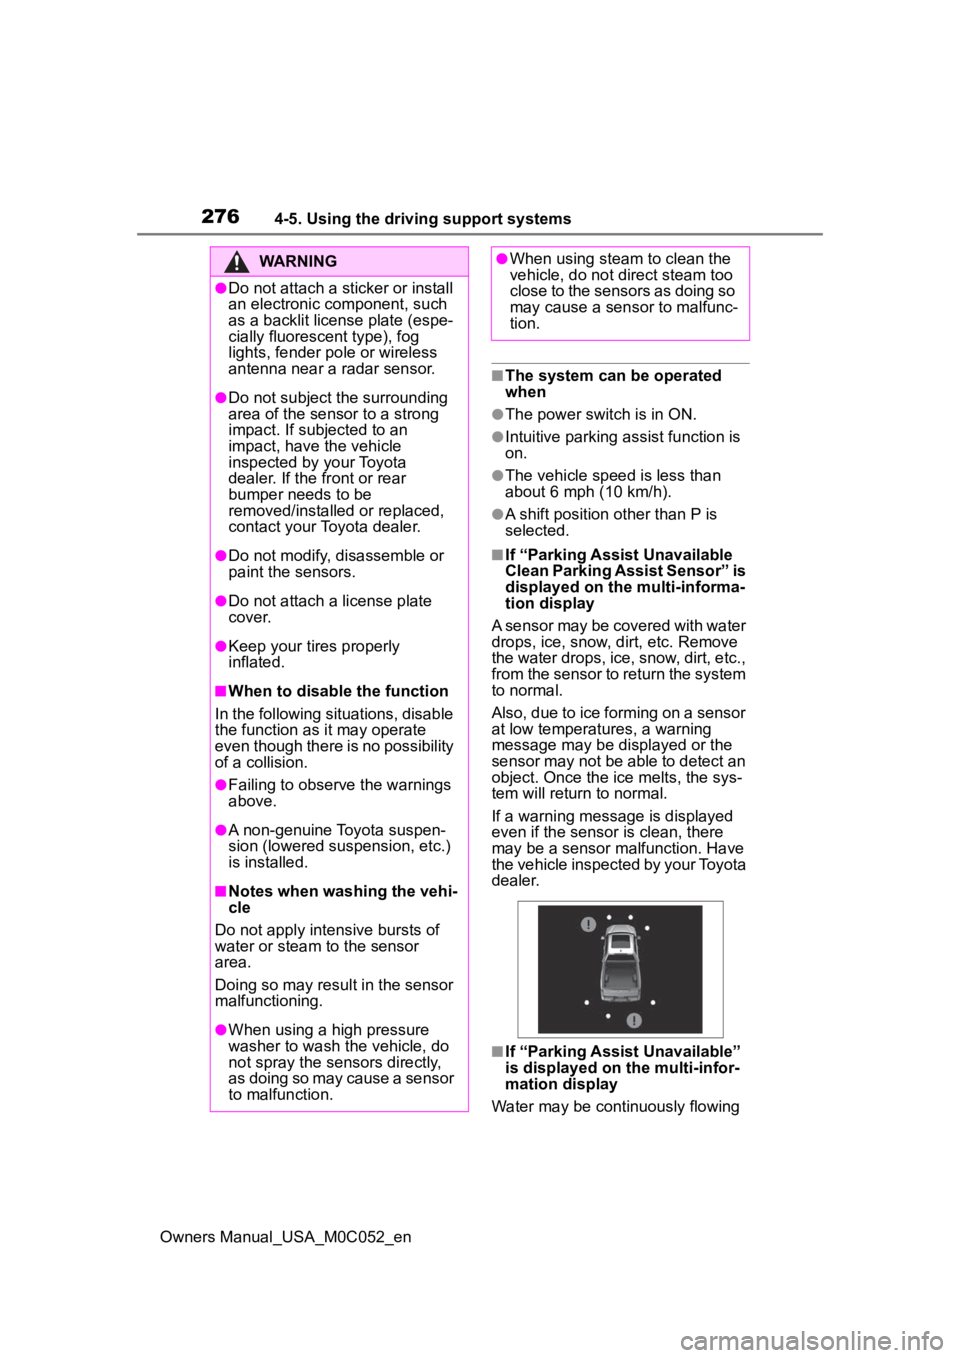
■If “Parking Assist Unavailable
Clean Parking Assist Sensor” is
displayed on the multi-informa-
tion display
A sensor may be covered with water
drops, ice, snow, dirt, etc. Remove
the water drops, ice, snow, dirt, etc.,
from the sensor to return the system
to normal.
Also, due to ice forming on a sensor
at low temperatures, a warning
message may be displayed or the
sensor may not be able to detect an
object. Once the ice melts, the sys-
tem will return to normal.
If a warning message is displayed
even if the sensor i s clean, there
may be a sensor malfunction. Have
the vehicle inspected by your Toyota
dealer.
■If “Parking Assist Unavailable”
is displayed on the multi-infor-
mation display
Water may be continuously flowing
WARNING
●Do not attach a sticker or install
an electronic component, such
as a backlit license plate (espe-
cially fluorescent type), fog
lights, fender pole or wireless
antenna near a radar sensor.
●Do not subject the surrounding
area of the sensor to a strong
impact. If subjected to an
impact, have the vehicle
inspected by your Toyota
dealer. If the fr ont or rear
bumper needs to be
removed/installed or replaced,
contact your Toyota dealer.
●Do not modify, disassemble or
paint the sensors.
●Do not attach a license plate
cover.
●Keep your tires properly
inflated.
■When to disable the function
In the following situations, disable
the function as it may operate
even though there is no possibility
of a collision.
●Failing to observe the warnings
above.
●A non-genuine Toyota suspen-
sion (lowered suspension, etc.)
is installed.
■Notes when washing the vehi-
cle
Do not apply intensive bursts of
water or steam to the sensor
area.
Doing so may result in the sensor
malfunctioning.
●When using a high pressure
washer to wash the vehicle, do
not spray the sensors directly,
as doing so may cause a sensor
to malfunction.
●When using steam to clean the
vehicle, do not direct steam too
close to the sensors as doing so
may cause a sensor to malfunc-
tion.
Page 293 of 618
2934-5. Using the driving support systems
Owners Manual_USA_M0C052_en
4
Driving
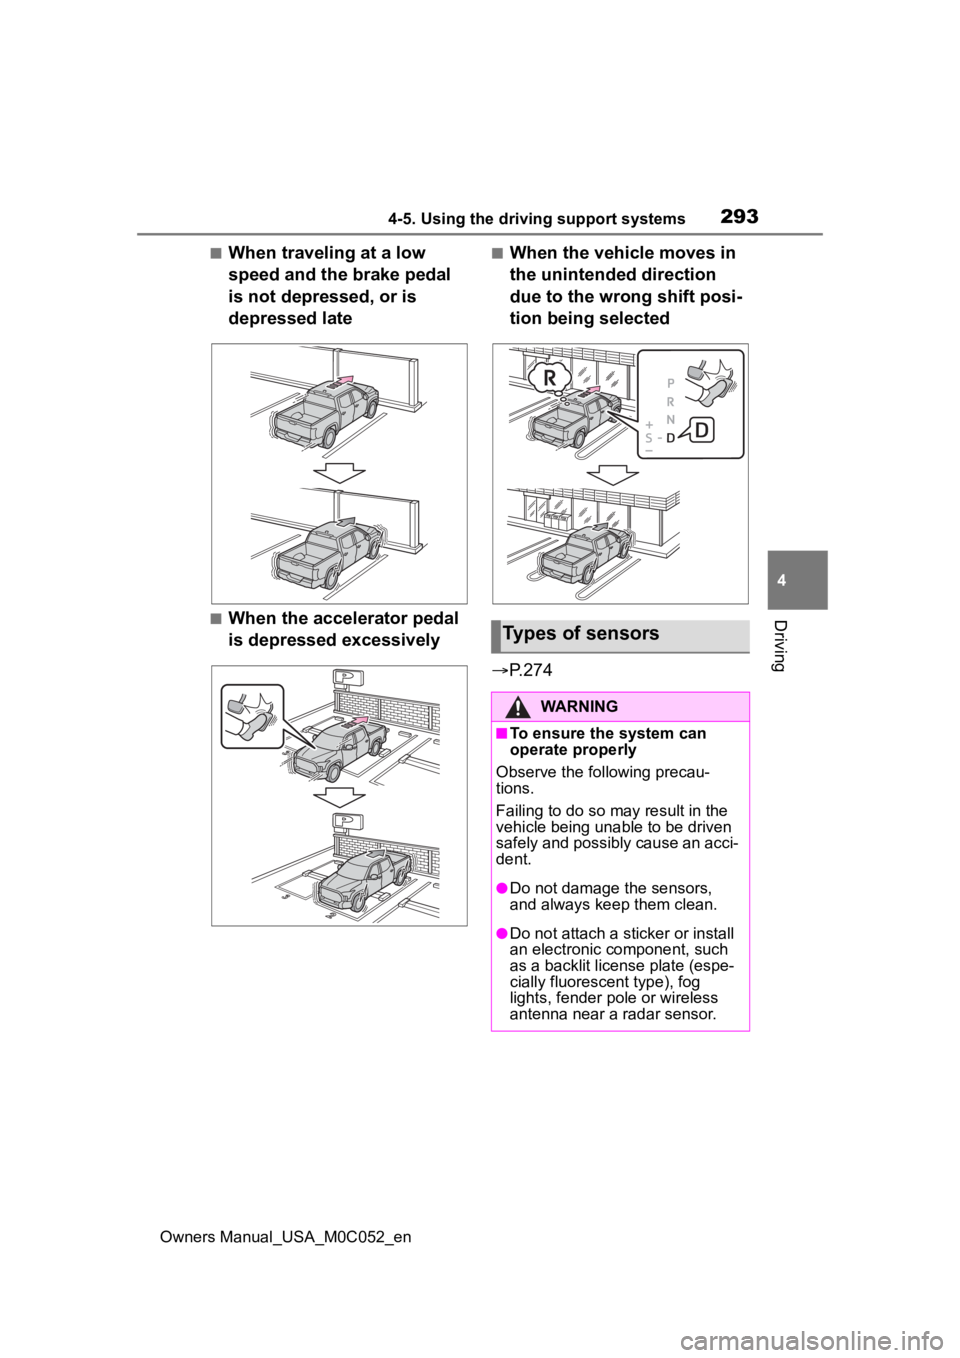
■When traveling at a low
speed and the brake pedal
is not depressed, or is
depressed late
■When the accelerator pedal
is depressed excessively
■When the vehicle moves in
the unintended direction
due to the wrong shift posi-
tion being selected
P.274
Types of sensors
WARNING
■To ensure the system can
operate properly
Observe the following precau-
tions.
Failing to do so may result in the
vehicle being unable to be driven
safely and possibly cause an acci-
dent.
●Do not damage the sensors,
and always keep them clean.
●Do not attach a sticker or install
an electronic component, such
as a backlit licen se plate (espe-
cially fluorescent type), fog
lights, fender po le or wireless
antenna near a radar sensor.
Page 397 of 618
399
Owners Manual_USA_M0C052_en
5
5
Interior features
Interior features
5-1. Using the air conditioning system and defogger
Automatic air conditioning system ....................... 400
Heated steering wheel/seat heaters/seat ventilators
.................................. 407
5-2. Using the interior lights Interior lights list .......... 410
5-3. Using the storage features List of storage features 413
Luggage compartment fea- tures .......................... 417
5-4. Using the other interior features
Other interior features . 420
Garage door opener.... 433
Page 406 of 618
4085-1. Using the air conditioning system and defogger
Owners Manual_USA_M0C052_en
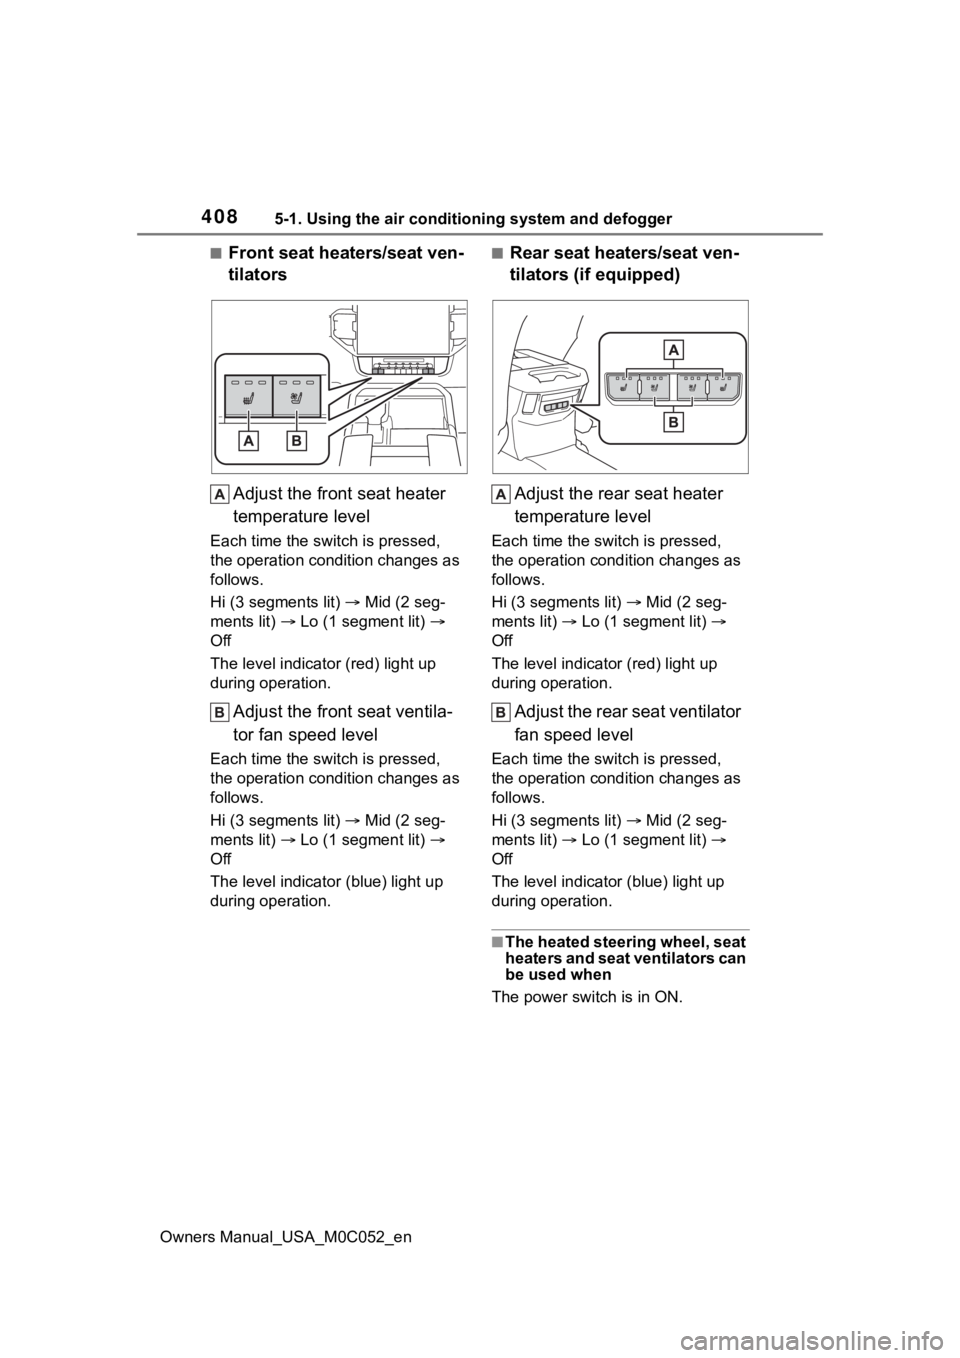
■Front seat heaters/seat ven-
tilatorsAdjust the front seat heater
temperature level
Each time the switch is pressed,
the operation condition changes as
follows.
Hi (3 segments lit) Mid (2 seg-
ments lit) Lo (1 segment lit)
Off
The level indicato r (red) light up
during operation.
Adjust the front seat ventila-
tor fan speed level
Each time the switch is pressed,
the operation condition changes as
follows.
Hi (3 segments lit) Mid (2 seg-
ments lit) Lo (1 segment lit)
Off
The level indicator (blue) light up
during operation.
■Rear seat heaters/seat ven-
tilators (if equipped)
Adjust the rear seat heater
temperature level
Each time the switch is pressed,
the operation condition changes as
follows.
Hi (3 segments lit) Mid (2 seg-
ments lit) Lo (1 segment lit)
Off
The level indicato r (red) light up
during operation.
Adjust the rear seat ventilator
fan speed level
Each time the switch is pressed,
the operation condition changes as
follows.
Hi (3 segments lit) Mid (2 seg-
ments lit) Lo (1 segment lit)
Off
The level indicato r (blue) light up
during operation.
■The heated steering wheel, seat
heaters and seat ventilators can
be used when
The power switch is in ON.