oil level TOYOTA TUNDRA HYBRID 2023 Owners Manual
[x] Cancel search | Manufacturer: TOYOTA, Model Year: 2023, Model line: TUNDRA HYBRID, Model: TOYOTA TUNDRA HYBRID 2023Pages: 618, PDF Size: 13.67 MB
Page 5 of 618
5TABLE OF CONTENTS
Owners Manual_USA_M0C052_en
1
2
3
4
5
6
7
8
9
If you think something is wrong .......................... 499
If a warning light turns on or a warning buzzer sounds 501
If a warning message is dis- played.......................... 511
If you have a flat tire...... 515
If the hybrid system will not start ............................. 524
If you lose your keys ..... 526
If the fuel door cannot be opened ........................ 526
If the electronic key does not operate properly .......... 527
If the vehicle 12-volt battery is discharged................... 529
If your vehicle overheats 535
If the vehicle becomes stuck .................................... 538
8-1. Specifications Maintenance data (fuel, oil level, etc.) .................... 540
Fuel information ............ 549
Tire information ............. 551
8-2. Customization Customizable features .. 561
8-3. Initialization Items to initialize ........... 571
9-1. For owners Reporting safety defects for U.S. owners................. 574Reporting safet
y defects for
Canadian owners ........ 574
Seat belt instructions for Canadian owners (in
French) ........................ 575
SRS airbag instructions for Canadian owners (in
French) ........................ 577
Camper information ....... 585
What to do if... (Troubleshoot- ing) .............................. 590
Alphabetical Index ......... 593
8Vehicle specifications
9For owners
Index
Page 94 of 618
942-1. Instrument cluster
Owners Manual_USA_M0C052_en
■Pop-up display
In some situations the following
will be temporarily displayed:
Distance until next engine oil
change
Displays the distan ce until the next
engine oil change. This display will
be displayed in the following situa-
tions:
When the power switch is
turned to ON.
When a warning message
indicating that oil mainte-
nance should be performed
soon or is required is dis-
played.
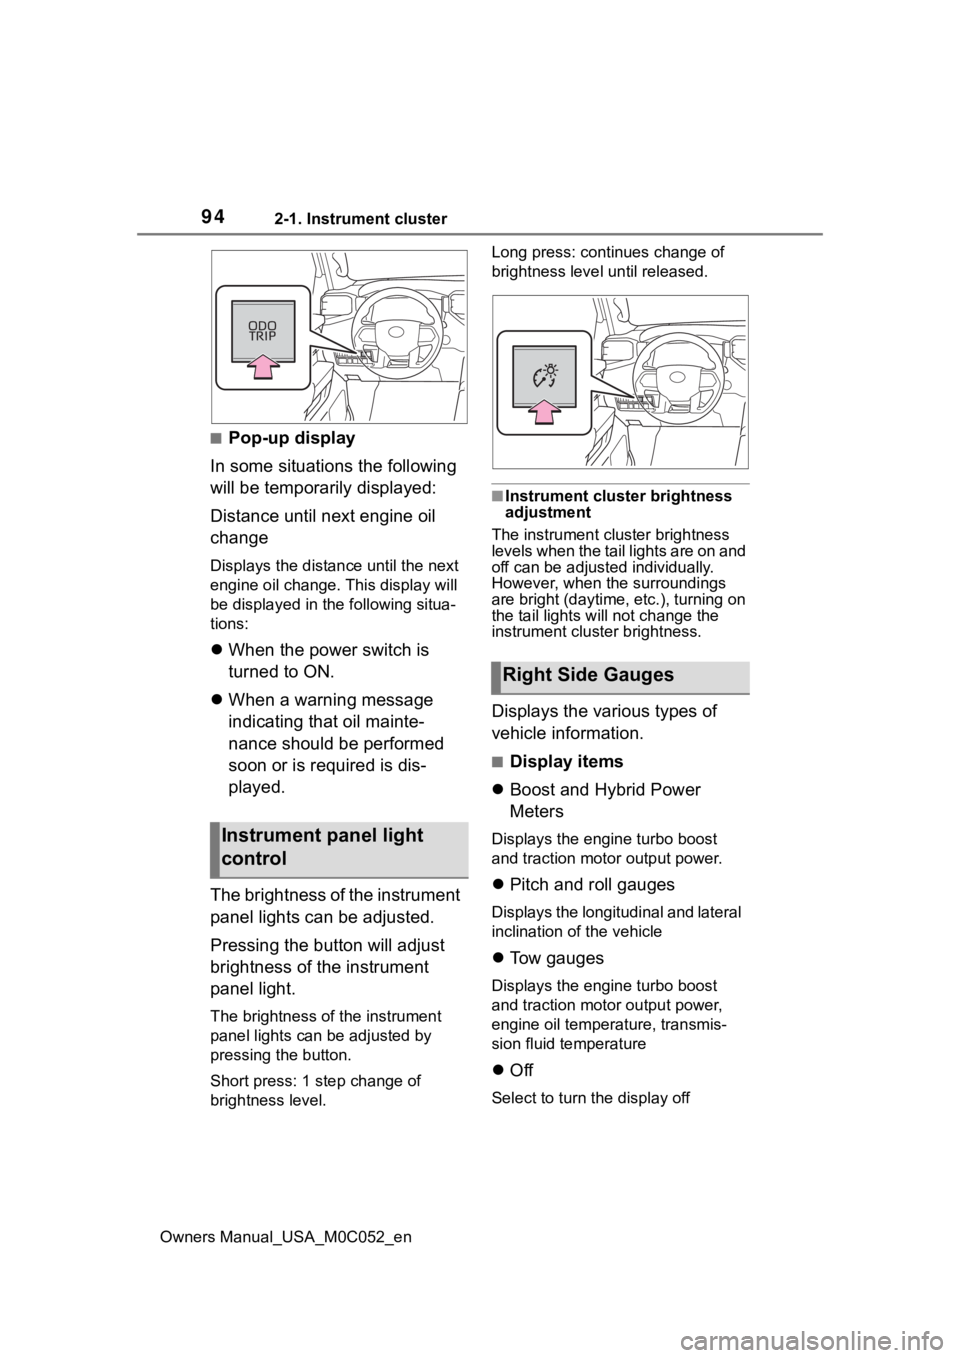
The brightness of the instrument
panel lights can be adjusted.
Pressing the button will adjust
brightness of the instrument
panel light.
The brightness of the instrument
panel lights can be adjusted by
pressing the button.
Short press: 1 s tep change of
brightness level. Long press: continues change of
brightness level until released.
■Instrument cluster brightness
adjustment
The instrument cluster brightness
levels when the tail lights are on and
off can be adjusted individually.
However, when the surroundings
are bright (daytime, etc.), turning on
the tail lights will not change the
instrument cluster brightness.
Displays the various types of
vehicle information.
■Display items
Boost and Hybrid Power
Meters
Displays the engine turbo boost
and traction motor output power.
Pitch and roll gauges
Displays the longitudinal and lateral
inclination of the vehicle
Tow gauges
Displays the engine turbo boost
and traction motor output power,
engine oil temperature, transmis-
sion fluid temperature
Off
Select to turn the display off
Instrument panel light
control
Right Side Gauges
Page 250 of 618

2504-5. Using the driving support systems
Owners Manual_USA_M0C052_enturn signal was operated)
• Vehicle is not being driven around a sharp curve.
• No system malfunctions are detected. ( P.252)
*1: The function opera tes even if the
vehicle speed is less than
approximately 32 mph (50 km/h)
when the lane centering function
is operating.
*2: May recognize the boundaries between the asphalt and the side
o f t he r oa d, su ch as gr as s, s oil, or
the curb, to be road lanes
●Steering assist function
This function oper ates when all of
the following conditions are met in
addition to the operation conditions
for the lane departure alert function.
• Vehicle is not accelerated or decelerated by a fixed amount or
more.
• Steering wheel is not operated with a steering force level suitable
for changing lanes.
• ABS, VSC, TRAC and PCS are not operating.
• TRAC or VSC is not turned off.
• Hands off steering wheel warning is not displayed. ( P.251)
●Vehicle sway warning function
This function oper ates when all of
the following cond itions are met.
• Setting for “Sway Warning” in of the multi-information display is
set to “ON”. ( P.567)
• Vehicle speed is approximately 32
mph (50 km/h) or more.
• Width of traffic lane is approxi- mately 9.8 ft. ( 3 m) or more.
• No system malfunctions are
detected. ( P.252)
●Lane centering function
This function oper ates when all of
the following cond itions are met.
• LTA is turned on. • Setting for “Lane Center” in of
the multi-informatio n display is set
to “ON”. ( P.567)
• This function recognizes white
(yellow) lane lines or the position
of a preceding v ehicle (except
when the preceding vehicle is
small, such as a motorcycle).
• The dynamic radar cruise control with full-speed ran ge is operating
in vehicle-to-vehicle distance con-
trol mode.
• Width of traffic lane is approxi- mately 10 to 13 ft. (3 to 4 m).
• Turn signal lever is not operated.
• Vehicle is not being driven around a sharp curve.
• No system malfunctions are detected. ( P.252)
• Vehicle does not accelerate or
decelerate by a fixed amount or
more.
• Steering wheel is not operated
with a steering force level suitable
for changing lanes.
• ABS, VSC, TRAC and PCS are
not operating.
• TRAC or VSC is not turned off.
• Hands off steering wheel warning is not displayed. ( P.251)
• The vehicle is being driven in the center of a lane.
• Steering assist function is not operating.
• When your vehicle is not towing a
trailer or during emergency tow-
ing.
■Temporary cancelation of func-
tions
●When operation conditions are no
longer met, a function may be
temporarily canceled. However,
when the operation conditions are
met again, operation of the func-
tion is automatically restored.
( P.249)
●If the operation conditions
( P.249) are no longer met while
the lane centering function is
operating, the steering wheel may
vibrate and the buzzer may sound
Page 394 of 618
3944-6. Driving tips
Owners Manual_USA_M0C052_en
Use fluids that are appropriate
to the prevailing outside tem-
peratures.
• Engine oil
• Engine/power control unit coolant
• Washer fluid
Have a service technician
inspect the condition of the
12-volt battery.
Have the vehicle fitted with
four snow tires or purchase a
set of tire chains for the rear
tires
*.
*: Tire chains cannot be mounted
on 285/65R18 tires.
Ensure that all tires are the same
size and brand, and that chains
match the size of the tires.
Winter driving tips
Carry out the necessary
preparations and inspec-
tions before driving the
vehicle in winter. Always
drive the vehicle in a man-
ner appropriate to the pre-
vailing weather conditions.
Preparation for winter
WARNING
■Driving with snow tires
Observe the following precautions
to reduce the risk of accidents.
Failure to do so m ay result in a
loss of vehicle control and cause
death or serious injury.
●Use tires of the specified size.
●Maintain the recommended
level of air pressure.
●Do not drive in excess of 75
mph (120 km/h), regardless of
the type of snow tires being
used.
●Use snow tires on all, not just
some wheels.
●4WD models: Do not mix tires of
different makes, models, tread
patterns or treadwear.
■Driving with tire chains (vehi-
cles without 285/65R18 tires)
Observe the following precautions
to reduce the risk of accidents.
Failure to do so may result in the
vehicle being unable to be driven
safely, and may cause death or
serious injury.
●Do not drive in excess of the
speed limit specifi ed for the tire
chains being used, or 30 mph
(50 km/h), whichever is lower.
●Avoid driving on bumpy road
surfaces or over potholes.
●Avoid sudden acceleration,
abrupt steering, sudden brak-
ing and shifting operations that
cause sudden engine braking.
●Slow down sufficiently before
entering a curve to ensure that
vehicle control is maintained.
●Do not use LTA (Lane Tracing
Assist) (if equipped) system.
Page 447 of 618
4496-2. Maintenance
Owners Manual_USA_M0C052_en
6
Maintenance and care
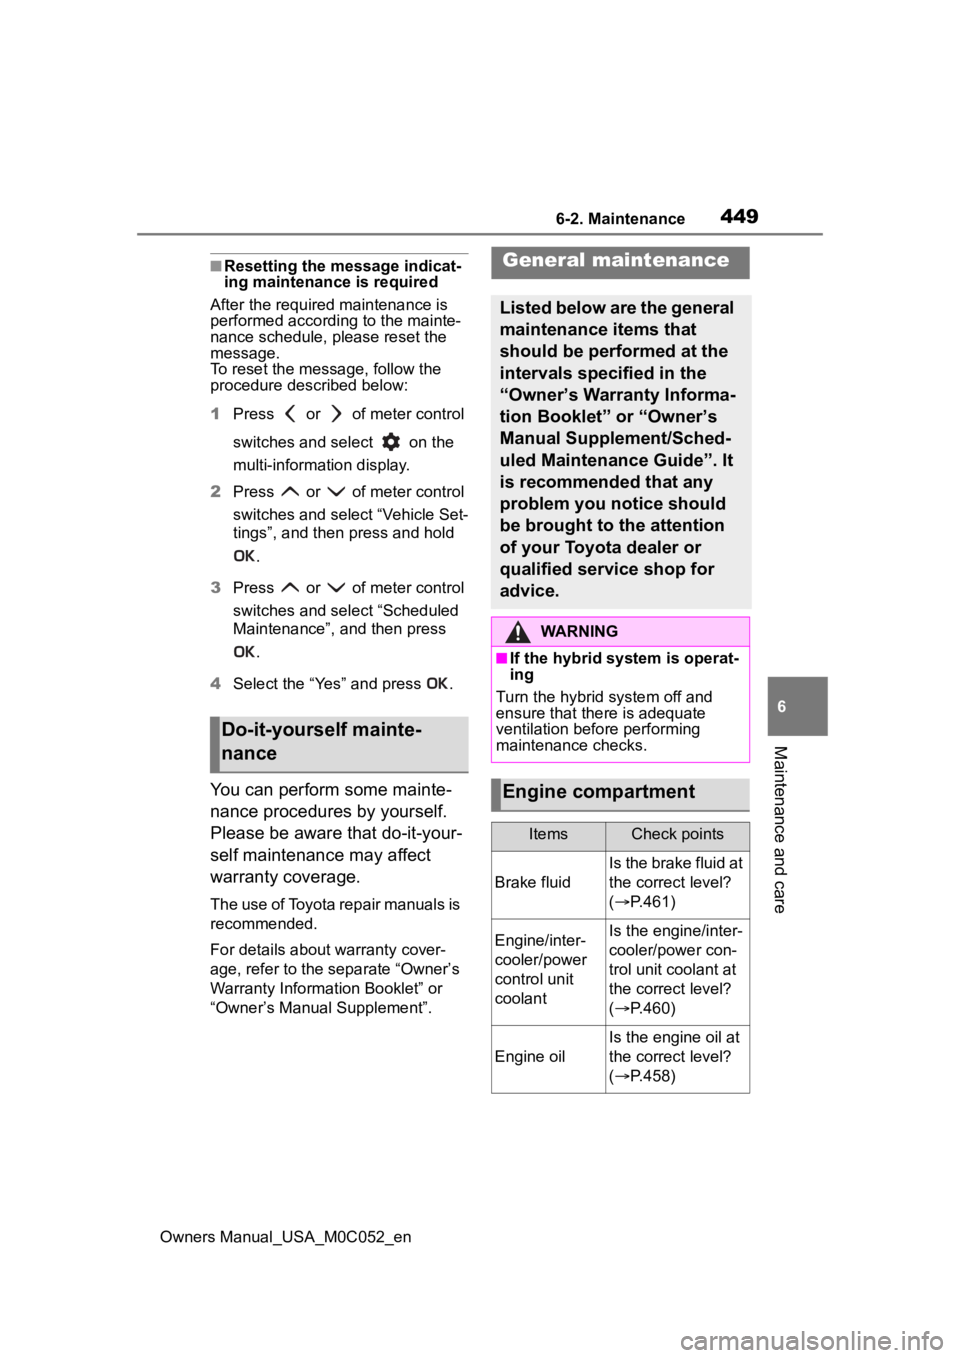
■Resetting the message indicat-
ing maintenance is required
After the required maintenance is
performed according to the mainte-
nance schedule, please reset the
message.
To reset the messa ge, follow the
procedure described below:
1 Press or of meter control
switches and select on the
multi-information display.
2 Press or of meter control
switches and select “Vehicle Set-
tings”, and then press and hold
.
3 Press or of meter control
switches and select “Scheduled
Maintenance”, and then press
.
4 Select the “Yes” and press .
You can perform some mainte-
nance procedures by yourself.
Please be aware that do-it-your-
self maintenance may affect
warranty coverage.
The use of Toyota repair manuals is
recommended.
For details about warranty cover-
age, refer to the separate “Owner’s
Warranty Information Booklet” or
“Owner’s Manual Supplement”.
Do-it-yourself mainte-
nance
General maintenance
Listed below are the general
maintenance items that
should be performed at the
intervals specified in the
“Owner’s Warranty Informa-
tion Booklet” or “Owner’s
Manual Supplement/Sched-
uled Maintenance Guide”. It
is recommended that any
problem you notice should
be brought to the attention
of your Toyota dealer or
qualified service shop for
advice.
WARNING
■If the hybrid system is operat-
ing
Turn the hybrid system off and
ensure that there is adequate
ventilation before performing
maintenance checks.
Engine compartment
ItemsCheck points
Brake fluid
Is the brake fluid at
the correct level?
( P.461)
Engine/inter-
cooler/power
control unit
coolantIs the engine/inter-
cooler/power con-
trol unit coolant at
the correct level?
( P.460)
Engine oil
Is the engine oil at
the correct level?
( P.458)
Page 452 of 618
4546-3. Do-it-yourself maintenance
Owners Manual_USA_M0C052_en
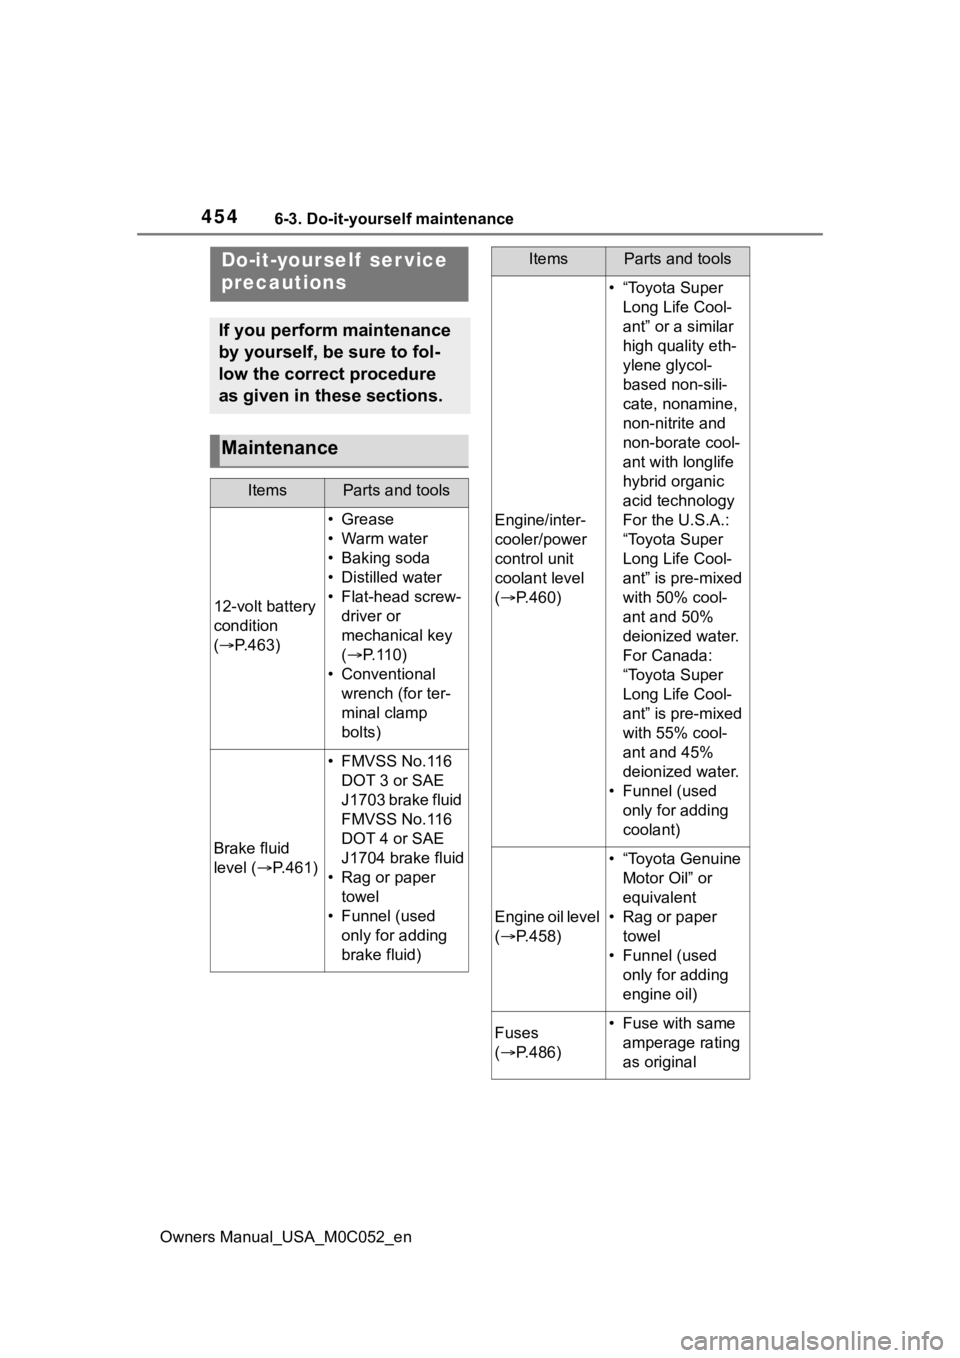
6-3.Do-it-yourself maintenance
Do-it-yourself ser vice
precautions
If you perform maintenance
by yourself, be sure to fol-
low the correct procedure
as given in these sections.
Maintenance
ItemsParts and tools
12-volt battery
condition
( P.463)
•Grease
•Warm water
• Baking soda
• Distilled water
• Flat-head screw-
driver or
mechanical key
( P. 1 1 0 )
• Conventional wrench (for ter-
minal clamp
bolts)
Brake fluid
level ( P.461)
• FMVSS No.116
DOT 3 or SAE
J1703 brake fluid
FMVSS No.116
DOT 4 or SAE
J1704 brake fluid
• Rag or paper towel
• Funnel (used only for adding
brake fluid)
Engine/inter-
cooler/power
control unit
coolant level
( P.460)
• “Toyota Super
Long Life Cool-
ant” or a similar
high quality eth-
ylene glycol-
based non-sili-
cate, nonamine,
non-nitrite and
non-borate cool-
ant with longlife
hybrid organic
acid technology
For the U.S.A.:
“Toyota Super
Long Life Cool-
ant” is pre-mixed
with 50% cool-
ant and 50%
deionized water.
For Canada:
“Toyota Super
Long Life Cool-
ant” is pre-mixed
with 55% cool-
ant and 45%
deionized water.
• Funnel (used only for adding
coolant)
Engine oil level
( P.458)
• “Toyota Genuine
Motor Oil” or
equivalent
• Rag or paper towel
• Funnel (used only for adding
engine oil)
Fuses
( P.486)• Fuse with same
amperage rating
as original
ItemsParts and tools
Page 455 of 618
4576-3. Do-it-yourself maintenance
Owners Manual_USA_M0C052_en
6
Maintenance and care
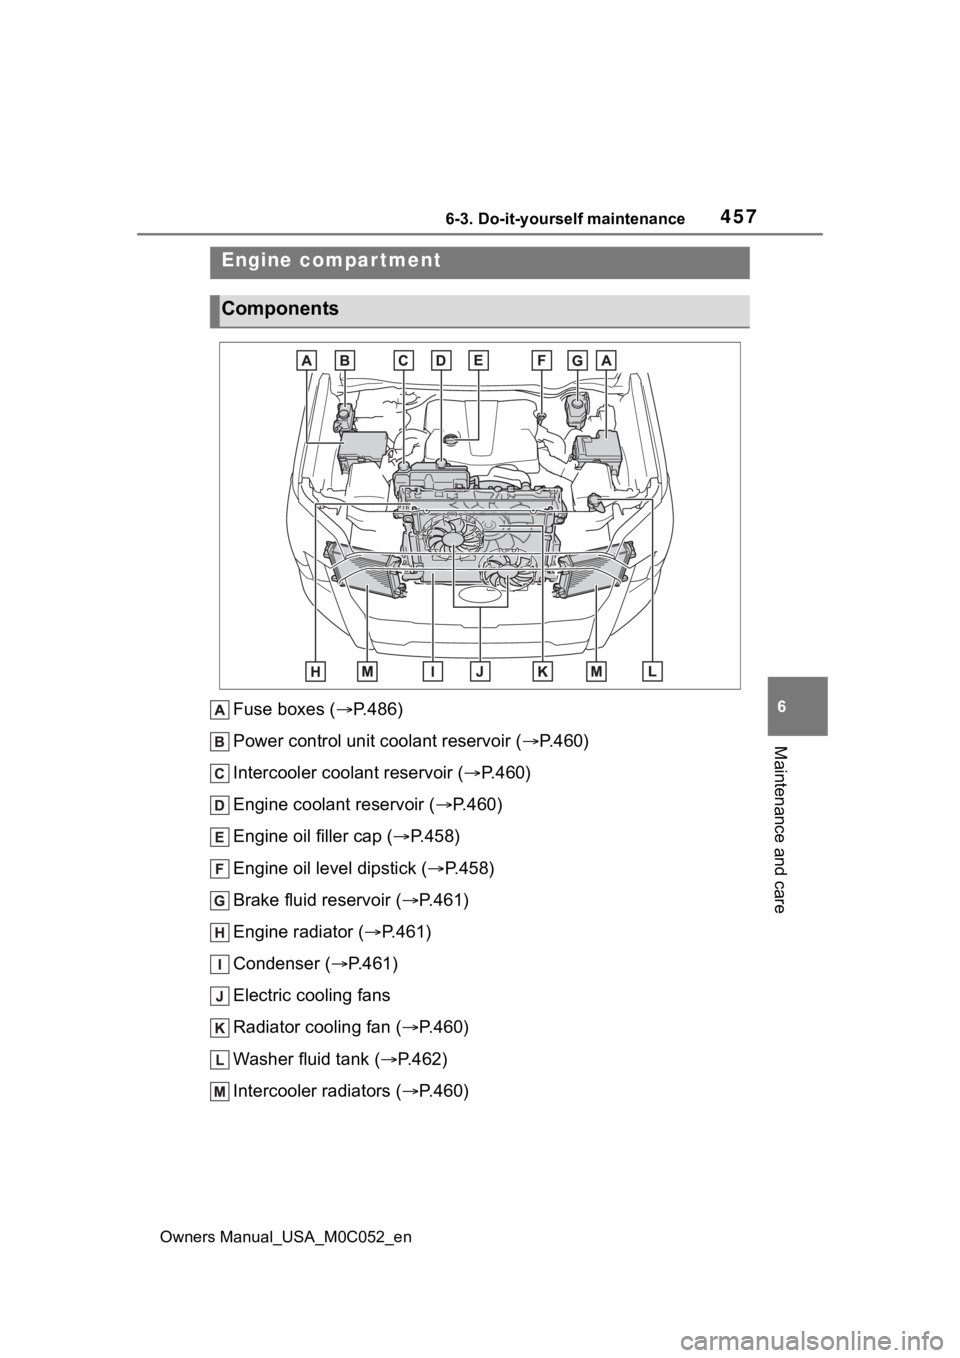
Fuse boxes ( P.486)
Power control unit coolant reservoir ( P.460)
Intercooler coolant reservoir ( P.460)
Engine coolant reservoir ( P.460)
Engine oil filler cap ( P.458)
Engine oil level dipstick ( P.458)
Brake fluid reservoir ( P.461)
Engine radiator ( P.461)
Condenser ( P.461)
Electric cooling fans
Radiator cooling fan ( P.460)
Washer fluid tank ( P.462)
Intercooler radiators ( P.460)
Engine compar tment
Components
Page 456 of 618
4586-3. Do-it-yourself maintenance
Owners Manual_USA_M0C052_en
With the engine at operating
temperature and turned off,
check the oil level on the dip-
stick.
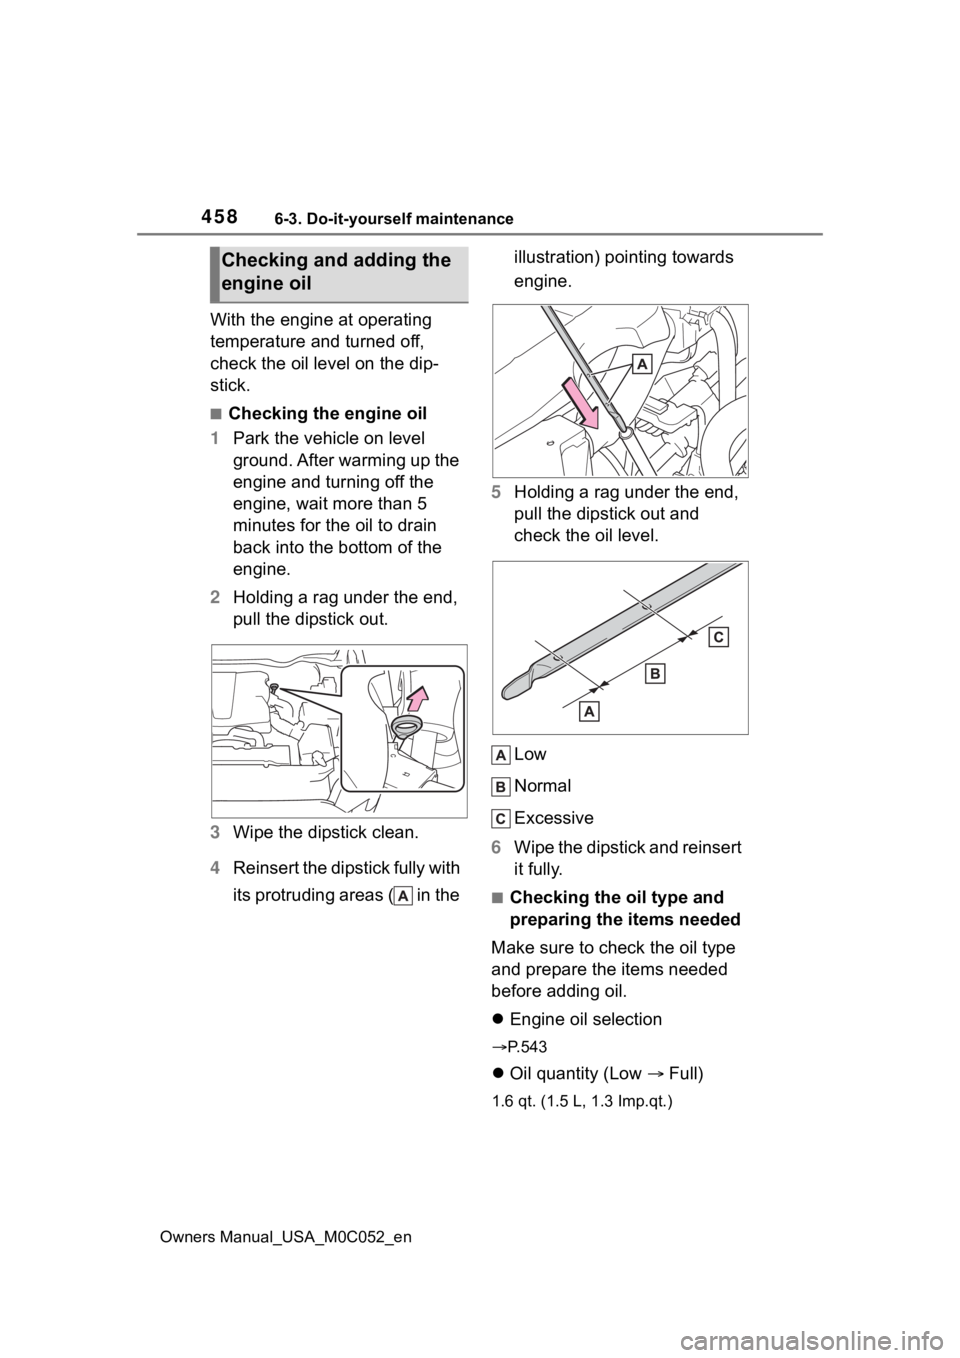
■Checking the engine oil
1 Park the vehicle on level
ground. After warming up the
engine and turning off the
engine, wait more than 5
minutes for the oil to drain
back into the bottom of the
engine.
2 Holding a rag under the end,
pull the dipstick out.
3 Wipe the dipstick clean.
4 Reinsert the dipstick fully with
its protruding areas ( in the illustration) pointing towards
engine.
5 Holding a rag under the end,
pull the dipstick out and
check the oil level.
Low
Normal
Excessive
6 Wipe the dipstick and reinsert
it fully.
■Checking the oil type and
preparing the items needed
Make sure to check the oil type
and prepare the items needed
before adding oil.
Engine oil selection
P.543
Oil quantity (Low Full)
1.6 qt. (1.5 L, 1.3 Imp.qt.)
Checking and adding the
engine oil
Page 457 of 618
4596-3. Do-it-yourself maintenance
Owners Manual_USA_M0C052_en
6
Maintenance and care
Items
Clean funnel
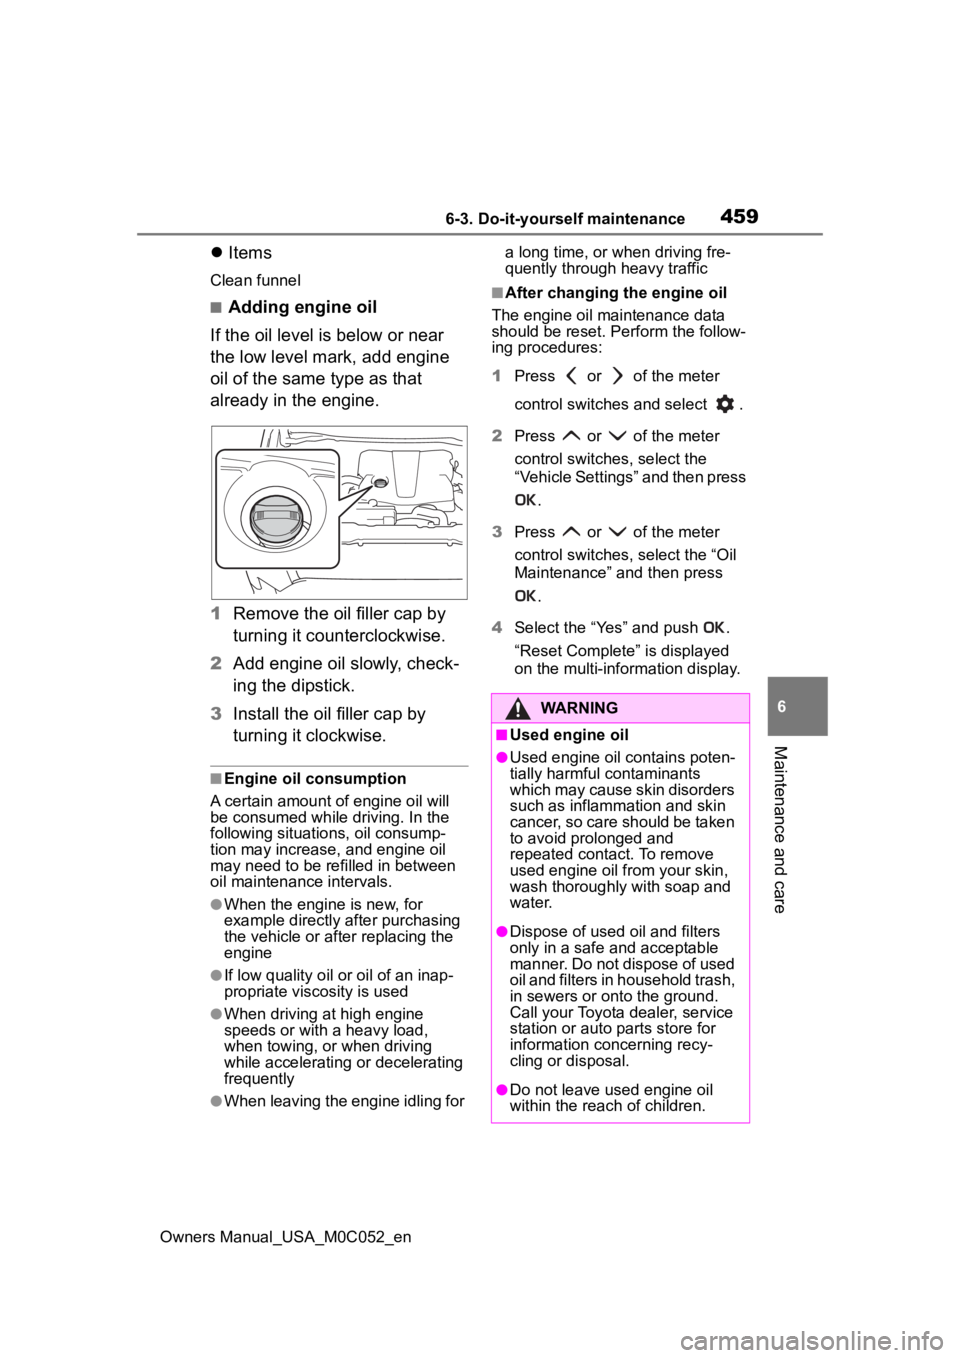
■Adding engine oil
If the oil level is below or near
the low level mark, add engine
oil of the same type as that
already in the engine.
1 Remove the oil filler cap by
turning it counterclockwise.
2 Add engine oil slowly, check-
ing the dipstick.
3 Install the oil filler cap by
turning it clockwise.
■Engine oil consumption
A certain amount of engine oil will
be consumed while driving. In the
following situatio ns, oil consump-
tion may increase, and engine oil
may need to be ref illed in between
oil maintenance intervals.
●When the engine is new, for
example directly after purchasing
the vehicle or after replacing the
engine
●If low quality oil or oil of an inap-
propriate viscosity is used
●When driving at high engine
speeds or with a heavy load,
when towing, or when driving
while accelerating o r decelerating
frequently
●When leaving the engine idling for a long time, or when driving fre-
quently through heavy traffic
■After changing the engine oil
The engine oil maintenance data
should be reset. Pe rform the follow-
ing procedures:
1 Press or of the meter
control switches and select .
2 Press or of the meter
control switches, select the
“Vehicle Settings” and then press
.
3 Press or of the meter
control switches, select the “Oil
Maintenance” and then press
.
4 Select the “Yes” and push .
“Reset Complete” is displayed
on the multi-info rmation display.
WARNING
■Used engine oil
●Used engine oil contains poten-
tially harmful contaminants
which may cause skin disorders
such as inflammation and skin
cancer, so care should be taken
to avoid prolonged and
repeated contact. To remove
used engine oil from your skin,
wash thoroughly with soap and
water.
●Dispose of used oil and filters
only in a safe and acceptable
manner. Do not dispose of used
oil and filters in h ousehold trash,
in sewers or onto the ground.
Call your Toyota dealer, service
station or auto parts store for
information concerning recy-
cling or disposal.
●Do not leave used engine oil
within the reach of children.
Page 458 of 618
4606-3. Do-it-yourself maintenance
Owners Manual_USA_M0C052_en
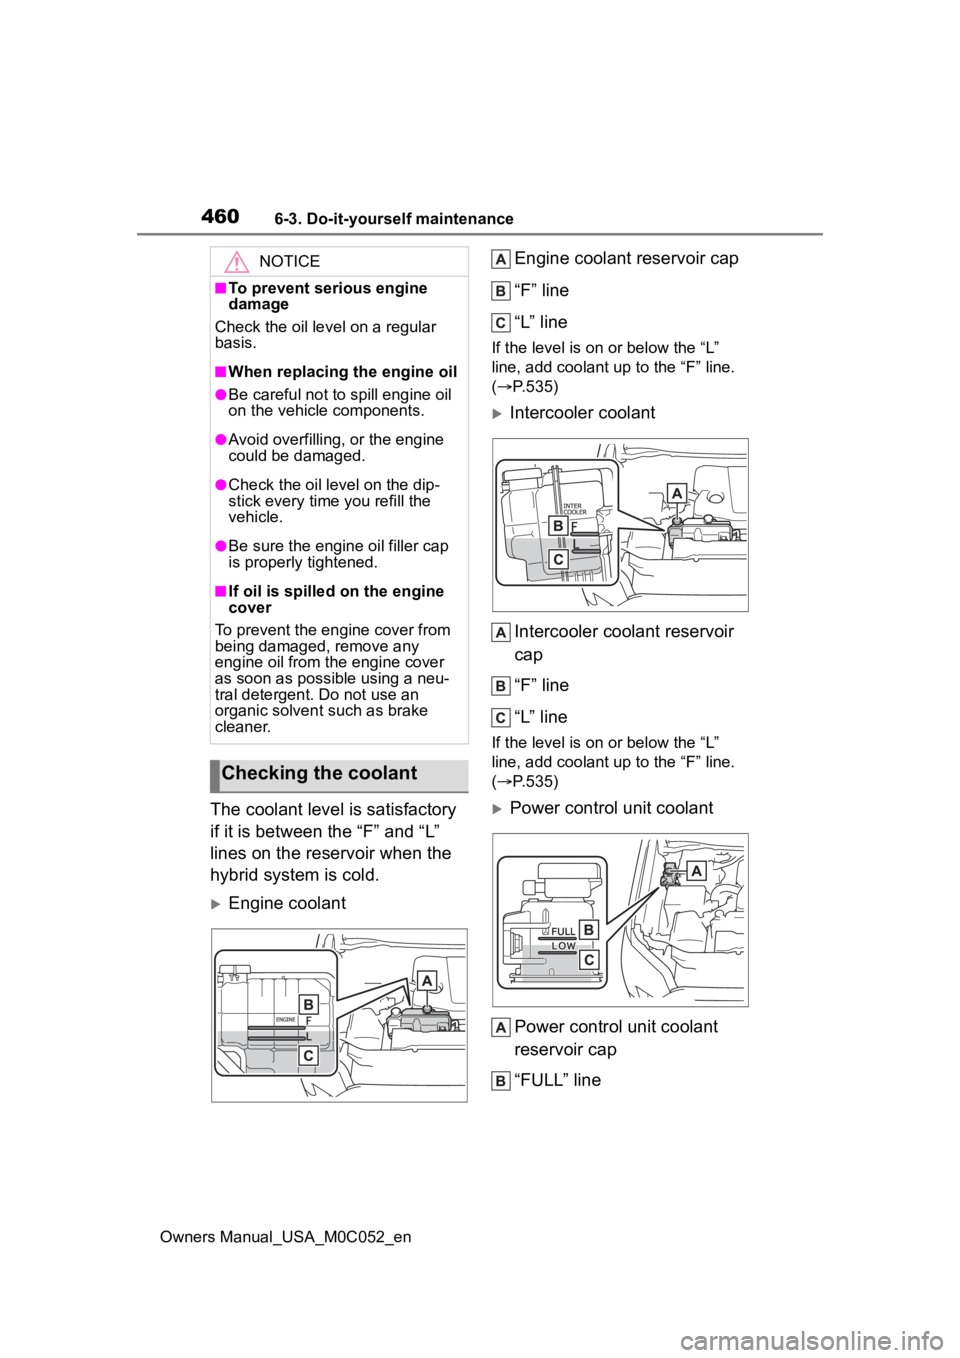
The coolant level is satisfactory
if it is between the “F” and “L”
lines on the reservoir when the
hybrid system is cold.
Engine coolant Engine coolant reservoir cap
“F” line
“L” line
If the level is on or below the “L”
line, add coolant up
to the “F” line.
( P.535)
Intercooler coolant
Intercooler coolant reservoir
cap
“F” line
“L” line
If the level is on or below the “L”
line, add coolant up to the “F” line.
( P.535)
Power control unit coolant
Power control unit coolant
reservoir cap
“FULL” line
NOTICE
■To prevent serious engine
damage
Check the oil level on a regular
basis.
■When replacing the engine oil
●Be careful not to spill engine oil
on the vehicle components.
●Avoid overfilling, or the engine
could be damaged.
●Check the oil le vel on the dip-
stick every time you refill the
vehicle.
●Be sure the engine oil filler cap
is properly tightened.
■If oil is spilled on the engine
cover
To prevent the engine cover from
being damaged, remove any
engine oil from the engine cover
as soon as possible using a neu-
tral detergent. Do not use an
organic solvent such as brake
cleaner.
Checking the coolant