ECU TOYOTA VENZA 2012 (in English) Service Manual
[x] Cancel search | Manufacturer: TOYOTA, Model Year: 2012, Model line: VENZA, Model: TOYOTA VENZA 2012Pages: 700, PDF Size: 12.2 MB
Page 473 of 700
473
3-8. Other interior features
3
Interior features
VENZA_U (OM73013U)
Garage door opener
The garage door opener (HomeLink Universal Transceiver) is manufac-
tured under license from HomeLink.
Programming HomeLink (for U.S.A. owners)
To ensure correct progr amming into the HomeLink, install a new bat-
tery in the hand-held transmitter prior to programming. Failure to
install a new battery into the hand-hel d transmitter will affect both the
range and accuracy of the HomeLink
in your vehicle.
The battery side of the hand-held transmitter must be pointed away
from the HomeLink
during the programming process.
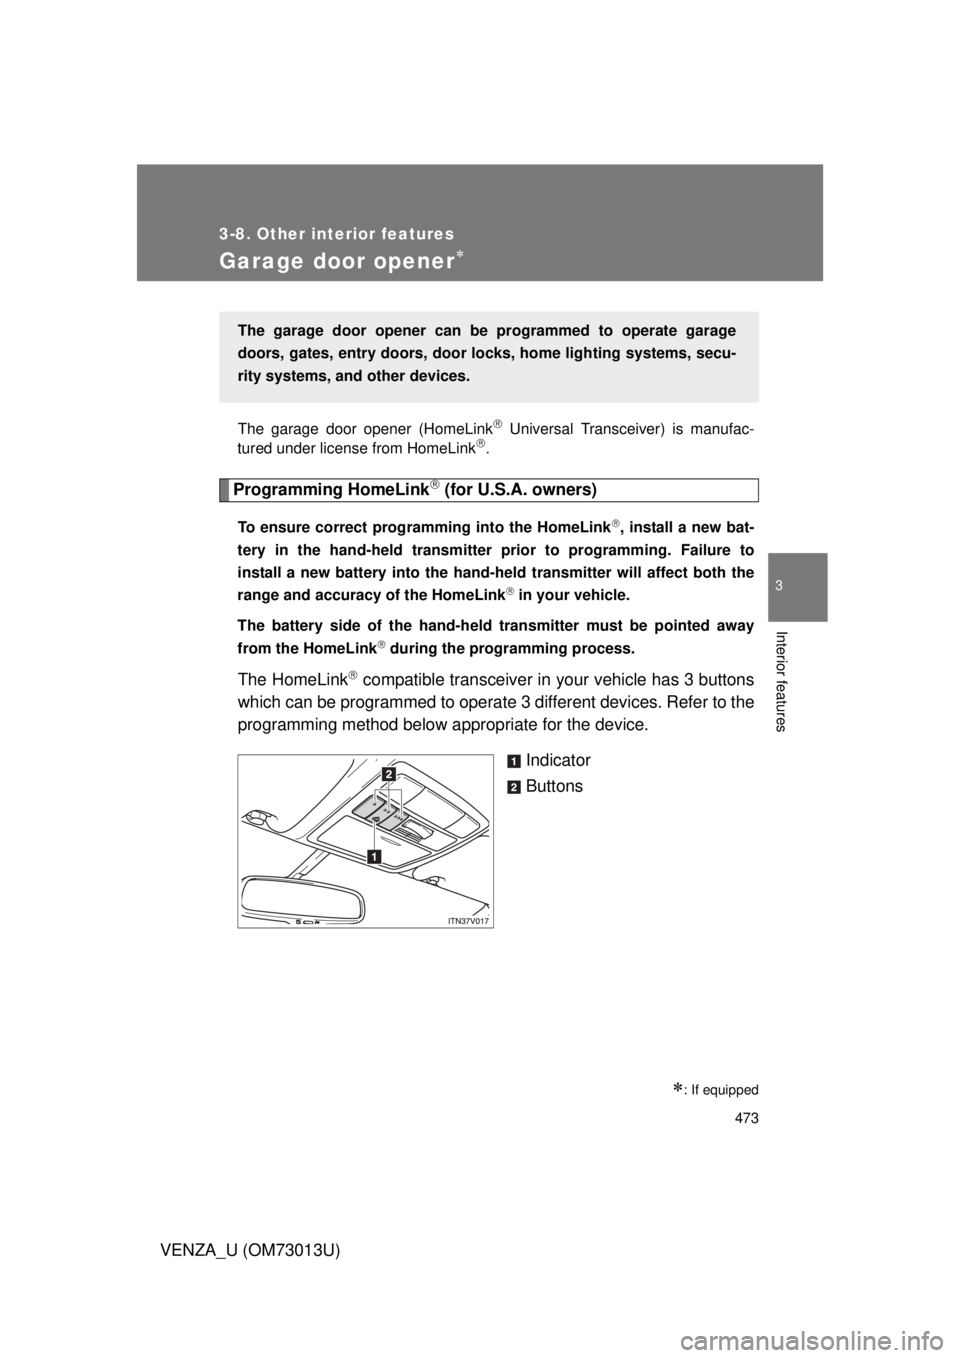
The HomeLink compatible transceiver in your vehicle has 3 buttons
which can be programmed to operate 3 different devices. Refer to the
programming method below appropriate for the device.
Indicator
Buttons
: If equipped
The garage door opener can be programmed to operate garage
doors, gates, entry doors, door locks, hom e lighting systems, secu-
rity systems, and other devices.
Page 477 of 700

477
3-8. Other interior features
3
Interior features
VENZA_U (OM73013U)
■
Programming an entry gate (f or U.S.A. owners)/Programming
all devices in the Canadian market
Place your transmitter 1 to 3 in. (25 to 75 mm) away from the
surface of the HomeLink
.
Keep the HomeLink indicator light in view while programming.
Press and hold the selected HomeLink button.
Repeatedly press and releas e (cycle) the device’s remote
control button for two seconds each until step 4 is completed.
When the indicator light on the HomeLink
compatible trans-
ceiver starts to flash rapidly, release the buttons.
Test the operation of the HomeLink
by pressing the newly
programmed button. Check to see if the gate/device operates
correctly.
Repeat the steps above to program another device for each of
the remaining HomeLink
buttons.
■ Programming other devices
To program other devices such as home security systems, home
door locks or lighting, contact your authorized Toyota dealer for
assistance.
■ Reprogramming a button
The individual HomeLink
buttons cannot be erased but can be
reprogrammed. To reprogram a bu tton, follow the “Programming”
instructions.
STEP1
STEP2
STEP3
STEP4
STEP5
STEP6
Page 483 of 700

483
3-8. Other interior features
3
Interior features
VENZA_U (OM73013U)
■
Conditions unfavorable to correct operation
The compass may not show the correct direction in the following conditions:
● The vehicle is stopped immediately after turning.
● The vehicle is on an inclined surface.
● The vehicle is in a place where the earth’s magnetic field is subject to
interference by artificial magnetic fields (underground car park/parking
lot, under a steel tower, between buildings, roof car park/parking lot, near
an intersection, near a large vehicle, etc.).
● The vehicle has become magnetized.
(There is a magnet or metal object near the inside rear view mirror.)
● The battery has been disconnected.
CAUTION
■While driving
Do not adjust the display.
Be sure to adjust the display only when the vehicle is stopped.
■ When doing the circling calibration
Be sure to secure a wide space, and watch out for people and vehicles in the
neighborhood. Do not violate any local traffic rules while performing circling
calibration.
Page 496 of 700

496 4-2. Maintenance
VENZA_U (OM73013U)
Vehicle interior
ItemsCheck points
Accelerator pedal • Moves smoothly (without uneven pedal
effort or catching)?
Automatic transmission
“Park” mechanism • Can the vehicle be held securely on an
incline with the shift lever in “P”?
Brake pedal • Moves smoothly?
• Does it have appropriate clearance and
correct amount of free play?
Brakes • Pulls to one side when applied?
• Loss of brake effectiveness?
• Spongy feeling brake pedal?
• Pedal almost touches floor?
Head restraints • Move smoothly and lock securely?
Indicators/buzzers • Function properly?
Lights • Do all the lights come on?
• Headlights aimed correctly?
Parking brake • Moves smoothly?
• Can hold the vehicle securely on an
incline?
Seat belts • Does the seat belt system operate
smoothly?
• Are the belts undamaged?
Seats • Do the seat controls operate properly?
Steering wheel • Moves smoothly?
• Has correct free play?
• No strange noises?
Page 504 of 700

504 4-3. Do-it-yourself maintenance
VENZA_U (OM73013U)
CAUTION
■Pre-driving check
Check that the hood is fully closed and locked.
If the hood is not locked properly it may open while the vehicle is in motion
and cause an accident, which may result in death or serious injury.
■ After installing the support rod into the slot
Make sure the rod supports the hood securely from falling down on to your
head or body.
NOTICE
■When closing the hood
Be sure to return the support rod to its clip before closing the hood. Closing
the hood with the support rod up could cause the hood to bend.
Page 548 of 700
548 4-3. Do-it-yourself maintenance
VENZA_U (OM73013U)
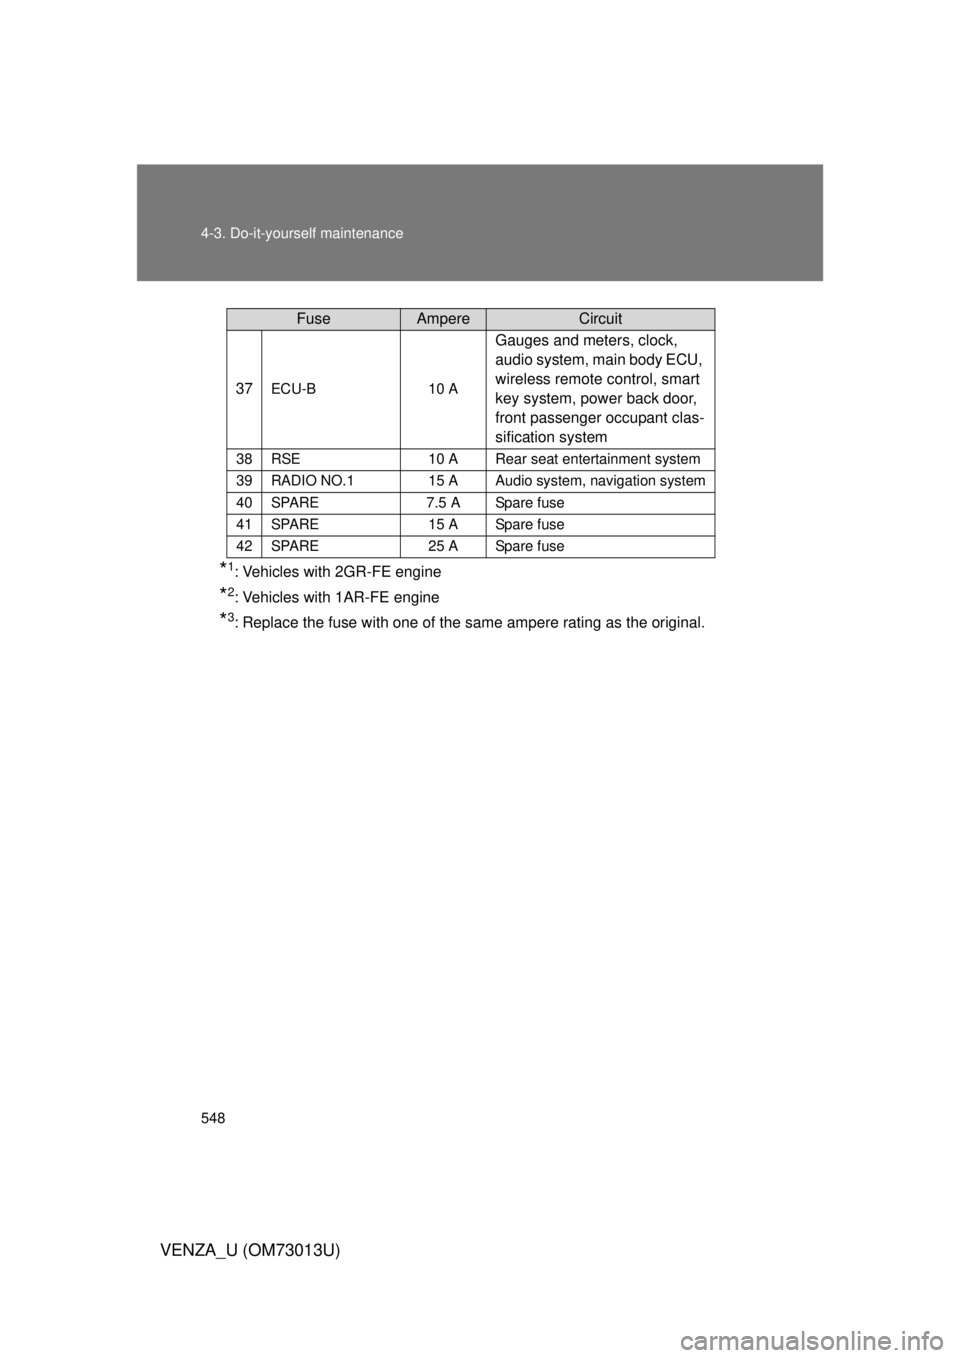
*1: Vehicles with 2GR-FE engine
*2: Vehicles with 1AR-FE engine
*3: Replace the fuse with one of the same ampere rating as the original.
37ECU-B10 A
Gauges and meters, clock,
audio system, main body ECU,
wireless remote control, smart
key system, power back door,
front passenger occupant clas-
sification system
38RSE10 ARear seat entertainment system
39RADIO NO.115 AAudio system, navigation system
40SPARE7.5 ASpare fuse
41SPARE15 ASpare fuse
42SPARE25 ASpare fuse
FuseAmpereCircuit
Page 549 of 700
549
4-3. Do-it-yourself maintenance
4
Maintenance and care
VENZA_U (OM73013U)
■
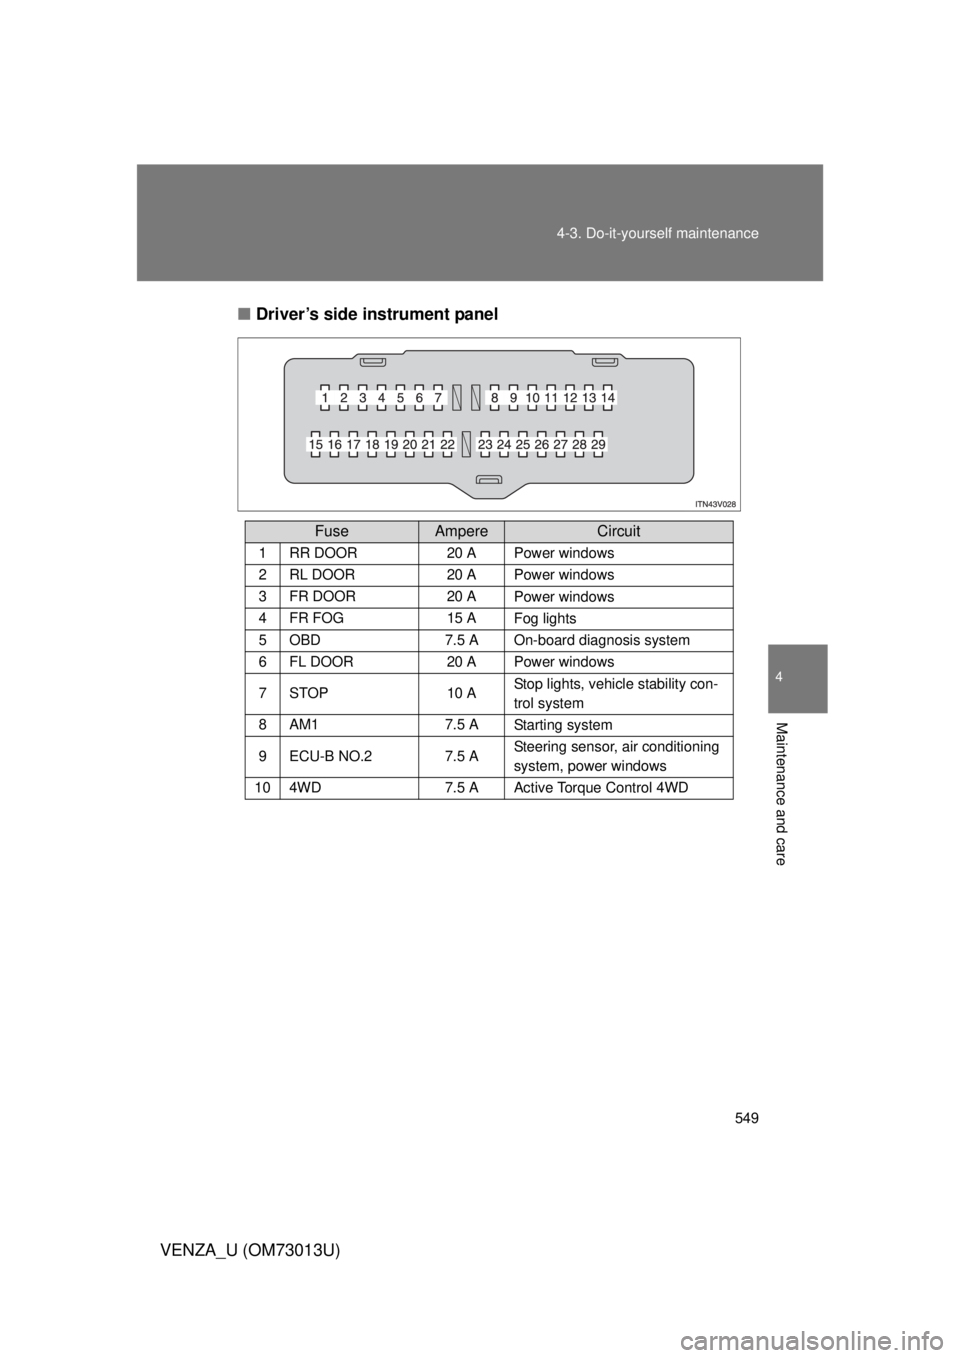
Driver’s side instrument panel
FuseAmpereCircuit
1RR DOOR20 APower windows
2RL DOOR20 APower windows
3FR DOOR20 APower windows
4FR FOG15 AFog lights
5OBD7.5 AOn-board diagnosis system
6FL DOOR20 APower windows
7STOP10 AStop lights, vehicle stability con-
trol system
8AM17.5 AStarting system
9ECU-B NO.27.5 ASteering sensor, air conditioning
system, power windows
104WD7.5 AActive Torque Control 4WD
Page 550 of 700
550 4-3. Do-it-yourself maintenance
VENZA_U (OM73013U)
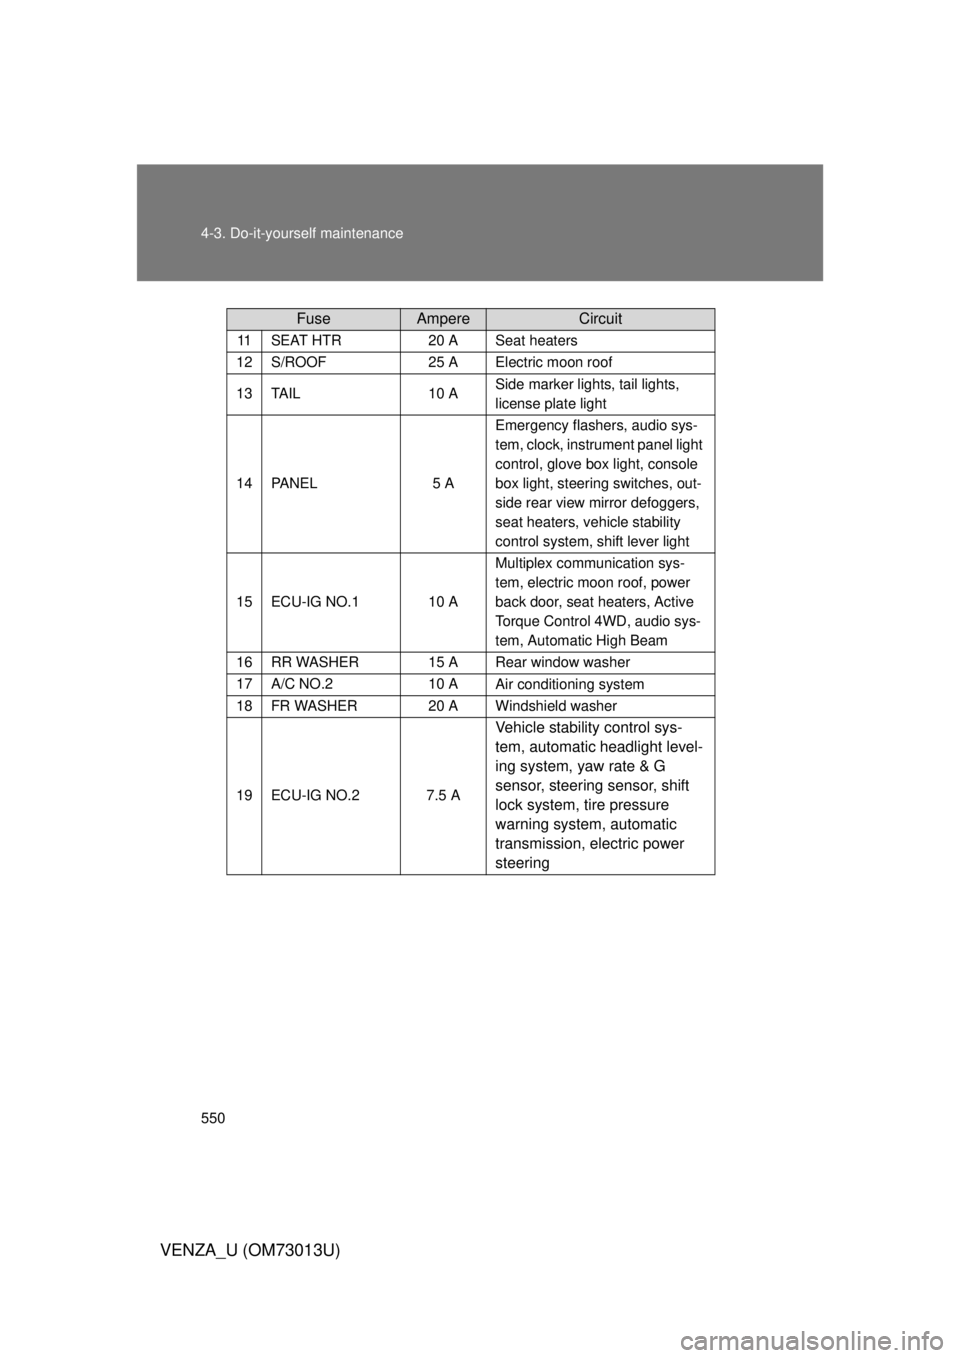
11SEAT HTR20 ASeat heaters
12S/ROOF25 AElectric moon roof
13TA I L10 ASide marker lights, tail lights,
license plate light
14PA N E L5 A
Emergency flashers, audio sys-
tem, clock, instrument panel light
control, glove box light, console
box light, steering switches, out-
side rear view mirror defoggers,
seat heaters, vehicle stability
control system, shift lever light
15ECU-IG NO.110 A
Multiplex communication sys-
tem, electric moon roof, power
back door, seat heaters, Active
Torque Control 4WD, audio sys-
tem, Automatic High Beam
16RR WASHER15 ARear window washer
17A/C NO.210 AAir conditioning system
18FR WASHER20 AWindshield washer
19ECU-IG NO.27.5 A
Vehicle stability control sys-
tem, automatic headlight level-
ing system, yaw rate & G
sensor, steering sensor, shift
lock system, tire pressure
warning system, automatic
transmission, electric power
steering
FuseAmpereCircuit
Page 551 of 700
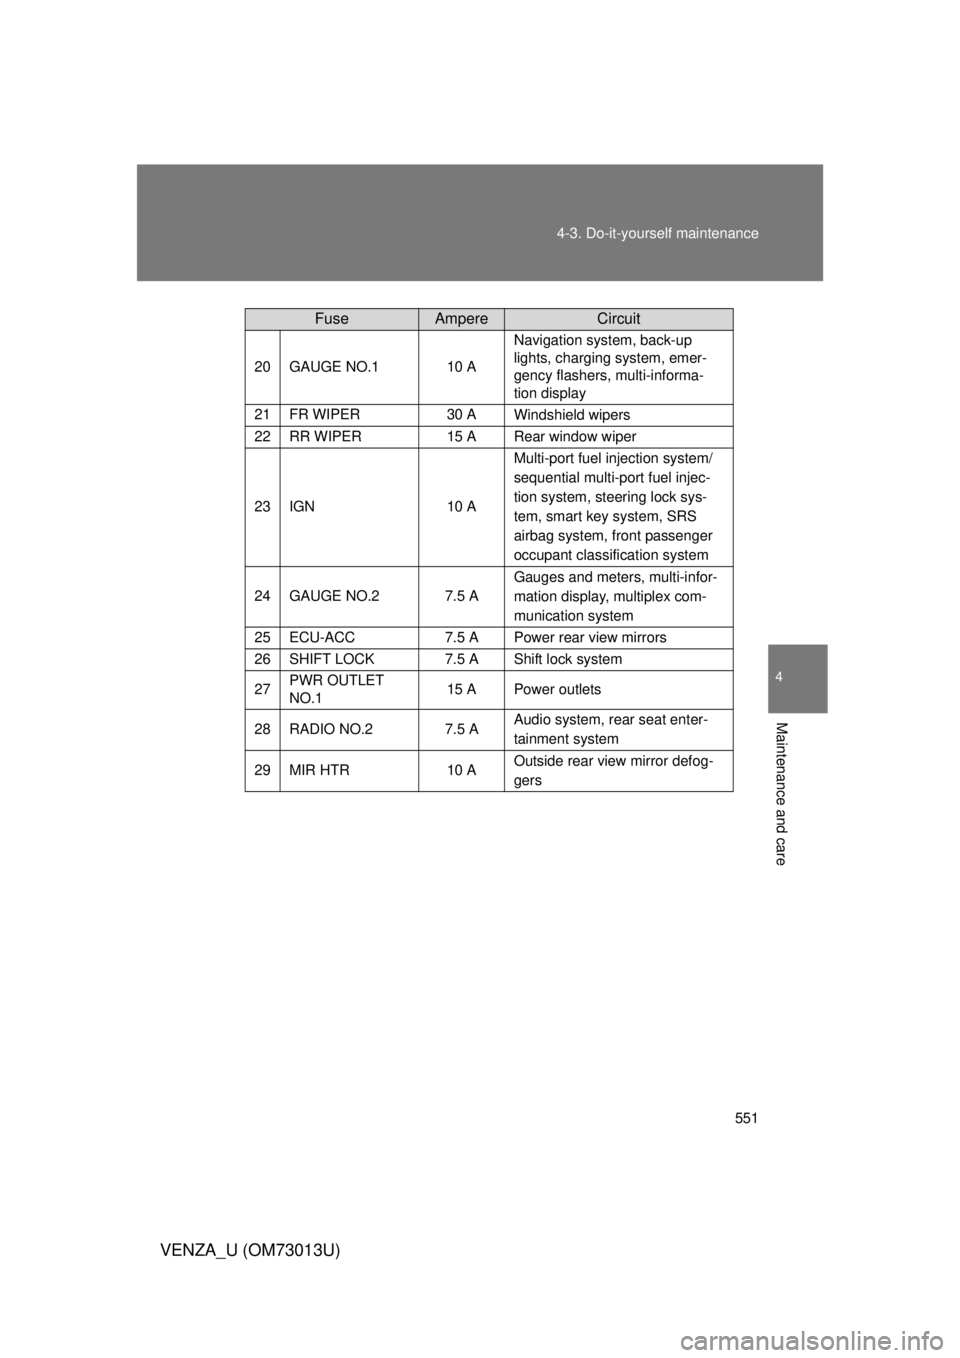
551
4-3. Do-it-yourself maintenance
4
Maintenance and care
VENZA_U (OM73013U)
20GAUGE NO.110 A
Navigation system, back-up
lights, charging system, emer-
gency flashers, multi-informa-
tion display
21FR WIPER30 AWindshield wipers
22RR WIPER15 ARear window wiper
23IGN10 A
Multi-port fuel
injection system/
sequential multi-port fuel injec-
tion system, steering lock sys-
tem, smart key system, SRS
airbag system, front passenger
occupant classification system
24GAUGE NO.27.5 A
Gauges and meters, multi-infor-
mation display, multiplex com-
munication system
25ECU-ACC7.5 APower rear view mirrors
26SHIFT LOCK7.5 AShift lock system
27PWR OUTLET
NO.115 APower outlets
28RADIO NO.27.5 AAudio system, rear seat enter-
tainment system
29MIR HTR10 AOutside rear view mirror defog-
gers
FuseAmpereCircuit
Page 555 of 700
555
4-3. Do-it-yourself maintenance
4
Maintenance and care
VENZA_U (OM73013U)
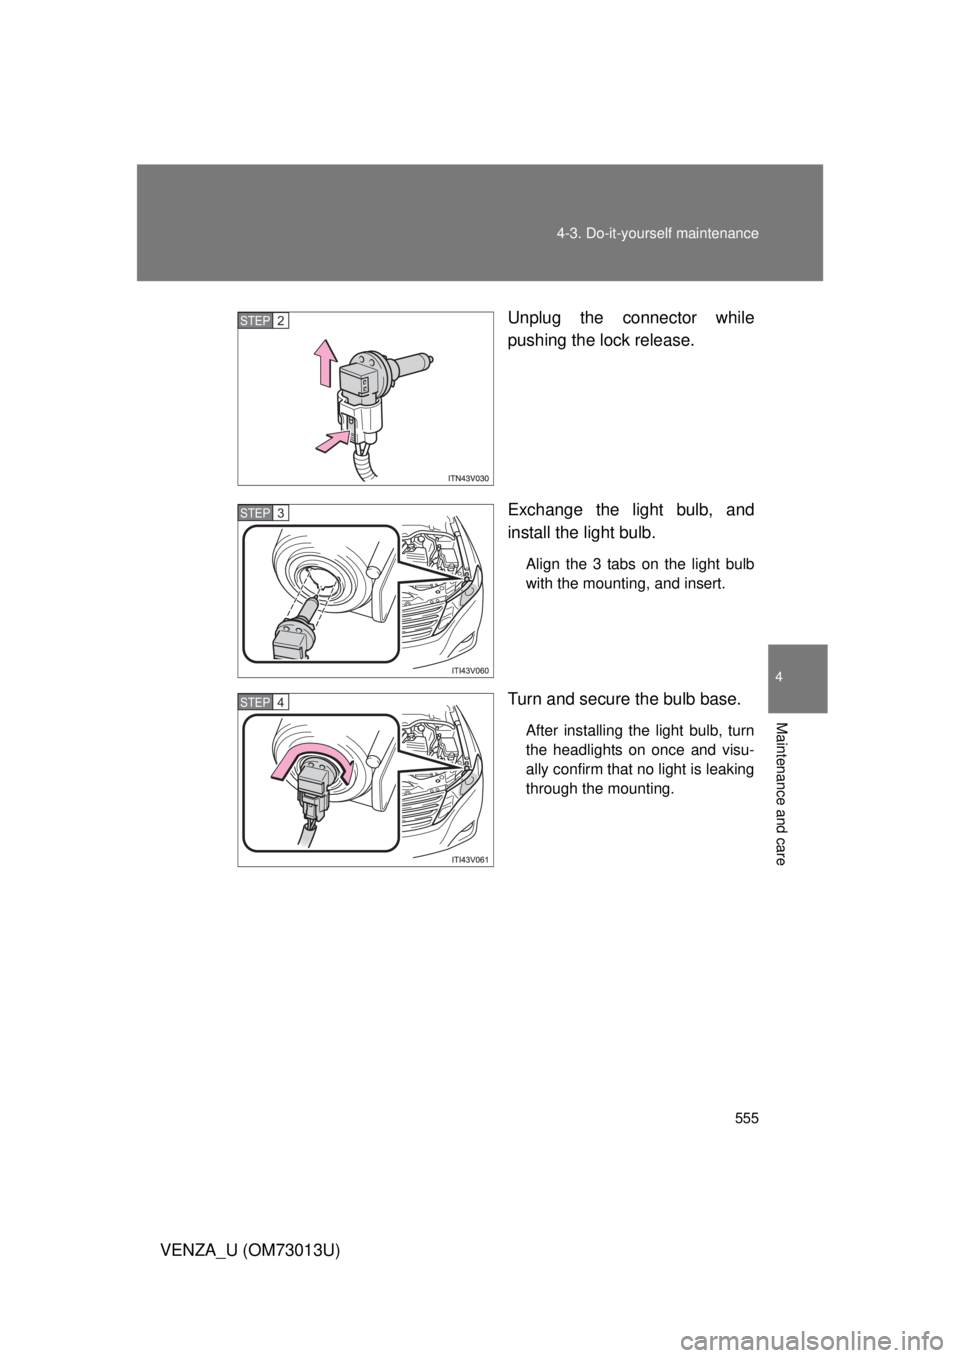
Unplug the connector while
pushing the lock release.
Exchange the light bulb, and
install the light bulb.
Align the 3 tabs on the light bulb
with the mounting, and insert.
Turn and secure the bulb base.
After installing the light bulb, turn
the headlights on once and visu-
ally confirm that no light is leaking
through the mounting.
STEP2
STEP3
STEP4