light TOYOTA VENZA 2013 Accessories, Audio & Navigation (in English)
[x] Cancel search | Manufacturer: TOYOTA, Model Year: 2013, Model line: VENZA, Model: TOYOTA VENZA 2013Pages: 228, PDF Size: 3.73 MB
Page 14 of 228
14
1. CONTROLS AND FEATURES
3. TOUCH SCREEN OPERATION
To prevent damage to the screen, lightly
touch screen buttons on the screen with
the finger. When a screen button on the
screen is touched, a beep sounds. (To set
a beep sound, see page 197.)
Do not use objects other than your finger
to touch the screen.
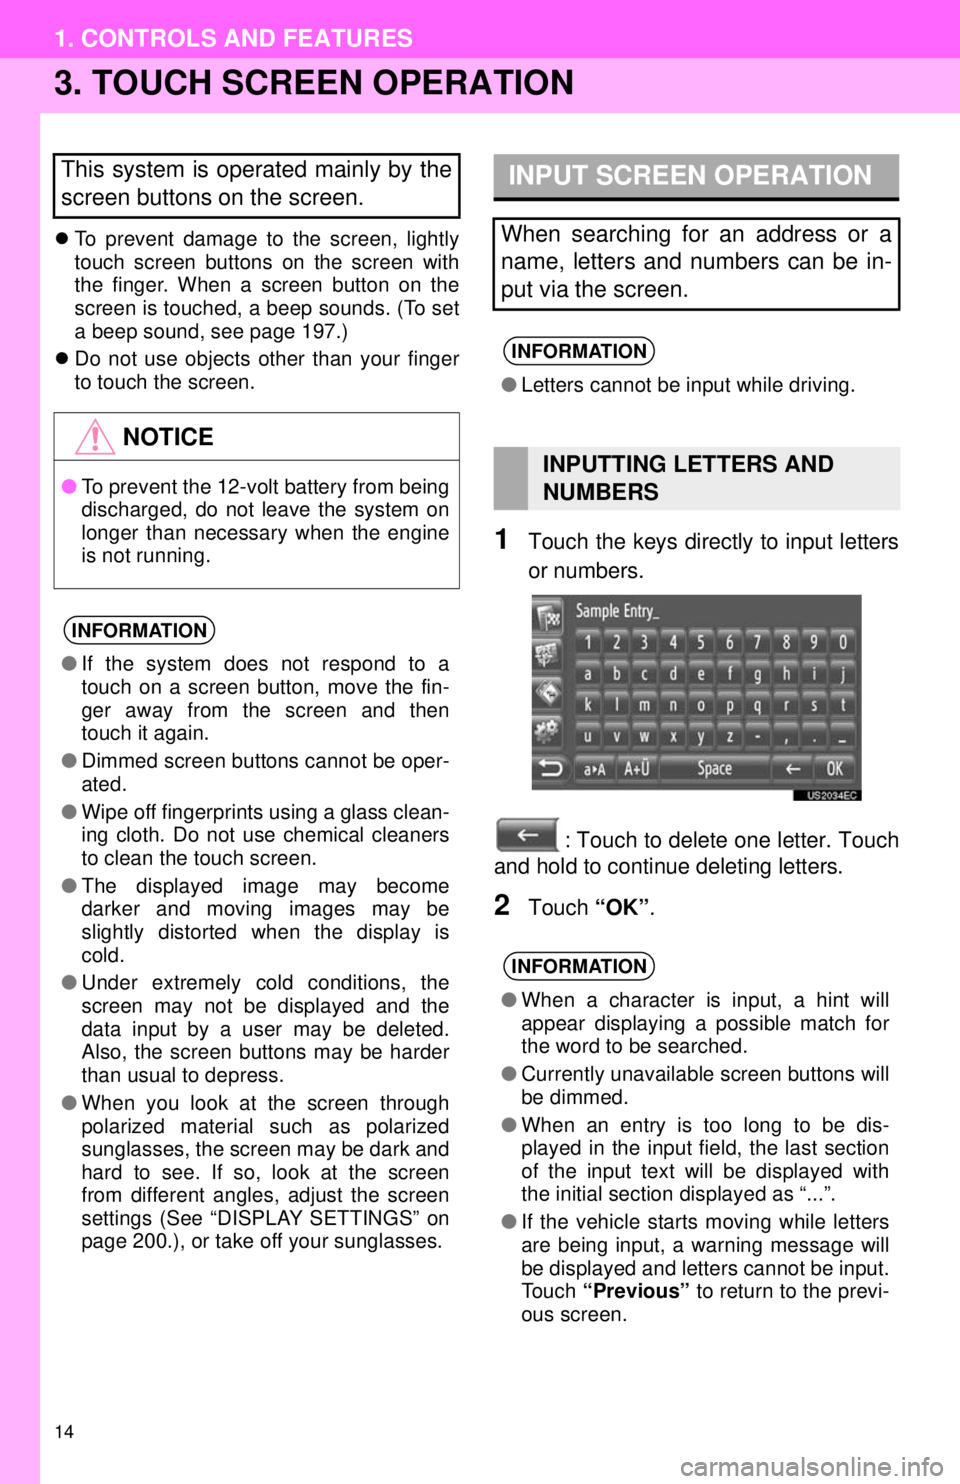
1Touch the keys directly to input letters
or numbers.
: Touch to delete one letter. Touch
and hold to continue deleting letters.
2Touch “OK”.
This system is operated mainly by the
screen buttons on the screen.
NOTICE
●To prevent the 12-volt battery from being
discharged, do not leave the system on
longer than necessary when the engine
is not running.
INFORMATION
●If the system does not respond to a
touch on a screen button, move the fin-
ger away from the screen and then
touch it again.
● Dimmed screen buttons cannot be oper-
ated.
● Wipe off fingerprints using a glass clean-
ing cloth. Do not use chemical cleaners
to clean the touch screen.
● The displayed image may become
darker and moving images may be
slightly distorted when the display is
cold.
● Under extremely cold conditions, the
screen may not be displayed and the
data input by a user may be deleted.
Also, the screen buttons may be harder
than usual to depress.
● When you look at the screen through
polarized material such as polarized
sunglasses, the screen may be dark and
hard to see. If so, look at the screen
from different angles, adjust the screen
settings (See “DISPLAY SETTINGS” on
page 200.), or take off your sunglasses.
INPUT SCREEN OPERATION
When searching for an address or a
name, letters and numbers can be in-
put via the screen.
INFORMATION
●Letters cannot be input while driving.
INPUTTING LETTERS AND
NUMBERS
INFORMATION
●When a character is input, a hint will
appear displaying a possible match for
the word to be searched.
● Currently unavailable screen buttons will
be dimmed.
● When an entry is too long to be dis-
played in the input field, the last section
of the input text will be displayed with
the initial section displayed as “...”.
● If the vehicle starts moving while letters
are being input, a warning message will
be displayed and letters cannot be input.
Touch “Previous” to return to the previ-
ous screen.
Page 63 of 228
63
5. NAVIGATION SETTING
2
APPLICATION-“Map”
1Touch “Day/Night Mode” on the “Map
Settings” screen.
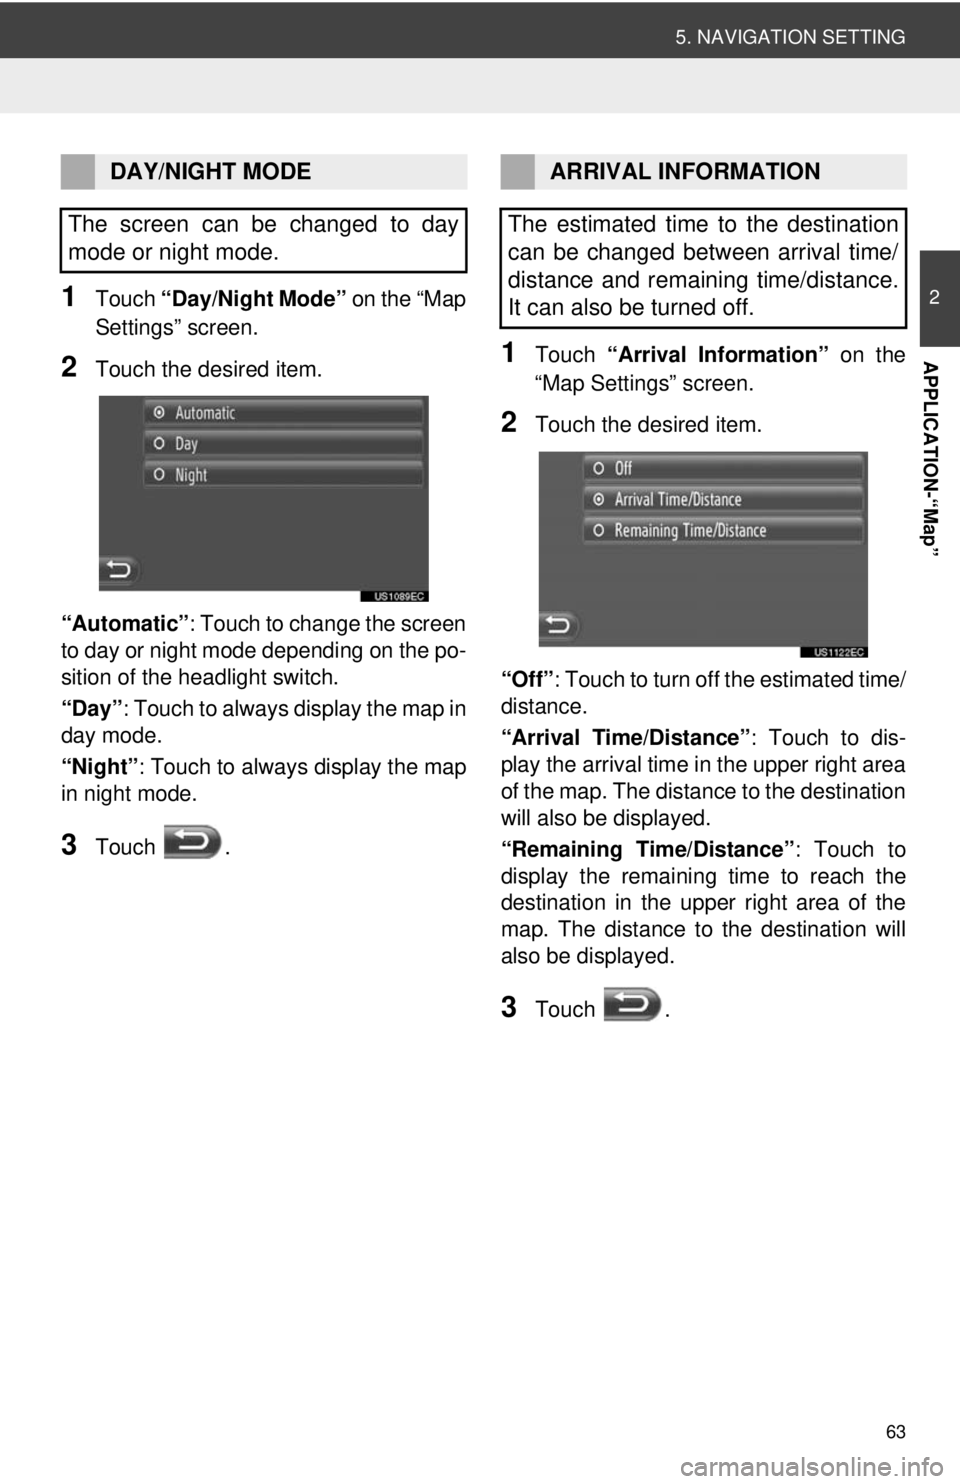
2Touch the desired item.
“Automatic” : Touch to change the screen
to day or night mode depending on the po-
sition of the headlight switch.
“Day” : Touch to always display the map in
day mode.
“Night”: Touch to always display the map
in night mode.
3Touch .
1Touch “Arrival Information” on the
“Map Settings” screen.
2Touch the desired item.
“Off” : Touch to turn off the estimated time/
distance.
“Arrival Time/Distance” : Touch to dis-
play the arrival time in the upper right area
of the map. The dist ance to the destination
will also be displayed.
“Remaining Time/Distance” : Touch to
display the remaining time to reach the
destination in the upper right area of the
map. The distance to the destination will
also be displayed.
3Touch .
DAY/NIGHT MODE
The screen can be changed to day
mode or night mode.ARRIVAL INFORMATION
The estimated time to the destination
can be changed between arrival time/
distance and remaining time/distance.
It can also be turned off.
Page 103 of 228
103
1. AUDIO SYSTEM OPERATION
4
AUDIO SYSTEM
Radio mode
Radio stations can be tuned in manually
using this knob.
Modes other than radio
Tracks, songs or files can be selected us-
ing the knob.
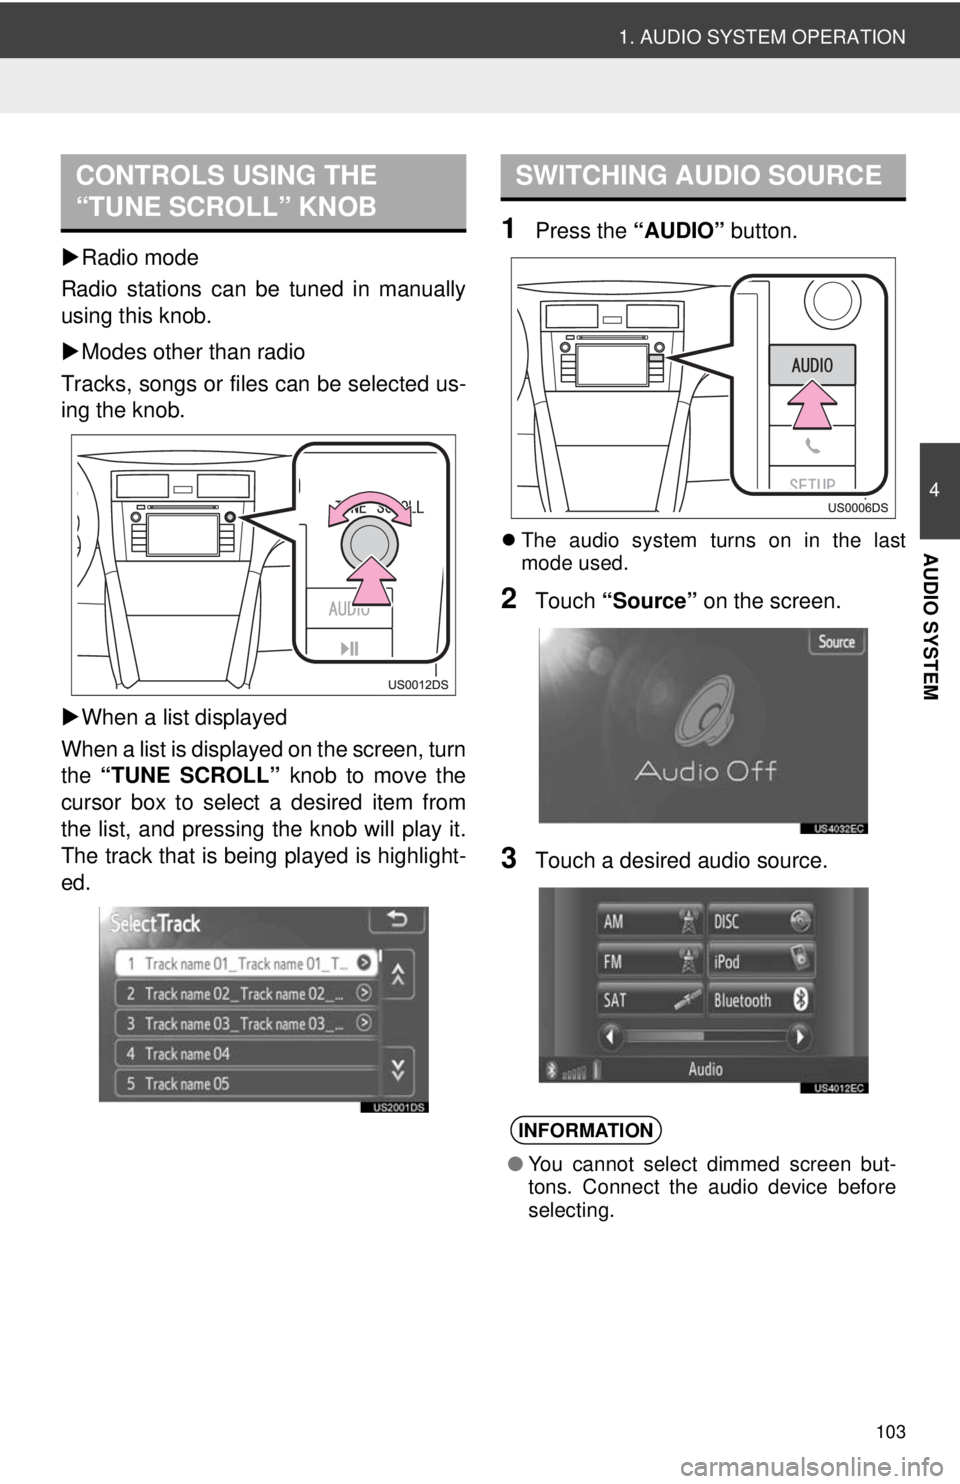
When a list displayed
When a list is displayed on the screen, turn
the “TUNE SCROLL” knob to move the
cursor box to select a desired item from
the list, and pressing the knob will play it.
The track that is being played is highlight-
ed.
1Press the “AUDIO” button.
The audio system turns on in the last
mode used.
2Touch “Source” on the screen.
3Touch a desired audio source.
CONTROLS USING THE
“TUNE SCROLL” KNOBSWITCHING AUDIO SOURCE
INFORMATION
●You cannot select dimmed screen but-
tons. Connect the audio device before
selecting.
Page 107 of 228
107
1. AUDIO SYSTEM OPERATION
4
AUDIO SYSTEM
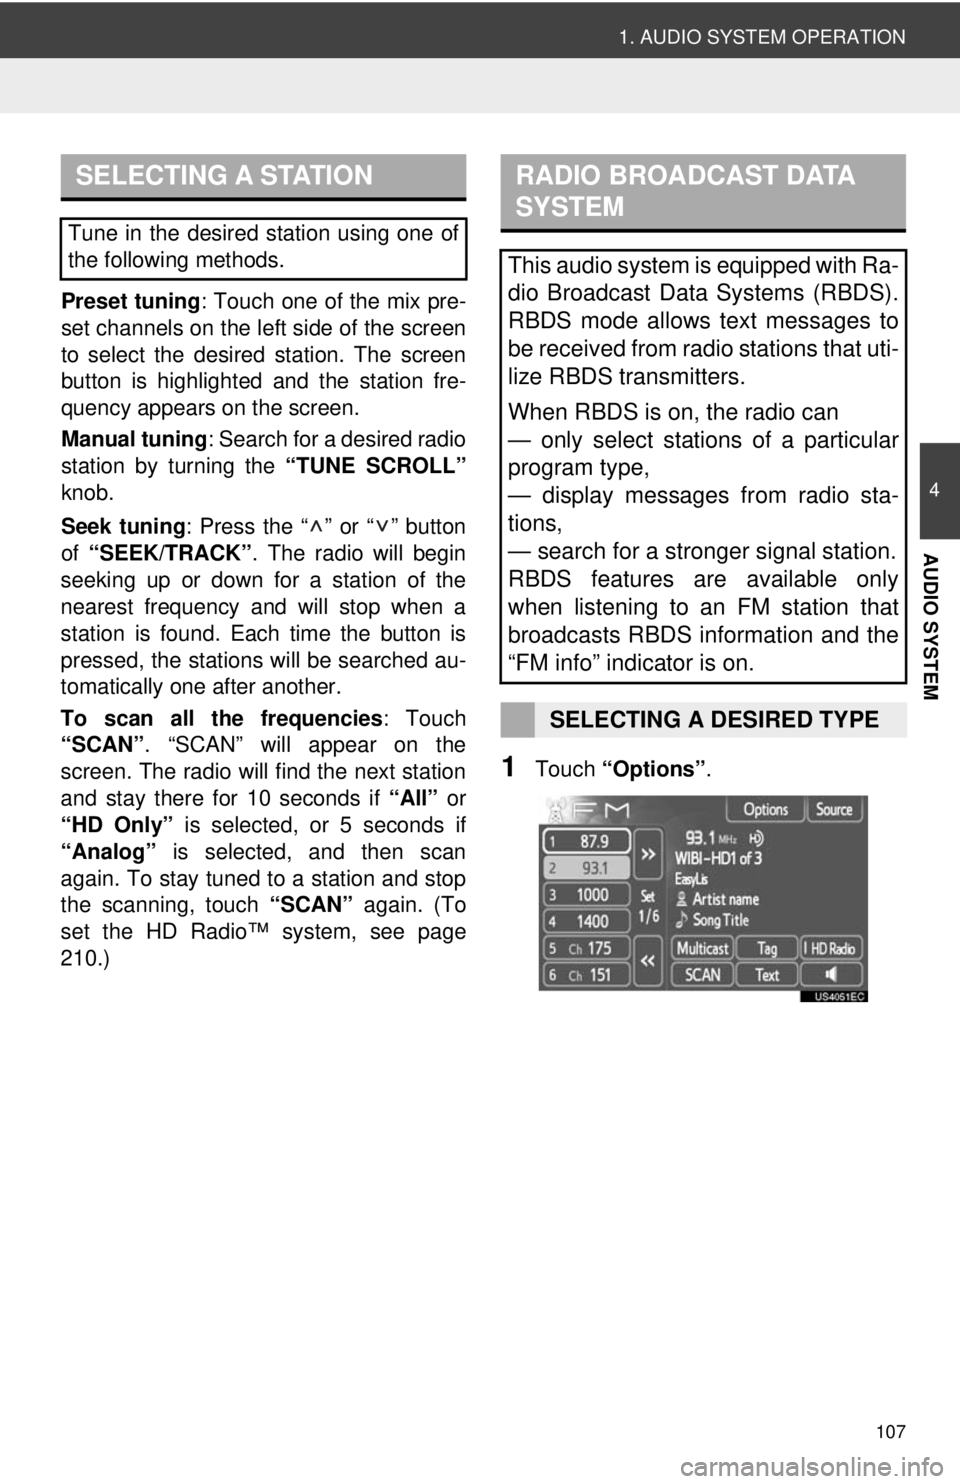
Preset tuning: Touch one of the mix pre-
set channels on the left side of the screen
to select the desired station. The screen
button is highlighted and the station fre-
quency appears on the screen.
Manual tuning: Search for a desired radio
station by turning the “TUNE SCROLL”
knob.
Seek tuning : Press the “ ” or “ ” button
of “SEEK/TRACK” . The radio will begin
seeking up or down for a station of the
nearest frequency and will stop when a
station is found. Ea ch time the button is
pressed, the stations will be searched au-
tomatically one after another.
To scan all the frequencies : Touch
“SCAN” . “SCAN” will appear on the
screen. The radio will find the next station
and stay there for 10 seconds if “All” or
“HD Only” is selected, or 5 seconds if
“Analog” is selected, and then scan
again. To stay tuned to a station and stop
the scanning, touch “SCAN” again. (To
set the HD Radio™ system, see page
210.)
1Touch “Options”.
SELECTING A STATION
Tune in the desired station using one of
the following methods.
RADIO BROADCAST DATA
SYSTEM
This audio system is equipped with Ra-
dio Broadcast Data Systems (RBDS).
RBDS mode allows text messages to
be received from radio stations that uti-
lize RBDS transmitters.
When RBDS is on, the radio can
— only select stations of a particular
program type,
— display messages from radio sta-
tions,
— search for a stronger signal station.
RBDS features are available only
when listening to an FM station that
broadcasts RBDS information and the
“FM info” indicator is on.
SELECTING A DESIRED TYPE
Page 114 of 228
114
1. AUDIO SYSTEM OPERATION
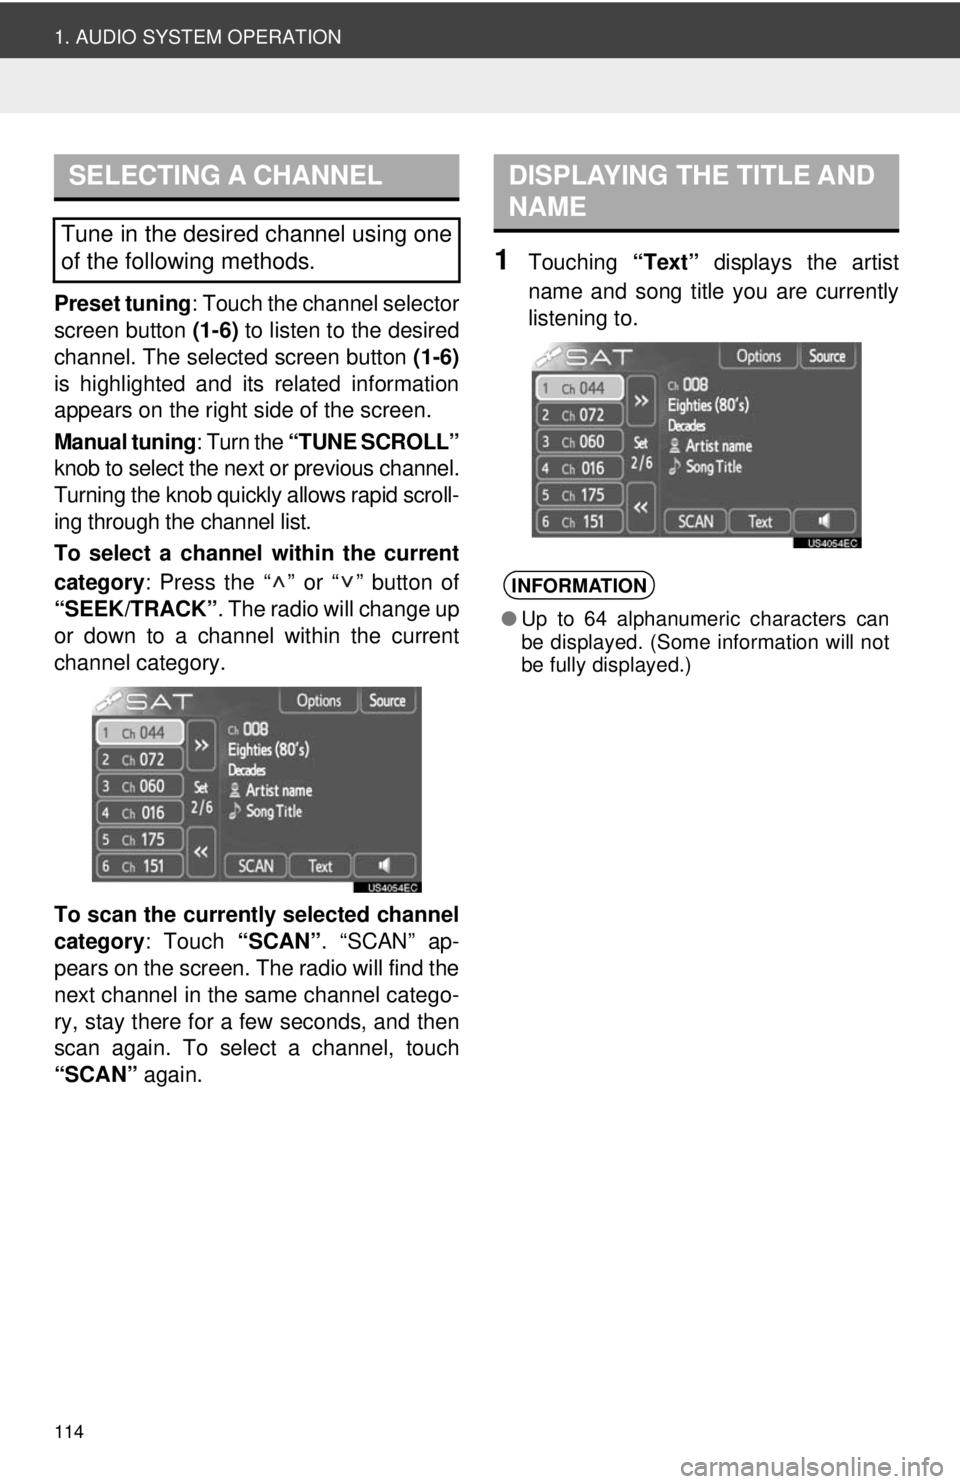
Preset tuning: Touch the channel selector
screen button (1-6) to listen to the desired
channel. The selected screen button (1-6)
is highlighted and its related information
appears on the right side of the screen.
Manual tuning : Turn the “TUNE SCROLL”
knob to select the next or previous channel.
Turning the knob quickly allows rapid scroll-
ing through the channel list.
To select a channel within the current
category : Press the “ ” or “ ” button of
“SEEK/TRACK” . The radio will change up
or down to a channel within the current
channel category.
To scan the currently selected channel
category : Touch “SCAN”. “SCAN” ap-
pears on the screen. The radio will find the
next channel in the same channel catego-
ry, stay there for a few seconds, and then
scan again. To select a channel, touch
“SCAN” again.
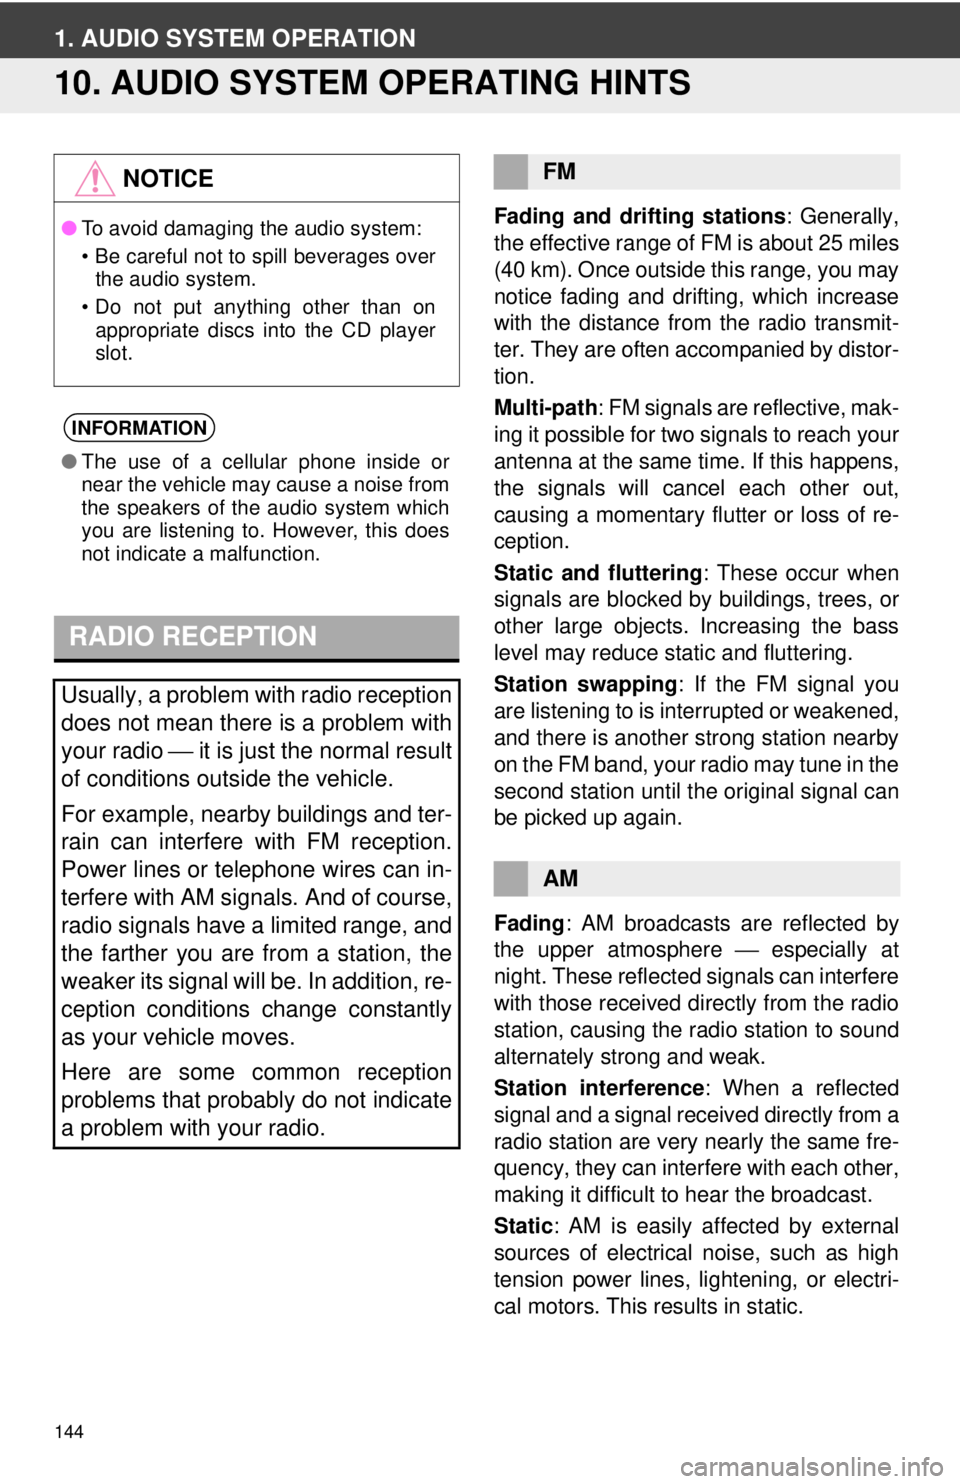
1Touching “Text” displays the artist
name and song title you are currently
listening to.
SELECTING A CHANNEL
Tune in the desired channel using one
of the following methods.
DISPLAYING THE TITLE AND
NAME
INFORMATION
● Up to 64 alphanumeric characters can
be displayed. (Some information will not
be fully displayed.)
Page 144 of 228
144
1. AUDIO SYSTEM OPERATION
10. AUDIO SYSTEM OPERATING HINTS
Fading and drifting stations: Generally,
the effective range of FM is about 25 miles
(40 km). Once outside this range, you may
notice fading and drifting, which increase
with the distance from the radio transmit-
ter. They are often accompanied by distor-
tion.
Multi-path : FM signals are reflective, mak-
ing it possible for two signals to reach your
antenna at the same time. If this happens,
the signals will cancel each other out,
causing a momentary flutter or loss of re-
ception.
Static and fluttering : These occur when
signals are blocked by buildings, trees, or
other large objects. Increasing the bass
level may reduce static and fluttering.
Station swapping : If the FM signal you
are listening to is interrupted or weakened,
and there is another strong station nearby
on the FM band, your radio may tune in the
second station until the original signal can
be picked up again.
Fading : AM broadcasts are reflected by
the upper atmosphere ⎯ especially at
night. These reflected signals can interfere
with those received directly from the radio
station, causing the radio station to sound
alternately strong and weak.
Station interference : When a reflected
signal and a signal received directly from a
radio station are very nearly the same fre-
quency, they can interfere with each other,
making it difficult to hear the broadcast.
Static : AM is easily affected by external
sources of electrical noise, such as high
tension power lines, lightening, or electri-
cal motors. This re sults in static.
NOTICE
●To avoid damaging the audio system:
• Be careful not to spill beverages over
the audio system.
• Do not put anything other than on appropriate discs into the CD player
slot.
INFORMATION
● The use of a cellular phone inside or
near the vehicle may cause a noise from
the speakers of the audio system which
you are listening to. However, this does
not indicate a malfunction.
RADIO RECEPTION
Usually, a problem with radio reception
does not mean there is a problem with
your radio ⎯ it is just the normal result
of conditions outside the vehicle.
For example, nearby buildings and ter-
rain can interfere with FM reception.
Power lines or telephone wires can in-
terfere with AM signals. And of course,
radio signals have a limited range, and
the farther you are from a station, the
weaker its signal will be. In addition, re-
ception conditions change constantly
as your vehicle moves.
Here are some common reception
problems that probably do not indicate
a problem with your radio.
FM
AM
Page 147 of 228
147
1. AUDIO SYSTEM OPERATION
4
AUDIO SYSTEM
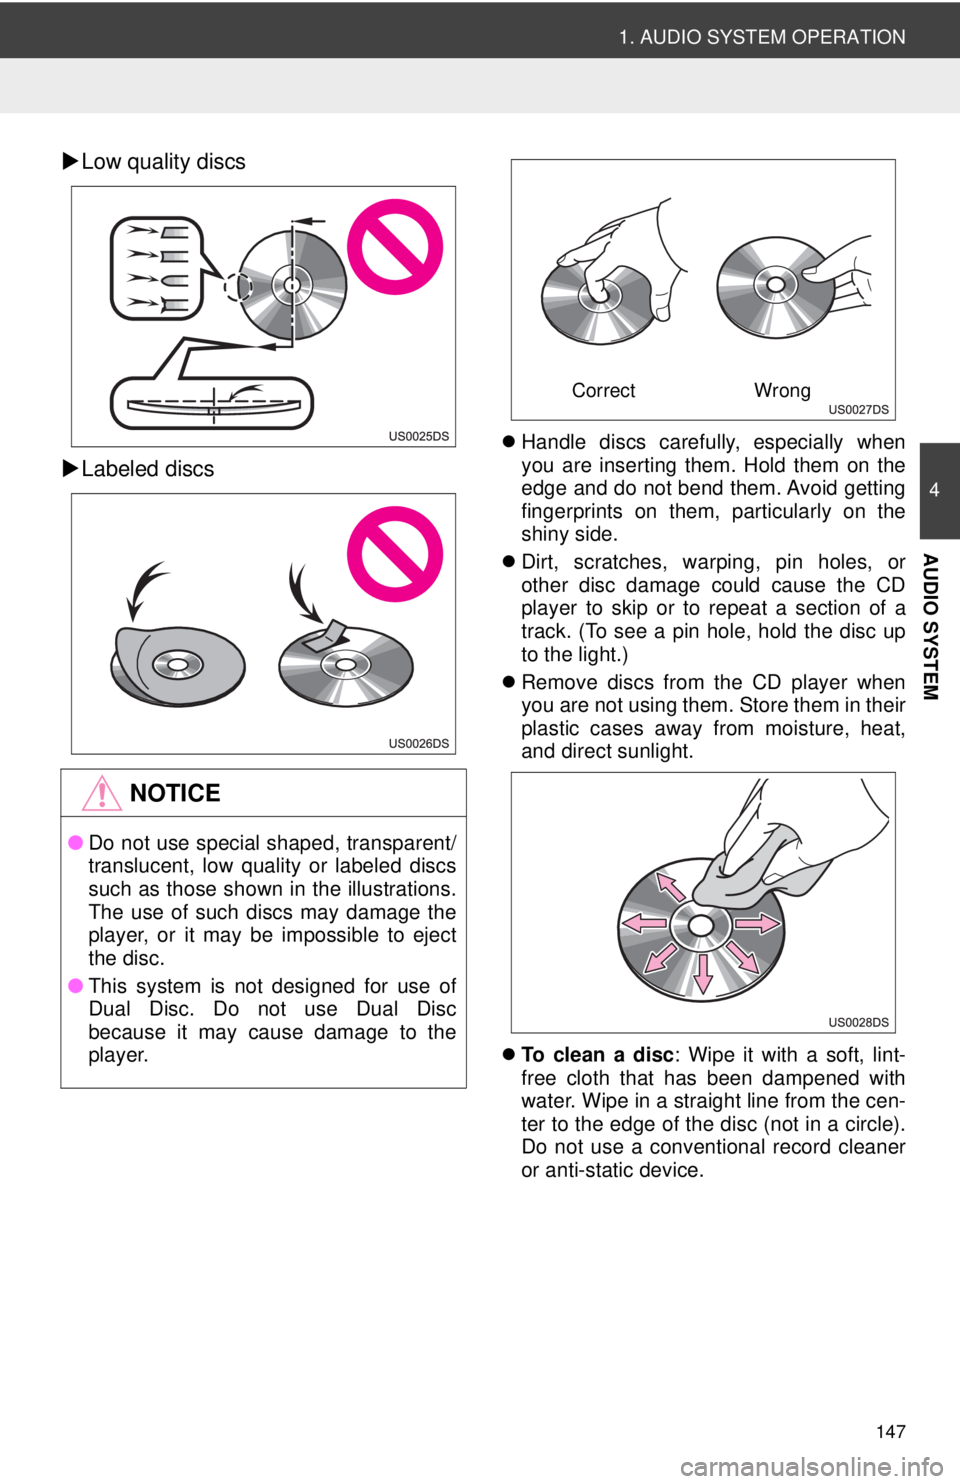
Low quality discs
Labeled discs
Handle discs carefully, especially when
you are inserting them. Hold them on the
edge and do not bend them. Avoid getting
fingerprints on them, particularly on the
shiny side.
Dirt, scratches, warping, pin holes, or
other disc damage could cause the CD
player to skip or to repeat a section of a
track. (To see a pin hole, hold the disc up
to the light.)
Remove discs from the CD player when
you are not using them. Store them in their
plastic cases away from moisture, heat,
and direct sunlight.
To clean a disc : Wipe it with a soft, lint-
free cloth that has been dampened with
water. Wipe in a straight line from the cen-
ter to the edge of the disc (not in a circle).
Do not use a conventional record cleaner
or anti-static device.
NOTICE
● Do not use special shaped, transparent/
translucent, low quality or labeled discs
such as those shown in the illustrations.
The use of such discs may damage the
player, or it may be impossible to eject
the disc.
● This system is not designed for use of
Dual Disc. Do not use Dual Disc
because it may cause damage to the
player.
Correct Wrong
Page 149 of 228
149
1. AUDIO SYSTEM OPERATION
4
AUDIO SYSTEM
MP3/WMA files in folders up to 8 levels
deep can be played. However, the start of
playback may be delayed when using
discs containing numerous levels of fold-
ers. For this reason, we recommend creat-
ing discs with no more than two levels of
folders.
WMA files Ver. 9 depends on “Windows
Media
® Audio Standard”.
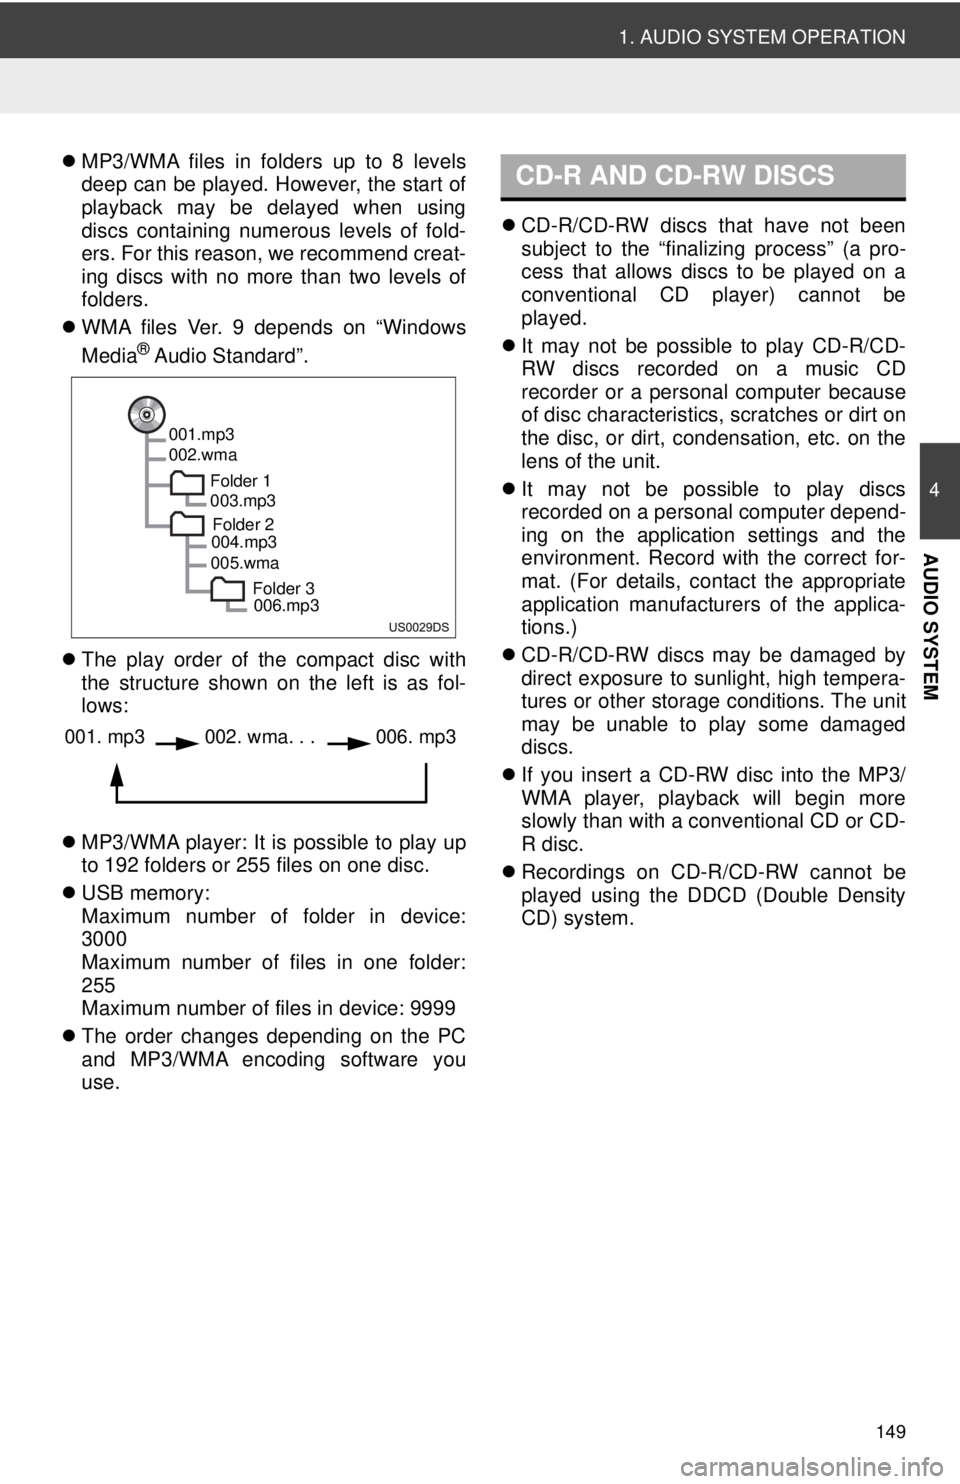
The play order of the compact disc with
the structure shown on the left is as fol-
lows:
MP3/WMA player: It is possible to play up
to 192 folders or 255 files on one disc.
USB memory:
Maximum number of folder in device:
3000
Maximum number of files in one folder:
255
Maximum number of files in device: 9999
The order changes depending on the PC
and MP3/WMA encoding software you
use.
CD-R/CD-RW discs that have not been
subject to the “finalizing process” (a pro-
cess that allows discs to be played on a
conventional CD player) cannot be
played.
It may not be possible to play CD-R/CD-
RW discs recorded on a music CD
recorder or a personal computer because
of disc characteristics, scratches or dirt on
the disc, or dirt, condensation, etc. on the
lens of the unit.
It may not be possible to play discs
recorded on a personal computer depend-
ing on the application settings and the
environment. Record with the correct for-
mat. (For details, contact the appropriate
application manufacturers of the applica-
tions.)
CD-R/CD-RW discs may be damaged by
direct exposure to sunlight, high tempera-
tures or other storage conditions. The unit
may be unable to play some damaged
discs.
If you insert a CD-RW disc into the MP3/
WMA player, playback will begin more
slowly than with a conventional CD or CD-
R disc.
Recordings on CD-R/CD-RW cannot be
played using the DDCD (Double Density
CD) system.
001.mp3
002.wma
Folder 1003.mp3
Folder 2
004.mp3
005.wma
Folder 3006.mp3
001. mp3002. wma. . . 006. mp3
CD-R AND CD-RW DISCS
Page 188 of 228
188
1. VOICE COMMAND SYSTEM OPERATION
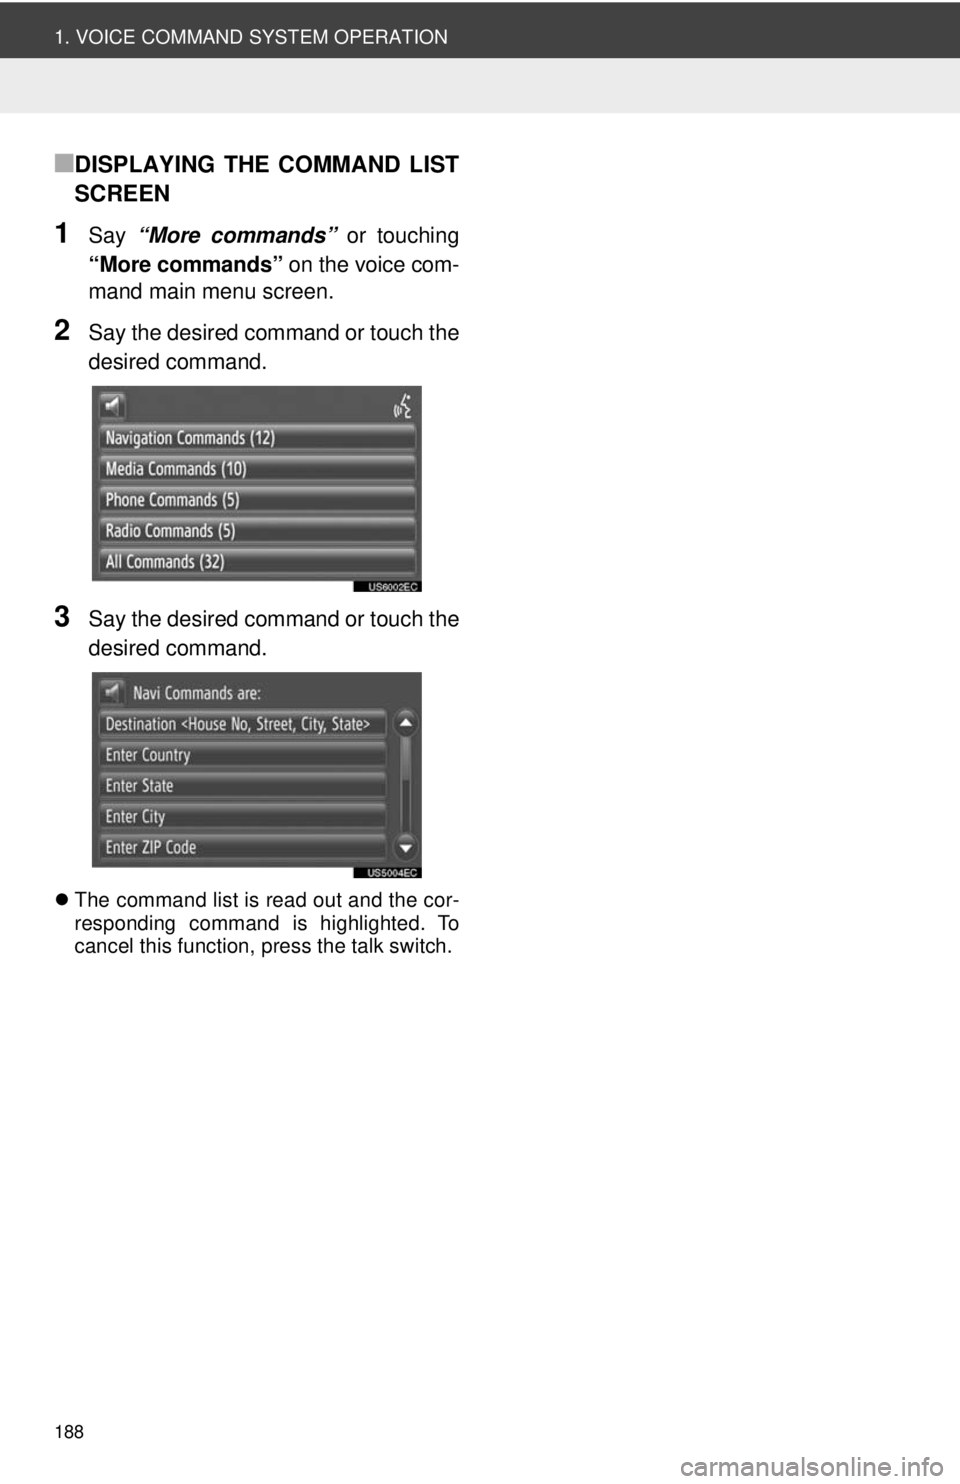
■DISPLAYING THE COMMAND LIST
SCREEN
1Say “More commands” or touching
“More commands” on the voice com-
mand main menu screen.
2Say the desired command or touch the
desired command.
3Say the desired command or touch the
desired command.
The command list is read out and the cor-
responding command is highlighted. To
cancel this function, press the talk switch.
Page 198 of 228
198
1. SETUP OPERATION
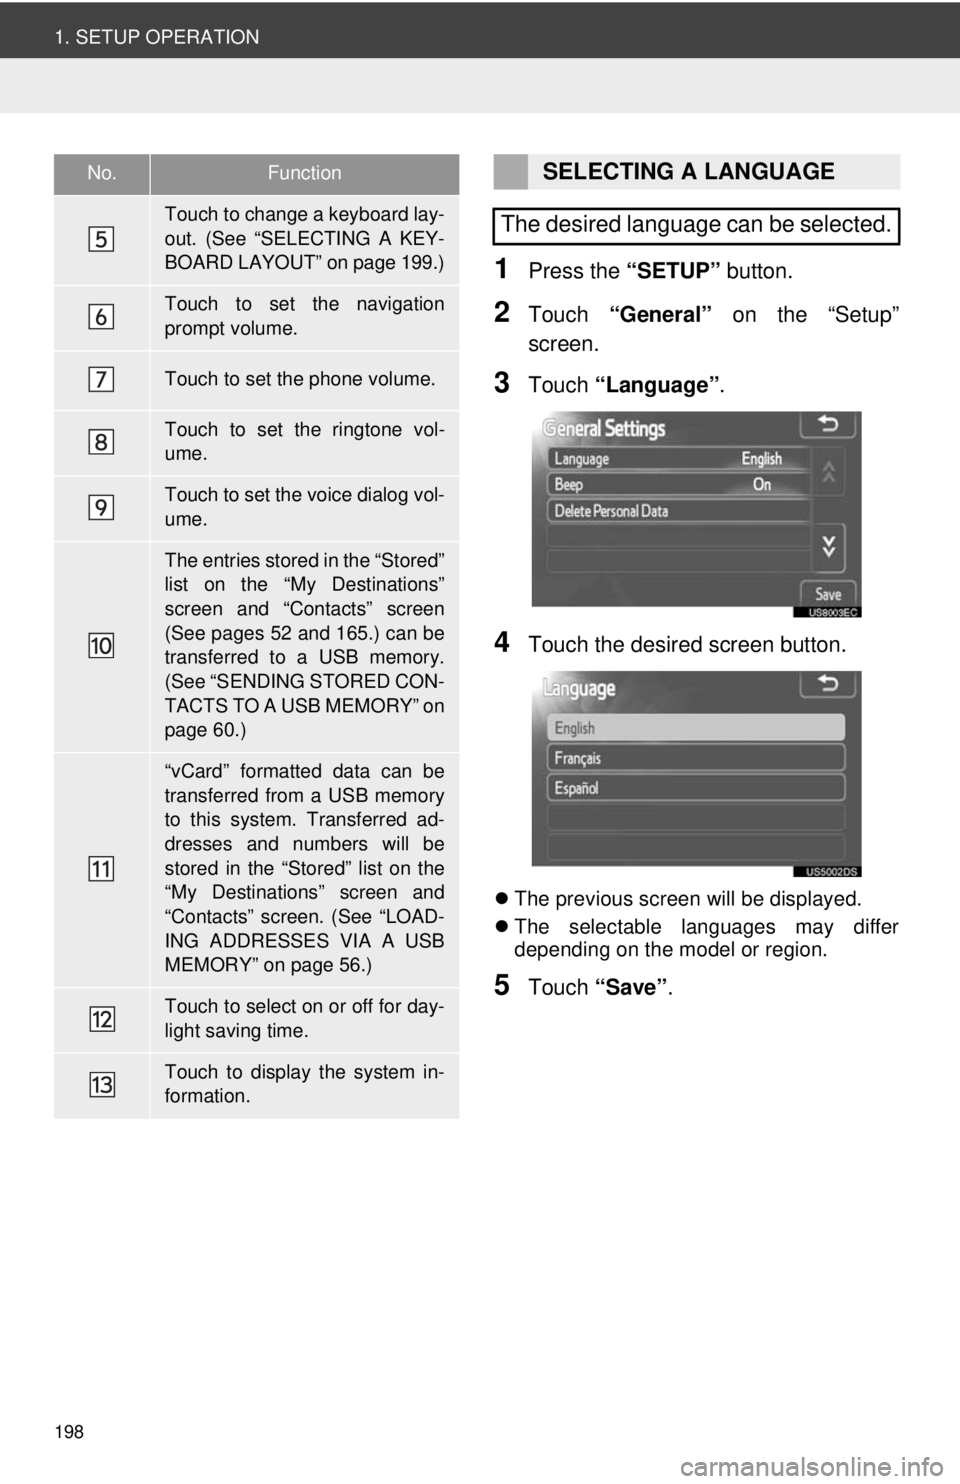
1Press the “SETUP” button.
2Touch “General” on the “Setup”
screen.
3Touch “Language” .
4Touch the desired screen button.
The previous screen will be displayed.
The selectable languages may differ
depending on the model or region.
5Touch “Save” .
Touch to change a keyboard lay-
out. (See “SELECTING A KEY-
BOARD LAYOUT” on page 199.)
Touch to set the navigation
prompt volume.
Touch to set the phone volume.
Touch to set the ringtone vol-
ume.
Touch to set the voice dialog vol-
ume.
The entries stored in the “Stored”
list on the “My Destinations”
screen and “Contacts” screen
(See pages 52 and 165.) can be
transferred to a USB memory.
(See “SENDING STORED CON-
TACTS TO A USB MEMORY” on
page 60.)
“vCard” formatted data can be
transferred from a USB memory
to this system. Transferred ad-
dresses and numbers will be
stored in the “Stored” list on the
“My Destinations” screen and
“Contacts” screen. (See “LOAD-
ING ADDRESSES VIA A USB
MEMORY” on page 56.)
Touch to select on or off for day-
light saving time.
Touch to display the system in-
formation.
No.FunctionSELECTING A LANGUAGE
The desired language can be selected.