window TOYOTA VENZA 2013 Accessories, Audio & Navigation (in English)
[x] Cancel search | Manufacturer: TOYOTA, Model Year: 2013, Model line: VENZA, Model: TOYOTA VENZA 2013Pages: 228, PDF Size: 3.73 MB
Page 25 of 228
25
2
APPLICATION-“Map”
1. NAVIGATION OPERATION
3. MAP SCREEN OPERATION
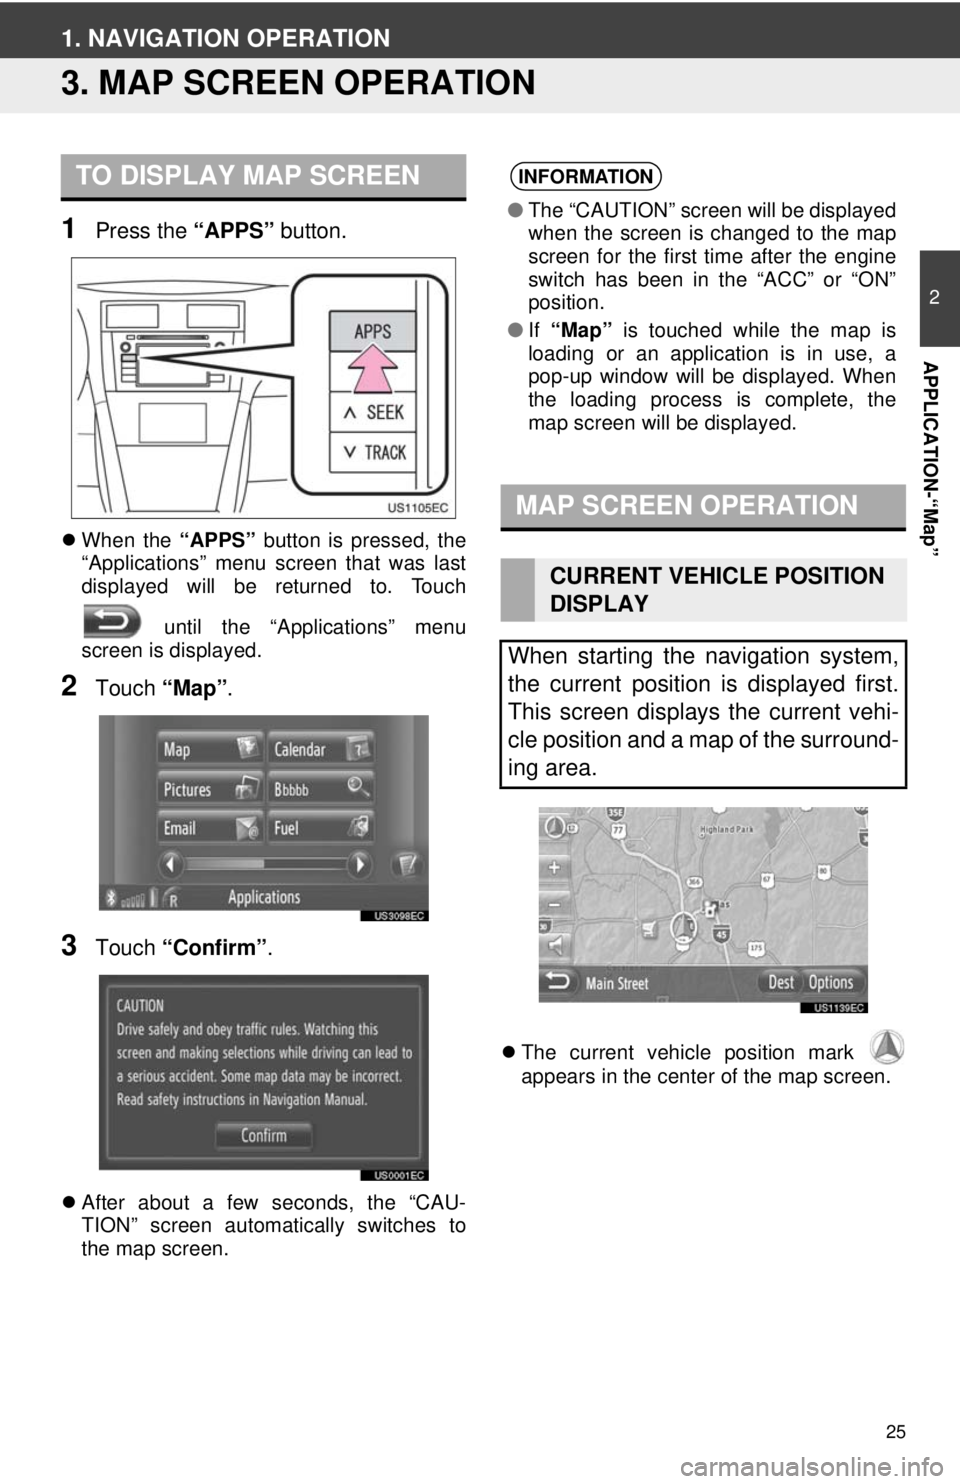
1Press the “APPS” button.
When the “APPS” button is pressed, the
“Applications” menu screen that was last
displayed will be returned to. Touch
until the “Applications” menu
screen is displayed.
2Touch “Map”.
3Touch “Confirm” .
After about a few seconds, the “CAU-
TION” screen automatically switches to
the map screen.
The current vehicle position mark
appears in the center of the map screen.
TO DISPLAY MAP SCREENINFORMATION
● The “CAUTION” screen will be displayed
when the screen is changed to the map
screen for the first time after the engine
switch has been in the “ACC” or “ON”
position.
● If “Map” is touched while the map is
loading or an application is in use, a
pop-up window will be displayed. When
the loading process is complete, the
map screen will be displayed.
MAP SCREEN OPERATION
CURRENT VEHICLE POSITION
DISPLAY
When starting the navigation system,
the current position is displayed first.
This screen displays the current vehi-
cle position and a map of the surround-
ing area.
Page 66 of 228
66
6. NAVIGATION SYSTEM INFORMATION
1. LIMITATIONS OF THE NAVIGATION SYSTEM
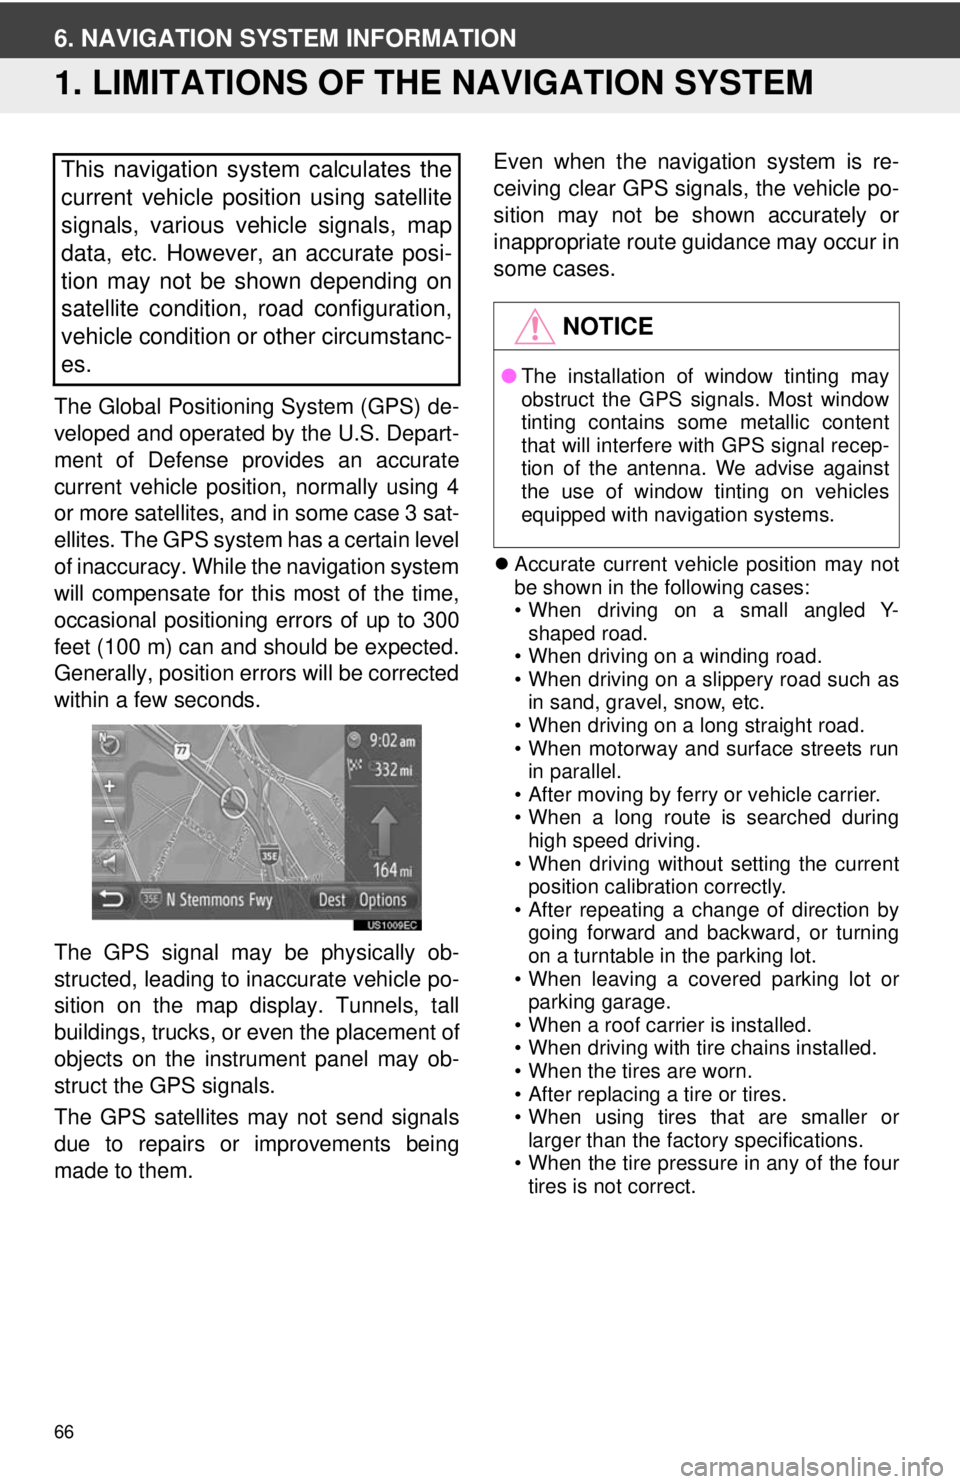
The Global Positioning System (GPS) de-
veloped and operated by the U.S. Depart-
ment of Defense provides an accurate
current vehicle position, normally using 4
or more satellites, and in some case 3 sat-
ellites. The GPS system has a certain level
of inaccuracy. While the navigation system
will compensate for this most of the time,
occasional positioning errors of up to 300
feet (100 m) can and should be expected.
Generally, position errors will be corrected
within a few seconds.
The GPS signal may be physically ob-
structed, leading to inaccurate vehicle po-
sition on the map display. Tunnels, tall
buildings, trucks, or even the placement of
objects on the instrument panel may ob-
struct the GPS signals.
The GPS satellites may not send signals
due to repairs or improvements being
made to them. Even when the navigation system is re-
ceiving clear GPS signals, the vehicle po-
sition may not be shown accurately or
inappropriate route guidance may occur in
some cases.
Accurate current vehicle position may not
be shown in the following cases:
• When driving on a small angled Y-
shaped road.
• When driving on a winding road.
• When driving on a slippery road such as in sand, gravel, snow, etc.
• When driving on a long straight road.
• When motorway and surface streets run in parallel.
• After moving by ferry or vehicle carrier.
• When a long route is searched during high speed driving.
• When driving without setting the current position calibration correctly.
• After repeating a change of direction by
going forward and backward, or turning
on a turntable in the parking lot.
• When leaving a covered parking lot or
parking garage.
• When a roof carrier is installed.
• When driving with tire chains installed.
• When the tires are worn.
• After replacing a tire or tires.
• When using tires that are smaller or
larger than the factory specifications.
• When the tire pressure in any of the four tires is not correct.
This navigation system calculates the
current vehicle position using satellite
signals, various vehicle signals, map
data, etc. However, an accurate posi-
tion may not be shown depending on
satellite condition, road configuration,
vehicle condition or other circumstanc-
es.
NOTICE
● The installation of window tinting may
obstruct the GPS signals. Most window
tinting contains some metallic content
that will interfere with GPS signal recep-
tion of the antenna. We advise against
the use of window tinting on vehicles
equipped with navigation systems.
Page 75 of 228
75
3
APPLICATION-THE OTHERS
1. APPLICATIONS OPERATION
2. PICTURE SLIDESHOW
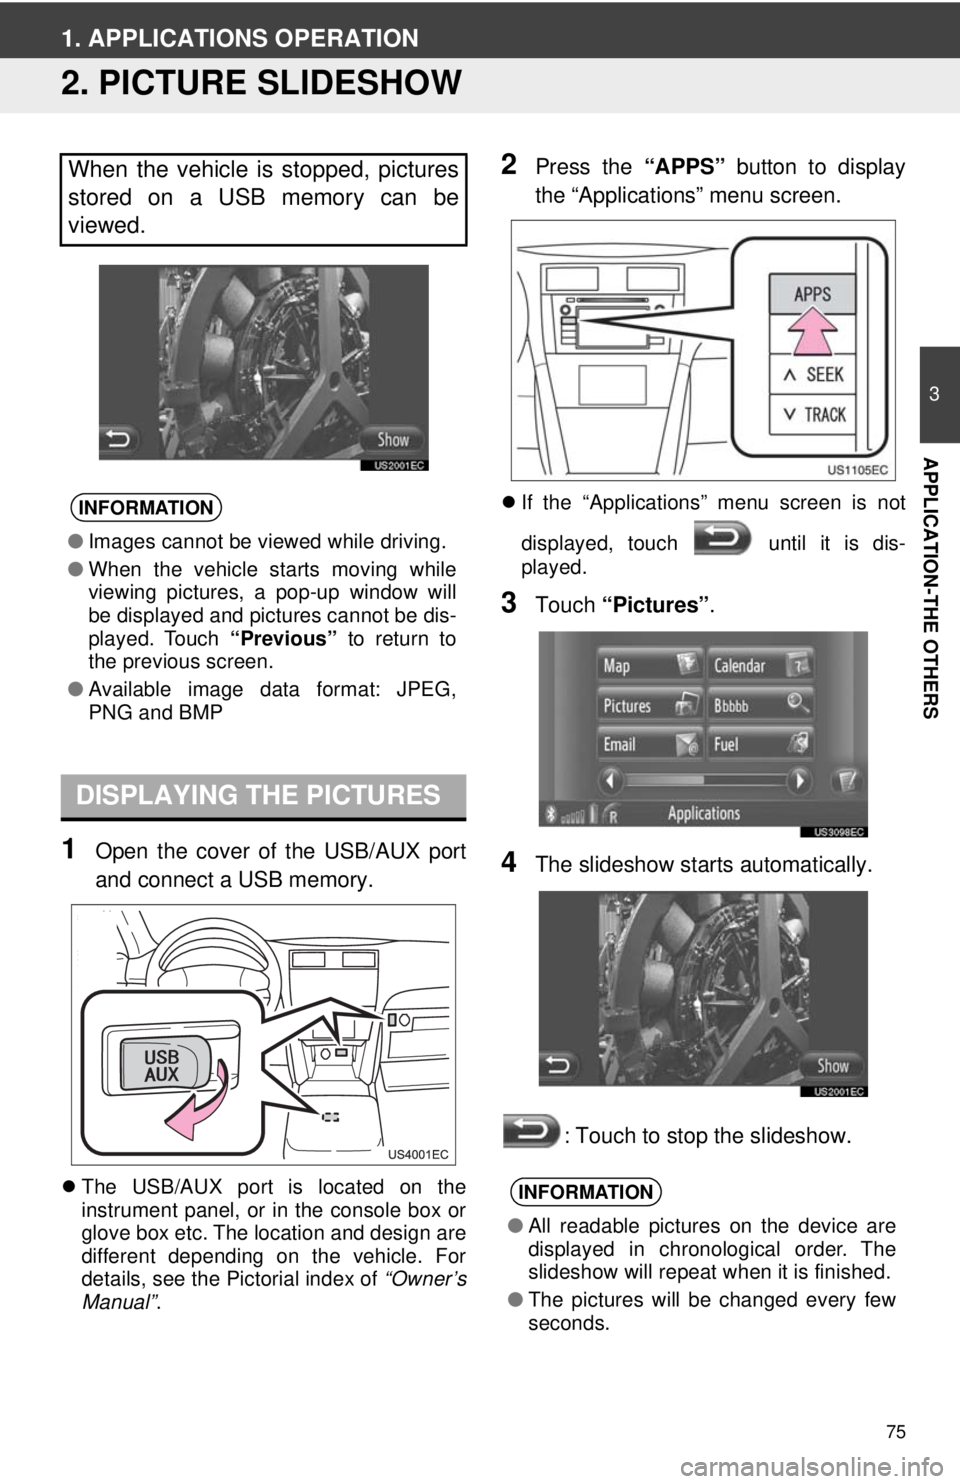
1Open the cover of the USB/AUX port
and connect a USB memory.
The USB/AUX port is located on the
instrument panel, or in the console box or
glove box etc. The location and design are
different depending on the vehicle. For
details, see the Pictorial index of “Owner’s
Manual” .
2Press the “APPS” button to display
the “Applications” menu screen.
If the “Applications” menu screen is not
displayed, touch until it is dis-
played.
3Touch “Pictures” .
4The slideshow starts automatically.
: Touch to stop the slideshow.
When the vehicle is stopped, pictures
stored on a USB memory can be
viewed.
INFORMATION
●Images cannot be viewed while driving.
● When the vehicle starts moving while
viewing pictures, a pop-up window will
be displayed and pictures cannot be dis-
played. Touch “Previous” to return to
the previous screen.
● Available image data format: JPEG,
PNG and BMP
DISPLAYING THE PICTURES
INFORMATION
●All readable pictures on the device are
displayed in chronological order. The
slideshow will repeat when it is finished.
● The pictures will be changed every few
seconds.
Page 77 of 228
77
3
APPLICATION-THE OTHERS
1. APPLICATIONS OPERATION
3. EMAIL
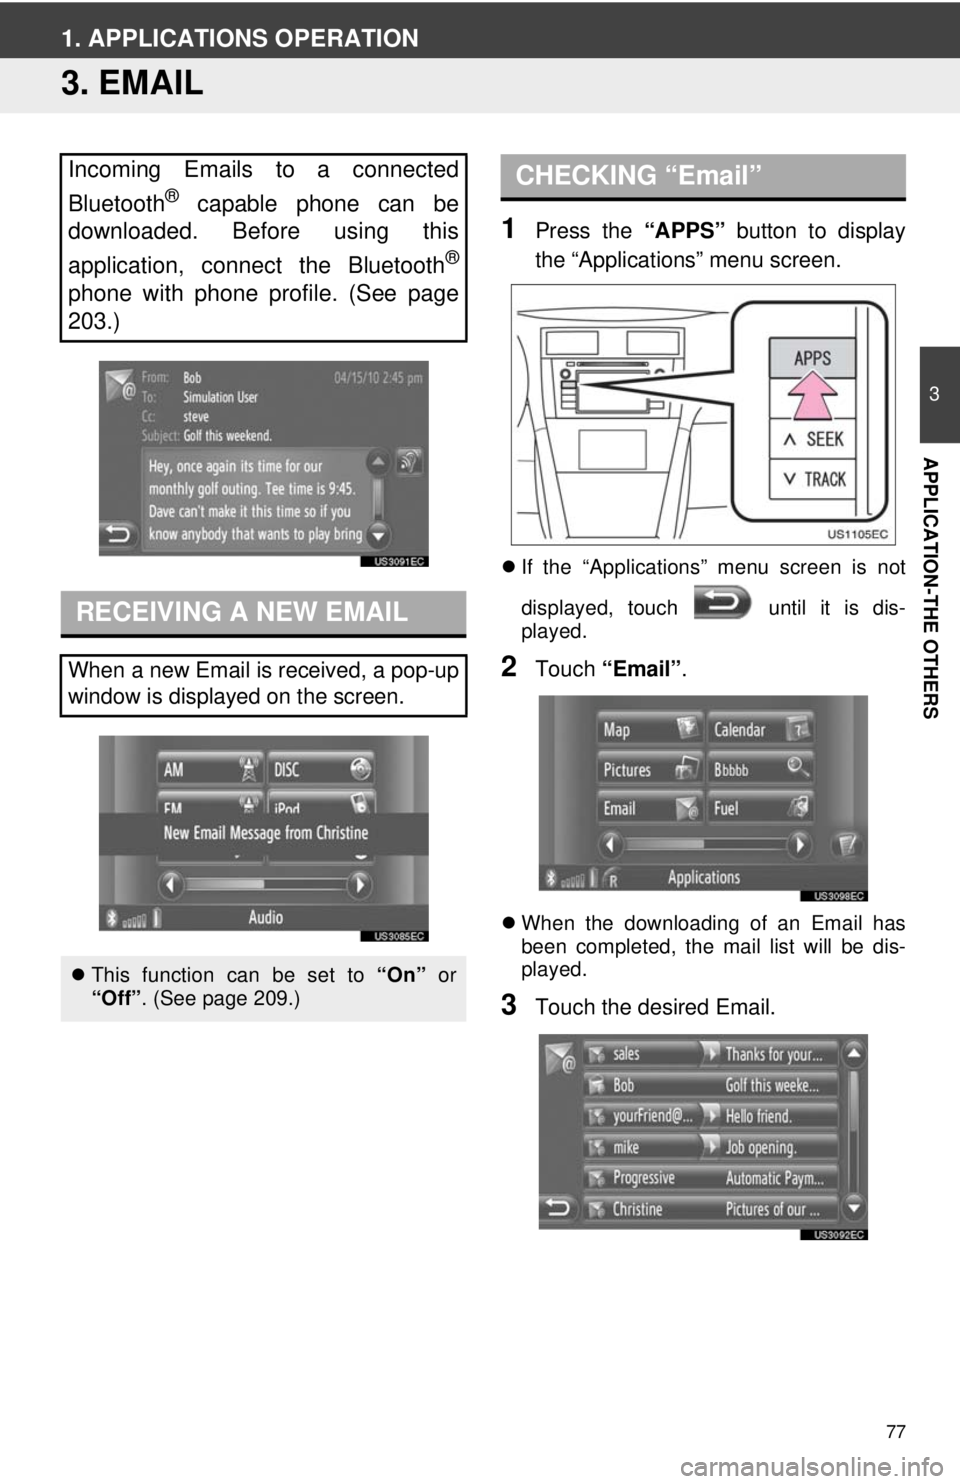
1Press the “APPS” button to display
the “Applications” menu screen.
If the “Applications” menu screen is not
displayed, touch until it is dis-
played.
2Touch “Email” .
When the downloading of an Email has
been completed, the mail list will be dis-
played.
3Touch the desired Email.
Incoming Emails to a connected
Bluetooth
® capable phone can be
downloaded. Before using this
application, connect the Bluetooth
®
phone with phone profile. (See page
203.)
RECEIVING A NEW EMAIL
When a new Email is received, a pop-up
window is displayed on the screen.
This function can be set to “On” or
“Off”. (See page 209.)
CHECKING “Email”
Page 89 of 228
89
2. ENTUNE SERVICE
3
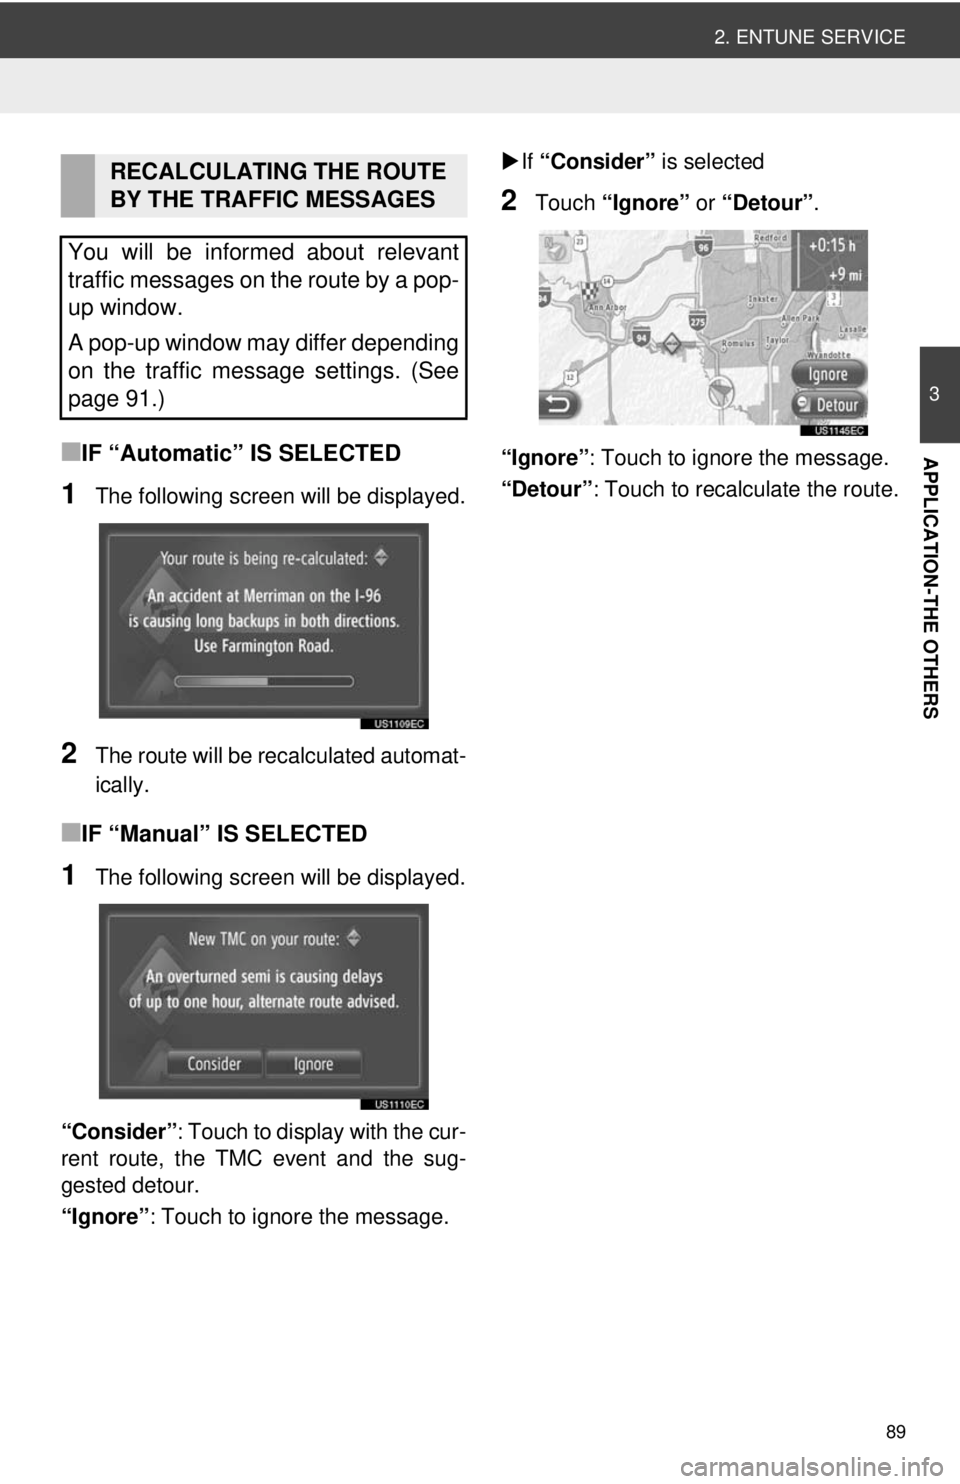
APPLICATION-THE OTHERS■IF “Automatic” IS SELECTED
1The following screen will be displayed.
2The route will be recalculated automat-
ically.
■IF “Manual” IS SELECTED
1The following screen will be displayed.
“Consider” : Touch to display with the cur-
rent route, the TMC event and the sug-
gested detour.
“Ignore” : Touch to ignore the message.
If “Consider” is selected
2Touch “Ignore” or “Detour” .
“Ignore” : Touch to ignore the message.
“Detour” : Touch to recalculate the route.
RECALCULATING THE ROUTE
BY THE TRAFFIC MESSAGES
You will be informed about relevant
traffic messages on the route by a pop-
up window.
A pop-up window may differ depending
on the traffic message settings. (See
page 91.)
Page 91 of 228
91
2. ENTUNE SERVICE
3
APPLICATION-THE OTHERS
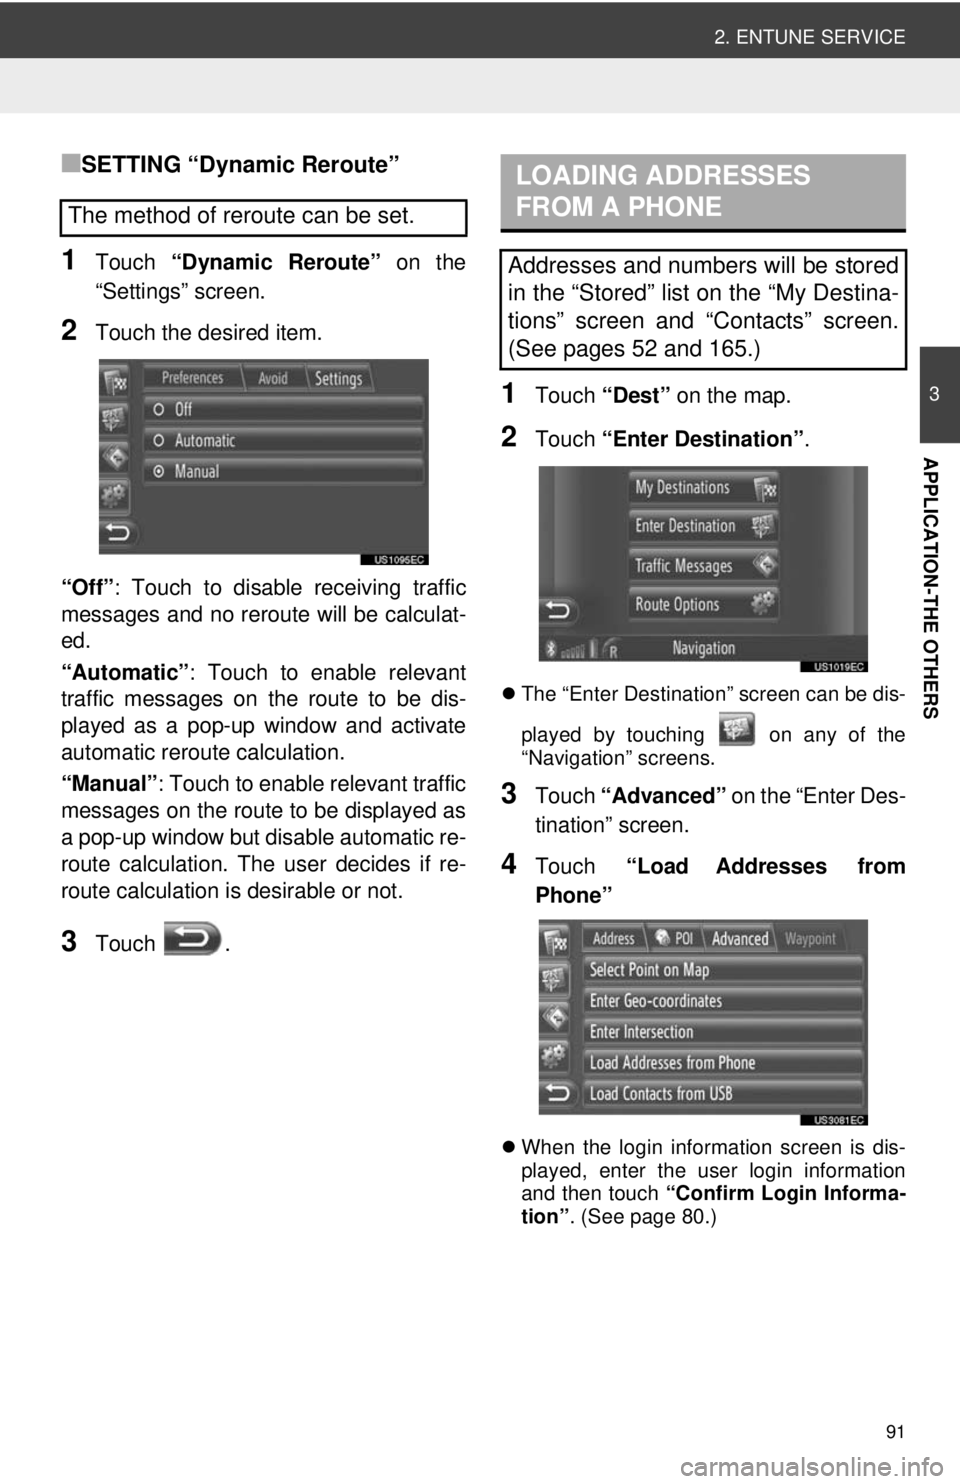
■SETTING “Dynamic Reroute”
1Touch “Dynamic Reroute” on the
“Settings” screen.
2Touch the desired item.
“Off” : Touch to disable receiving traffic
messages and no reroute will be calculat-
ed.
“Automatic” : Touch to enable relevant
traffic messages on the route to be dis-
played as a pop-up window and activate
automatic reroute calculation.
“Manual” : Touch to enable relevant traffic
messages on the route to be displayed as
a pop-up window but disable automatic re-
route calculation. The user decides if re-
route calculation is desirable or not.
3Touch .
1Touch “Dest” on the map.
2Touch “Enter Destination” .
The “Enter Destination” screen can be dis-
played by touching on any of the
“Navigation” screens.
3Touch “Advanced” on the “Enter Des-
tination” screen.
4Touch “Load Addresses from
Phone”
When the login information screen is dis-
played, enter the user login information
and then touch “Confirm Login Informa-
tion” . (See page 80.)
The method of reroute can be set.
LOADING ADDRESSES
FROM A PHONE
Addresses and numbers will be stored
in the “Stored” list on the “My Destina-
tions” screen and “Contacts” screen.
(See pages 52 and 165.)
Page 126 of 228
126
1. AUDIO SYSTEM OPERATION
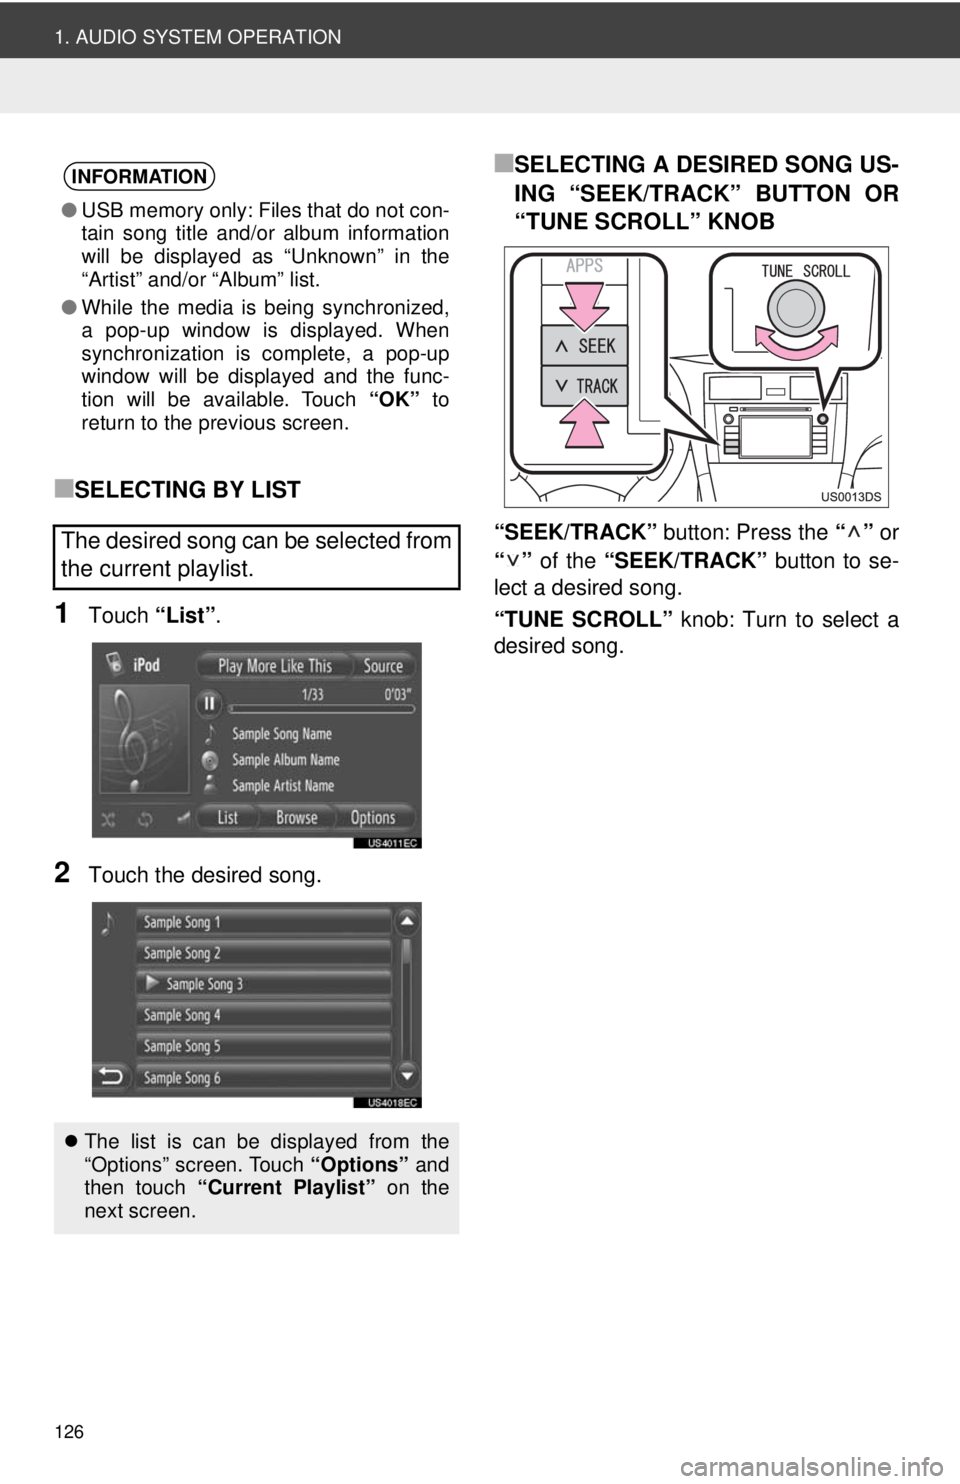
■SELECTING BY LIST
1Touch “List”.
2Touch the desired song.
■SELECTING A DESIRED SONG US-
ING “SEEK/TRACK” BUTTON OR
“TUNE SCROLL” KNOB
“SEEK/TRACK” button: Press the “” or
“” of the “SEEK/TRACK” button to se-
lect a desired song.
“TUNE SCROLL” knob: Turn to select a
desired song.
INFORMATION
● USB memory only: Files that do not con-
tain song title and/or album information
will be displayed as “Unknown” in the
“Artist” and/or “Album” list.
● While the media is being synchronized,
a pop-up window is displayed. When
synchronization is complete, a pop-up
window will be displayed and the func-
tion will be available. Touch “OK” to
return to the previous screen.
The desired song can be selected from
the current playlist.
The list is can be displayed from the
“Options” screen. Touch “Options” and
then touch “Current Playlist” on the
next screen.
Page 127 of 228
127
1. AUDIO SYSTEM OPERATION
4
AUDIO SYSTEM
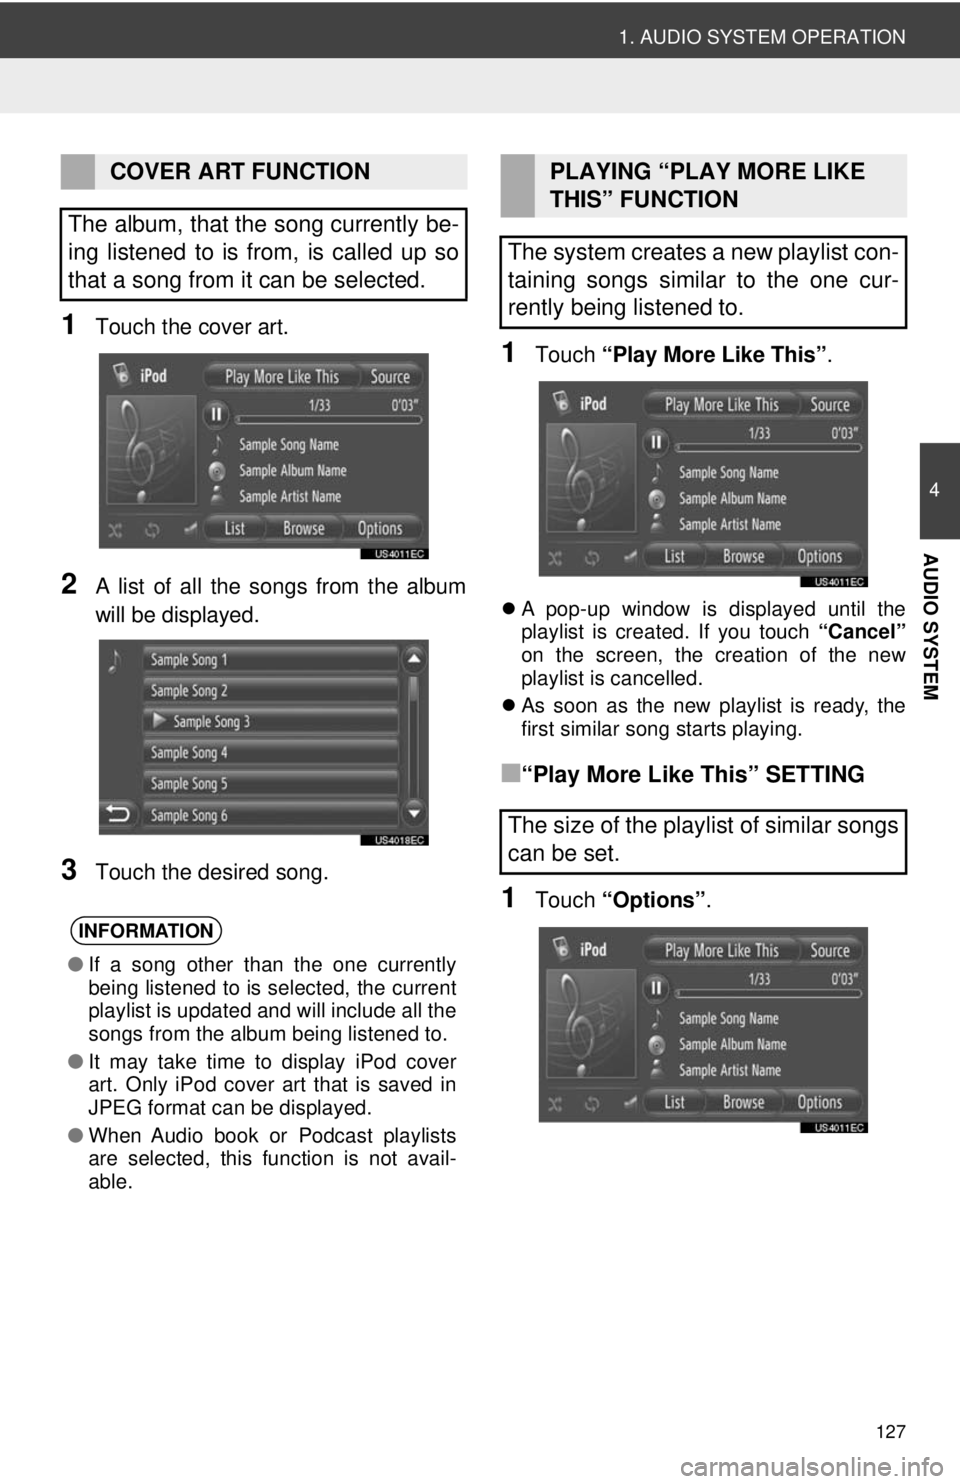
1Touch the cover art.
2A list of all the songs from the album
will be displayed.
3Touch the desired song.
1Touch “Play More Like This” .
A pop-up window is displayed until the
playlist is created. If you touch “Cancel”
on the screen, the creation of the new
playlist is cancelled.
As soon as the new playlist is ready, the
first similar song starts playing.
■“Play More Like This” SETTING
1Touch “Options”.
COVER ART FUNCTION
The album, that the song currently be-
ing listened to is from, is called up so
that a song from it can be selected.
INFORMATION
● If a song other than the one currently
being listened to is selected, the current
playlist is updated and will include all the
songs from the album being listened to.
● It may take time to display iPod cover
art. Only iPod cover art that is saved in
JPEG format can be displayed.
● When Audio book or Podcast playlists
are selected, this function is not avail-
able.
PLAYING “PLAY MORE LIKE
THIS” FUNCTION
The system creates a new playlist con-
taining songs similar to the one cur-
rently being listened to.
The size of the playlist of similar songs
can be set.
Page 134 of 228
134
1. AUDIO SYSTEM OPERATION
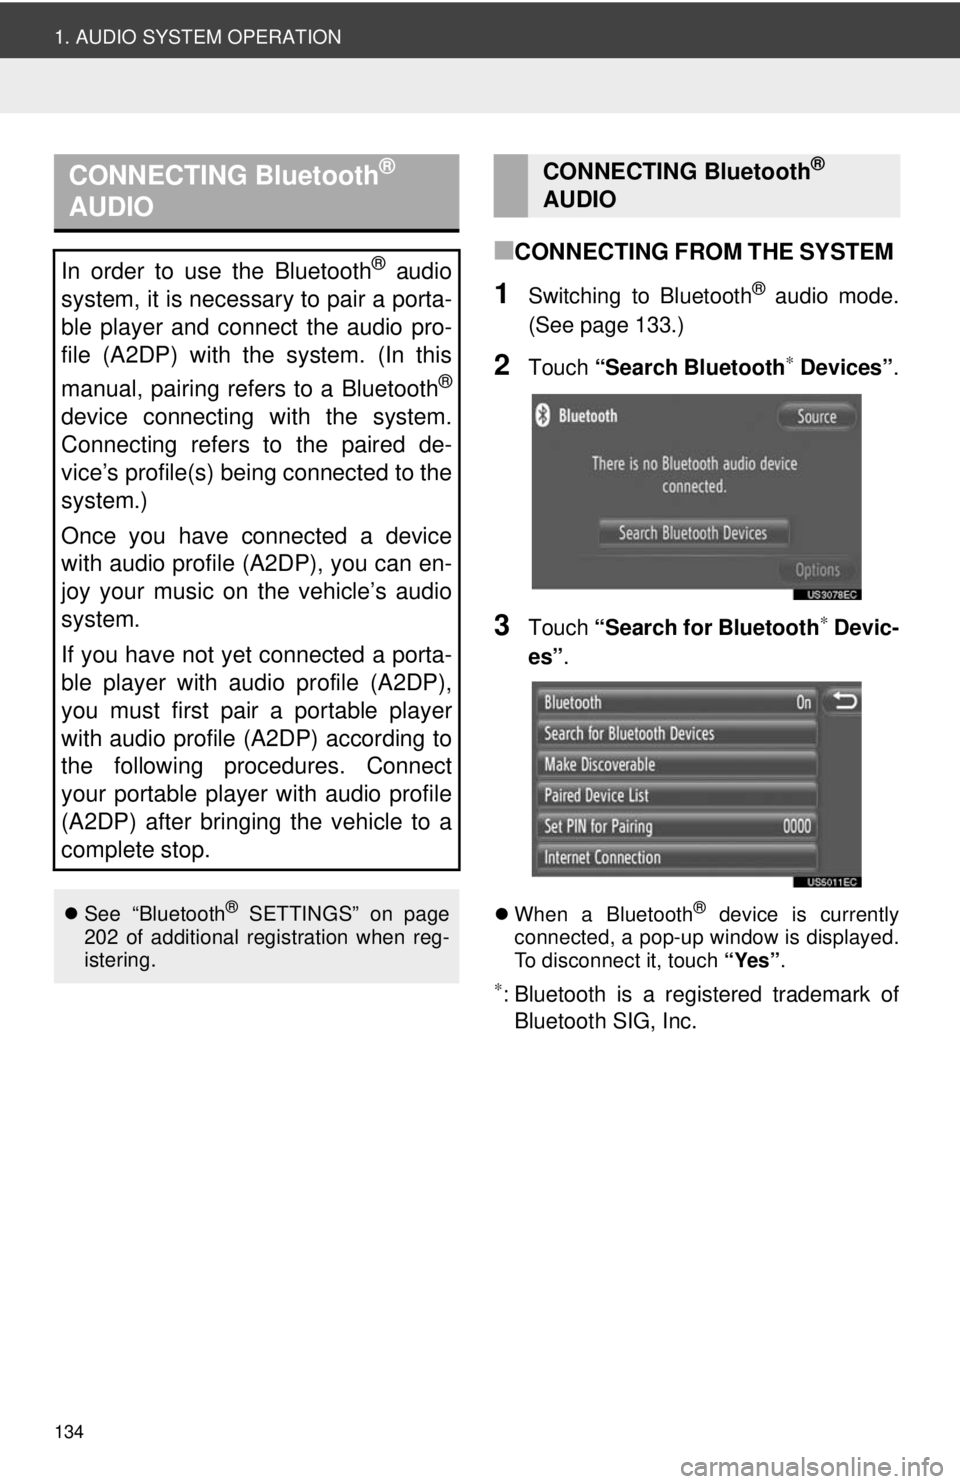
■CONNECTING FROM THE SYSTEM
1Switching to Bluetooth® audio mode.
(See page 133.)
2Touch “Search Bluetooth∗ Devices” .
3Touch “Search for Bluetooth∗ Devic-
es” .
When a Bluetooth® device is currently
connected, a pop-up window is displayed.
To disconnect it, touch “Yes”.
∗: Bluetooth is a registered trademark of
Bluetooth SIG, Inc.
CONNECTING Bluetooth®
AUDIO
In order to use the Bluetooth® audio
system, it is necessary to pair a porta-
ble player and connect the audio pro-
file (A2DP) with the system. (In this
manual, pairing refers to a Bluetooth
®
device connecting with the system.
Connecting refers to the paired de-
vice’s profile(s) being connected to the
system.)
Once you have connected a device
with audio profile (A2DP), you can en-
joy your music on the vehicle’s audio
system.
If you have not yet connected a porta-
ble player with audio profile (A2DP),
you must first pair a portable player
with audio profile (A2DP) according to
the following procedures. Connect
your portable player with audio profile
(A2DP) after bringing the vehicle to a
complete stop.
See “Bluetooth® SETTINGS” on page
202 of additional registration when reg-
istering.
CONNECTING Bluetooth®
AUDIO
Page 136 of 228
136
1. AUDIO SYSTEM OPERATION
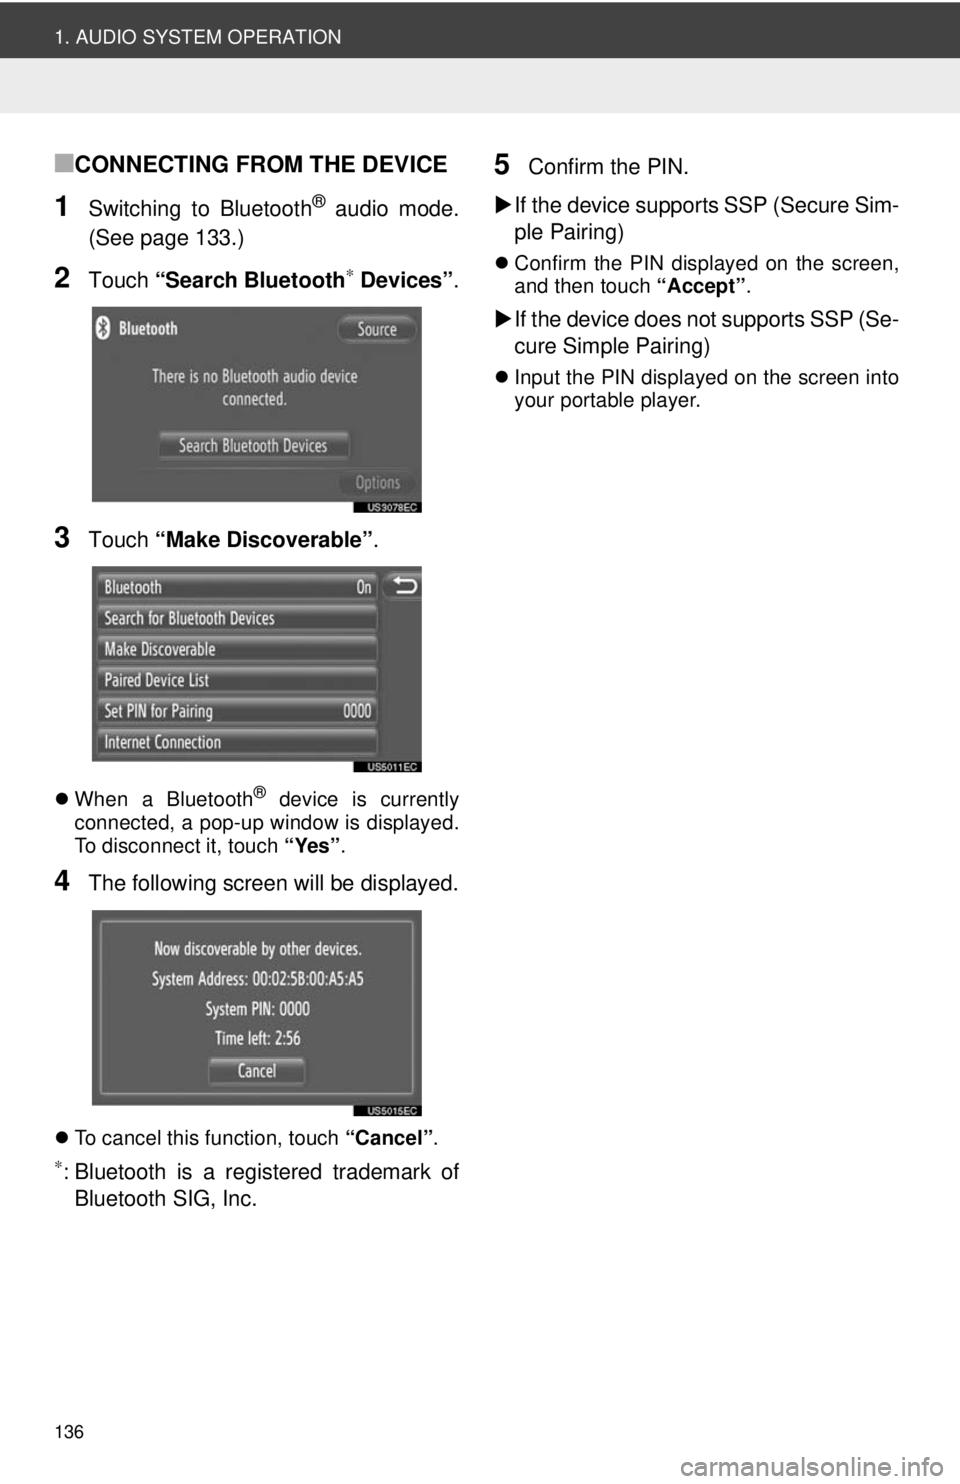
■CONNECTING FROM THE DEVICE
1Switching to Bluetooth® audio mode.
(See page 133.)
2Touch “Search Bluetooth∗ Devices” .
3Touch “Make Discoverable” .
When a Bluetooth® device is currently
connected, a pop-up window is displayed.
To disconnect it, touch “Yes”.
4The following screen will be displayed.
To cancel this function, touch “Cancel”.
∗: Bluetooth is a registered trademark of
Bluetooth SIG, Inc.
5Confirm the PIN.
If the device supports SSP (Secure Sim-
ple Pairing)
Confirm the PIN displayed on the screen,
and then touch “Accept”.
If the device does not supports SSP (Se-
cure Simple Pairing)
Input the PIN displayed on the screen into
your portable player.