garage door opener TOYOTA VENZA HYBRID 2021 Owners Manual (in English)
[x] Cancel search | Manufacturer: TOYOTA, Model Year: 2021, Model line: VENZA HYBRID, Model: TOYOTA VENZA HYBRID 2021Pages: 548, PDF Size: 18.43 MB
Page 4 of 548
4TABLE OF CONTENTS
Luggage compartment fea-tures ............................ 341
5-4. Using the other interior fea- tures
Toyota multi-operation touch
(vehicle with the 12.3-inch
display) ........................ 345
Panoramic fixed moon roof with one-touch frosted glass
control ......................... 347
Other interior features ... 349
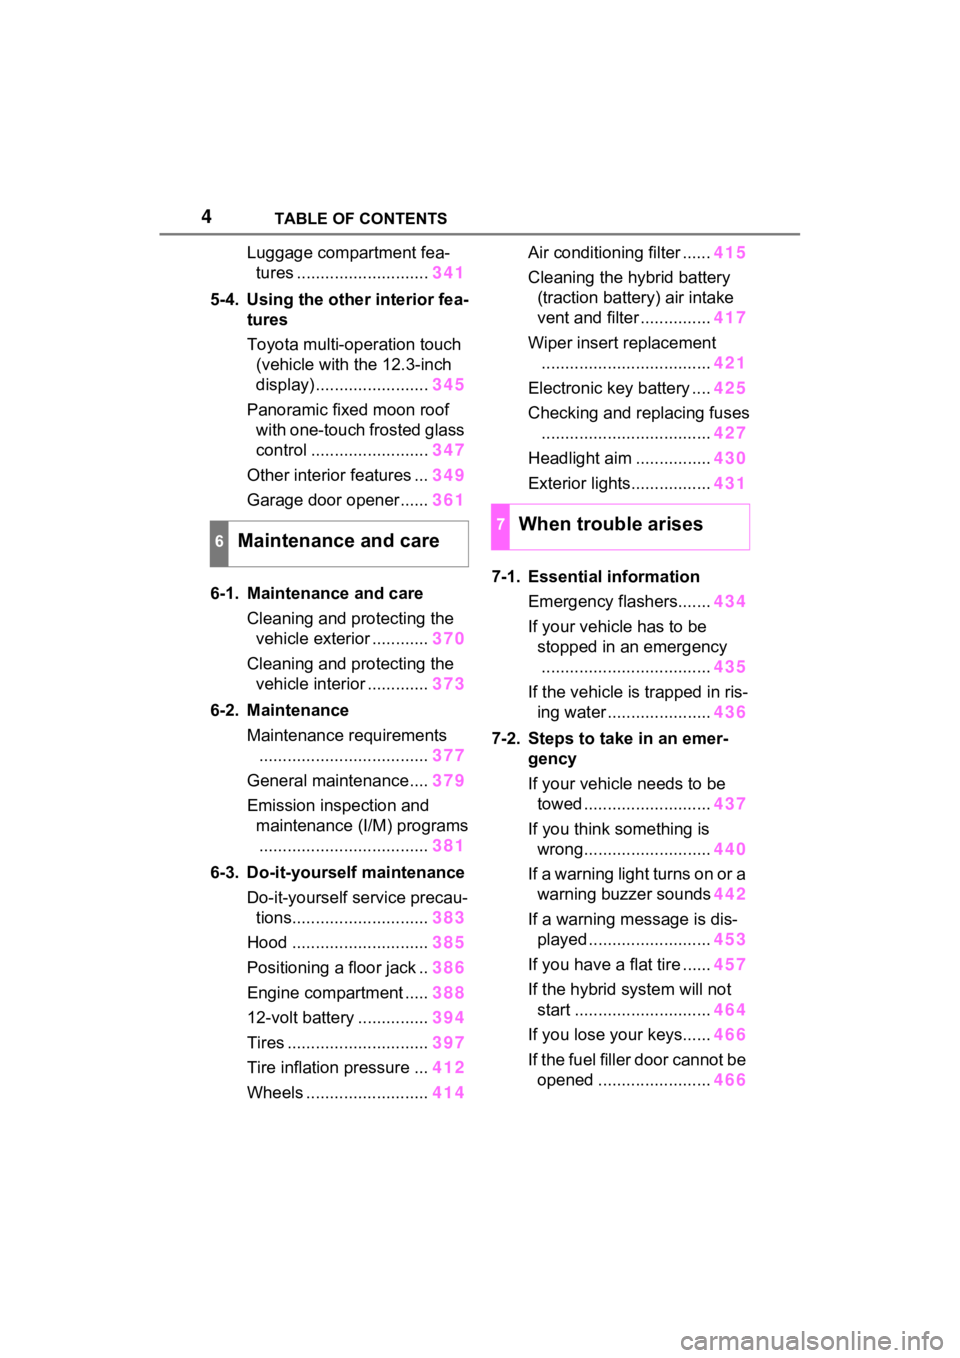
Garage door opener...... 361
6-1. Maintenance and care Cleaning and protecting the vehicle exterior ............ 370
Cleaning and protecting the vehicle interior ............. 373
6-2. Maintenance Maintenance requirements.................................... 377
General maintenance.... 379
Emission inspection and maintenance (I/M) programs.................................... 381
6-3. Do-it-yourself maintenance Do-it-yourself service precau-tions............................. 383
Hood ............................. 385
Positioning a floor jack .. 386
Engine compartment ..... 388
12-volt battery ............... 394
Tires .............................. 397
Tire inflation pressure ... 412
Wheels ......... .................414 Air conditioning filter ......
415
Cleaning the hybrid battery (traction battery) air intake
vent and filter ............... 417
Wiper insert replacement .................................... 421
Electronic key battery .... 425
Checking and replacing fuses .................................... 427
Headlight aim ................ 430
Exterior lights................. 431
7-1. Essential information Emergency flashers....... 434
If your vehicle has to be stopped in an emergency.................................... 435
If the vehicle is trapped in ris- ing water ...................... 436
7-2. Steps to take in an emer- gency
If your vehicle needs to be towed ........................... 437
If you think something is wrong........................... 440
If a warning light turns on or a warning buzzer sounds 442
If a warning message is dis- played .......................... 453
If you have a flat tire ...... 457
If the hybrid system will not start ............................. 464
If you lose your keys...... 466
If the fuel filler door cannot be open ed
........................ 466
6Maintenance and care
7When trouble arises
Page 23 of 548
23Pictorial index
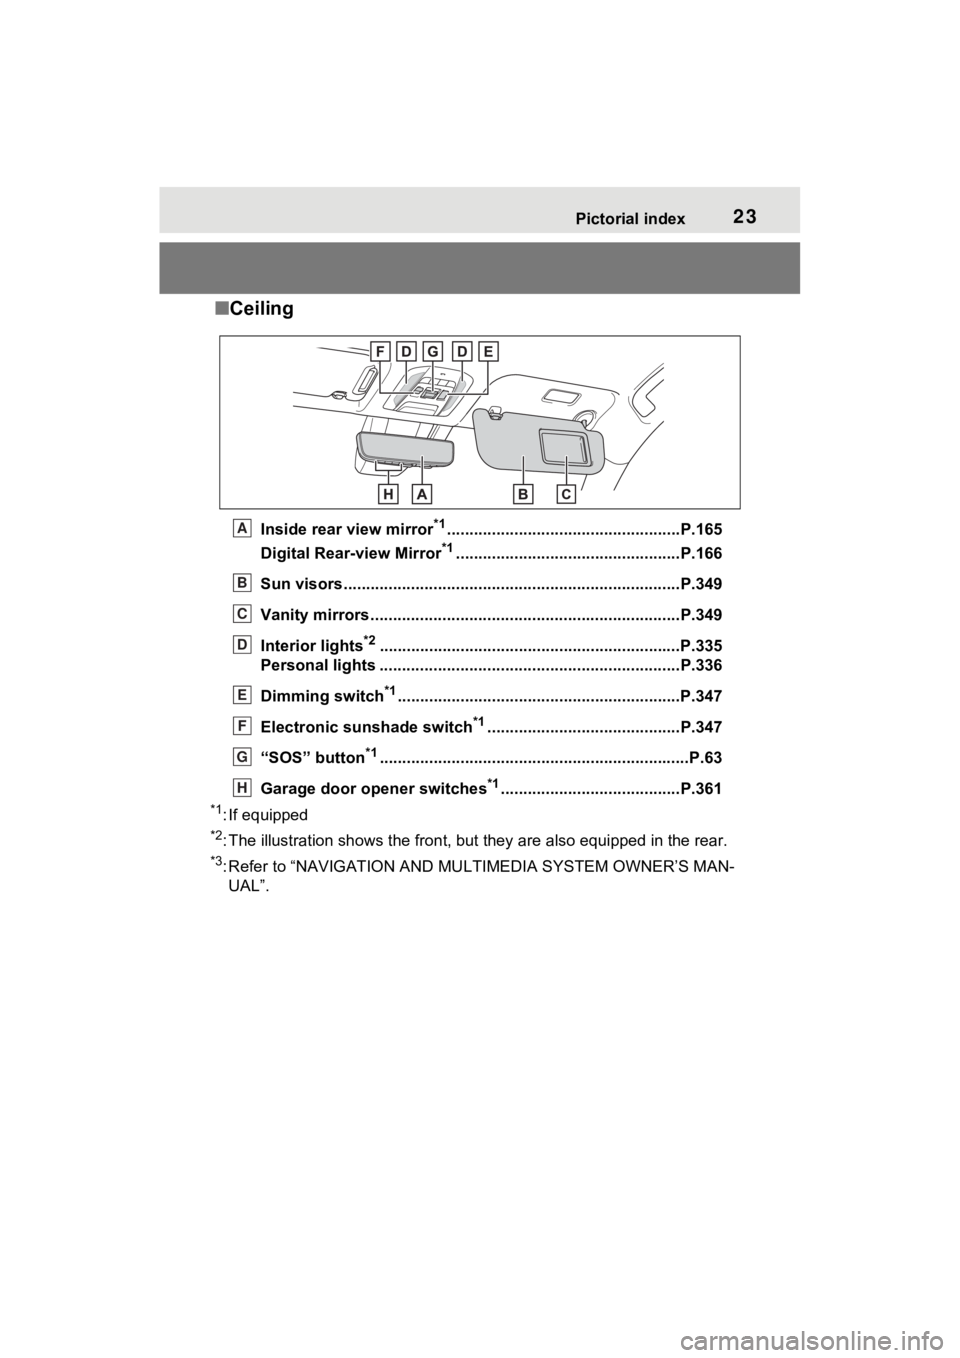
■Ceiling
Inside rear view mirror*1....................................................P.165
Digital Rear-view Mirror
*1..................................................P.166
Sun visors..................................................... ......................P.349
Vanity mirrors.....................................................................P.349
Interior lights
*2............................................................... ....P.335
Personal lights ................................................ ...................P.336
Dimming switch
*1............................................................... P.347
Electronic sunshade switch
*1...........................................P.347
“SOS” button
*1............................................................... ......P.63
Garage door opener switches
*1........................................P.361
*1: If equipped
*2: The illustration shows the fron t, but they are also equipped i n the rear.
*3: Refer to “NAVIGATI ON AND MULTIMEDIA SYSTEM OWNER’S MAN-
UAL”.
A
B
C
D
E
F
G
H
Page 171 of 548
1693-4. Adjusting the steering wheel and mirrors
3
Before driving
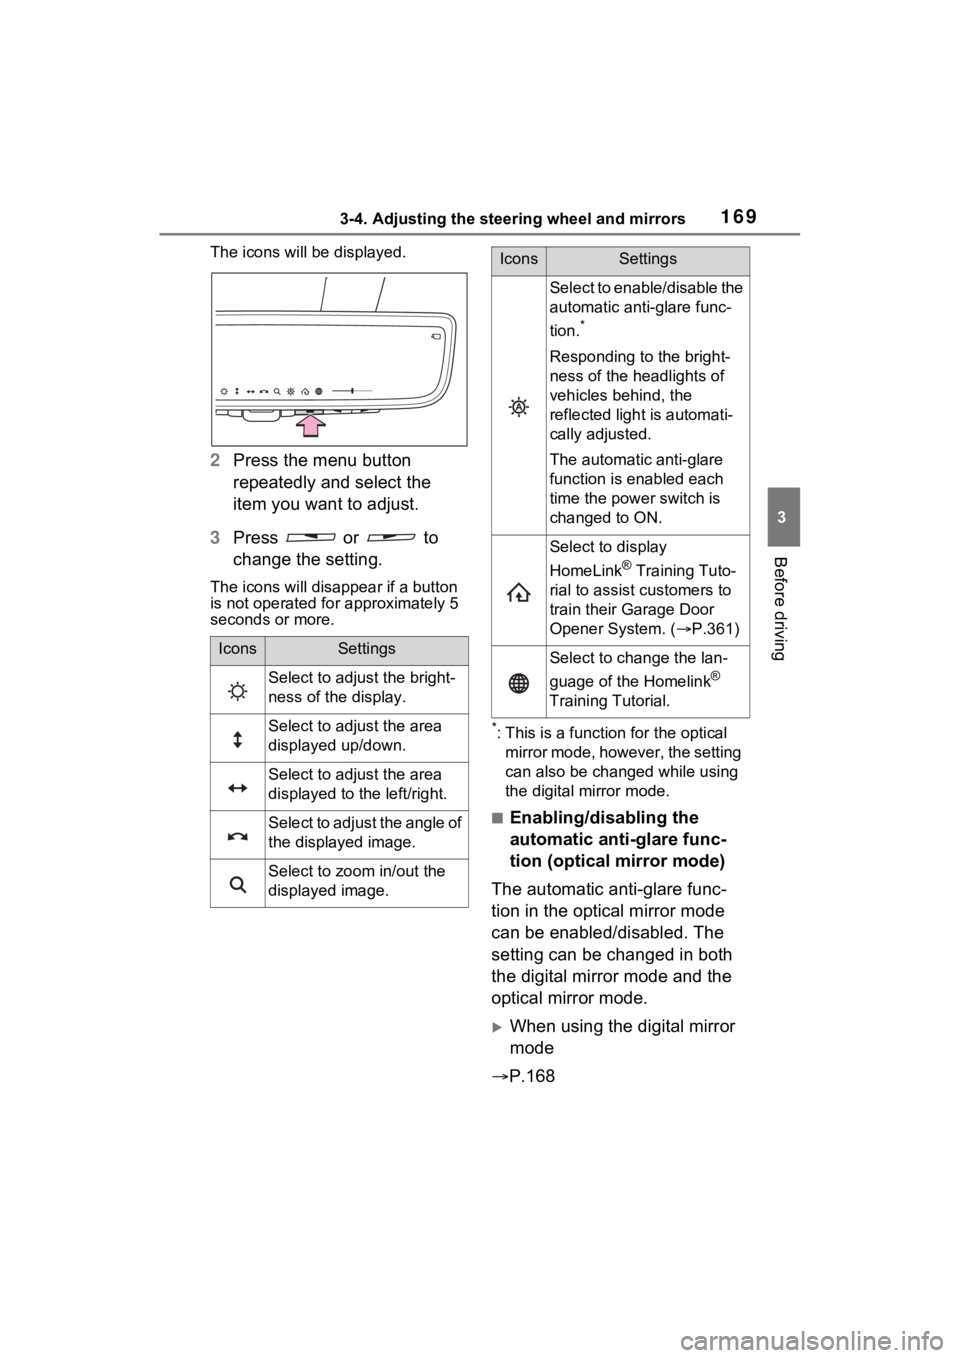
The icons will be displayed.
2Press the menu button
repeatedly and select the
item you want to adjust.
3 Press or to
change the setting.
The icons will disapp ear if a button
is not operated fo r approximately 5
seconds or more.
*: This is a functi on for the optical
mirror mode, however, the setting
can also be changed while using
the digital mirror mode.
■Enabling/disabling the
automatic anti-glare func-
tion (optical mirror mode)
The automatic anti-glare func-
tion in the optical mirror mode
can be enabled/disabled. The
setting can be changed in both
the digital mirror mode and the
optical mirror mode.
When using the digital mirror
mode
P.168
IconsSettings
Select to adjust the bright-
ness of the display.
Select to adjust the area
displayed up/down.
Select to adjust the area
displayed to the left/right.
Select to adjust the angle of
the displayed image.
Select to zoom in/out the
displayed image.
Select to enable/disable the
automatic anti-glare func-
tion.
*
Responding to the bright-
ness of the headlights of
vehicles behind, the
reflected light is automati-
cally adjusted.
The automatic anti-glare
function is enabled each
time the power switch is
changed to ON.
Select to display
HomeLink
® Training Tuto-
rial to assist customers to
train their Garage Door
Opener System. ( P.361)
Select to change the lan-
guage of the Homelink
®
Training Tutorial.
IconsSettings
Page 313 of 548
313
5
5
Interior features
Interior features
5-1. Using the air conditioning system and defogger
Automatic air conditioning system (vehicles with 8-
inch display) .............. 314
Automatic air conditioning system (vehicles with 12.3-
inch display) .............. 321
Heated steering wheel/seat heaters/seat ventilators
.................................. 331
5-2. Using the interior lights Interior lights list .......... 334
5-3. Using the storage features List of storage features 338
Luggage compartment fea- tures .......................... 341
5-4. Using the other interior features
Toyota multi-operation touch (vehicle with the
12.3-inch display) ...... 345
Panoramic fixed moon roof with one-touch frosted
glass control .............. 347
Other interior features . 349
Garage door opener.... 361
Page 361 of 548
3615-4. Using the other interior features
5
Interior features
*: If equipped
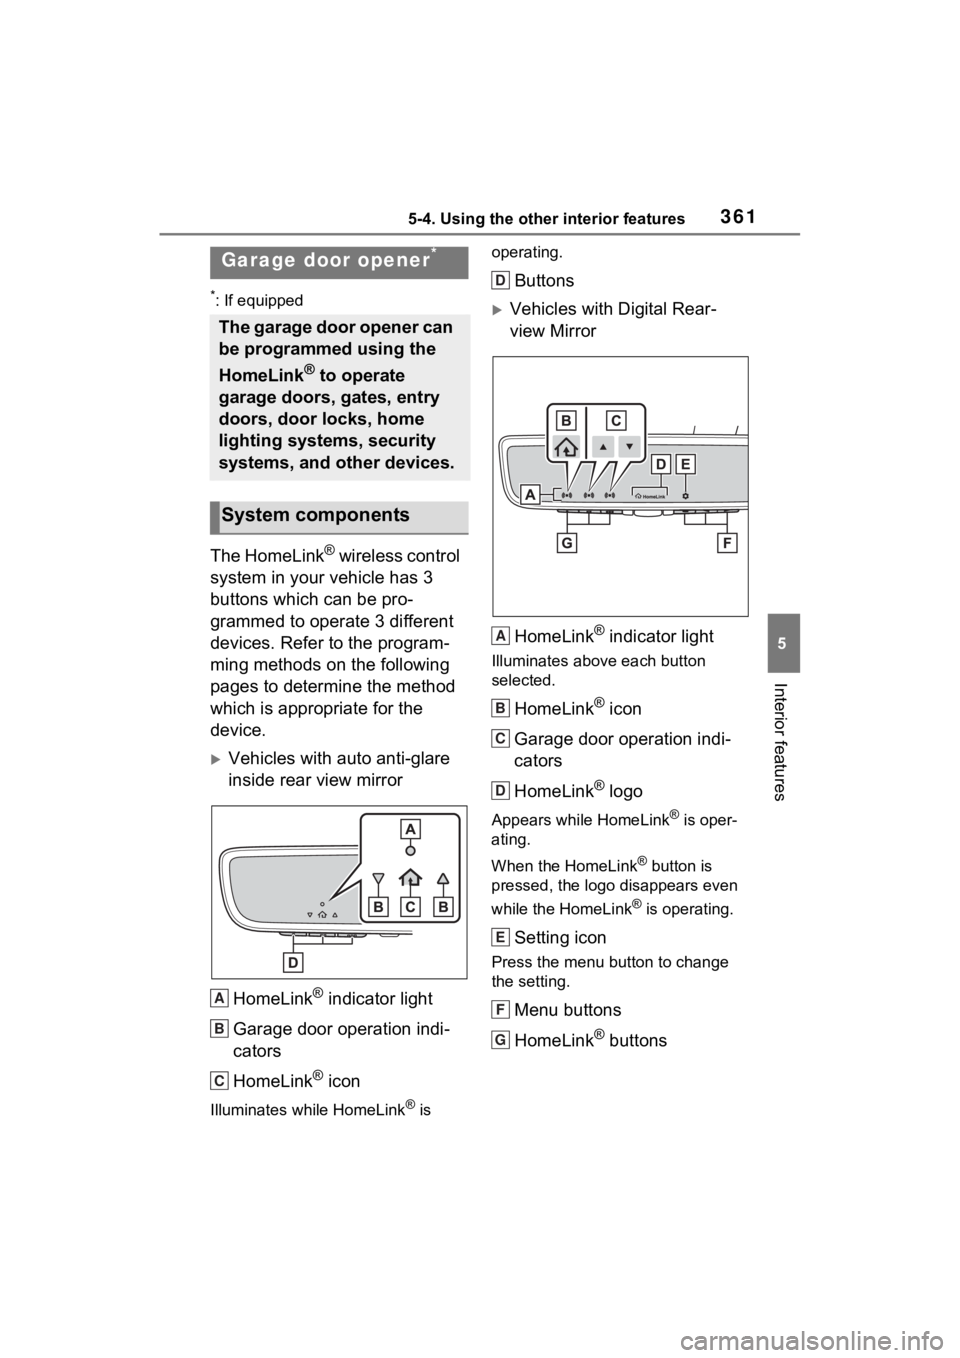
The HomeLink® wireless control
system in your vehicle has 3
buttons which can be pro-
grammed to operate 3 different
devices. Refer to the program-
ming methods on the following
pages to determine the method
which is appropriate for the
device.
Vehicles with auto anti-glare
inside rear view mirror
HomeLink
® indicator light
Garage door operation indi-
cators
HomeLink
® icon
Illuminates while HomeLink® is operating.
Buttons
Vehicles with Digital Rear-
view Mirror
HomeLink
® indicator light
Illuminates above each button
selected.
HomeLink® icon
Garage door operation indi-
cators
HomeLink
® logo
Appears while HomeLink® is oper-
ating.
When the HomeLink
® button is
pressed, the logo disappears even
while the HomeLink
® is operating.
Setting icon
Press the menu button to change
the setting.
Menu buttons
HomeLink
® buttons
Garage door opener*
The garage door opener can
be programmed using the
HomeLink
® to operate
garage doors, gates, entry
doors, door locks, home
lighting systems, security
systems, and other devices.
System components
A
B
C
D
A
B
C
D
E
F
G
Page 362 of 548
3625-4. Using the other interior features
■Codes stored in the HomeLink®
memory
●The registered codes are not
erased even if the 12-volt battery
cable is disconnected.
●If learning failed when registering
a different code to a HomeLink®
button that already has a code
registered to it, the already regis-
tered code will not be erased.
■Certification for the garage door opener
For vehicles sold in the U.S. ma inland, Hawaii, Guam, Saipan an d Puerto
Rico
For vehicles sold in Canada
■When support is necessary
Visit on the web at
www.homelink.com/toyota
or call 1-
800-355-3515.
WARNING
■When programming a garage
door or other remote control
device
The garage door or other device
may operate, so ensure people
and objects are out of danger to
prevent potential harm.
Page 363 of 548
3635-4. Using the other interior features
5
Interior features■Before programming
HomeLink
®
During programming, it is pos-
sible that garage doors,
gates, or other devices may
operate. For this reason,
make sure that people and
objects are clear of the
garage door or other devices
to prevent injury or other
potential harm.
It is recommended that a new
battery be placed in the
remote control transmitter for
successful programming.
Garage door opener motors
manufactured after 1995 may
be equipped with rolling code
protection. If this is the case, you may need a stepladder or
other sturdy, safe device to
reach the “Learn” or “Smart”
button on the garage door
opener motor.
■Programming HomeLink®
Steps 2 through 4 must be per-
formed within 60 seconds, oth-
erwise the HomeLink
® indicator
light will stop flashing and pro-
gramming will not be success-
fully completed.
1 Vehicles with Digital Rear-
view Mirror: Press the
HomeLink
® button or menu
button
When the HomeLink® button is
pressed: Homelink® Training Tuto-
rial will be displayed to assist you
programming the HomeLink
®.
When Homelink
® Training Tutorial
is displayed, follow the instructions
displayed.
When the menu button is pressed:
Press the menu button and
select the “Set U p >”. Homelink
®
Training Tutoria l will be displayed
to assist you programming the
HomeLink
®.
When Homelink
® Training Tutorial
is displayed, follow the instructions
displayed.
2 Press and release the
HomeLink
® button you want
to program and check that
the HomeLink
® indicator light
flashes (orange).
WARNING
■Conforming to federal safety
standards
Do not use the HomeLink
® com-
patible transceiver with any
garage door opener or device that
lacks safety stop and reverse fea-
tures as required by federal safety
standards.
This includes any garage door
that cannot detect an interfering
object. A door or device without
these features increases the risk
of death or serious injury.
■When operating or program-
ming HomeLink®
Never allow a child to operate or
play with the HomeLink® buttons.
Programming HomeLink®
Page 364 of 548
3645-4. Using the other interior features
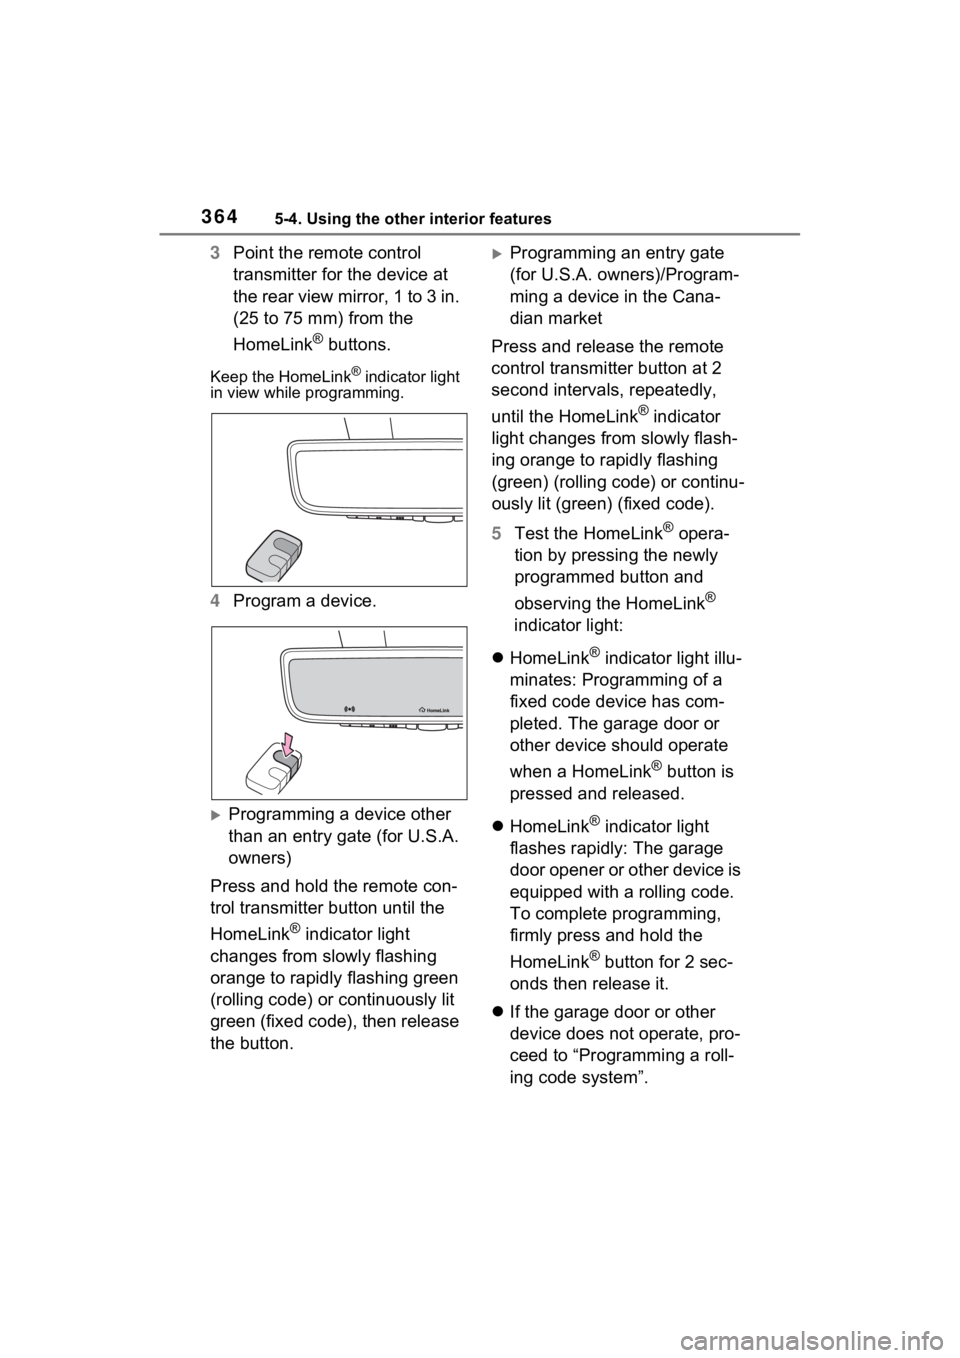
3Point the remote control
transmitter for the device at
the rear view mirror, 1 to 3 in.
(25 to 75 mm) from the
HomeLink
® buttons.
Keep the HomeLink® indicator light
in view while programming.
4 Program a device.
Programming a device other
than an entry gate (for U.S.A.
owners)
Press and hold the remote con-
trol transmitter button until the
HomeLink
® indicator light
changes from slowly flashing
orange to rapidly flashing green
(rolling code) or continuously lit
green (fixed code), then release
the button.
Programming an entry gate
(for U.S.A. owners)/Program-
ming a device in the Cana-
dian market
Press and release the remote
control transmitter button at 2
second intervals, repeatedly,
until the HomeLink
® indicator
light changes from slowly flash-
ing orange to rapidly flashing
(green) (rolling code) or continu-
ously lit (green) (fixed code).
5 Test the HomeLink
® opera-
tion by pressing the newly
programmed button and
observing the HomeLink
®
indicator light:
HomeLink
® indicator light illu-
minates: Programming of a
fixed code device has com-
pleted. The garage door or
other device should operate
when a HomeLink
® button is
pressed and released.
HomeLink
® indicator light
flashes rapidly: The garage
door opener or other device is
equipped with a rolling code.
To complete programming,
firmly press and hold the
HomeLink
® button for 2 sec-
onds then release it.
If the garage door or other
device does not operate, pro-
ceed to “Programming a roll-
ing code system”.
Page 365 of 548
3655-4. Using the other interior features
5
Interior features
6Repeat the steps above to
program another device for
any of the remaining
HomeLink
® buttons.
■Programming a rolling code
system
Two or more people may be
needed to complete rolling code
programming.
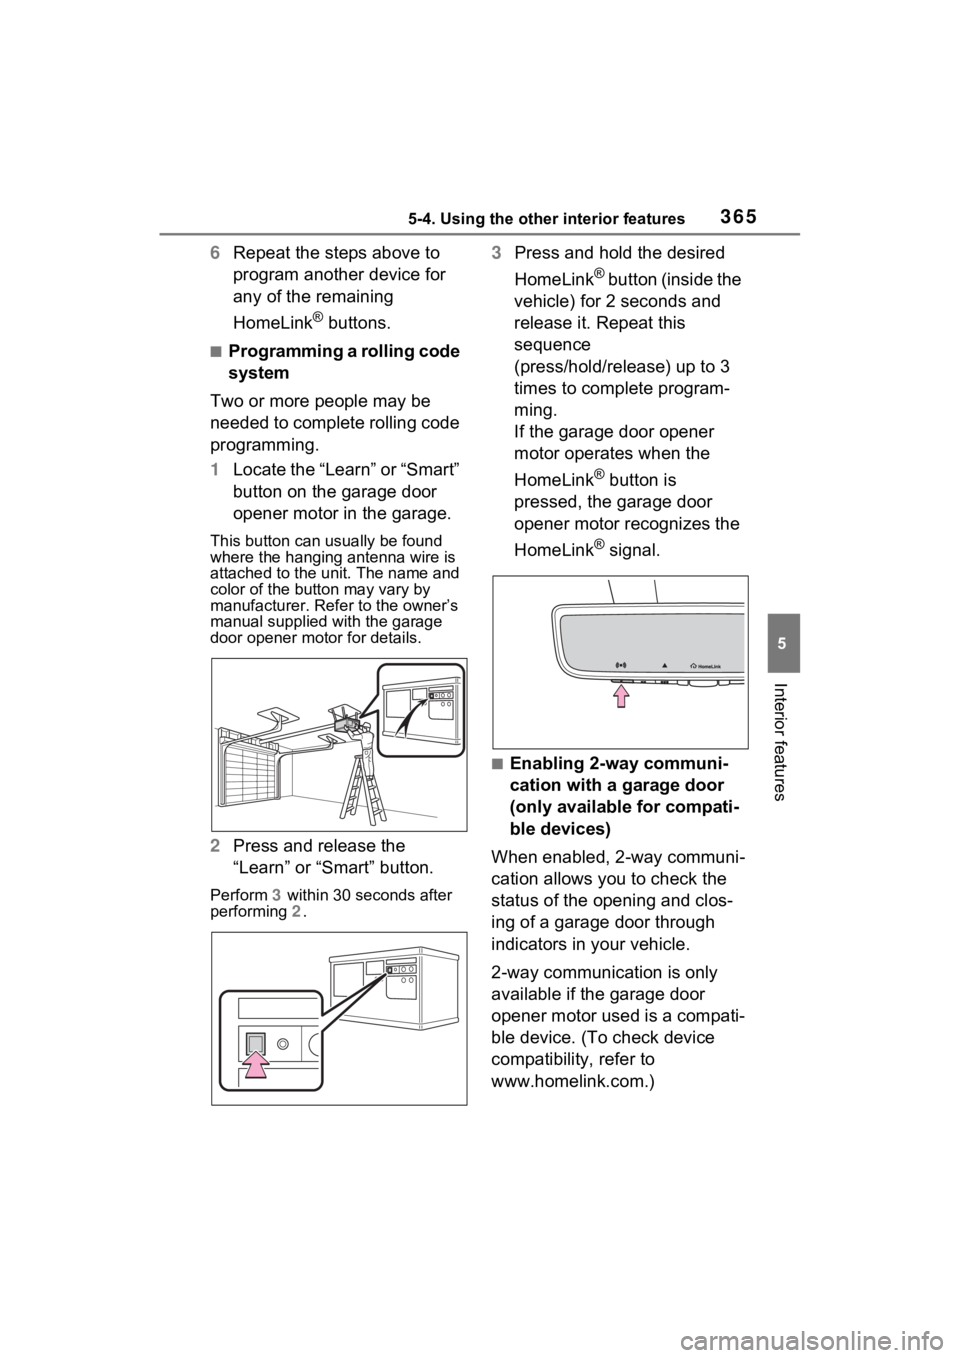
1 Locate the “Learn” or “Smart”
button on the garage door
opener motor in the garage.
This button can usually be found
where the hanging antenna wire is
attached to the u nit. The name and
color of the button may vary by
manufacturer. Refer to the owner’s
manual supplied with the garage
door opener motor for details.
2 Press and release the
“Learn” or “Smart” button.
Perform 3 within 30 seconds after
performing 2.
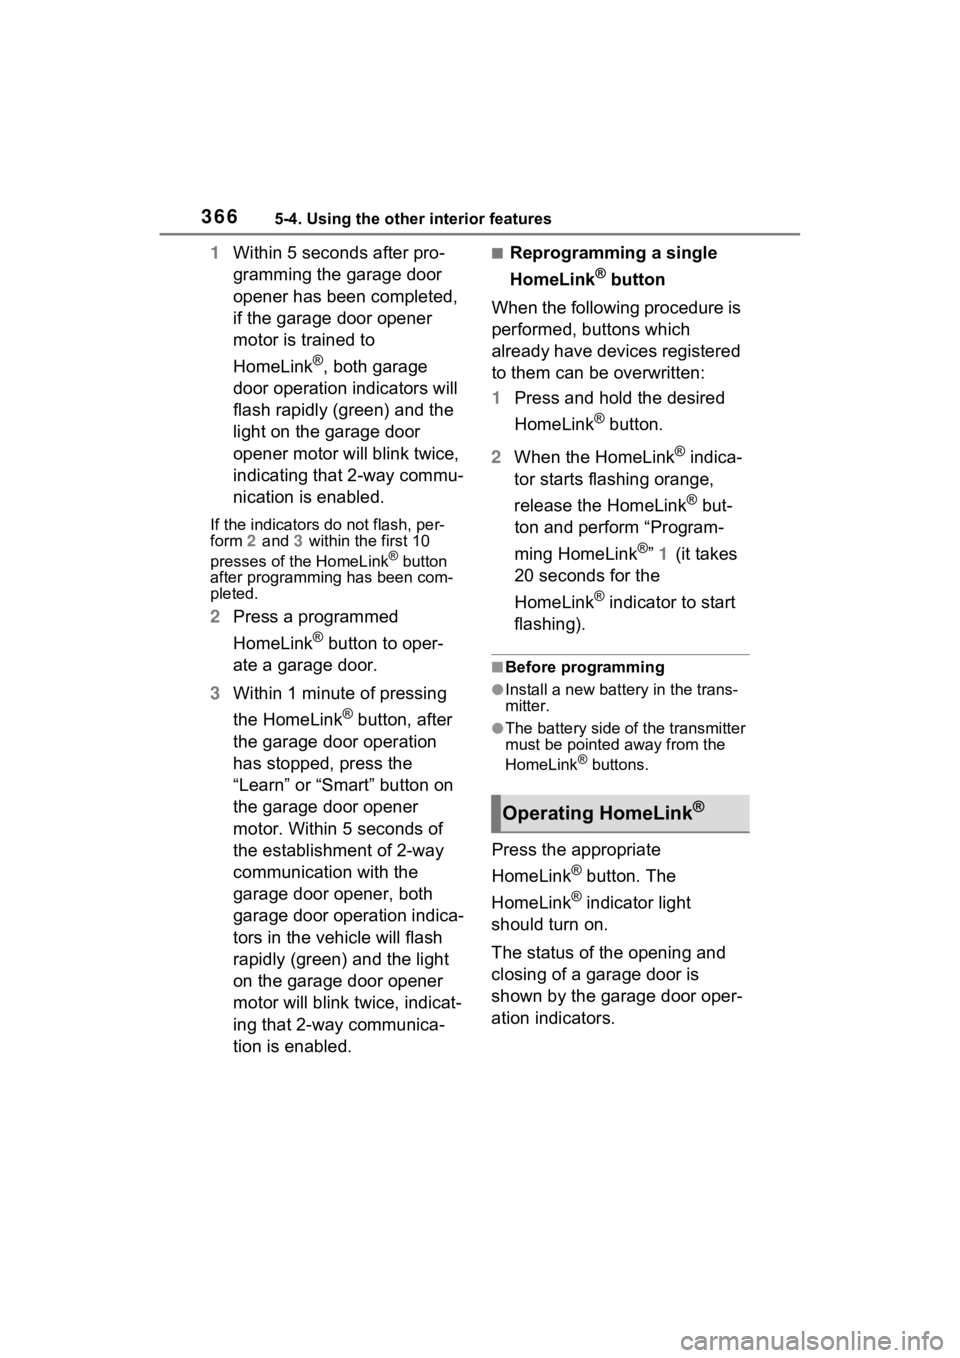
3 Press and hold the desired
HomeLink
® button (inside the
vehicle) for 2 seconds and
release it. Repeat this
sequence
(press/hold/release) up to 3
times to complete program-
ming.
If the garage door opener
motor operates when the
HomeLink
® button is
pressed, the garage door
opener motor recognizes the
HomeLink
® signal.
■Enabling 2-way communi-
cation with a garage door
(only available for compati-
ble devices)
When enabled, 2-way communi-
cation allows you to check the
status of the opening and clos-
ing of a garage door through
indicators in your vehicle.
2-way communication is only
available if the garage door
opener motor used is a compati-
ble device. (To check device
compatibility, refer to
www.homelink.com.)
Page 366 of 548
3665-4. Using the other interior features
1Within 5 seconds after pro-
gramming the garage door
opener has been completed,
if the garage door opener
motor is trained to
HomeLink
®, both garage
door operation indicators will
flash rapidly (green) and the
light on the garage door
opener motor will blink twice,
indicating that 2-way commu-
nication is enabled.
If the indicators do not flash, per-
form 2 and 3 within the first 10
presses of the HomeLink
® button
after programming has been com-
pleted.
2 Press a programmed
HomeLink
® button to oper-
ate a garage door.
3 Within 1 minute of pressing
the HomeLink
® button, after
the garage door operation
has stopped, press the
“Learn” or “Smart” button on
the garage door opener
motor. Within 5 seconds of
the establishment of 2-way
communication with the
garage door opener, both
garage door operation indica-
tors in the vehicle will flash
rapidly (green) and the light
on the garage door opener
motor will blink twice, indicat-
ing that 2-way communica-
tion is enabled.
■Reprogramming a single
HomeLink
® button
When the following procedure is
performed, buttons which
already have devices registered
to them can be overwritten:
1 Press and hold the desired
HomeLink
® button.
2 When the HomeLink
® indica-
tor starts flashing orange,
release the HomeLink
® but-
ton and perform “Program-
ming HomeLink
®” 1 (it takes
20 seconds for the
HomeLink
® indicator to start
flashing).
■Before programming
●Install a new battery in the trans-
mitter.
●The battery side of the transmitter
must be pointed away from the
HomeLink
® buttons.
Press the appropriate
HomeLink
® button. The
HomeLink
® indicator light
should turn on.
The status of the opening and
closing of a garage door is
shown by the garage door oper-
ation indicators.
Operating HomeLink®