TOYOTA VENZA HYBRID 2023 Owners Manual
Manufacturer: TOYOTA, Model Year: 2023, Model line: VENZA HYBRID, Model: TOYOTA VENZA HYBRID 2023Pages: 560, PDF Size: 12.18 MB
Page 341 of 560
3415-2. Using the interior lights
5
Interior features
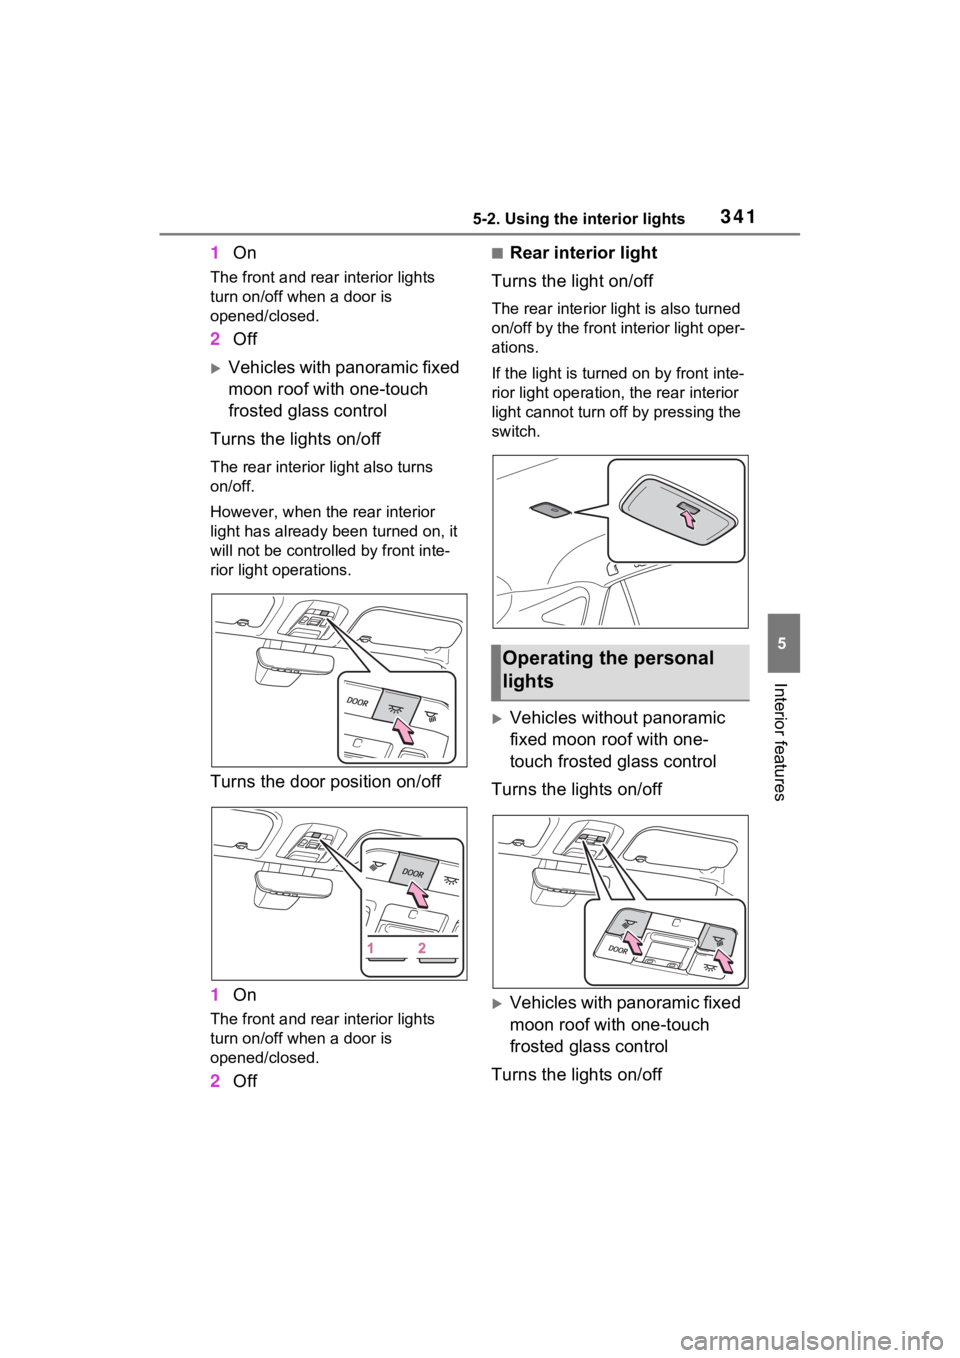
1On
The front and rear interior lights
turn on/off when a door is
opened/closed.
2Off
Vehicles with panoramic fixed
moon roof with one-touch
frosted glass control
Turns the lights on/off
The rear interior light also turns
on/off.
However, when the rear interior
light has already been turned on, it
will not be contro lled by front inte-
rior light operations.
Turns the door position on/off
1 On
The front and rear interior lights
turn on/off when a door is
opened/closed.
2Off
■Rear interior light
Turns the light on/off
The rear interior light is also turned
on/off by the front interior light oper-
ations.
If the light is turned on by front inte-
rior light operation, the rear interior
light cannot turn off by pressing the
switch.
Vehicles without panoramic
fixed moon roof with one-
touch frosted glass control
Turns the lights on/off
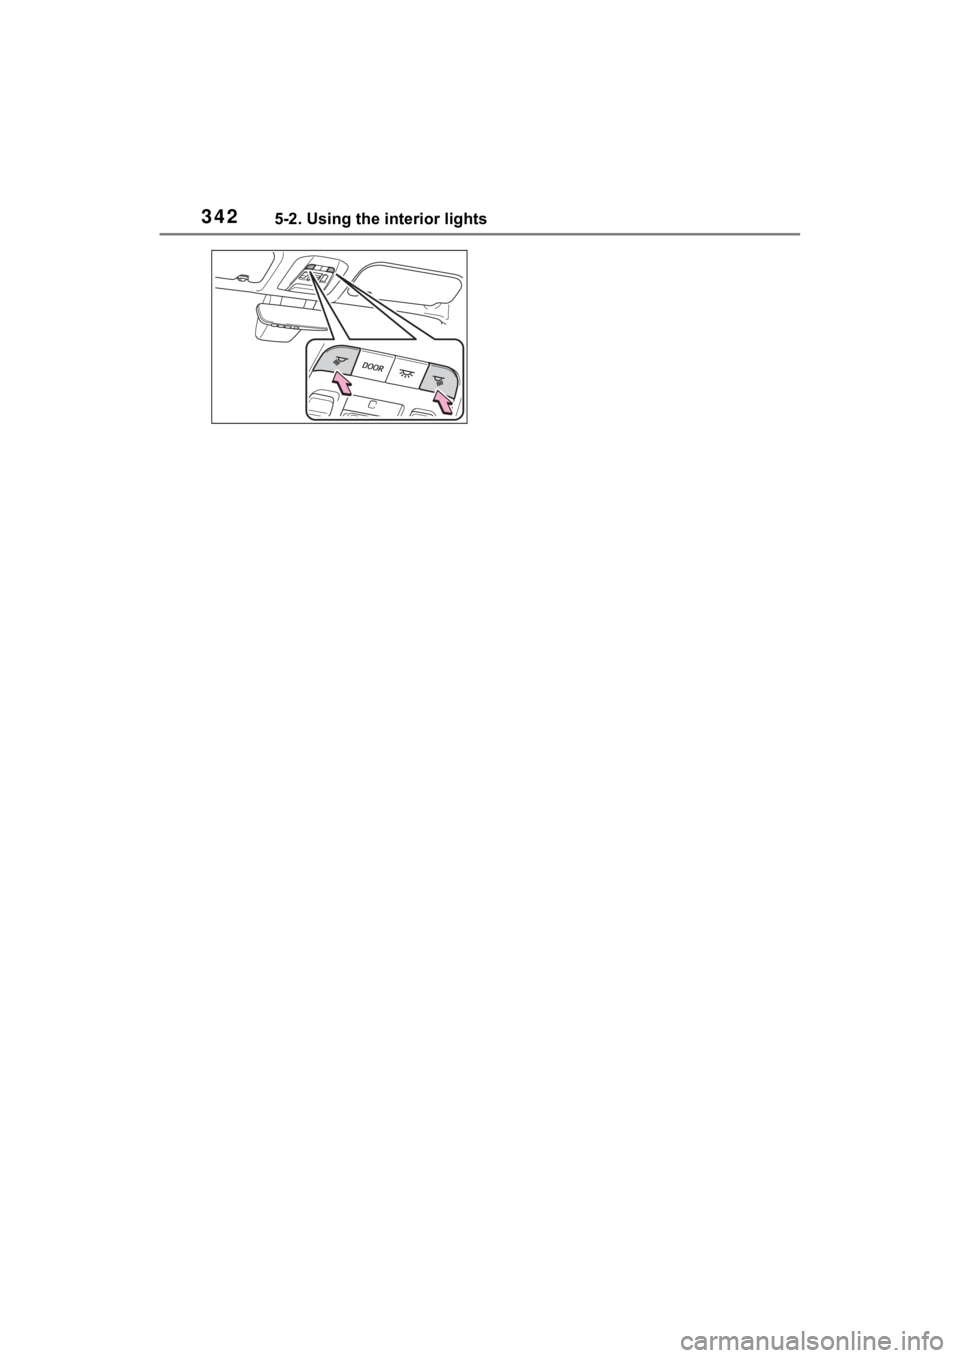
Vehicles with panoramic fixed
moon roof with one-touch
frosted glass control
Turns the lights on/off
Operating the personal
lights
Page 342 of 560
3425-2. Using the interior lights
Page 343 of 560
3435-3. Using the storage features
5
Interior features
5-3.Using the storage features
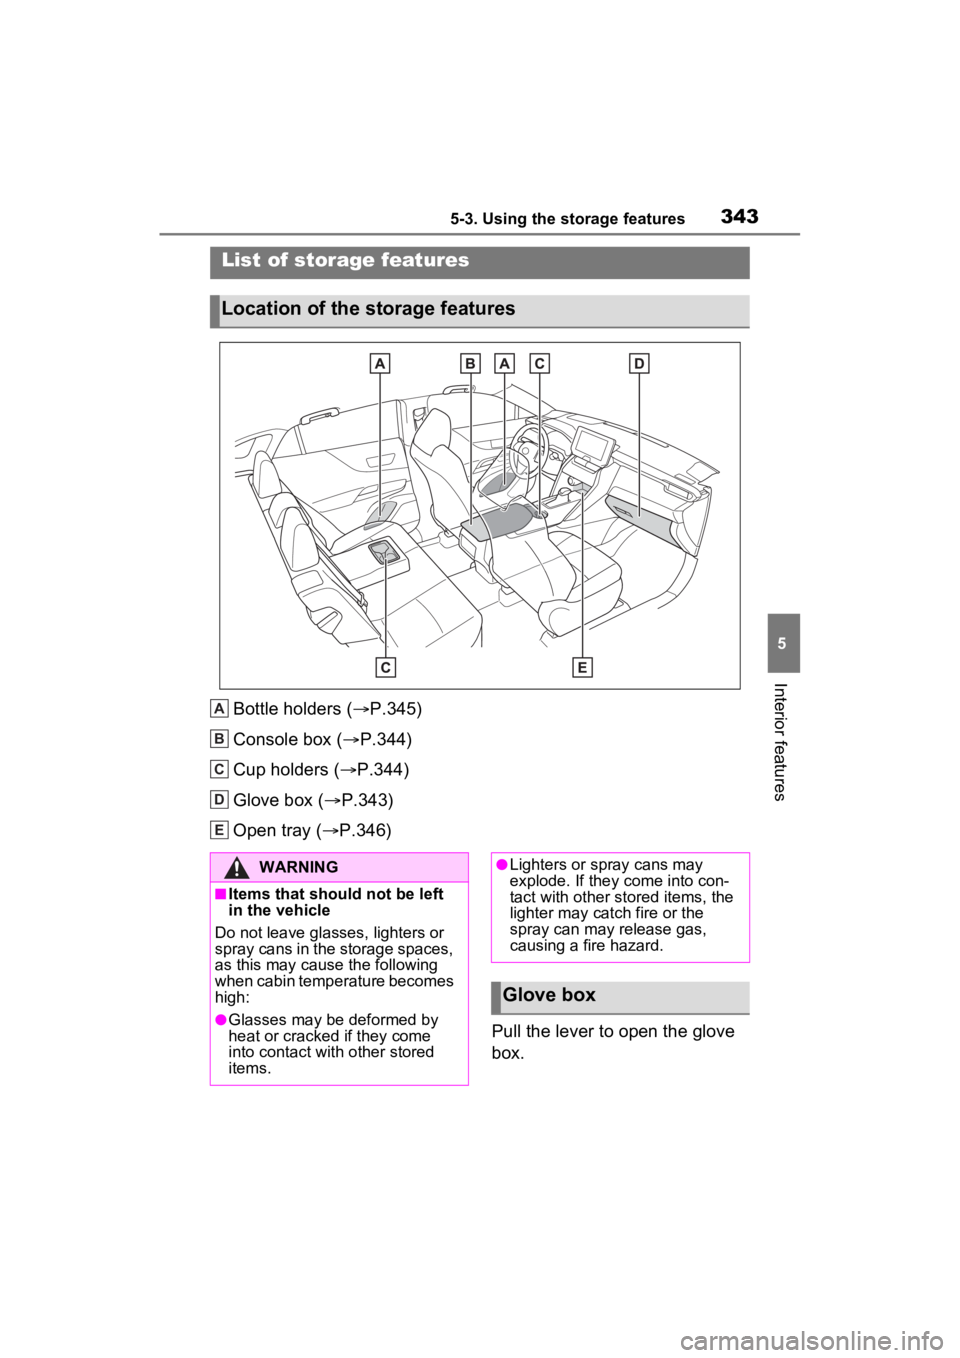
Bottle holders (P.345)
Console box ( P.344)
Cup holders ( P.344)
Glove box ( P.343)
Open tray ( P.346)
Pull the lever to open the glove
box.
List of storage features
Location of the storage features
A
B
C
D
E
�:�$�5�1�,�1�*
■Items that should not be left
in the vehicle
Do not leave glasses, lighters or
spray cans in the storage spaces,
as this may cau se the following
when cabin temperature becomes
high:
●Glasses may be deformed by
heat or cracked if they come
into contact with other stored
items.
●Lighters or spray cans may
explode. If they come into con-
tact with other stored items, the
lighter may catch fire or the
spray can may release gas,
causing a fire hazard.
Glove box
Page 344 of 560
3445-3. Using the storage features
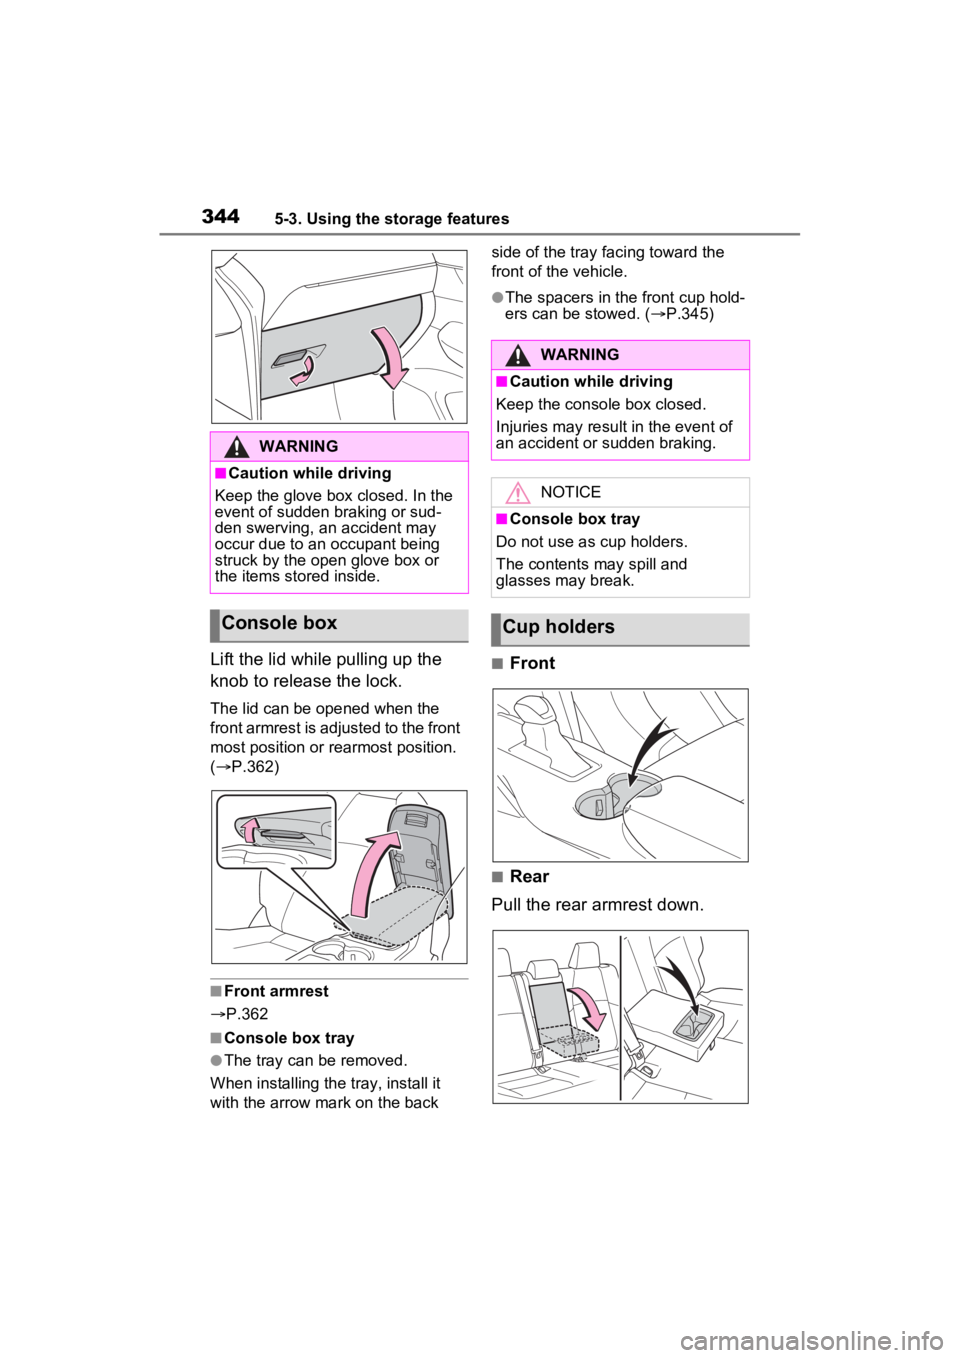
Lift the lid while pulling up the
knob to release the lock.
The lid can be opened when the
front armrest is adjusted to the front
most position or rearmost position.
( P.362)
■Front armrest
P.362
■Console box tray
●The tray can be removed.
When installing the tray, install it
with the arrow mark on the back side of the tray facing toward the
front of the vehicle.
●The spacers in the front cup hold-
ers can be stowed. (
P.345)
■Front
■Rear
Pull the rear armrest down.
WARNING
■Caution while driving
Keep the glove box closed. In the
event of sudden braking or sud-
den swerving, an accident may
occur due to an occupant being
struck by the open glove box or
the items stored inside.
Console box
WARNING
■Caution while driving
Keep the console box closed.
Injuries may resul t in the event of
an accident or sudden braking.
NOTICE
■Console box tray
Do not use as cup holders.
The contents may spill and
glasses may break.
Cup holders
Page 345 of 560
3455-3. Using the storage features
5
Interior features
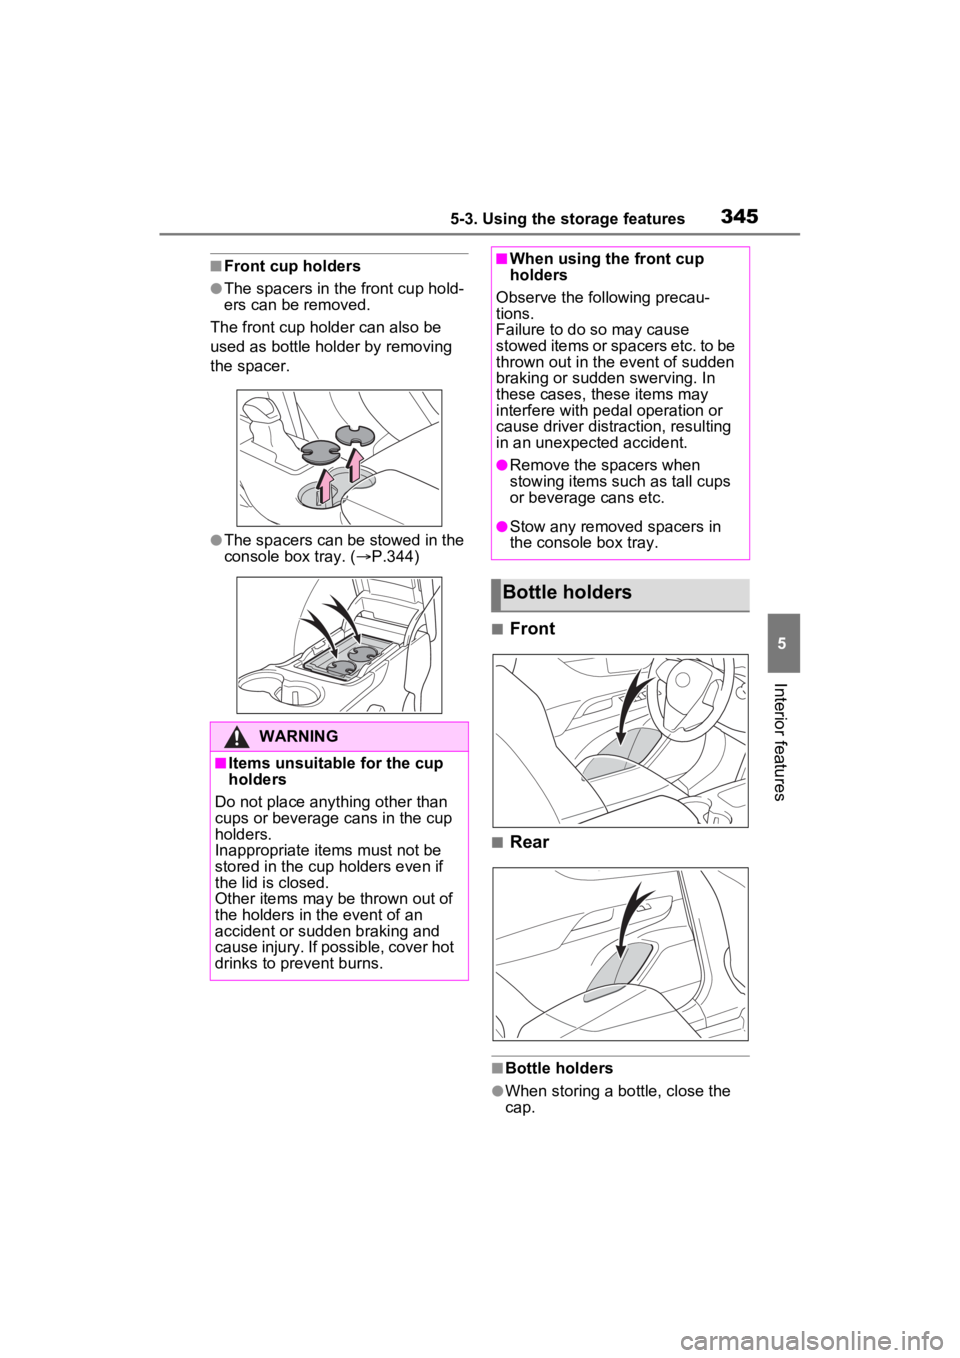
■Front cup holders
●The spacers in the front cup hold-
ers can be removed.
The front cup holder can also be
used as bottle holder by removing
the spacer.
●The spacers can be stowed in the
console box tray. ( P.344)
■Front
■Rear
■Bottle holders
●When storing a bottle, close the
cap.
WARNING
■Items unsuitable for the cup
holders
Do not place anything other than
cups or beverage cans in the cup
holders.
Inappropriate items must not be
stored in the cup holders even if
the lid is closed.
Other items may be thrown out of
the holders in the event of an
accident or sudden braking and
cause injury. If possible, cover hot
drinks to prevent burns.
■When using the front cup
holders
Observe the following precau-
tions.
Failure to do so may cause
stowed items or spacers etc. to be
thrown out in the event of sudden
braking or sudden swerving. In
these cases, these items may
interfere with pedal operation or
cause driver distraction, resulting
in an unexpected accident.
●Remove the spacers when
stowing items such as tall cups
or beverage cans etc.
●Stow any removed spacers in
the console box tray.
Bottle holders
Page 346 of 560
3465-3. Using the storage features
●The bottle may not be stored
depending on its size or shape.
Wireless charger: P.355 1
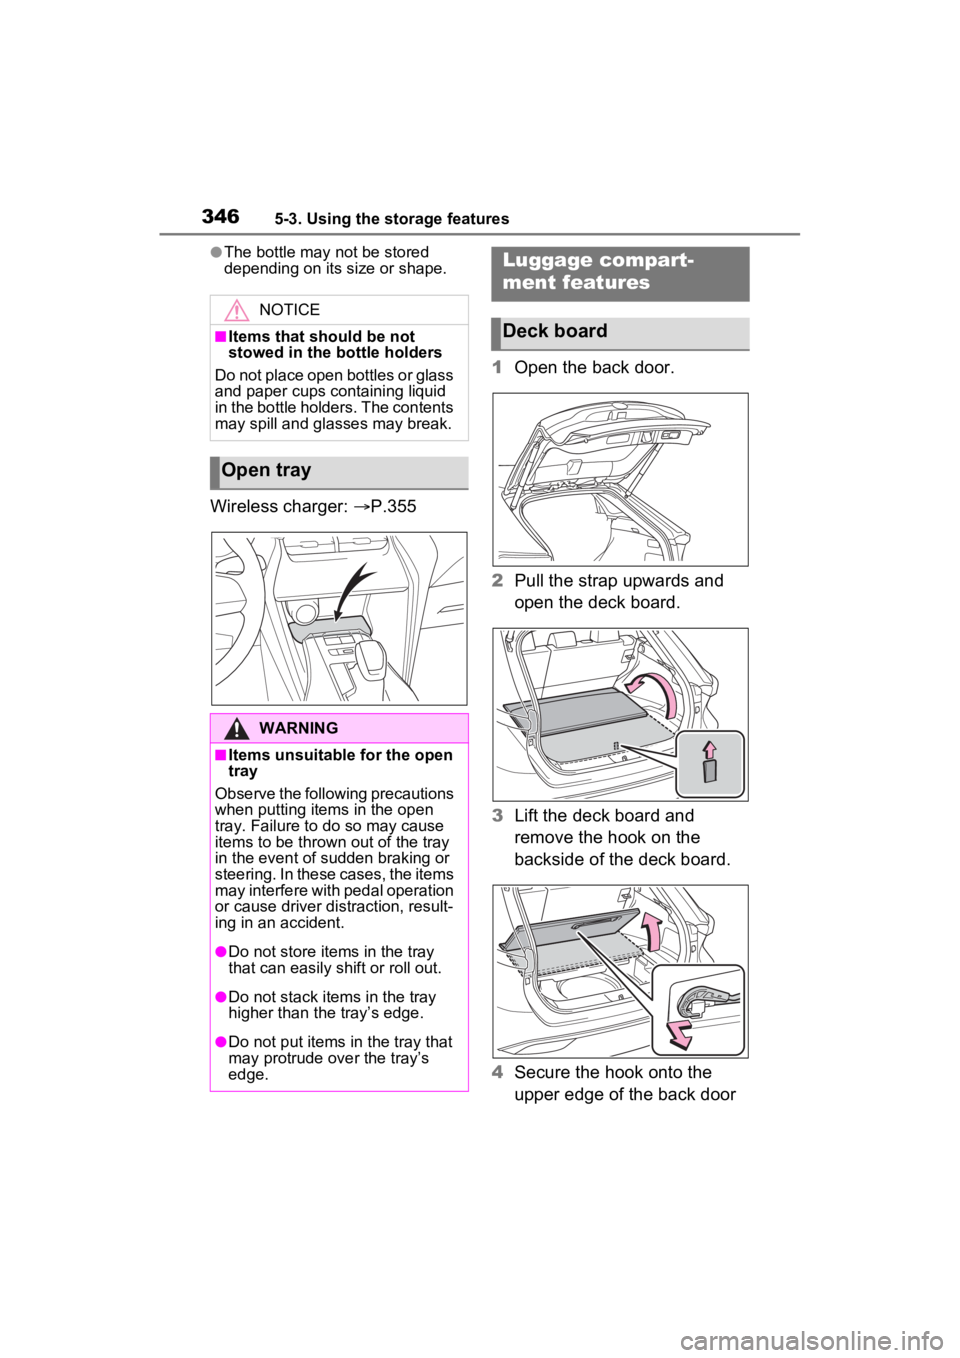
Open the back door.
2 Pull the strap upwards and
open the deck board.
3 Lift the deck board and
remove the hook on the
backside of the deck board.
4 Secure the hook onto the
upper edge of the back door
NOTICE
■Items that should be not
stowed in the bottle holders
Do not place open bottles or glass
and paper cups containing liquid
in the bottle holders. The contents
may spill and glasses may break.
Open tray
WARNING
■Items unsuitable for the open
tray
Observe the following precautions
when putting items in the open
tray. Failure to do so may cause
items to be thrown out of the tray
in the event of sudden braking or
steering. In these cases, the items
may interfere with pedal operation
or cause driver distraction, result-
ing in an accident.
●Do not store items in the tray
that can easily shift or roll out.
●Do not stack items in the tray
higher than the tray’s edge.
●Do not put items in the tray that
may protrude over the tray’s
edge.
Luggage compart-
ment features
Deck board
Page 347 of 560
3475-3. Using the storage features
5
Interior features
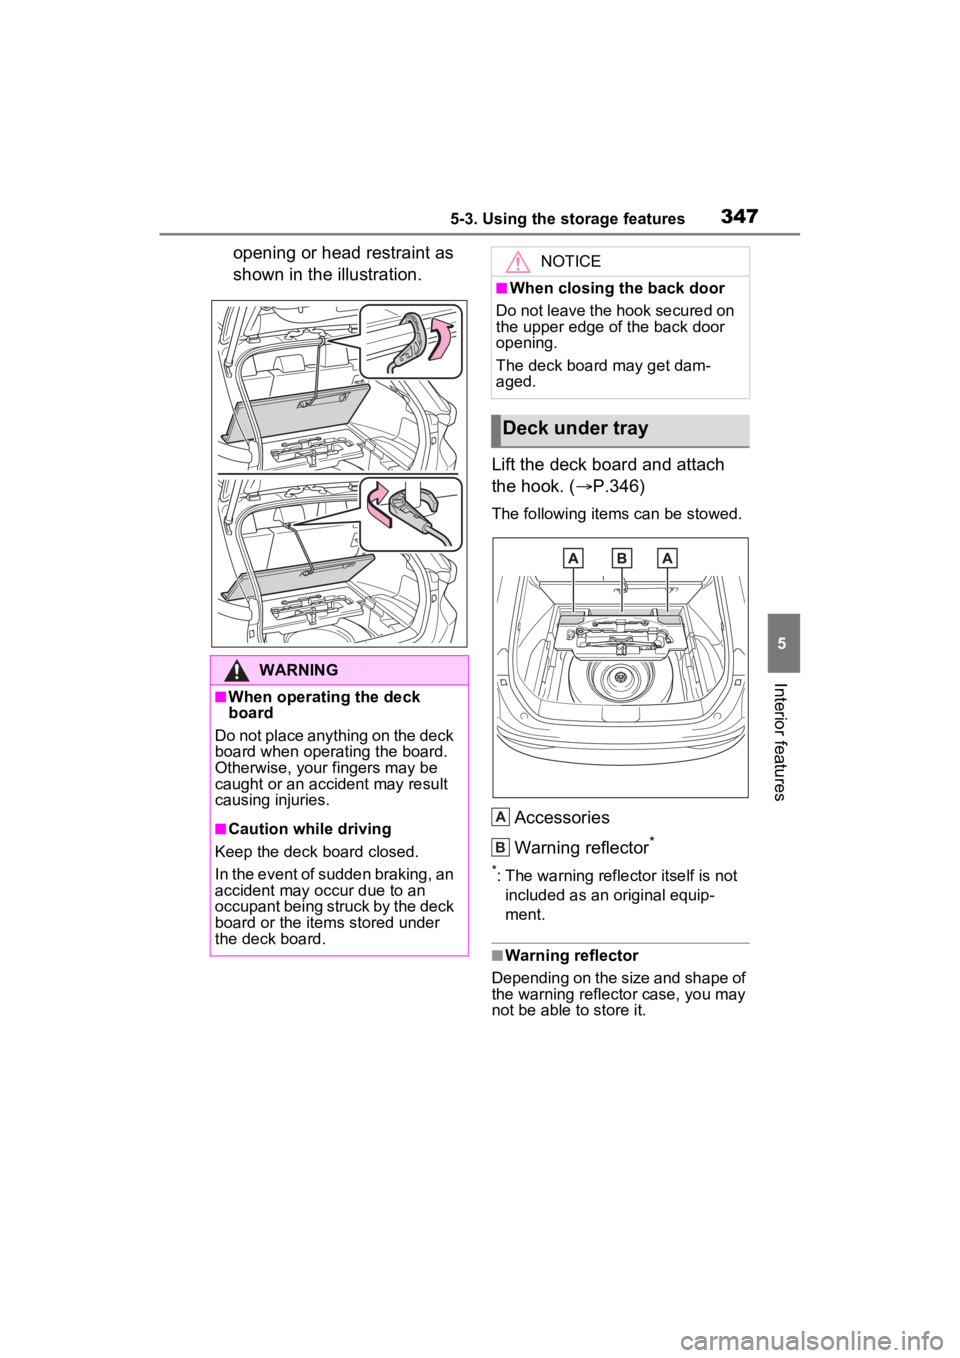
opening or head restraint as
shown in the illustration.Lift the deck board and attach
the hook. (P.346)
The following items can be stowed.
Accessories
Warning reflector
*
*: The warning reflector itself is not
included as an original equip-
ment.
■Warning reflector
Depending on the size and shape of
the warning reflector case, you may
not be able to store it.
WARNING
■When operating the deck
board
Do not place anything on the deck
board when operating the board.
Otherwise, your fingers may be
caught or an accident may result
causing injuries.
■Caution while driving
Keep the deck board closed.
In the event of sudden braking, an
accident may occur due to an
occupant being struck by the deck
board or the items stored under
the deck board.
NOTICE
■When closing the back door
Do not leave the hook secured on
the upper edge of the back door
opening.
The deck board may get dam-
aged.
Deck under tray
A
B
Page 348 of 560
3485-3. Using the storage features
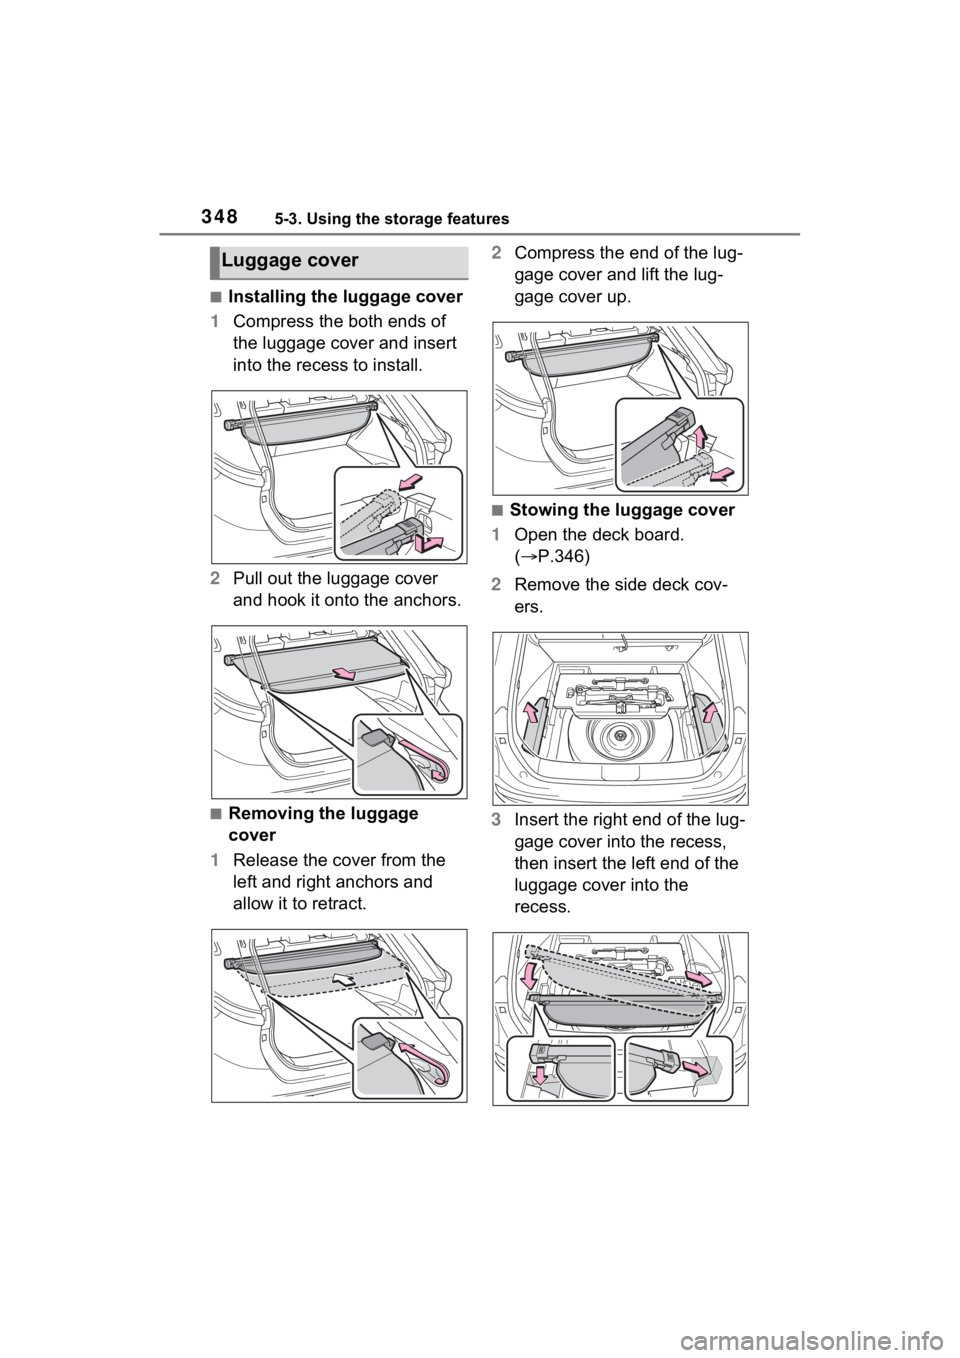
■Installing the luggage cover
1 Compress the both ends of
the luggage cover and insert
into the recess to install.
2 Pull out the luggage cover
and hook it onto the anchors.
■Removing the luggage
cover
1 Release the cover from the
left and right anchors and
allow it to retract. 2
Compress the end of the lug-
gage cover and lift the lug-
gage cover up.
■Stowing the luggage cover
1 Open the deck board.
( P.346)
2 Remove the side deck cov-
ers.
3 Insert the right end of the lug-
gage cover into the recess,
then insert the left end of the
luggage cover into the
recess.
Luggage cover
Page 349 of 560
3495-3. Using the storage features
5
Interior features
4Attach the side deck covers
and close the deck board.
When taking out the luggage cover,
reverse the steps listed.
WARNING
■Luggage cover
●When installing/stowing the lug-
gage cover, make sure that the
luggage cover is securely
installed/stowed. Failure to do
so may result in serious injury in
the event of sudden braking or a
collision.
●Do not place anything on the
luggage cover. In the event of
sudden braking or turning, the
item may go flying and strike an
occupant. This could lead to an
unexpected accident, resulting
in death or serious injury.
●Do not allow ch ildren to climb
on the luggage cover. Climbing
on the luggage cover could
result in damage to the luggage
cover, possibly causing death or
serious injury to the child.
NOTICE
■To prevent damage to the lug-
gage cover
Do not place anything on top of
the luggage cover. When rolling
up the luggage cover, objects
may be caught in the cover, dam-
aging the cover and generating
noise.
Page 350 of 560
3505-4. Using the other interior features
5-4.Using the other interior features
*: If equipped
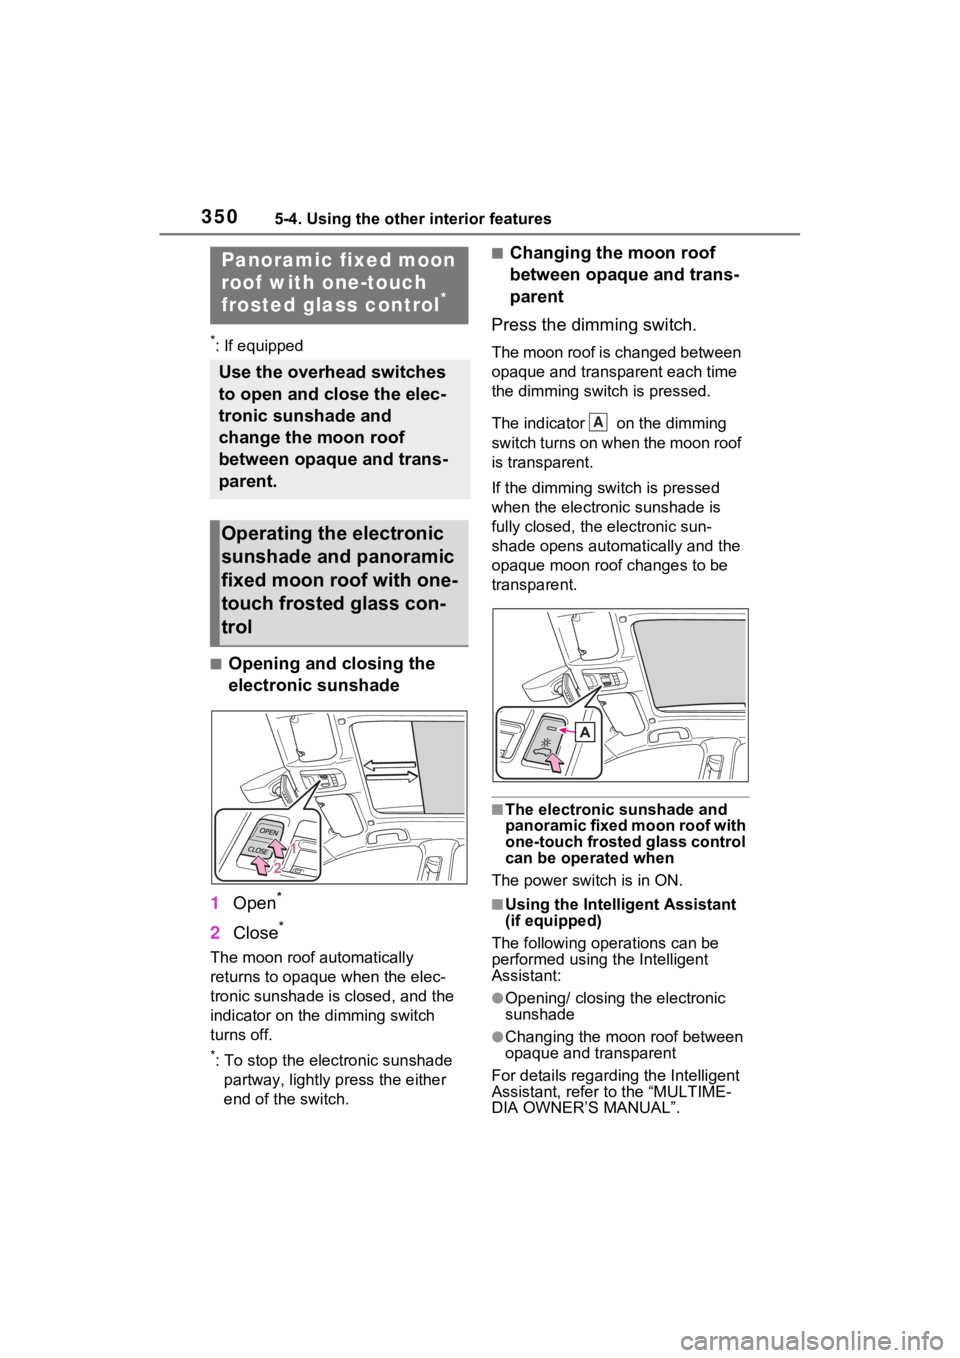
■Opening and closing the
electronic sunshade
1 Open
*
2Close*
The moon roof automatically
returns to opaque when the elec-
tronic sunshade is closed, and the
indicator on the dimming switch
turns off.
*: To stop the electronic sunshade
partway, lightly p ress the either
end of the switch.
■Changing the moon roof
between opaque and trans-
parent
Press the dimming switch.
The moon roof is changed between
opaque and transparent each time
the dimming switch is pressed.
The indicator on the dimming
switch turns on when the moon roof
is transparent.
If the dimming swit ch is pressed
when the electronic sunshade is
fully closed, the electronic sun-
shade opens automat ically and the
opaque moon roof changes to be
transparent.
■The electronic sunshade and
panoramic fixed moon roof with
one-touch frosted glass control
can be operated when
The power switch is in ON.
■Using the Intelligent Assistant
(if equipped)
The following operations can be
performed using the Intelligent
Assistant:
●Opening/ closing the electronic
sunshade
●Changing the moon roof between
opaque and transparent
For details regarding the Intelligent
Assistant, refer to the “MULTIME-
DIA OWNER’S MANUAL”.
Panoramic fixed moon
roof with one-touch
frosted glass control
*
Use the overhead switches
to open and close the elec-
tronic sunshade and
change the moon roof
between opaque and trans-
parent.
Operating the electronic
sunshade and panoramic
fixed moon roof with one-
touch frosted glass con-
trol
A