power steering TOYOTA VENZA HYBRID 2023 Owners Manual
[x] Cancel search | Manufacturer: TOYOTA, Model Year: 2023, Model line: VENZA HYBRID, Model: TOYOTA VENZA HYBRID 2023Pages: 560, PDF Size: 12.18 MB
Page 2 of 560
2TABLE OF CONTENTS
For your information...................6
Reading this manual ................ 11
How to search .......................... 12
Pictorial index .......................... 14
1-1. For safe use Before driving ................... 26
For safe driving ................ 27
Seat belts ......................... 29
SRS airbags ..................... 33
Front passenger occupant classification system ...... 43
Exhaust gas precautions.. 48
1-2. Child safety Riding with children .......... 49
Child restraint systems..... 50
1-3. Emergency assistance Safety Connect ................ 65
1-4. Hybrid system Hybrid system features .... 70
Hybrid system precautions ....................................... 75
1-5. Theft deterrent system Immobilizer system .......... 80
Alarm................................ 81
2-1. Instrument cluster Warning lights and indicators....................................... 84
Gauges and meters (Vehi- cles with 7-inch multi-infor-
mation display) ............... 90Gauges and meters (Vehi-
cles with 12.3-inch multi-
information display) ........ 94
Multi-information display (7- inch multi-information dis-
play)............................. 100
Multi-information display (12.3-inch multi-information
display) ........................ 111
Head-up display ............ 123
Energy monitor/consumption screen.......................... 128
3-1. Key information Keys .............................. 134
3-2. Opening, closing and lock- ing the doors
Side doors ..................... 137
Back door ...................... 142
Smart key system .......... 154
3-3. Adjusting the seats Front seats .................... 159
Rear seats ..................... 160
Driving position memory 162
Head restraints .............. 166
3-4. Adjusting the steering wheel and mirrors
Steering wheel............... 168
Inside rear view mirror ... 169
Digital Rear-view Mirror . 170
Outside rear view mirrors .................................... 181
3-5. Opening, closing the win- dows
Power windows ............. 183
1For safety and security
2
Vehicle status
information and
indicators
3Before driving
Page 3 of 560
3TABLE OF CONTENTS
1
2
3
4
5
6
7
8
9
4-1. Before drivingDriving the vehicle......... 188
Cargo and luggage ....... 195
Vehicle load limits ......... 198
Trailer towing ................ 199
Dinghy towing ............... 200
4-2. Driving procedures Power (ignition) switch .. 201
EV drive mode .............. 206
Hybrid transmission ...... 208
Turn signal lever ........... 212
Parking brake ................ 213
Brake Hold .................... 217
4-3. Operating the lights and wipers
Headlight switch ............ 219
AHB (Automatic High Beam) .................................... 222
Fog light switch ............. 225
Windshield wipers and washer......................... 226
Rear window wiper and washer......................... 229
4-4. Refueling Opening the fuel tank cap.................................... 231
4-5. Using the driving support
systems
Toyota Safety Sense 2.5 + .................................... 234
PCS (Pre-Collision System) .................................... 239
LTA (Lane Tracing Assist) .................................... 250RSA (Road Sign Assist)
262
Dynamic radar cruise control with full-speed range ... 265
BSM (Blind Spot Monitor) .................................... 277
Intuitive parking assist ... 287
PKSB (Parking Support Brake) .......................... 295
Parking Support Brake func- tion (static objects) ...... 300
Parking Support Brake func- tion (rear-crossing vehicles)
.................................... 302
Driving mode s elect switch
.................................... 304
Driving assist systems ... 305
4-6. Driving tips Hybrid Electric Vehicle driv-ing tips ......................... 311
Winter driving tips .......... 313
Utility vehicle precautions .................................... 316
5-1. Using the ai r conditioning
system and defogger
Automatic air conditioning system (vehicles with 8-inch
multimedia display)...... 320
Automatic air conditioning system (vehicl es w
ith 12 .3-
in
ch multimedia display)
.................................... 328
Heated steering wheel/seat heaters/seat ventilators 337
5-2. Using the interior lights Interior lights list ............ 339
4Driving
5Interior features
Page 19 of 560
19Pictorial index
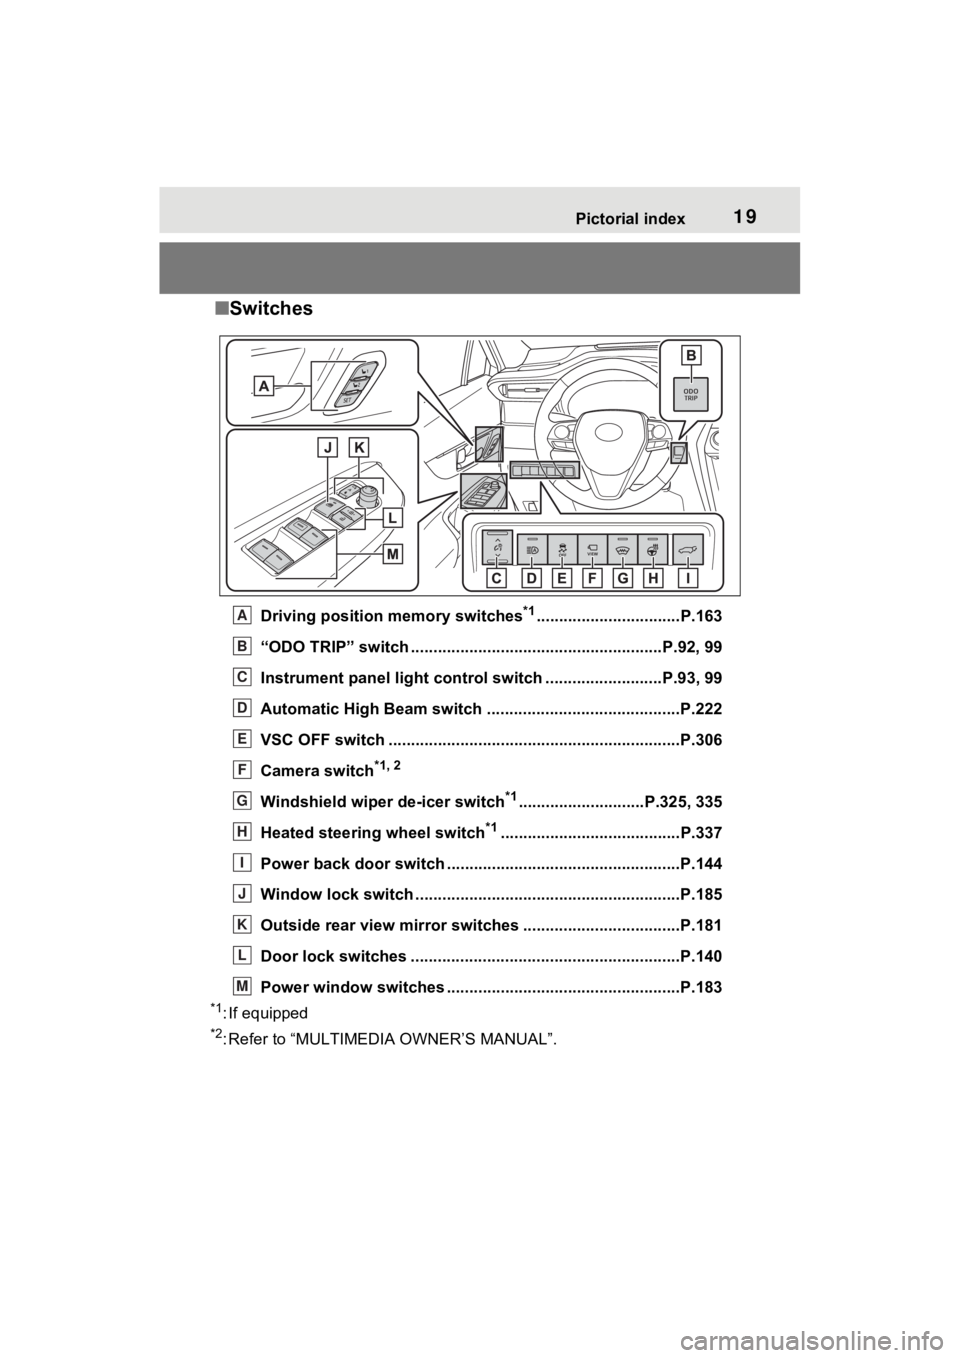
■Switches
Driving position memory switches*1................................P.163
“ODO TRIP” switch .............................................. ..........P.92, 99
Instrument panel light cont rol switch ..........................P.93, 99
Automatic High Beam switch ..................................... ......P.222
VSC OFF switch .................................................................P.306
Camera switch
*1, 2
Windshield wiper de-icer switch*1............................P.325, 335
Heated steering wheel switch
*1........................................P.337
Power back door switch ... .................................................P.144
Window lock switch ............................................. ..............P.185
Outside rear view mirror swi tches ...................................P.181
Door lock switches ............................................................P.140
Power window switches ....... .............................................P.183
*1: If equipped
*2: Refer to “MULTIMEDIA OWNER’S MANUAL”.
A
B
C
D
E
F
G
H
I
J
K
L
M
Page 86 of 560
862-1. Instrument cluster
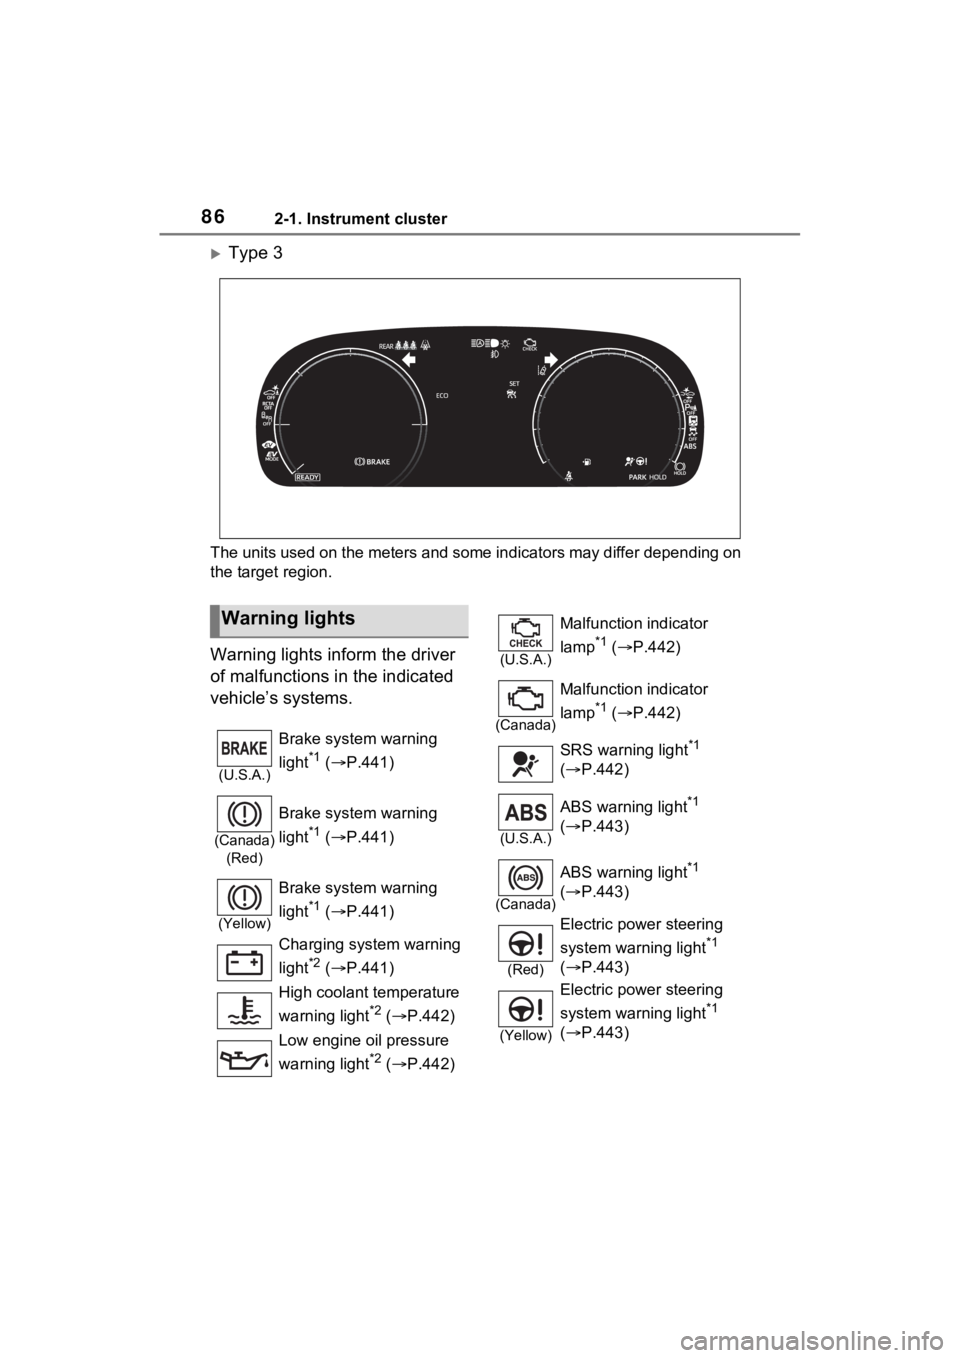
Type 3
The units used on the meters and some indicators may differ depending on
the target region.
Warning lights inform the driver
of malfunctions in the indicated
vehicle’s systems.
Warning lights
(U.S.A.)
Brake system warning
light
*1 ( P.441)
(Canada)
(Red)
Brake system warning
light
*1 ( P.441)
(Yellow)
Brake system warning
light
*1 ( P.441)
Charging system warning
light
*2 ( P.441)
High coolant temperature
warning light
*2 ( P.442)
Low engine oil pressure
warning light
*2 ( P.442)
(U.S.A.)
Malfunction indicator
lamp
*1 ( P.442)
(Canada)
Malfunction indicator
lamp
*1 ( P.442)
SRS warning light
*1
( P.442)
(U.S.A.)
ABS warning light*1
( P.443)
(Canada)
ABS warning light*1
( P.443)
(Red)
Electric power steering
system warning light
*1
( P.443)
(Yellow)
Electric power steering
system warning light
*1
( P.443)
Page 101 of 560
1012-1. Instrument cluster
2
Vehicle status information and indicators
RSA (Road Sign Assist) (if
equipped) is operating. ( P.262)
Information display area
A variety of information can be dis-
played by selecting a menu icon.
Additionally, warning or sugges-
tion/advice pop-up displays will be
displayed in some situations.
Menu icons ( P.101)
■The multi-information display is
displayed when
The power swit ch is in ON.
■When changing to a driving
mode other than normal mode
P.304
■Liquid crystal display
Small spots or light spots may
appear on the display. This phe-
nomenon is character istic of liquid
crystal displays, and there is no
problem continuing to use the dis-
play.
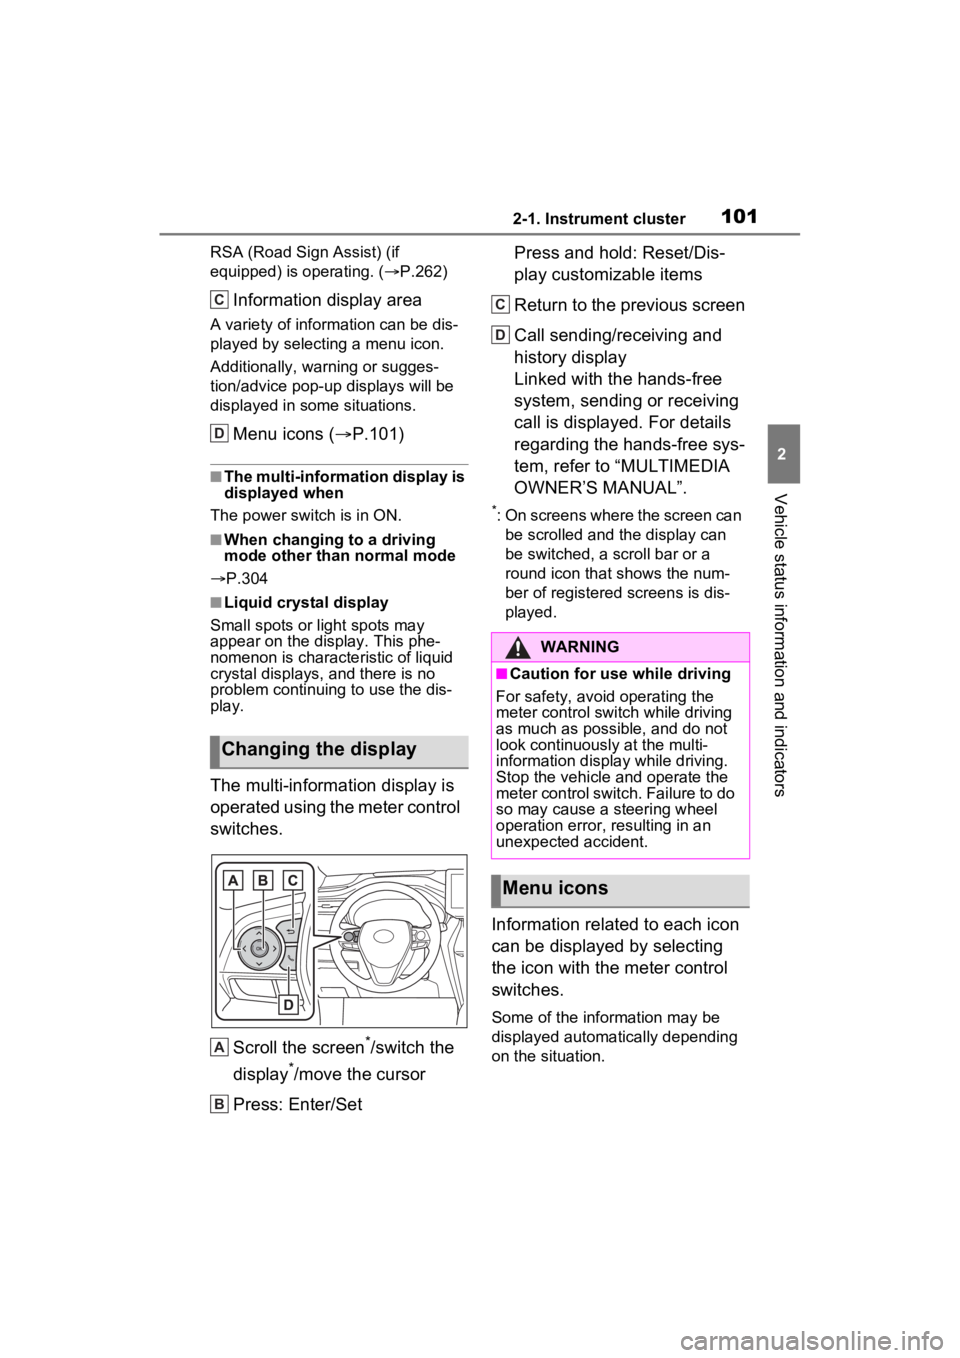
The multi-information display is
operated using the meter control
switches.
Scroll the screen
*/switch the
display
*/move the cursor
Press: Enter/Set Press and hold: Reset/Dis-
play customizable items
Return to the previous screen
Call sending/receiving and
history display
Linked with the hands-free
system, sending or receiving
call is displayed. For details
regarding the hands-free sys-
tem, refer to “MULTIMEDIA
OWNER’S MANUAL”.
*: On screens where the screen can
be scrolled and the display can
be switched, a scroll bar or a
round icon that shows the num-
ber of registered screens is dis-
played.
Information related to each icon
can be displayed by selecting
the icon with the meter control
switches.
Some of the information may be
displayed automatically depending
on the situation.
Changing the display
C
D
A
B
�:�$�5�1�,�1�*
■Caution for use while driving
For safety, avoid operating the
meter control switch while driving
as much as possible, and do not
look continuously at the multi-
information display while driving.
Stop the vehicle and operate the
meter control switch. Failure to do
so may cause a steering wheel
operation error, resulting in an
unexpected accident.
Menu icons
C
D
Page 133 of 560
133
3
3
Before driving
Before driving
3-1. Key informationKeys ............................ 134
3-2. Opening, closing and locking the doors
Side doors ................... 137
Back door .................... 142
Smart key system ....... 154
3-3. Adjusting the seats Front seats .................. 159
Rear seats................... 160
Driving position memory .................................. 162
Head restraints............ 166
3-4. Adjusting the steering wheel and mirrors
Steering wheel ............ 168
Inside rear view mirror 169
Digital Rear-view Mirror .................................. 170
Outside rear view mirrors .................................. 181
3-5. Opening, closing the win- dows
Power windows ........... 183
Page 159 of 560
1593-3. Adjusting the seats
3
Before driving
3-3.Adjusting the seats
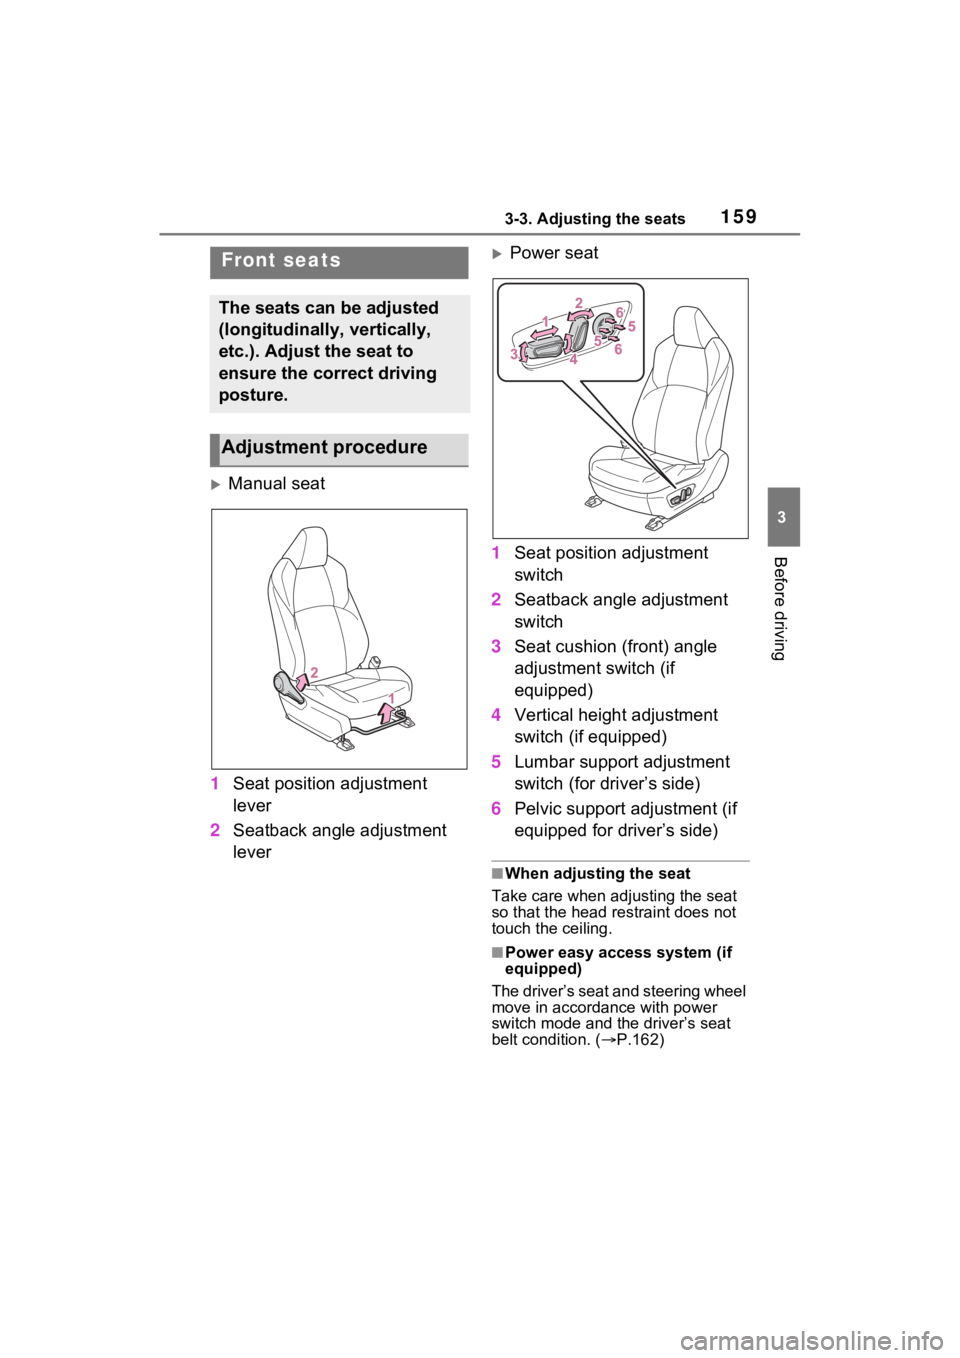
Manual seat
1 Seat position adjustment
lever
2 Seatback angle adjustment
lever
Power seat
1 Seat position adjustment
switch
2 Seatback angle adjustment
switch
3 Seat cushion (front) angle
adjustment switch (if
equipped)
4 Vertical height adjustment
switch (if equipped)
5 Lumbar support adjustment
switch (for driver’s side)
6 Pelvic support adjustment (if
equipped for driver’s side)
■When adjusting the seat
Take care when adjusting the seat
so that the head restraint does not
touch the ceiling.
■Power easy access system (if
equipped)
The driver’s seat and steering wheel
move in accordance with power
switch mode and th e driver’s seat
belt condition. ( P.162)
Front seats
The seats can be adjusted
(longitudinally, vertically,
etc.). Adjust the seat to
ensure the correct driving
posture.
Adjustment procedure
Page 162 of 560
1623-3. Adjusting the seats
*: If equipped
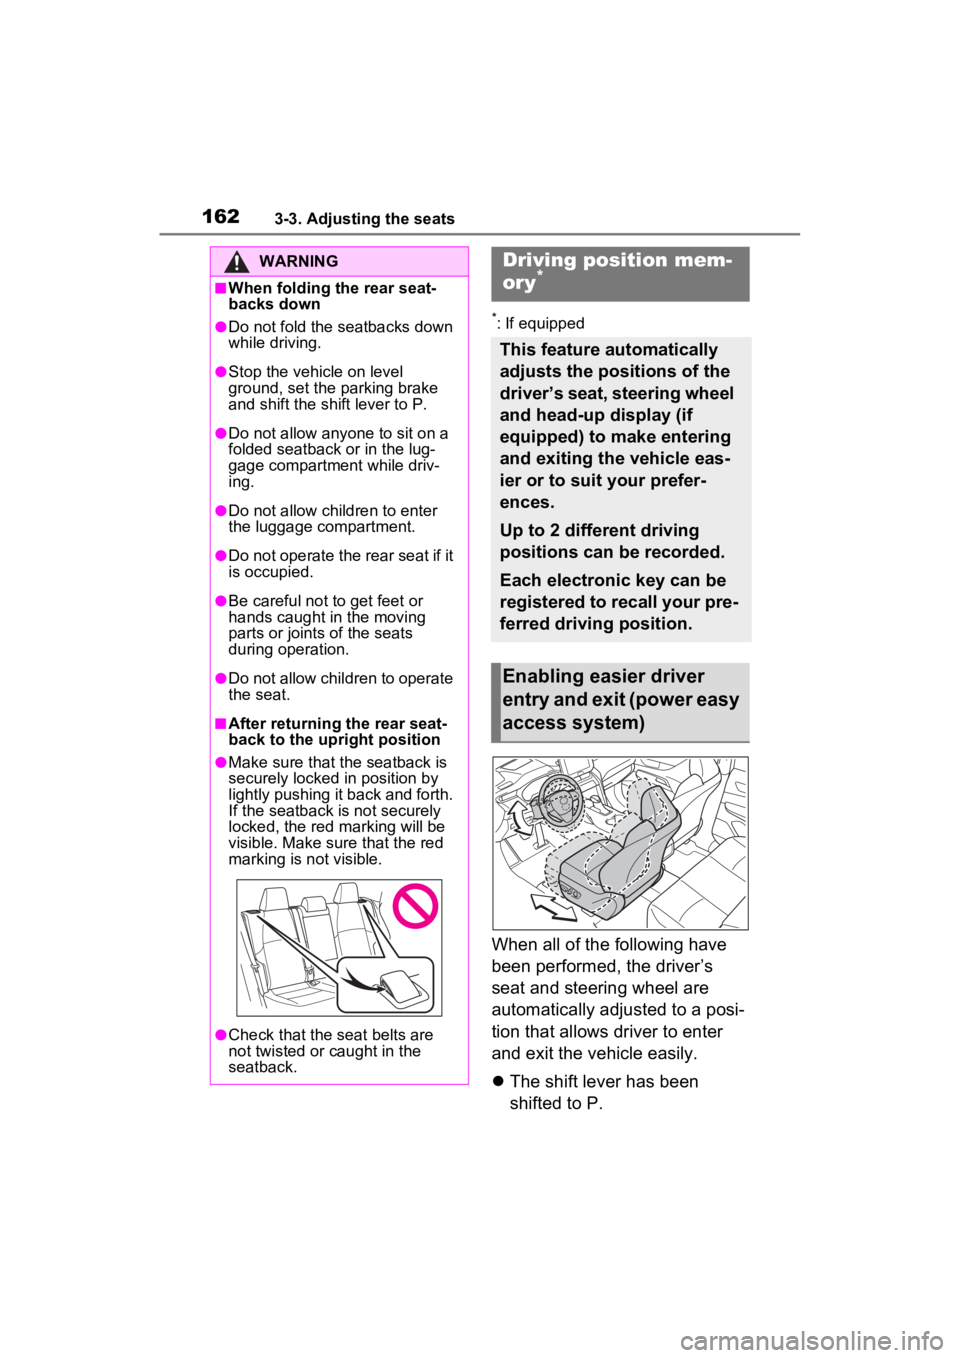
When all of the following have
been performed, the driver’s
seat and steering wheel are
automatically adjusted to a posi-
tion that allows driver to enter
and exit the vehicle easily.
The shift lever has been
shifted to P.
WARNING
■When folding the rear seat-
backs down
●Do not fold the seatbacks down
while driving.
●Stop the vehicle on level
ground, set the parking brake
and shift the shift lever to P.
●Do not allow anyo ne to sit on a
folded seatback or in the lug-
gage compartment while driv-
ing.
●Do not allow child ren to enter
the luggage compartment.
●Do not operate the rear seat if it
is occupied.
●Be careful not to get feet or
hands caught in the moving
parts or joints of the seats
during operation.
●Do not allow children to operate
the seat.
■After returning the rear seat-
back to the upright position
●Make sure that the seatback is
securely locked in position by
lightly pushing it back and forth.
If the seatback is not securely
locked, the red marking will be
visible. Make sure that the red
marking is not visible.
●Check that the seat belts are
not twisted or caught in the
seatback.
Driving position mem-
ory*
This feature automatically
adjusts the positions of the
driver’s seat, steering wheel
and head-up display (if
equipped) to make entering
and exiting the vehicle eas-
ier or to suit your prefer-
ences.
Up to 2 different driving
positions can be recorded.
Each electronic key can be
registered to recall your pre-
ferred driving position.
Enabling easier driver
entry and exit (power easy
access system)
Page 163 of 560
1633-3. Adjusting the seats
3
Before driving
The power switch has been
turned to OFF.
The driver’s seat belt has
been unfastened.
When any of the following has
been performed, the driver’s
seat and steering wheel auto-
matically return to their original
positions.
The power switch has been
turned to ACC or ON.
The driver’s seat belt has
been fastened.
■Operation of the power easy
access system
When exiting the vehicle, the power
easy access system may not oper-
ate if the seat is already close to the
rearmost position, etc.
■Customization
The seat movement amount set-
tings of the powe r easy access sys-
tem can be customized.
(Customizable features: P.508)
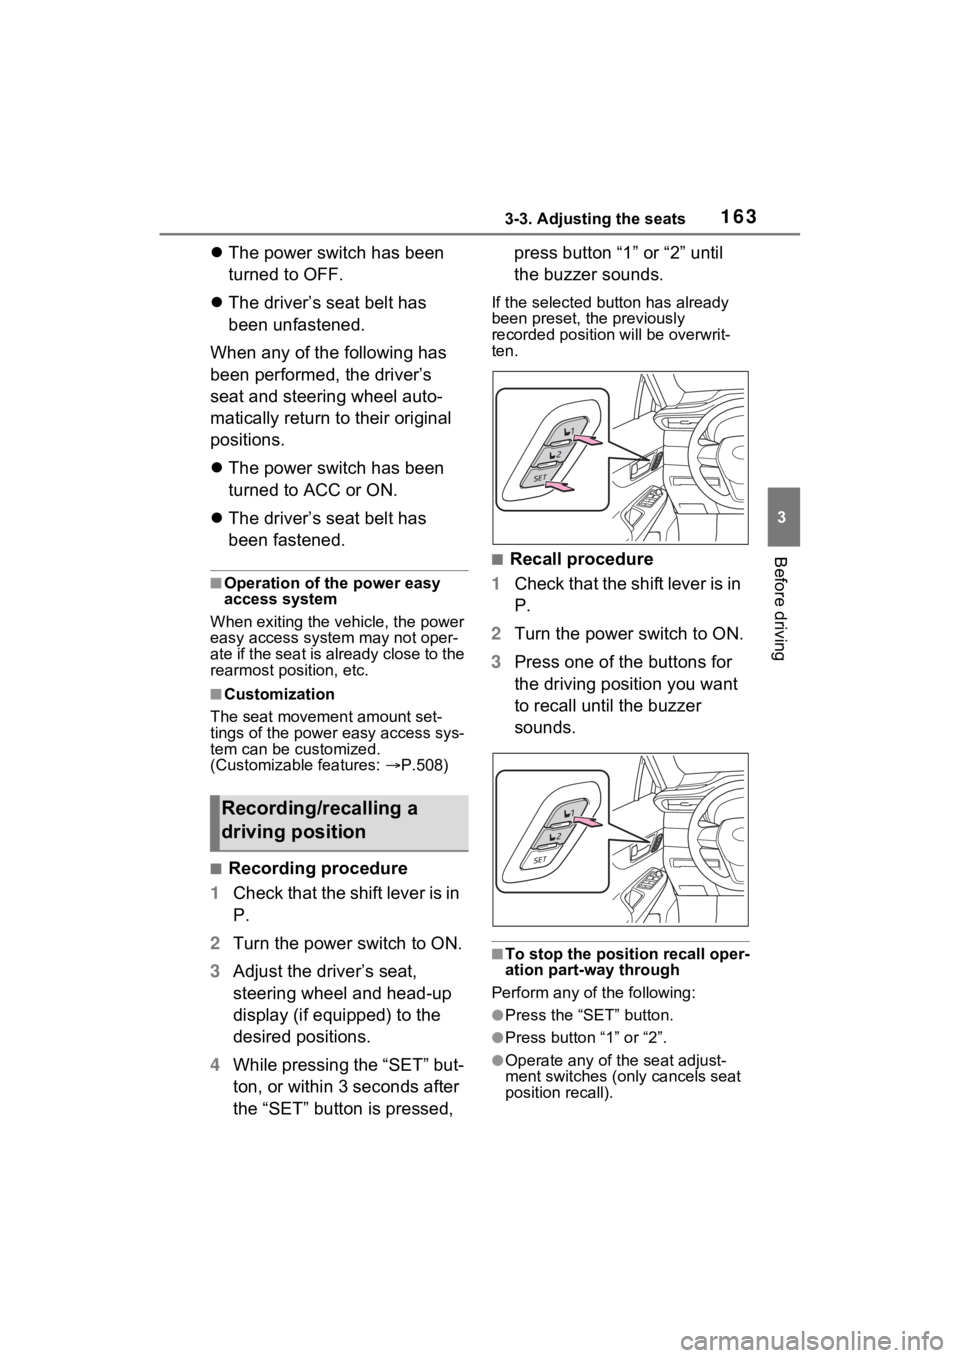
■Recording procedure
1 Check that the shift lever is in
P.
2 Turn the power switch to ON.
3 Adjust the driver’s seat,
steering wheel and head-up
display (if equipped) to the
desired positions.
4 While pressing the “SET” but-
ton, or within 3 seconds after
the “SET” button is pressed, press button “1” or “2” until
the buzzer sounds.
If the selected button has already
been preset, the previously
recorded positio
n will be overwrit-
ten.
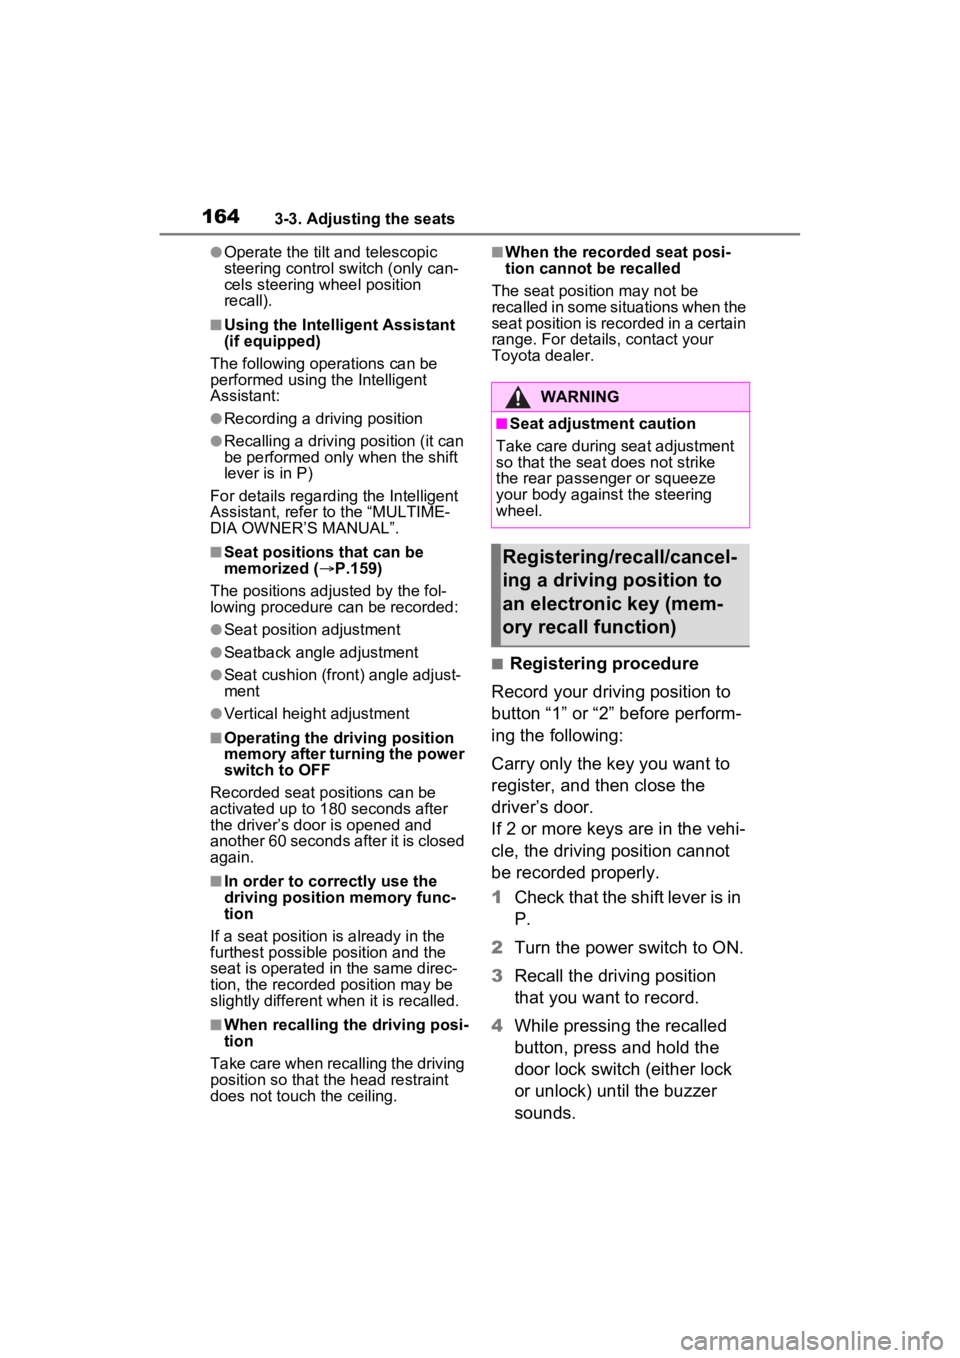
■Recall procedure
1 Check that the shift lever is in
P.
2 Turn the power switch to ON.
3 Press one of the buttons for
the driving position you want
to recall until the buzzer
sounds.
■To stop the position recall oper-
ation part-way through
Perform any of the following:
●Press the “SET” button.
●Press button “1” or “2”.
●Operate any of t he seat adjust-
ment switches (only cancels seat
position recall).
Recording/recalling a
driving position
Page 164 of 560
1643-3. Adjusting the seats
●Operate the tilt and telescopic
steering control switch (only can-
cels steering wheel position
recall).
■Using the Intelligent Assistant
(if equipped)
The following operations can be
performed using the Intelligent
Assistant:
●Recording a dr iving position
●Recalling a driving position (it can
be performed only when the shift
lever is in P)
For details regardi ng the Intelligent
Assistant, refer to the “MULTIME-
DIA OWNER’S MANUAL”.
■Seat positions that can be
memorized ( P.159)
The positions adjusted by the fol-
lowing procedure can be recorded:
●Seat position adjustment
●Seatback angle adjustment
●Seat cushion (front) angle adjust-
ment
●Vertical height adjustment
■Operating the driving position
memory after turning the power
switch to OFF
Recorded seat positions can be
activated up to 1 80 seconds after
the driver’s door is opened and
another 60 seconds after it is closed
again.
■In order to correctly use the
driving position memory func-
tion
If a seat position is already in the
furthest possible position and the
seat is operated in the same direc-
tion, the recorded position may be
slightly different w hen it is recalled.
■When recalling the driving posi-
tion
Take care when recalling the driving
position so that the head restraint
does not touch the ceiling.
■When the recorded seat posi-
tion cannot be recalled
The seat position may not be
recalled in some situations when the
seat position is recorded in a certain
range. For details, contact your
Toyota dealer.
■Registering procedure
Record your driving position to
button “1” or “2” before perform-
ing the following:
Carry only the key you want to
register, and then close the
driver’s door.
If 2 or more keys are in the vehi-
cle, the driving position cannot
be recorded properly.
1 Check that the shift lever is in
P.
2 Turn the power switch to ON.
3 Recall the driving position
that you want to record.
4 While pressing the recalled
button, press and hold the
door lock switch (either lock
or unlock) until the buzzer
sounds.
WARNING
■Seat adjustment caution
Take care during seat adjustment
so that the seat does not strike
the rear passenger or squeeze
your body against the steering
wheel.
Registering/recall/cancel-
ing a driving position to
an electronic key (mem-
ory recall function)