bulb TOYOTA VERSO S 2011 Owners Manual
[x] Cancel search | Manufacturer: TOYOTA, Model Year: 2011, Model line: VERSO S, Model: TOYOTA VERSO S 2011Pages: 664, PDF Size: 160.56 MB
Page 1 of 664
RAV4 Plug-in Hybrid_OM_OM42C53E_(EE)
1
6
5
4
3
2
8
7
9
Pictorial indexSearch by illustration
For safety
and security
Make sure to read through them
(Main topics: Child seat, theft deterrent system)
Plug-in hybrid
system
Plug-in hybrid system features, charging method, etc.
(Main topics: Driving tips, charging methods)
Vehicle status
information and
indicators
Reading driving-related information
(Main topics: Meters, multi-information display)
Before driving
Opening and closing the doors and windows,
adjustment before driving
(Main topics: Keys, doors, seats, power windows)
Driving
Operations and advice which are necessary for
driving
(Main topics: Starting hybrid system, refueling)
Interior featuresUsage of the interior features
(Main topics: Air conditioner, storage features)
Maintenance
and care
Caring for your vehicle and maintenance procedures
(Main topics: Interior and exterior, light bulbs)
When trouble
arises
What to do in case of malfunction and emergency
(Main topics: 12-volt battery discharge, flat tire)
Vehicle
specifications
Vehicle specifications, customizable features
(Main topics: Fuel, oil, tire inflation pressure)
IndexSearch by symptom
Search alphabetically
Page 4 of 664
4TABLE OF CONTENTS
6-1. Using the air conditioning
system and defogger
Automatic air conditioning sys-
tem .................................... 452
Remote Air Conditioning System
.......................................... 460
Heated steering wheel/Front
seat heaters/Front seat heaters
and ventilators/Rear seat heat-
ers..................................... 462
6-2. Using the interior lights
Interior lights list .................. 465
6-3. Using the storage features
List of storage features ....... 468
Luggage compartment features
.......................................... 472
6-4. Using the other interior fea-
tures
Other interior features ......... 476
7-1. Maintenance and care
Cleaning and protecting the
vehicle exterior ................. 488
Cleaning and protecting the
vehicle interior .................. 491
7-2. Maintenance
Maintenance requirements . 494
7-3. Do-it-yourself maintenance
Do-it-yourself service precau-
tions .................................. 496
Hood ................................... 498
Positioning a floor jack ........ 499
Engine compartment........... 501
12-volt battery ..................... 506
Tires .................................... 509
Tire inflation pressure ......... 529
Wheels ................................ 530
Air conditioning filter ........... 532
Cleaning the DC/DC Converter
air intake vent and filter .... 536
Wiper insert replacement .... 539
Electronic key battery ......... 543
Checking and replacing fuses
.......................................... 545
Light bulbs .......................... 548
8-1. Essential information
Emergency flashers ............ 560
If your vehicle has to be stopped
in an emergency ............... 560
If the vehicle is trapped in rising
water ................................. 561
8-2. Steps to take in an emergency
If your vehicle needs to be towed
.......................................... 563
If you think something is wrong
.......................................... 566
If a warning light turns on or a
warning buzzer sounds..... 568
If a warning message is dis-
played ............................... 578
If you have a flat tire (vehicles
without spare tire) ............. 582
If you have a flat tire (vehicles
with spare tire) .................. 593
6Interior features
7Maintenance and care
8When trouble arises
Page 13 of 664
13Pictorial index
Precautions against winter season ................................................. P.445
To prevent freezing (windshield wiper de-icer)
*1............................. P.457
Precautions against car wash ......................................................... P.489
Replacing the wiper insert............................................................... P.539
Fuel filler door ............................................................................... P.342
Refueling method ............................................................................ P.342
Fuel type/fuel tank capacity ............................................................ P.620
Charging port ................................................................................ P.105
Charging method ............................................................................ P.127
Tires ............................................................................................... P.509
Tire size/inflation pressure .............................................................. P.624
Winter tires/tire chain ...................................................................... P.445
Checking/rotation/tire pressure warning system ............................. P.509
Coping with flat tires................................................................ P.582, 593
Hood ............................................................................................... P.498
Opening .......................................................................................... P.498
Engine oil ........................................................................................ P.621
Coping with overheat ...................................................................... P.611
Warning messages ......................................................................... P.578
Headlights/front position lights/daytime running lights ........... P.332
Turn signal lights .......................................................................... P.325
Front fog lights.............................................................................. P.337
Tail lights ....................................................................................... P.332
Tail lights ....................................................................................... P.332
Back-up lights
Shifting the shift lever to R .............................................................. P.321
Light bulbs of the exterior lights for driving
(Replacing method: P.548, Watts: P.625)
E
F
G
H
I
J
K
L
M
Page 325 of 664
325
5
5-2. Driving procedures
Driving
■S mode
●You can choose from 6 levels of accelerating force and engine braking force.
●A lower shift range will provide greater accelerating force and engine braking
force than a higher shift range, and the engine revolutions will also increase.
●To prevent the engine from over-rev-ving, upshifting may automatically
occur when the shift range is 3 or lower.
●When the shift range is 4 or lower, holding the shift lever toward “+” sets the shift range to 6.
■Downshifting restriction warning
buzzer
To help ensure safety and driving per- formance, downshifting operation may
sometimes be restricted. In some cir- cumstances, downshifting may not be possible even when the shift lever or
paddle shift switches (if equipped) is operated. (A buzzer will sound twice.)
■If the “S” indicator does not come on or the “D” indicator is displayed
even after shifting the shift lever to S
This may indicate a malfunction in the
transmission system. Have the vehicle inspected by any authorized Toyota
retailer or Toyota authorized repairer, or any reliable repairer immediately. (In this situation, the transmission will oper-
ate in the same manner as when the shift lever is in D.)
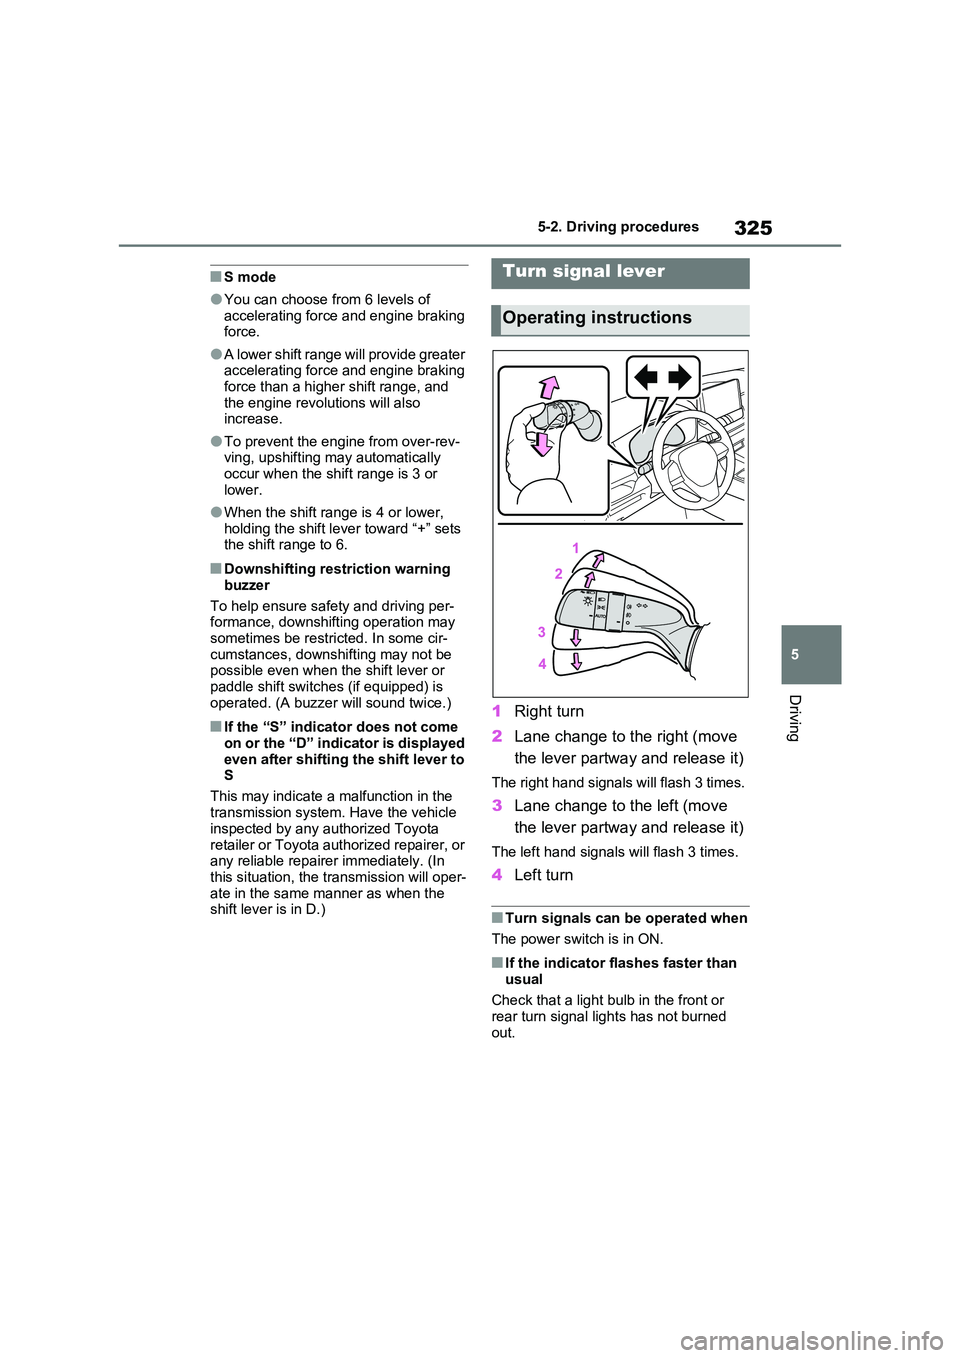
1 Right turn
2 Lane change to the right (move
the lever partway and release it)
The right hand signals will flash 3 times.
3 Lane change to the left (move
the lever partway and release it)
The left hand signals will flash 3 times.
4 Left turn
■Turn signals can be operated when
The power switch is in ON.
■If the indicator flashes faster than
usual
Check that a light bulb in the front or rear turn signal lights has not burned
out.
Turn signal lever
Operating instructions
Page 487 of 664
7
487
7
Maintenance and care
Maintenance and care
7-1. Maintenance and care
Cleaning and protecting the
vehicle exterior ............... 488
Cleaning and protecting the
vehicle interior ................ 491
7-2. Maintenance
Maintenance requirements 494
7-3. Do-it-yourself maintenance
Do-it-yourself service precau-
tions ................................ 496
Hood ................................. 498
Positioning a floor jack...... 499
Engine compartment ........ 501
12-volt battery ................... 506
Tires.................................. 509
Tire inflation pressure ....... 529
Wheels.............................. 530
Air conditioning filter ......... 532
Cleaning the DC/DC Con-
verter air intake vent and filter
....................................... 536
Wiper insert replacement .. 539
Electronic key battery ....... 543
Checking and replacing fuses
....................................... 545
Light bulbs ........................ 548
Page 496 of 664
4967-3. Do-it-yourself maintenance
7-3.Do-it-y ours elf main ten ance
Do-it-yourself service
precautions
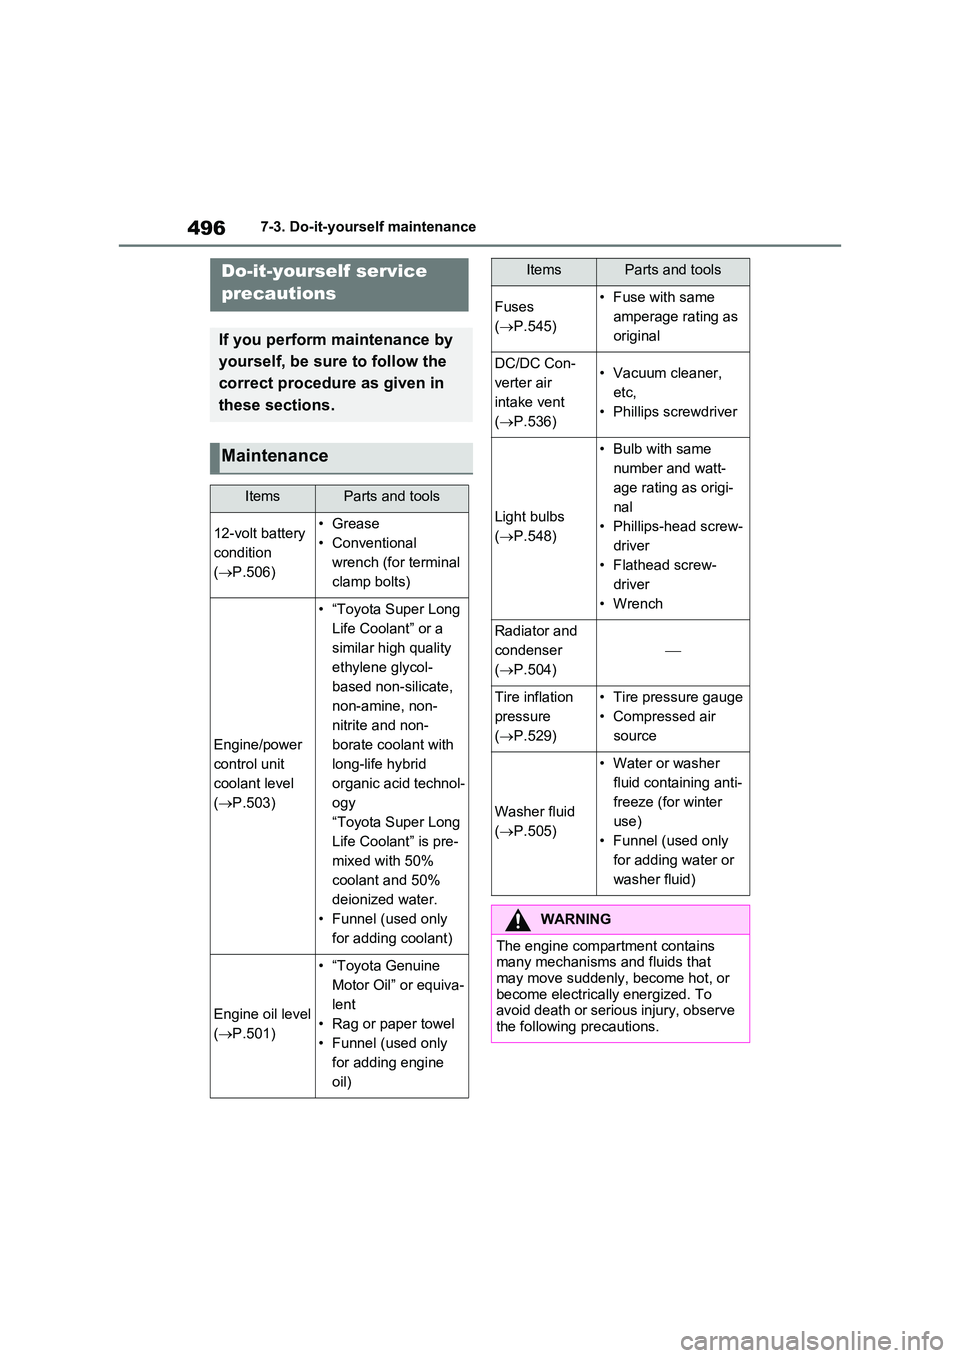
If you perform maintenance by
yourself, be sure to follow the
correct procedure as given in
these sections.
Maintenance
ItemsParts and tools
12-volt battery
condition
( P.506)
•Grease
• Conventional
wrench (for terminal
clamp bolts)
Engine/power
control unit
coolant level
( P.503)
• “Toyota Super Long
Life Coolant” or a
similar high quality
ethylene glycol-
based non-silicate,
non-amine, non-
nitrite and non-
borate coolant with
long-life hybrid
organic acid technol-
ogy
“Toyota Super Long
Life Coolant” is pre-
mixed with 50%
coolant and 50%
deionized water.
• Funnel (used only
for adding coolant)
Engine oil level
( P.501)
• “Toyota Genuine
Motor Oil” or equiva-
lent
• Rag or paper towel
• Funnel (used only
for adding engine
oil)
Fuses
( P.545)
• Fuse with same
amperage rating as
original
DC/DC Con-
verter air
intake vent
( P.536)
• Vacuum cleaner,
etc,
• Phillips screwdriver
Light bulbs
( P.548)
• Bulb with same
number and watt-
age rating as origi-
nal
• Phillips-head screw-
driver
• Flathead screw-
driver
•Wrench
Radiator and
condenser
( P.504)
Tire inflation
pressure
( P.529)
• Tire pressure gauge
• Compressed air
source
Washer fluid
( P.505)
• Water or washer
fluid containing anti-
freeze (for winter
use)
• Funnel (used only
for adding water or
washer fluid)
WARNING
The engine compartment contains many mechanisms and fluids that may move suddenly, become hot, or
become electrically energized. To avoid death or serious injury, observe the following precautions.
ItemsParts and tools
Page 547 of 664
547
7
7-3. Do-it-yourself maintenance
Maintenance and care
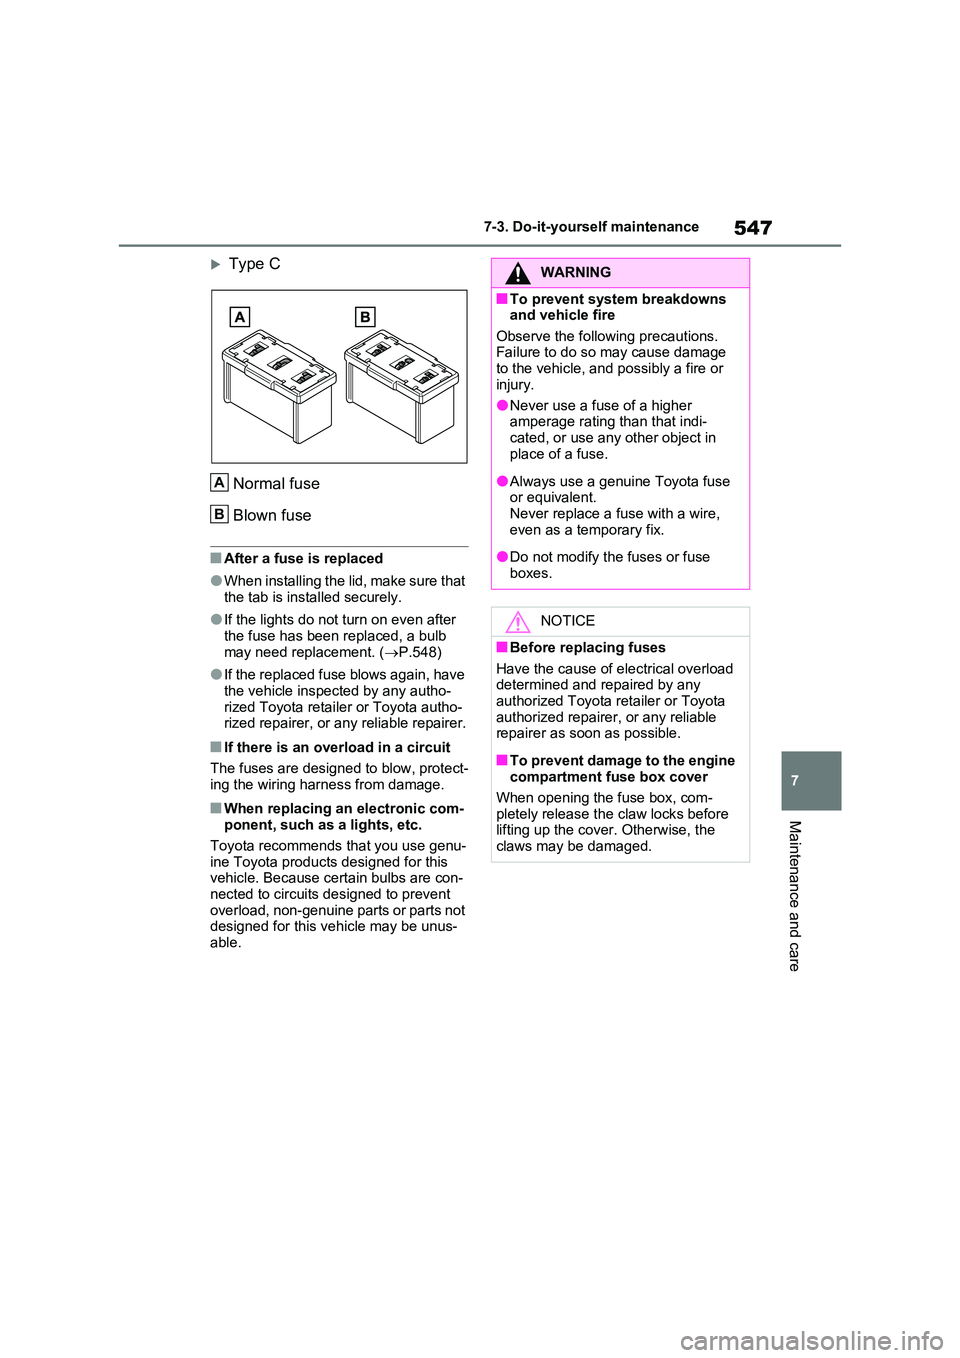
Type C
Normal fuse
Blown fuse
■After a fuse is replaced
●When installing the lid, make sure that
the tab is installed securely.
●If the lights do not turn on even after
the fuse has been replaced, a bulb may need replacement. ( P.548)
●If the replaced fuse blows again, have the vehicle inspected by any autho-
rized Toyota retailer or Toyota autho- rized repairer, or any reliable repairer.
■If there is an overload in a circuit
The fuses are designed to blow, protect-
ing the wiring harness from damage.
■When replacing an electronic com- ponent, such as a lights, etc.
Toyota recommends that you use genu-
ine Toyota products designed for this vehicle. Because certain bulbs are con-nected to circuits designed to prevent
overload, non-genuine parts or parts not designed for this vehicle may be unus-able.
A
B
WARNING
■To prevent system breakdowns and vehicle fire
Observe the following precautions. Failure to do so may cause damage to the vehicle, and possibly a fire or
injury.
●Never use a fuse of a higher amperage rating than that indi-
cated, or use any other object in place of a fuse.
●Always use a genuine Toyota fuse or equivalent.Never replace a fuse with a wire,
even as a temporary fix.
●Do not modify the fuses or fuse
boxes.
NOTICE
■Before replacing fuses
Have the cause of electrical overload determined and repaired by any authorized Toyota retailer or Toyota
authorized repairer, or any reliable repairer as soon as possible.
■To prevent damage to the engine compartment fuse box cover
When opening the fuse box, com- pletely release the claw locks before lifting up the cover. Otherwise, the
claws may be damaged.
Page 548 of 664
5487-3. Do-it-yourself maintenance
Check the wattage of the light bulb
to be replaced. ( P.625)
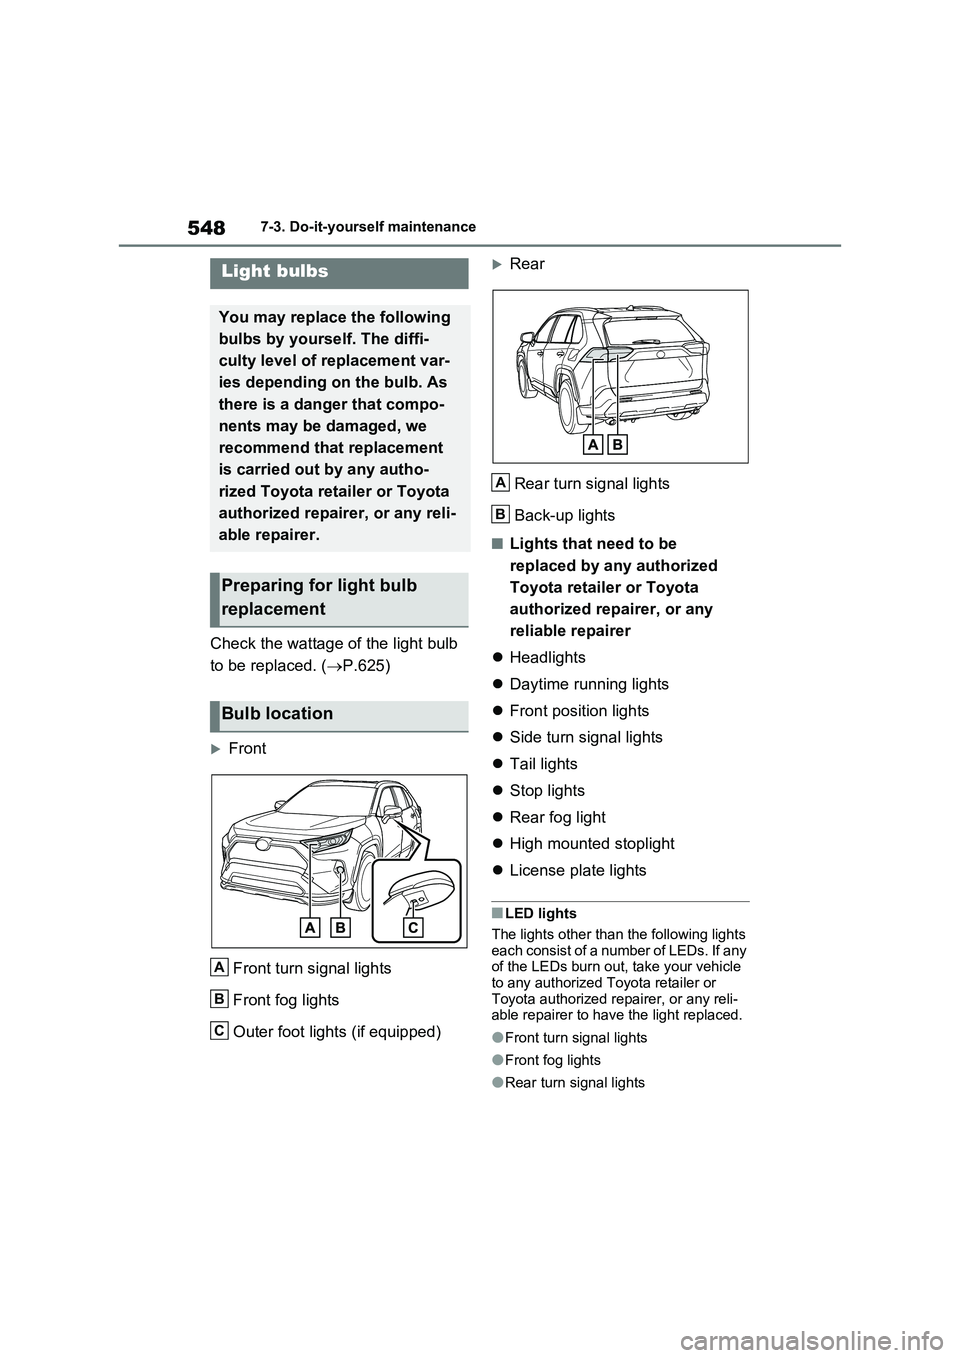
Front
Front turn signal lights
Front fog lights
Outer foot lights (if equipped)
Rear
Rear turn signal lights
Back-up lights
■Lights that need to be
replaced by any authorized
Toyota retailer or Toyota
authorized repairer, or any
reliable repairer
Headlights
Daytime running lights
Front position lights
Side turn signal lights
Tail lights
Stop lights
Rear fog light
High mounted stoplight
License plate lights
■LED lights
The lights other than the following lights each consist of a number of LEDs. If any of the LEDs burn out, take your vehicle
to any authorized Toyota retailer or Toyota authorized repairer, or any reli-able repairer to have the light replaced.
●Front turn signal lights
●Front fog lights
●Rear turn signal lights
Light bulbs
You may replace the following
bulbs by yourself. The diffi-
culty level of replacement var-
ies depending on the bulb. As
there is a danger that compo-
nents may be damaged, we
recommend that replacement
is carried out by any autho-
rized Toyota retailer or Toyota
authorized repairer, or any reli-
able repairer.
Preparing for light bulb
replacement
Bulb location
A
B
C
A
B
Page 549 of 664
549
7 7-3. Do-it-yourself maintenance
Maintenance and care
●Back-up lights
●Outer foot lights (if equipped)
■Condensation build-up on the
inside of the lens
Temporary condensation build-up on
the inside of the light lens does not indi-
cate a malfunction. Contact any autho-
rized Toyota retailer or Toyota
authorized repairer, or any reliable
repairer for more information in the fol-
lowing situations:
●Large drops of water have built up on
the inside of the lens.
●Water has built up inside the light.
■When replacing an electronic com-
ponent, such as a lights, etc.
P.547
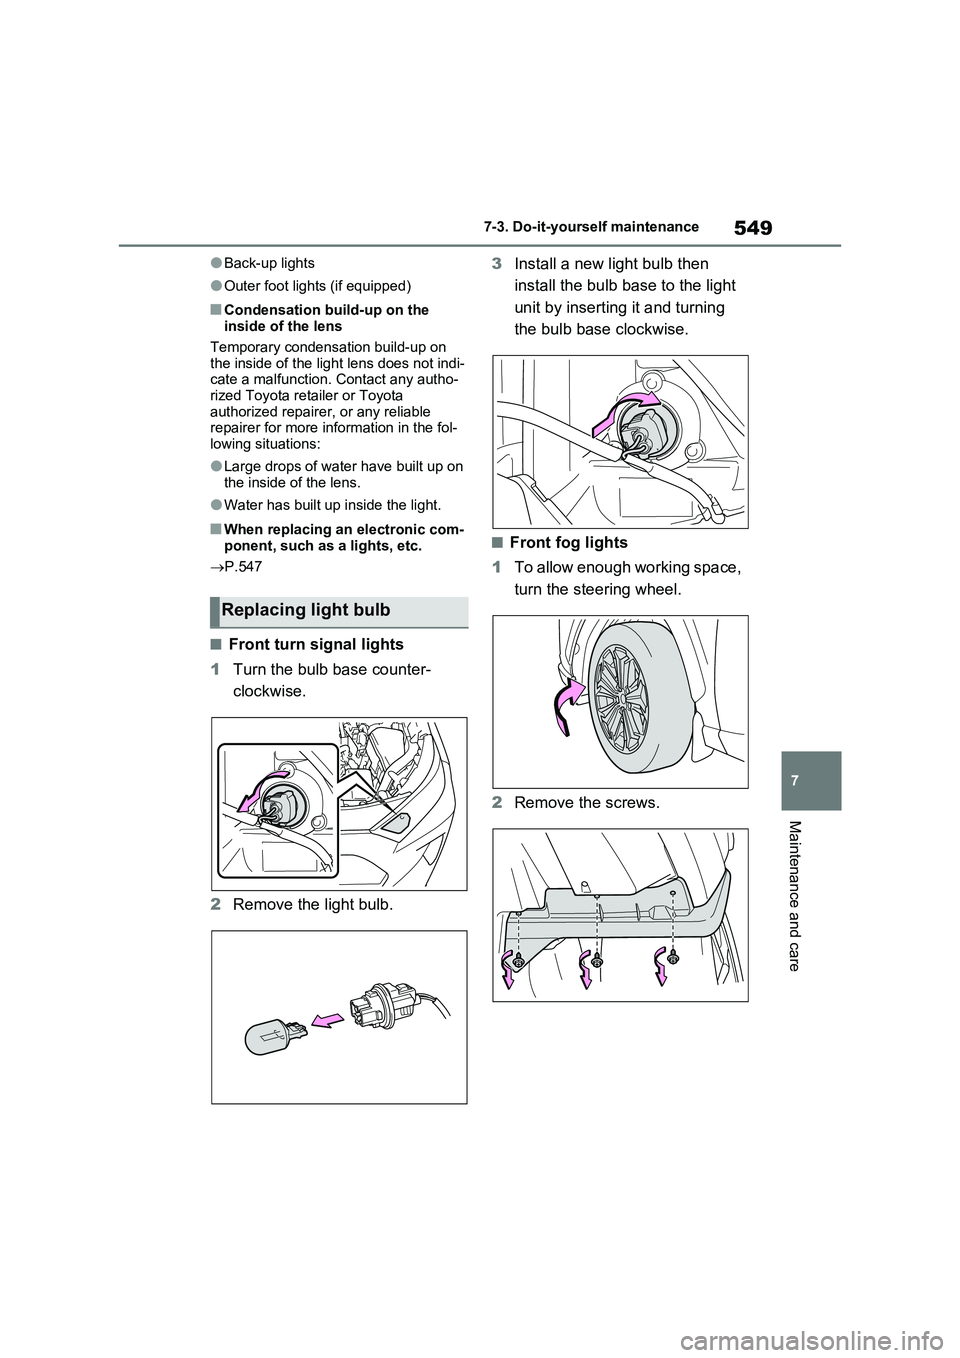
■Front turn signal lights
1Turn the bulb base counter-
clockwise.
2Remove the light bulb.3Install a new light bulb then
install the bulb base to the light
unit by inserting it and turning
the bulb base clockwise.
■Front fog lights
1To allow enough working space,
turn the steering wheel.
2Remove the screws.
Replacing light bulb
Page 550 of 664
5507-3. Do-it-yourself maintenance
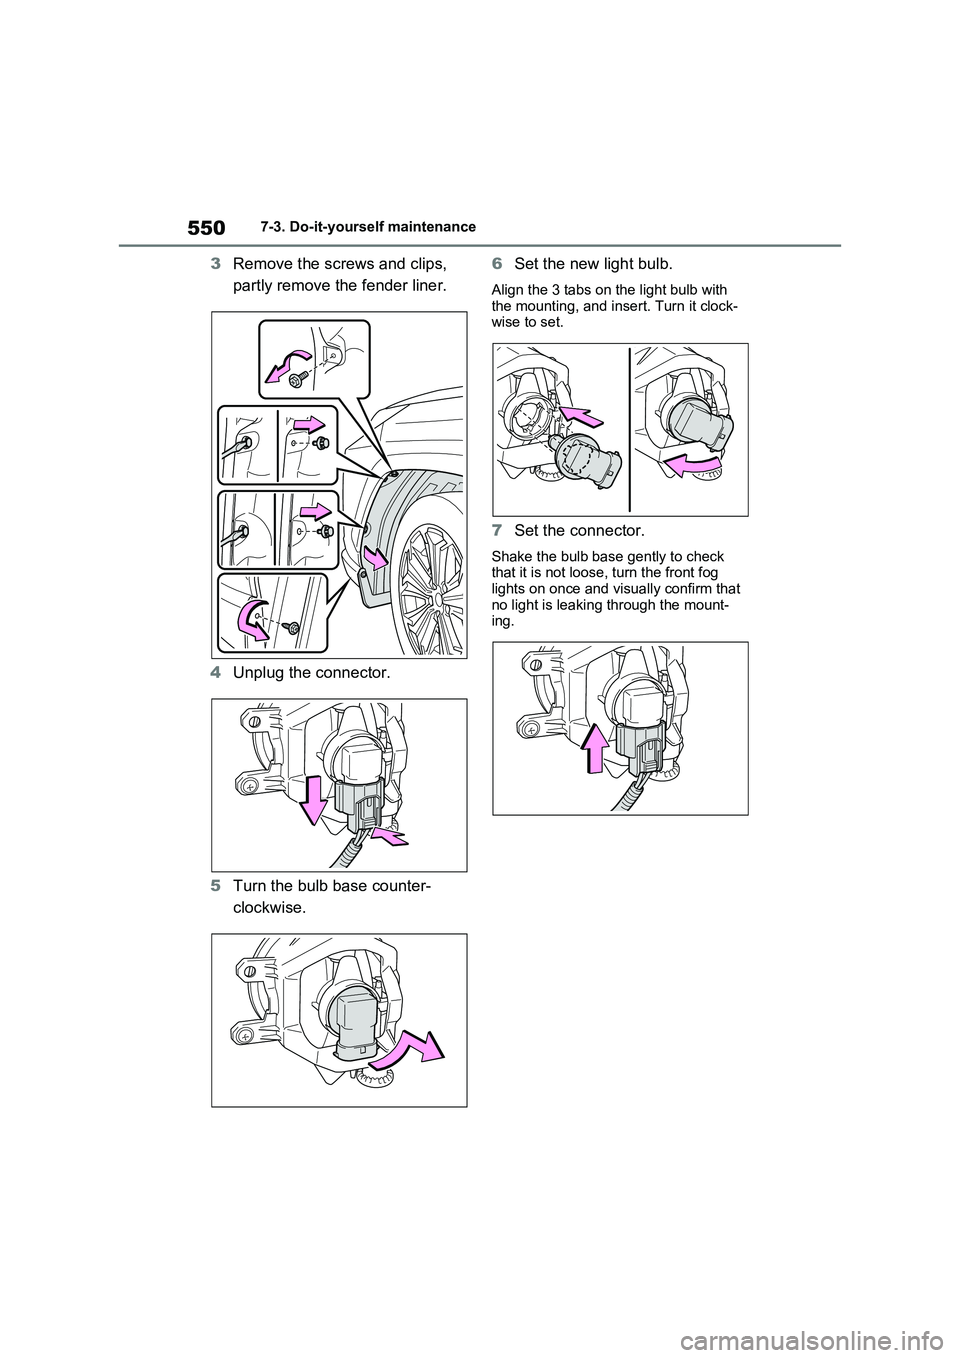
3Remove the screws and clips,
partly remove the fender liner.
4Unplug the connector.
5Turn the bulb base counter-
clockwise.6Set the new light bulb.
Align the 3 tabs on the light bulb with
the mounting, and insert. Turn it clock-
wise to set.
7Set the connector.
Shake the bulb base gently to check
that it is not loose, turn the front fog
lights on once and visually confirm that
no light is leaking through the mount-
ing.