spare tire TOYOTA xB 2011 Owners Manual (in English)
[x] Cancel search | Manufacturer: TOYOTA, Model Year: 2011, Model line: xB, Model: TOYOTA xB 2011Pages: 372, PDF Size: 9.58 MB
Page 229 of 372
229
4-3. Do-it-yourself maintenance
4
Maintenance and care
Tires
Replace or rotate tires in accordance with maintenance sched-
ules and treadwear.
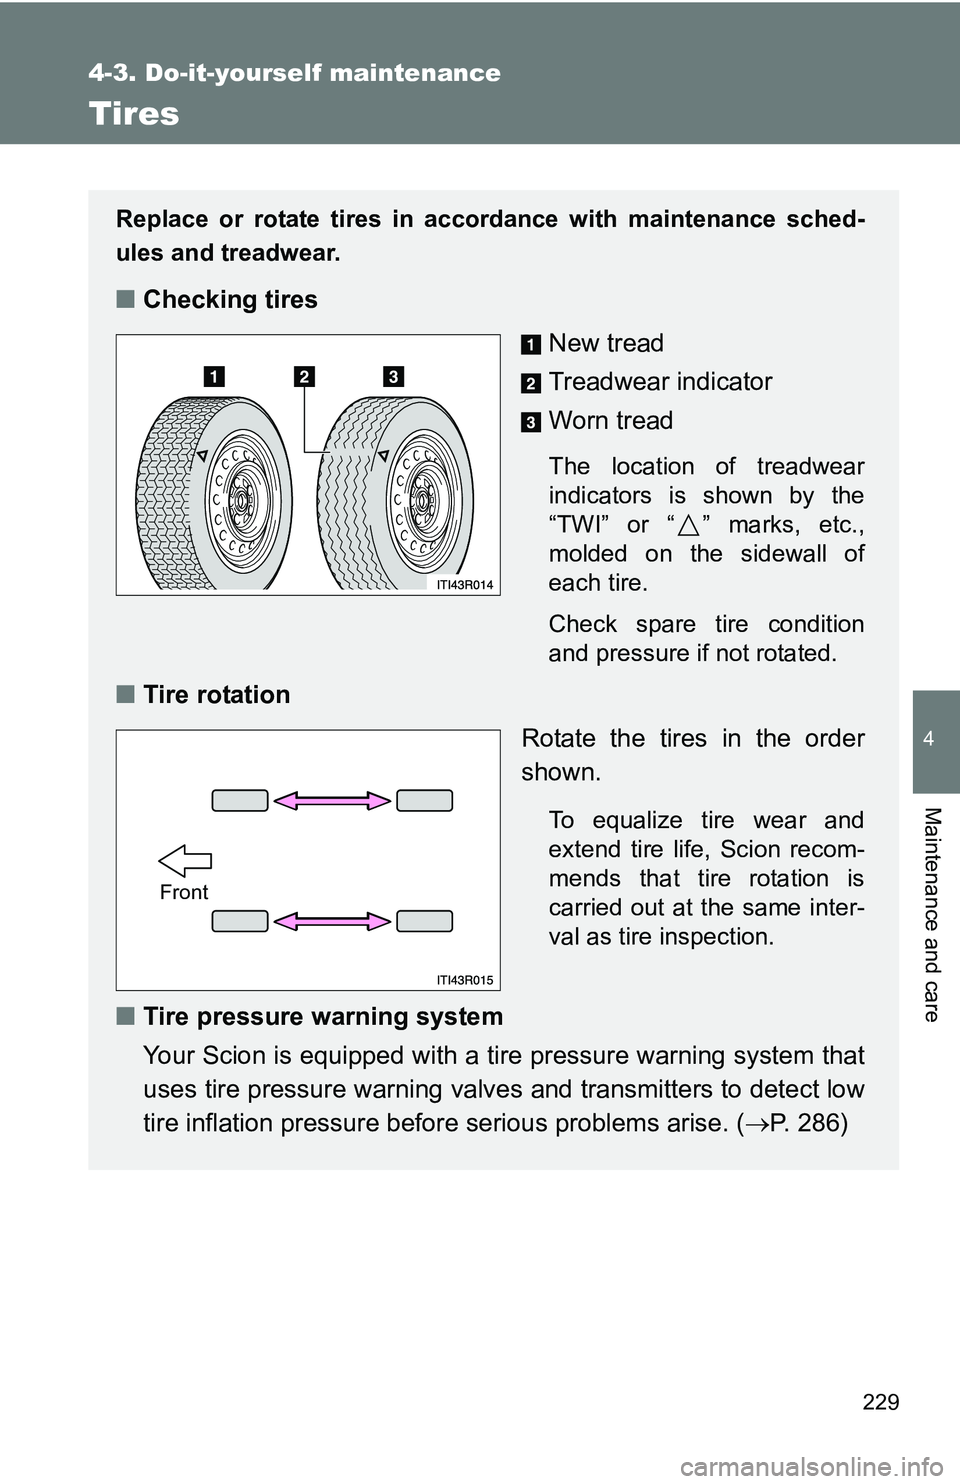
■Checking tires
New tread
Treadwear indicator
Worn tread
The location of treadwear
indicators is shown by the
“TWI” or “ ” marks, etc.,
molded on the sidewall of
each tire.
Check spare tire condition
and pressure if not rotated.
■Tire rotation
Rotate the tires in the order
shown.
To equalize tire wear and
extend tire life, Scion recom-
mends that tire rotation is
carried out at the same inter-
val as tire inspection.
■Tire pressure warning system
Your Scion is equipped with a tire pressure warning system that
uses tire pressure warning valves and transmitters to detect low
tire inflation pressure before serious problems arise. (P. 286)
Front
Page 235 of 372
235
4-3. Do-it-yourself maintenance
4
Maintenance and care
CAUTION
■
When inspecting or replacing tires
Observe the following precautions to prevent accidents.
Failure to do so may cause damage to parts of the drive train as well as
dangerous handling characteristics, which may lead to an accident
resulting in death or serious injury.
●Do not mix tires of different ma kes, models or tread patterns.
Also, do not mix tires of remarkably different treadwear.
●Do not use tire sizes other t han those recommended by Scion.
●Do not mix differently constructed ti res (radial, bias-belted or bias-ply
tires).
●Do not mix summer, all season and snow tires.
●Do not use tires that have been used on another vehicle.
Do not use tires if you do not know how they were used previously.
●Do not tow if your vehicle has a compact spare tire installed.
■When initializing the tire pressure warning system
Do not operate the tire pressure warning reset button without first adjust-
ing the tire inflation pr essure to the specified level. Otherwise, the tire
pressure warning light may not come on even if the tire inflation pressure
is low, or it may come on when the ti re inflation pressure is actually nor-
mal.
Page 238 of 372
238 4-3. Do-it-yourself maintenance
■Tire inflation pressure check interval
You should check tire inflation pressure every two weeks, or at least
once a month.
Do not forget to check the spare.
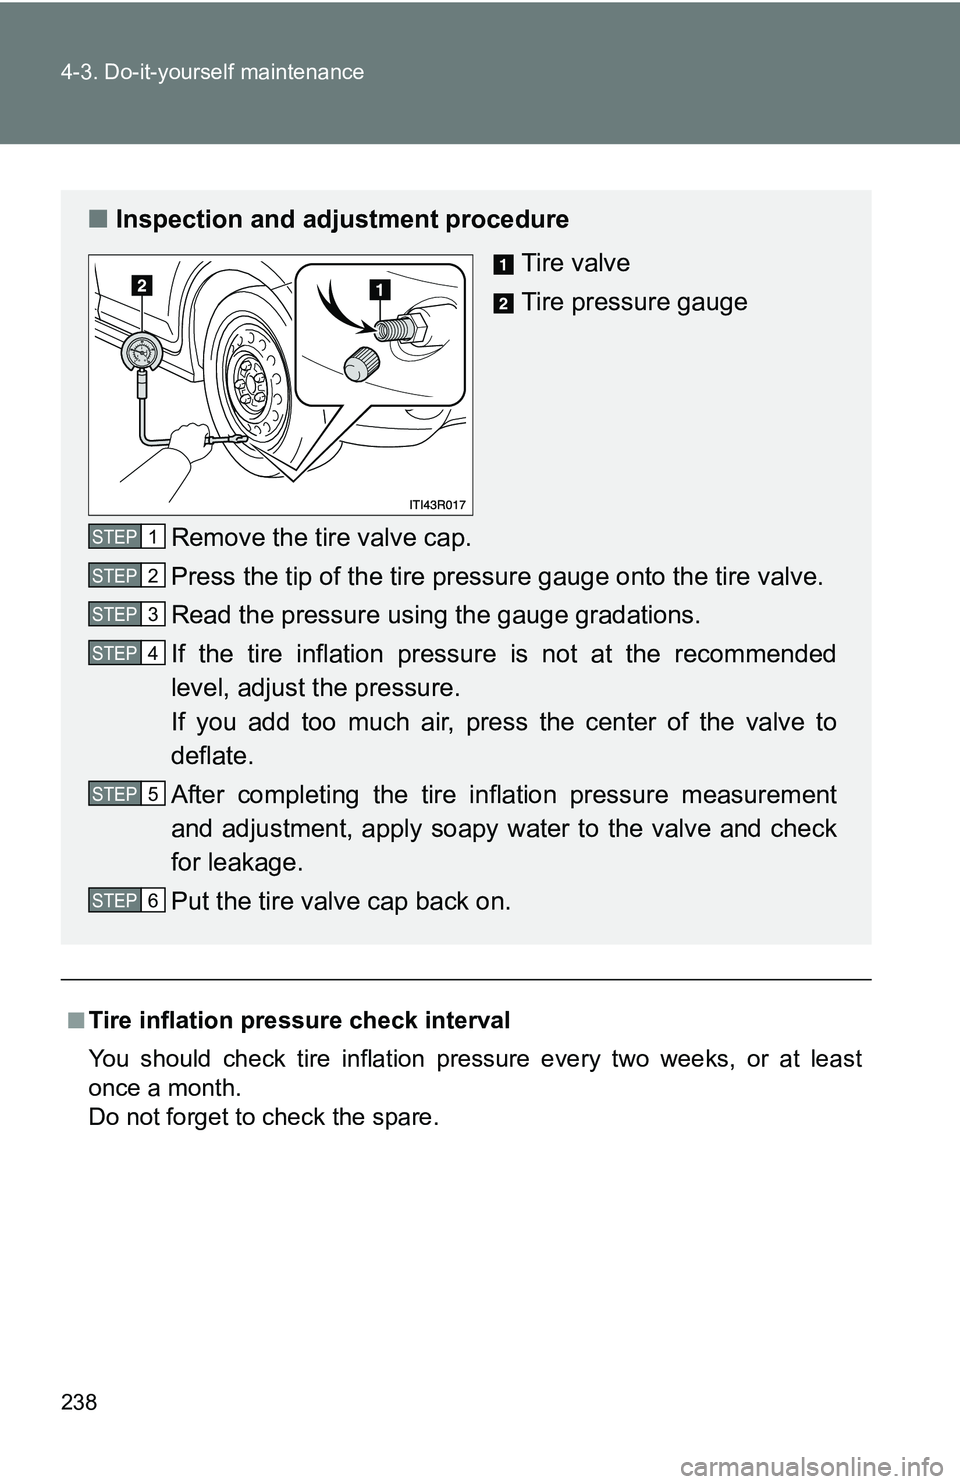
■Inspection and adjustment procedure
Tire valve
Tire pressure gauge
Remove the tire valve cap.
Press the tip of the tire pressure gauge onto the tire valve.
Read the pressure using the gauge gradations.
If the tire inflation pressure is not at the recommended
level, adjust the pressure.
If you add too much air, pres s the center of the valve to
deflate.
After completing the tire inflation pressure measurement
and adjustment, apply soapy water to the valve and check
for leakage.
Put the tire valve cap back on.
STEP 1
STEP 2
STEP 3
STEP 4
STEP 5
STEP 6
Page 289 of 372
5
When trouble arises
289
5-2. Steps to take in an emergency
■
Changing the engine oil (U.S.A. only)
Make sure to reset the oil change system. ( P. 218)
■
When the tire pressure warning light comes on
Check the tire inflation pressure and adjust to the appropriate level.
Pushing the tire pressure warning re set switch will not turn off the tire
pressure warning light.
■The tire pressure warning light may come on due to natural causes
The tire pressure warning light may come on due to natural causes such
as natural air leaks and tire inflat ion pressure changes caused by tem-
perature. In this case, adjusting the tire inflation pressure will turn off the
warning light (after a few minutes).
■When a tire is replaced with a spare tire
The compact spare tire is not equipped with a tire pressure warning
valve and transmitter. If a tire goes flat, the tire pressure warning light will
not turn off even though the flat tire has been replaced with the spare
tire. Replace the spare tire with the re paired tire and adjust the tire infla-
tion pressure. The tire pressure wa rning light will go off after a few min-
utes.
Page 291 of 372
5
When trouble arises
291
5-2. Steps to take in an emergency
CAUTION
■
When the electric power steering system warning light comes on
The steering wheel may become extremely heavy.
If the steering wheel becomes heavier than usual when operating, hold
firmly and operate using more force than usual.
■
If the tire pressure warning light comes on
Be sure to observe the following precautions. Failure to do so could
cause a loss of vehicle control and result in death or serious injury.
●Stop your vehicle in a safe place as soon as possible. Adjust the tire
inflation pressure immediately.
●If the tire pressure warning light comes on even after tire inflation pres-
sure adjustment, it is pr obable that you have a flat tire. Check the tires.
If a tire is flat, change it with th e spare tire and have the flat tire
repaired by the nearest Scion dealer.
●Avoid abrupt maneuvering and braking. If the vehicle tires deteriorate,
you could lose control of the steering wheel or the brakes.
■If a blowout or sudden air leakage should occur
The tire pressure warning syste m may not activate immediately.
Page 292 of 372
292 5-2. Steps to take in an emergency
CAUTION
■Maintenance of the tires
Each tire, including the spare (if provided), should be checked monthly
when cold and inflated to the inflation pressure recommended by the
vehicle manufacturer on the vehicle placard or tire inflation pressure
label (tire and load information label). (If your vehicle has tires of a differ-
ent size than the size indicated on the vehicle placard or tire inflation
pressure label [tire and load information label], you should determine the
proper tire inflation pr essure for those tires.)
As an added safety feature, your vehicle has been equipped with a tire
pressure monitoring system (TPMS-ti re pressure warning system) that
illuminates a low tire pressure telltal e (tire pressure warning light) when
one or more of your tires is significantly under-inflated. Accordingly,
when the low tire pressu re telltale (tire pressure warning light) illumi-
nates, you should stop and check your tires as soon as possible, and
inflate them to the proper pressure. Driving on a significantly under-
inflated tire causes the tire to overheat and can lead to tire failure.
Under-inflation also reduces fuel effi ciency and tire tread life, and may
affect the vehicle’s handling and stopping ability.
Please note that the TPMS (tire pressure warning system) is not a sub-
stitute for proper tire main tenance, and it is the driver’s responsibility to
maintain correct tire pressure, even if under-inflation has not reached the
level to trigger illu mination of the TPMS low tire pressure telltale (tire
pressure warning light).
Page 294 of 372
294
5-2. Steps to take in an emergency
If you have a flat tire
Remove the flat tire and replace it with the spare provided.
■Before jacking up the vehicle
●Stop the vehicle on a hard, flat surface.
● Set the parking brake.
● Shift the shift lever to P (automatic transmission) or R (manual
transmission).
● Stop the engine.
● Turn on the emergency flashers.
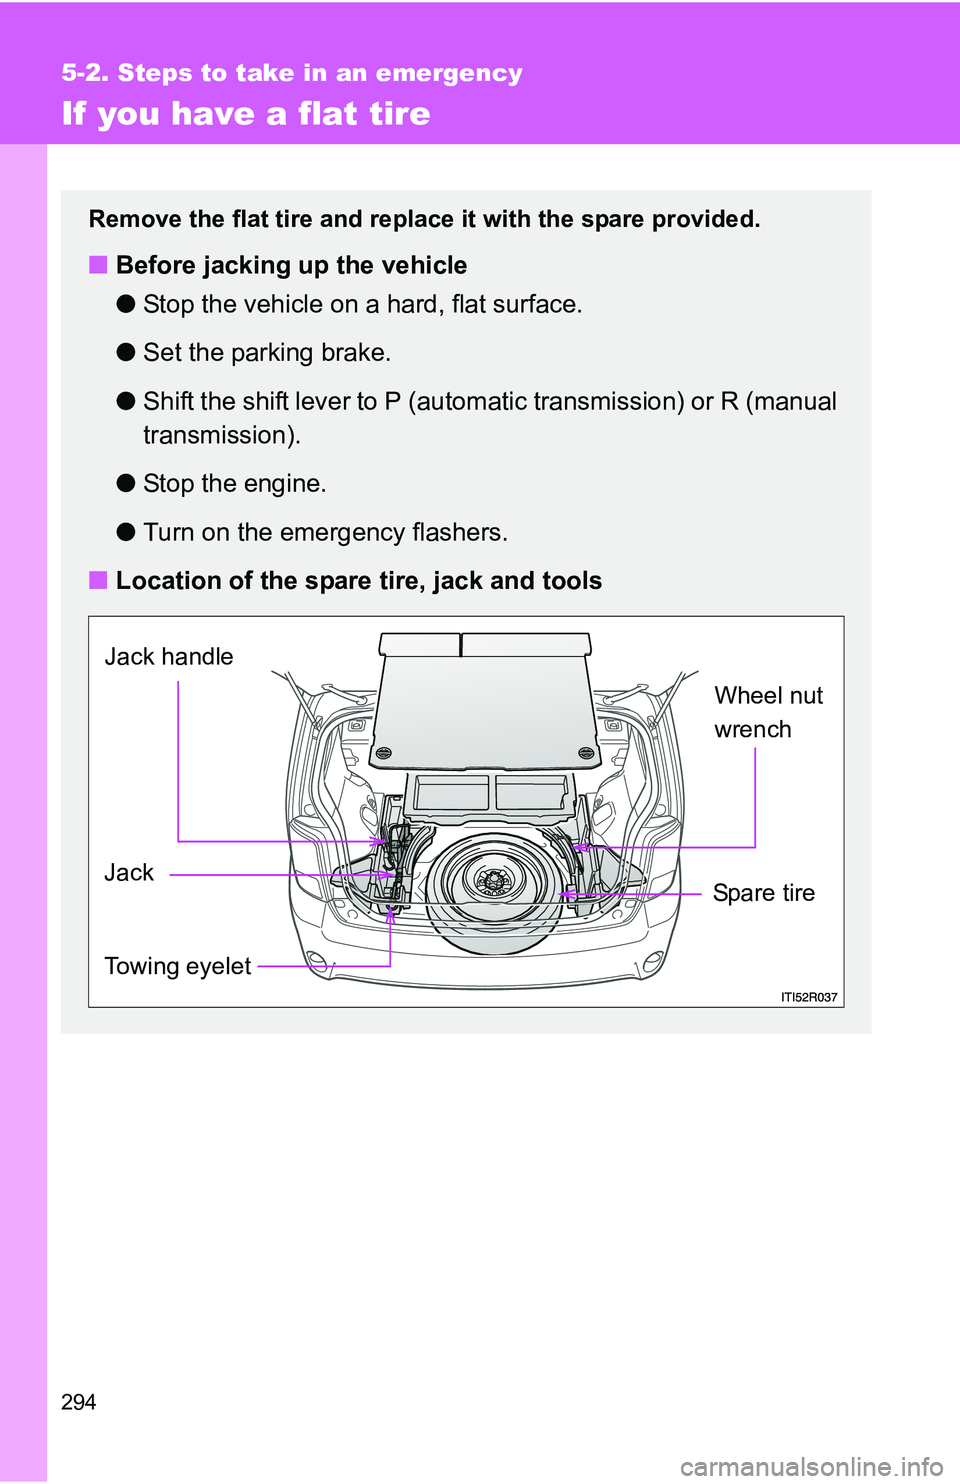
■ Location of the spare tire, jack and tools
Towing eyelet
Jack Wheel nut
wrench
Jack handle
Spare tire
Page 295 of 372
5
When trouble arises
295
5-2. Steps to take in an emergency
■
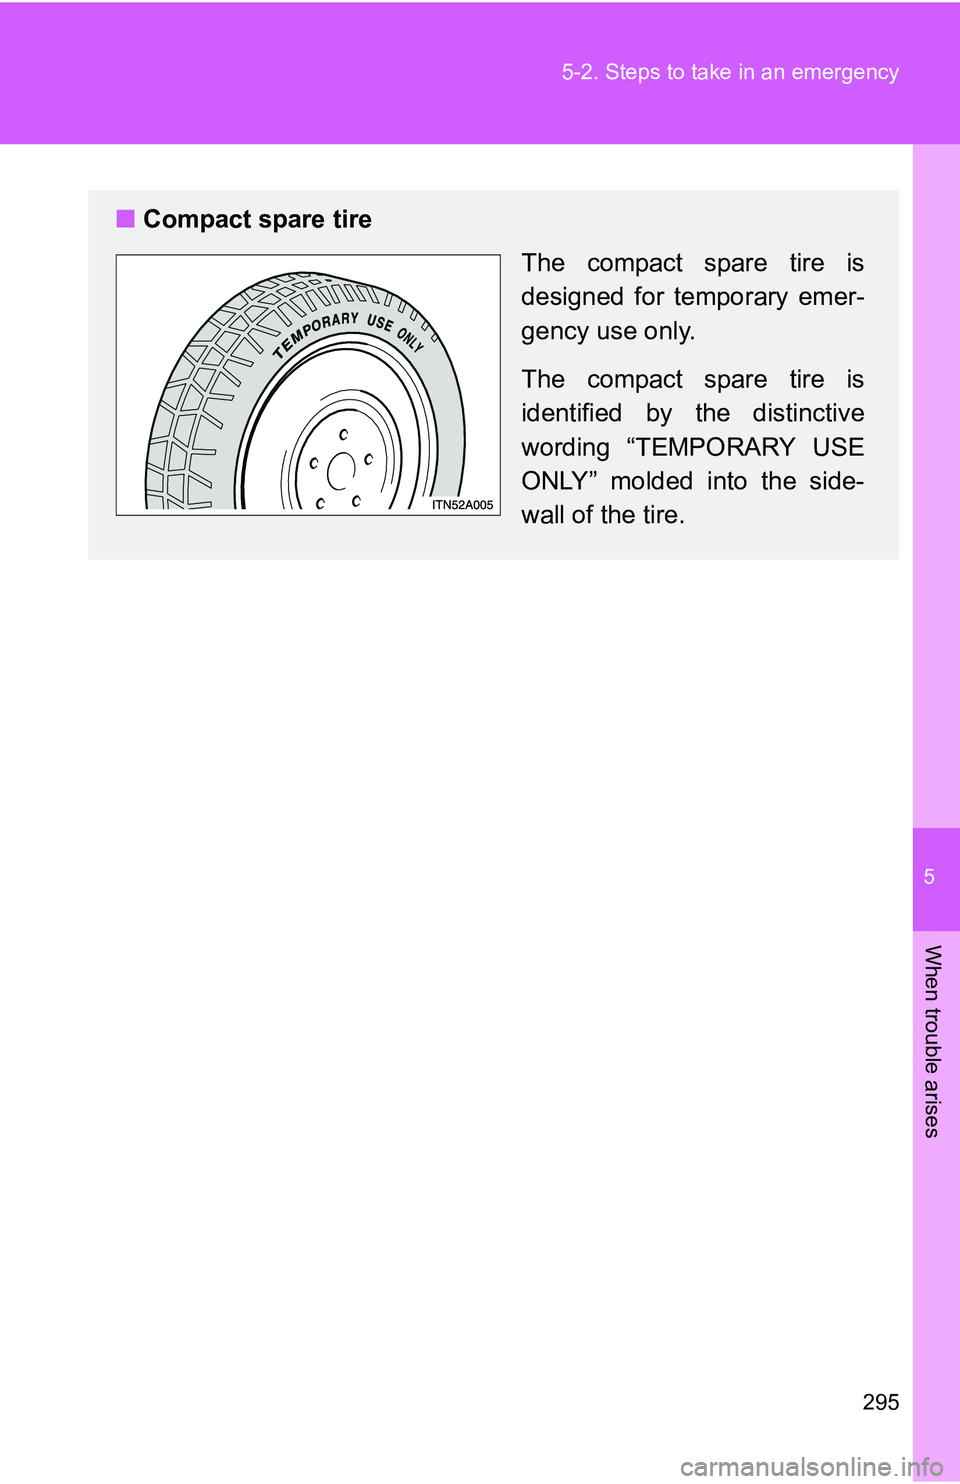
Compact spare tire
The compact spare tire is
designed for temporary emer-
gency use only.
The compact spare tire is
identified by the distinctive
wording “TEMPORARY USE
ONLY” molded into the side-
wall of the tire.
Page 297 of 372
5
When trouble arises
297
5-2. Steps to take in an emergency
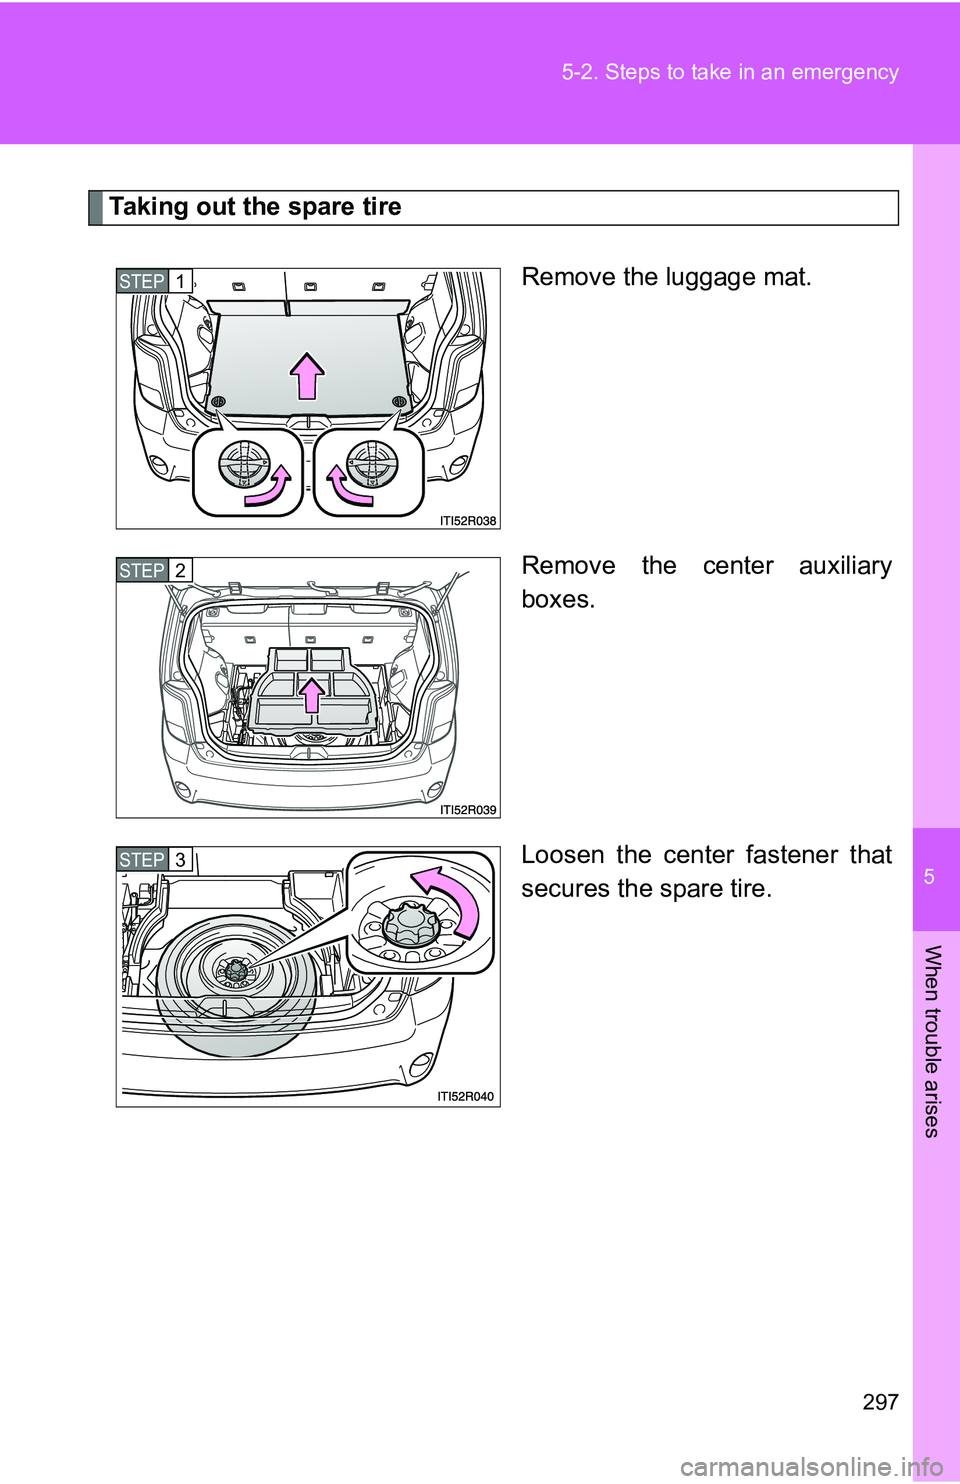
Taking out the spare tire
Remove the luggage mat.
Remove the center auxiliary
boxes.
Loosen the center fastener that
secures the spare tire.
STEP 1
STEP 2
STEP 3
Page 300 of 372
300 5-2. Steps to take in an emergency
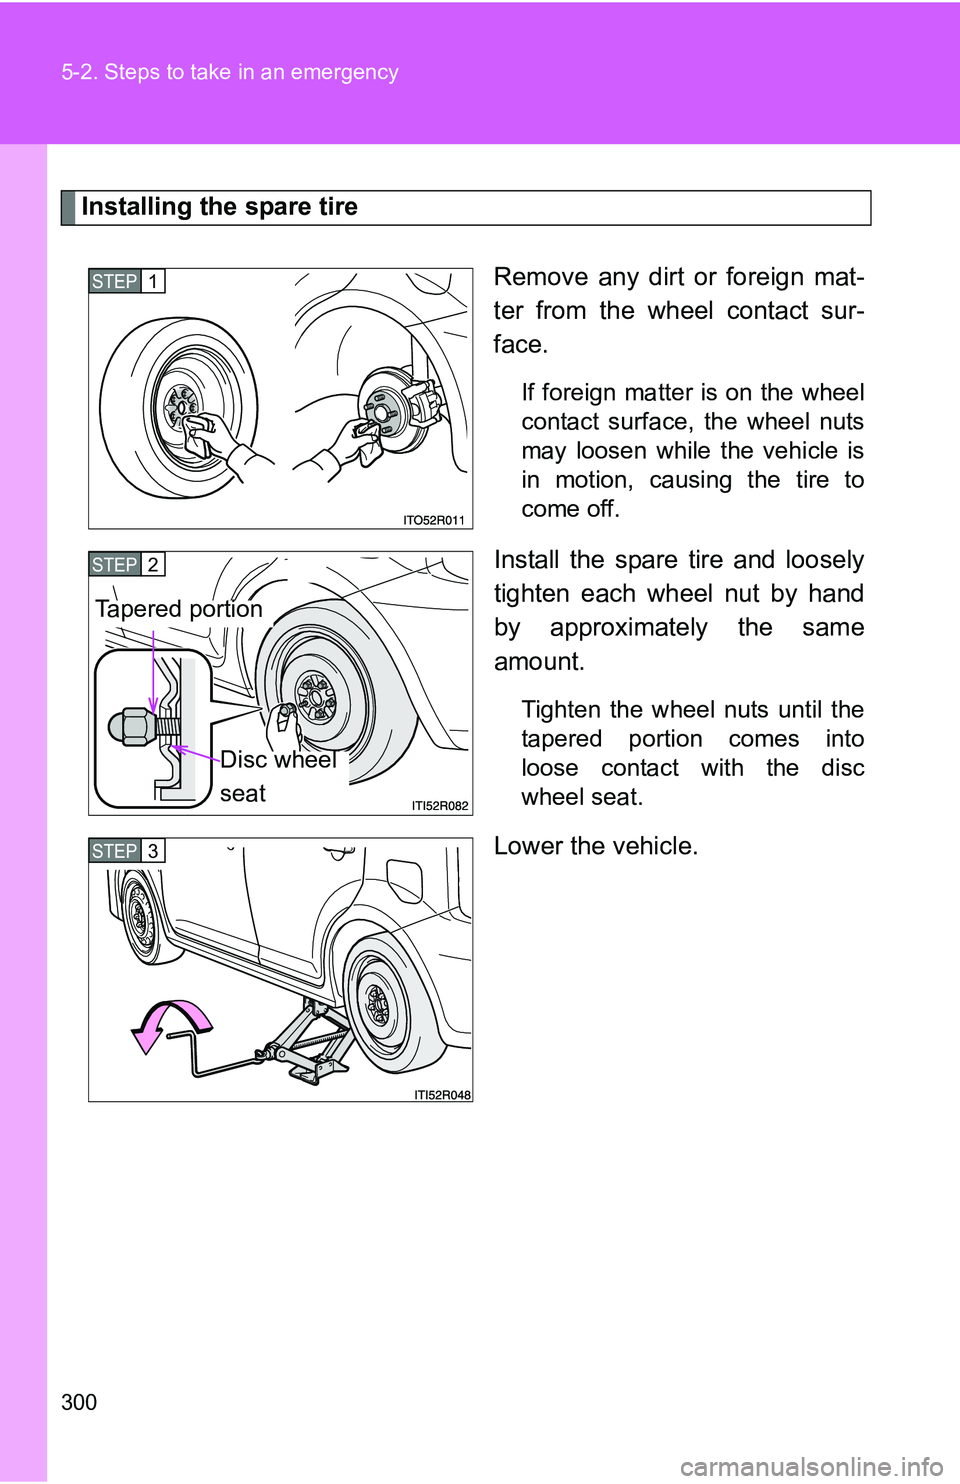
Installing the spare tireRemove any dirt or foreign mat-
ter from the wheel contact sur-
face.
If foreign matter is on the wheel
contact surface, the wheel nuts
may loosen while the vehicle is
in motion, causing the tire to
come off.
Install the spare tire and loosely
tighten each wheel nut by hand
by approximately the same
amount.
Tighten the wheel nuts until the
tapered portion comes into
loose contact with the disc
wheel seat.
Lower the vehicle.
STEP 1
STEP 2
Tapered portion
Disc wheel
seat
STEP 3