tow TOYOTA xB 2011 Owners Manual (in English)
[x] Cancel search | Manufacturer: TOYOTA, Model Year: 2011, Model line: xB, Model: TOYOTA xB 2011Pages: 388, PDF Size: 11.79 MB
Page 1 of 388
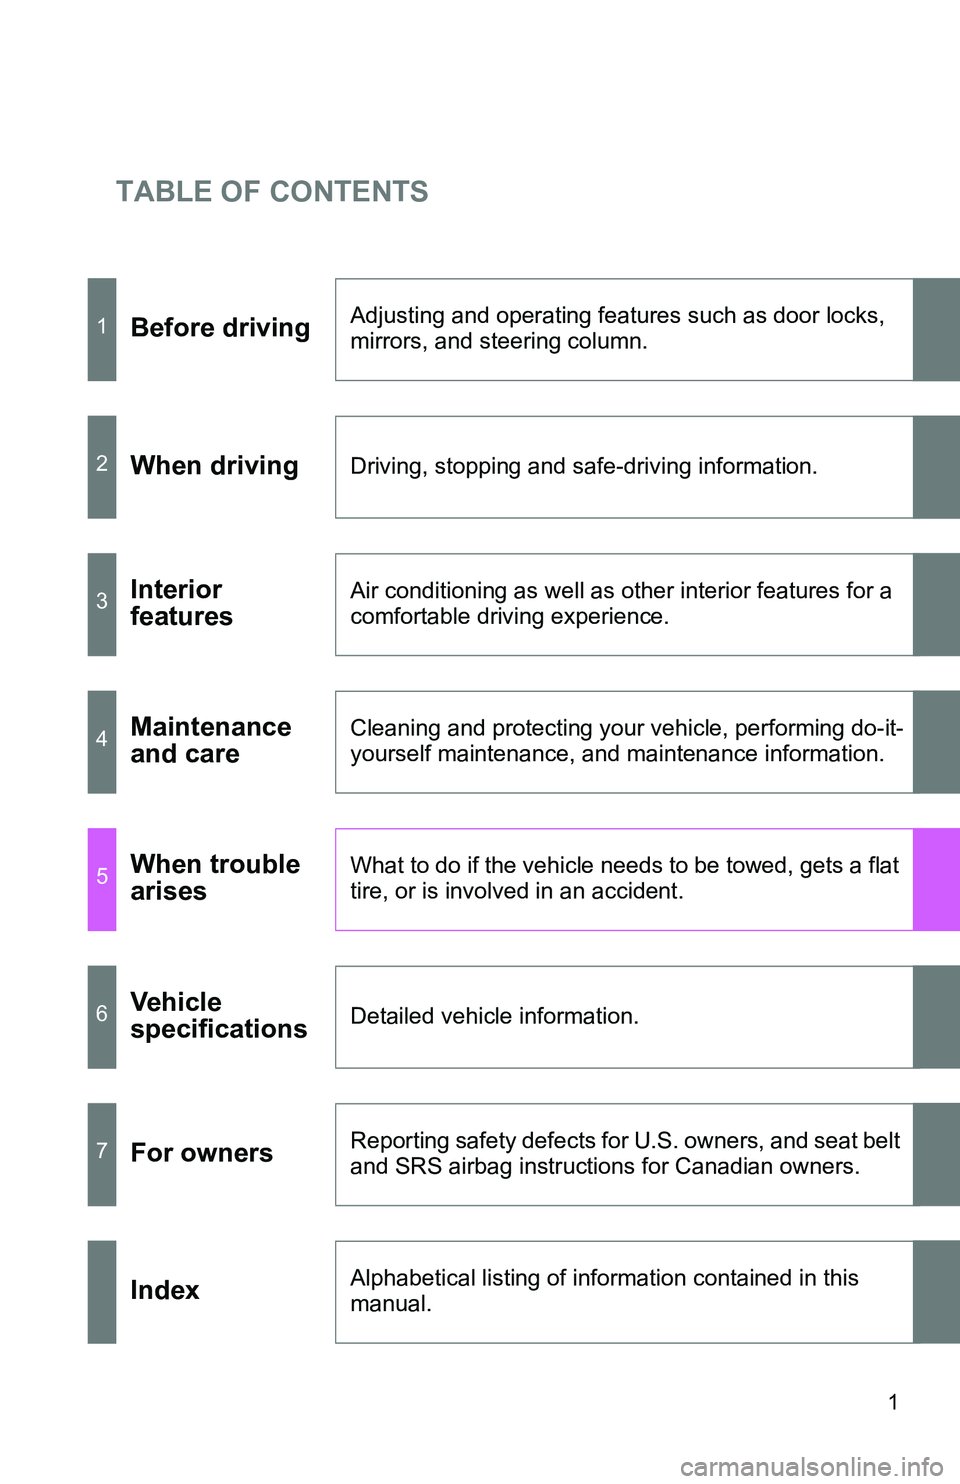
TABLE OF CONTENTS
1
1Before drivingAdjusting and operating features such as door locks,
mirrors, and steering column.
2When drivingDriving, stopping and safe-driving information.
3Interior
featuresAir conditioning as well as other interior features for a
comfortable driving experience.
4Maintenance
and careCleaning and protecting your vehicle, performing do-it-
yourself maintenance, and maintenance information.
5When trouble
arisesWhat to do if the vehicle needs to be towed, gets a flat
tire, or is involved in an accident.
6Vehicle
specificationsDetailed vehicle information.
7For ownersReporting safety defects for U.S. owners, and seat belt
and SRS airbag instructions for Canadian owners.
IndexAlphabetical listing of information contained in this
manual.
Page 3 of 388
1
2
3
4
5
6
7
3
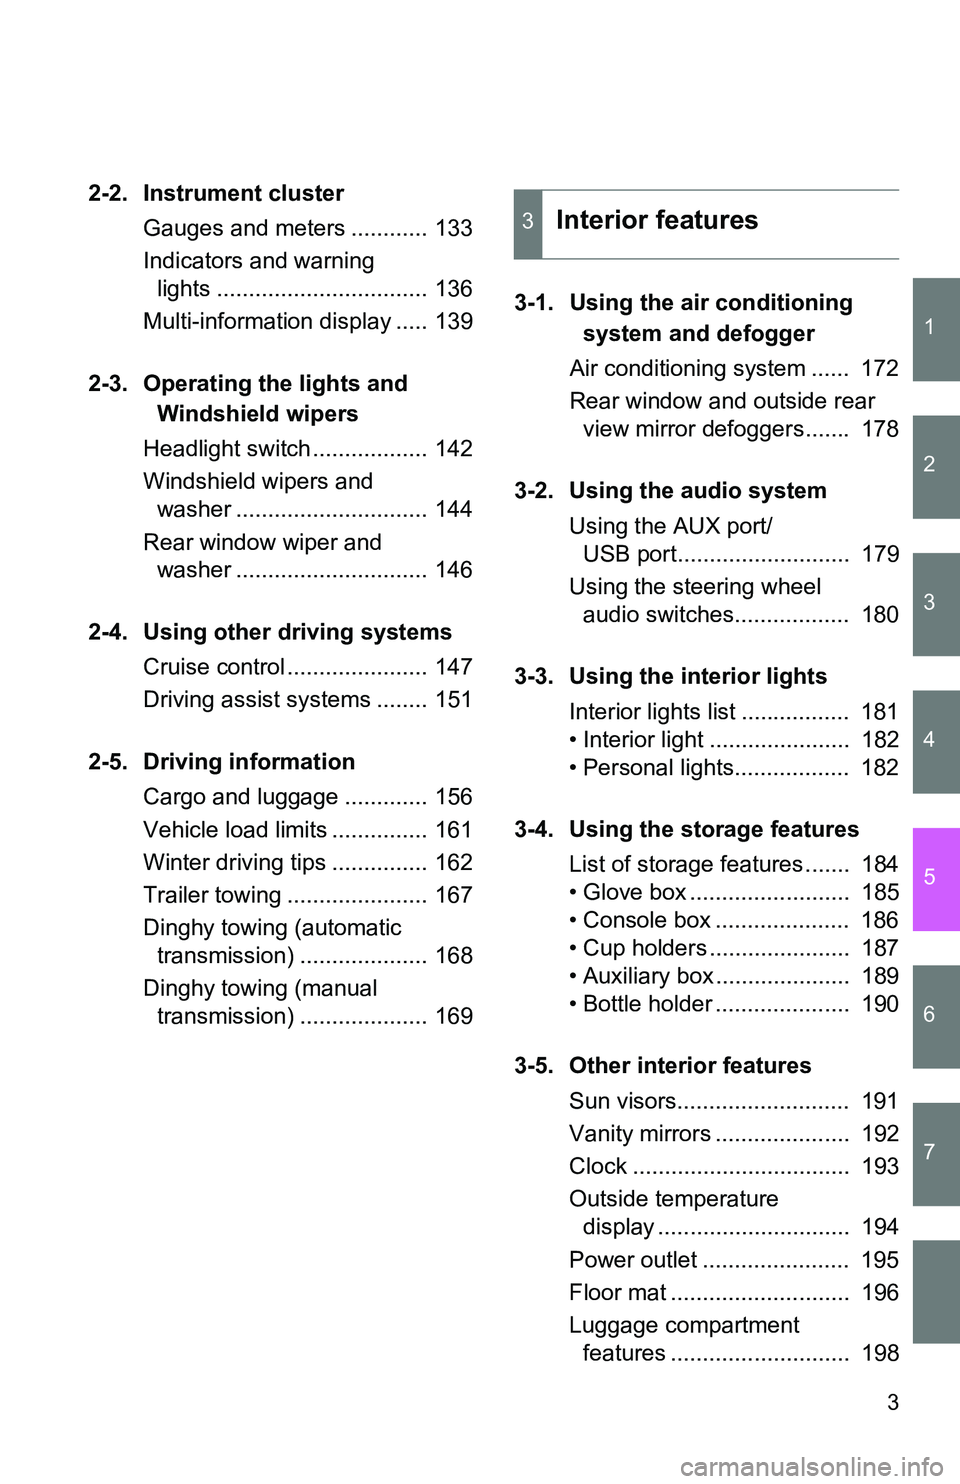
2-2. Instrument clusterGauges and meters ............ 133
Indicators and warning lights ................................. 136
Multi-information display ..... 139
2-3. Operating the lights and Windshield wipers
Headlight switch .................. 142
Windshield wipers and washer .............................. 144
Rear window wiper and washer .............................. 146
2-4. Using other driving systems Cruise control ...................... 147
Driving assist systems ........ 151
2-5. Driving information Cargo and luggage ............. 156
Vehicle load limits ............... 161
Winter driving tips ............... 162
Trailer towing ...................... 167
Dinghy towing (automatic transmission) .................... 168
Dinghy towing (manual transmission) .................... 169 3-1. Using the air conditioning
system and defogger
Air conditioning system ...... 172
Rear window and outside rear view mirror defoggers....... 178
3-2. Using the audio system Using the AUX port/USB port........................... 179
Using the steering wheel audio switches.................. 180
3-3. Using the interior lights Interior lights list ................. 181
• Interior light ...................... 182
• Personal lights.................. 182
3-4. Using the storage features List of storage features ....... 184
• Glove box ......................... 185
• Console box ..................... 186
• Cup holders ...................... 187
• Auxiliary box ..................... 189
• Bottle holder ..................... 190
3-5. Other interior features Sun visors........................... 191
Vanity mirrors ..................... 192
Clock .................................. 193
Outside temperature display .............................. 194
Power outlet ....................... 195
Floor mat ............................ 196
Luggage compartment features ............................ 198
3Interior features
Page 4 of 388
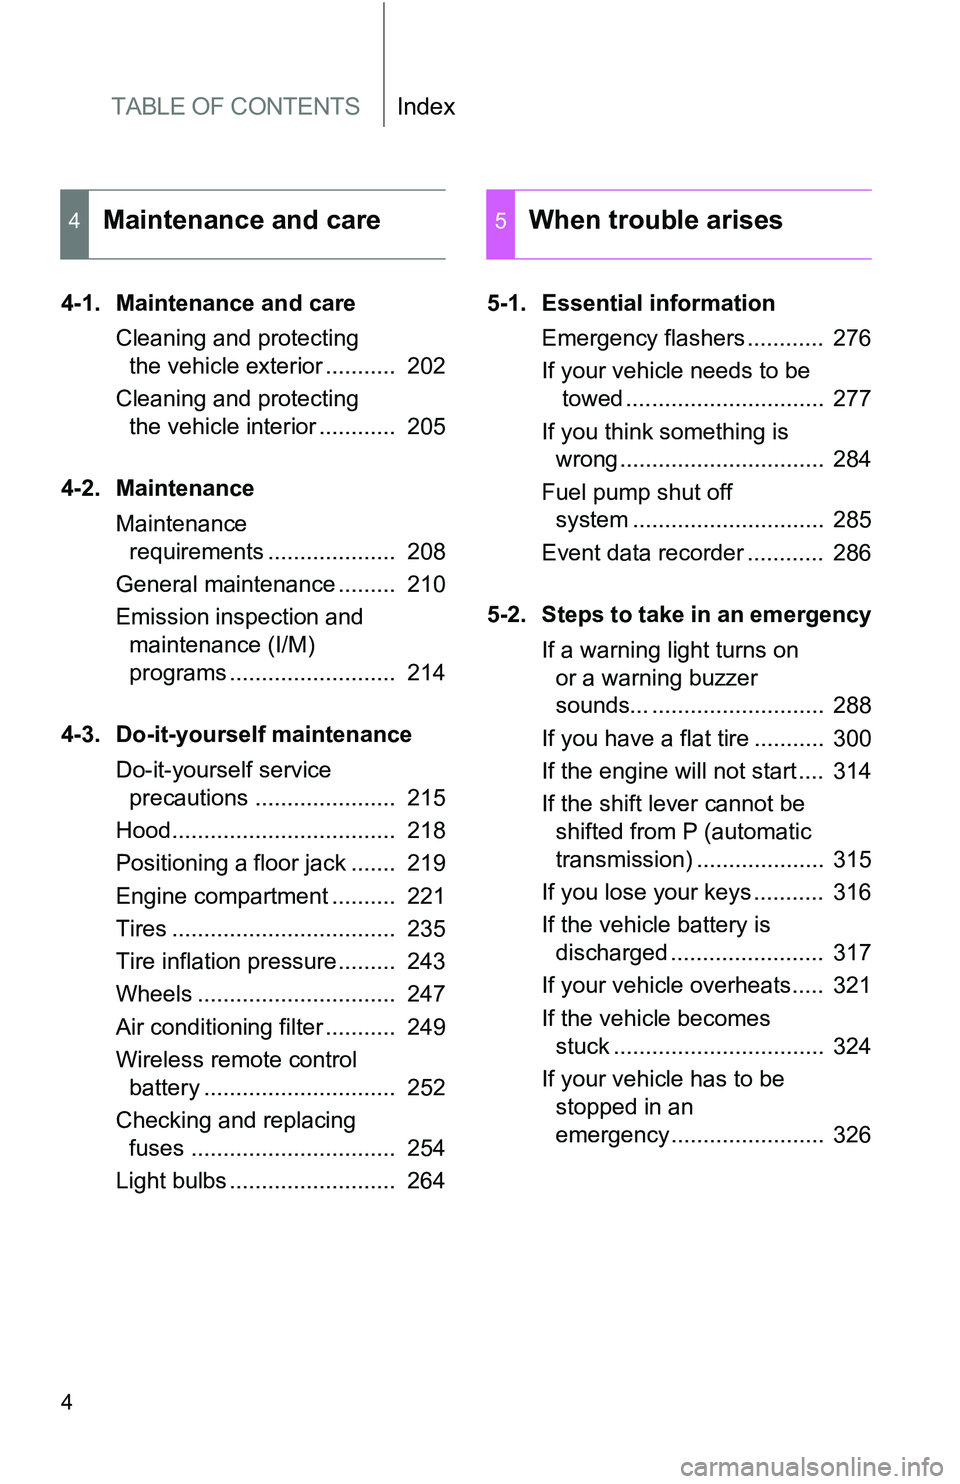
TABLE OF CONTENTSIndex
4
4-1. Maintenance and careCleaning and protecting the vehicle exterior ........... 202
Cleaning and protecting the vehicle interior ............ 205
4-2. Maintenance Maintenance requirements .................... 208
General maintenance ......... 210
Emission inspection and maintenance (I/M)
programs .......................... 214
4-3. Do-it-yourself maintenance Do-it-yourself service precautions ...................... 215
Hood................................... 218
Positioning a floor jack ....... 219
Engine compartment .......... 221
Tires ................................... 235
Tire inflation pressure......... 243
Wheels ............................... 247
Air conditioning filter ........... 249
Wireless remote control battery .............................. 252
Checking and replacing fuses ................................ 254
Light bulbs .......................... 264 5-1. Essential information
Emergency flashers ............ 276
If your vehicle needs to be towed ............................... 277
If you think something is wrong ................................ 284
Fuel pump shut off system .............................. 285
Event data recorder ............ 286
5-2. Steps to take in an emergency If a warning light turns on or a warning buzzer
sounds... ........................... 288
If you have a flat tire ........... 300
If the engine will not start .... 314
If the shift lever cannot be shifted from P (automatic
transmission) .................... 315
If you lose your keys ........... 316
If the vehicle battery is discharged ........................ 317
If your vehicle overheats..... 321
If the vehicle becomes stuck ................................. 324
If your vehicle has to be stopped in an
emergency........................ 326
4Maintenance and care5When trouble arises
Page 26 of 388
26 1-2. Opening, closing and locking the doors
■Security feature
If a door is not opened within approximately 60 seconds after the vehicle is
unlocked, the security feature automatically locks the vehicle again.
■ Conditions affecting operation
The wireless remote control function may not operate normally in the follow-
ing situations:
●Near a TV tower, radio station, electr ic power plant, airport or other facil-
ity that generates strong radio waves
● When carrying a portable radio, cell ular phone or other wireless commu-
nication devices
● When multiple wireless keys are in the vicinity
● When the wireless key is in contact with, or is covered by, a metallic
object
● When a wireless key (that emits radio waves) is being used nearby
● When the wireless key has been left near an electrical appliance such as
a personal computer
■ Key battery depletion
If the wireless remote control function does not operate, the battery may be
depleted. Replace the battery when necessary. ( P. 252)
Page 45 of 388
45
1-3. Adjustable components (s
eats, mirrors, steering wheel)
1
Before driving
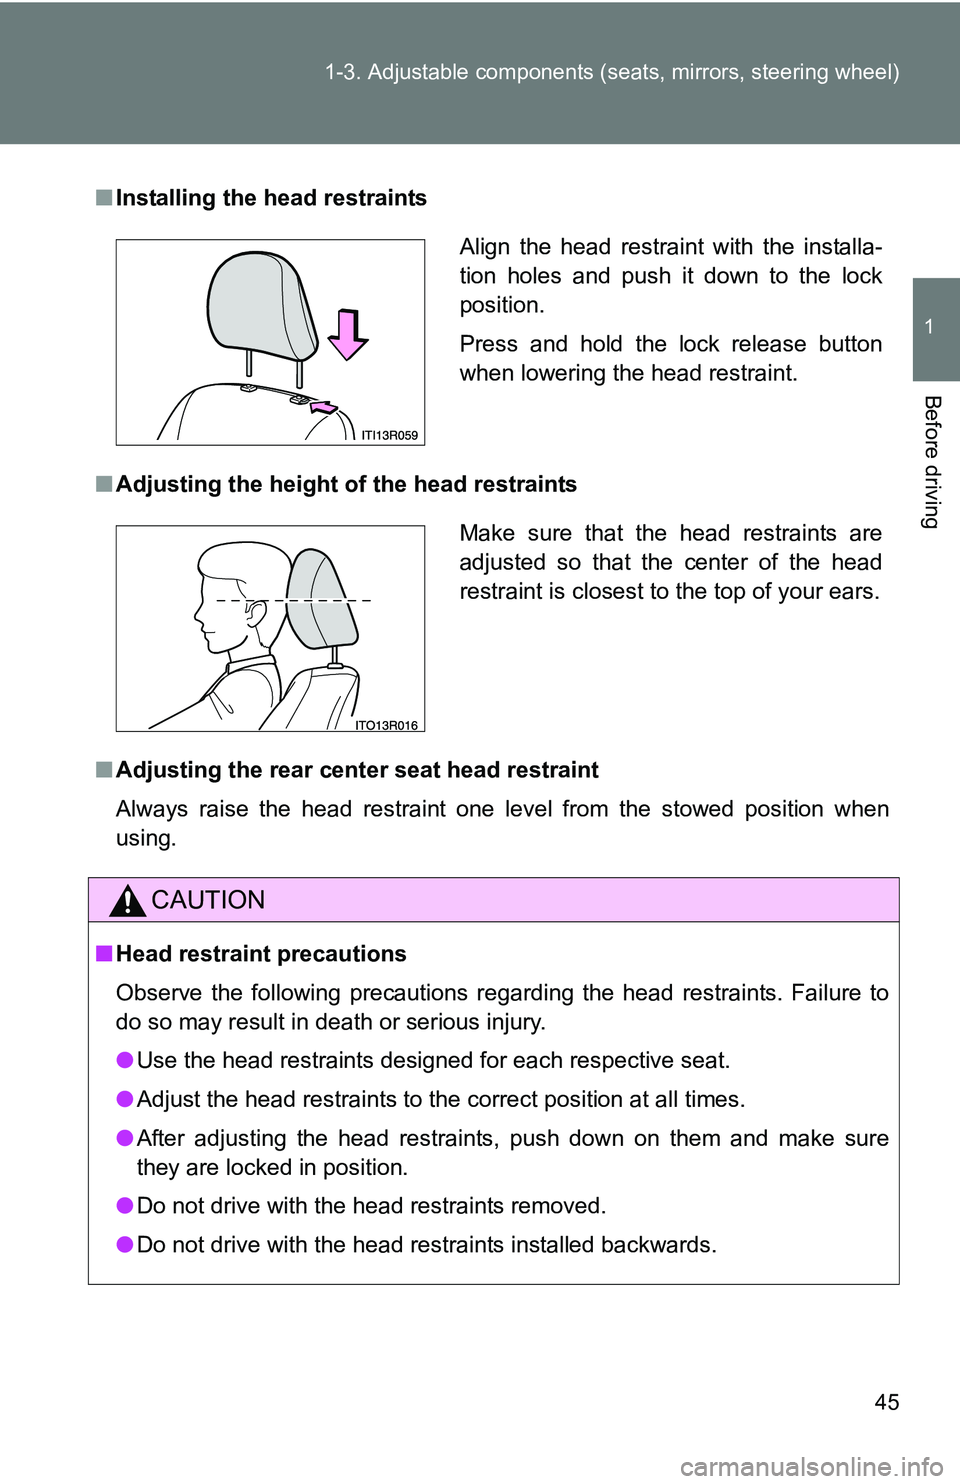
■Installing the head restraints
■ Adjusting the height of the head restraints
■ Adjusting the rear cent er seat head restraint
Always raise the head restraint one level from the stowed position when
using.
CAUTION
■ Head restraint precautions
Observe the following precautions regarding the head restraints. Failure to
do so may result in death or serious injury.
●Use the head restraints designed for each respective seat.
● Adjust the head restraints to the correct position at all times.
● After adjusting the head restraints, push down on them and make sure
they are locked in position.
● Do not drive with the head restraints removed.
● Do not drive with the head restraints installed backwards.
Align the head restraint with the installa-
tion holes and push it down to the lock
position.
Press and hold the lock release button
when lowering the head restraint.
Make sure that the head restraints are
adjusted so that the center of the head
restraint is closest to the top of your ears.
Page 79 of 388
79
1-7. Safety information
1
Before driving
CAUTION
■
SRS airbag precautions
Observe the following precautions regarding the SRS airbags.
Failure to do so may cause death or serious injury.
●The driver and all passengers in the vehicle must wear their seat belts
properly.
The SRS airbags are supplemental devices to be used with the seat belts.
● The SRS driver airbag deploys with considerable force, and can cause
death or serious injury especially if the driver is very close to the airbag.
The National Highway Traffic Safety Administration (NHTSA) advises:
Since the risk zone for the driver’s airbag is the first 2 - 3 in. (50 - 75 mm)
of inflation, placing yourself 10 in. (250 mm) from your driver airbag pro-
vides you with a clear margin of safety. This distance is measured from the
center of the steering wheel to your breastbone. If you sit less than 10 in.
(250 mm) away now, you can change your driving position in several
ways:
• Move your seat to the rear as far as you can while still reaching the pedals comfortably.
• Slightly recline the back of the seat. Although vehicle designs vary, many drivers can achieve the 10 in.
(250 mm) distance, even with the driver seat all the way forward, sim-
ply by reclining the back of the seat somewhat. If reclining the back of
your seat makes it hard to see the road, raise yourself by using a firm,
non-slippery cushion, or raise the seat if your vehicle has that feature\
.
• If your steering wheel is adjustable, tilt it downward. This points the air- bag toward your chest instead of your head and neck.
The seat should be adjusted as recommended by NHTSA above, while
still maintaining control of the foot pedals, steering wheel, and your view of
the instrument panel controls.
Page 81 of 388
81
1-7. Safety information
1
Before driving
CAUTION
■
SRS airbag precautions
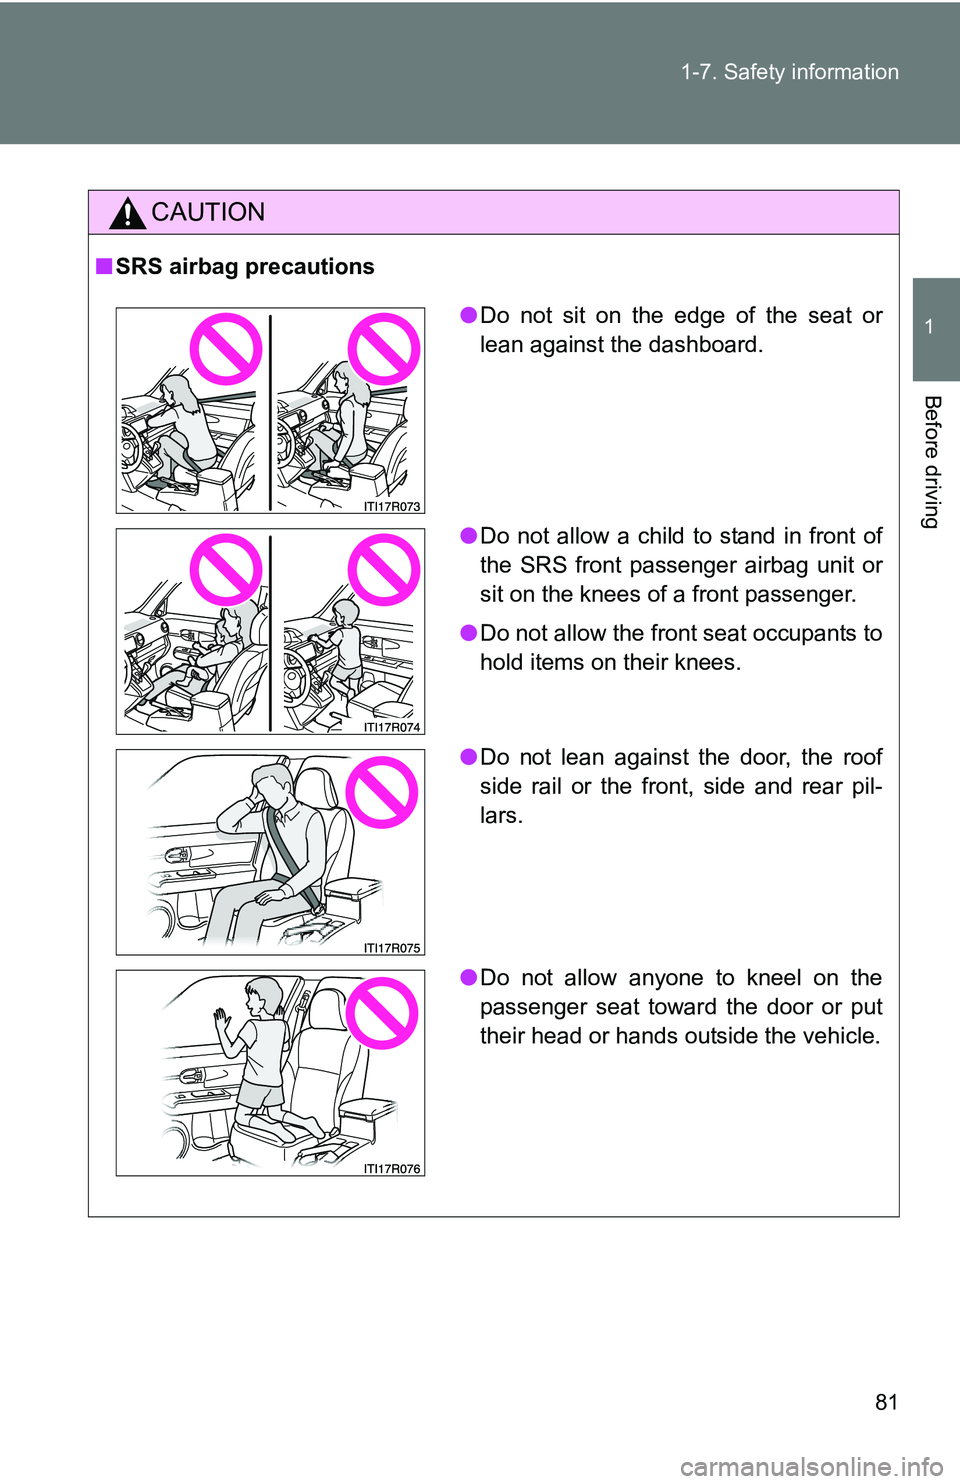
●Do not sit on the edge of the seat or
lean against the dashboard.
● Do not allow a child to stand in front of
the SRS front passenger airbag unit or
sit on the knees of a front passenger.
● Do not allow the front seat occupants to
hold items on their knees.
● Do not lean against the door, the roof
side rail or the front, side and rear pil-
lars.
● Do not allow anyone to kneel on the
passenger seat toward the door or put
their head or hands outside the vehicle.
Page 107 of 388
When driving2
107
2-1. Driving proceduresDriving the vehicle............ 108
Engine (ignition) switch .... 121
Automatic transmission .... 125
Manual transmission ........ 129
Turn signal lever .............. 130
Parking brake ................... 131
Horn ................................. 132
2-2. Instrument cluster Gauges and meters ......... 133
Indicators and warning lights .............................. 136
Multi-information display............................ 139 2-3. Operating the lights and
Windshield wipers
Headlight switch ............... 142
Windshield wipers and washer ........................... 144
Rear window wiper and washer ........................... 146
2-4. Using other driving systems Cruise control ................... 147
Driving assist systems ..... 151
2-5. Driving information Cargo and luggage .......... 156
Vehicle load limits ............ 161
Winter driving tips ............ 162
Trailer towing ................... 167
Dinghy towing (automatic transmission) ................. 168
Dinghy towing (manual transmission) ................. 169
Page 142 of 388
142
2-3. Operating the lights and Windshield wipers
Headlight switch
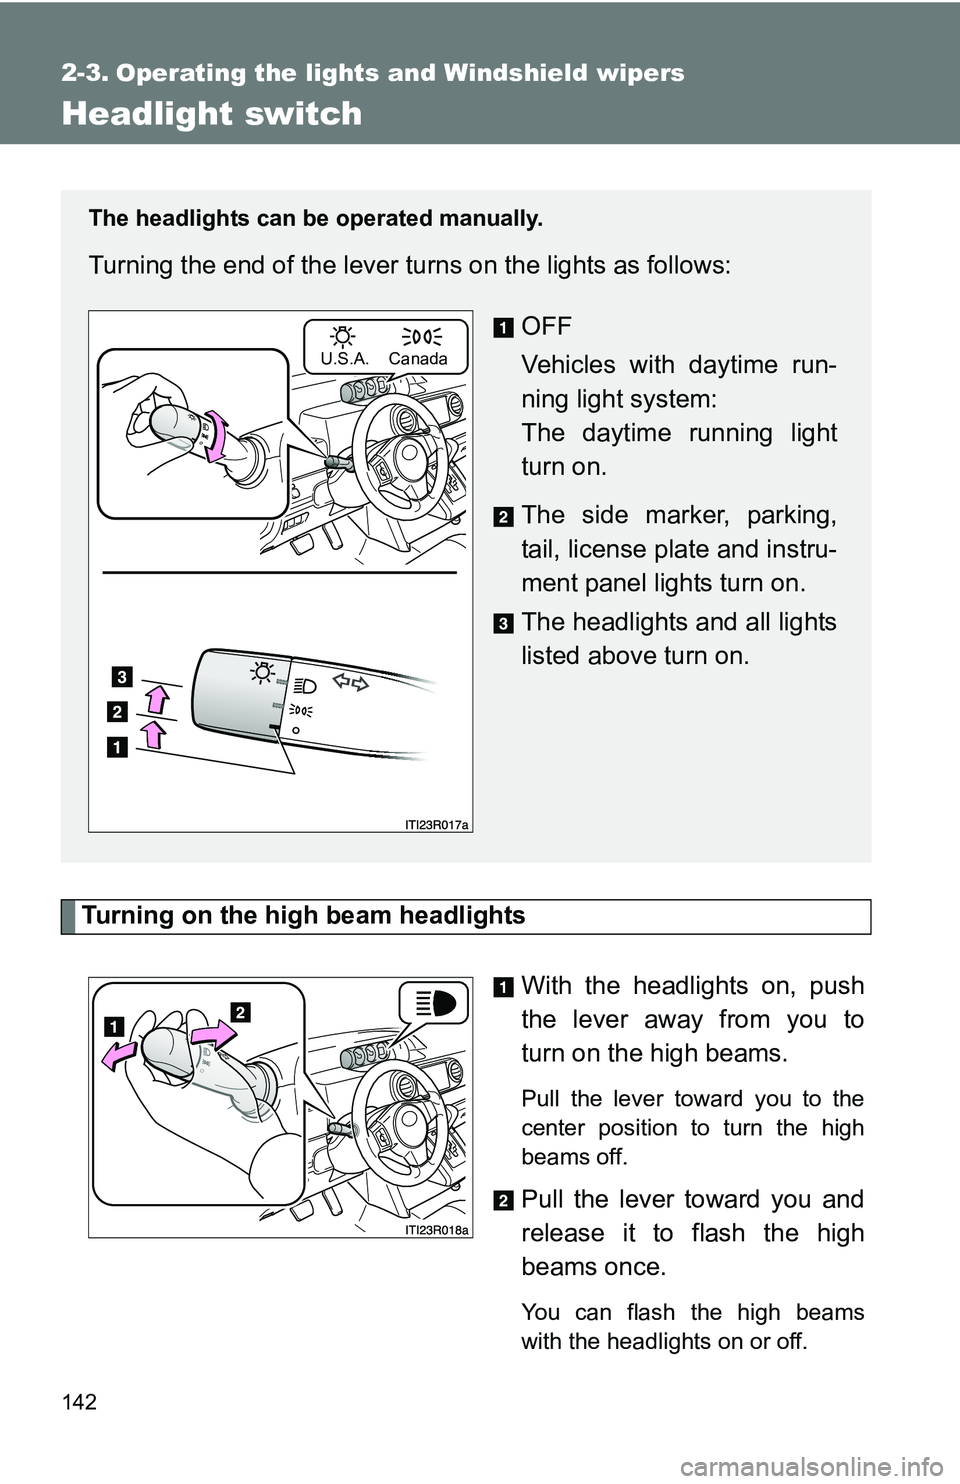
Turning on the high beam headlightsWith the headlights on, push
the lever away from you to
turn on the high beams.
Pull the lever toward you to the
center position to turn the high
beams off.
Pull the lever toward you and
release it to flash the high
beams once.
You can flash the high beams
with the headlights on or off.
The headlights can be operated manually.
Turning the end of the lever turns on the lights as follows:OFF
Vehicles with daytime run-
ning light system:
The daytime running light
turn on.
The side marker, parking,
tail, license plate and instru-
ment panel lights turn on.
The headlights and all lights
listed above turn on.
U.S.A. Canada
Page 148 of 388
148 2-4. Using other driving systems
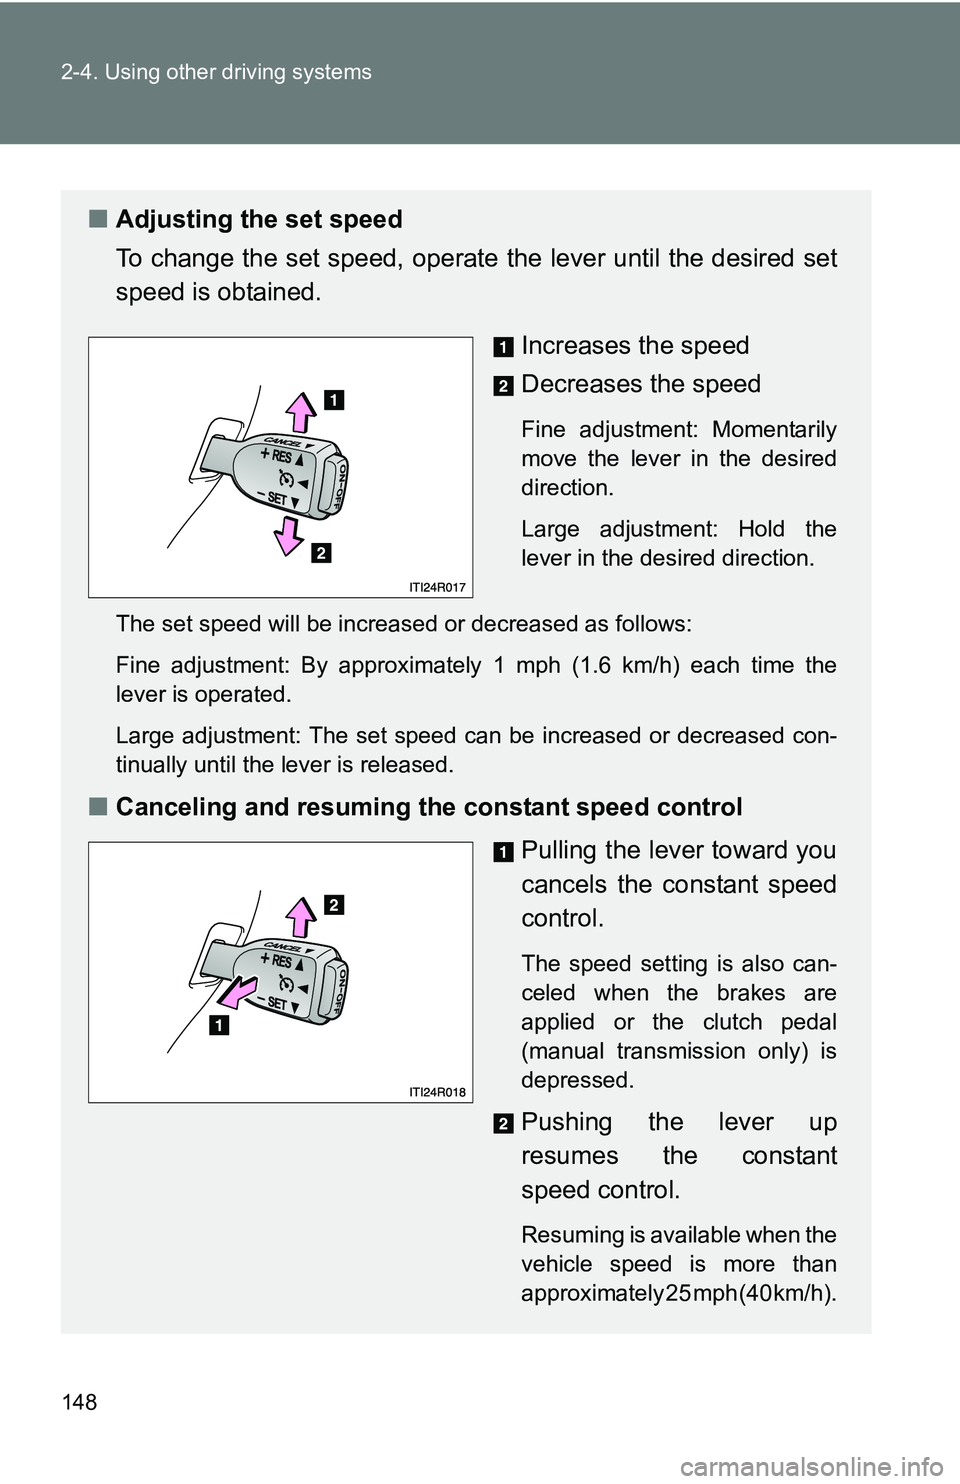
■Adjusting the set speed
To change the set speed, operate the lever until the desired set
speed is obtained.
Increases the speed
Decreases the speed
Fine adjustment: Momentarily
move the lever in the desired
direction.
Large adjustment: Hold the
lever in the desired direction.
The set speed will be increased or decreased as follows:
Fine adjustment: By approximately 1 mph (1.6 km/h) each time the
lever is operated.
Large adjustment: The set speed can be increased or decreased con-
tinually until the lever is released.
■ Canceling and resuming the constant speed control
Pulling the lever toward you
cancels the constant speed
control.
The speed setting is also can-
celed when the brakes are
applied or the clutch pedal
(manual transmission only) is
depressed.
Pushing the lever up
resumes the constant
speed control.
Resuming is available when the
vehicle speed is more than
approximately 25 mph (40 km/h).