steering wheel adjustment TOYOTA YARIS 2008 2.G Owners Manual
[x] Cancel search | Manufacturer: TOYOTA, Model Year: 2008, Model line: YARIS, Model: TOYOTA YARIS 2008 2.GPages: 388, PDF Size: 7.34 MB
Page 37 of 388
37
1
Before driving
1-3. Adjustable components (seats, mirrors, steering wheel)
Front seats
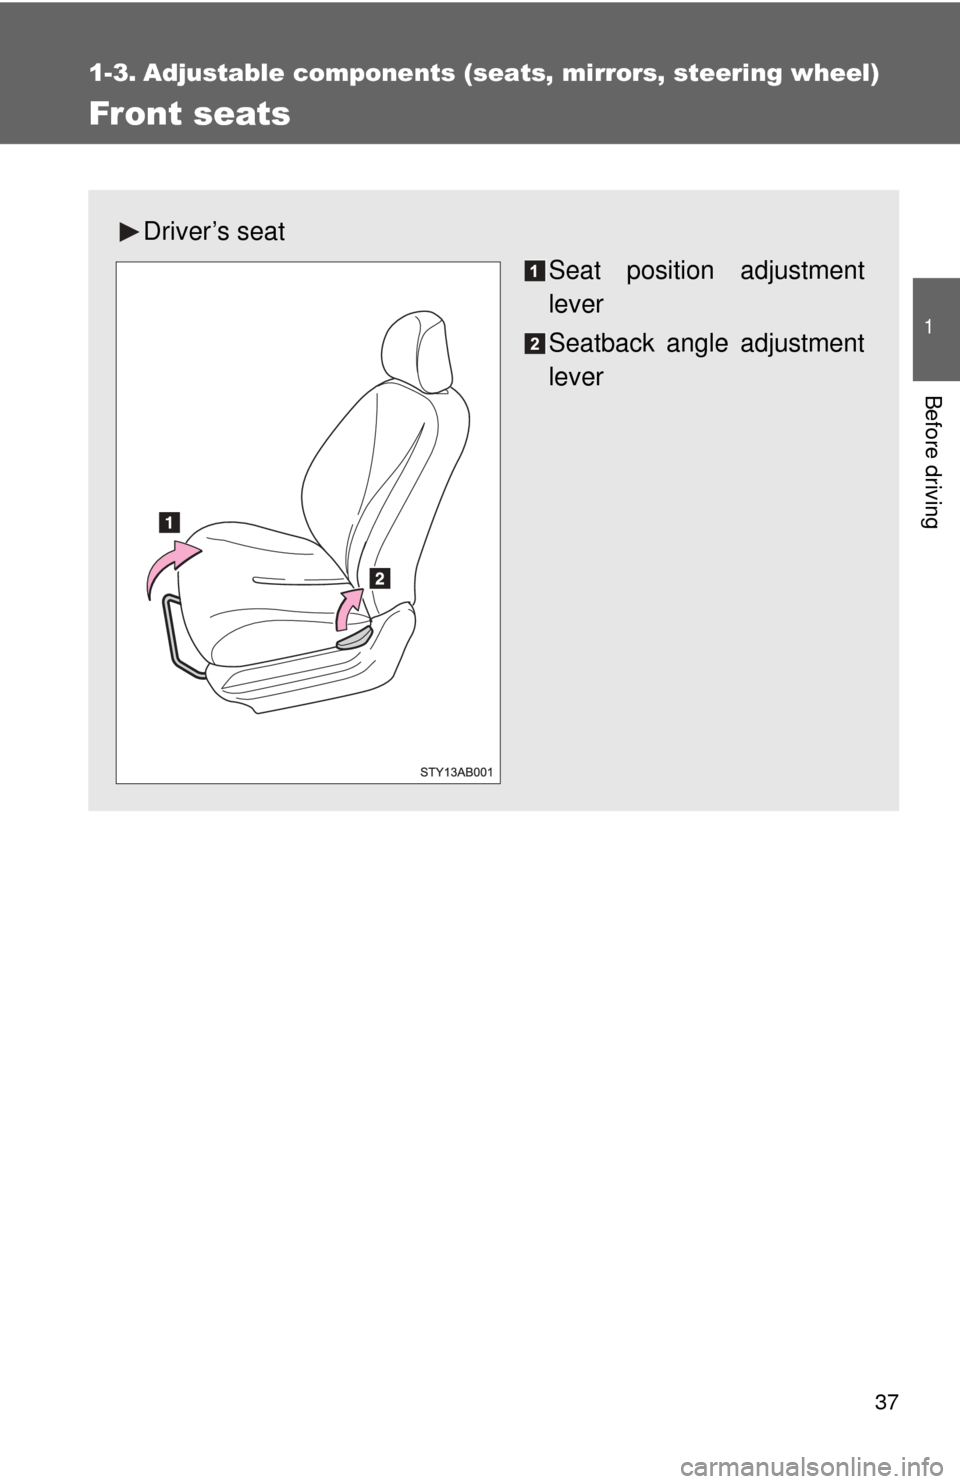
Driver’s seat
Seat position adjustment
lever
Seatback angle adjustment
lever
Page 38 of 388
38 1-3. Adjustable components (seats, mirrors, steering wheel)
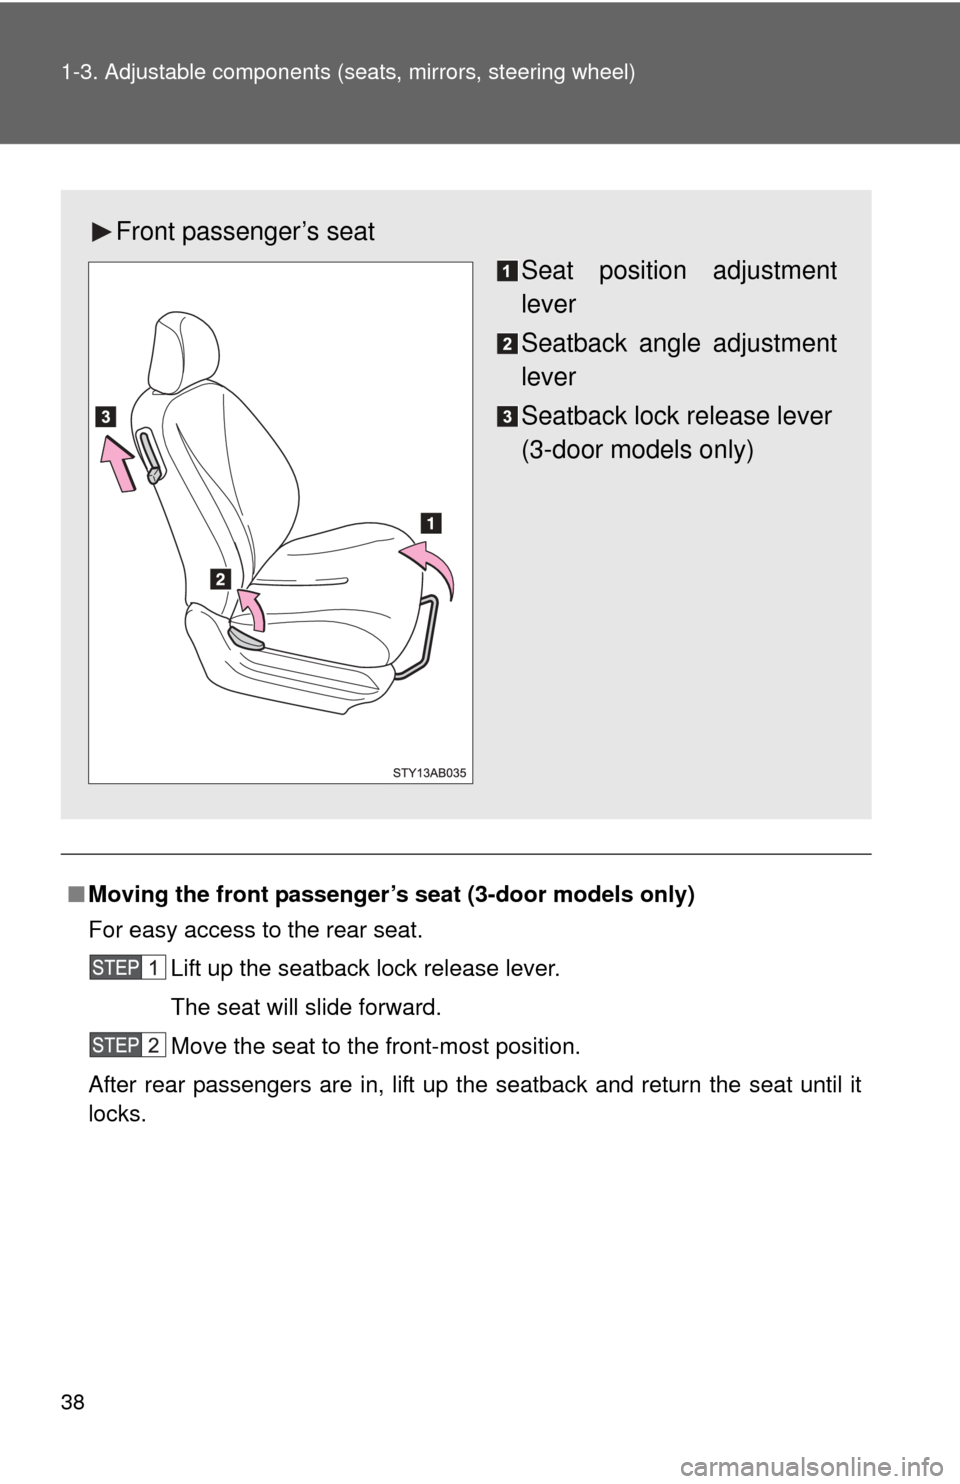
■Moving the front passenger’s seat (3-door models only)
For easy access to the rear seat.
Lift up the seatback lock release lever.
The seat will slide forward.
Move the seat to the front-most position.
After rear passengers are in, lift up the seatback and return the seat until it
locks.
Front passenger’s seat Seat position adjustment
lever
Seatback angle adjustment
lever
Seatback lock release lever
(3-door models only)
Page 39 of 388
39
1-3. Adjustable components (s
eats, mirrors, steering wheel)
1
Before driving
CAUTION
■Seat adjustment
●Do not recline the seat more than necessary when the vehicle is in motion
to reduce the risk of sliding under the lap belt.
If the seat is too reclined, the lap belt may slide past the hips and apply
restraint forces directly to the abdomen or your neck may contact the
shoulder belt, increasing the risk of death or serious injury in the event of
an accident.
● After adjusting the seat, make sure that the seat is locked in position.
■ After returning the seatback
Push and pull the seatback to confirm that it is securely locked.
■ Caution while driving
Never operate the seatback lock release lever.
Page 40 of 388
40
1-3. Adjustable components (seats, mirrors, steering wheel)
Rear seats
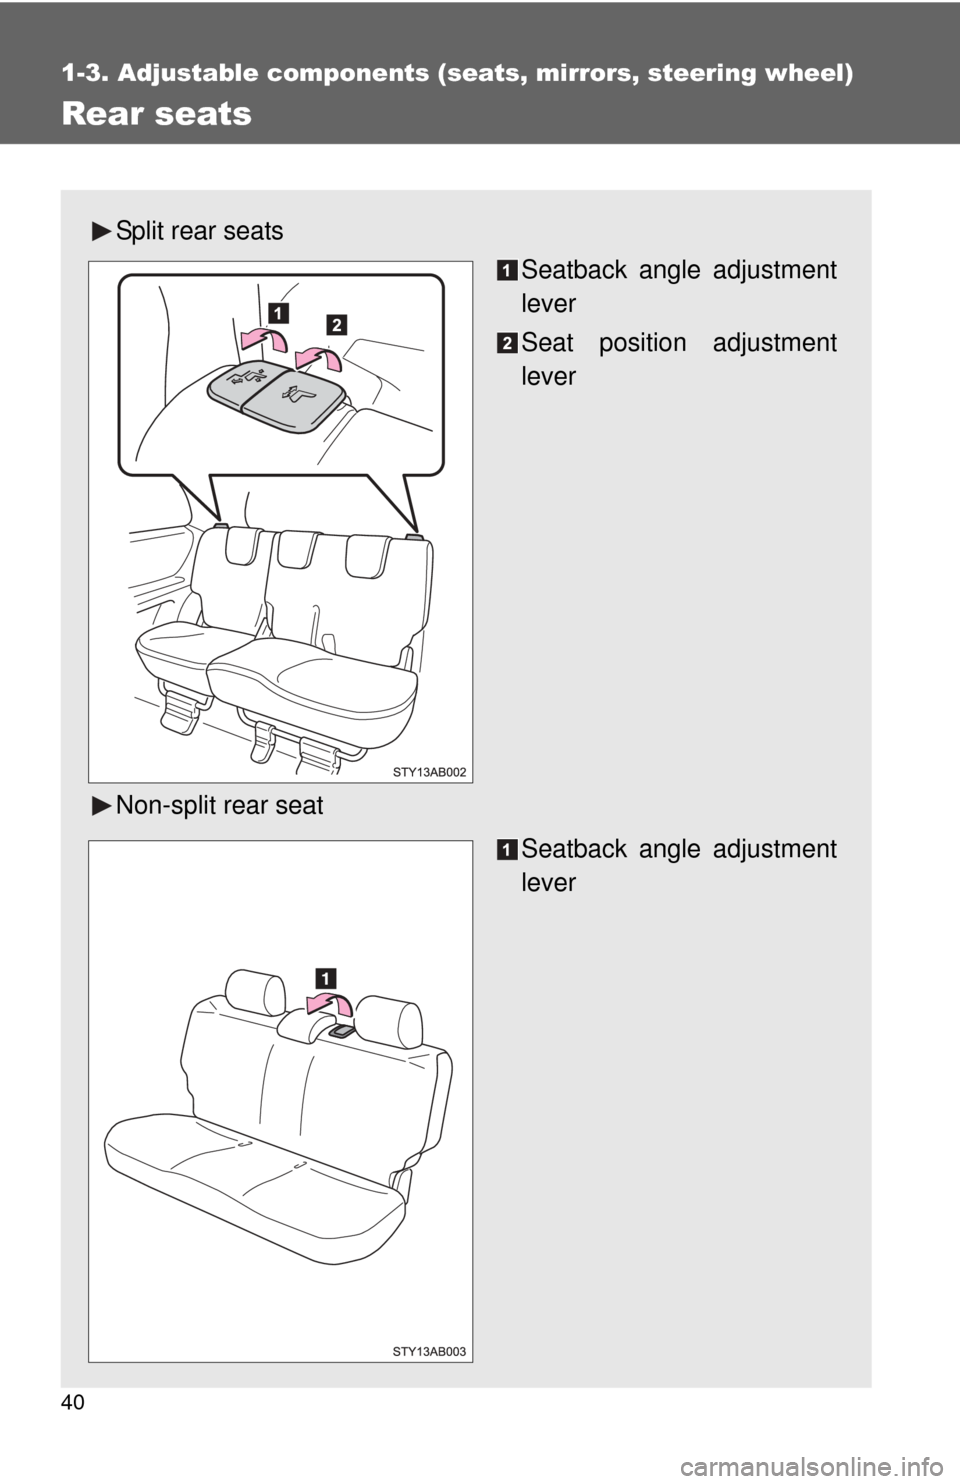
Split rear seatsSeatback angle adjustment
lever
Seat position adjustment
lever
Non-split rear seat Seatback angle adjustment
lever
Page 42 of 388
42 1-3. Adjustable components (seats, mirrors, steering wheel)
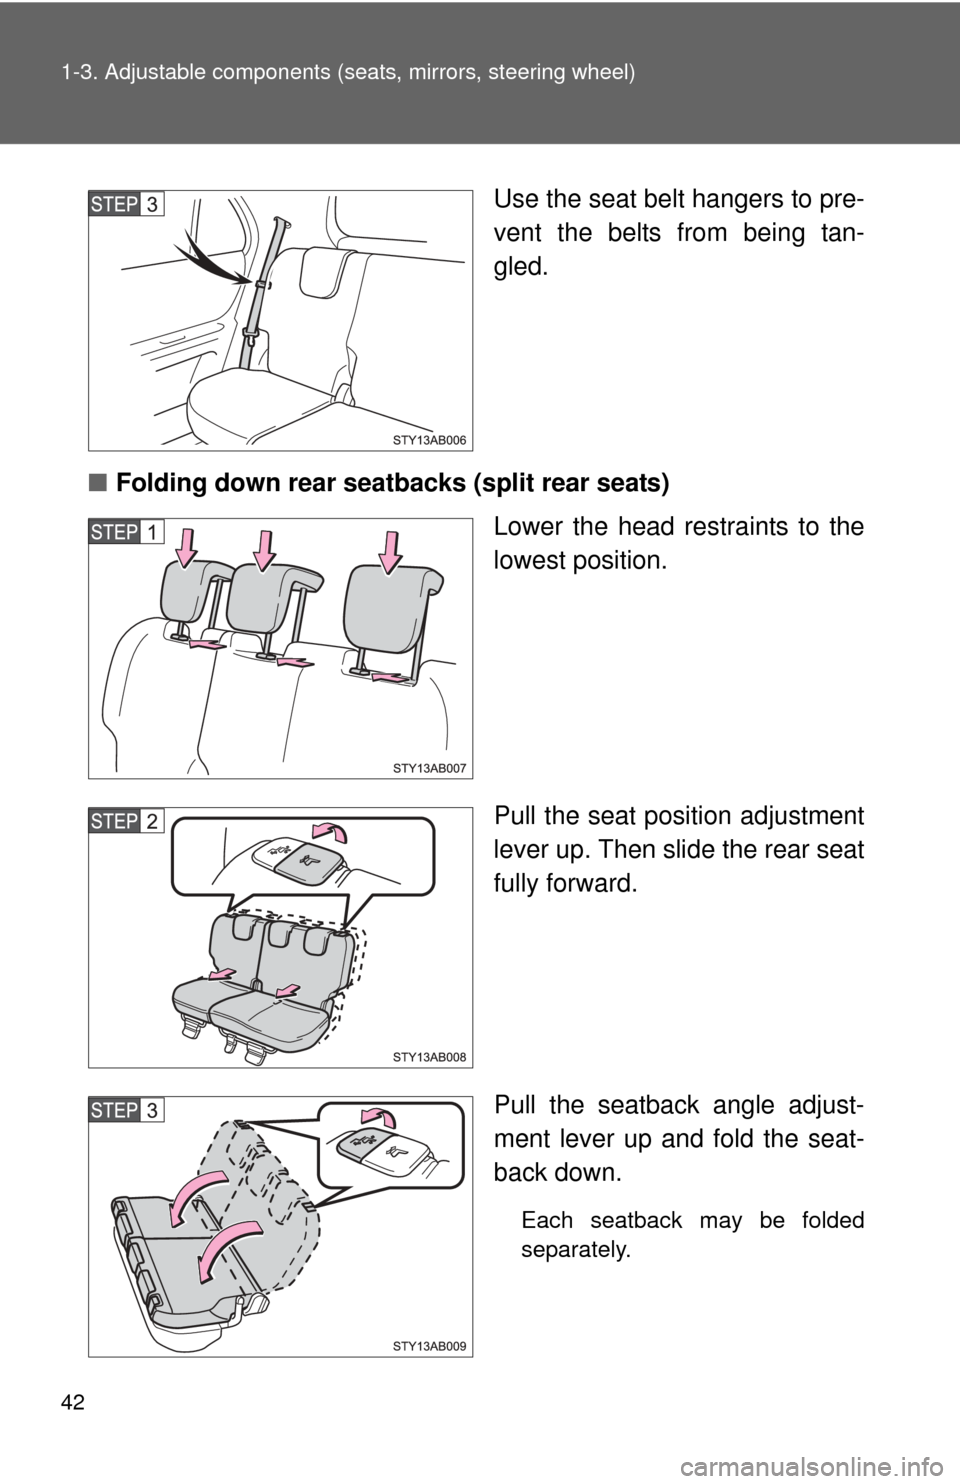
Use the seat belt hangers to pre-
vent the belts from being tan-
gled.
■ Folding down rear seatbacks (split rear seats)
LLower the head restraints to the
lowest position.
Pull the seat position adjustment
lever up. Then slide the rear seat
fully forward.
Pull the seatback angle adjust-
ment lever up and fold the seat-
back down.
Each seatback may be folded
separately.
Page 44 of 388
44 1-3. Adjustable components (seats, mirrors, steering wheel)
CAUTION
■Seat adjustment
●Do not recline the seat more than necessary when the vehicle is in motion
to reduce the risk of sliding under the lap belt. If the seat is too reclined,
the lap belt may slide past the hips and apply restraint forces directly to the
abdomen or your neck may contact the shoulder belt, increasing the risk of
death or serious injury in the event of an accident.
● After adjusting the seat, make sure that the seat is locked in position.
■ After returning the seatback to the upright position
Observe the following precautions. Failure to do so may result in death or
serious injury.
● Make sure that the seatback is securely locked in position by lightly rock-
ing it back and forth.
● Check that the seat belts and buckles are not twisted or caught under the
seat.
● Arrange the seat belts in the proper positions for ready use.
NOTICE
■Stowing the seat belts
The seat belts and the buckles must be stowed before you fold down the
rear seat backs.
■ When returning the seatback to the upright position
Do not pull the pocket that stores the seat belt comfort guide.
Page 45 of 388
45
1
1-3. Adjustable components (seats, mirrors, steering wheel)
Before driving
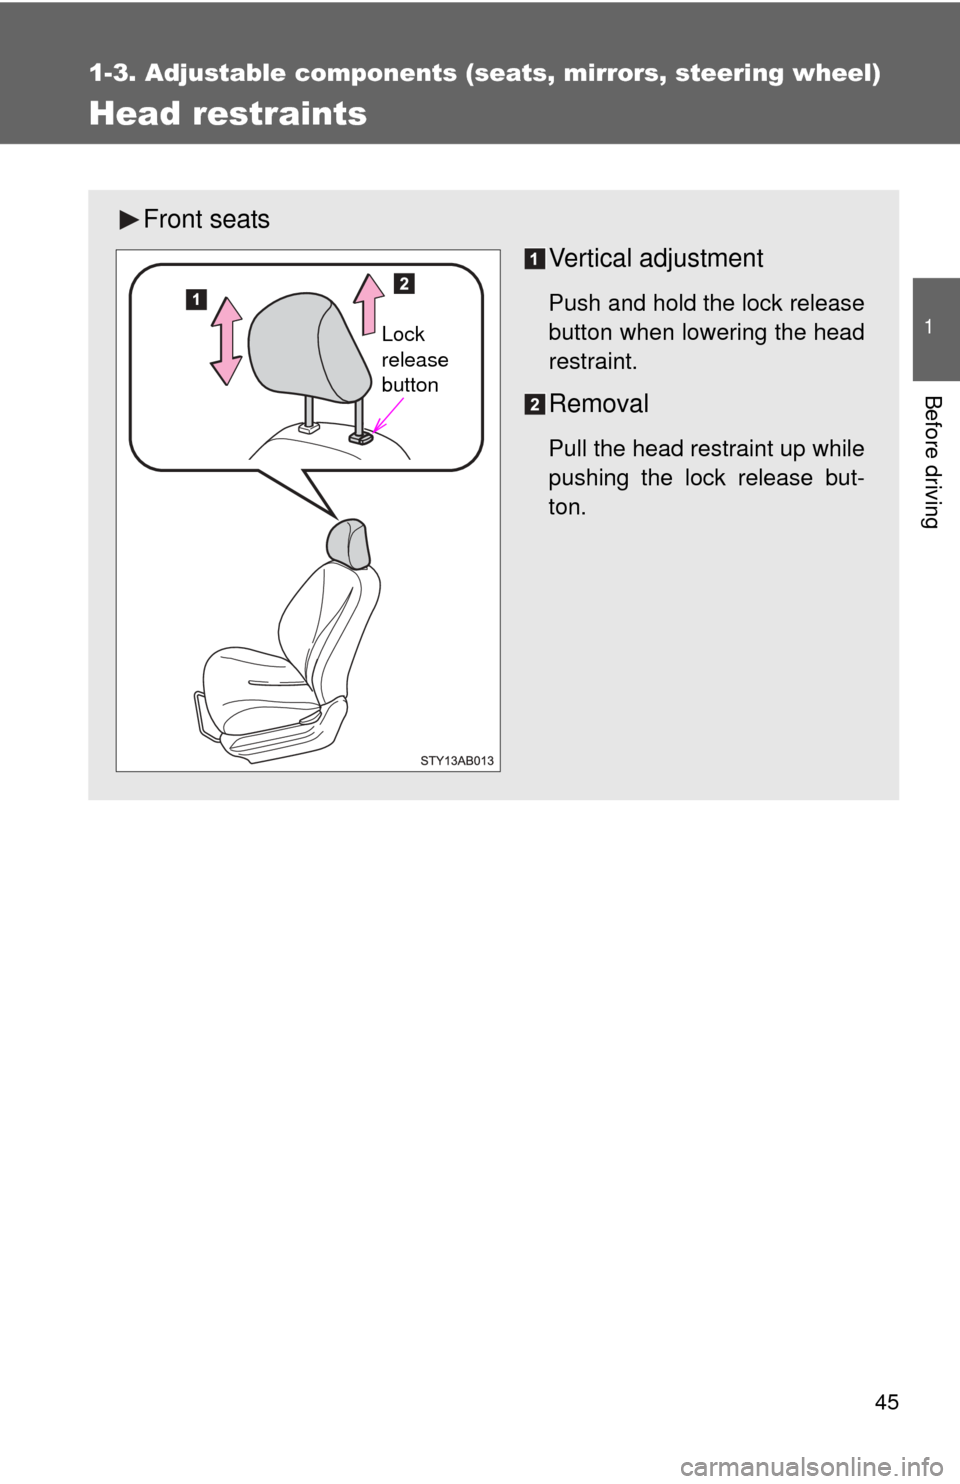
Head restraints
Front seatsVertical adjustment
Push and hold the lock release
button when lowering the head
restraint.
Removal
Pull the head restraint up while
pushing the lock release but-
ton.
Lock
release
button
Page 46 of 388
46 1-3. Adjustable components (seats, mirrors, steering wheel)
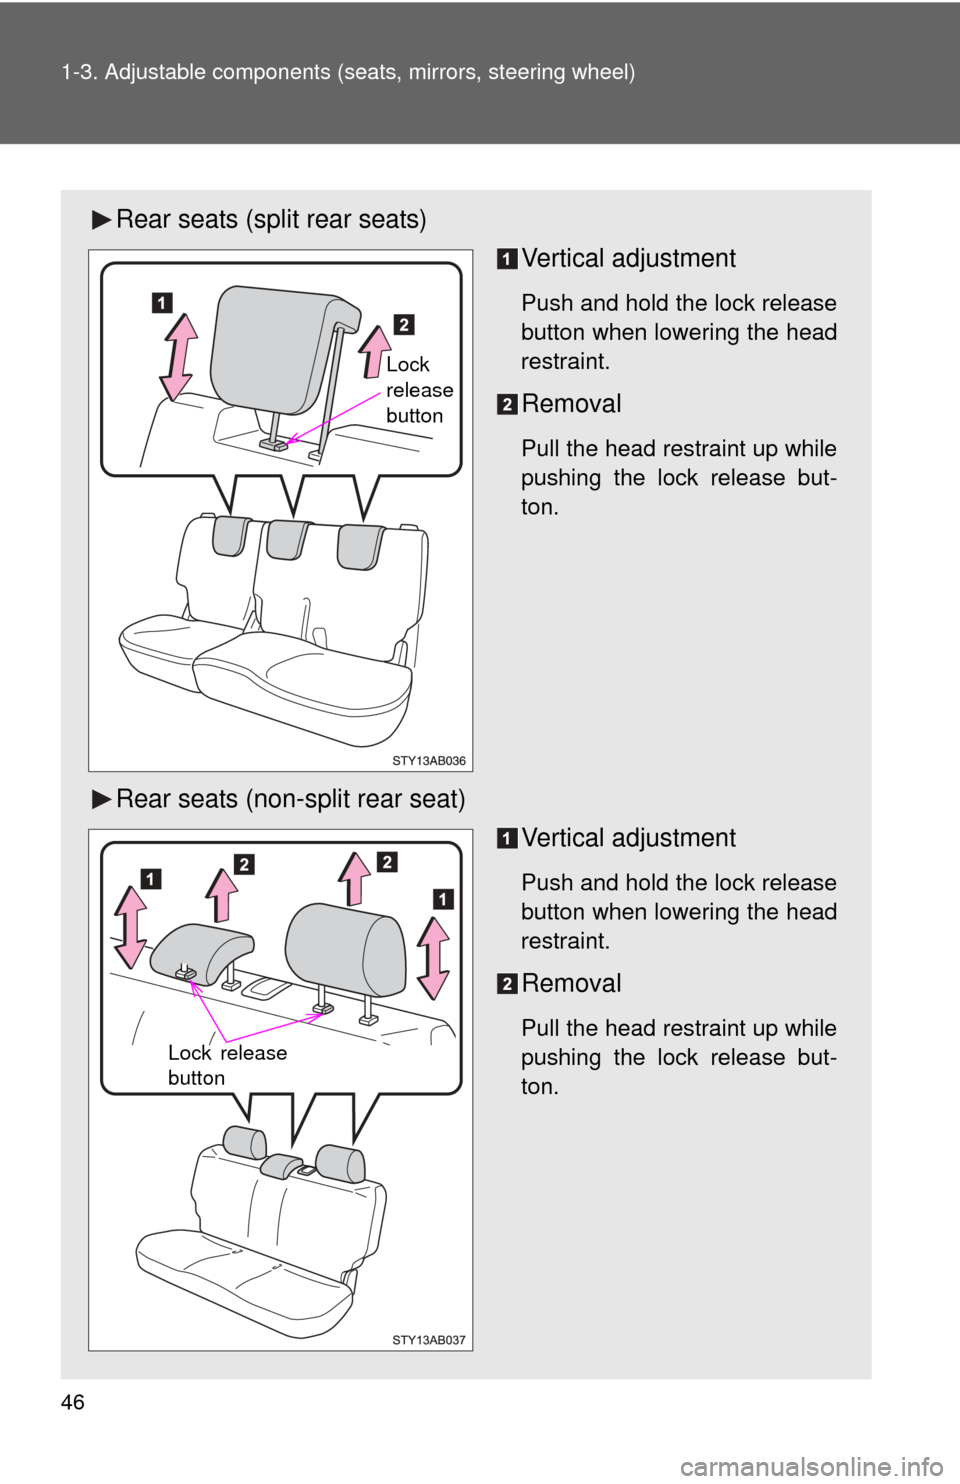
Rear seats (split rear seats)
Vertical adjustment
Push and hold the lock release
button when lowering the head
restraint.
Removal
Pull the head restraint up while
pushing the lock release but-
ton.
Rear seats (non-split rear seat)
Vertical adjustment
Push and hold the lock release
button when lowering the head
restraint.
Removal
Pull the head restraint up while
pushing the lock release but-
ton.
Lock
release
button
Lock release
button
Page 309 of 388
5
When trouble arises
309
5-2. Steps to take in an emergency
CAUTION
TPMS (tire pressure warning system) malfunctions may occur for a vari-
ety of reasons, including the installati
on of replacement or alternate tires
or wheels on the vehicle that prevent the TPMS (tire pressure warning
system) from functioning properly. Always check the TPMS (tire pres-
sure warning system) malfunction te lltale after replacing one or more
tires or wheels on your vehicle to ensure that the replacement or alter-
nate tires and wheels allow the TPMS (tire pressure warning system) to
continue to function properly.
■If the tire pressure warning light comes on
Be sure to observe the following precautions. Failure to do so could
cause loss of vehicle control and result in death or serious injury.
●Stop your vehicle in a safe place as soon as possible. Adjust the tire
inflation pressure immediately.
●If the tire pressure warning light comes on even after tire inflation pres-
sure adjustment, it is pr obable that you have a flat tire. Check the tires.
If the tire is flat, change to the spare tire and have the flat tire repaired
by the nearest Toyota dealer.
●Avoid abrupt maneuvering and braking. If the vehicle tires deteriorate,
you could lose control of the steering wheel or the brakes.
■If a blowout or sudden air leakage should occur
The tire pressure warning syste m may not activate immediately.
NOTICE
■Precaution when installing a different tire
When a tire of a different specification or maker is installed, the tire pres-
sure warning system may not operate properly.
Page 380 of 388

380 Alphabetical index
Adjustment precautions........... 39
Child seats/child restraint system installation ..........94, 98
Cleaning ................................ 224
Folding down the rear seat......41
Folding down the rear seat precautions ...........................44
Front seat adjustment .............37
Front seat adjustment
precautions ...........................39
Head restraint..........................45
Properly sitting in the seat .......75
Service reminder indicators .............................. 135
Shift lever Automatic transmission ......... 123
If the shift lever cannot be shifted from P...................... 325
Manual transmission ............. 125
Shift lock system ..................... 325
Side airbags................................77
Side marker lights Replacing light bulbs ............. 280
Switch.................................... 139
Wattage ................................. 346
Side mirror
Adjusting .................................60
Folding ....................................61
Spare tire
Identification number ............. 350
Inflation pressure........... 258, 345
Information ............................ 350
Replacing .............................. 310
Size ....................................... 345
Spare tire............................... 310
Spark plug ................................ 342
Specifications........................... 338
Speedometer ............................ 129
Steering wheel Adjustment ..............................58
Column lock release.............. 121
Electric power steering .......... 145
EPS ....................................... 145 Specification.......................... 344
Warning light ......................... 301
Stop lights Replacing light bulbs ............. 280
Wattage................................. 346
Storage features Auxiliary boxes .............. 206, 211
Bottle holders ................ 206, 209
Cup holders................... 206, 208
Glove boxes .......................... 206
Storage precautions ................ 149
Stuck
If the vehicle becomes stuck ................................... 335
Sun visors ................................ 213
Switch Engine switch ........................ 119
Fog lights switch ................... 141
Ignition switch ....................... 119
Headlights switch .................. 139
Light switch ........................... 139
Power door lock switch ........... 32
Power window switch .............. 63
Turn signal lights ................... 126
Window lock switch ................. 64
Wiper and washer ......... 142, 144
Tachometer .............................. 129
Tail lights Indicator ................................ 139
Replacing light bulbs ............. 280
Switch ................................... 139
Wattage................................. 346
Theft deterrent system
Alarm....................................... 72
Engine immobilizer system ..... 70
Theft prevention labels............ 74
Theft prevention labels ............. 74
Tire inflation pressure ............. 258
Tire information Glossary ................................ 357
Size ....................................... 354
Tire identification number...... 353
T