tire type TOYOTA YARIS 2013 Owners Manual
[x] Cancel search | Manufacturer: TOYOTA, Model Year: 2013, Model line: YARIS, Model: TOYOTA YARIS 2013Pages: 712, PDF Size: 30.2 MB
Page 338 of 712
338 2-5. Driving information
YARIS_F(including HV)_WE_52E26E
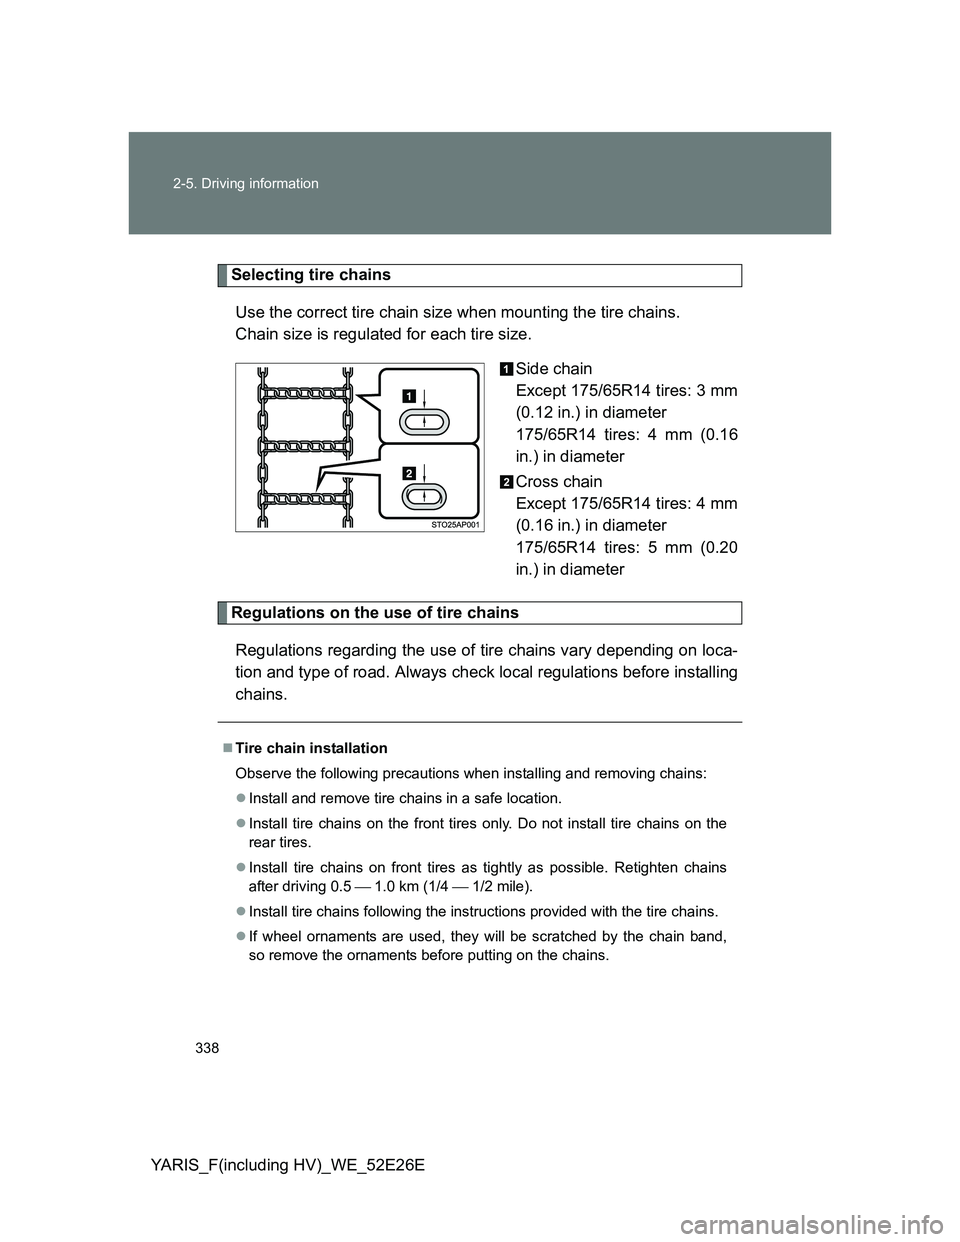
Selecting tire chains
Use the correct tire chain size when mounting the tire chains.
Chain size is regulated for each tire size.
Side chain
Except 175/65R14 tires: 3 mm
(0.12 in.) in diameter
175/65R14 tires: 4 mm (0.16
in.) in diameter
Cross chain
Except 175/65R14 tires: 4 mm
(0.16 in.) in diameter
175/65R14 tires: 5 mm (0.20
in.) in diameter
Regulations on the use of tire chains
Regulations regarding the use of tire chains vary depending on loca-
tion and type of road. Always check local regulations before installing
chains.
Tire chain installation
Observe the following precautions when installing and removing chains:
Install and remove tire chains in a safe location.
Install tire chains on the front tires only. Do not install tire chains on the
rear tires.
Install tire chains on front tires as tightly as possible. Retighten chains
after driving 0.5 1.0 km (1/4 1/2 mile).
Install tire chains following the instructions provided with the tire chains.
If wheel ornaments are used, they will be scratched by the chain band,
so remove the ornaments before putting on the chains.
Page 490 of 712
490
4-3. Do-it-yourself maintenance
YARIS_F(including HV)_WE_52E26E
Tires
Replace or rotate tires in accordance with maintenance schedules
and treadwear.
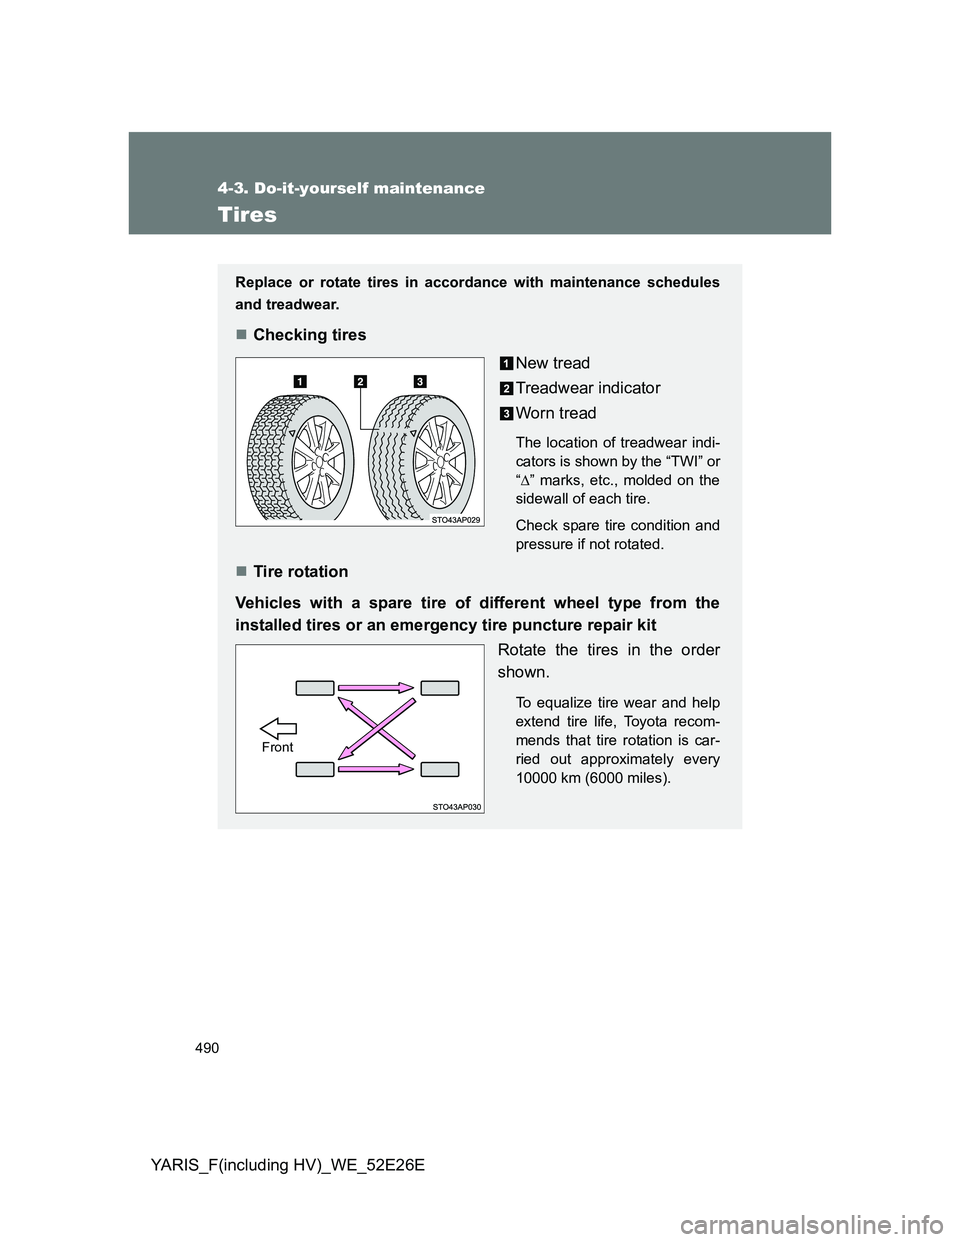
Checking tires
New tread
Treadwear indicator
Worn tread
The location of treadwear indi-
cators is shown by the “TWI” or
“” marks, etc., molded on the
sidewall of each tire.
Check spare tire condition and
pressure if not rotated.
Tire rotation
Vehicles with a spare tire of different wheel type from the
installed tires or an emergency tire puncture repair kit
Rotate the tires in the order
shown.
To equalize tire wear and help
extend tire life, Toyota recom-
mends that tire rotation is car-
ried out approximately every
10000 km (6000 miles).
Front
Page 491 of 712
491 4-3. Do-it-yourself maintenance
4
Maintenance and care
YARIS_F(including HV)_WE_52E26E
When to replace your vehicle’s tires
Tires should be replaced if:
You have tire damage such as cuts, splits, cracks deep enough to
expose the fabric, and bulges indicating internal damage
A tire goes flat repeatedly or cannot be properly repaired due to the size
or location of a cut or other damage
If you are not sure, consult with any authorized Toyota dealer or repairer, or
another duly qualified and equipped professional.
Tire life
Any tire over 6 years old must be checked by a qualified technician even if it
has seldom or never been used or damage is not obvious.
Low profile tires (vehicles with 195/50R16 tires)
Generally, low profile tires will wear more rapidly and tire grip performance
will be reduced on snowy and/or icy roads when compared to standard tires.
Be sure to use snow tires or tire chains on snowy and/or icy roads and drive
carefully at a speed appropriate for road and weather conditions.
If the tread on snow tires wears down below 4 mm (0.16 in.)
The effectiveness of the tires as snow tires is lost.
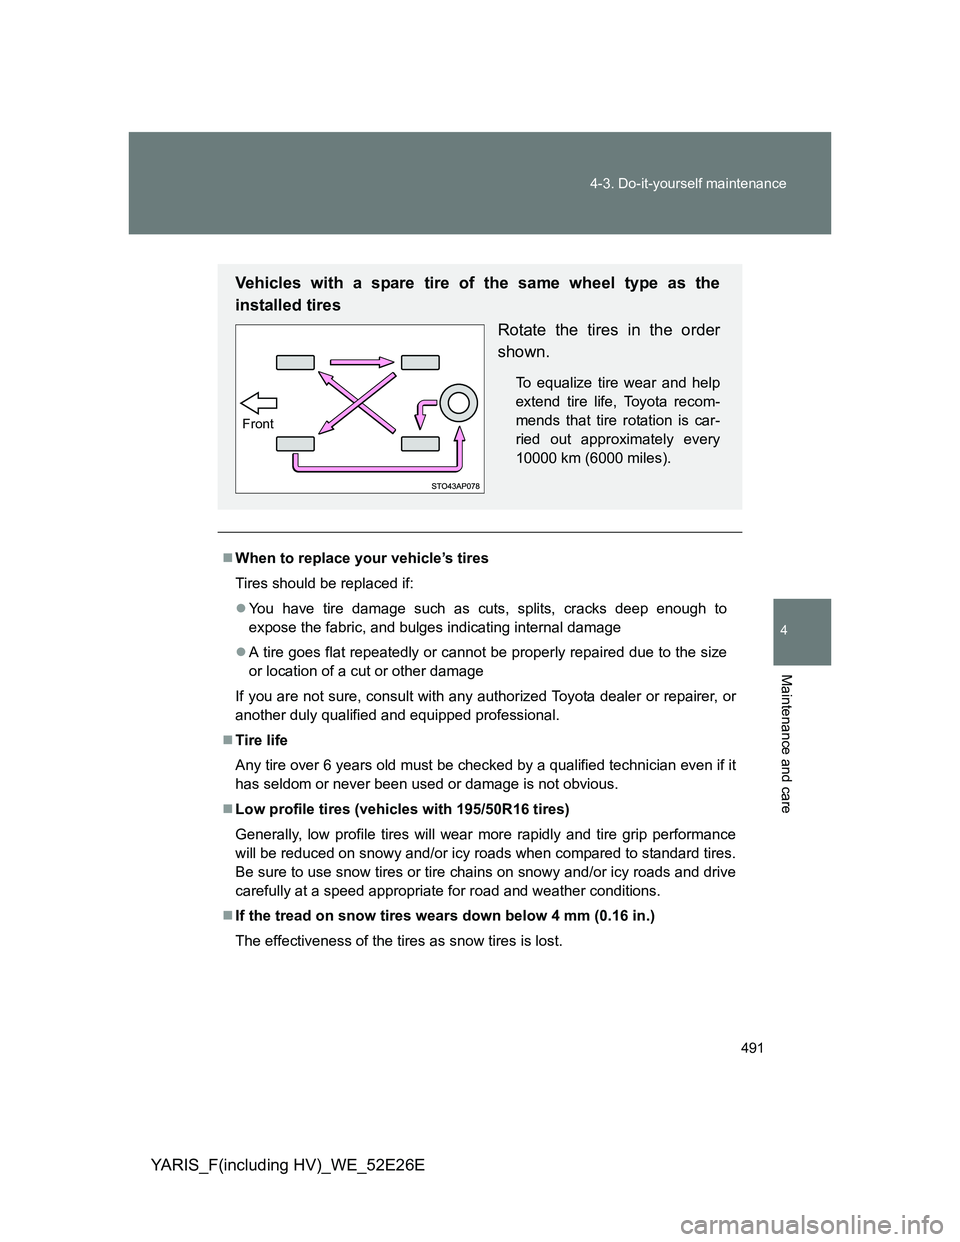
Vehicles with a spare tire of the same wheel type as the
installed tires
Rotate the tires in the order
shown.
To equalize tire wear and help
extend tire life, Toyota recom-
mends that tire rotation is car-
ried out approximately every
10000 km (6000 miles).
Front
Page 496 of 712
496
4-3. Do-it-yourself maintenance
YARIS_F(including HV)_WE_52E26E
Wheels
If a wheel is bent, cracked or heavily corroded, it should be replaced.
Otherwise, the tire may separate from the wheel or cause a loss of
handling control.
Wheel selection
When replacing wheels, care should be taken to ensure that
they are equivalent to those removed in load capacity, diameter,
rim width and inset*.
Replacement wheels are available at any authorized Toyota
dealer or repairer, or another duly qualified and equipped profes-
sional.
*: Conventionally referred to as “offset”.
Toyota does not recommend using the following:
Wheels of different sizes or types
Used wheels
Bent wheels that have been straightened
Aluminum wheel precautions (if equipped)
Use only Toyota wheel nuts and wrenches designed for use
with your aluminum wheels.
When rotating, repairing or changing your tires, check that the
wheel nuts are still tight after driving 1600 km (1000 miles).
Be careful not to damage the aluminum wheels when using
tire chains.
Use only Toyota genuine balance weights or equivalent and
use a plastic or rubber hammer when balancing your wheels.
Page 597 of 712
5
597 5-2. Steps to take in an emergency
When trouble arises
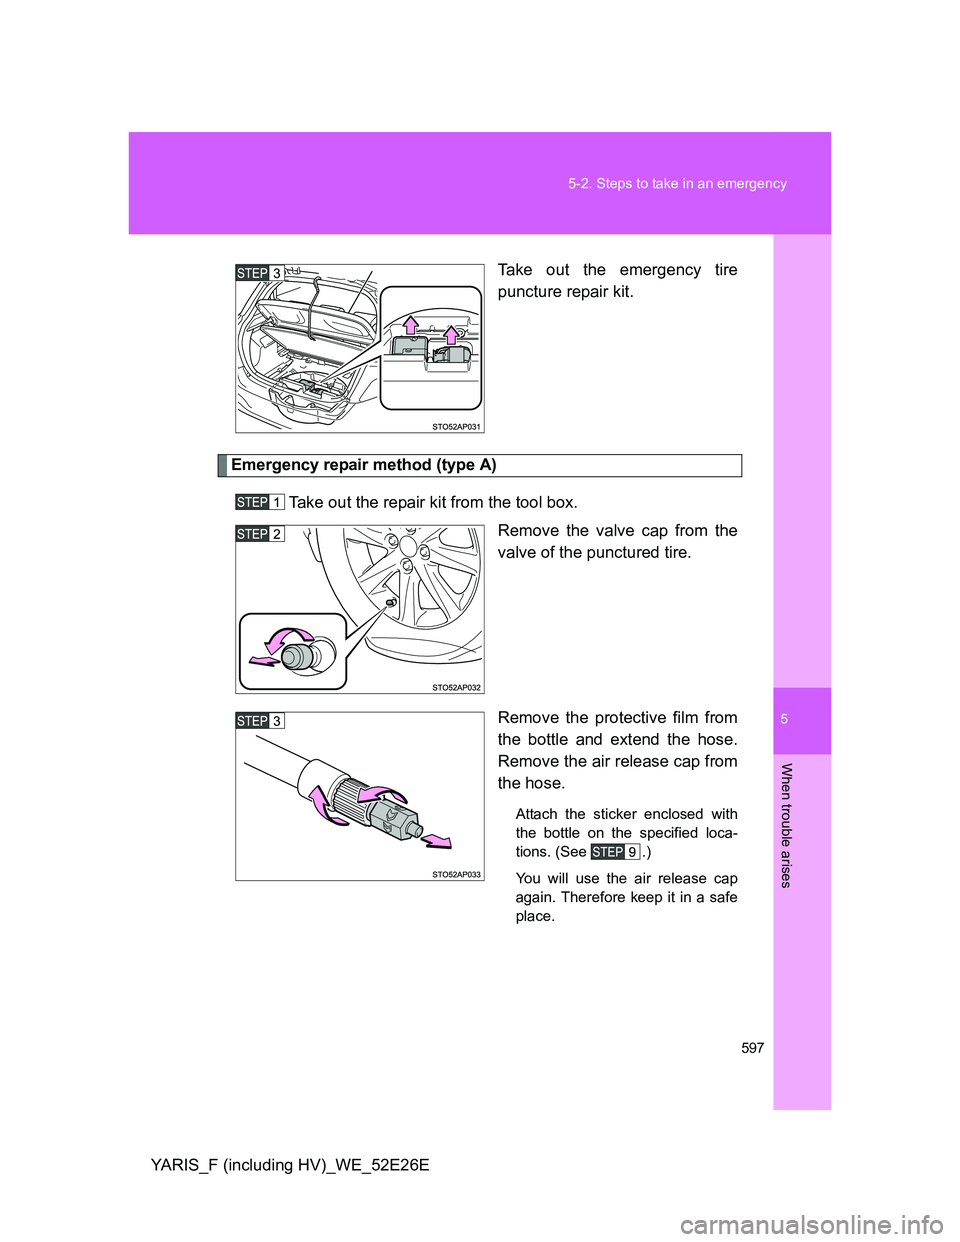
YARIS_F (including HV)_WE_52E26ETake out the emergency tire
puncture repair kit.
Emergency repair method (type A)
Take out the repair kit from the tool box.
Remove the valve cap from the
valve of the punctured tire.
Remove the protective film from
the bottle and extend the hose.
Remove the air release cap from
the hose.
Attach the sticker enclosed with
the bottle on the specified loca-
tions. (See .)
You will use the air release cap
again. Therefore keep it in a safe
place.
Page 604 of 712
604 5-2. Steps to take in an emergency
YARIS_F (including HV)_WE_52E26ETaking precautions to avoid sudden braking, sudden accelera-
tion and sharp turns, drive carefully at under 80 km/h (50
mph) to the nearest authorized Toyota dealer or repairer, or
another duly qualified and equipped professional for tire repair
or replacement.
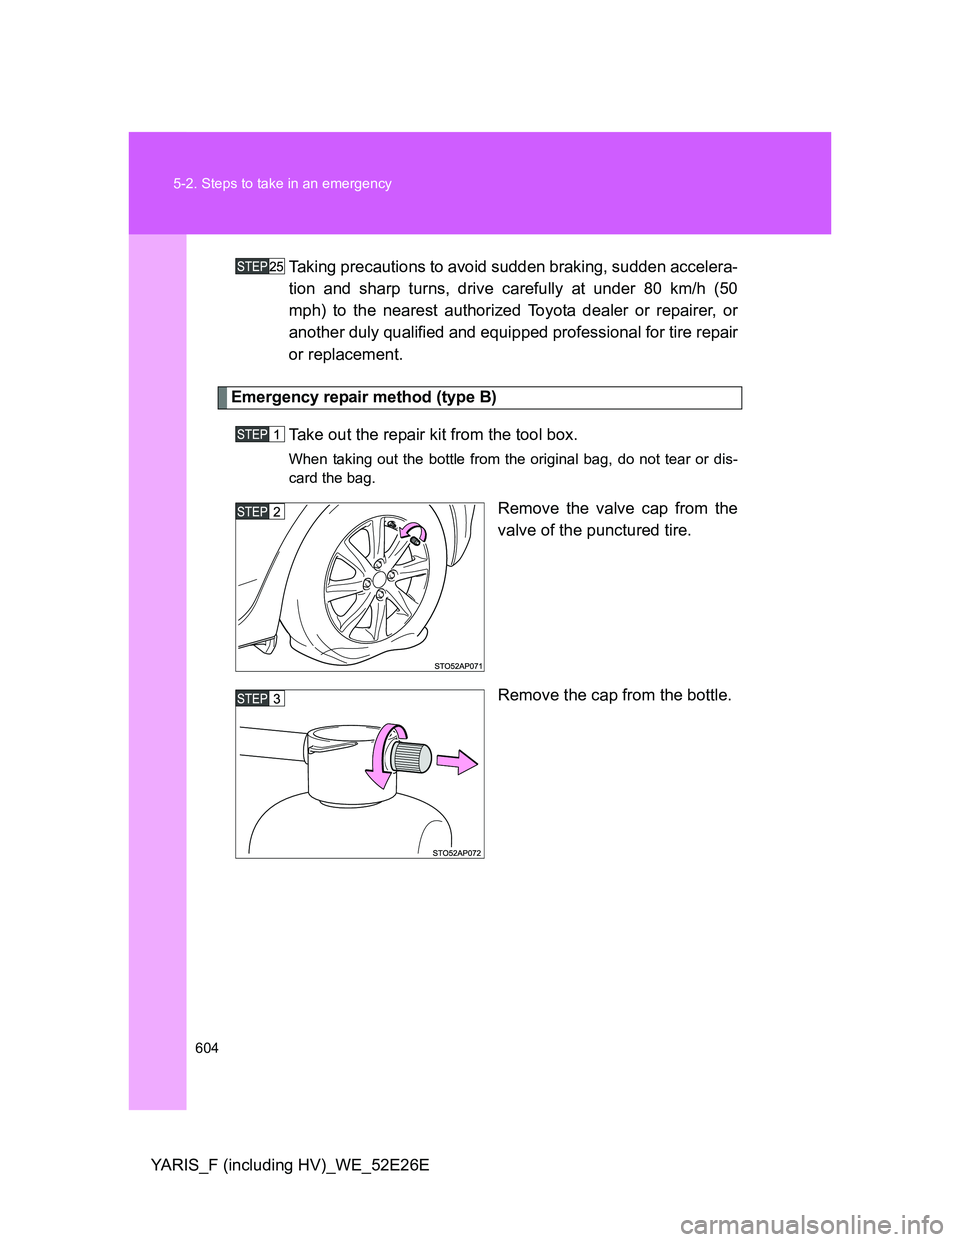
Emergency repair method (type B)
Take out the repair kit from the tool box.
When taking out the bottle from the original bag, do not tear or dis-
card the bag.
Remove the valve cap from the
valve of the punctured tire.
Remove the cap from the bottle.
Page 611 of 712
5
611 5-2. Steps to take in an emergency
When trouble arises
YARIS_F (including HV)_WE_52E26E
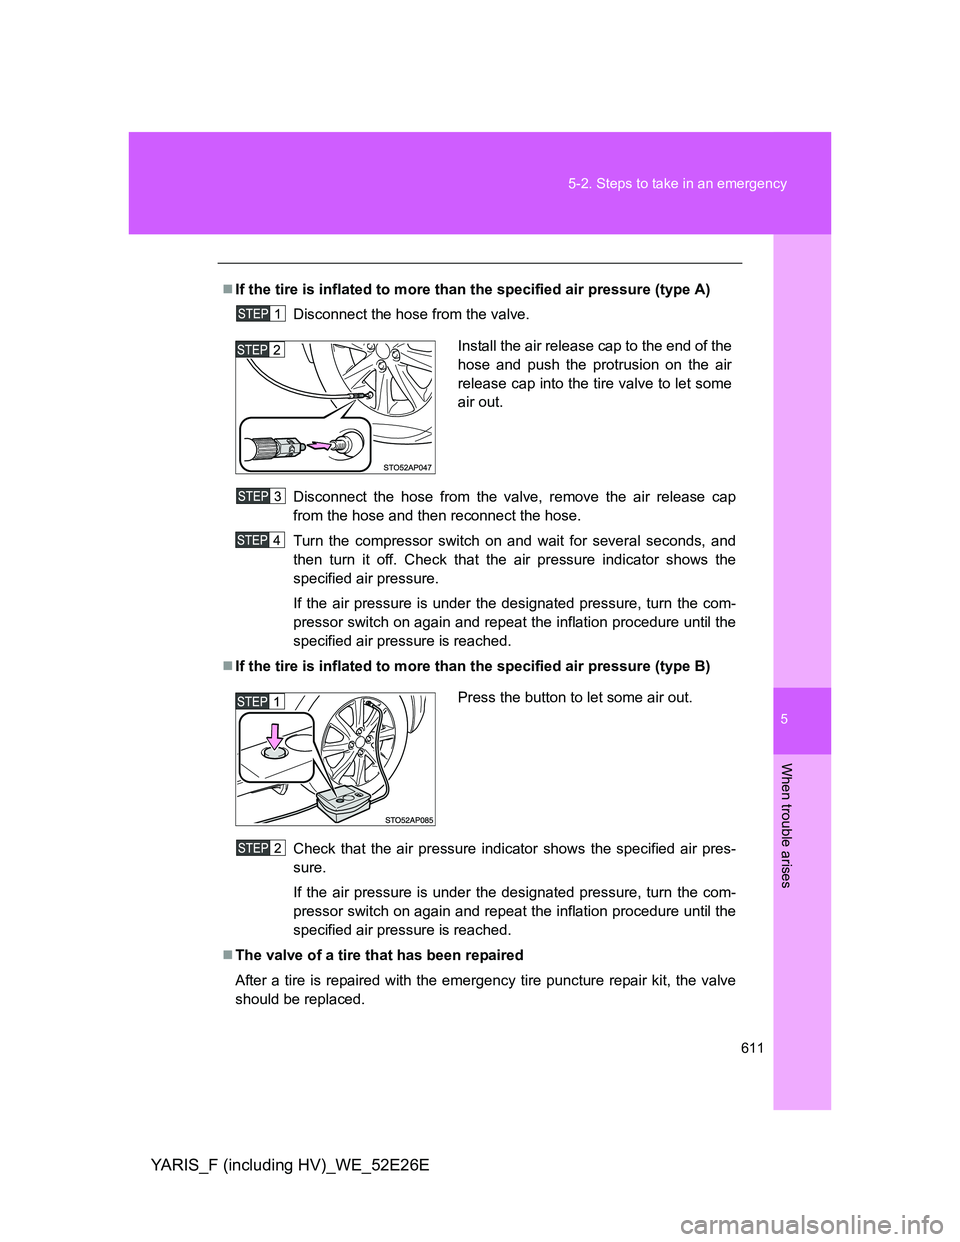
If the tire is inflated to more than the specified air pressure (type A)
Disconnect the hose from the valve.
Disconnect the hose from the valve, remove the air release cap
from the hose and then reconnect the hose.
Turn the compressor switch on and wait for several seconds, and
then turn it off. Check that the air pressure indicator shows the
specified air pressure.
If the air pressure is under the designated pressure, turn the com-
pressor switch on again and repeat the inflation procedure until the
specified air pressure is reached.
If the tire is inflated to more than the specified air pressure (type B)
Check that the air pressure indicator shows the specified air pres-
sure.
If the air pressure is under the designated pressure, turn the com-
pressor switch on again and repeat the inflation procedure until the
specified air pressure is reached.
The valve of a tire that has been repaired
After a tire is repaired with the emergency tire puncture repair kit, the valve
should be replaced.
Install the air release cap to the end of the
hose and push the protrusion on the air
release cap into the tire valve to let some
air out.
Press the button to let some air out.
Page 612 of 712
612 5-2. Steps to take in an emergency
YARIS_F (including HV)_WE_52E26E
Note for checking the emergency tire puncture repair kit
Check the sealant expiry date occasionally.
The expiry date is shown on the bottle. Do not use sealant whose expiry
date has already passed. Otherwise, repairs conducted using the emer-
gency tire puncture repair kit may not be performed properly.
Emergency tire puncture repair kit
The sealant stored in the emergency tire puncture repair kit can be used
only once to temporarily repair a single tire. If the sealant has been used
and needs to be replaced, purchase a new bottle at any authorized Toy-
ota dealer or repairer, or another duly qualified and equipped profes-
sional. The compressor is reusable.
The sealant can be used when the outside temperature is from -30°C
(-22°F) to 60°C (140°F).
The repair kit is exclusively designed for size and type of tires originally
installed on your vehicle. Do not use it for tires that a different size than
the original ones, or for any other purposes.
The sealant has a limited lifespan. The expiry date is marked on the bot-
tle. The bottle of sealant should be replaced with a new bottle before the
expiry date. Contact any authorized Toyota dealer or repairer, or another
duly qualified and equipped professional for replacement.
If the sealant gets on your clothes, it may stain.
If the sealant adheres to a wheel or the surface of the vehicle body, the
stain may not be removable if it is not cleaned at once. Immediately wipe
away the sealant with a wet cloth.
During operation of the repair kit, a loud operation noise is produced.
This does not indicate a malfunction.
Do not use to check or to adjust the tire pressure.
Page 679 of 712
679 6-1. Specifications
6
Vehicle specifications
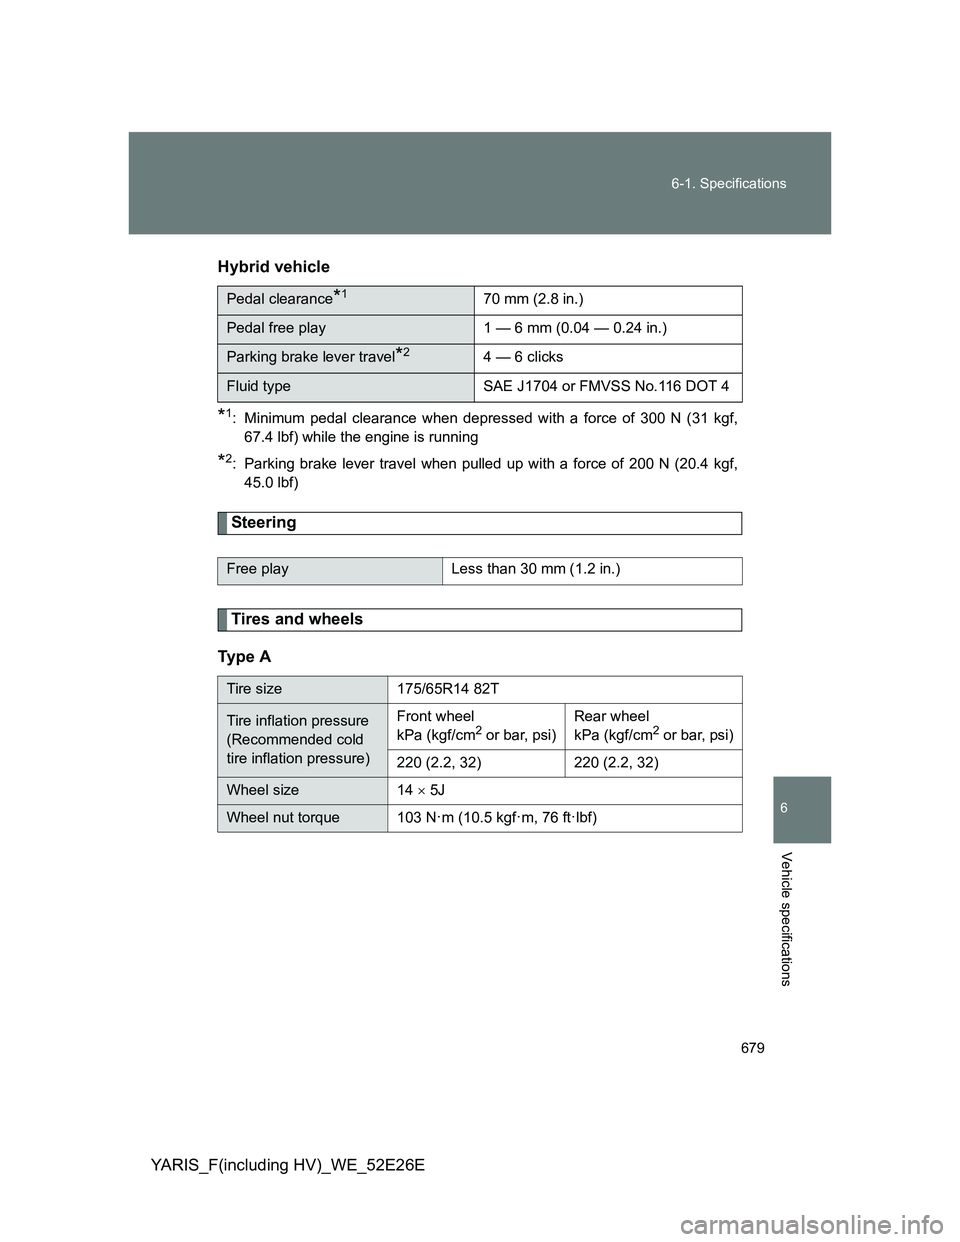
YARIS_F(including HV)_WE_52E26EHybrid vehicle
*1: Minimum pedal clearance when depressed with a force of 300 N (31 kgf,
67.4 lbf) while the engine is running
*2: Parking brake lever travel when pulled up with a force of 200 N (20.4 kgf,
45.0 lbf)
Steering
Tires and wheels
Ty p e A
Pedal clearance*170 mm (2.8 in.)
Pedal free play 1 — 6 mm (0.04 — 0.24 in.)
Parking brake lever travel*24 — 6 clicks
Fluid type SAE J1704 or FMVSS No.116 DOT 4
Free play Less than 30 mm (1.2 in.)
Tire size 175/65R14 82T
Tire inflation pressure
(Recommended cold
tire inflation pressure)Front wheel
kPa (kgf/cm2 or bar, psi)Rear wheel
kPa (kgf/cm2 or bar, psi)
220 (2.2, 32) 220 (2.2, 32)
Wheel size 14 5J
Wheel nut torque 103 N·m (10.5 kgf·m, 76 ft·lbf)
Page 698 of 712
698 Alphabetical index
YARIS_F(including HV)_WE_52E26E
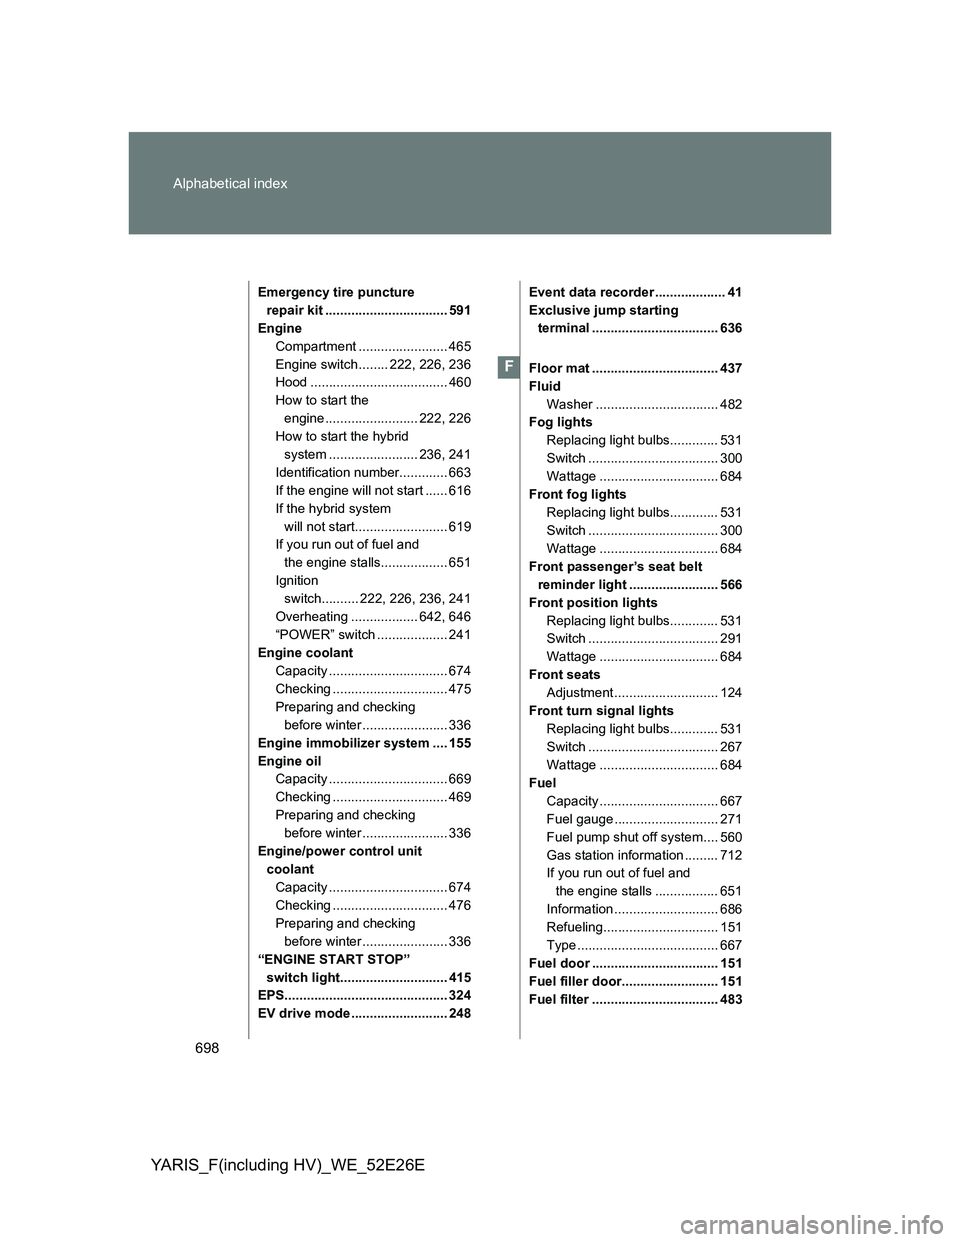
Emergency tire puncture
repair kit ................................. 591
Engine
Compartment ........................ 465
Engine switch ........ 222, 226, 236
Hood ..................................... 460
How to start the
engine ......................... 222, 226
How to start the hybrid
system ........................ 236, 241
Identification number............. 663
If the engine will not start ...... 616
If the hybrid system
will not start......................... 619
If you run out of fuel and
the engine stalls.................. 651
Ignition
switch.......... 222, 226, 236, 241
Overheating .................. 642, 646
“POWER” switch ................... 241
Engine coolant
Capacity ................................ 674
Checking ............................... 475
Preparing and checking
before winter ....................... 336
Engine immobilizer system .... 155
Engine oil
Capacity ................................ 669
Checking ............................... 469
Preparing and checking
before winter ....................... 336
Engine/power control unit
coolant
Capacity ................................ 674
Checking ............................... 476
Preparing and checking
before winter ....................... 336
“ENGINE START STOP”
switch light............................. 415
EPS............................................ 324
EV drive mode .......................... 248Event data recorder ................... 41
Exclusive jump starting
terminal .................................. 636
Floor mat .................................. 437
Fluid
Washer ................................. 482
Fog lights
Replacing light bulbs............. 531
Switch ................................... 300
Wattage ................................ 684
Front fog lights
Replacing light bulbs............. 531
Switch ................................... 300
Wattage ................................ 684
Front passenger’s seat belt
reminder light ........................ 566
Front position lights
Replacing light bulbs............. 531
Switch ................................... 291
Wattage ................................ 684
Front seats
Adjustment ............................ 124
Front turn signal lights
Replacing light bulbs............. 531
Switch ................................... 267
Wattage ................................ 684
Fuel
Capacity ................................ 667
Fuel gauge ............................ 271
Fuel pump shut off system.... 560
Gas station information ......... 712
If you run out of fuel and
the engine stalls ................. 651
Information ............................ 686
Refueling............................... 151
Type ...................................... 667
Fuel door .................................. 151
Fuel filler door.......................... 151
Fuel filter .................................. 483
F