head TOYOTA YARIS 2014 3.G Service Manual
[x] Cancel search | Manufacturer: TOYOTA, Model Year: 2014, Model line: YARIS, Model: TOYOTA YARIS 2014 3.GPages: 400, PDF Size: 9 MB
Page 287 of 400
287
4-3. Do-it-yourself maintenance
4
Maintenance and care
Light bulbs
You may replace the following bulbs by yourself. The difficulty level
of replacement varies depending on the bulb. If necessary bulb
replacement seems difficult to perfor m, contact your Toyota dealer.
For more information about replacing other light bulbs, contact your
Toyota dealer.
■ Preparing for light bulb replacement
Check the wattage of the light bulb to be replaced. ( P. 352)
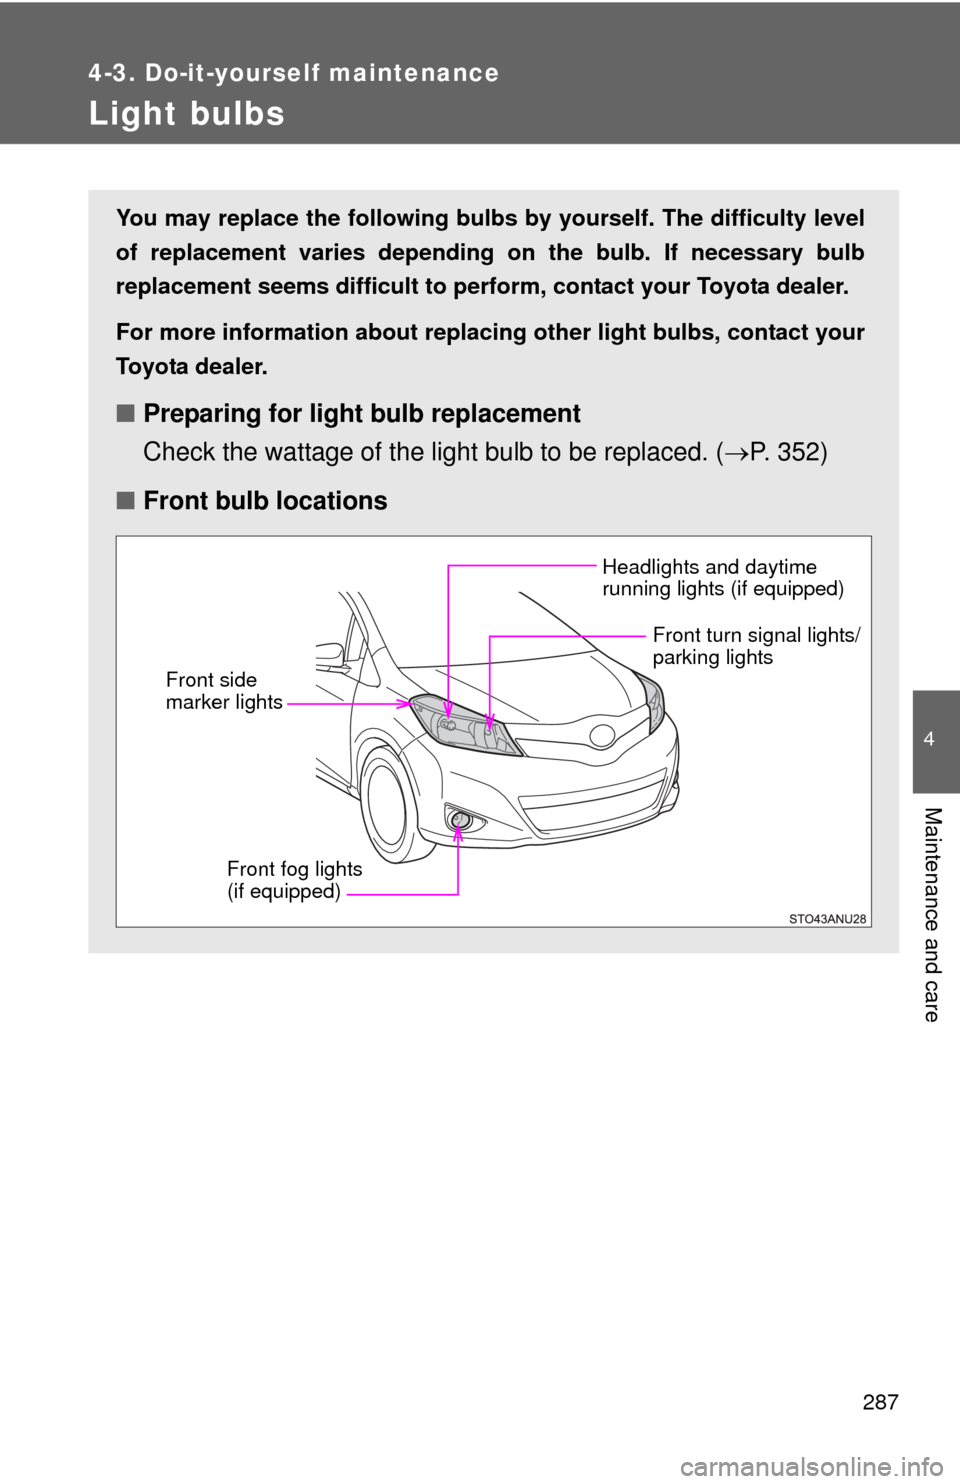
■ Front bulb locations
Headlights and daytime
running lights (if equipped)
Front fog lights
(if equipped)
Front side
marker lights
Front turn signal lights/
parking lights
Page 288 of 400
288 4-3. Do-it-yourself maintenance
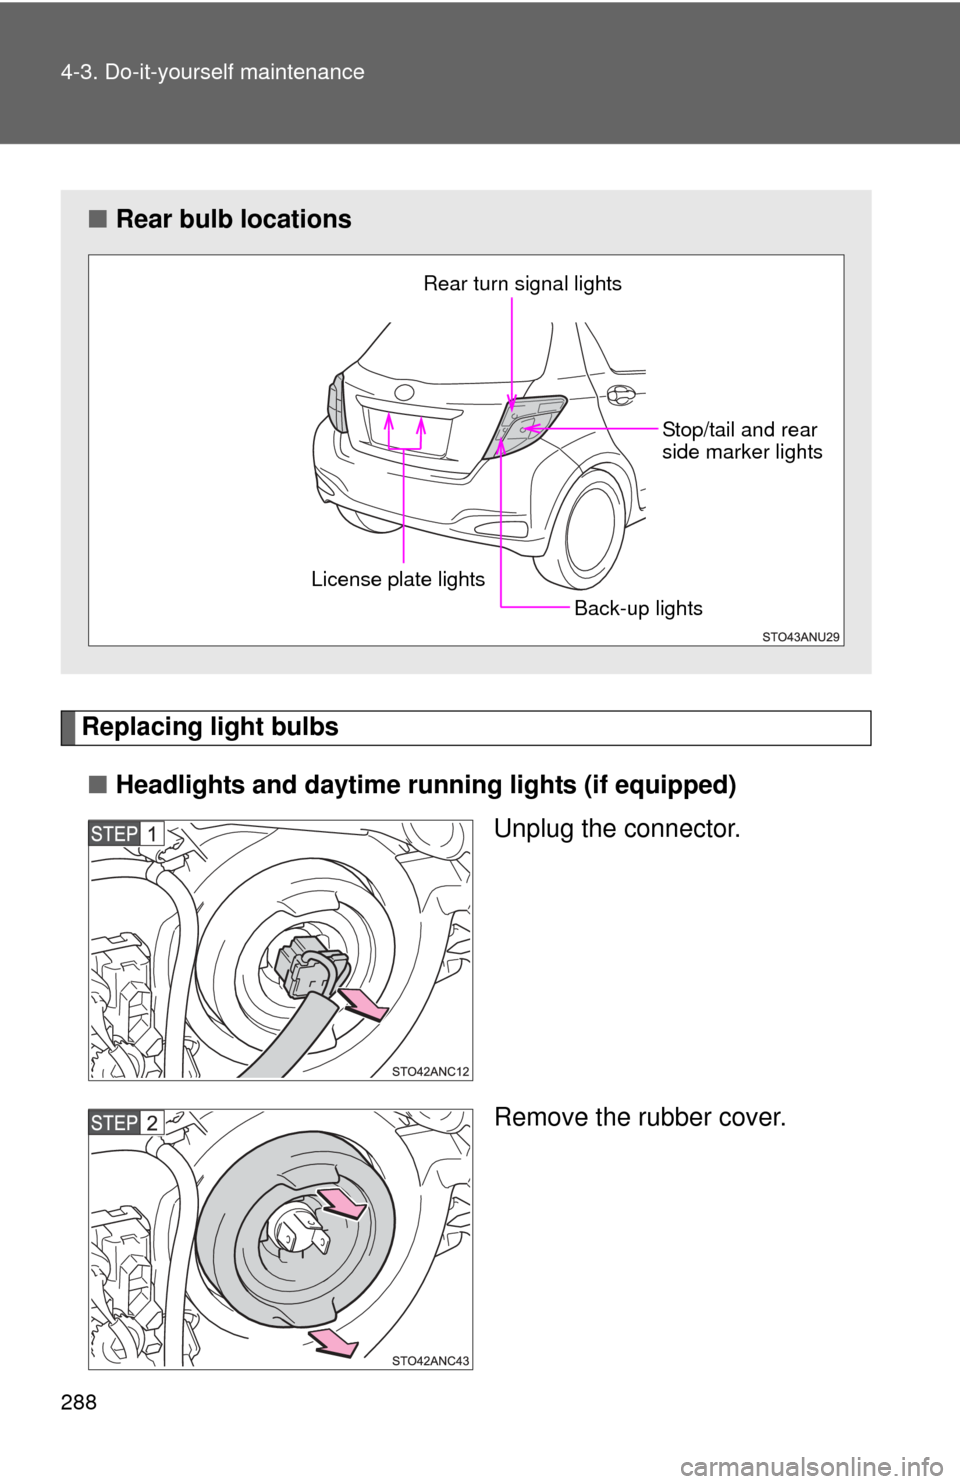
Replacing light bulbs■ Headlights and daytime running lights (if equipped)
Unplug the connector.
Remove the rubber cover.
■Rear bulb locations
Back-up lights
Rear turn signal lights
Stop/tail and rear
side marker lights
License plate lights
Page 293 of 400
293
4-3. Do-it-yourself maintenance
4
Maintenance and care
■
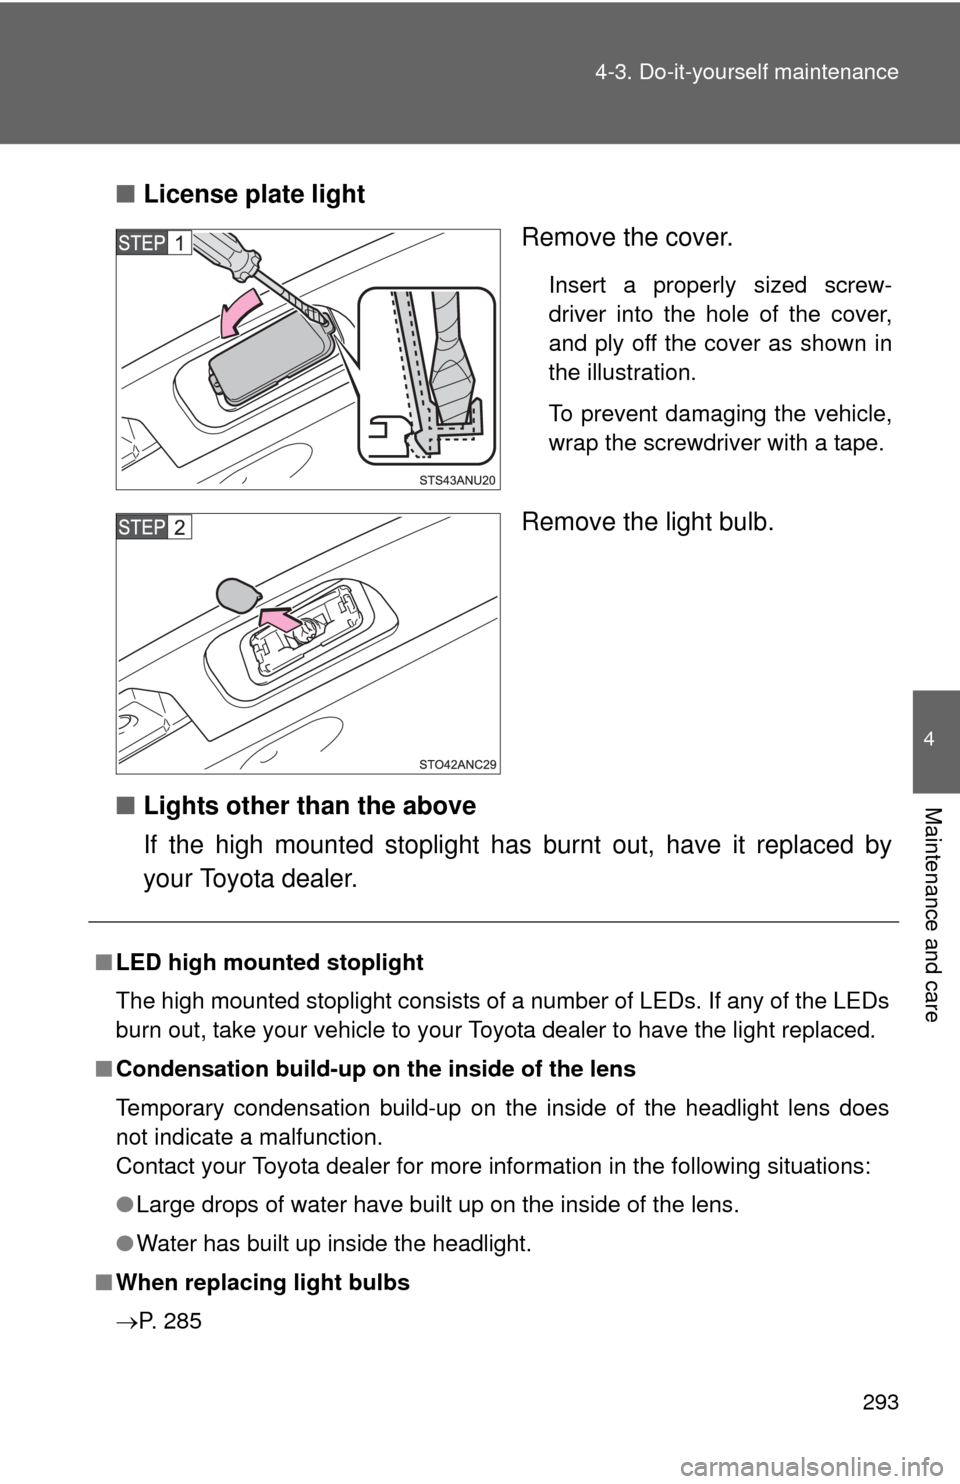
License plate light
Remove the cover.
Insert a properly sized screw-
driver into the hole of the cover,
and ply off the cover as shown in
the illustration.
To prevent damaging the vehicle,
wrap the screwdriver with a tape.
Remove the light bulb.
■ Lights other than the above
If the high mounted stoplight has burnt out, have it replaced by
your Toyota dealer.
■LED high mounted stoplight
The high mounted stoplight consists of a number of LEDs. If any of the LEDs
burn out, take your vehicle to your Toyota dealer to have the light replaced.
■ Condensation build-up on th e inside of the lens
Temporary condensation build-up on the inside of the headlight lens does
not indicate a malfunction.
Contact your Toyota dealer for more information in the following situations:
● Large drops of water have built up on the inside of the lens.
● Water has built up inside the headlight.
■ When replacing light bulbs
P. 285
Page 294 of 400

294 4-3. Do-it-yourself maintenance
CAUTION
■Replacing light bulbs
●Turn off the lights. Do not attempt to replace the bulb immediately after
turning off the lights.
The bulbs become very hot and may cause burns.
● Do not touch the glass portion of the light bulb with bare hands. Hold the
bulb by the plastic or metal portion.
If the bulb is scratched or dropped, it may blow out or crack.
● Fully install light bulbs and any parts used to secure them. Failure to do so
may result in head damage, fire, or water entering the headlight unit. This
may damage the headlights or cause condensation to build up on the lens.
■ To prevent damage or fire
Make sure bulbs are fully seated and locked.
Page 298 of 400
298 5-1. Essential information
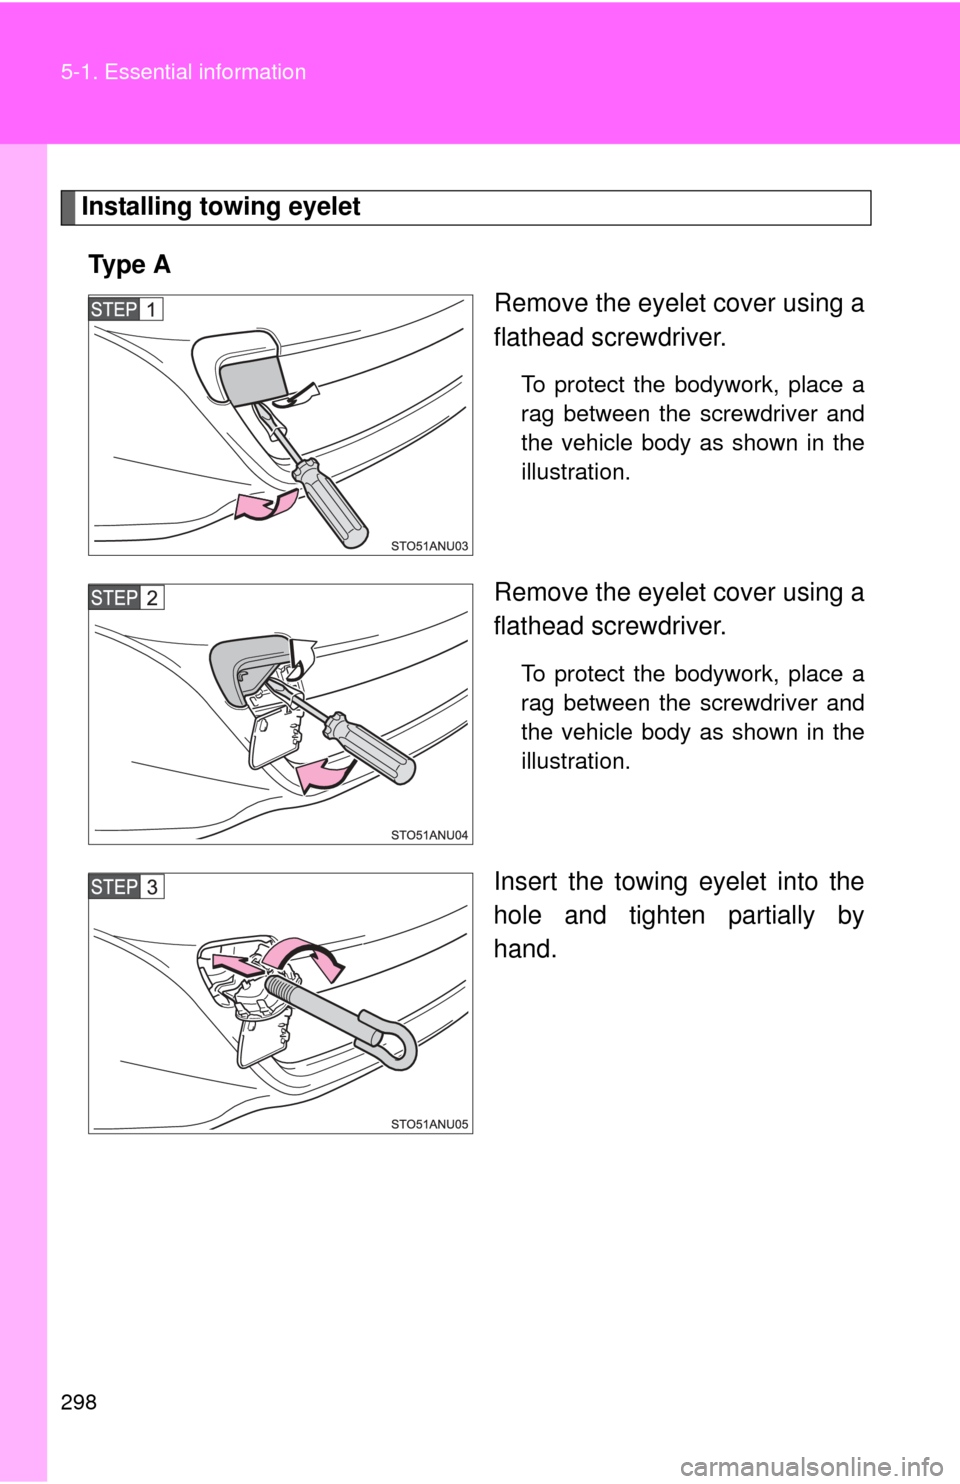
Installing towing eyeletTy p e A Remove the eyelet cover using a
flathead screwdriver.
To protect the bodywork, place a
rag between the screwdriver and
the vehicle body as shown in the
illustration.
Remove the eyelet cover using a
flathead screwdriver.
To protect the bodywork, place a
rag between the screwdriver and
the vehicle body as shown in the
illustration.
Insert the towing eyelet into the
hole and tighten partially by
hand.
Page 299 of 400
5
When trouble arises
299
5-1. Essential information
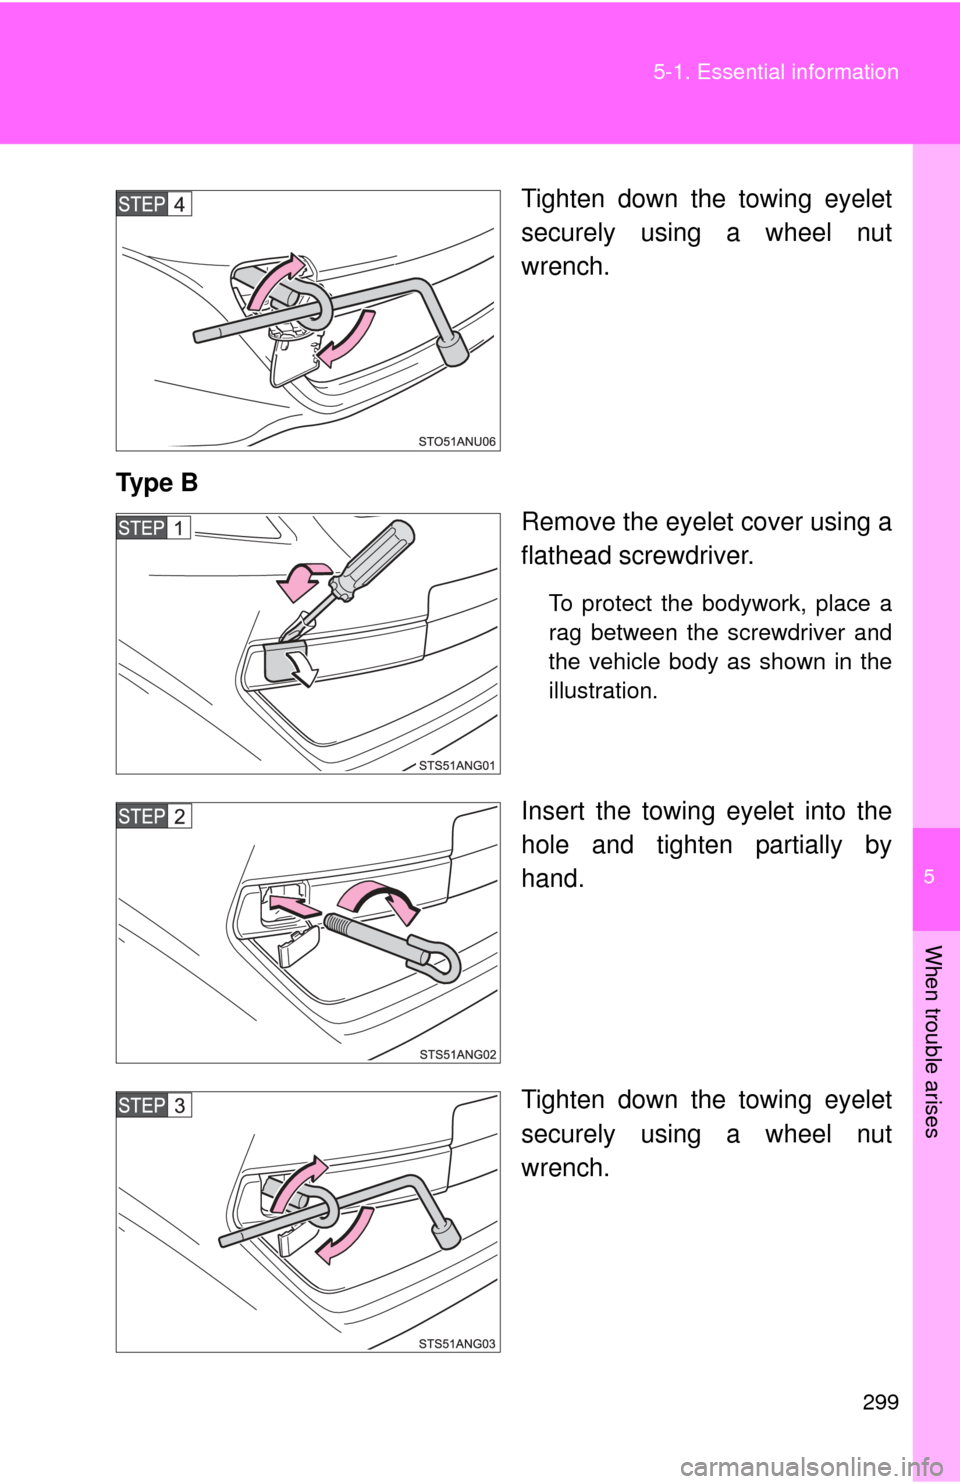
Tighten down the towing eyelet
securely using a wheel nut
wrench.
Ty p e B Remove the eyelet cover using a
flathead screwdriver.
To protect the bodywork, place a
rag between the screwdriver and
the vehicle body as shown in the
illustration.
Insert the towing eyelet into the
hole and tighten partially by
hand.
Tighten down the towing eyelet
securely using a wheel nut
wrench.
Page 321 of 400
5
When trouble arises
321
5-2. Steps to take in an emergency
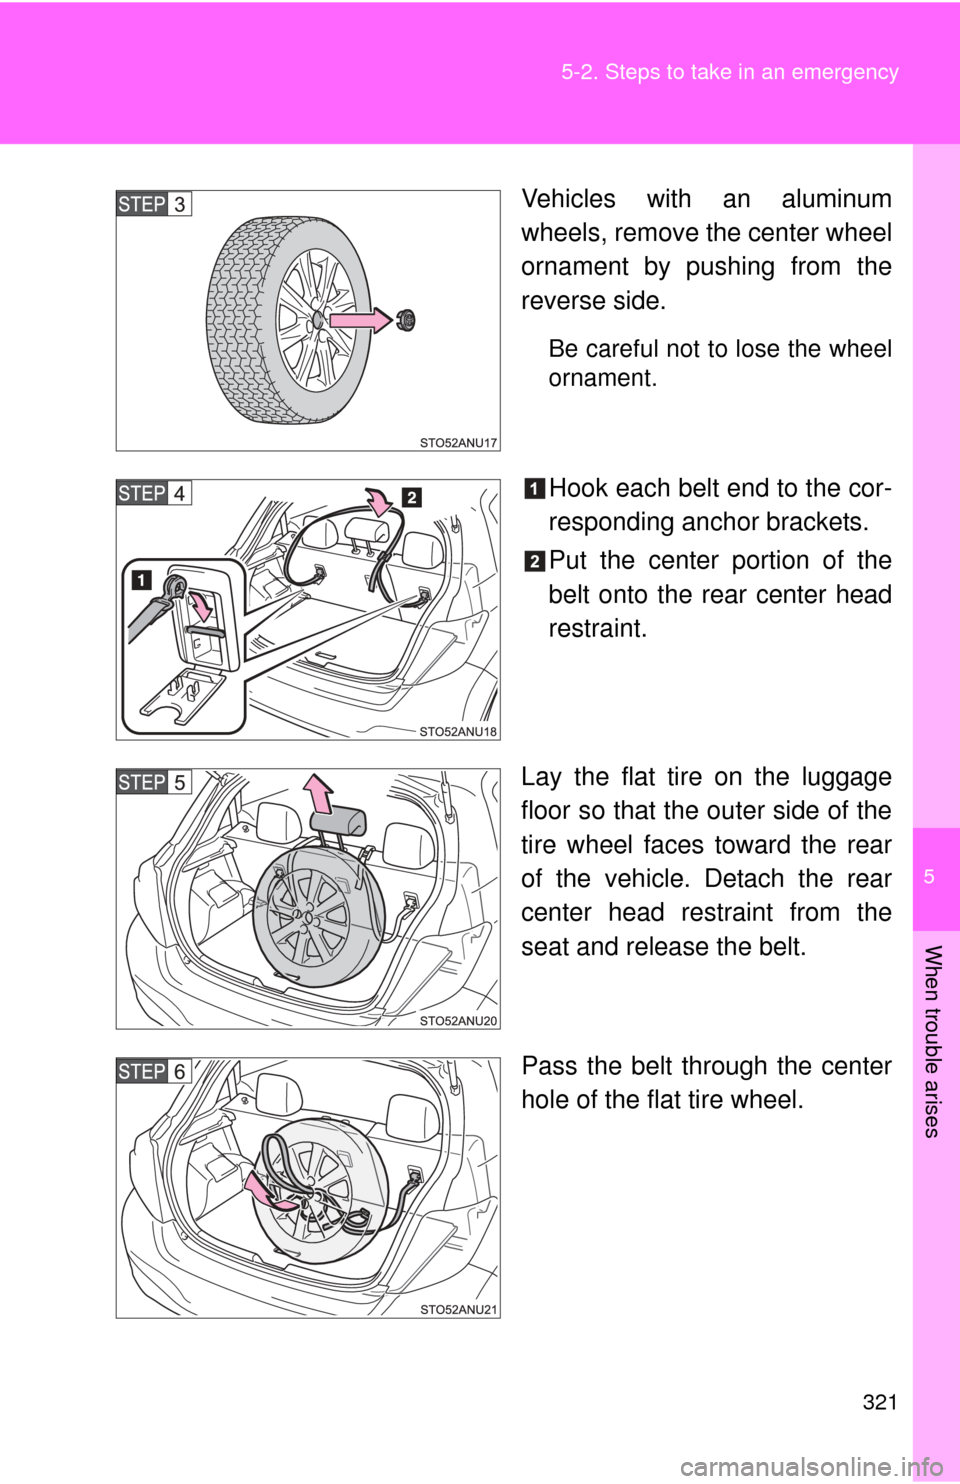
Vehicles with an aluminum
wheels, remove the center wheel
ornament by pushing from the
reverse side.
Be careful not to lose the wheel
ornament.
Hook each belt end to the cor-
responding anchor brackets.
Put the center portion of the
belt onto the rear center head
restraint.
Lay the flat tire on the luggage
floor so that the outer side of the
tire wheel faces toward the rear
of the vehicle. Detach the rear
center head restraint from the
seat and release the belt.
Pass the belt through the center
hole of the flat tire wheel.
Page 322 of 400
322 5-2. Steps to take in an emergency
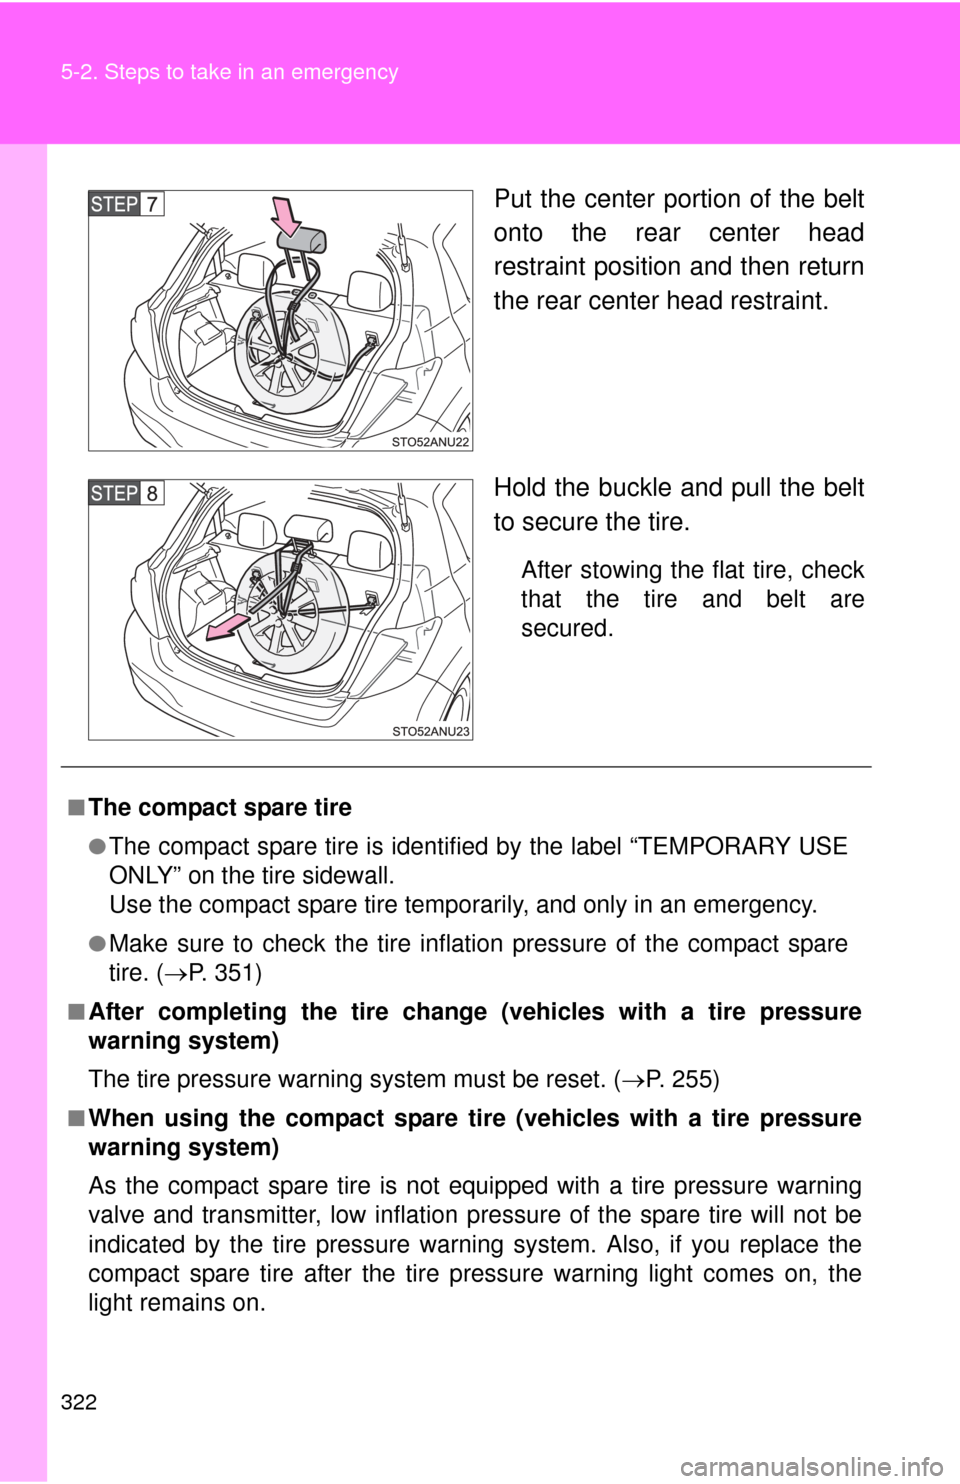
Put the center portion of the belt
onto the rear center head
restraint position and then return
the rear center head restraint.
Hold the buckle and pull the belt
to secure the tire.
After stowing the flat tire, check
that the tire and belt are
secured.
■The compact spare tire
●The compact spare tire is identified by the label “TEMPORARY USE
ONLY” on the tire sidewall.
Use the compact spare tire temporarily, and only in an emergency.
●Make sure to check the tire inflation pressu re of the compact spare
tire. ( P. 351)
■After completing the tire change (vehicles with a tire pressure
warning system)
The tire pressure warnin g system must be reset. ( P. 255)
■When using the compact spare tire (vehicles with a tire pressure
warning system)
As the compact spare tire is not equipped with a tire pressure warning
valve and transmitter, low inflation pressure of the spare tire will not be
indicated by the tire pressure warn ing system. Also, if you replace the
compact spare tire after the tire pressure warning light comes on, the
light remains on.
Page 327 of 400
5
When trouble arises
327
5-2. Steps to take in an emergency
If the engine will not star t
If the engine will not start even though correct starting procedures
are being followed ( P. 124), consider each of the following points:
■The engine will not start even though the starter motor
operates normally.
One of the following may be the cause of the problem:
●There may not be sufficient fuel in the vehicle’s tank.
Refuel the vehicle.
● The engine may be flooded.
Try to restart the engine again following correct starting proce-
dures. ( P. 124)
● Vehicles with engine immobilizer system: There may be a
malfunction in the engine immobilizer system. (P. 7 2 )
■ The starter motor turns over slowly, the interior lights and
headlights are dim, or the horn does not sound or sounds at
a low volume.
One of the following may be the cause of the problem:
●The battery may be discharged. ( P. 330)
● The battery terminal connec tions may be loose or corroded.
■ The starter motor does not turn over, the interior lights and
headlights do not turn on, or the horn does not sound.
One of the following may be the cause of the problem:
● One or both of the battery terminals may be disconnected.
● The battery may be discharged. ( P. 330)
Contact your Toyota dealer if the problem cannot be repaired, or if
repair procedures are unknown.
Page 328 of 400
328
5-2. Steps to take in an emergency
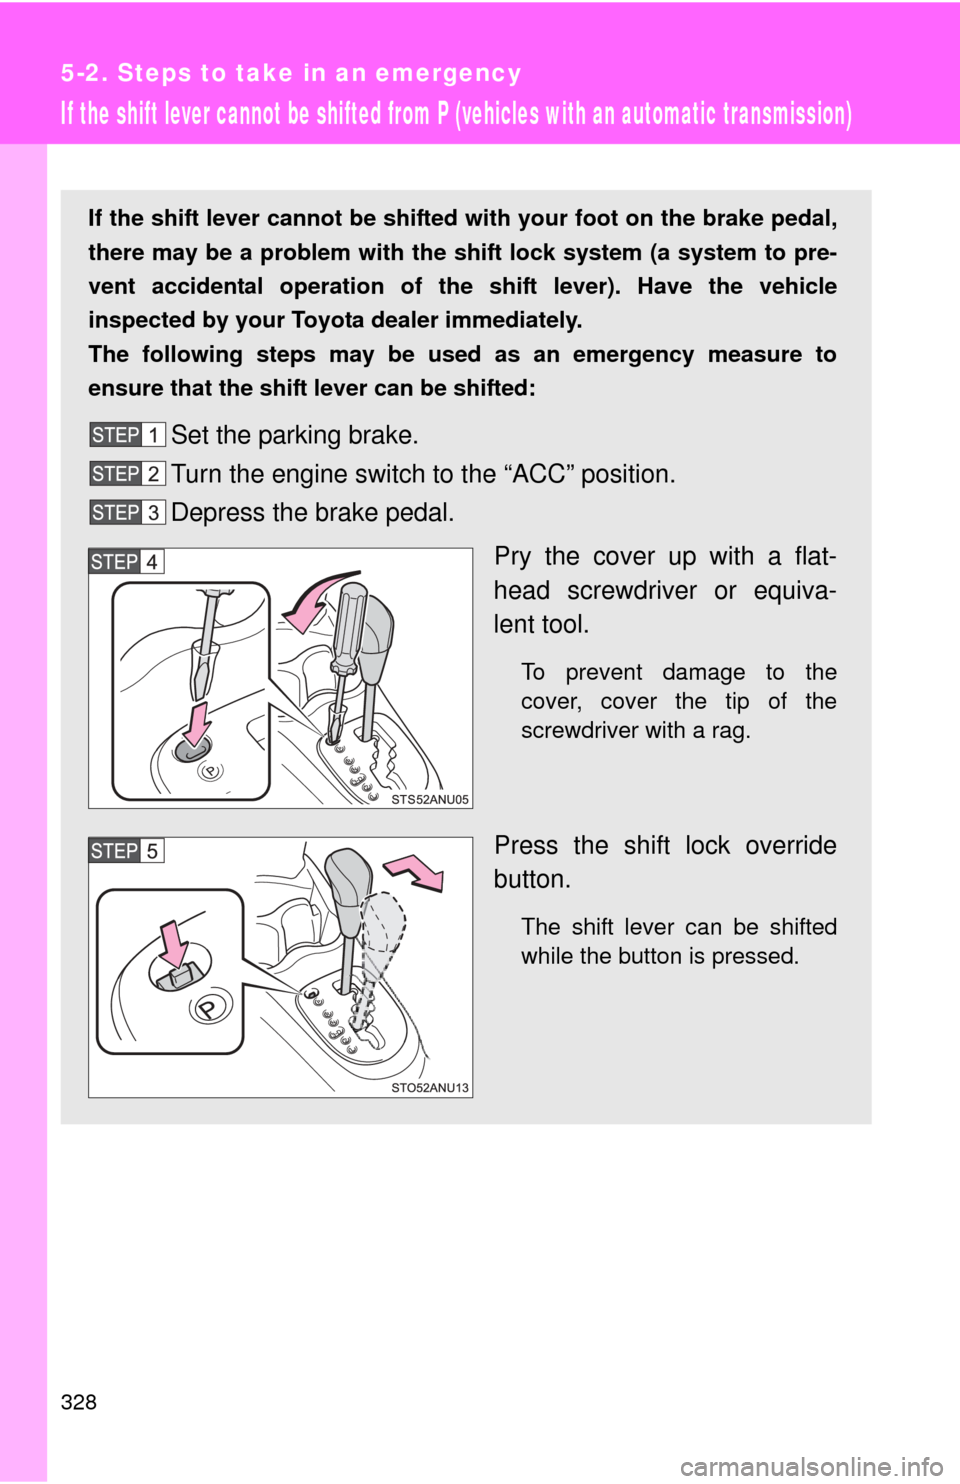
If the shift lever cannot be shifted from P (vehicles with an automatic transmission)
If the shift lever cannot be shifted with your foot on the brake pedal,
there may be a problem with the shift lock system (a system to pre-
vent accidental operation of the shift lever). Have the vehicle
inspected by your Toyo ta dealer immediately.
The following steps may be used as an emergency measure to
ensure that the shift lever can be shifted:
Set the parking brake.
Turn the engine switch to the “ACC” position.
Depress the brake pedal.
Pry the cover up with a flat-
head screwdriver or equiva-
lent tool.
To prevent damage to the
cover, cover the tip of the
screwdriver with a rag.
Press the shift lock override
button.
The shift lever can be shifted
while the button is pressed.