bulb TOYOTA YARIS 2015 3.G User Guide
[x] Cancel search | Manufacturer: TOYOTA, Model Year: 2015, Model line: YARIS, Model: TOYOTA YARIS 2015 3.GPages: 364, PDF Size: 5.74 MB
Page 252 of 364
2526-3. Do-it-yourself maintenance
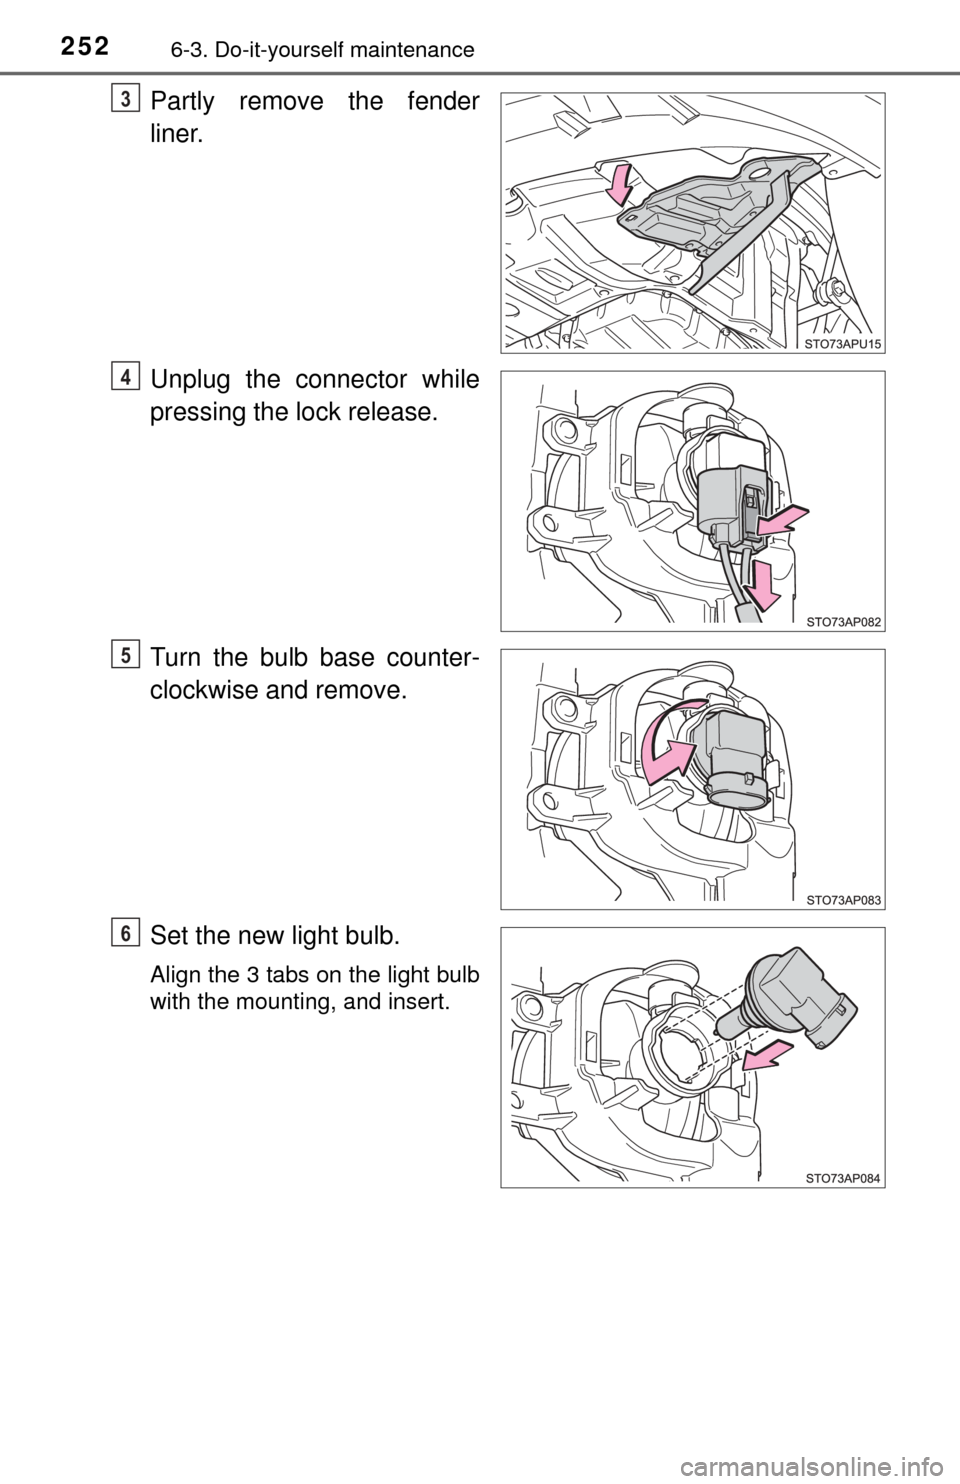
Partly remove the fender
liner.
Unplug the connector while
pressing the lock release.
Turn the bulb base counter-
clockwise and remove.
Set the new light bulb.
Align the 3 tabs on the light bulb
with the mounting, and insert.
3
4
5
6
Page 253 of 364
2536-3. Do-it-yourself maintenance
6
Maintenance and care
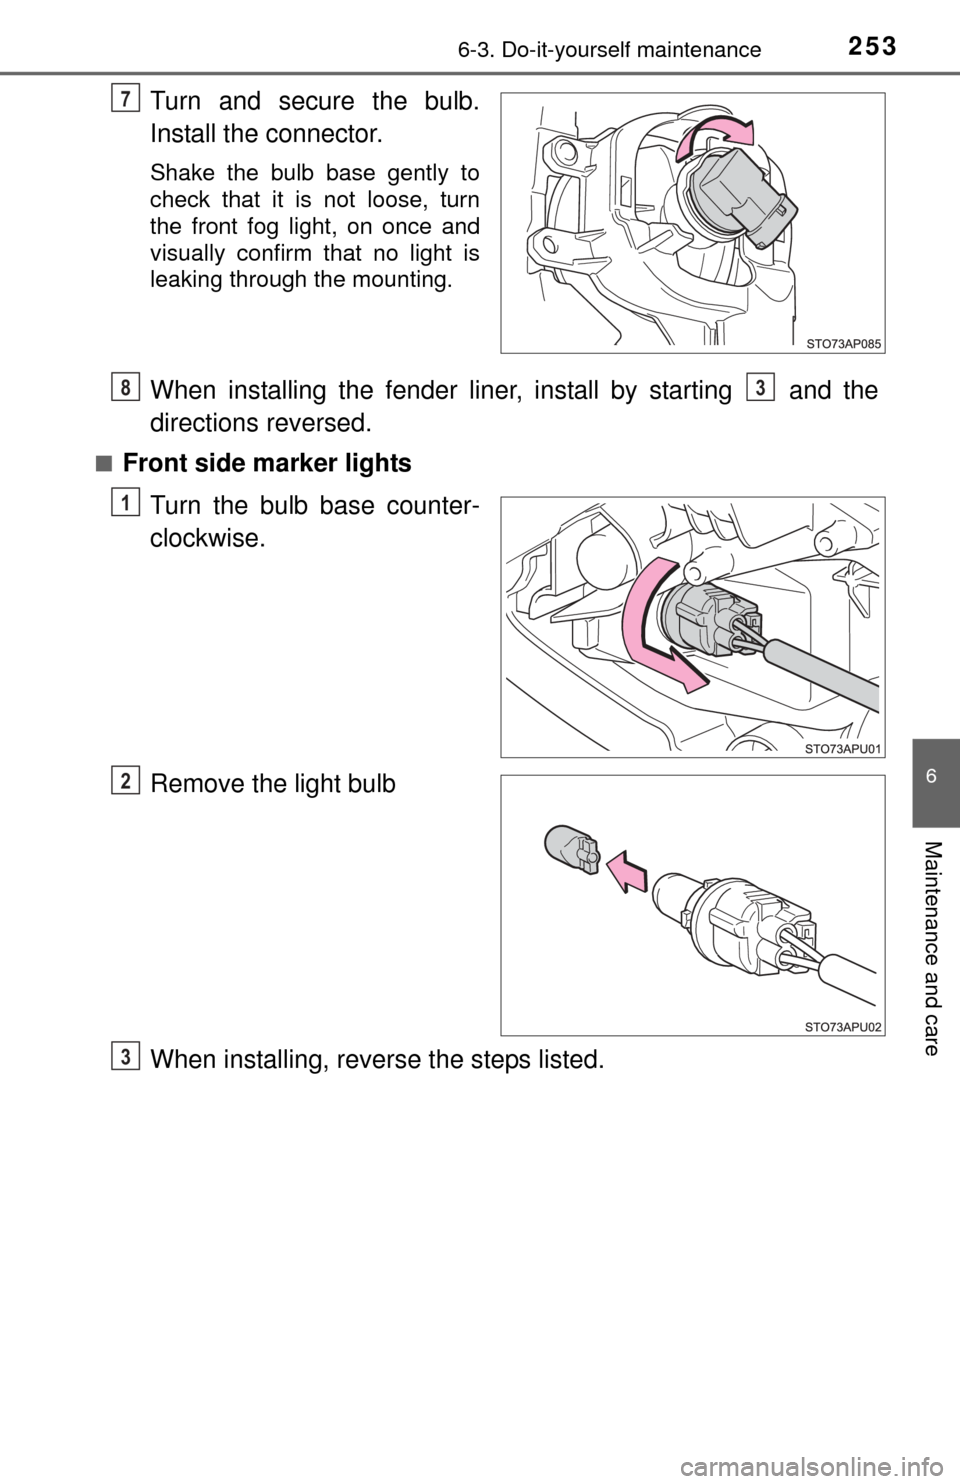
Turn and secure the bulb.
Install the connector.
Shake the bulb base gently to
check that it is not loose, turn
the front fog light, on once and
visually confirm that no light is
leaking through the mounting.
When installing the fender liner, install by starting and the
directions reversed.
■Front side marker lightsTurn the bulb base counter-
clockwise.
Remove the light bulb
When installing, reverse the steps listed.
7
83
1
2
3
Page 254 of 364
2546-3. Do-it-yourself maintenance
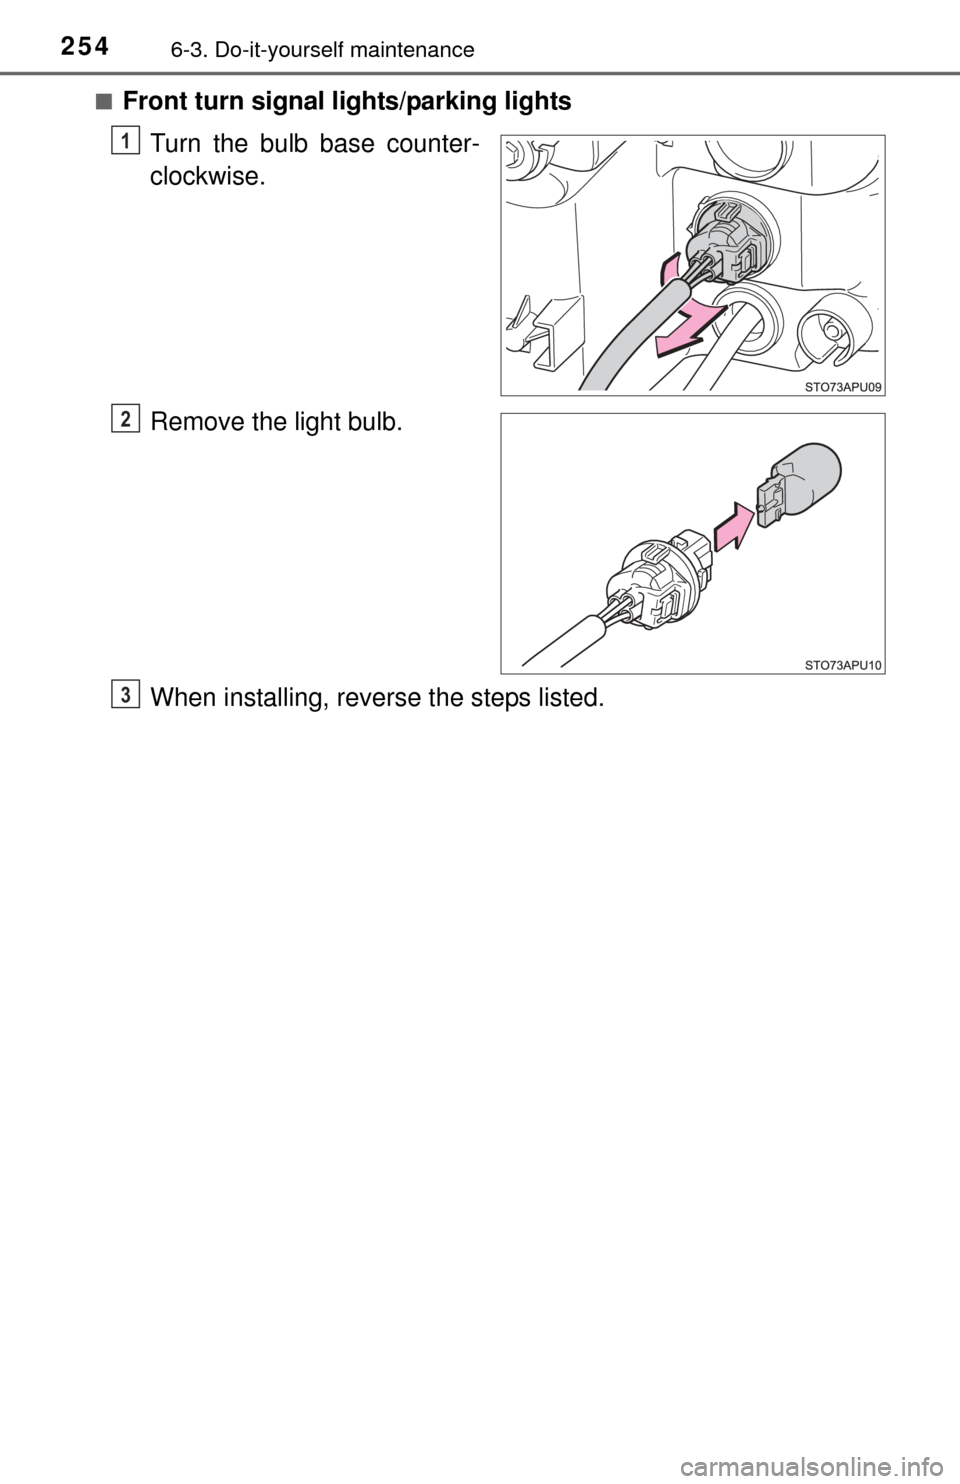
■Front turn signal lights/parking lights
Turn the bulb base counter-
clockwise.
Remove the light bulb.
When installing, reverse the steps listed.
1
2
3
Page 255 of 364
2556-3. Do-it-yourself maintenance
6
Maintenance and care
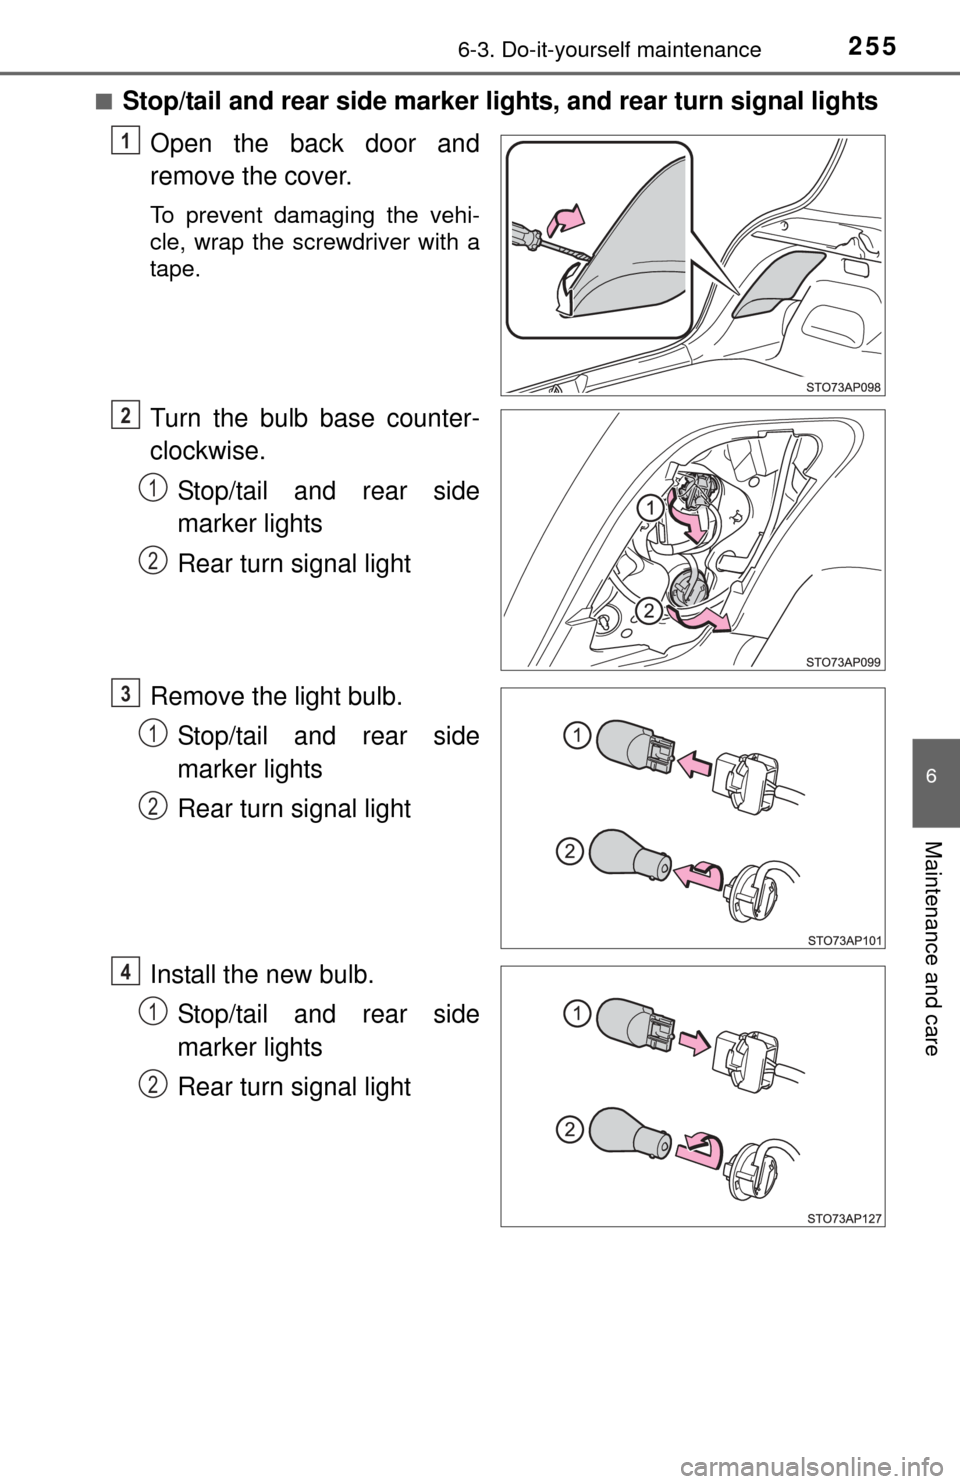
■Stop/tail and rear side marker lights, and rear turn signal lightsOpen the back door and
remove the cover.
To prevent damaging the vehi-
cle, wrap the screwdriver with a
tape.
Turn the bulb base counter-
clockwise.Stop/tail and rear side
marker lights
Rear turn signal light
Remove the light bulb. Stop/tail and rear side
marker lights
Rear turn signal light
Install the new bulb. Stop/tail and rear side
marker lights
Rear turn signal light
1
2
1
2
3
1
2
4
1
2
Page 256 of 364
2566-3. Do-it-yourself maintenance
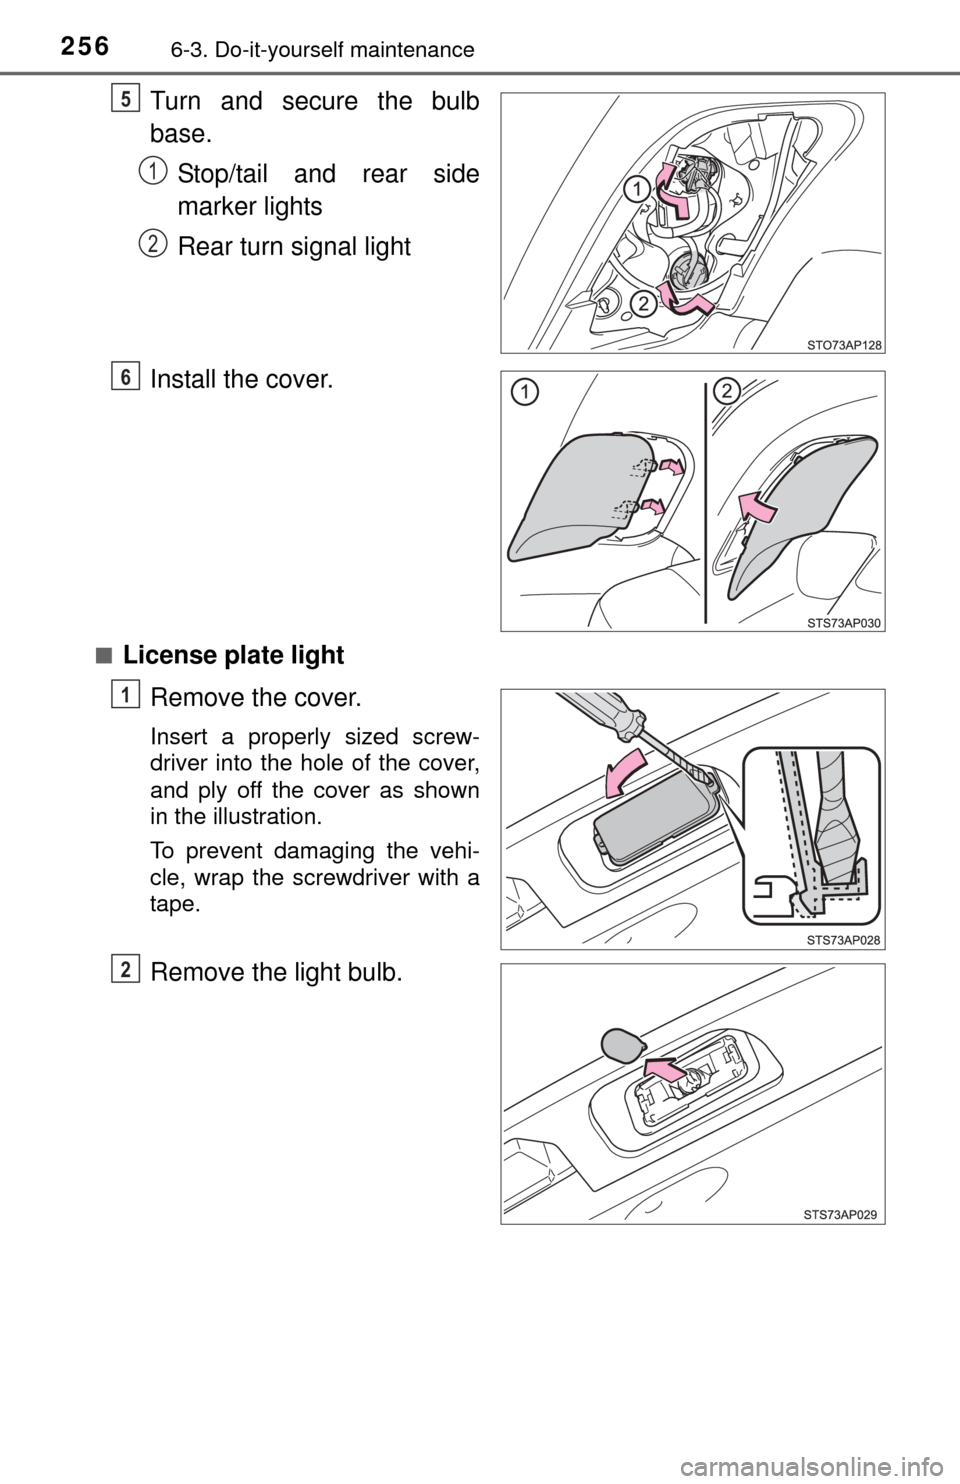
Turn and secure the bulb
base.Stop/tail and rear side
marker lights
Rear turn signal light
Install the cover.
■License plate light Remove the cover.
Insert a properly sized screw-
driver into the hole of the cover,
and ply off the cover as shown
in the illustration.
To prevent damaging the vehi-
cle, wrap the screwdriver with a
tape.
Remove the light bulb.
5
1
2
6
1
2
Page 257 of 364
2576-3. Do-it-yourself maintenance
6
Maintenance and care
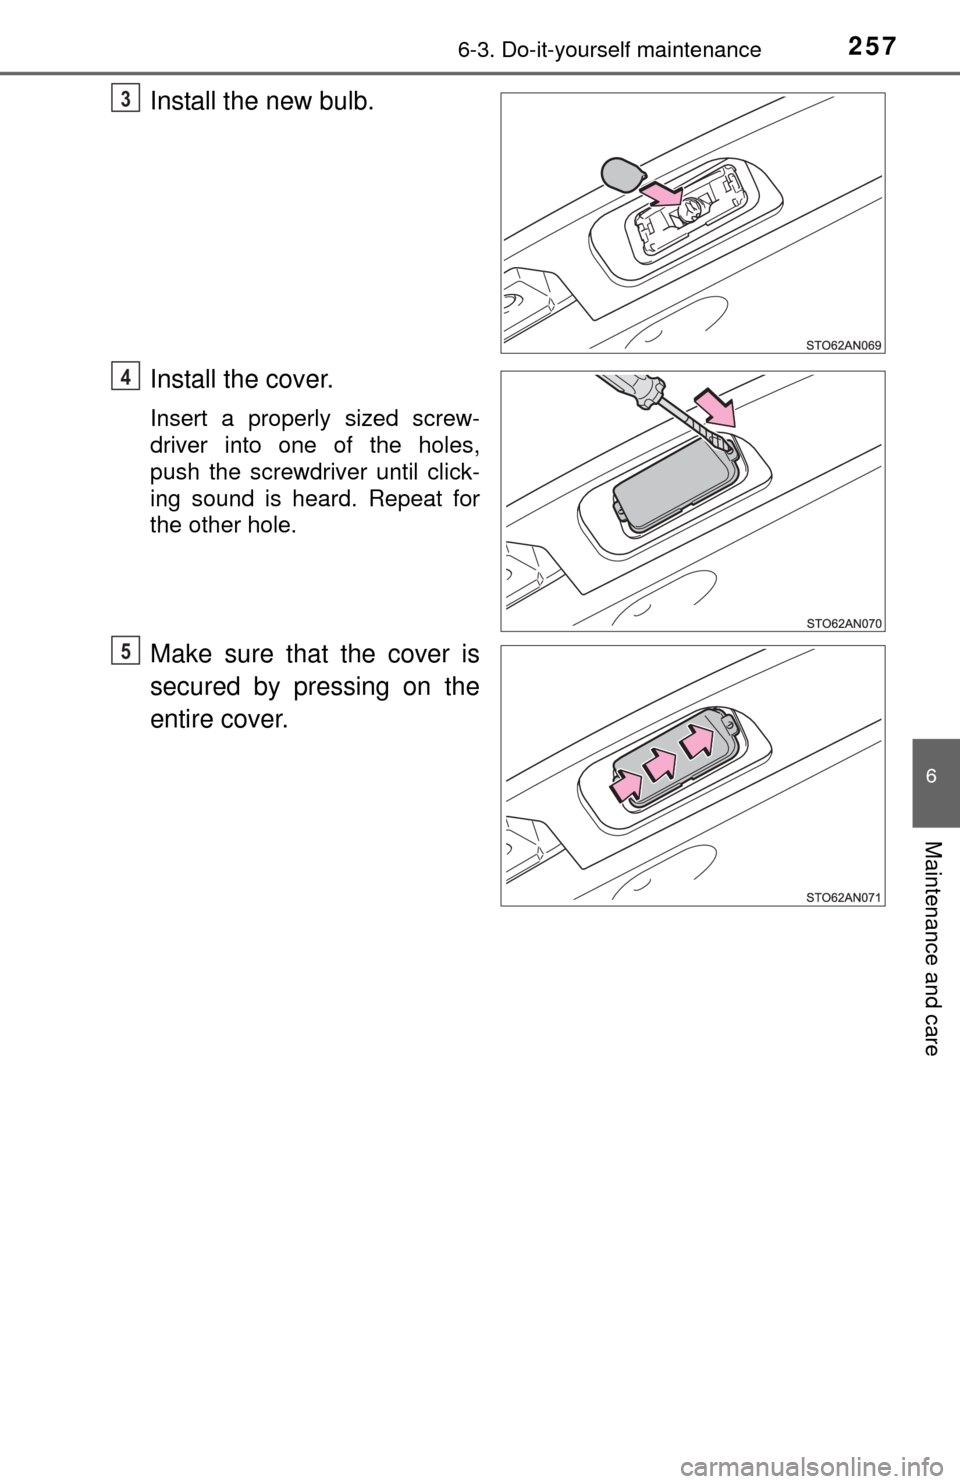
Install the new bulb.
Install the cover.
Insert a properly sized screw-
driver into one of the holes,
push the screwdriver until click-
ing sound is heard. Repeat for
the other hole.
Make sure that the cover is
secured by pressing on the
entire cover.
3
4
5
Page 258 of 364
2586-3. Do-it-yourself maintenance
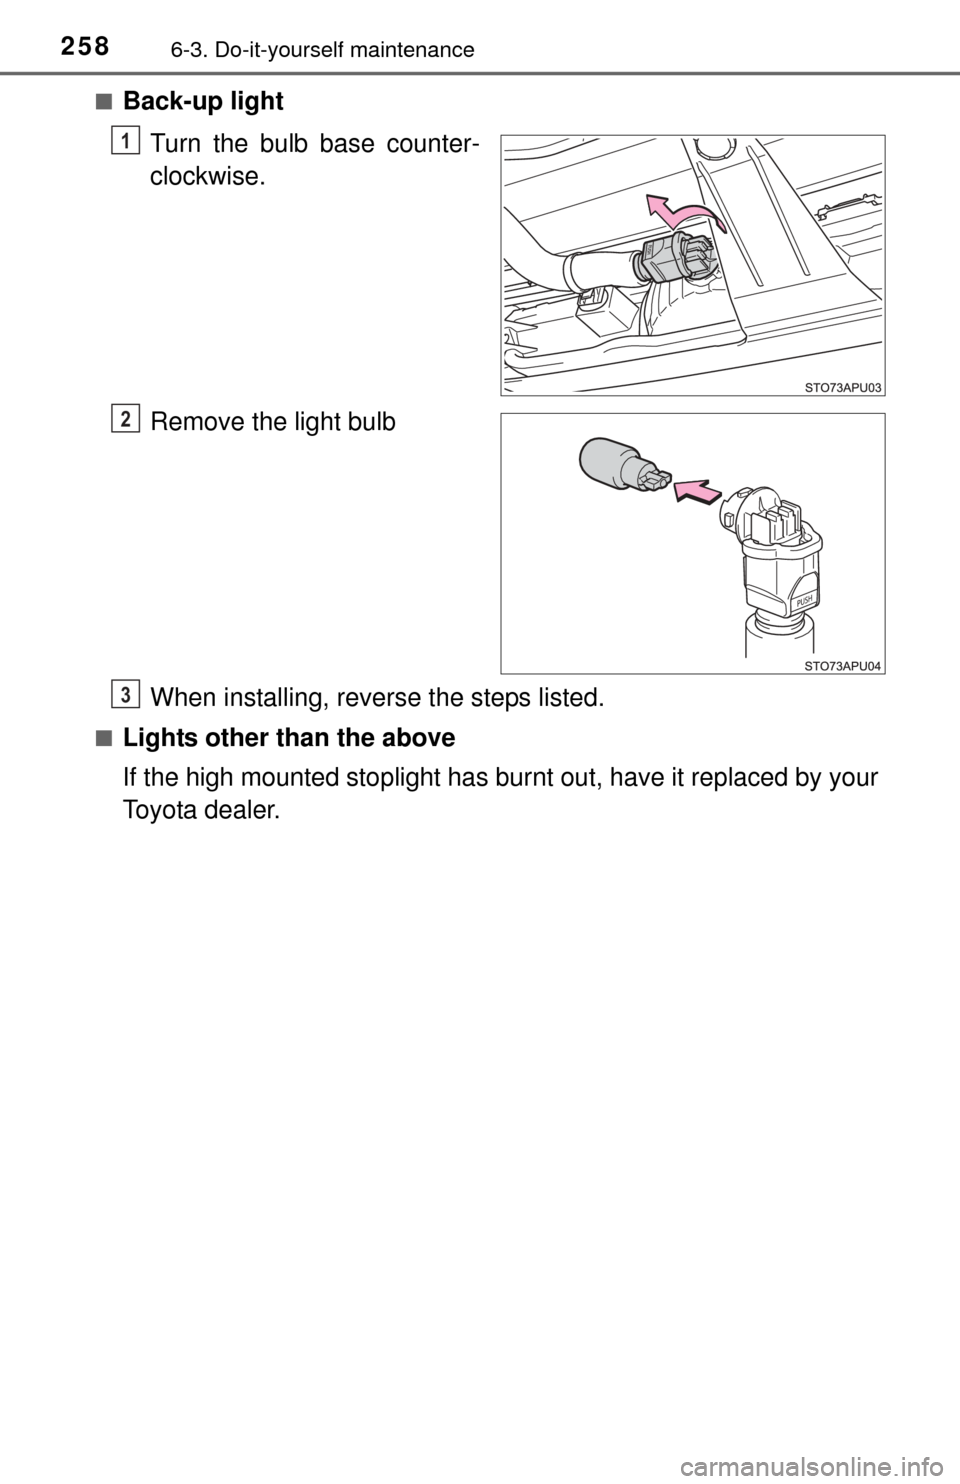
■Back-up lightTurn the bulb base counter-
clockwise.
Remove the light bulb
When installing, reverse the steps listed.
■Lights other than the above
If the high mounted stoplight has bur nt out, have it replaced by your
Toyota dealer.
1
2
3
Page 259 of 364
2596-3. Do-it-yourself maintenance
6
Maintenance and care
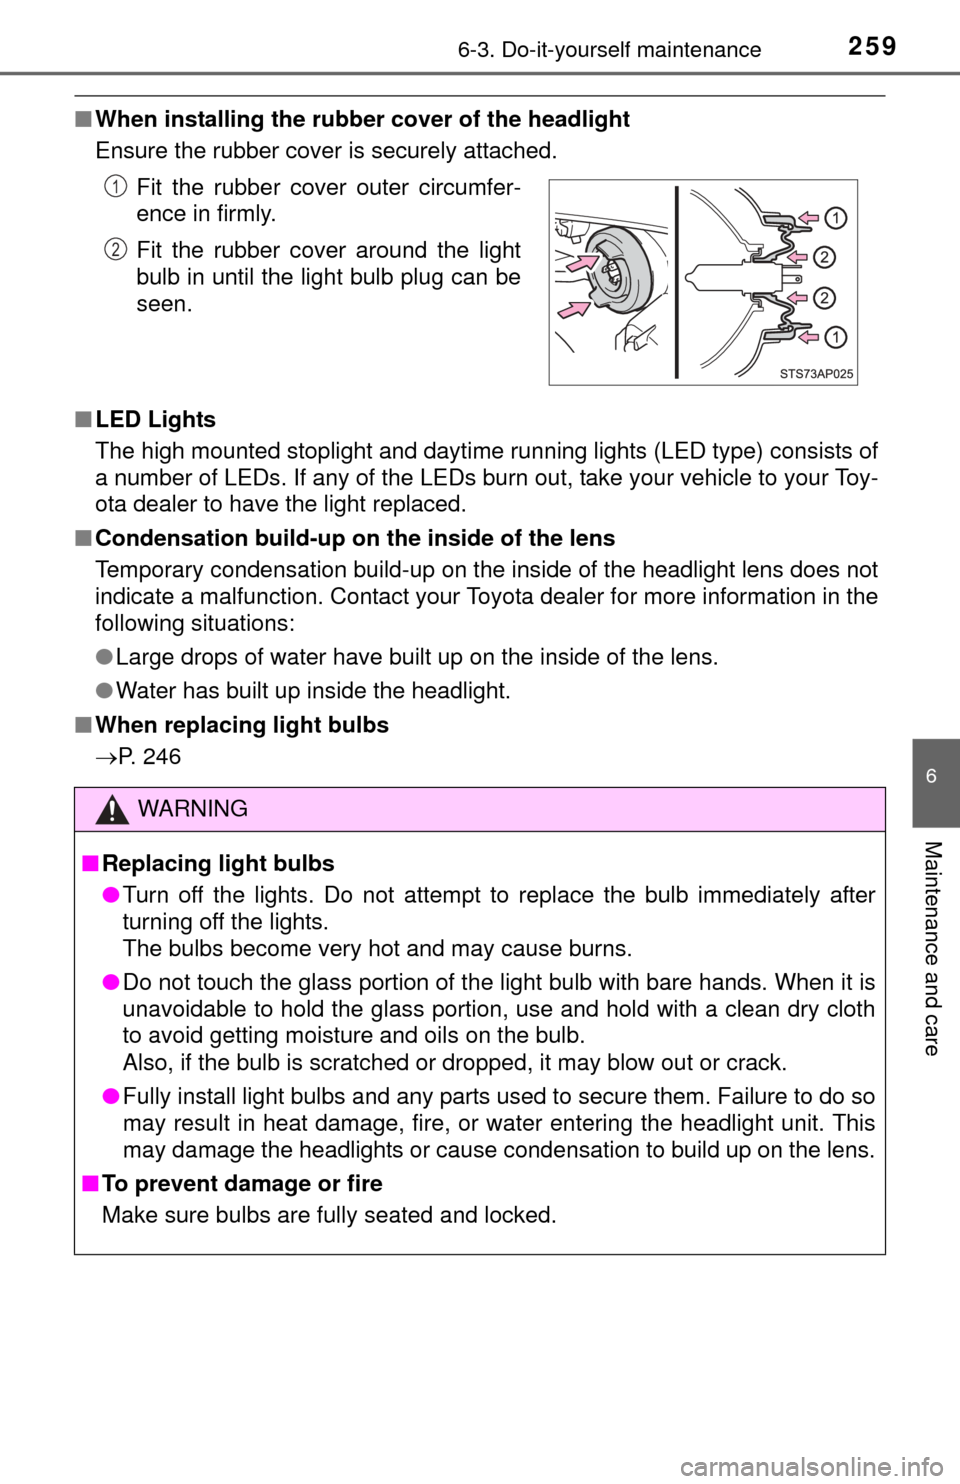
■When installing the rubber cover of the headlight
Ensure the rubber cover is securely attached.
■ LED Lights
The high mounted stoplight and daytime running lights (LED type) consists of
a number of LEDs. If any of the LEDs burn out, take your vehicle to your Toy-
ota dealer to have the light replaced.
■ Condensation build-up on the inside of the lens
Temporary condensation build-up on the inside of the headlight lens does not
indicate a malfunction. Contact your Toyota dealer for more information in the
following situations:
●Large drops of water have built up on the inside of the lens.
● Water has built up inside the headlight.
■ When replacing light bulbs
P. 246 Fit the rubber cover outer circumfer-
ence in firmly.
Fit the rubber cover around the light
bulb in until the light bulb plug can be
seen.
WARNING
■
Replacing light bulbs
● Turn off the lights. Do not attempt to replace the bulb immediately after
turning off the lights.
The bulbs become very hot and may cause burns.
● Do not touch the glass portion of the light bulb with bare hands. When it is
unavoidable to hold the glass portion, use and hold with a clean dry cloth
to avoid getting moisture and oils on the bulb.
Also, if the bulb is scratched or dropped, it may blow out or crack.
● Fully install light bulbs and any parts used to secure them. Failure to do so
may result in heat damage, fire, or water entering the headlight unit. This
may damage the headlights or cause condensation to build up on the lens.
■ To prevent damage or fire
Make sure bulbs are fully seated and locked.
1
2
Page 316 of 364
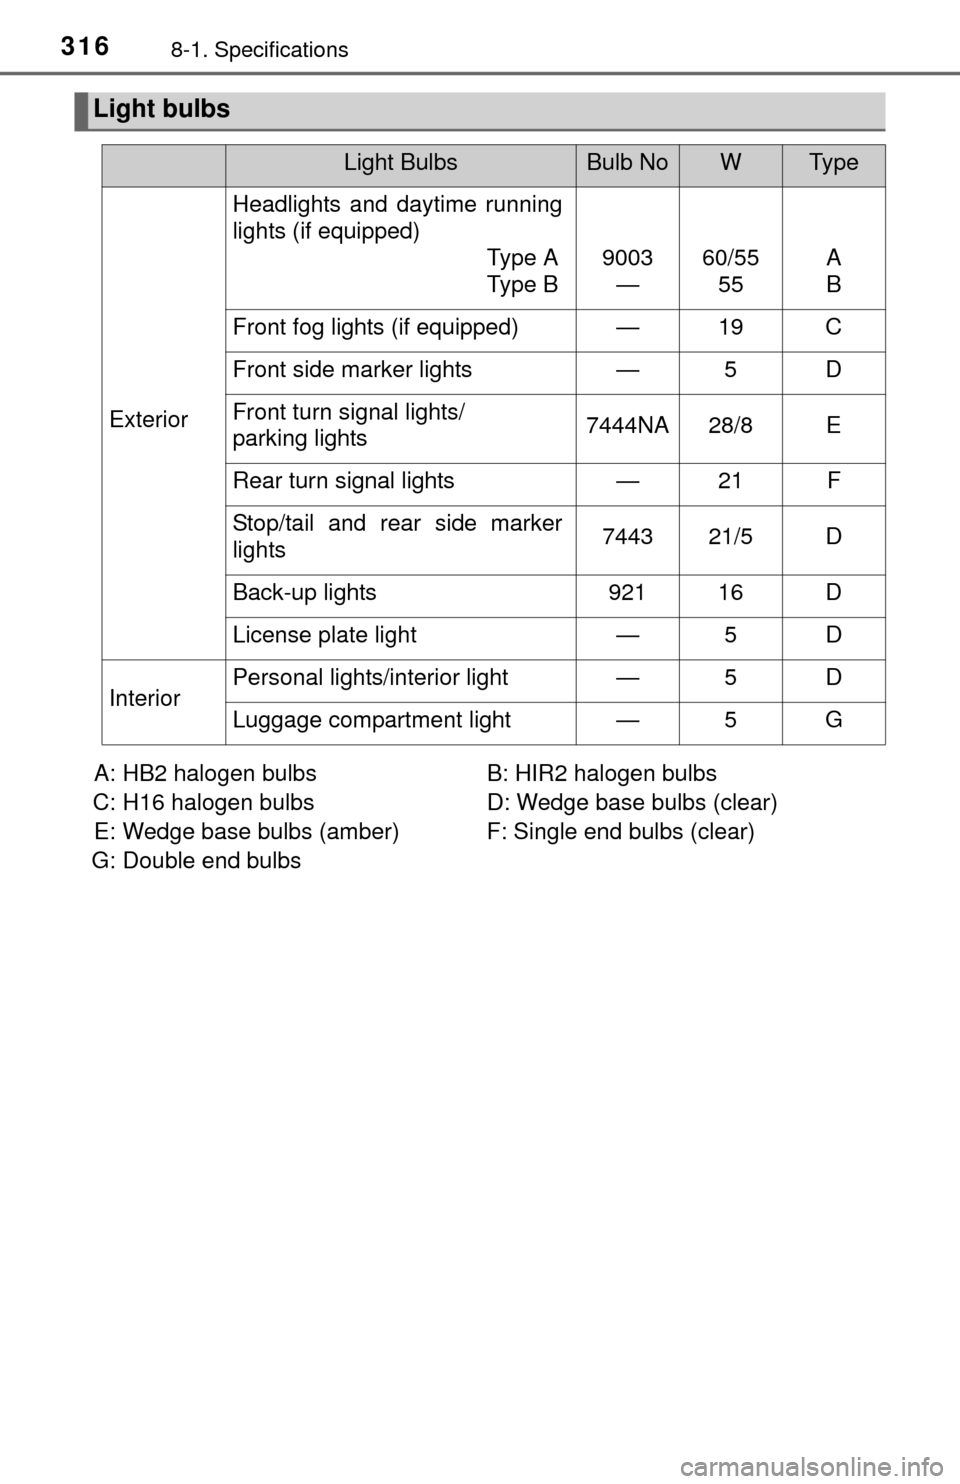
3168-1. Specifications
A: HB2 halogen bulbs B: HIR2 halogen bulbs
C: H16 halogen bulbs D: Wedge base bulbs (clear)
E: Wedge base bulbs (amber) F: Single end bulbs (clear)
G: Double end bulbs
Light bulbs
Light BulbsBulb NoWTy p e
Exterior Headlights and daytime running
lights (if equipped)
Type A
Type B9003
— 60/55
55 A
B
Front fog lights (if equipped) — 19 C
Front side marker lights — 5 D
Front turn signal lights/
parking lights 7444NA 28/8 E
Rear turn signal lights — 21 F
Stop/tail and rear side marker
lights 7443 21/5 D
Back-up lights 921 16 D
License plate light — 5 D
Interior
Personal lights/interior light —5D
Luggage compartment light —5G
Page 355 of 364
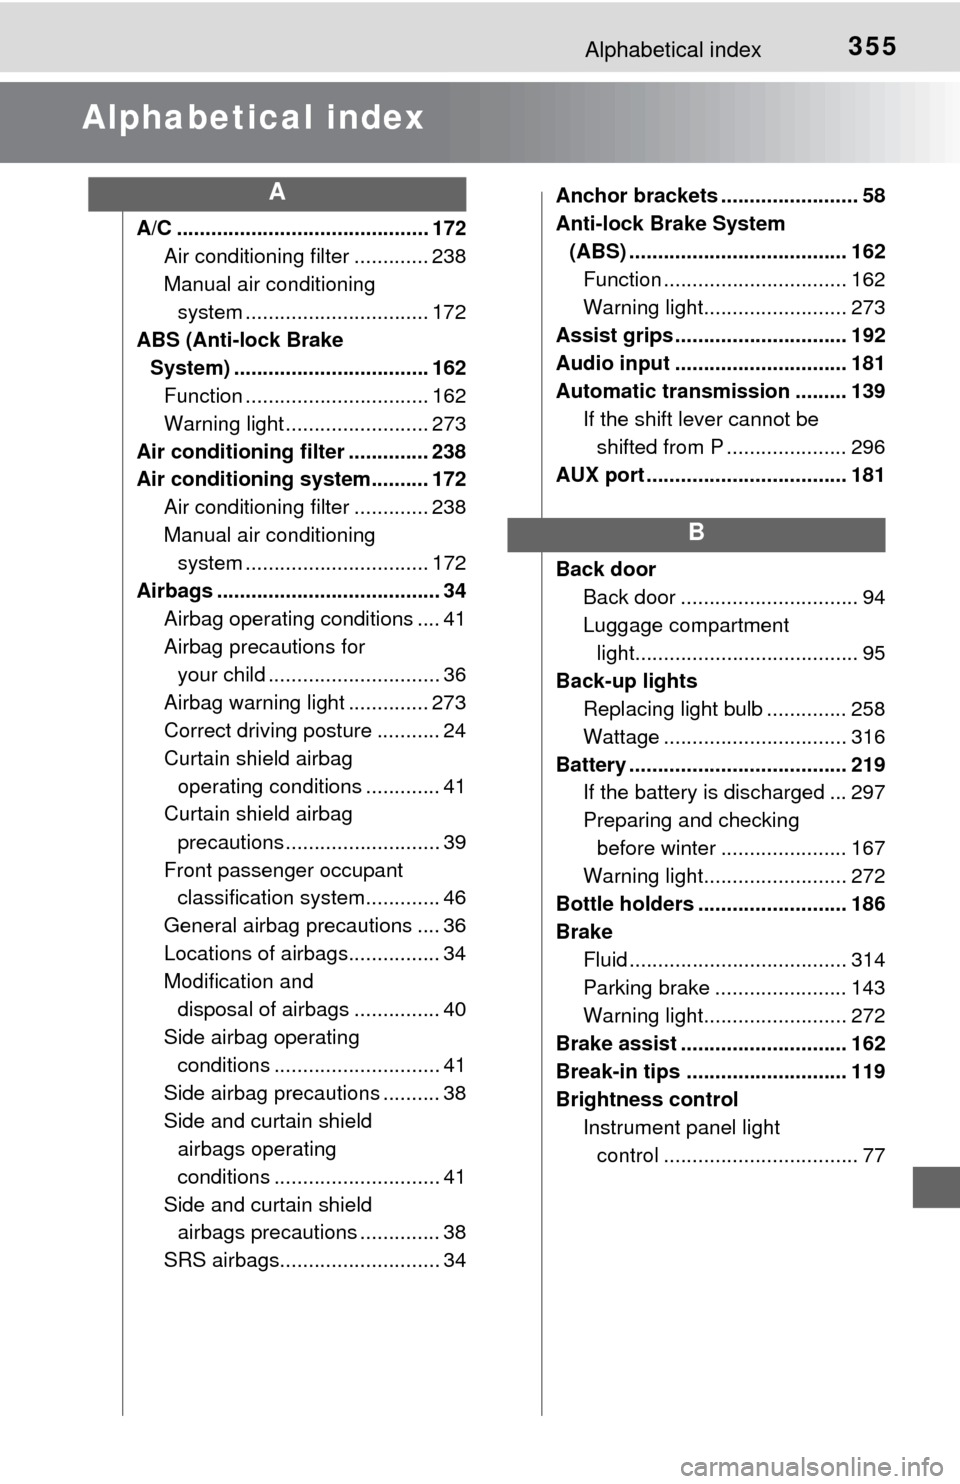
355Alphabetical index
Alphabetical index
A/C ............................................ 172Air conditioning filter ............. 238
Manual air conditioning system ......... ....................... 172
ABS (Anti-lock Brake System) .................................. 162 Function ................................ 162
Warning light ......................... 273
Air conditioning filter .............. 238
Air conditioning system.......... 172 Air conditioning filter ............. 238
Manual air conditioning system ......... ....................... 172
Airbags ....................................... 34 Airbag operating conditions .... 41
Airbag precautions for your child .............................. 36
Airbag warning light .............. 273
Correct driving posture ........... 24
Curtain shield airbag operating conditions ............. 41
Curtain shield airbag
precautions ........................... 39
Front passenger occupant classification syst em............. 46
General airbag precautions .... 36
Locations of airbags................ 34
Modification and disposal of airbags ............... 40
Side airbag operating conditions ............................. 41
Side airbag precautions .......... 38
Side and curtain shield airbags operating
conditions ............................. 41
Side and curtain shield airbags precautions .............. 38
SRS airbags............................ 34 Anchor brackets ........................ 58
Anti-lock Brake System
(ABS) ...................................... 162
Function ................................ 162
Warning light......................... 273
Assist grips .............................. 192
Audio input .............................. 181
Automatic transmission ......... 139 If the shift lever cannot be shifted from P ..................... 296
AUX port ................................... 181
Back door Back door ............................... 94
Luggage compartment light....................................... 95
Back-up lights Replacing light bulb .............. 258
Wattage ................................ 316
Battery ...................................... 219 If the battery is discharged ... 297
Preparing and checking
before winter ...................... 167
Warning light......................... 272
Bottle holders .......................... 186
Brake Fluid ...................................... 314
Parking brake ....................... 143
Warning light......................... 272
Brake assist ............................. 162
Break-in tips ............................ 119
Brightness control Instrument panel light
control .................................. 77
A
B