TOYOTA YARIS 2020 Owners Manual
Manufacturer: TOYOTA, Model Year: 2020, Model line: YARIS, Model: TOYOTA YARIS 2020Pages: 692, PDF Size: 68.71 MB
Page 591 of 692
5918-2. Steps to take in an emergency
8
When trouble arises
YARIS_F_OM_Europe_OM52A54E
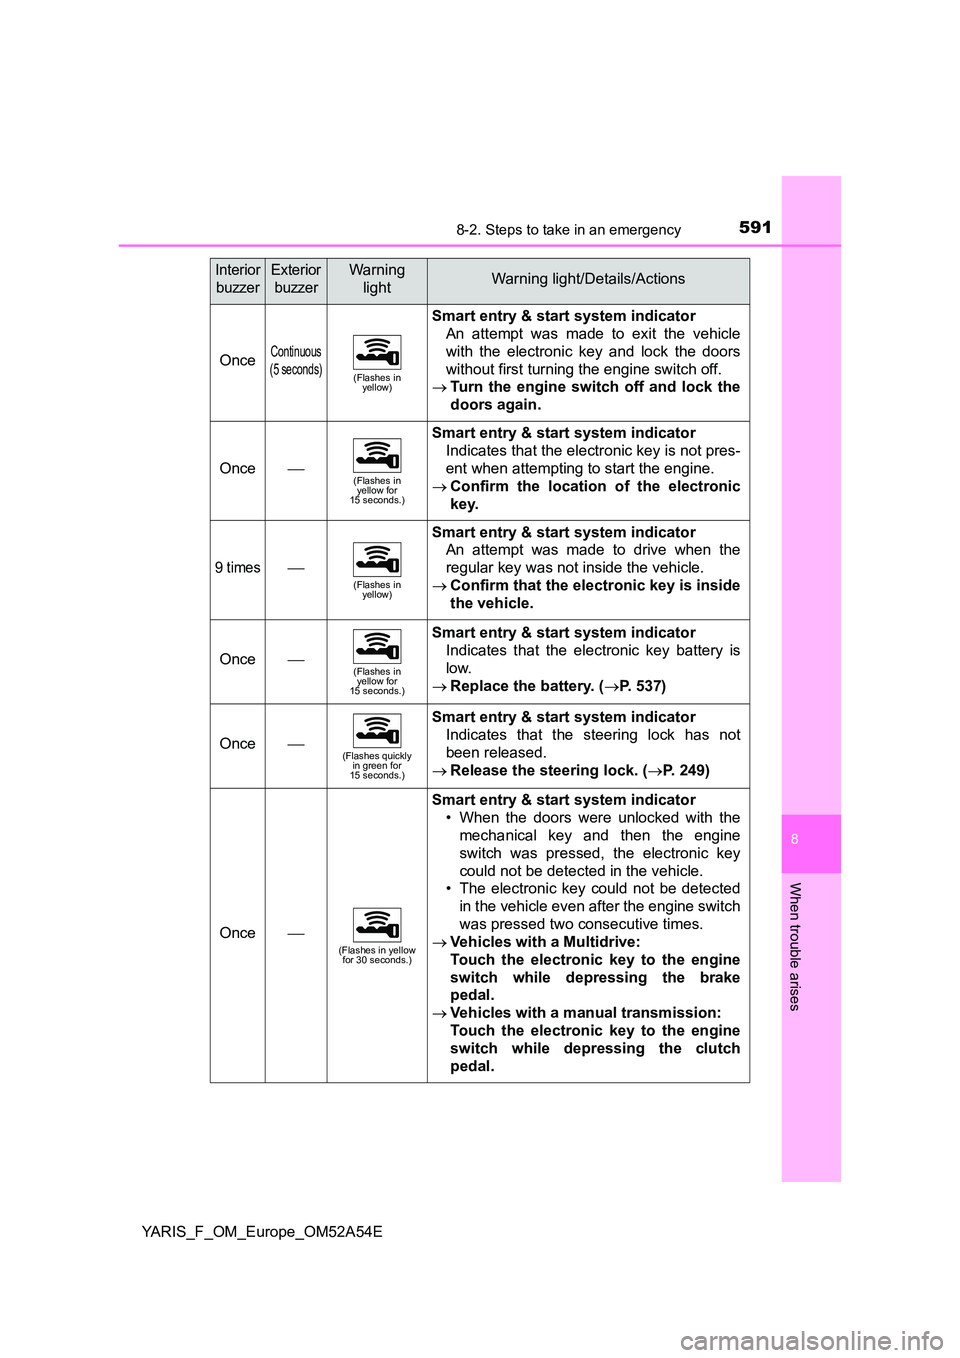
OnceContinuous
(5 seconds)(Flashes in yellow)
Smart entry & start system indicator
An attempt was made to exit the vehicle
with the electronic key and lock the doors
without first turning the engine switch off.
Turn the engine switch off and lock the
doors again.
Once(Flashes in yellow for 15 seconds.)
Smart entry & start system indicator
Indicates that the electronic key is not pres-
ent when attempting to start the engine.
Confirm the location of the electronic
key.
9 times(Flashes in yellow)
Smart entry & start system indicator
An attempt was made to drive when the
regular key was not inside the vehicle.
Confirm that the electronic key is inside
the vehicle.
Once(Flashes in yellow for 15 seconds.)
Smart entry & start system indicator
Indicates that the electronic key battery is
low.
Replace the battery. (P. 537)
Once(Flashes quickly in green for 15 seconds.)
Smart entry & start system indicator
Indicates that the steering lock has not
been released.
Release the steering lock. (P. 249)
Once(Flashes in yellow for 30 seconds.)
Smart entry & start system indicator
• When the doors were unlocked with the
mechanical key and then the engine
switch was pressed, the electronic key
could not be detected in the vehicle.
• The electronic key could not be detected
in the vehicle even after the engine switch
was pressed two consecutive times.
Vehicles with a Multidrive:
Touch the electronic key to the engine
switch while depressing the brake
pedal.
Vehicles with a manual transmission:
Touch the electronic key to the engine
switch while depressing the clutch
pedal.
Interior
buzzer
Exterior
buzzer
Warning
lightWarning light/Details/Actions
Page 592 of 692
5928-2. Steps to take in an emergency
YARIS_F_OM_Europe_OM52A54E
If a warning message is displayed (vehicles
with color display)
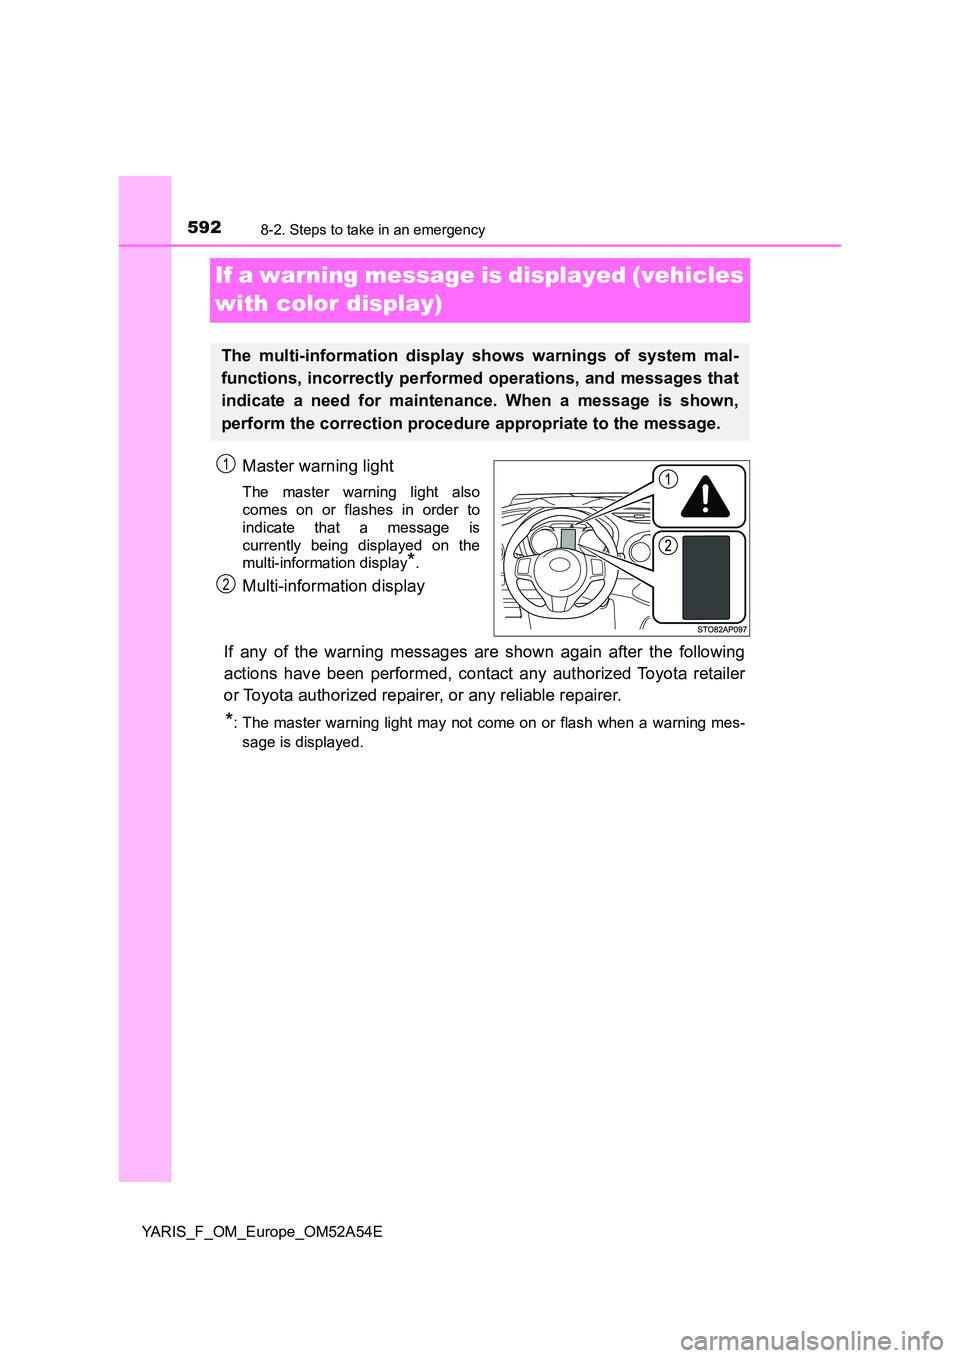
Master warning light
The master warning light also
comes on or flashes in order to
indicate that a message is
currently being displayed on the
multi-information display*.
Multi-information display
If any of the warning messages are shown again after the following
actions have been performed, contact any authorized Toyota retailer
or Toyota authorized repairer, or any reliable repairer.
*: The master warning light may not come on or flash when a warning mes-
sage is displayed.
The multi-information display shows warnings of system mal-
functions, incorrectly performed operations, and messages that
indicate a need for maintenance. When a message is shown,
perform the correction procedure appropriate to the message.
1
2
Page 593 of 692
5938-2. Steps to take in an emergency
8
When trouble arises
YARIS_F_OM_Europe_OM52A54E
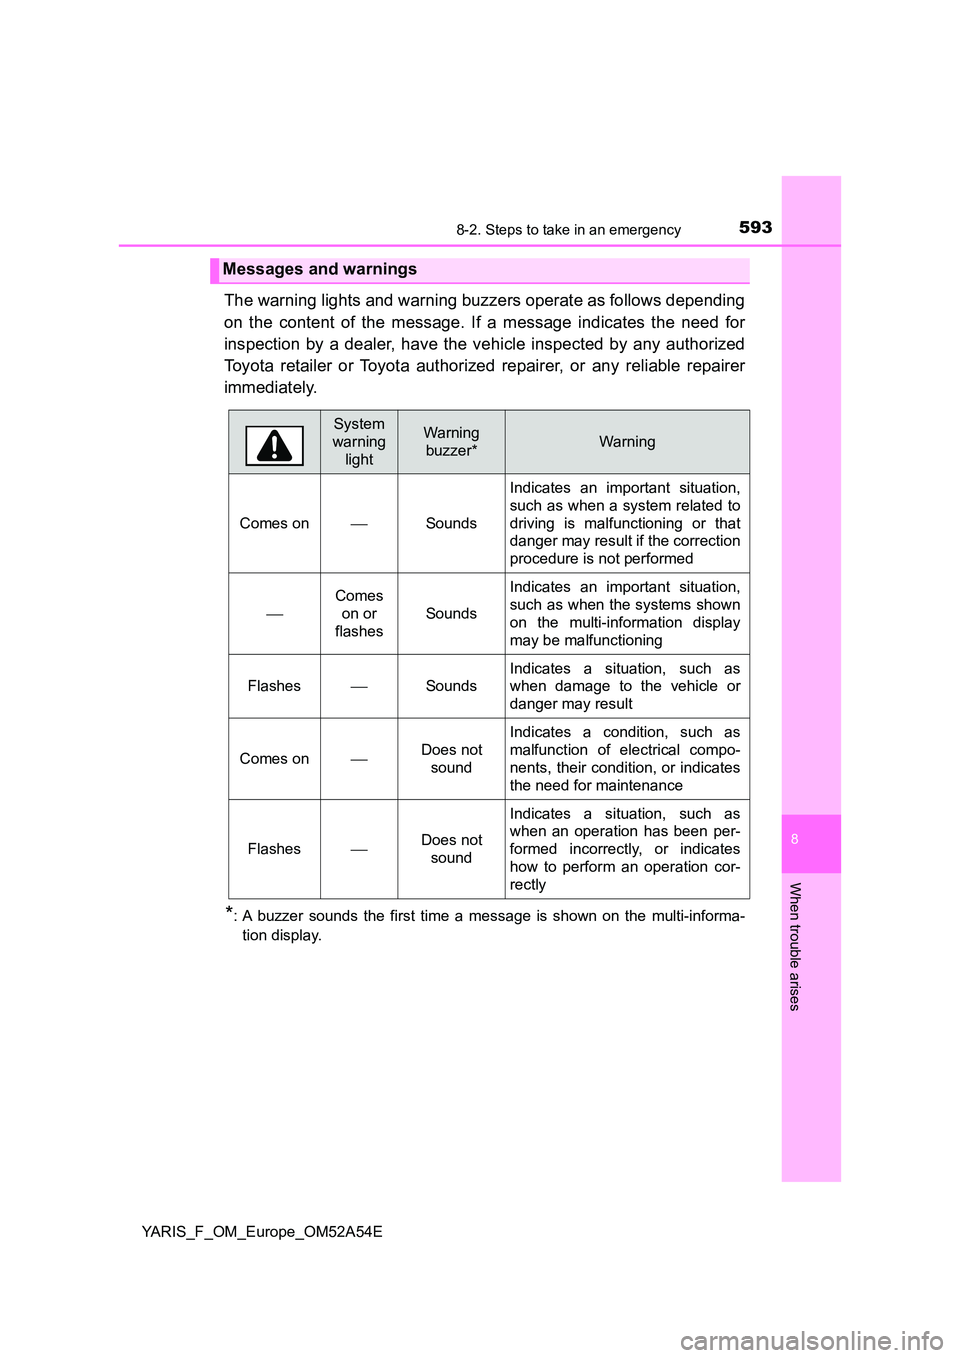
The warning lights and warning buzzers operate as follows depending
on the content of the message. If a message indicates the need for
inspection by a dealer, have the vehicle inspected by any authorized
Toyota retailer or Toyota authorized repairer, or any reliable repairer
immediately.
*: A buzzer sounds the first time a message is shown on the multi-informa-
tion display.
Messages and warnings
System
warning
light
Warning
buzzer*Warning
Comes on Sounds
Indicates an important situation,
such as when a system related to
driving is malfunctioning or that
danger may result if the correction
procedure is not performed
Comes
on or
flashes
Sounds
Indicates an important situation,
such as when the systems shown
on the multi-information display
may be malfunctioning
FlashesSounds
Indicates a situation, such as
when damage to the vehicle or
danger may result
Comes onDoes not
sound
Indicates a condition, such as
malfunction of electrical compo-
nents, their condition, or indicates
the need for maintenance
FlashesDoes not
sound
Indicates a situation, such as
when an operation has been per-
formed incorrectly, or indicates
how to perform an operation cor-
rectly
Page 594 of 692
5948-2. Steps to take in an emergency
YARIS_F_OM_Europe_OM52A54E
■Warning messages
The warning messages explained below may differ from the actual
messages according to operation conditions and vehicle specifica-
tions.
■If “Visit your dealer” is shown
The system or part shown on the multi-information display is mal-
functioning.
Have the vehicle inspected by any authorized Toyota retailer or
Toyota authorized repairer, or any reliable repairer.
■If a message about an operation is shown
● If a message about an operation of the engine switch is shown
An instruction for operation of the engine switch is shown when the
incorrect procedure for starting the engine is performed or the
engine switch is operated incorrectly. Follow the instructions shown
on the multi-information display to operate the engine switch again.
● If a message about a shift lever operation is shown
To prevent the shift lever from being operated incorrectly or the
vehicle from moving unexpectedly, a message that requires shifting
the shift lever may be shown on the multi-information display. In
that case, follow the instruction of the message and shift the shift
lever.
● If a message or image about an open/close state of a part or
replenishment of a consumable is shown
Confirm the part indicated by the multi-information display or a
warning light, and then perform the coping method such as closing
the open door or replenishing a consumable.
■If “Charging system malfunction. Stop in a safe place. See
owner's manual.” is shown
Indicates a malfunction in the vehicle’s charging system. Immedi-
ately stop the vehicle in a safe place and contact any authorized
Toyota retailer or Toyota authorized repairer, or any reliable
repairer. Continuing to drive the vehicle may be dangerous.
Page 595 of 692
5958-2. Steps to take in an emergency
8
When trouble arises
YARIS_F_OM_Europe_OM52A54E
■If “Engine oil pressure low” is shown
Indicates that the engine oil pressure is too low. Immediately stop
the vehicle in a safe place and contact any authorized Toyota
retailer or Toyota authorized repairer, or any reliable repairer.
■If “Engine oil low” is shown
Indicates that the engine oil level may be low. Check the engine oil
level and add oil if necessary.
■If “Front camera unavailable.” or “Front camera vision
blocked. Clean and demist windshield.” is displayed.
The following systems may be suspended until the problem shown
in the message is resolved.
● PCS (Pre-Crash Safety system)*
●LDA (Lane Departure Alert)*
●Automatic High Beam*
●RSA (Road Sign Assist)*
*: If equipped
■Warning buzzer
P. 5 8 7
Page 596 of 692
5968-2. Steps to take in an emergency
YARIS_F_OM_Europe_OM52A54E
If you have a flat tire (vehicles with an
emergency tire puncture repair kit)
Your vehicle is not equipped with a spare tire, but instead is
equipped with an emergency tire puncture repair kit.
A puncture caused by a nail or screw passing through the tire
tread can be repaired temporarily using the emergency tire
puncture repair kit. (The kit contains a bottle of sealant. The
sealant can be used only once to temporarily repair one tire
without removing the nail or screw from the tire.) Depending on
the damage, this kit cannot be used to repair the tire. ( P. 598)
After temporarily repairing the tire with the kit, have the tire
repaired or replaced by any authorized Toyota retailer or Toyota
authorized repairer, or any reliable repairer. Repairs conducted
using the emergency tire puncture repair kit are only a tempo-
rary measure. Have the tire repaired and replaced as soon as
possible.
WARNING
■ If you have a flat tire
Do not continue driving with a flat tire.
Driving even a short distance with a flat tire can damage the tire and the
wheel beyond repair, which could result in an accident.
Page 597 of 692
5978-2. Steps to take in an emergency
8
When trouble arises
YARIS_F_OM_Europe_OM52A54E
●Stop the vehicle in a safe place on a hard, flat surface.
● Set the parking brake.
● Shift the shift lever to P (Multidrive) or N (manual transmission).
● Stop the engine.
● Turn on the emergency flashers. (P. 568)
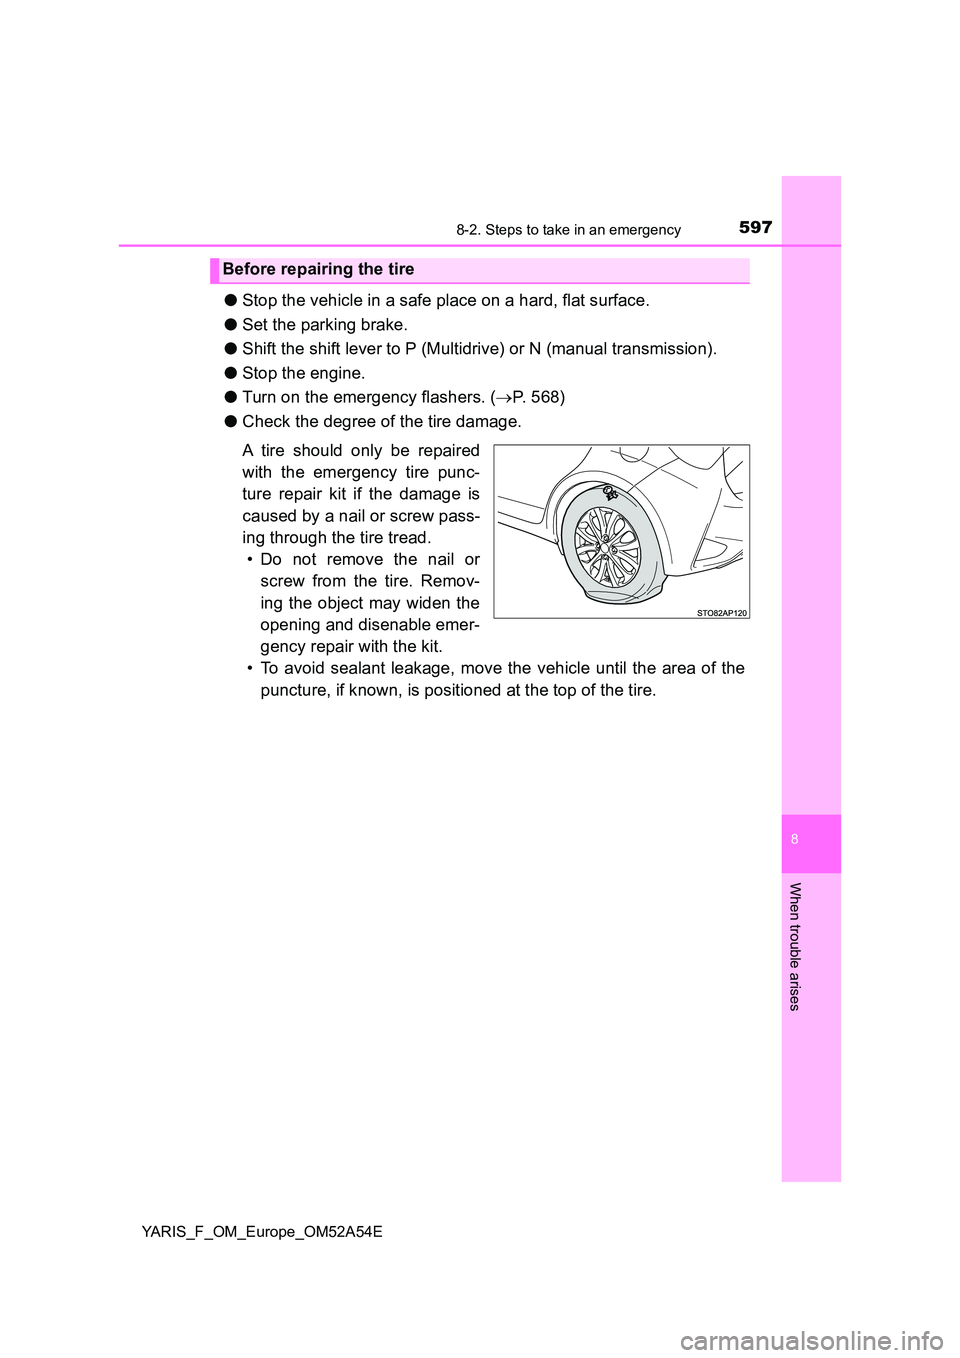
● Check the degree of the tire damage.
A tire should only be repaired
with the emergency tire punc-
ture repair kit if the damage is
caused by a nail or screw pass-
ing through the tire tread.
• Do not remove the nail or
screw from the tire. Remov-
ing the object may widen the
opening and disenable emer-
gency repair with the kit.
• To avoid sealant leakage, move the vehicle until the area of the
puncture, if known, is positioned at the top of the tire.
Before repairing the tire
Page 598 of 692
5988-2. Steps to take in an emergency
YARIS_F_OM_Europe_OM52A54E
■A flat tire that cannot be repaired with the emergency tire puncture repair
kit
In the following cases, the tire c annot be repaired with the emergency tire
puncture repair kit. Contact any authorized Toyota retailer or Toyota autho-
rized repairer, or any reliable repairer.
● When the tire is damaged due to driving without sufficient air pressure
● When there are any cracks or damage at any location on the tire, such as on
the side wall, except the tread
● When the tire is visibly separated from the wheel
● When the cut or damage to the tread is 4 mm (0.16 in.) long or more
● When the wheel is damaged
● When two or more tires have been punctured
● When more than 2 sharp objects such as nails or screws have passed
through the tread on a single tire
● When the sealant has expired
Page 599 of 692
5998-2. Steps to take in an emergency
8
When trouble arises
YARIS_F_OM_Europe_OM52A54E
*: Use of the jack, jack handle and wheel nut wrench. (if equipped) (P. 615)
A jack, jack handle and wheel nut wrench can be purchased at any autho-
rized Toyota retailer or Toyota authorized repairer, or any reliable repairer.
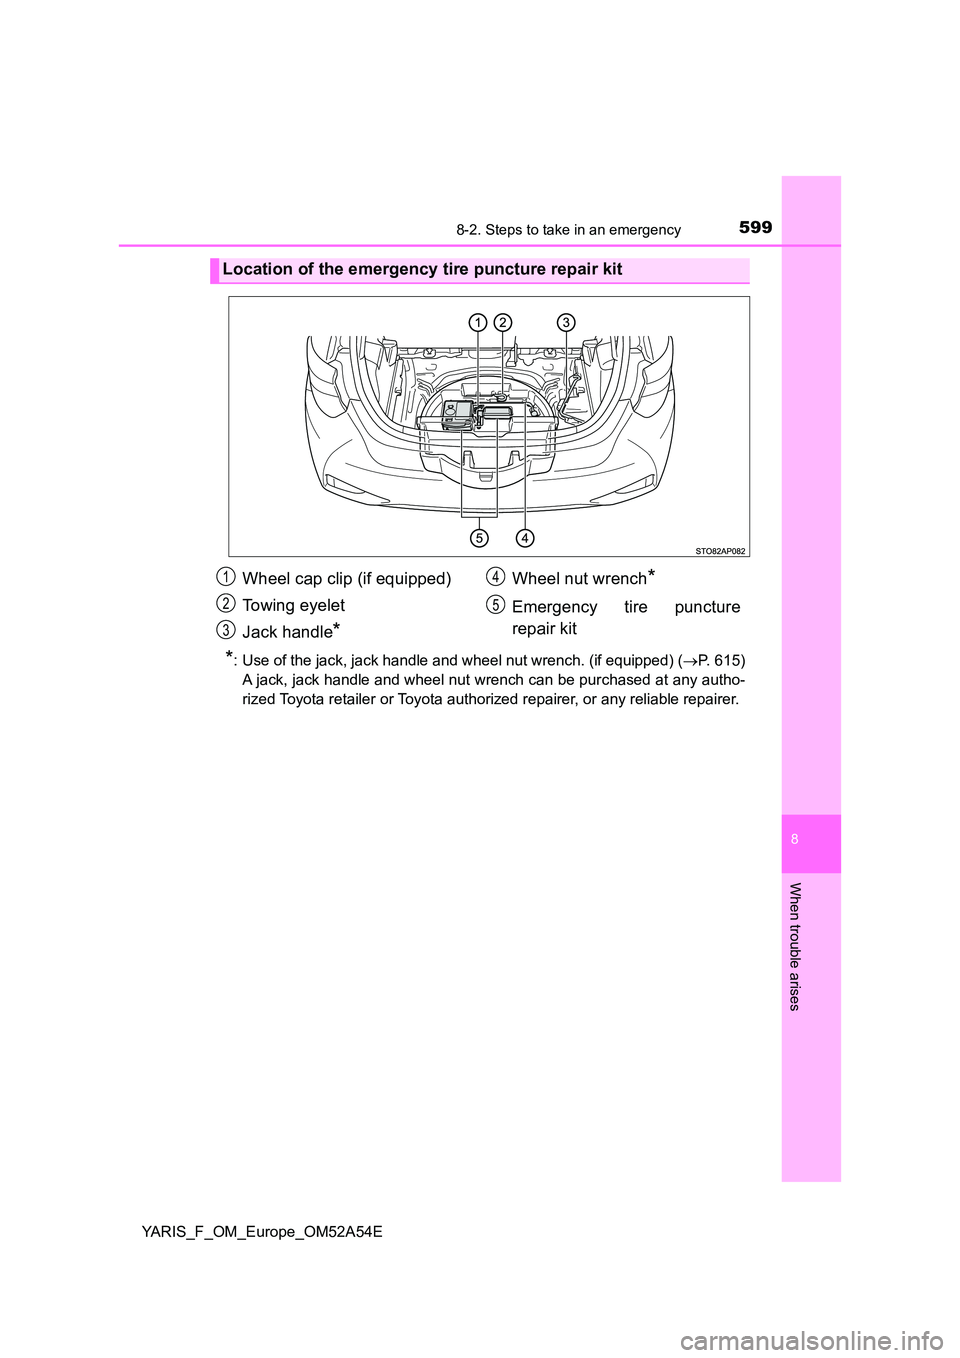
Location of the emergency tire puncture repair kit
Wheel cap clip (if equipped)
Towing eyelet
Jack handle*
Wheel nut wrench*
Emergency tire puncture
repair kit
1
2
3
4
5
Page 600 of 692
6008-2. Steps to take in an emergency
YARIS_F_OM_Europe_OM52A54E
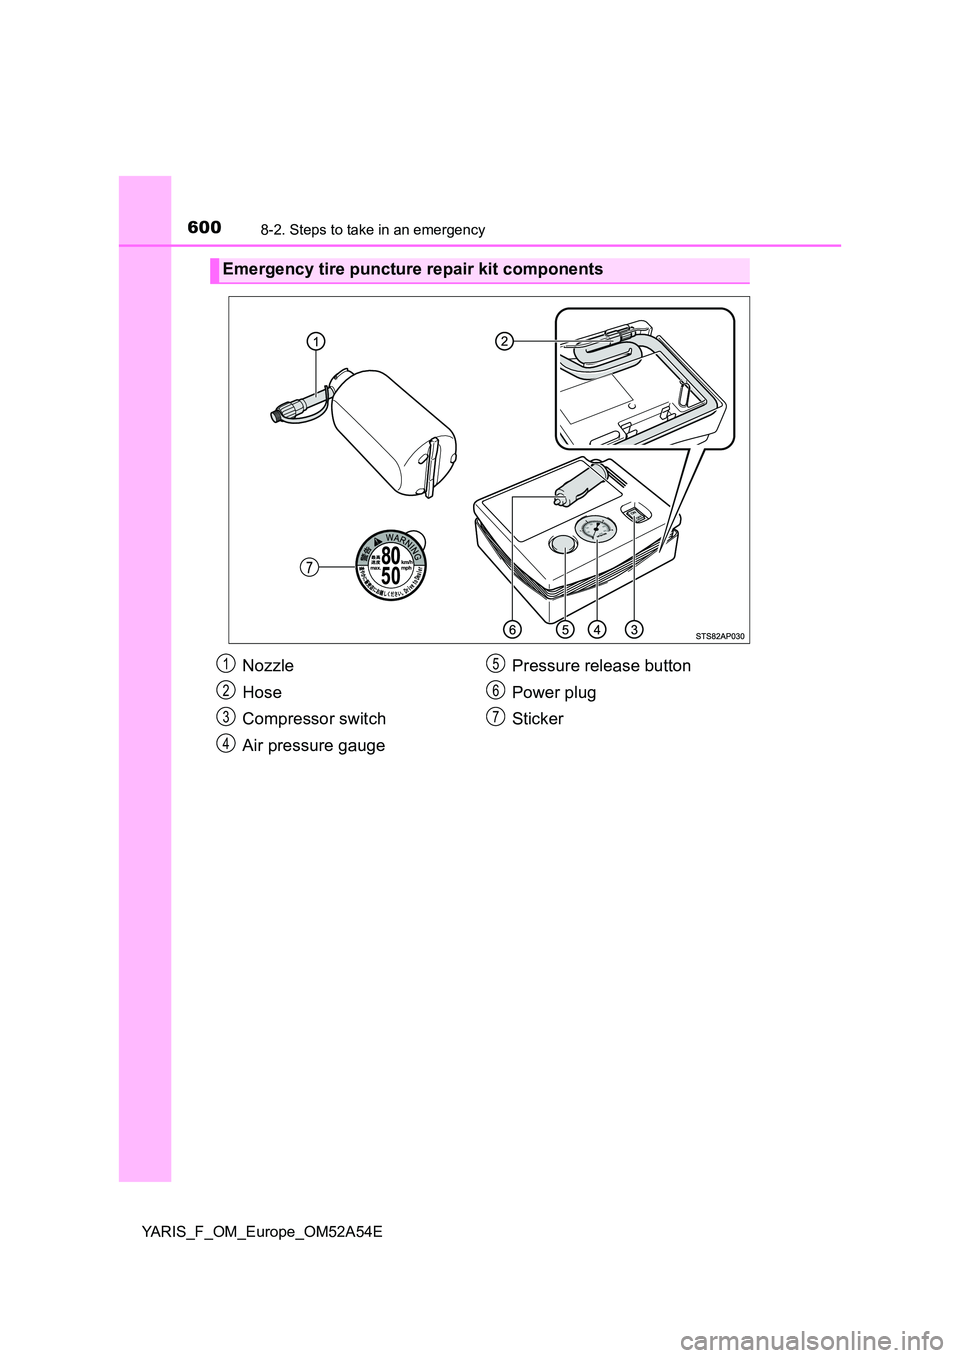
Emergency tire puncture repair kit components
Nozzle
Hose
Compressor switch
Air pressure gauge
Pressure release button
Power plug
Sticker
1
2
3
4
5
6
7