display TOYOTA YARIS HATCHBACK 2018 Owners Manual
[x] Cancel search | Manufacturer: TOYOTA, Model Year: 2018, Model line: YARIS HATCHBACK, Model: TOYOTA YARIS HATCHBACK 2018Pages: 520, PDF Size: 8.69 MB
Page 2 of 520
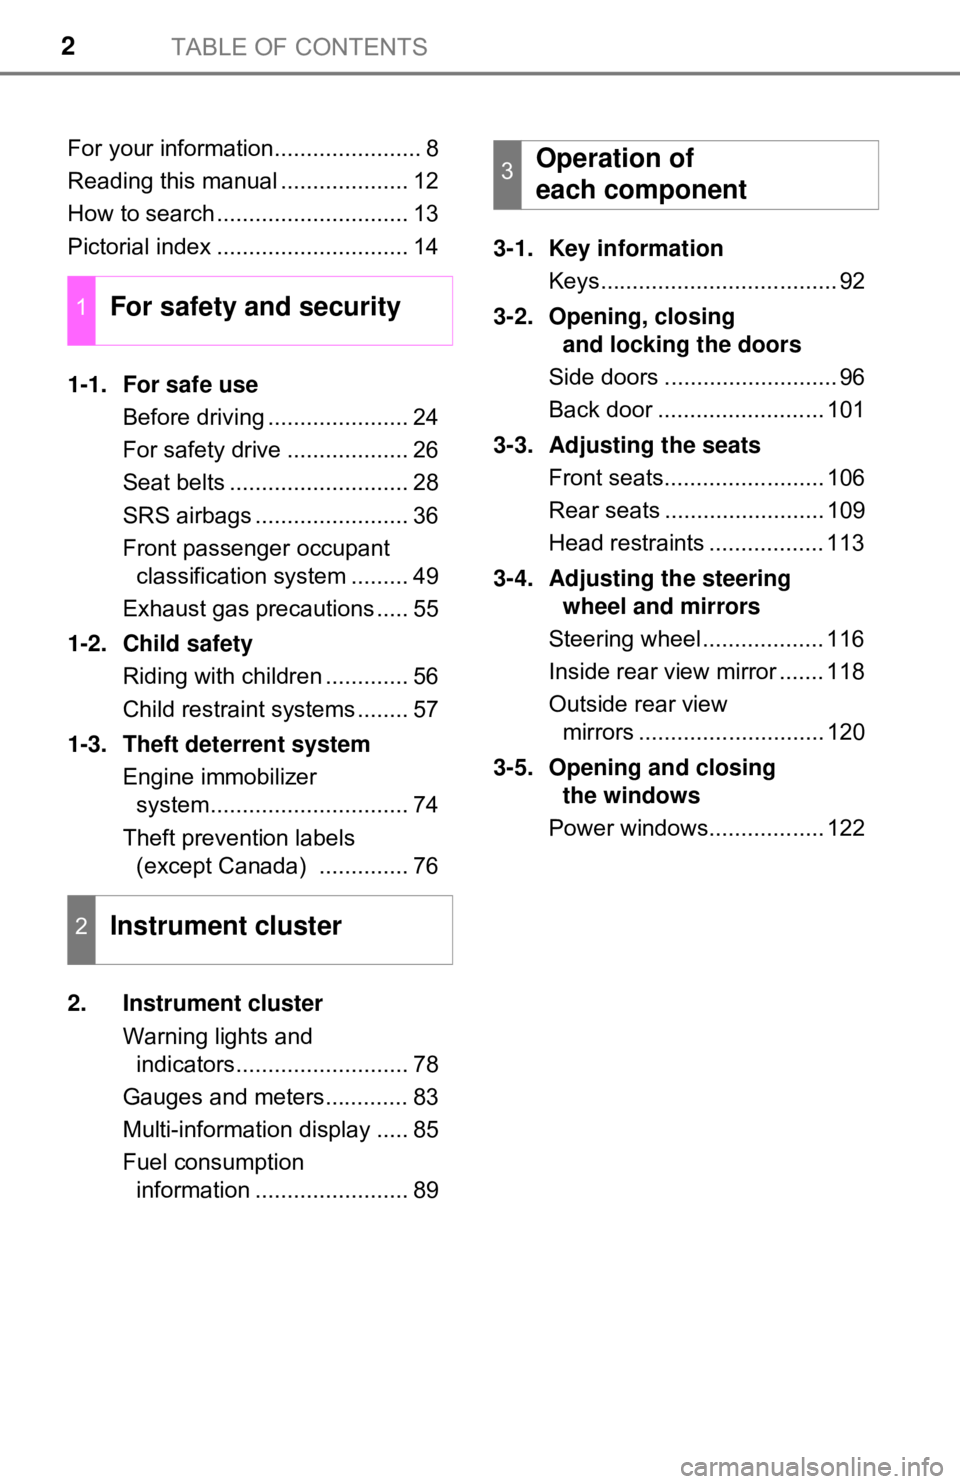
TABLE OF CONTENTS2
For your information....................... 8
Reading this manual .................... 12
How to search .............................. 13
Pictorial index .............................. 14
1-1. For safe useBefore driving ...................... 24
For safety drive ................... 26
Seat belts ............................ 28
SRS airbags ........................ 36
Front passenger occupant classification system ......... 49
Exhaust gas precautions ..... 55
1-2. Child safety Riding with children ............. 56
Child restraint systems ........ 57
1-3. Theft deterrent system Engine immobilizer system............................... 74
Theft prevention labels (except Canada) .............. 76
2. Instrument cluster Warning lights and indicators........................... 78
Gauges and meters............. 83
Multi-information display ..... 85
Fuel consumption information ........................ 89 3-1. Key information
Keys..................................... 92
3-2. Opening, closing and locking the doors
Side doors ........................... 96
Back door .......................... 101
3-3. Adjusting the seats Front seats......................... 106
Rear seats ......................... 109
Head restraints .................. 113
3-4. Adjusting the steering wheel and mirrors
Steering wheel ................... 116
Inside rear view mirror ....... 118
Outside rear view mirrors ............................. 120
3-5. Opening and closing the windows
Power windows.................. 122
1For safety and security
2Instrument cluster
3Operation of
each component
Page 4 of 520

TABLE OF CONTENTS4
5-1. Basic OperationsAudio system types ........... 228
Audio system..................... 229
Steering wheel audio switches .......................... 231
USB port/AUX port ............ 232
Basic audio operations ...... 233
5-2. Setup Setup menu ....................... 235
General settings ................ 236
Audio settings.................... 238
Display settings ................. 239
Voice settings .................... 240
5-3. Using the multimedia system
Selecting the audio source ............................. 241
List screen operation ......... 242
Optimal use of the multimedia system .......... 244
5-4. Using the radio Radio operation ................. 245
5-5. Playing an audio CD and MP3/WMA/AAC discs
CD player operation .......... 247 5-6. Using an external device
Listening to an iPod ........... 253
Listening to a USB memory device ................ 257
Using the AUX port ............ 262
5-7. Connecting Bluetooth
®
Preparations to use wireless
communication ................ 263
Registering a Bluetooth
®
audio player
for the first time................ 267
Registering a Bluetooth
®
phone for the first time .... 268
Registering a Bluetooth
®
device .............................. 269
Connecting a Bluetooth
®
device .............................. 271
Displaying a Bluetooth
®
device details................... 273
Detailed Bluetooth
®
system settings................ 274
5-8. Bluetooth
® audio
Listening to Bluetooth®
audio................................ 276
5Multimedia system
Page 17 of 520
17Pictorial index
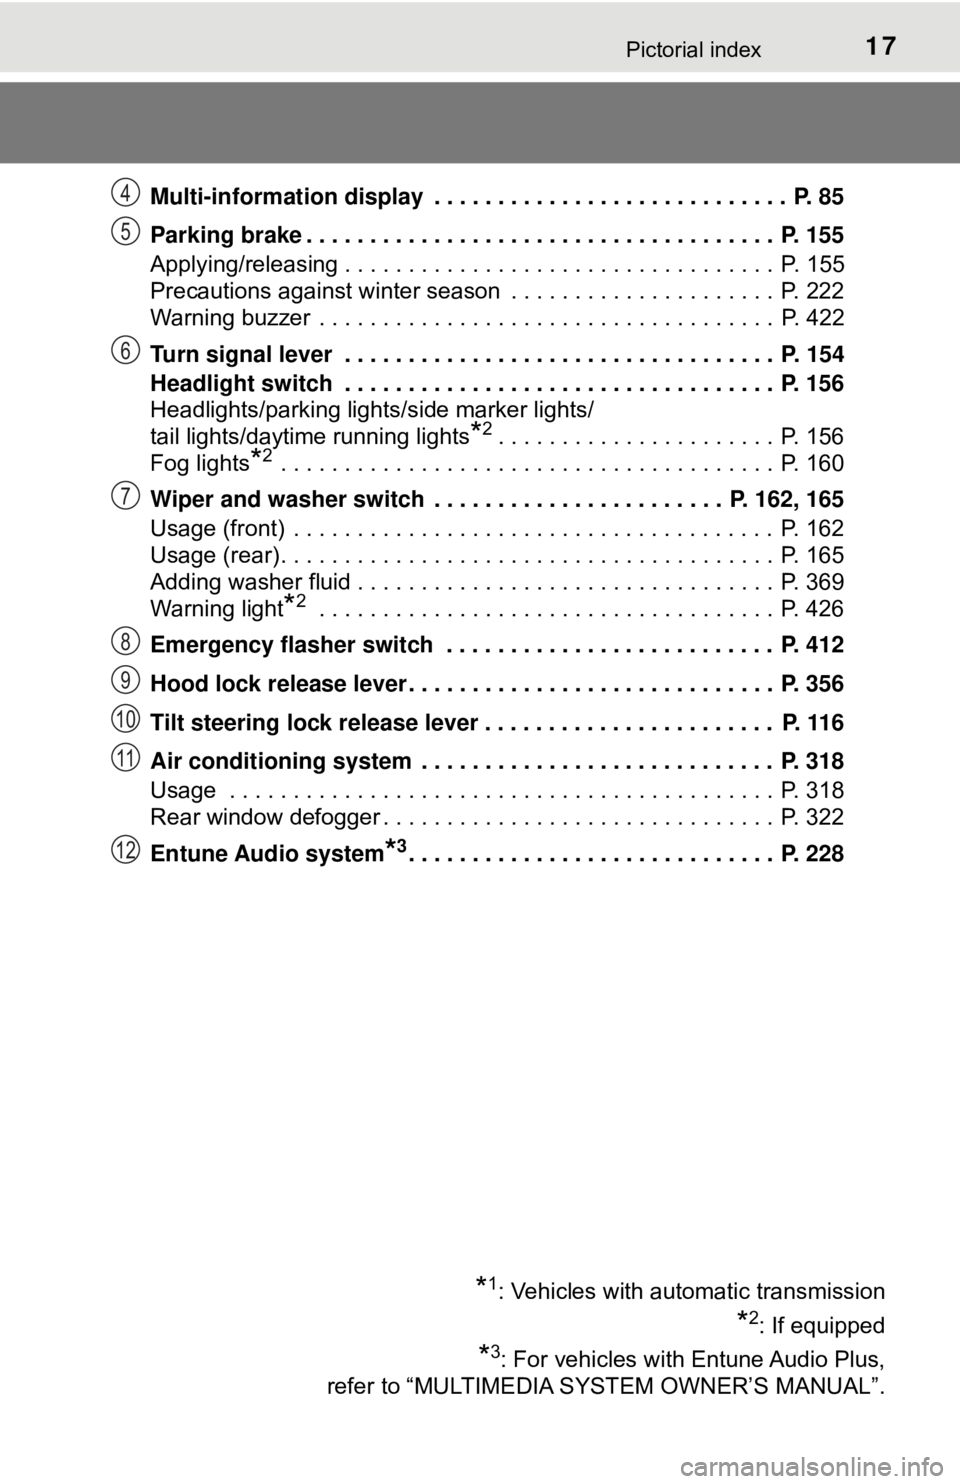
Multi-information display . . . . . . . . . . . . . . . . . . . . . . . . . . . . P. 85
Parking brake . . . . . . . . . . . . . . . . . . . . . . . . . . . . . . . . . . . . . P. 155
Applying/releasing . . . . . . . . . . . . . . . . . . . . . . . . . . . . . . . . . . P. 155
Precautions against winter season . . . . . . . . . . . . . . . . . . . . . P. 222
Warning buzzer . . . . . . . . . . . . . . . . . . . . . . . . . . . . . . . . . . . . P. 422
Turn signal lever . . . . . . . . . . . . . . . . . . . . . . . . . . . . . . . . . . P. 154
Headlight switch . . . . . . . . . . . . . . . . . . . . . . . . . . . . . . . . . . P. 156
Headlights/parking lights/side marker lights/
tail lights/daytime running lights
*2. . . . . . . . . . . . . . . . . . . . . . P. 156
Fog lights
*2 . . . . . . . . . . . . . . . . . . . . . . . . . . . . . . . . . . . . . . . P. 160
Wiper and washer switch . . . . . . . . . . . . . . . . . . . . . . . P. 162, 165
Usage (front) . . . . . . . . . . . . . . . . . . . . . . . . . . . . . . . . . . . . . . P. 162
Usage (rear) . . . . . . . . . . . . . . . . . . . . . . . . . . . . . . . . . . . . . . . P. 165
Adding washer fluid . . . . . . . . . . . . . . . . . . . . . . . . . . . . . . . . . P. 369
Warning light
*2 . . . . . . . . . . . . . . . . . . . . . . . . . . . . . . . . . . . . P. 426
Emergency flasher switch . . . . . . . . . . . . . . . . . . . . . . . . . . P. 412
Hood lock release lever. . . . . . . . . . . . . . . . . . . . . . . . . . . . . P. 356
Tilt steering lock release lever . . . . . . . . . . . . . . . . . . . . . . . P. 116
Air conditioning system . . . . . . . . . . . . . . . . . . . . . . . . . . . . P. 318
Usage . . . . . . . . . . . . . . . . . . . . . . . . . . . . . . . . . . . . . . . . . . . P. 318
Rear window defogger . . . . . . . . . . . . . . . . . . . . . . . . . . . . . . . P. 322
Entune Audio system
*3. . . . . . . . . . . . . . . . . . . . . . . . . . . . . P. 228
*1: Vehicles with automatic transmission
*2: If equipped
*3: For vehicles with Entune Audio Plus,
refer to “MULTIMEDIA SYSTEM OWNER’S MANUAL”.
4
5
6
7
8
9
10
11
12
Page 69 of 520
691-2. Child safety
1
For safety and security
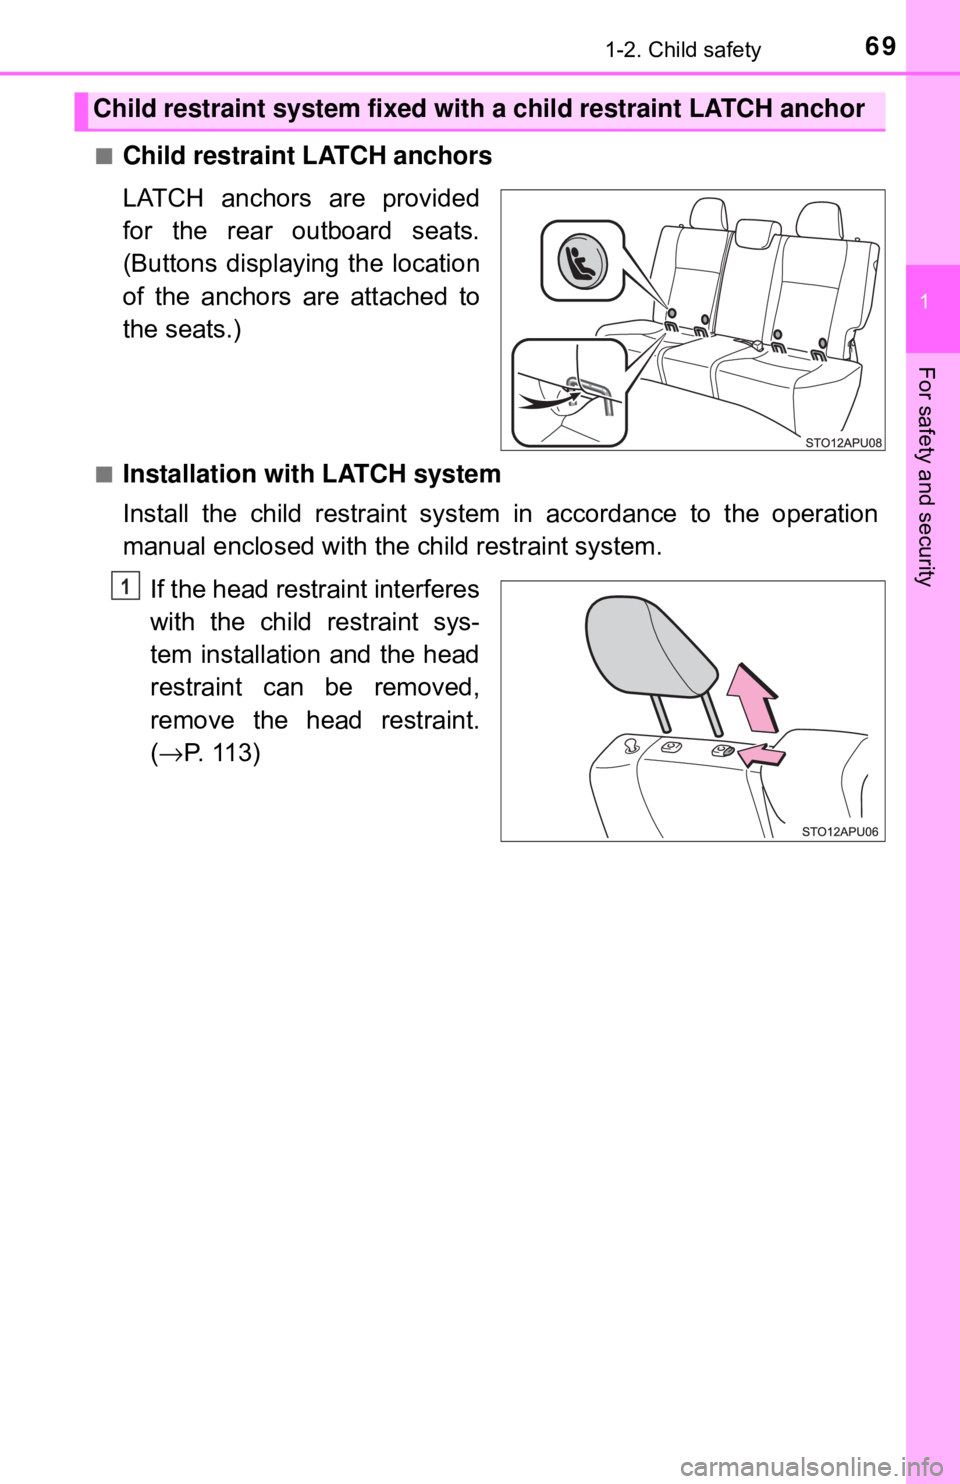
■Child restraint LATCH anchors
LATCH anchors are provided
for the rear outboard seats.
(Buttons displaying the location
of the anchors are attached to
the seats.)
■Installation with LATCH system
Install the child restraint system in accordance to the operation
manual enclosed with the child restraint system.If the head restraint interferes
with the child restraint sys-
tem installation and the head
restraint can be removed,
remove the head restraint.
(→ P. 113)
Child restraint system fixed with a child restraint LATCH anchor
1
Page 77 of 520

77
Instrument cluster2
2. Instrument clusterWarning lights and indicators .......................... 78
Gauges and meters ............ 83
Multi-information display ..... 85
Fuel consumption information ........................ 89
Page 83 of 520
832. Instrument cluster
2
Instrument cluster
Gauges and meters
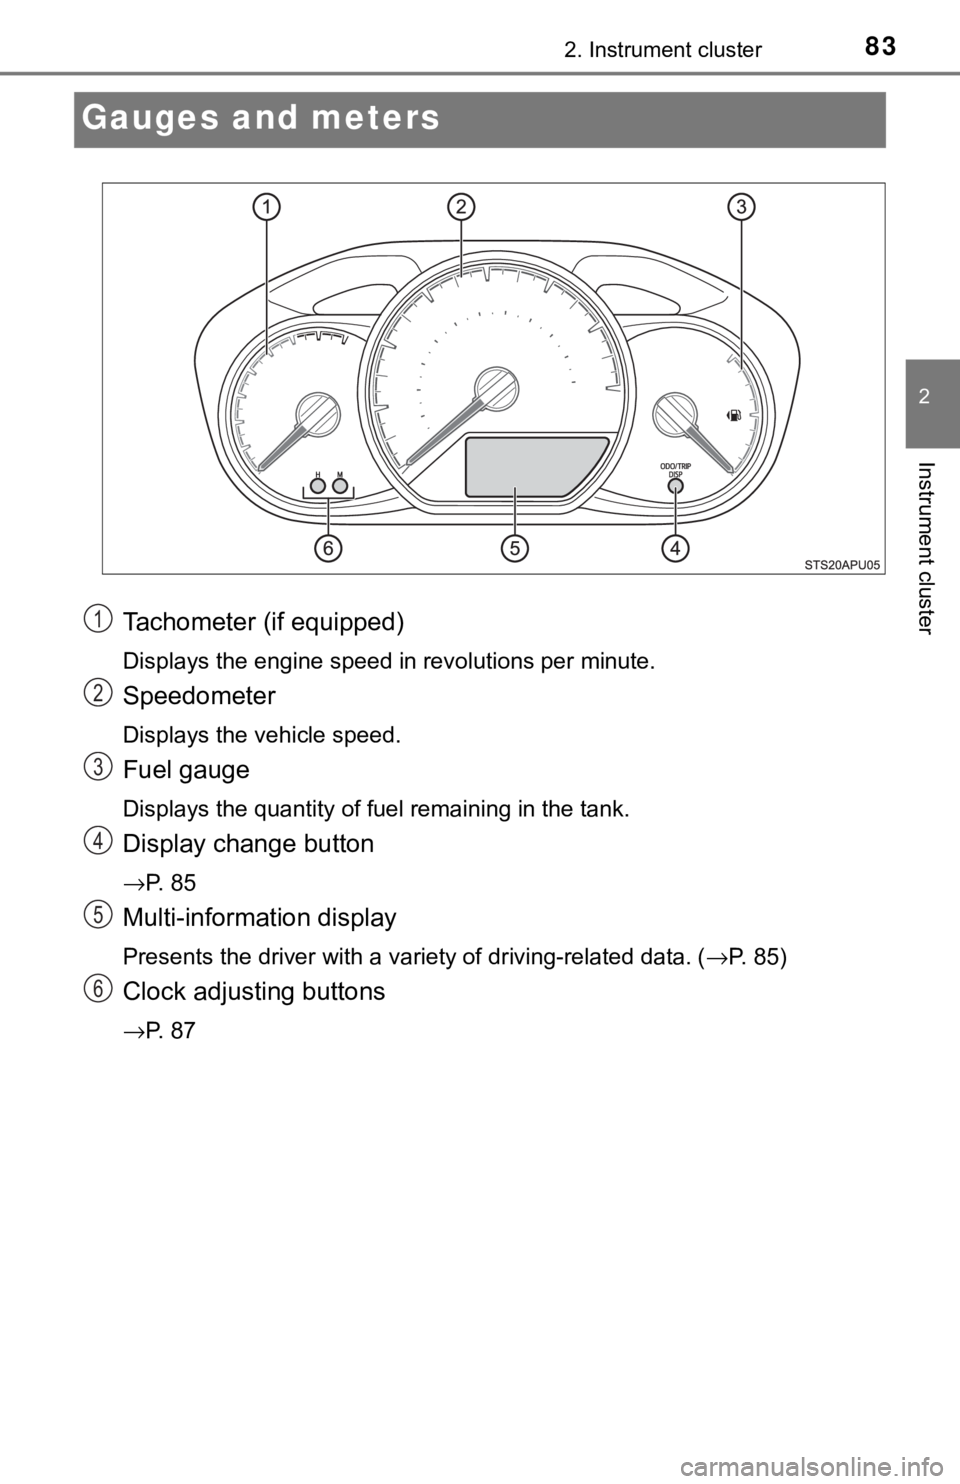
Tachometer (if equipped)
Displays the engine speed in revolutions per minute.
Speedometer
Displays the vehicle speed.
Fuel gauge
Displays the quantity of fuel remaining in the tank.
Display change button
→P. 8 5
Multi-information display
Presents the driver with a variety of driving-related data. (→P. 85)
Clock adjusting buttons
→P. 8 7
1
2
3
4
5
6
Page 84 of 520
842. Instrument cluster
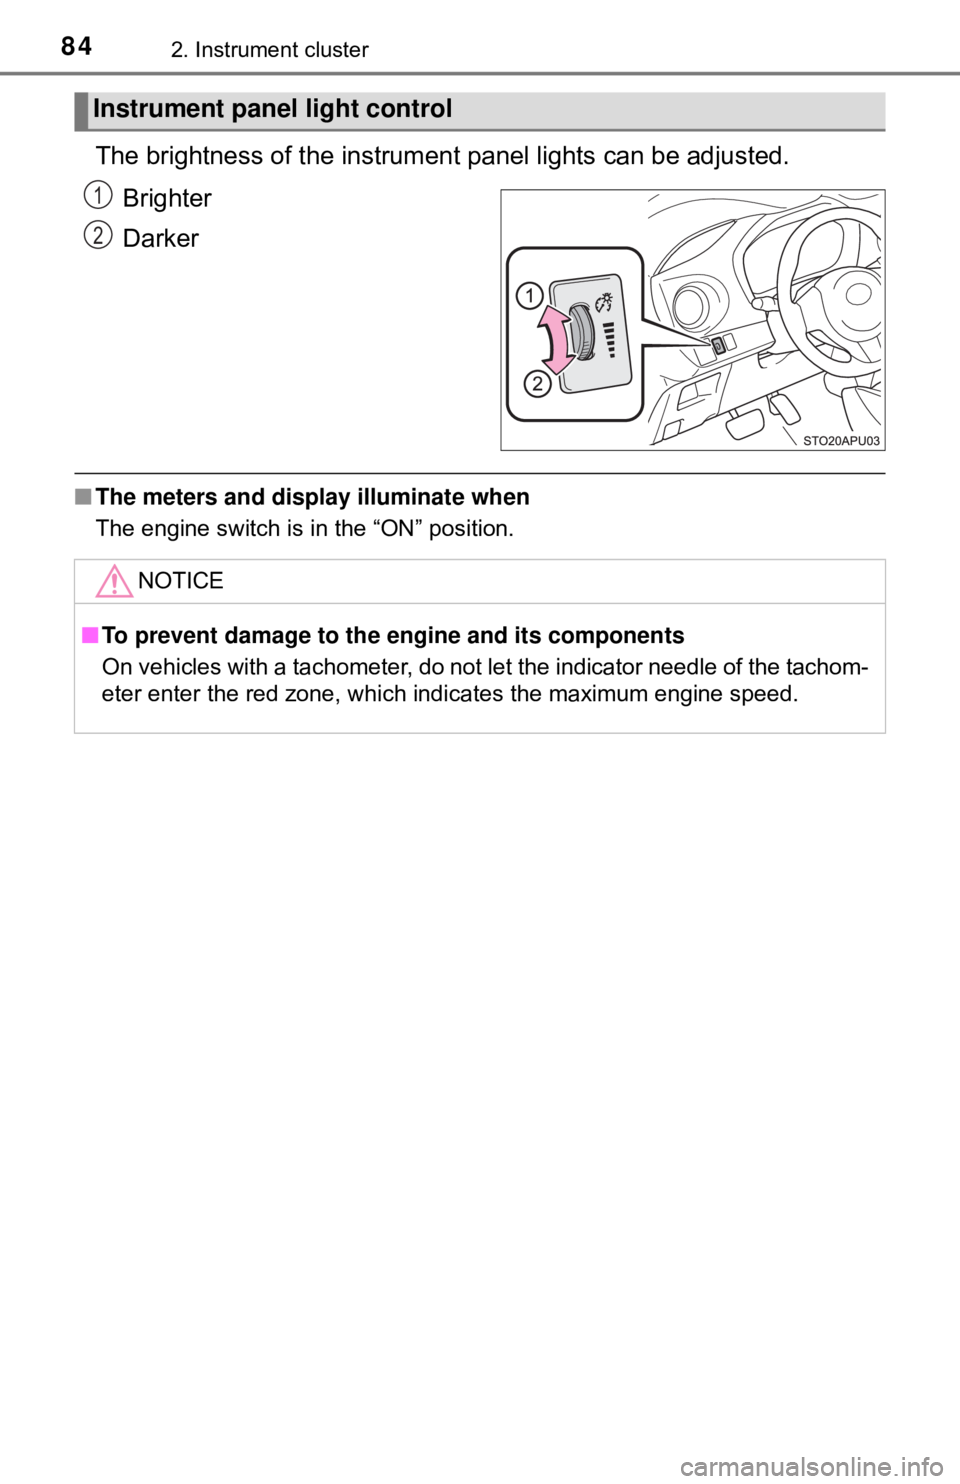
The brightness of the instrument panel lights can be adjusted.
Brighter
Darker
■ The meters and display illuminate when
The engine switch is in the “ON” position.
Instrument panel light control
1
2
NOTICE
■To prevent damage to the engine and its components
On vehicles with a tachometer, do not let the indicator needle of the tachom-
eter enter the red zone, which indicates the maximum engine speed.
Page 85 of 520
852. Instrument cluster
2
Instrument cluster
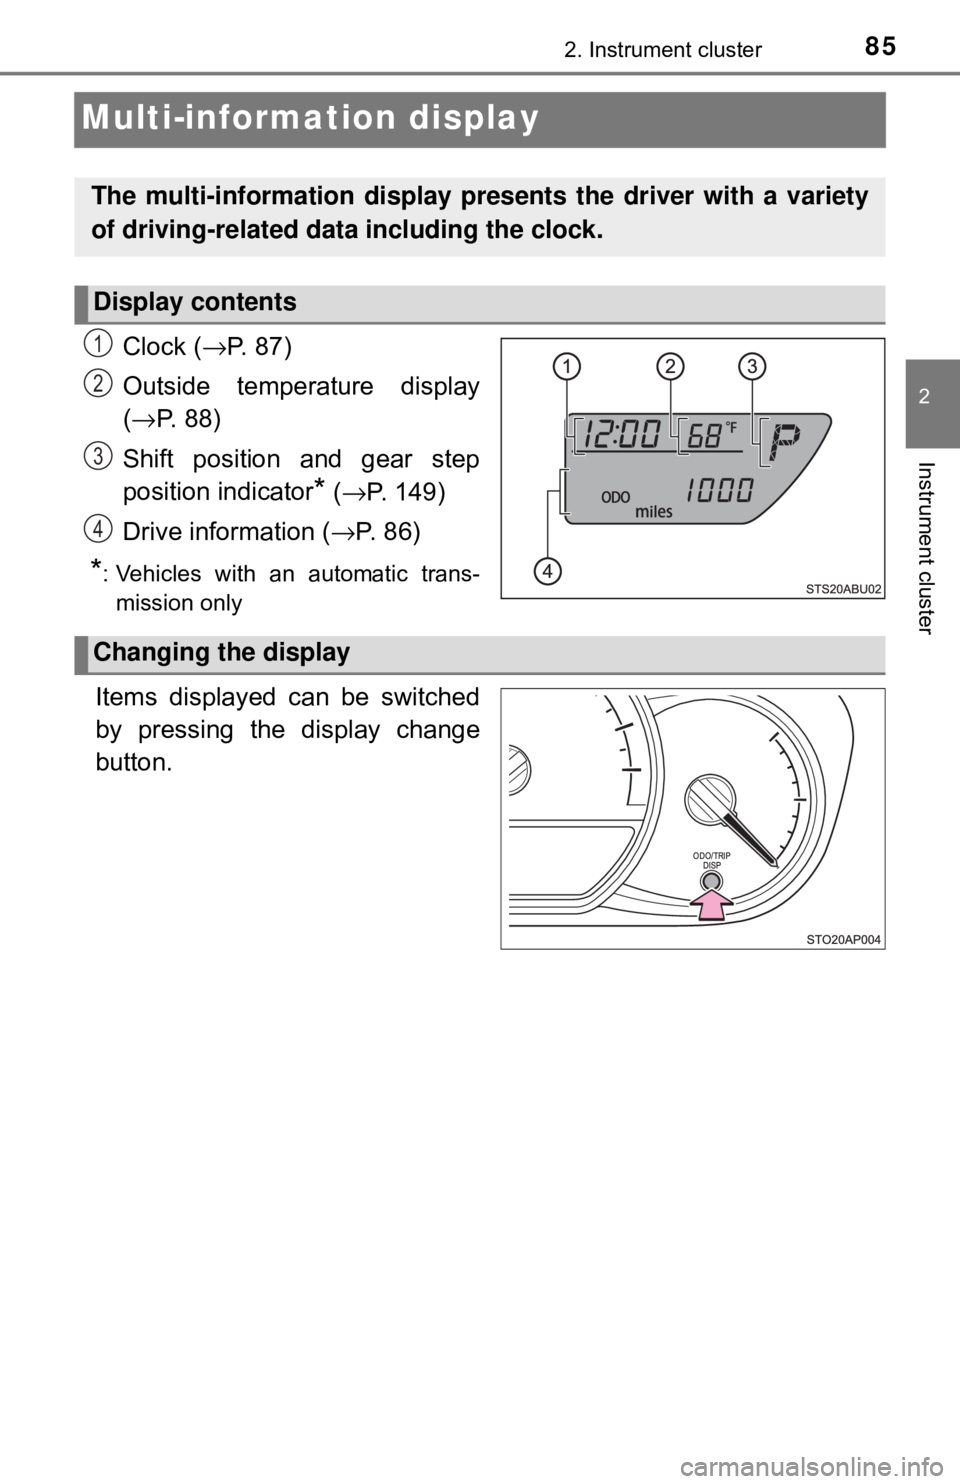
Multi-information display
Clock (→P. 87)
Outside temperature display
( → P. 88)
Shift position and gear step
position indicator
* ( → P. 149)
Drive information ( →P. 8 6 )
*: Vehicles with an automatic trans-
mission only
.
Items displayed can be switched
by pressing the display change
button.
The multi-information display pre sents the driver with a variety
of driving-related data including the clock.
Display contents
1
2
3
4
Changing the display
Page 86 of 520
862. Instrument cluster
■Odometer
Displays the total distance the vehicle has been driven.
■Tr i p m e t e r s
Displays the distance the vehicle has been driven since the meter
was last reset. Trip meters “A” and “B” can be used to record and
display different distances independently.
Pressing and holding the display change button while the trip meter is
displayed will reset the trip meter to “0”.
■
Driving range
Displays the estimated maximum distance that can be driven with
the quantity of fuel remaining.
• This distance is computed based on your average fuel consumption. As a result, the actual distance that can be driven may differ from that dis-
played.
• When only a small amount of fuel is added to the tank, the display may not be updated.
When refueling, turn the engine switch to the “LOCK” position. If th\
e vehi-
cle is refueled without turning the engine switch to the “LOCK” po\
sition, the
display may not be updated.
■
Average fuel consumption
Displays the average fuel consum ption since the function was
reset.
• The function can be reset by pressing and holding the display change button when the average fuel consumption is displayed.
• Use the displayed average fuel consumption as a reference.
■
Instantaneous fuel consumption
Displays the instantaneou s of fuel consumption.
■Average vehicle speed
Displays the average vehicle speed since the engine was last
started.
Drive information
Page 87 of 520
872. Instrument cluster
2
Instrument cluster
Eco Driving Indicator Light can be activated or deactivated by press-
ing the display change button when the Eco Driving Indicator Light
customization display is displayed.
To change the Eco Driving Indicator Light customization display, display the
odometer and press and hold the display change button until the display
changes.
After customization, press the display change button for more than 2 sec-
onds to return to the odometer.
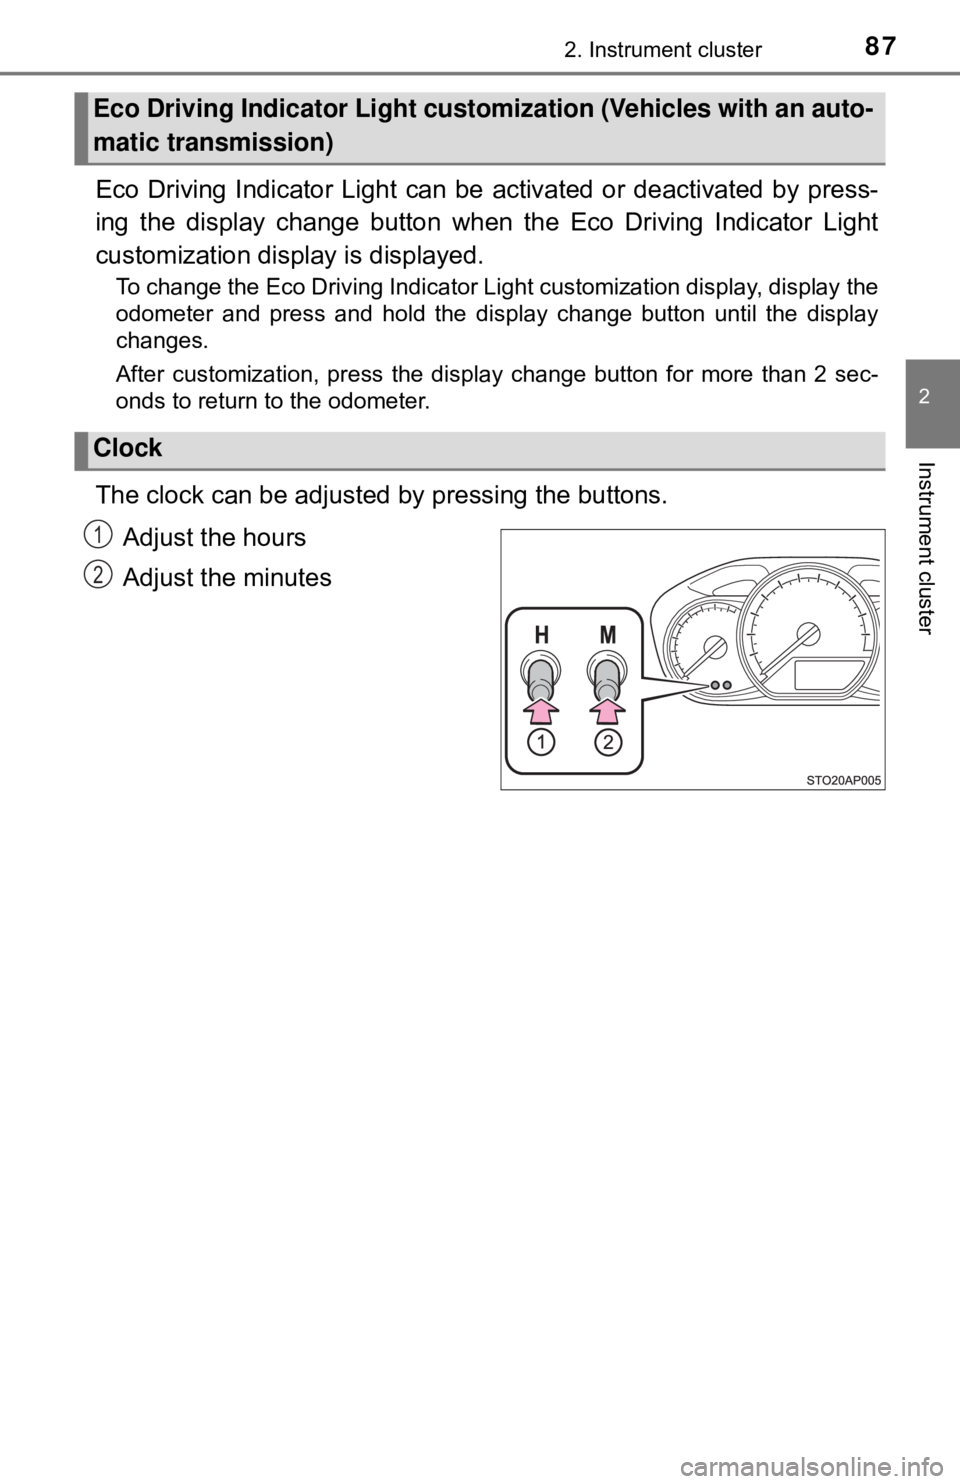
The clock can be adjusted by pressing the buttons.
Adjust the hours
Adjust the minutes
Eco Driving Indicator Light custom ization (Vehicles with an auto-
matic transmission)
Clock
1
2