ECU TOYOTA YARIS SEDAN 2009 Owners Manual
[x] Cancel search | Manufacturer: TOYOTA, Model Year: 2009, Model line: YARIS SEDAN, Model: TOYOTA YARIS SEDAN 2009Pages: 388, PDF Size: 6.89 MB
Page 12 of 388
10
FEATURES/OPERATIONS
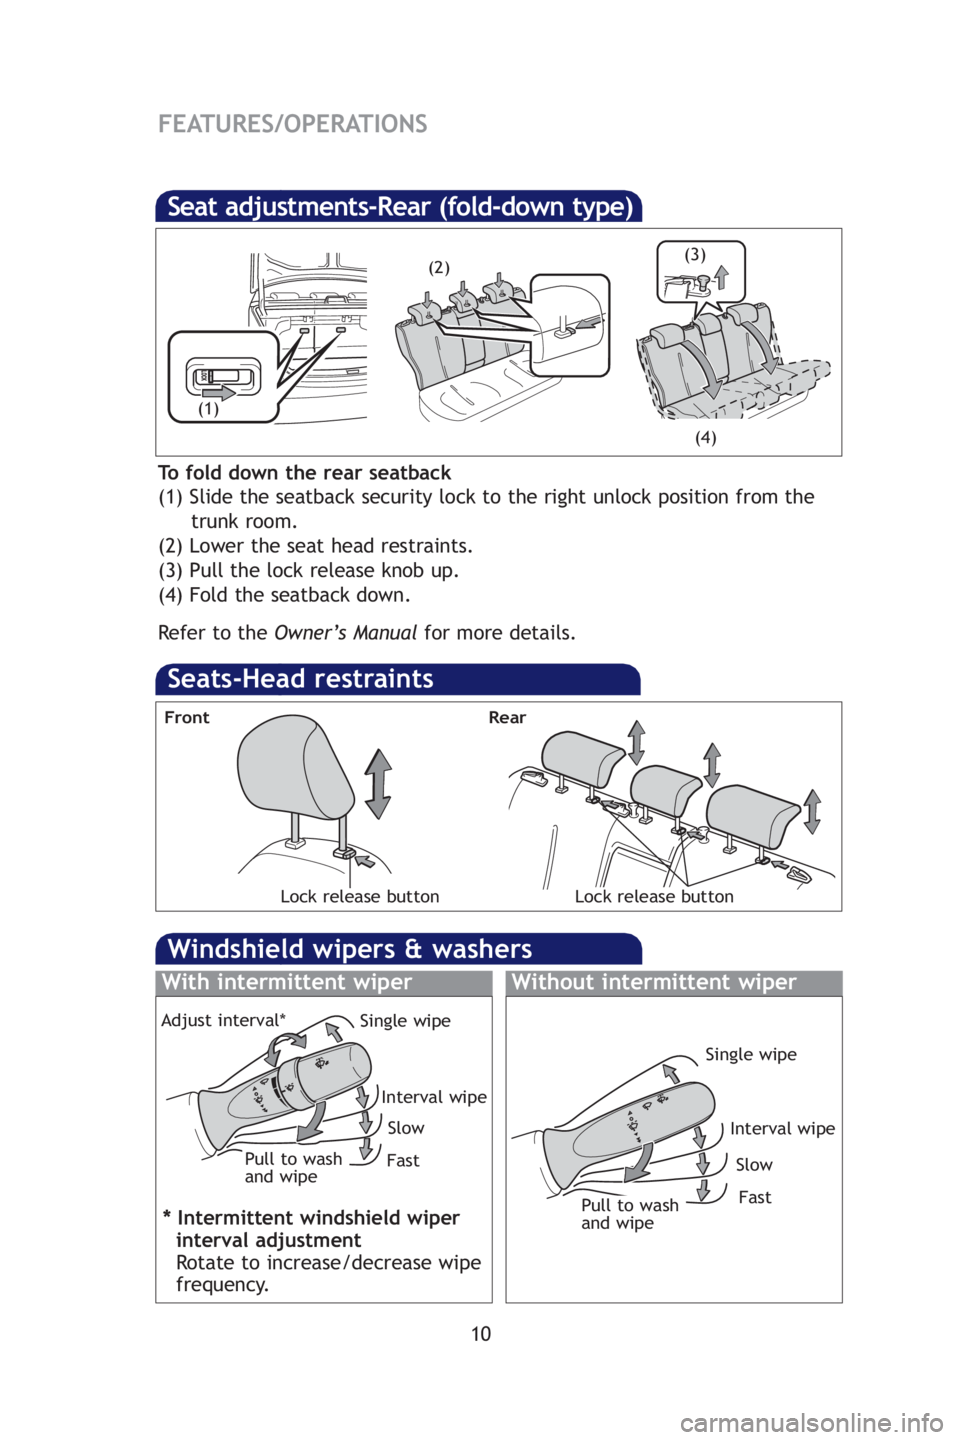
Seats-Head restraints
Lock release button
Front
Seat adjustments-Rear (fold-down type)
To fold down the rear seatback
(1) Slide the seatback security lock to the right unlock position from the
trunk room.
(2) Lower the seat head restraints.
(3) Pull the lock release knob up.
(4) Fold the seatback down.
R efer to the Owner’s Manual for more details.
Windshield wipers & washers
Rear
(1)
(4)
(3)
(2)
Without intermittent wiperWith intermittent wiper
Pull to wash
and wipe
Single wipe
Interval wipe
Slow
Fast
Interval wipe
Single wipe
Slow
Fast
Adjust interval*
* Intermittent windshield wiper
interval adjustment
Rotate to increase /decrease wipe
frequency.
Pull to wash
and wipe
Lock release button
M2.qxd 7/28/08 3:45 PM Page 10
Page 18 of 388
16
SAFETY AND
EMERGENCY FEATURES
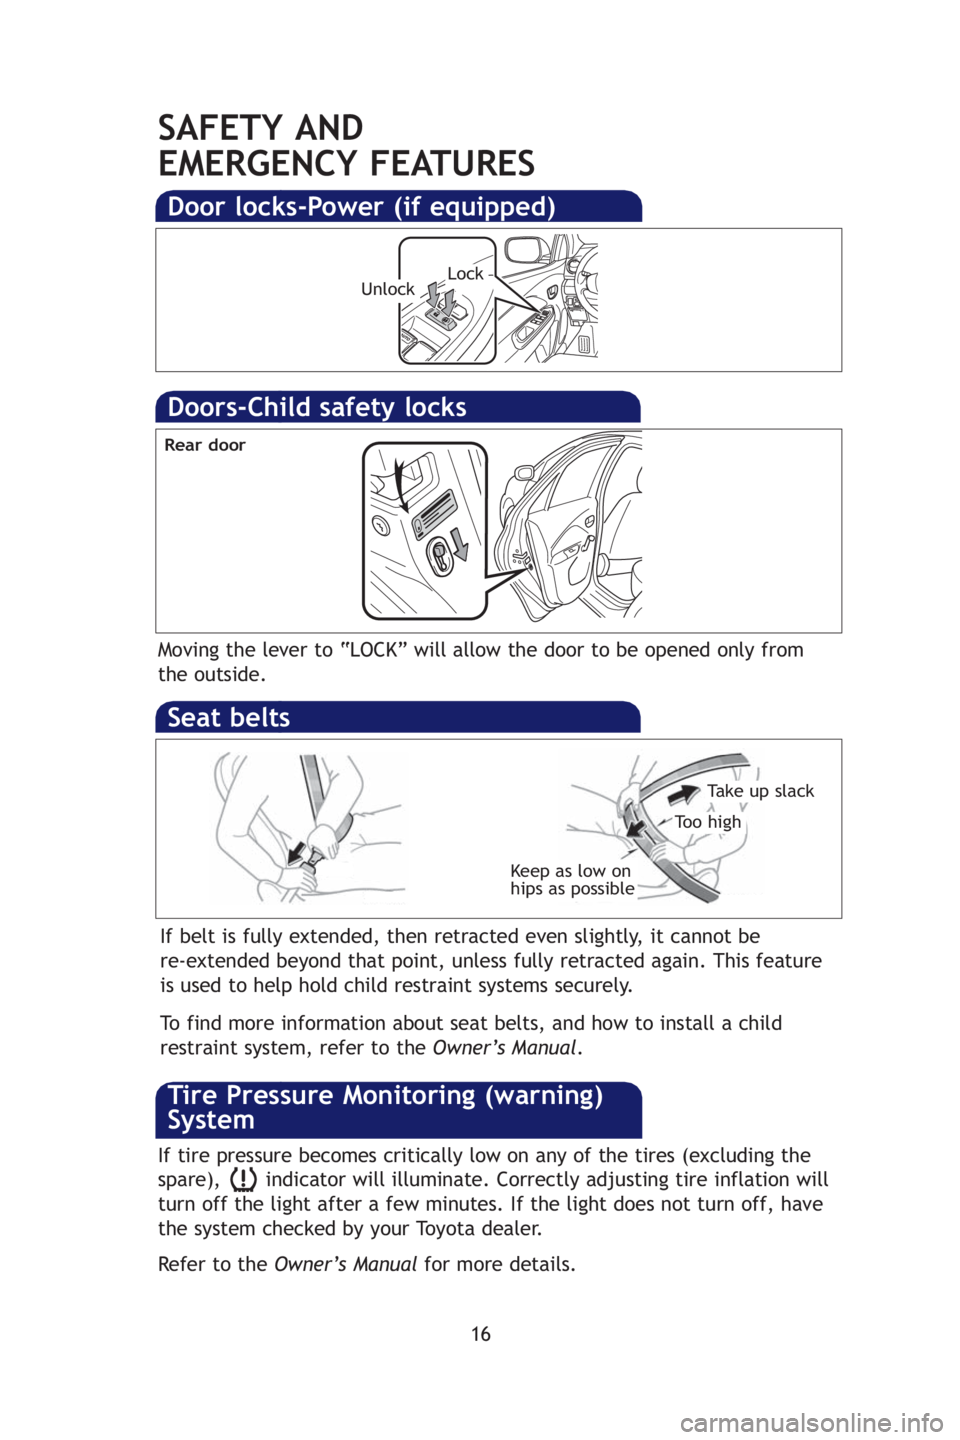
Keep as low on
hips as possible
Take up slack
Too high
Seat belts
Doors-Child safety locks
Moving the lever to “LOCK” will allow the door to be opened only from
the outside.
If belt is fully extended, then retracted even slightly, it cannot be
re -extended beyond that point, unless fully retracted again. This feature
is used to help hold child restraint systems securely.
To find more information about seat belts, and how to install a child
restraint system, refer to the Owner’s Manual.
Rear door
Door locks-Power (if equipped)
UnlockLock
If tire pressure becomes critically low on any of the tires (excluding the
spare), indicator will illuminate. Correctly adjusting tire inflation will
turn off the light after a few minutes. If the light does not turn off, \
have
the system checked by your Toyota dealer.
R efer to the Owner’s Manual for more details.
Tire Pressure Monitoring (warning)
System
M2.qxd 7/28/08 3:45 PM Page 16
Page 21 of 388
362
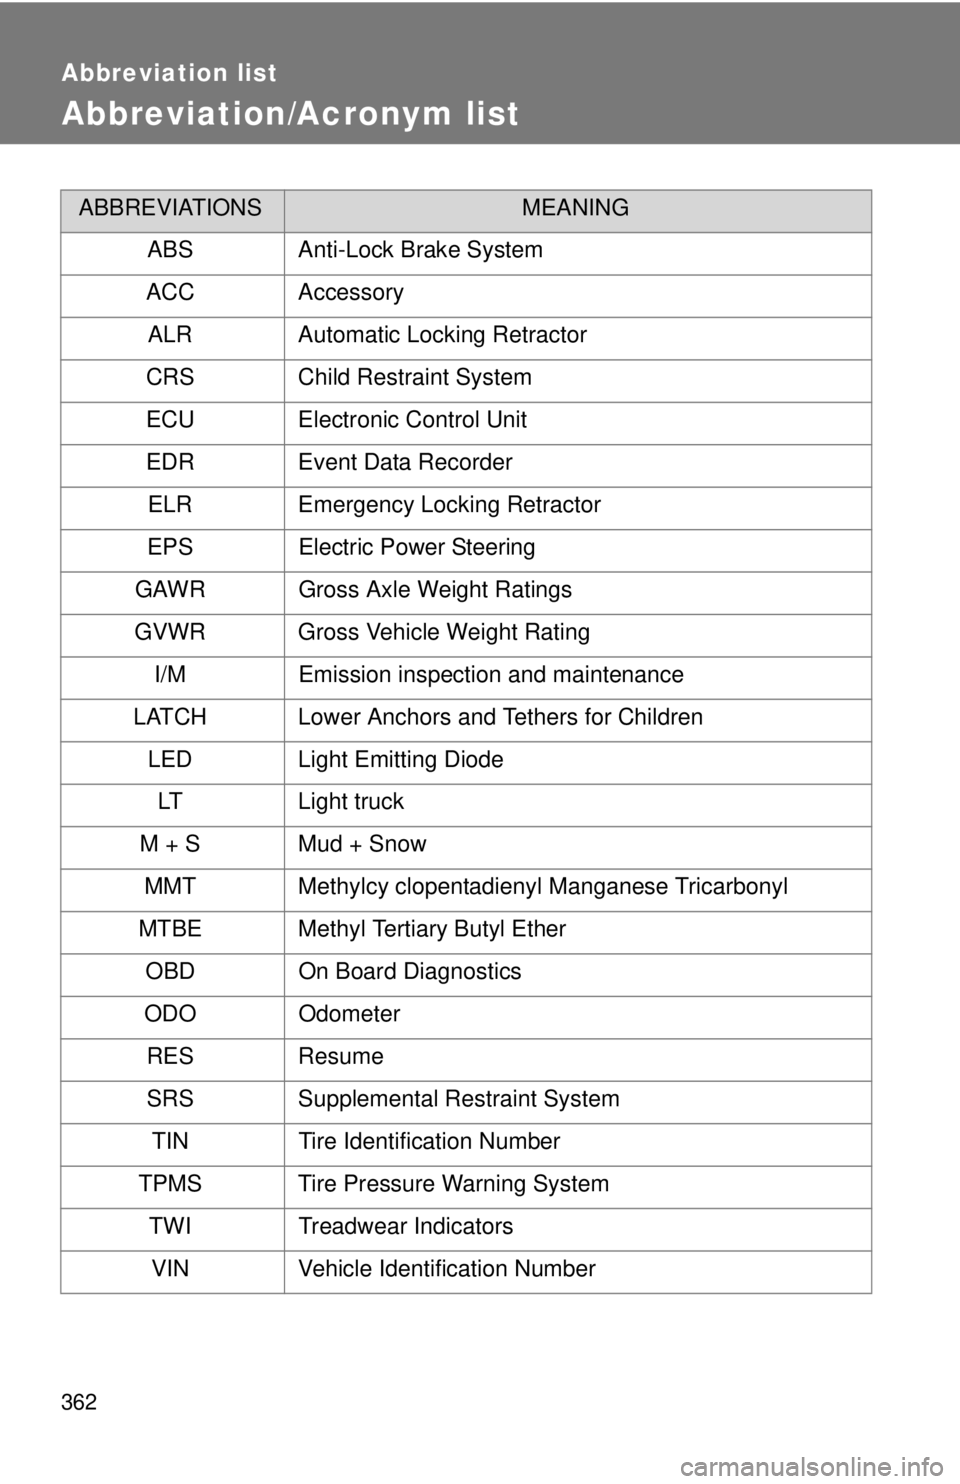
Abbreviation list
Abbreviation/Acronym list
ABBREVIATIONSMEANING
ABS Anti-Lock Brake System
ACC Accessory ALR Automatic Locking Retractor
CRS Child Restraint System
ECU Electronic Control Unit
EDR Event Data Recorder ELR Emergency Locking Retractor
EPS Electric Power Steering
GAWR Gross Axle Weight Ratings
GVWR Gross Vehicle Weight Rating I/M Emission inspection and maintenance
LATCH Lower Anchors and Tethers for Children LED Light Emitting Diode
LT Light truck
M + S Mud + Snow MMT Methylcy clopentadienyl Manganese Tricarbonyl
MTBE Methyl Tertiary Butyl Ether OBD On Board Diagnostics
ODO Odometer
RES Resume
SRS Supplemental Restraint System TIN Tire Identification Number
TPMS Tire Pressure Warning System TWI Treadwear IndicatorsVIN Vehicle Identification Number
Page 30 of 388
8
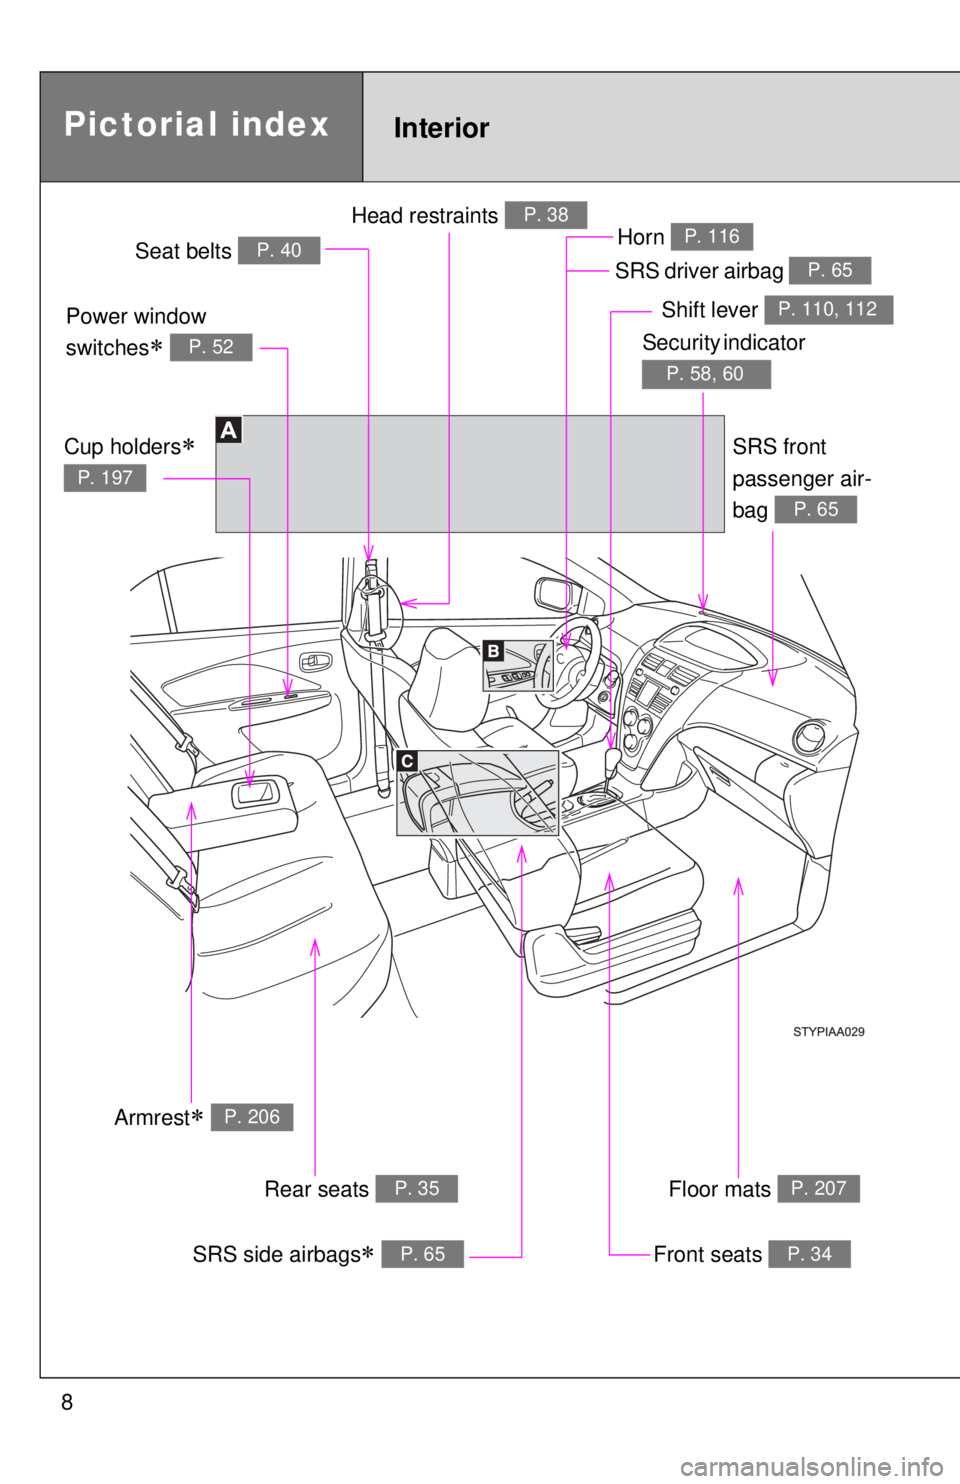
Power window
switches
∗ P. 52
Pictorial indexInterior
Seat belts P. 40SRS driver airbag P. 65
Head restraints P. 38
Cup holders∗
P. 197
Armrest∗ P. 206
Front seats P. 34SRS side airbags∗ P. 65
Floor mats P. 207
SRS front
passenger air-
bag
P. 65
Shift lever P. 110, 112
Security indicator
P. 58, 60
Rear seats P. 35
Horn P. 116
Page 39 of 388
23
1-1. Key information
1
Before driving
n
When required to leave a key to th e vehicle with a parking attendant
Turn the luggage security system on. ( →P. 3 2 )
Carry the master key for your own use and leave the valet key only with the
attendant.
n Key number plate
Keep the plate in a safe place such as your wallet, not in the vehicle. In the
event that a key is lost, a new key can be made by your Toyota dealer using
the key number plate. ( →P. 317)
NOTICE
nTo prevent key damage (vehicles with engine immobilizer system)
l Do not subject the keys to strong shocks, expose them to high tempera-
tures by placing them in direct sunlight, or get them wet.
l Do not expose the keys to electromagnetic materials or attach any mate-
rial that blocks electromagnetic waves to the key surface.
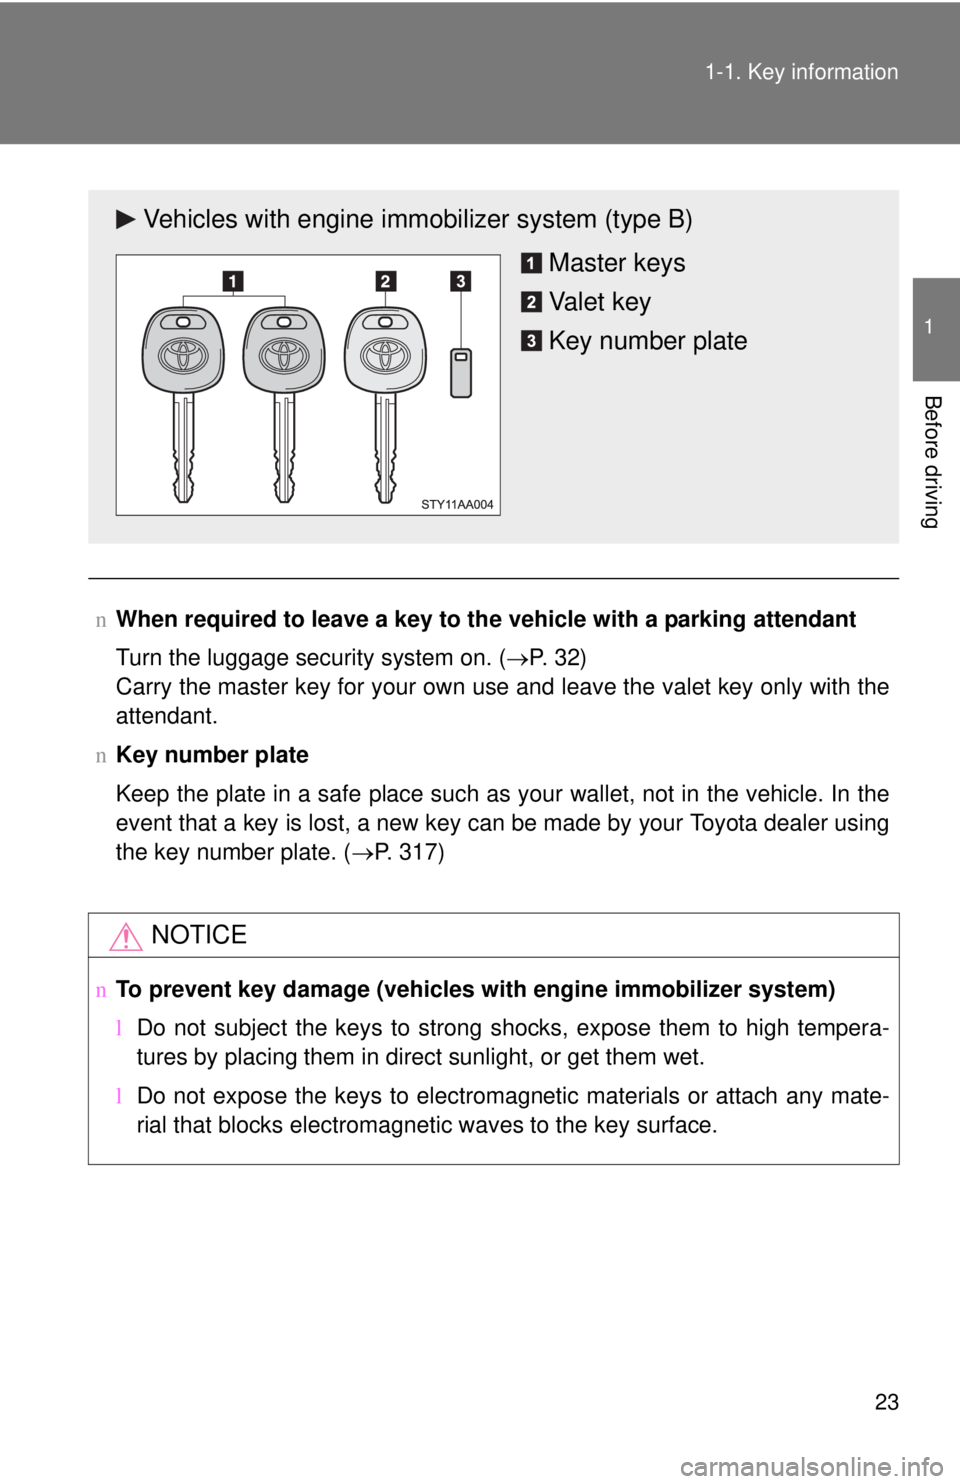
Vehicles with engine immobilizer system (type B)
Master keys
Va l e t k e y
Key number plate
Page 40 of 388
24
1-2. Opening, closing and locking the doors
Wireless remote control (if equipped)
nOperation signals
The emergency flashers flash to indicate that the doors have been locked/
unlocked. (Locked: Once; Unlocked: Twice)
nPanic mode
nKey battery depletion
The standard battery life is 1 to 2 years. (The battery becomes depleted
even if the key is not used.) If the wireless remote control function does not
operate, the battery may be depleted. Replace the battery when necessary.
(→P. 257)
n Security feature
If a door is not opened within approximately 30 seconds after the vehicle is
unlocked, the security feature automatically locks the vehicle again.
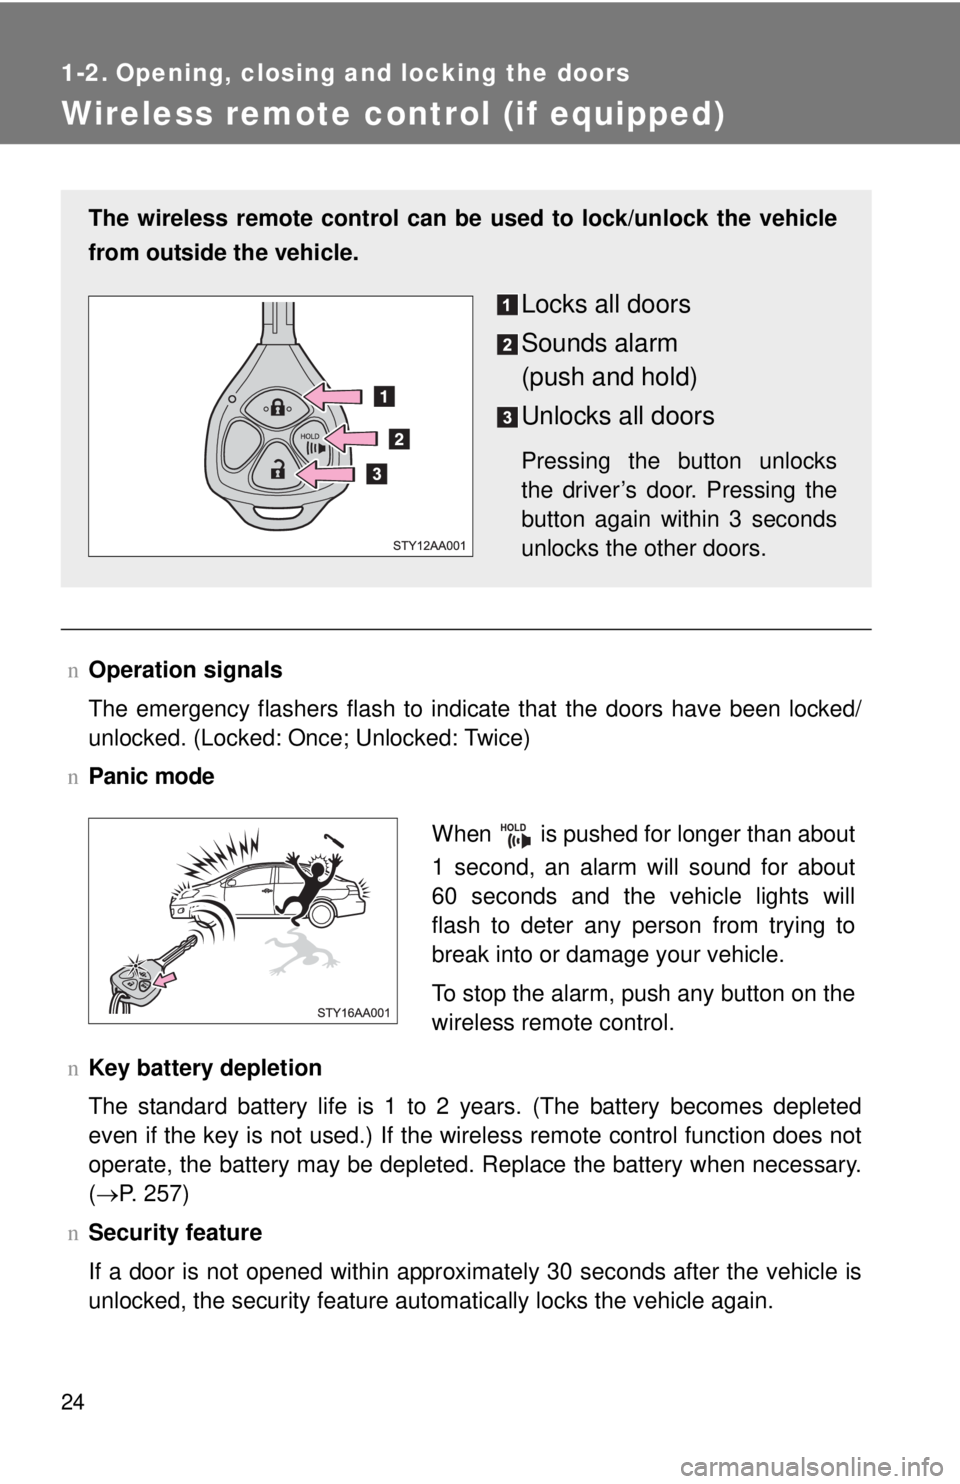
The wireless remote control can be used to lock/unlock the vehicle
from outside the vehicle.
Locks all doors
Sounds alarm
(push and hold)
Unlocks all doors
Pressing the button unlocks
the driver’s door. Pressing the
button again within 3 seconds
unlocks the other doors.
When is pushed for longer than about
1 second, an alarm will sound for about
60 seconds and the vehicle lights will
flash to deter any person from trying to
break into or damage your vehicle.
To stop the alarm, push any button on the
wireless remote control.
Page 48 of 388
32 1-2. Opening, closing and locking the doors
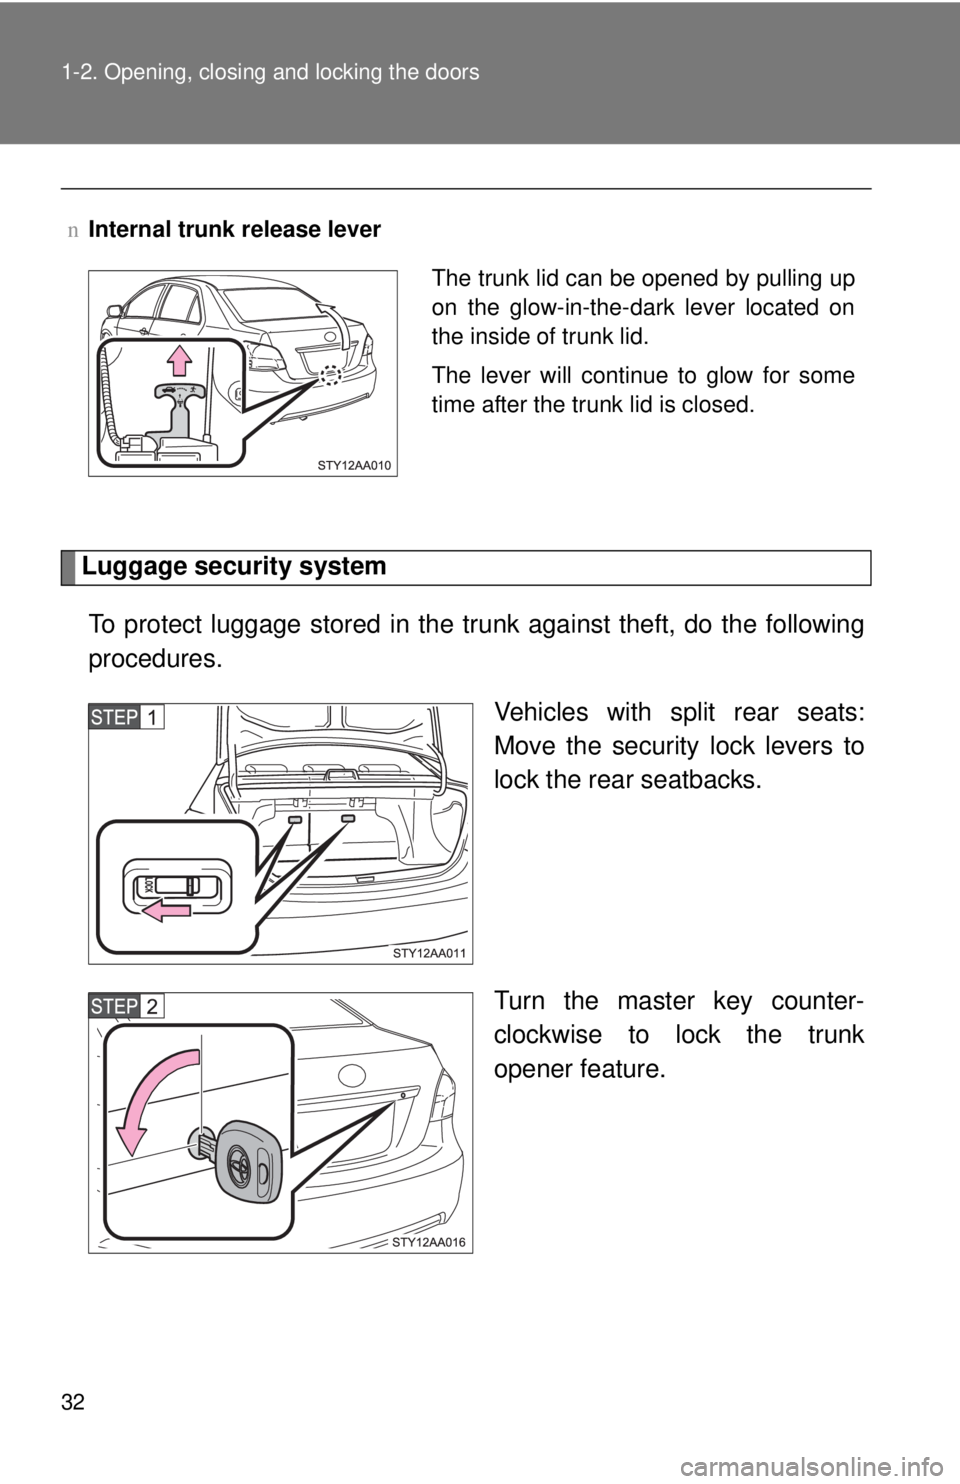
Luggage security systemTo protect luggage stored in the trunk against theft, do the following
procedures. Vehicles with split rear seats:
Move the security lock levers to
lock the rear seatbacks.
Turn the master key counter-
clockwise to lock the trunk
opener feature.
nInternal trunk release lever
The trunk lid can be opened by pulling up
on the glow-in-the-dark lever located on
the inside of trunk lid.
The lever will continue to glow for some
time after the trunk lid is closed.
Page 51 of 388
35
1
1-3. Adjustable components (seats, mirrors, steering wheel)
Before driving
Rear seats (split rear seats only)
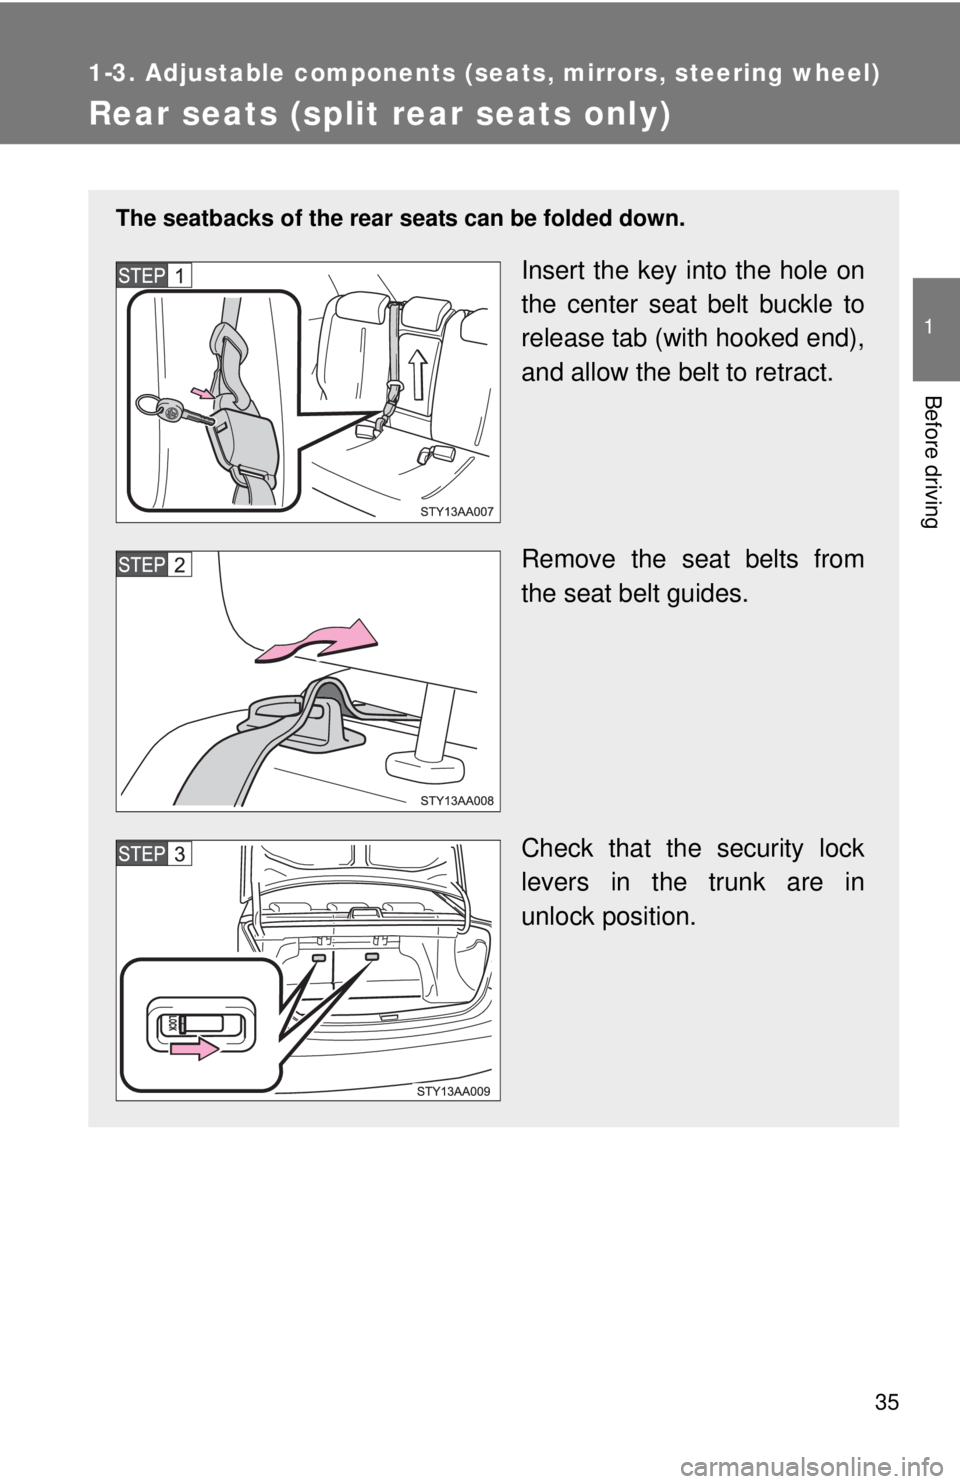
The seatbacks of the rear seats can be folded down.
Insert the key into the hole on
the center seat belt buckle to
release tab (with hooked end),
and allow the belt to retract.
Remove the seat belts from
the seat belt guides.
Check that the security lock
levers in the trunk are in
unlock position.
Page 53 of 388
37
1-3. Adjustable components (s
eats, mirrors, steering wheel)
1
Before driving
CAUTION
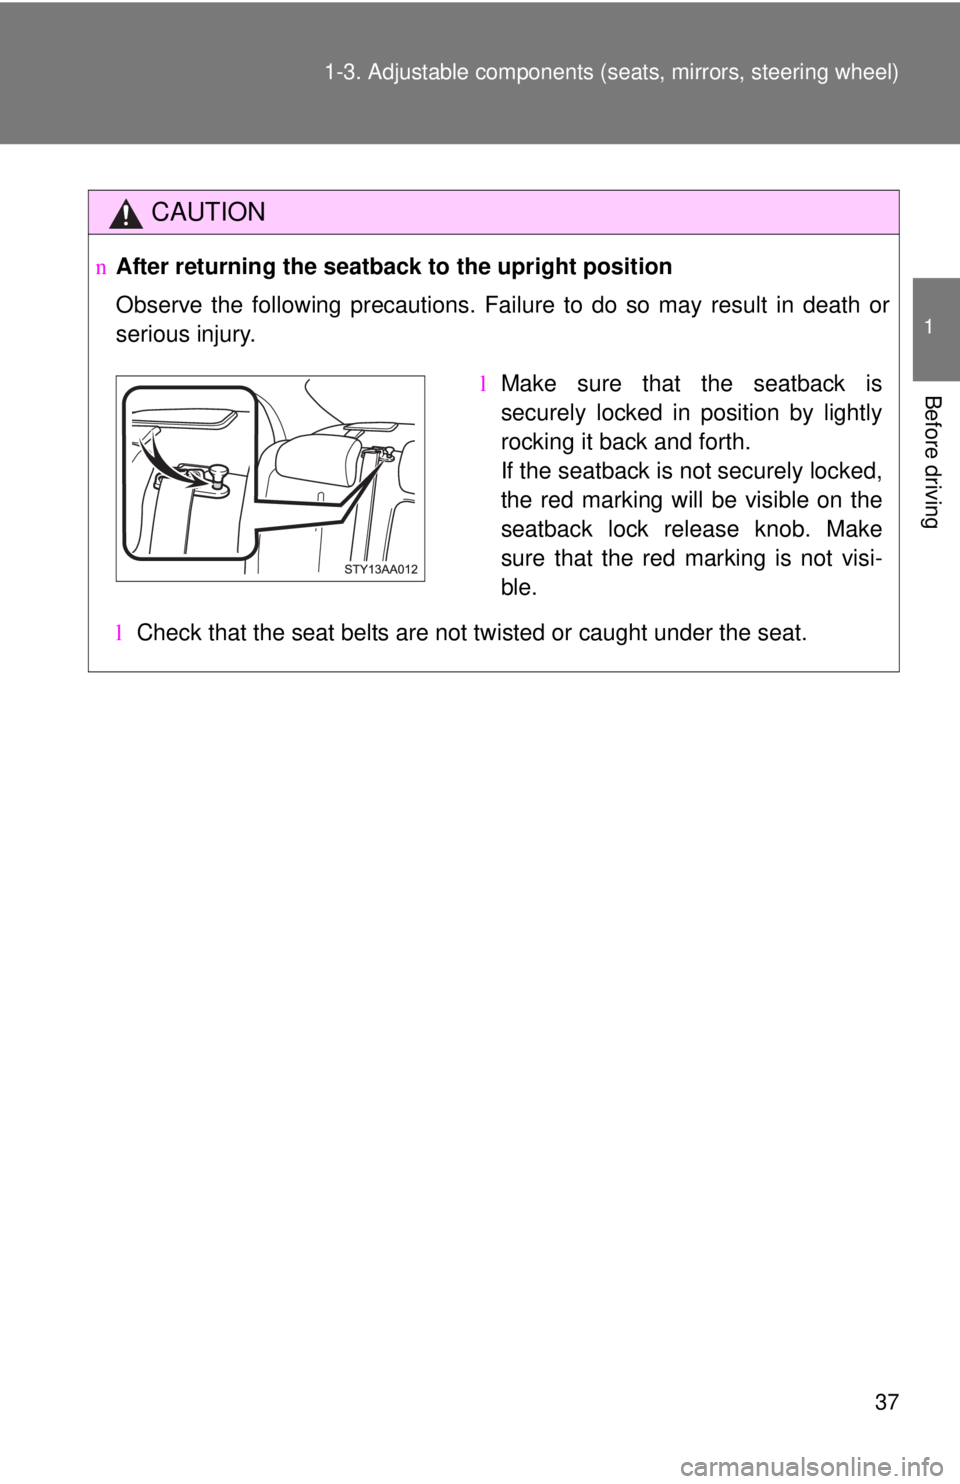
nAfter returning the seatback to the upright position
Observe the following precautions. Failure to do so may result in death or
serious injury.
lCheck that the seat belts are not twisted or caught under the seat.
lMake sure that the seatback is
securely locked in position by lightly
rocking it back and forth.
If the seatback is not securely locked,
the red marking will be visible on the
seatback lock release knob. Make
sure that the red marking is not visi-
ble.
Page 57 of 388
41
1-3. Adjustable components (s
eats, mirrors, steering wheel)
1
Before driving
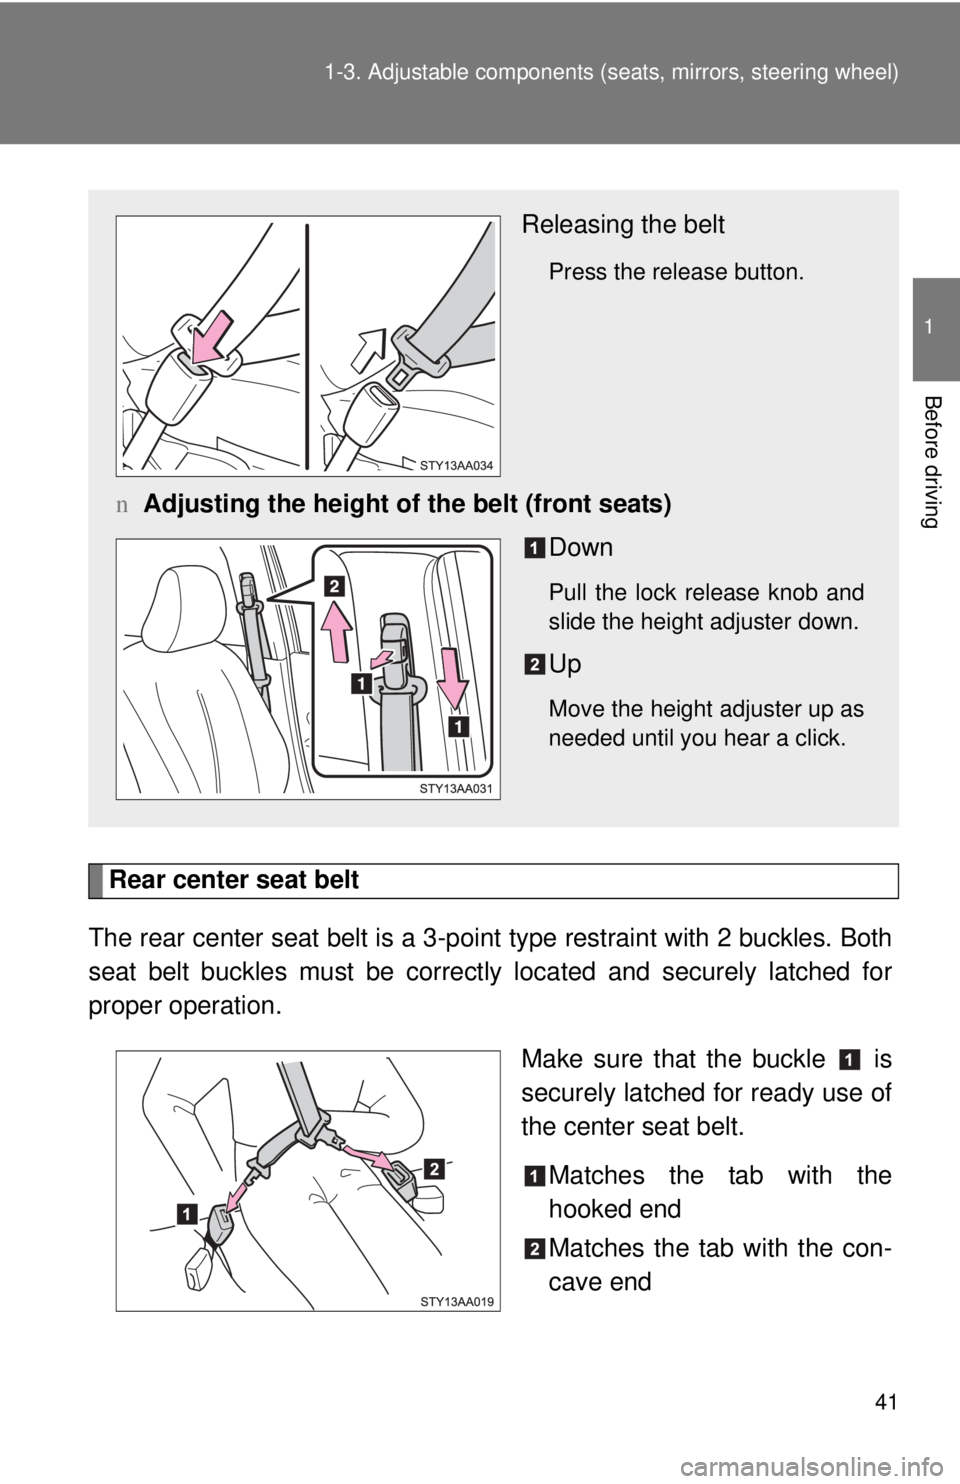
Rear center seat belt
The rear center seat belt is a 3-po int type restraint with 2 buckles. Both
seat belt buckles must be correctly located and securely latched for
proper operation.
Make sure that the buckle is
securely latched for ready use of
the center seat belt.Matches the tab with the
hooked end
Matches the tab with the con-
cave end
Releasing the belt
Press the release button.
nAdjusting the height of the belt (front seats)
Down
Pull the lock release knob and
slide the height adjuster down.
Up
Move the height adjuster up as
needed until you hear a click.