remove seats VAUXHALL ADAM 2014 Owner's Manual
[x] Cancel search | Manufacturer: VAUXHALL, Model Year: 2014, Model line: ADAM, Model: VAUXHALL ADAM 2014Pages: 217, PDF Size: 6.68 MB
Page 33 of 217
Seats, restraints31
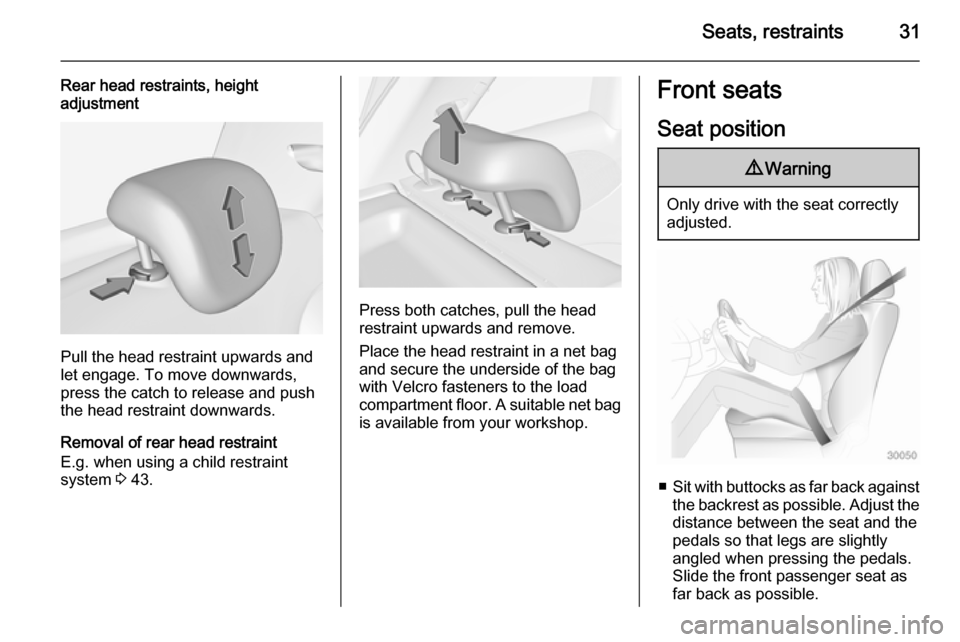
Rear head restraints, heightadjustment
Pull the head restraint upwards and
let engage. To move downwards, press the catch to release and push
the head restraint downwards.
Removal of rear head restraint
E.g. when using a child restraint
system 3 43.
Press both catches, pull the head
restraint upwards and remove.
Place the head restraint in a net bag
and secure the underside of the bag
with Velcro fasteners to the load
compartment floor. A suitable net bag
is available from your workshop.
Front seats
Seat position9 Warning
Only drive with the seat correctly
adjusted.
■ Sit with buttocks as far back against
the backrest as possible. Adjust the distance between the seat and the
pedals so that legs are slightly
angled when pressing the pedals.
Slide the front passenger seat as
far back as possible.
Page 46 of 217

44Seats, restraints
backbone, which is still very weak, is
under less strain in the event of an
accident.
Suitable are restraint systems that
comply with ECE 44-03 or
ECE 44-04. Check local laws and
regulations for mandatory use of child restraint systems.
Ensure that the child restraint system to be installed is compatible with the
vehicle type.
Ensure that the mounting location of
the child restraint system within the
vehicle is correct.
Allow children to enter and exit the
vehicle only on the side facing away
from the traffic.
When the child restraint system is not in use, secure the seat with a seat beltor remove it from the vehicle.
Notice
Do not affix anything on the child
restraint systems and do not cover
them with any other materials.
A child restraint system which has
been subjected to stress in an
accident must be replaced.
Page 47 of 217

Seats, restraints45Child restraint installation locationsPermissible options for fitting a child restraint system
Weight and age class
On front passenger seat
On rear seats
activated airbagdeactivated airbagGroup 0: up to 10 kg
or approx. 10 monthsXU 1U 2
*Group 0+: up to 13 kg
or approx. 2 yearsXU 1U2
*Group I: 9 to 18 kg
or approx. 8 months to 4 yearsXU 1U2, 3
*Group II: 15 to 25 kg
or approx. 3 to 7 yearsU **XU *Group III: 22 to 36 kg
or approx. 6 to 12 yearsU **XU *1=Only if front passenger seat airbag system is deactivated. If the child restraint system is being secured using a three- point seat belt, move seat height adjustment in the uppermost position. Adjust seat backrest inclination as far asnecessary to a vertical position to ensure that the belt is tight on the buckle side.2=Seat available with ISOFIX and Top-Tether mounting brackets 3 48.3=Remove rear head restraint when using child restraint systems in this group 3 30.*=Move the respective front seat ahead of the child restraint system in one of the foremost adjustment positions.
Page 49 of 217

Seats, restraints47
IL=Suitable for particular ISOFIX restraint systems of the "specific-vehicle", "restricted" or "semi-universal" categories.
The ISOFIX restraint system must be approved for the specific vehicle type.IUF=Suitable for ISOFIX forward-facing child restraint systems of universal category approved for use in this weight class.X=No ISOFIX child restraint system approved in this weight class.*=Move the respective front seat ahead of the child restraint system in one of the foremost adjustment positions.**=Remove respective rear head restraint when using child restraint systems in this size class 3 30.
ISOFIX size class and seat device
A – ISO/F3=Forward-facing child restraint system for children of maximum size in the weight class 9 to 18 kg.B – ISO/F2=Forward-facing child restraint system for smaller children in the weight class 9 to 18 kg.B1 – ISO/F2X=Forward-facing child restraint system for smaller children in the weight class 9 to 18 kg.C – ISO/R3=Rear-facing child restraint system for children of maximum size in the weight class up to 18 kg.D – ISO/R2=Rear-facing child restraint system for smaller children in the weight class up to 18 kg.E – ISO/R1=Rear-facing child restraint system for young children in the weight class up to 13 kg.
Page 50 of 217
48Seats, restraintsISOFIX child restraint
systems Fasten vehicle-approved ISOFIX
child restraint systems to the ISOFIX
mounting brackets. Specific vehicle
ISOFIX child restraint system
positions are marked in the table by
IL.
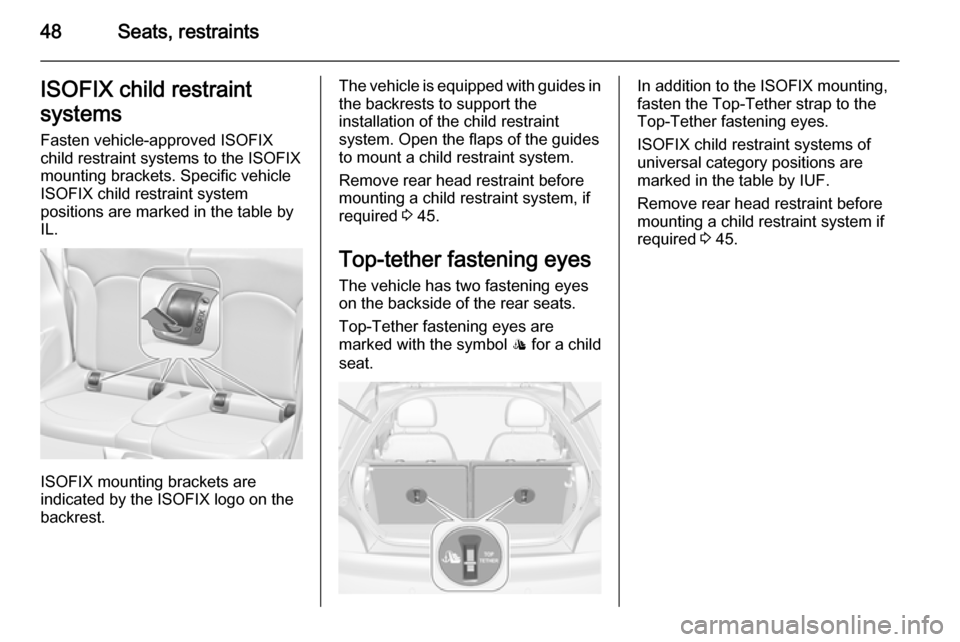
ISOFIX mounting brackets are
indicated by the ISOFIX logo on the
backrest.
The vehicle is equipped with guides in the backrests to support the
installation of the child restraint
system. Open the flaps of the guides
to mount a child restraint system.
Remove rear head restraint before
mounting a child restraint system, if
required 3 45.
Top-tether fastening eyes The vehicle has two fastening eyes
on the backside of the rear seats.
Top-Tether fastening eyes are
marked with the symbol : for a child
seat.In addition to the ISOFIX mounting,
fasten the Top-Tether strap to the
Top-Tether fastening eyes.
ISOFIX child restraint systems of
universal category positions are
marked in the table by IUF.
Remove rear head restraint before
mounting a child restraint system if
required 3 45.
Page 51 of 217
Storage49StorageStorage compartments................49
Load compartment .......................60
Roof rack system .........................66
Loading information .....................66Storage compartments9Warning
Do not not store heavy or sharp
objects in the storage
compartments. Otherwise, the
storage compartment lid could
open and vehicle occupants could be injured by objects being thrown
around in the event of sharp
braking, a sudden change in
direction or an accident.
Glovebox
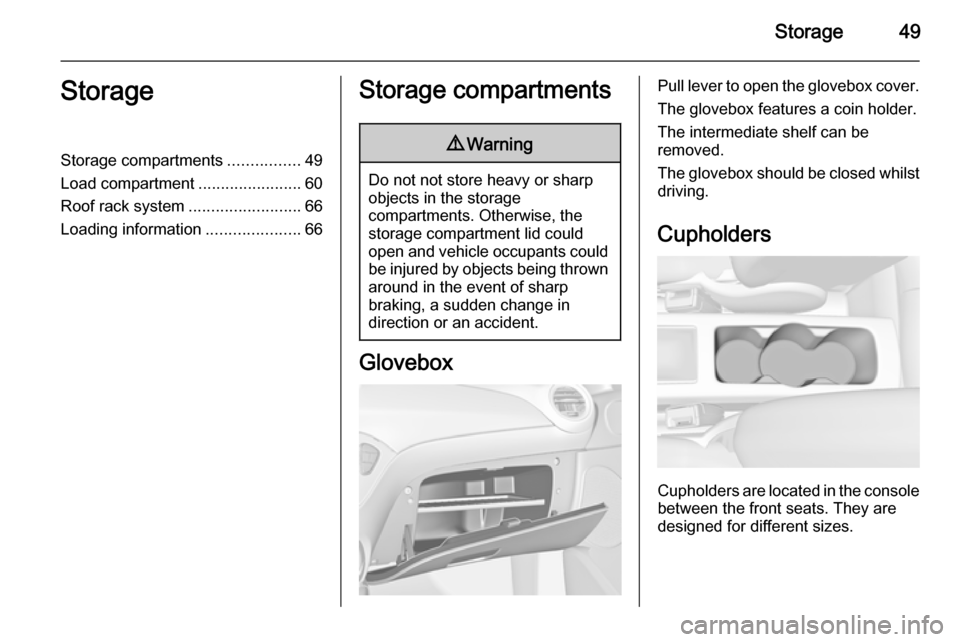
Pull lever to open the glovebox cover.
The glovebox features a coin holder.
The intermediate shelf can be
removed.
The glovebox should be closed whilst
driving.
Cupholders
Cupholders are located in the consolebetween the front seats. They are
designed for different sizes.
Page 67 of 217
Storage65Warning triangle
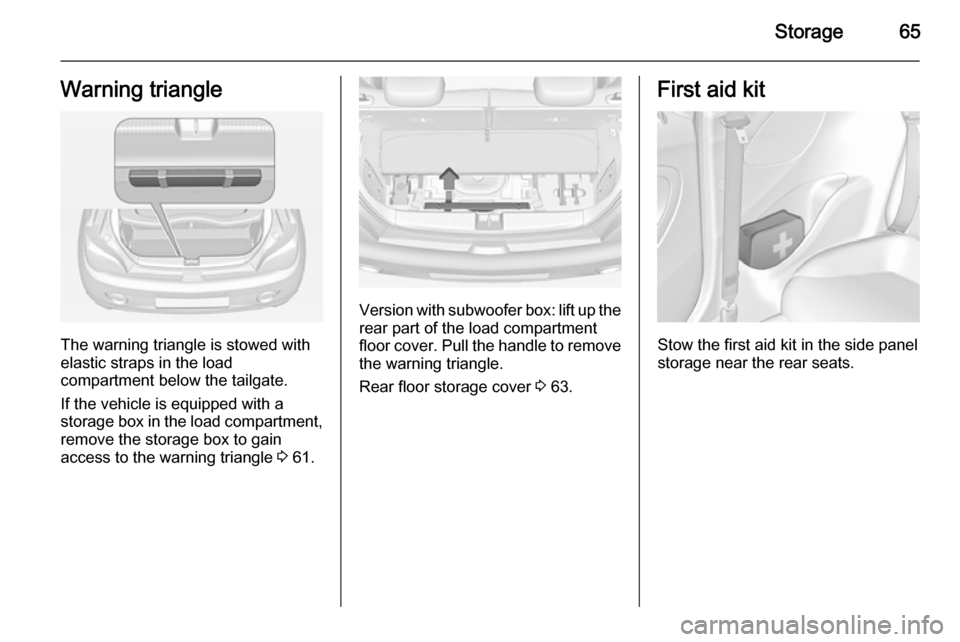
The warning triangle is stowed with
elastic straps in the load
compartment below the tailgate.
If the vehicle is equipped with a
storage box in the load compartment,
remove the storage box to gain
access to the warning triangle 3 61.
Version with subwoofer box: lift up the
rear part of the load compartment
floor cover. Pull the handle to remove
the warning triangle.
Rear floor storage cover 3 63.
First aid kit
Stow the first aid kit in the side panel
storage near the rear seats.
Page 68 of 217
66StorageRoof rack systemRoof rack
For safety reasons and to avoid
damage to the roof, the vehicle
approved roof rack system is
recommended. For further
information contact your workshop.
Follow the installation instructions
and remove the roof rack when not in use.
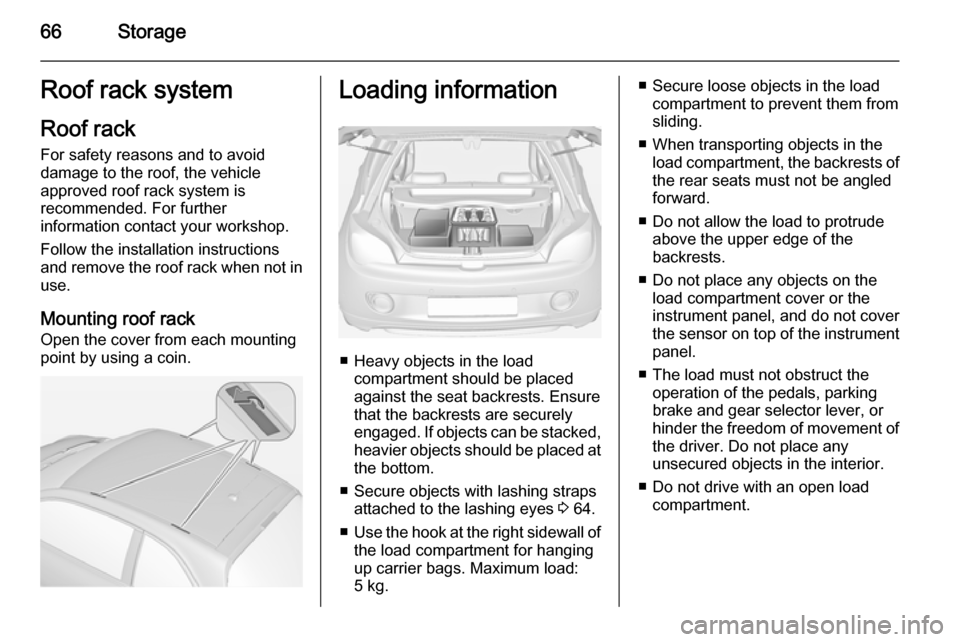
Mounting roof rack Open the cover from each mounting
point by using a coin.Loading information
■ Heavy objects in the load compartment should be placedagainst the seat backrests. Ensure
that the backrests are securely
engaged. If objects can be stacked, heavier objects should be placed at
the bottom.
■ Secure objects with lashing straps attached to the lashing eyes 3 64.
■ Use the hook at the right sidewall of
the load compartment for hanging
up carrier bags. Maximum load: 5 kg.
■ Secure loose objects in the load compartment to prevent them from
sliding.
■ When transporting objects in the load compartment, the backrests ofthe rear seats must not be angled
forward.
■ Do not allow the load to protrude above the upper edge of the
backrests.
■ Do not place any objects on the load compartment cover or theinstrument panel, and do not cover
the sensor on top of the instrument
panel.
■ The load must not obstruct the operation of the pedals, parking
brake and gear selector lever, or
hinder the freedom of movement of the driver. Do not place any
unsecured objects in the interior.
■ Do not drive with an open load compartment.
Page 110 of 217
108Lighting
Path lightingHeadlights, tail lights, reversing lights
and number plate lights illuminate the surrounding area for an adjustable
time after leaving the vehicle.
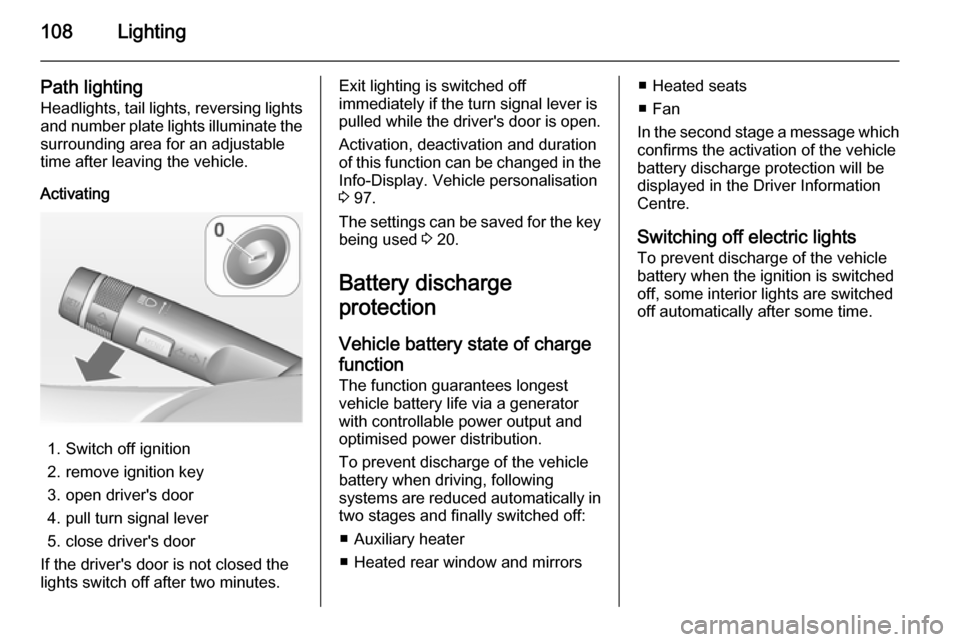
Activating
1. Switch off ignition
2. remove ignition key
3. open driver's door
4. pull turn signal lever
5. close driver's door
If the driver's door is not closed the
lights switch off after two minutes.
Exit lighting is switched off
immediately if the turn signal lever is
pulled while the driver's door is open.
Activation, deactivation and duration
of this function can be changed in the Info-Display. Vehicle personalisation
3 97.
The settings can be saved for the key being used 3 20.
Battery discharge
protection
Vehicle battery state of charge
function
The function guarantees longest
vehicle battery life via a generator with controllable power output and
optimised power distribution.
To prevent discharge of the vehicle
battery when driving, following
systems are reduced automatically in two stages and finally switched off:
■ Auxiliary heater
■ Heated rear window and mirrors■ Heated seats
■ Fan
In the second stage a message which
confirms the activation of the vehicle
battery discharge protection will be
displayed in the Driver Information
Centre.
Switching off electric lights To prevent discharge of the vehicle
battery when the ignition is switched
off, some interior lights are switched
off automatically after some time.
Page 185 of 217

Vehicle care183
4.Lift the spare wheel holder a bit by
hand and unhook the catch.
5. Lower the spare wheel holder.
6. Lift the spare wheel holder a bit by
hand and detach the safety cable.
7. Lower holder all the way and remove spare wheel.
8. Change the wheel 3 179.
The damaged wheel has to be
secured in the load compartment,
see below.
9. Lift the empty spare wheel holder and insert the safety cable.
10. Lift the spare wheel holder farther
and engage in catch. The open
side of the catch must point in the
direction of travel.
11. Close the empty spare wheel holder by turning the hexagon boltclockwise successively using the
wheel wrench.
12. Stow wheel wrench and the jack in the tool box in vehicle floor.
13. Close the load compartment floor.
Stowing a damaged wheel in the
load compartment The spare wheel holder is not
designed for other tyre sizes than the
spare wheel.
A damaged wheel wider than the
spare wheel has to be stowed in the
load compartment and secured with a strap. Vehicle tools 3 169.Wheels with tyre size up to
195/55R16 1. Remove load compartment cover and lift up load compartment floor.
Stow both behind the raised up
backrests of the rear seats.