display VAUXHALL ADAM 2015.5 Workshop Manual
[x] Cancel search | Manufacturer: VAUXHALL, Model Year: 2015.5, Model line: ADAM, Model: VAUXHALL ADAM 2015.5Pages: 233, PDF Size: 6.98 MB
Page 149 of 233

Driving and operating147
When a slot is detected, a visual
feedback in the Driver Information
Centre and an acoustic signal is
given.
Select parallel or perpendicular
parking slot by tapping the icon 6 or
7 on the Colour-Info-Display.
When a slot is detected, a visual
feedback on the Colour-Info-Display
and an acoustic signal is given.
If the driver does not stop the vehicle
within 10 metres for parallel parking
slots or 6 metres for perpendicular
parking slots after a parking slot is
proposed, the system starts to search
for another suitable parking slot.
Park guiding mode
The parking slot suggestion of the system is accepted when the vehicle
is stopped by the driver within
10 metres for parallel parking slots or
6 metres for perpendicular parkingslots after the Stop message is given.
The system calculates the optimal
path into the parking slot.
A brief vibration in the steering wheel
after engaging reverse gear indicates
that the steering is controlled by the
system. Then the vehicle is steered
into the slot automatically by giving
the driver detailed instructions for
braking, accelerating and gear
shifting. The driver must keep hands
away from the steering wheel.
Always pay attention to the sound of
the front-rear parking assist.
Continuous sound indicates that the
distance to an obstacle is less than
approx. 30 cm.
If, for any reason, the driver must take over control of the steering, hold the
steering wheel only at the outer edge. Automatic steering is cancelled in thisevent.Changing the parking side
The system is configured to detect
parking slots by default on the
passenger side. To detect parking
Page 150 of 233

148Driving and operating
slots on the driver side, switch on turn
signal indicator to the driver side for
the durance of the search.
As soon as the turn signal indicator is switched off, the system searches for
parking slots on the passenger side again.Display indication
The instructions in the display show:
■ general hints and warning messages,
■ a hint when driving faster than 18 mph during parking slot
searching mode, or 5 mph in
guiding mode,
■ the demand to stop the vehicle, when a parking slot is detected,
■ the direction of driving during the parking manoeuvre,
■ the demand to gearshift rearwards or forwards,
■ the demand to accelerate or brake,
■ for some of the instructions a progress bar is shown in the DriverInformation Centre,■ the successful parking indicated by
a pop-up symbol and a chime,
■ the cancelling of a parking manoeuvre.
Display priorities
Advanced parking assist indication on
the Driver Information Centre can be
inhibited by vehicle messages with a higher priority. After approving the
message by pressing the SET/CLR
button on the turn signal lever,
advanced parking assist instructions
appear again and the parking
manoeuvre can be continued.
Deactivation
The system is deactivated by:
■ a long press of button D,
■ parking manoeuvre successfully ended,
■ driving faster than 18 mph during parking slot search,
■ driving faster than 5 mph during parking guidance,
■ driver interference on steering wheel detected,■ exceeding number of maximum gear changes: 8 parking cycles
when parallel parking or 5 cycles
when perpendicular parking,
■ switching off the ignition.
Deactivation by the driver or by the
system during manoeuvring will be
indicated by Parking Deactivated on
the display. Additionally an acoustic
signal sounds.
Fault
A message appears when:
■ there is a fault in the system; control
indicator r illuminates in the
instrument cluster,
■ the driver did not successfully complete the parking manoeuvre,
■ the system is not operational,
■ any of the deactivation reasons described above apply.
If an object is detected during parking
instructions, Stop is indicated on the
display. Removing the object will
resume the parking manoeuvre. If the
object is not removed, the system will
Page 152 of 233

150Driving and operating
Notice
After production, the system
requires a calibration. For optimal parking guidance, a driving distance of at least 6 miles, including a
number of bends, is required.
Side blind spot alert The Side blind spot alert system
detects and reports objects on either
side of the vehicle, within a specified
"blind spot" zone. The system alerts
visually in each exterior mirror, when
detecting objects that may not be
visible in the interior and exterior
mirrors.
Side blind spot alert uses some of the advanced parking assist sensors
which are located in the front and rear
bumper on both sides of the vehicle.9 Warning
Side blind spot alert does not
replace driver vision.
The system does not detect:
■ Vehicles outside the side blind zones which may be rapidly
approaching.
■ Pedestrians, cyclists or animals.
Before changing a lane, always
check all mirrors, look over the
shoulder and use the turn signal.
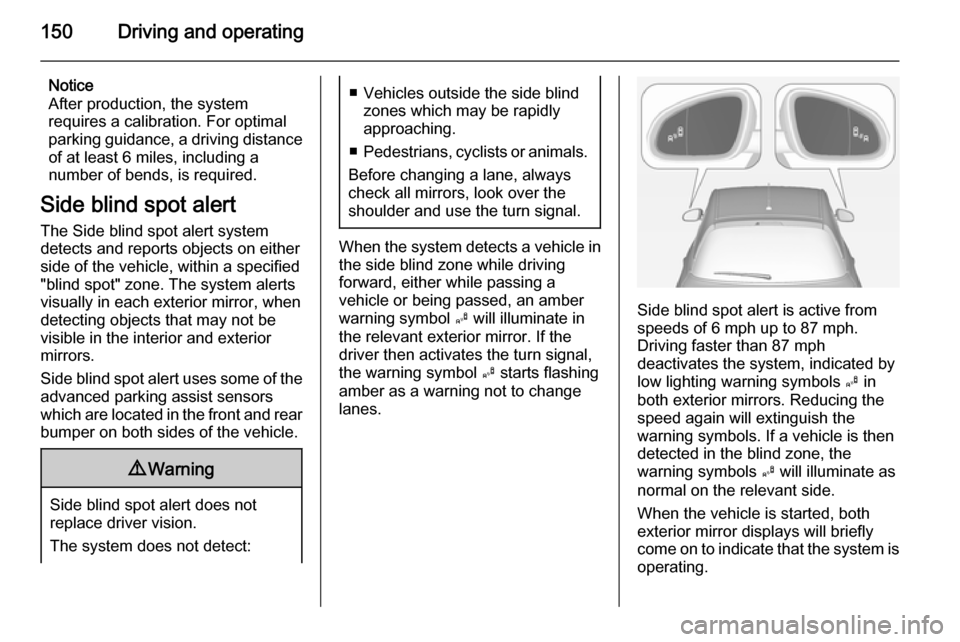
When the system detects a vehicle in the side blind zone while driving
forward, either while passing a
vehicle or being passed, an amber warning symbol B will illuminate in
the relevant exterior mirror. If the
driver then activates the turn signal,
the warning symbol B starts flashing
amber as a warning not to change
lanes.
Side blind spot alert is active from
speeds of 6 mph up to 87 mph.
Driving faster than 87 mph
deactivates the system, indicated by
low lighting warning symbols B in
both exterior mirrors. Reducing the speed again will extinguish the
warning symbols. If a vehicle is then
detected in the blind zone, the
warning symbols B will illuminate as
normal on the relevant side.
When the vehicle is started, both
exterior mirror displays will briefly
come on to indicate that the system is
operating.
Page 153 of 233

Driving and operating151
The system can be activated or
deactivated in the Info-Display,
vehicle personalisation 3 100.
Deactivation is indicated by a
message in the Driver Information
Centre.
Detection zones
The detection zones start at the rear
bumper and extend approx.
3 metres rearwards and to the sides.
The height of the zone is approx.
between 0.5 metres and 2 metres off
the ground.
Side blind spot alert is designed to ignore stationary objects, e.g.
guardrails, posts, curbs, walls and
beams. Parked vehicles or oncoming vehicles are not detected.
Fault Occasional missed alerts can occur
under normal circumstances and will
increase in wet conditions.
Side blind spot alert does not operate when the left or right corners of the
rear bumper are covered with mud,dirt, snow, ice, slush, or in heavy
rainstorms. Cleaning instructions
3 203.
In the event of a fault in the system or if the system does not work due to
temporary conditions, a message is
displayed in the Driver Information
Centre. Seek the assistance of a
workshop.Fuel
Fuel for petrol enginesOnly use unleaded fuel that complies
with European standard EN 228 or E DIN 51626-1 or equivalent.
The engine is capable of running with E10 fuel that fulfills these standards.E10 fuel contains up to 10 %
bioethanol.
Use fuel with the recommended
octane rating 3 215. Use of fuel with
too low an octane rating can reduce
engine power and torque and slightly increases fuel consumption.Caution
Do not use fuel or fuel additives
that contain metallic compounds
such as manganese-based
additives. This may cause engine
damage.
Page 180 of 233

178Vehicle care
No.Circuit1–2–3Power windows4Voltage transformer5Body control module 16Body control module 27Body control module 38Body control module 49Body control module 510Body control module 611Body control module 712Body control module 813–14Tailgate15Diagnostic connector16Data link connection17IgnitionNo.Circuit18Air conditioning system19Audio amplifier20Parking assist21Brake switch22Audio system23Display24–25Onstar26Instrument panel27Seat heating, driver28–29–30Instrument panel31Horn32Seat heating, passenger33Heated steering wheel34–
Page 185 of 233

Vehicle care183
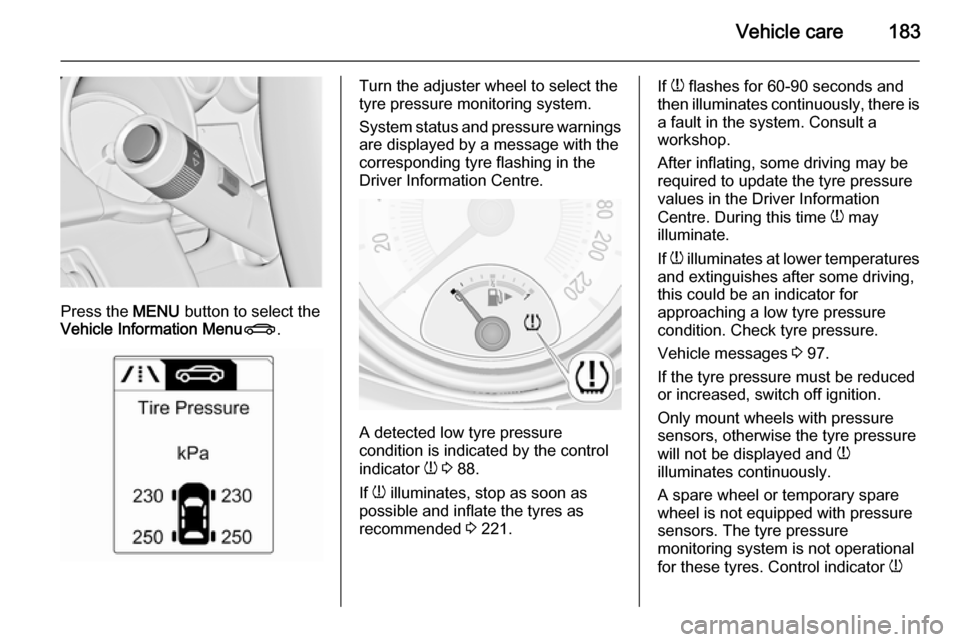
Press the MENU button to select the
Vehicle Information Menu X.
Turn the adjuster wheel to select the
tyre pressure monitoring system.
System status and pressure warnings
are displayed by a message with the
corresponding tyre flashing in the
Driver Information Centre.
A detected low tyre pressure
condition is indicated by the control
indicator w 3 88.
If w illuminates, stop as soon as
possible and inflate the tyres as
recommended 3 221.
If w flashes for 60-90 seconds and
then illuminates continuously, there is
a fault in the system. Consult a
workshop.
After inflating, some driving may be
required to update the tyre pressure
values in the Driver Information
Centre. During this time w may
illuminate.
If w illuminates at lower temperatures
and extinguishes after some driving,
this could be an indicator for
approaching a low tyre pressure
condition. Check tyre pressure.
Vehicle messages 3 97.
If the tyre pressure must be reduced
or increased, switch off ignition.
Only mount wheels with pressure
sensors, otherwise the tyre pressure
will not be displayed and w
illuminates continuously.
A spare wheel or temporary spare
wheel is not equipped with pressure
sensors. The tyre pressure
monitoring system is not operational
for these tyres. Control indicator w
Page 187 of 233

Vehicle care185
3. On vehicles with manualtransmission automated: Press
and hold brake pedal. Move and
hold the selector lever for
5 seconds in position N until P is
displayed in the DIC. P indicates
that the sensor matching process of the TPMS can be started.
On vehicles with manual
transmission: select neutral.
4. Use the MENU button on the turn
signal lever to select the Vehicle
Information Menu in the DIC.
5. Turn the adjuster wheel to scroll to
the tyre pressure menu.
6. Press the SET/CLR button to
begin the sensor matching
process. A message requesting
acceptance of the process should
be displayed.
7. Press the SET/CLR button again
to confirm the selection. The horn sounds twice to indicate that the
receiver is in relearn mode.
8. Start with the left side front wheel.9. Place the relearn tool against the
tyre sidewall, near the valve stem.Then press the button to activate
the TPMS sensor. A horn chirp
confirms that the sensor
identification code has been
matched to this wheel position.
10. Proceed to the right side front wheel, and repeat the procedure
in Step 9.
11. Proceed to the right side rear wheel, and repeat the procedure
in Step 9.
12. Proceed to the left side rear wheel, and repeat the procedure
in Step 9. The horn sounds twice
to indicate that the sensor
identification code has been
matched to the left side rear
wheel, and the TPMS sensor
matching process is no longer
active.
13. Turn off the ignition.14. Set all four tyres to the recommended air pressure level
as indicated on the tyre
information label.
15. Ensure the tyre loading status is set according to the selected
pressure 3 90.
Temperature dependency
Tyre pressure depends on the
temperature of the tyre. During
driving, tyre temperature and
pressure increase.
The tyre pressure value displayed in
the Driver Information Centre shows
the actual tyre pressure. Therefore it
is important to check tyre pressure
with cold tyres.
Tread depth
Check tread depth at regular
intervals.
Tyres should be replaced for safety
reasons at a tread depth of 2-3 mm
(4 mm for winter tyres).
Page 207 of 233

Vehicle care205
Glass panel
Never clean with solvents or abrasive
agents, fuels, aggressive media
(e.g. paint cleaner, acetone-
containing solutions etc.), acidic or
highly alkaline media or abrasive
pads. Do not apply wax or polishing
agents to the glass panel.
Wheels and tyres Do not use high-pressure jet
cleaners.
Clean rims with a pH-neutral wheel
cleaner.
Rims are painted and can be treated
with the same agents as the body.
Paintwork damageRectify minor paintwork damage with
a touch-up pen before rust forms.
Have more extensive damage or rust
areas repaired by a workshop.
Underbody
Some areas of the vehicle underbody
have a PVC undercoating while other critical areas have a durable
protective wax coating.After the underbody is washed, check
the underbody and have it waxed if
necessary.
Bitumen/rubber materials could
damage the PVC coating. Have
underbody work carried out by a
workshop.
Before and after winter, wash the
underbody and have the protective
wax coating checked.
Liquid gas system9 Danger
Liquid gas is heavier than air and
can collect in sink points.
Take care when performing work
at the underbody in a pit.
For painting work and when using a
drying booth at a temperature above
60 °C, the liquid gas tank must be
removed.
Do not make any modifications to the
liquid gas system.
Rear carrier system
Clean the rear carrier system with a
steam-jet or high-pressure jet cleaner
at least once a year.
Operate the rear carrier system
periodically if not in regular use, in
particular during winter.
Interior care
Interior and upholstery Only clean the vehicle interior,
including the instrument panel fascia
and panelling, with a dry cloth or
interior cleaner.
Clean the leather upholstery with
clear water and a soft cloth. In case of heavy soiling, use leather care.
The instrument cluster and the
displays should only be cleaned using
a soft damp cloth. If necessary use a
weak soap solution.
Clean fabric upholstery with a
vacuum cleaner and brush. Remove
stains with an upholstery cleaner.
Page 209 of 233

Service and maintenance207Service and
maintenanceGeneral information ...................207
Recommended fluids, lubricants and parts .................................... 208General information
Service information In order to ensure economical and
safe vehicle operation and to
maintain the value of your vehicle, it
is of vital importance that all
maintenance work is carried out at the proper intervals as specified.
The detailed, up-to-date service
schedule for your vehicle is available
at the workshop.
Service display 3 82.
European service intervals
Maintenance of your vehicle is
required every 20,000 miles or after
1 year , whichever occurs first, unless
otherwise indicated in the service
display.
A shorter service interval can be valid for severe driving behaviour, e.g. for
taxis and police vehicles.
The European service intervals are
valid for the following countries:Andorra, Austria, Belgium, Bosnia-
Herzegovina, Bulgaria, Croatia,
Cyprus, Czech Republic, Denmark,
Estonia, Finland, France, Germany,
Greece, Greenland, Hungary,
Iceland, Ireland, Italy, Latvia,
Lithuania, Luxembourg, Macedonia,
Malta, Montenegro, Netherlands,
Norway, Poland, Portugal, Romania,
Serbia, Slovakia, Slovenia, Spain,
Sweden, Switzerland, United
Kingdom.
Service display 3 82.
International service intervals Maintenance of your vehicle is
required every 10,000 miles or after
1 year , whichever occurs first, unless
otherwise indicated in the service
display.
The international service intervals are
valid for the countries which are not
listed in the European service
intervals.
Service display 3 82.
Page 210 of 233

208Service and maintenance
Confirmations
Confirmation of service is recorded in the Service and Warranty Booklet.The date and mileage is completed
with the stamp and signature of the servicing workshop.
Make sure that the Service and
Warranty Booklet is completed
correctly as continuous proof of
service is essential if any warranty or goodwill claims are to be met, and is
also a benefit when selling the
vehicle.
Service interval with remaining engine oil life duration The service interval is based on
several parameters depending on
usage.
The service display lets you know
when to change the engine oil.
Service display 3 82.Recommended fluids,
lubricants and parts
Recommended fluids and
lubricants Only use products that meet the
recommended specifications.
Damage resulting from the use of
products not in line with these
specifications will not be covered by
the warranty.9 Warning
Operating materials are
hazardous and could be
poisonous. Handle with care. Pay
attention to information given on
the containers.
Engine oil
Engine oil is identified by its quality
and its viscosity. Quality is more
important than viscosity when
selecting which engine oil to use. The oil quality ensures e.g. engine
cleanliness, wear protection and oil
aging control, whereas viscosity
grade gives information on the oil's
thickness over a temperature range.
Dexos is the newest engine oil quality
that provides optimum protection for petrol and diesel engines. If it is
unavailable, engine oils of other listed qualities have to be used.
Recommendations for petrol engines
are also valid for Compressed Natural
Gas (CNG), Liquified Petroleum Gas
(LPG) and Ethanol (E85) fuelled
engines.
Select the appropriate engine oil
based on its quality and on the
minimum ambient temperature
3 212.
Topping up engine oil
Engine oils of different manufacturers and brands can be mixed as long as
they comply with the required engine oil quality and viscosity.
Use of engine oil with only
ACEA A1/B1 or only A5/B5 quality is
prohibited, since it can cause long-
term engine damage under certain
operating conditions.