height VAUXHALL ADAM 2015.5 Owner's Manual
[x] Cancel search | Manufacturer: VAUXHALL, Model Year: 2015.5, Model line: ADAM, Model: VAUXHALL ADAM 2015.5Pages: 233, PDF Size: 6.98 MB
Page 9 of 233
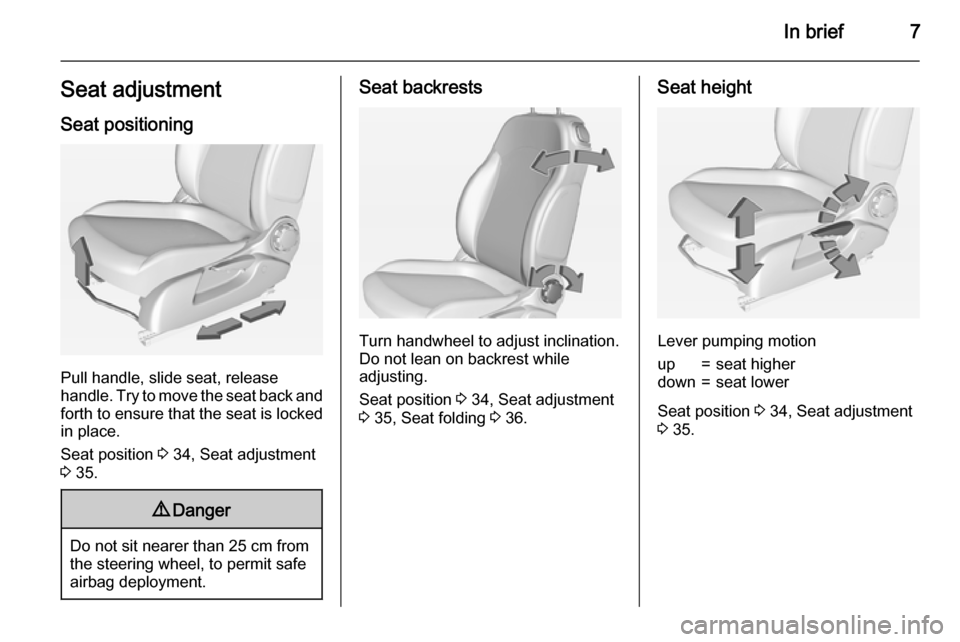
In brief7Seat adjustmentSeat positioning
Pull handle, slide seat, release
handle. Try to move the seat back and forth to ensure that the seat is locked
in place.
Seat position 3 34, Seat adjustment
3 35.
9 Danger
Do not sit nearer than 25 cm from
the steering wheel, to permit safe
airbag deployment.
Seat backrests
Turn handwheel to adjust inclination.
Do not lean on backrest while
adjusting.
Seat position 3 34, Seat adjustment
3 35, Seat folding 3 36.
Seat height
Lever pumping motion
up=seat higherdown=seat lower
Seat position 3 34, Seat adjustment
3 35.
Page 10 of 233
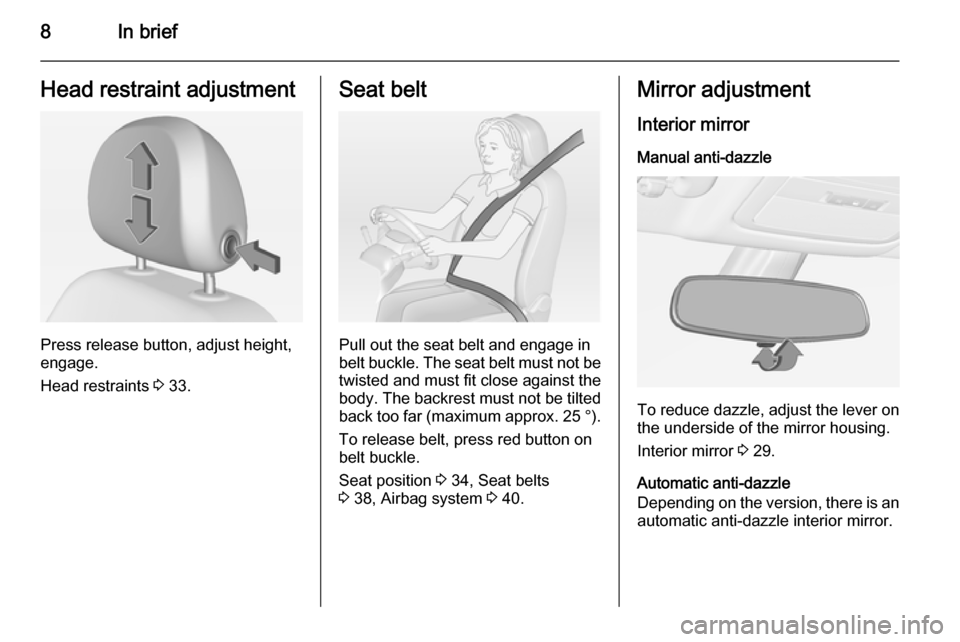
8In briefHead restraint adjustment
Press release button, adjust height,
engage.
Head restraints 3 33.
Seat belt
Pull out the seat belt and engage in
belt buckle. The seat belt must not be twisted and must fit close against the
body. The backrest must not be tilted
back too far (maximum approx. 25 ° ).
To release belt, press red button on belt buckle.
Seat position 3 34, Seat belts
3 38, Airbag system 3 40.
Mirror adjustment
Interior mirror
Manual anti-dazzle
To reduce dazzle, adjust the lever on the underside of the mirror housing.
Interior mirror 3 29.
Automatic anti-dazzle
Depending on the version, there is an
automatic anti-dazzle interior mirror.
Page 35 of 233
Seats, restraints33Seats, restraintsHead restraints............................ 33
Front seats ................................... 34
Seat belts ..................................... 38
Airbag system .............................. 40
Child restraints ............................. 47Head restraints
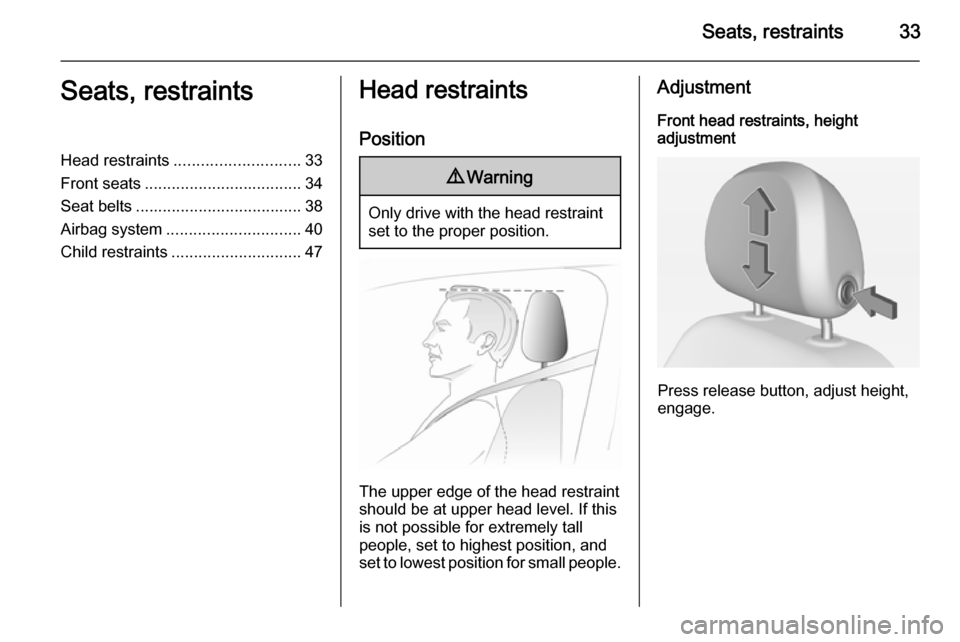
Position9 Warning
Only drive with the head restraint
set to the proper position.
The upper edge of the head restraint
should be at upper head level. If this
is not possible for extremely tall
people, set to highest position, and
set to lowest position for small people.
Adjustment
Front head restraints, height
adjustment
Press release button, adjust height,
engage.
Page 36 of 233
34Seats, restraints
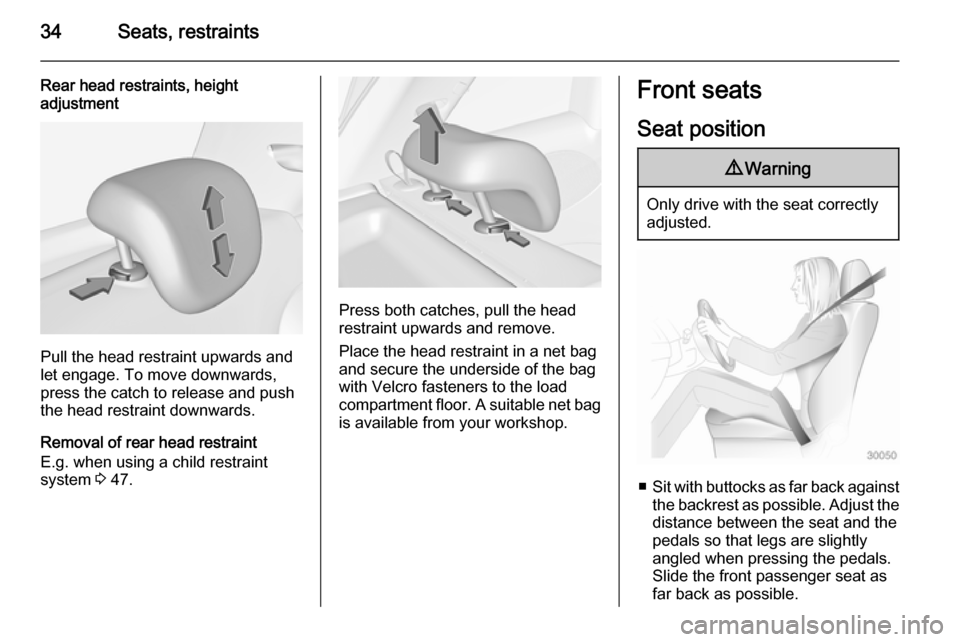
Rear head restraints, height
adjustment
Pull the head restraint upwards and
let engage. To move downwards, press the catch to release and push
the head restraint downwards.
Removal of rear head restraint
E.g. when using a child restraint
system 3 47.
Press both catches, pull the head
restraint upwards and remove.
Place the head restraint in a net bag
and secure the underside of the bag
with Velcro fasteners to the load
compartment floor. A suitable net bag
is available from your workshop.
Front seats
Seat position9 Warning
Only drive with the seat correctly
adjusted.
■ Sit with buttocks as far back against
the backrest as possible. Adjust the distance between the seat and the
pedals so that legs are slightly
angled when pressing the pedals.
Slide the front passenger seat as
far back as possible.
Page 37 of 233
Seats, restraints35
■ Sit with shoulders as far backagainst the backrest as possible.
Set the backrest rake so that it is
possible to easily reach the
steering wheel with arms slightly
bent. Maintain contact between
shoulders and the backrest when
turning the steering wheel. Do not
angle the backrest too far back. We
recommend a maximum rake of
approx. 25°.
■ Adjust the steering wheel 3 72.
■ Set seat height high enough to have a clear field of vision on allsides and of all display instruments. There should be at least one hand
of clearance between head and the
roof frame. Your thighs should rest
lightly on the seat without pressing
into it.
■ Adjust the head restraint 3 33.Seat adjustment9 Danger
Do not sit nearer than 25 cm from
the steering wheel, to permit safe
airbag deployment.
9 Warning
Never adjust seats while driving as
they could move uncontrollably.
9 Warning
Never store any objects under the
seats.
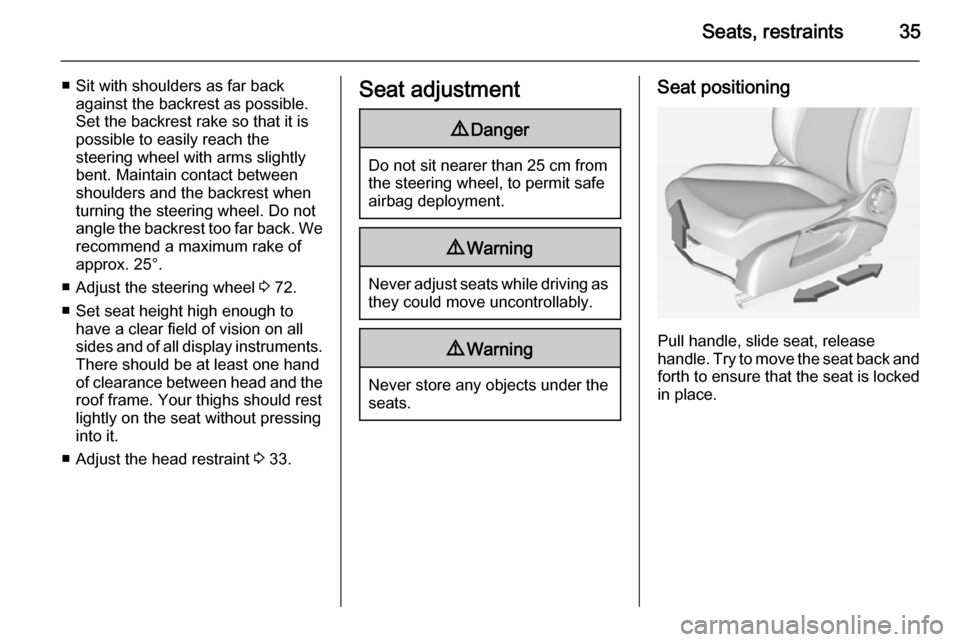
Seat positioning
Pull handle, slide seat, release
handle. Try to move the seat back and forth to ensure that the seat is locked
in place.
Page 38 of 233
36Seats, restraints
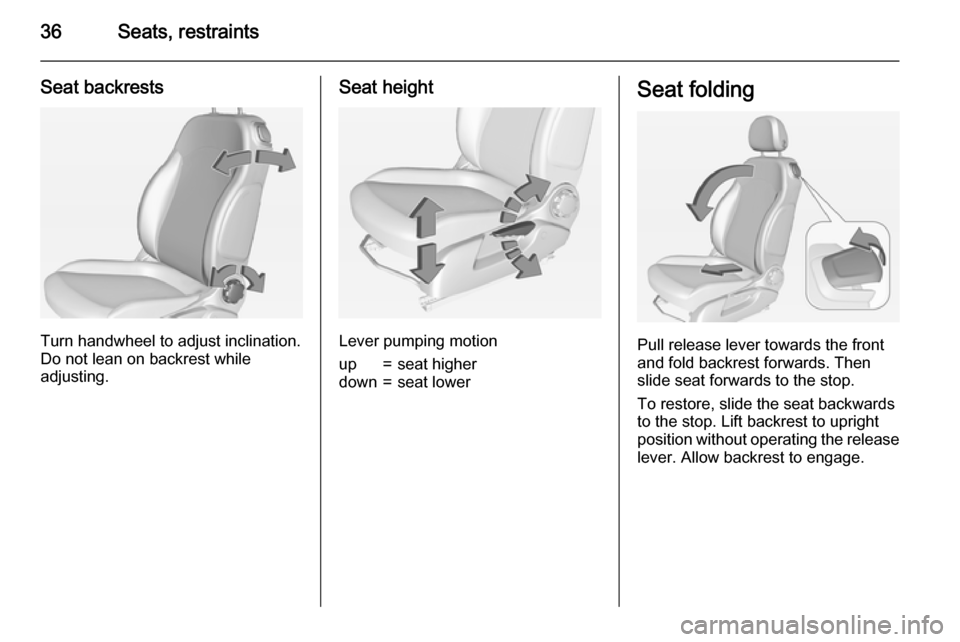
Seat backrests
Turn handwheel to adjust inclination.
Do not lean on backrest while
adjusting.
Seat height
Lever pumping motion
up=seat higherdown=seat lowerSeat folding
Pull release lever towards the front
and fold backrest forwards. Then
slide seat forwards to the stop.
To restore, slide the seat backwards
to the stop. Lift backrest to upright
position without operating the release
lever. Allow backrest to engage.
Page 39 of 233
Seats, restraints379Warning
When folding up, ensure that the
seat is securely locked in position
before driving. Failure to do so
may result in personal injury in the event of heavy braking or collision.
The memory function allows the seat
to engage in its original position after
folding.
Do not operate backrest adjuster
handwheel when backrest is folded
forwards.
Caution
When seat height is in the highest position, push head restraints
down and fold up sun visors before
folding backrest forwards.
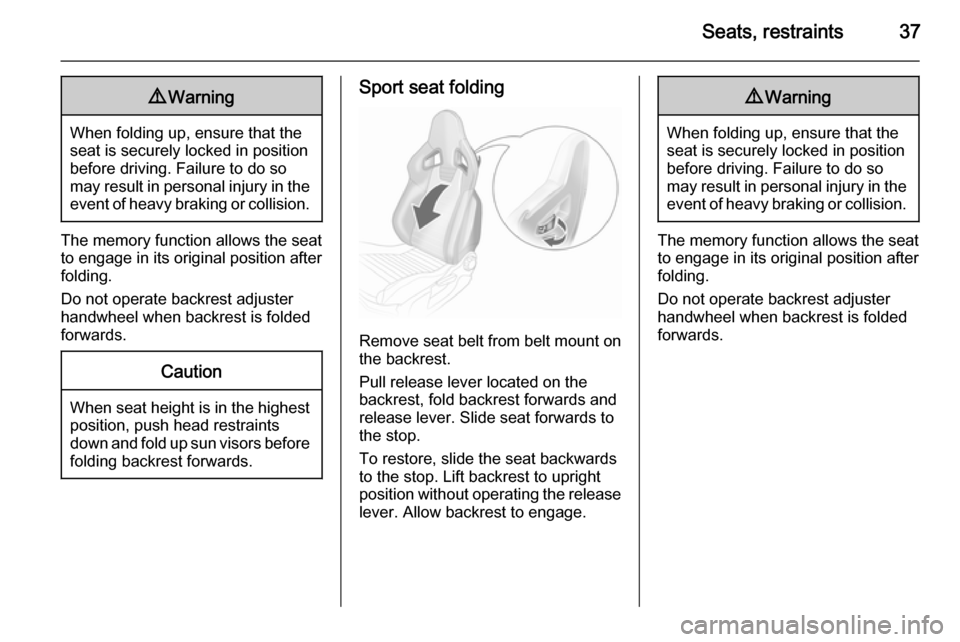
Sport seat folding
Remove seat belt from belt mount on
the backrest.
Pull release lever located on the
backrest, fold backrest forwards and
release lever. Slide seat forwards to
the stop.
To restore, slide the seat backwards
to the stop. Lift backrest to upright
position without operating the release lever. Allow backrest to engage.
9 Warning
When folding up, ensure that the
seat is securely locked in position
before driving. Failure to do so
may result in personal injury in the event of heavy braking or collision.
The memory function allows the seat
to engage in its original position after
folding.
Do not operate backrest adjuster
handwheel when backrest is folded
forwards.
Page 51 of 233

Seats, restraints49
1=if the child restraint system is being secured using a three-point seat belt, adjust seat backrest inclination to a verticalposition to ensure that the belt is tight on the buckle side. Move seat height adjustment in the uppermost position.2=remove rear head restraint when using child restraint systems in this group 3 33*=move the respective front seat ahead of the child restraint system to one of the foremost adjustment positions**=move the front passenger seat to the rearmost adjustment position. Move seat height adjustment to the uppermost
position and the headrest to the lowest position. Adjust seat backrest inclination as far as necessary to a vertical position to ensure that vehicle seat belt runs forwards from the upper anchorage pointU=universal suitability in conjunction with three-point seat beltX=no child restraint system permitted in this weight class
Permissible options for fitting an ISOFIX child restraint system
Weight classSize classFixtureOn front passenger seatOn rear seatsGroup 0: up to 10 kg
or approx. 10 monthsEISO/R1XIL *Group 0+: up to 13 kg
or approx. 2 yearsEISO/R1XIL *DISO/R2XXCISO/R3XX
Page 153 of 233

Driving and operating151
The system can be activated or
deactivated in the Info-Display,
vehicle personalisation 3 100.
Deactivation is indicated by a
message in the Driver Information
Centre.
Detection zones
The detection zones start at the rear
bumper and extend approx.
3 metres rearwards and to the sides.
The height of the zone is approx.
between 0.5 metres and 2 metres off
the ground.
Side blind spot alert is designed to ignore stationary objects, e.g.
guardrails, posts, curbs, walls and
beams. Parked vehicles or oncoming vehicles are not detected.
Fault Occasional missed alerts can occur
under normal circumstances and will
increase in wet conditions.
Side blind spot alert does not operate when the left or right corners of the
rear bumper are covered with mud,dirt, snow, ice, slush, or in heavy
rainstorms. Cleaning instructions
3 203.
In the event of a fault in the system or if the system does not work due to
temporary conditions, a message is
displayed in the Driver Information
Centre. Seek the assistance of a
workshop.Fuel
Fuel for petrol enginesOnly use unleaded fuel that complies
with European standard EN 228 or E DIN 51626-1 or equivalent.
The engine is capable of running with E10 fuel that fulfills these standards.E10 fuel contains up to 10 %
bioethanol.
Use fuel with the recommended
octane rating 3 215. Use of fuel with
too low an octane rating can reduce
engine power and torque and slightly increases fuel consumption.Caution
Do not use fuel or fuel additives
that contain metallic compounds
such as manganese-based
additives. This may cause engine
damage.
Page 162 of 233
160Vehicle care9Danger
The ignition system uses
extremely high voltage. Do not
touch.
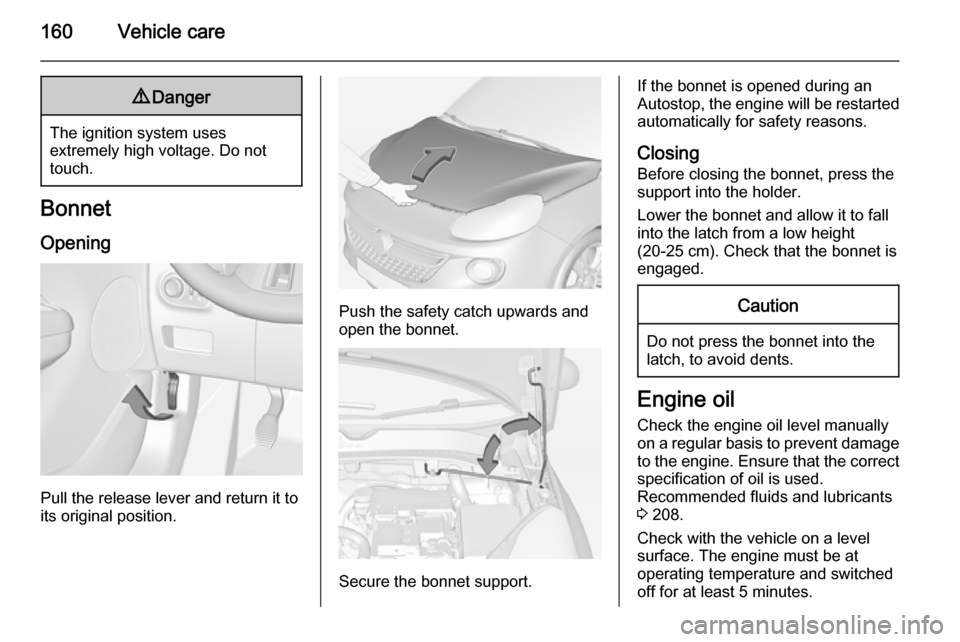
Bonnet
Opening
Pull the release lever and return it to
its original position.
Push the safety catch upwards and open the bonnet.
Secure the bonnet support.
If the bonnet is opened during an
Autostop, the engine will be restarted automatically for safety reasons.
Closing Before closing the bonnet, press the
support into the holder.
Lower the bonnet and allow it to fall
into the latch from a low height
(20-25 cm). Check that the bonnet is engaged.Caution
Do not press the bonnet into the
latch, to avoid dents.
Engine oil
Check the engine oil level manuallyon a regular basis to prevent damage
to the engine. Ensure that the correct specification of oil is used.
Recommended fluids and lubricants
3 208.
Check with the vehicle on a level
surface. The engine must be at
operating temperature and switched
off for at least 5 minutes.