start stop VAUXHALL ADAM 2015 Owner's Guide
[x] Cancel search | Manufacturer: VAUXHALL, Model Year: 2015, Model line: ADAM, Model: VAUXHALL ADAM 2015Pages: 225, PDF Size: 6.81 MB
Page 131 of 225

Driving and operating129To reduce the operating forces of
the parking brake, depress the
foot brake at the same time.
Control indicator R 3 86.
Brake assist
If the brake pedal is depressed
quickly and forcefully, maximum
brake force is automatically applied
(full braking).
Maintain steady pressure on the brake pedal for as long as full braking is required. Maximum brake force is
automatically reduced when the
brake pedal is released.
Hill start assist The system helps prevent unintendedmovement when driving away on
inclines.
When releasing the foot brake after
stopping on an incline, the brakes
remain on for a further two seconds.
The brakes release automatically as
soon as the vehicle begins to
accelerate or the two seconds holding
time is over.
The hill start assist is not active during
an Autostop.Ride control systems
Traction Control system
The Traction Control system (TC) is a
component of the Electronic Stability
Control (ESC).
TC improves driving stability when
necessary, regardless of the type of
road surface or tyre grip, by
preventing the drive wheels from
spinning.
As soon as the drive wheels starts to spin, engine output is reduced and
the wheel spinning the most is braked
individually. This considerably
improves the driving stability of the
vehicle on slippery road surfaces.
Page 133 of 225

Driving and operating131
FaultIf there is a fault in the system the
control indicator b illuminates
continuously and a message or a
warning code appears in the Driver
Information Centre. The system is not
operational.
Have the cause of the fault remedied by a workshop.
City mode City mode is a feature which enables
increased steering assistance during
lower speed conditions, e.g. city
traffic or parking. Steering assistance
is increased for greater convenience.Activation
Press button B when engine is
running. The system works from
standstill up to 22 mph, and in reverse gear. Above this speed the system
changes to normal mode. When
activated, City mode engages
automatically below 22 mph.
An illuminated LED in the City mode
button indicates that the system is
active.
Additionally, a message pops-up in
the Driver Information Centre.
City mode remains active during an
Autostop, but is only operational
when the engine is running.
Stop-start system 3 123.
Deactivation
Press button B; LED in the button
extinguishes and a message pops-up
in the Driver Information Centre.
Each time the engine is started, City
mode is deactivated.
Overload If the steering in City mode is heavily
loaded, e.g. in long parking
manoeuvres or heavy city traffic, the
system is deactivated for overheat
protection. Steering operates in
normal mode until City mode
activates automatically.
Page 143 of 225

Driving and operating141
Select parallel or perpendicular
parking slot in Driver Information
Centre by pressing the SET/CLR
button.
When a slot is detected, a visual
feedback in the Driver Information
Centre and an acoustic signal is
given.
Select parallel or perpendicular
parking slot by tapping the icon 6 or
7 on the Colour-Info-Display.
When a slot is detected, a visual
feedback on the Colour-Info-Display
and an acoustic signal is given.
If the driver does not stop the vehicle
within 10 metres for parallel parking
slots or 6 metres for perpendicular
parking slots after a parking slot is
proposed, the system starts to search
for another suitable parking slot.
Park guiding mode
The parking slot suggestion of the system is accepted when the vehicle
is stopped by the driver within
10 metres for parallel parking slots or
6 metres for perpendicular parking
Page 156 of 225

154Vehicle care9Danger
The ignition system uses
extremely high voltage. Do not
touch.
Bonnet
Opening
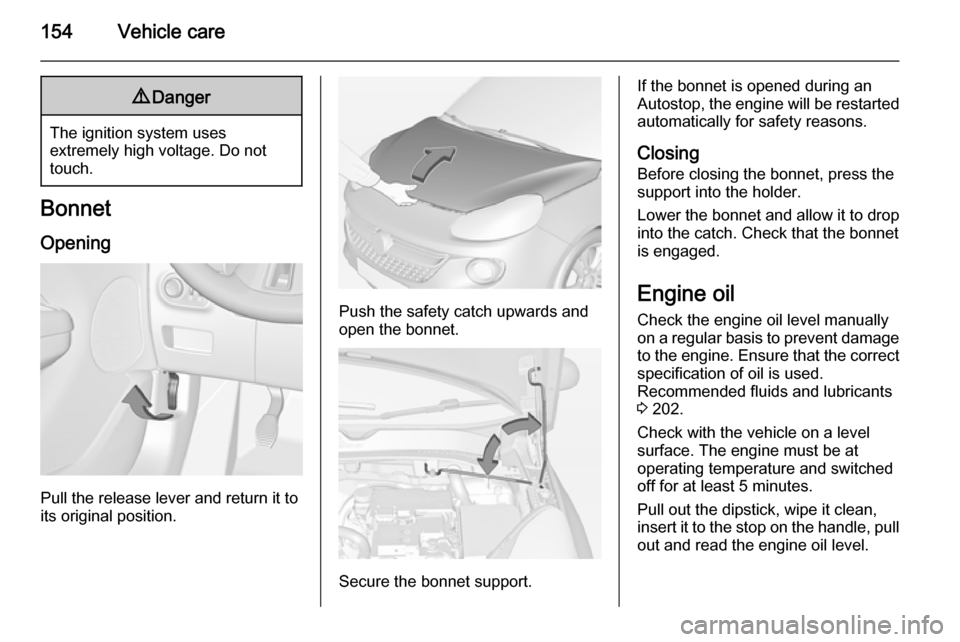
Pull the release lever and return it to
its original position.
Push the safety catch upwards and open the bonnet.
Secure the bonnet support.
If the bonnet is opened during an
Autostop, the engine will be restarted automatically for safety reasons.
Closing Before closing the bonnet, press the
support into the holder.
Lower the bonnet and allow it to drop
into the catch. Check that the bonnet
is engaged.
Engine oil
Check the engine oil level manually
on a regular basis to prevent damage
to the engine. Ensure that the correct specification of oil is used.
Recommended fluids and lubricants
3 202.
Check with the vehicle on a level
surface. The engine must be at
operating temperature and switched
off for at least 5 minutes.
Pull out the dipstick, wipe it clean, insert it to the stop on the handle, pull
out and read the engine oil level.
Page 159 of 225

Vehicle care157
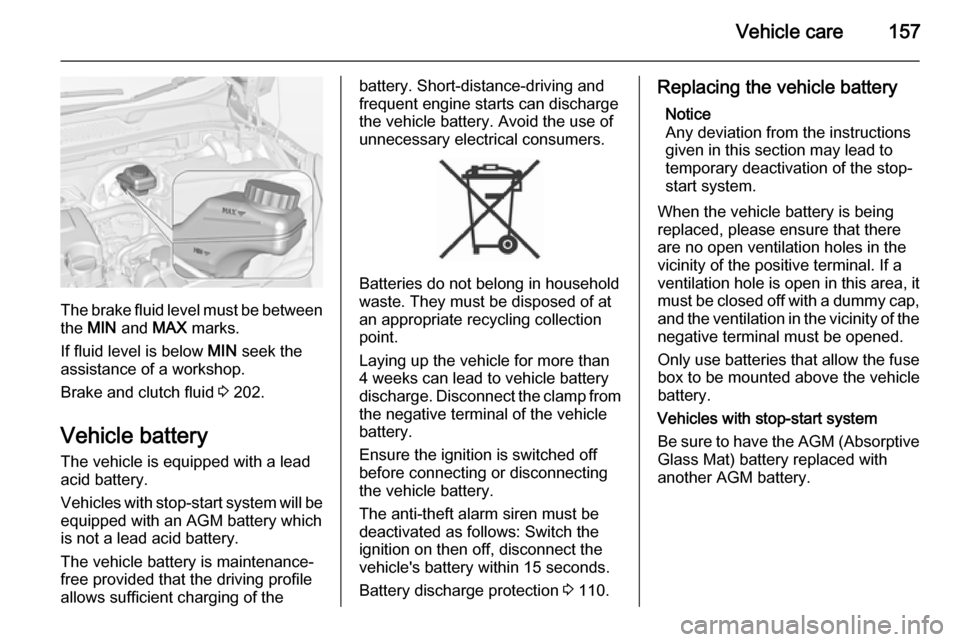
The brake fluid level must be betweenthe MIN and MAX marks.
If fluid level is below MIN seek the
assistance of a workshop.
Brake and clutch fluid 3 202.
Vehicle battery The vehicle is equipped with a lead
acid battery.
Vehicles with stop-start system will be
equipped with an AGM battery which
is not a lead acid battery.
The vehicle battery is maintenance-
free provided that the driving profile
allows sufficient charging of the
battery. Short-distance-driving and
frequent engine starts can discharge
the vehicle battery. Avoid the use of
unnecessary electrical consumers.
Batteries do not belong in household
waste. They must be disposed of at
an appropriate recycling collection
point.
Laying up the vehicle for more than
4 weeks can lead to vehicle battery
discharge. Disconnect the clamp from the negative terminal of the vehicle
battery.
Ensure the ignition is switched off
before connecting or disconnecting
the vehicle battery.
The anti-theft alarm siren must be
deactivated as follows: Switch the
ignition on then off, disconnect the
vehicle's battery within 15 seconds.
Battery discharge protection 3 110.
Replacing the vehicle battery
Notice
Any deviation from the instructions
given in this section may lead to
temporary deactivation of the stop-
start system.
When the vehicle battery is being
replaced, please ensure that there
are no open ventilation holes in the
vicinity of the positive terminal. If a
ventilation hole is open in this area, it
must be closed off with a dummy cap,
and the ventilation in the vicinity of the negative terminal must be opened.
Only use batteries that allow the fuse
box to be mounted above the vehicle
battery.
Vehicles with stop-start system
Be sure to have the AGM (Absorptive
Glass Mat) battery replaced with
another AGM battery.
Page 160 of 225

158Vehicle care
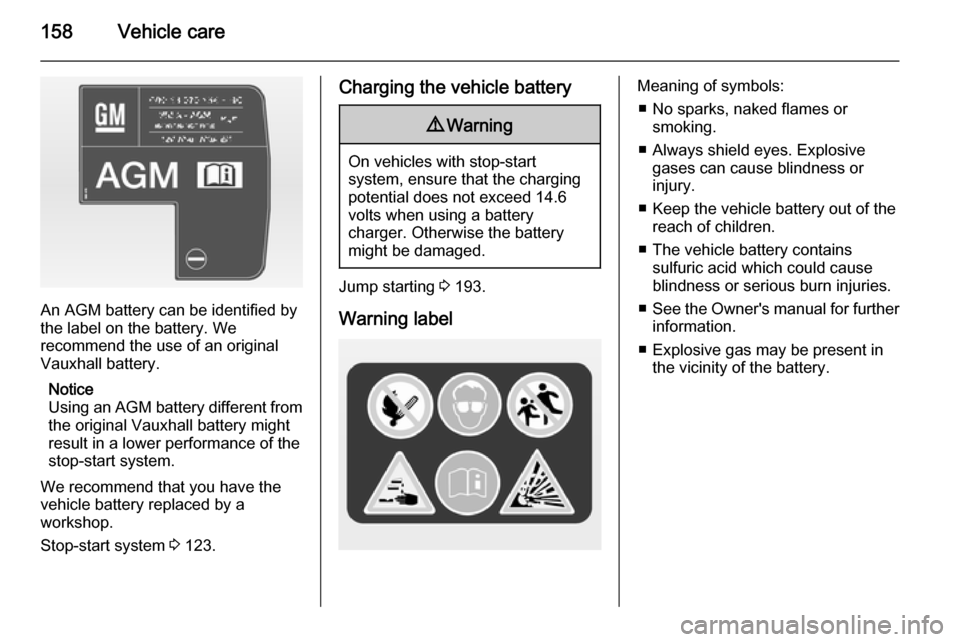
An AGM battery can be identified by
the label on the battery. We
recommend the use of an original
Vauxhall battery.
Notice
Using an AGM battery different from
the original Vauxhall battery might
result in a lower performance of the
stop-start system.
We recommend that you have the
vehicle battery replaced by a
workshop.
Stop-start system 3 123.
Charging the vehicle battery9 Warning
On vehicles with stop-start
system, ensure that the charging potential does not exceed 14.6
volts when using a battery
charger. Otherwise the battery
might be damaged.
Jump starting 3 193.
Warning label
Meaning of symbols: ■ No sparks, naked flames or smoking.
■ Always shield eyes. Explosive gases can cause blindness or
injury.
■ Keep the vehicle battery out of the reach of children.
■ The vehicle battery contains sulfuric acid which could cause
blindness or serious burn injuries.
■ See the Owner's manual for further
information.
■ Explosive gas may be present in the vicinity of the battery.
Page 180 of 225

178Vehicle care
The use of commercially-availableliquid tyre repair kits can impair the
function of the system. Factory-
approved repair kits can be used.
External high-power radio equipment
could disrupt the tyre pressure
monitoring system.
Each time the tyres are replaced, tyre pressure monitoring system sensors
must be dismounted and serviced.
For the screwed sensor; replace
valve core and sealing ring. For the
clipped sensor; replace complete
valve stem.
Vehicle loading status Adjust tyre pressure to load condition according tyre information label or
tyre pressure chart 3 214, and select
the according setting in the menu Tire
Load in the Driver Information Centre,
Vehicle Information Menu 3 89.
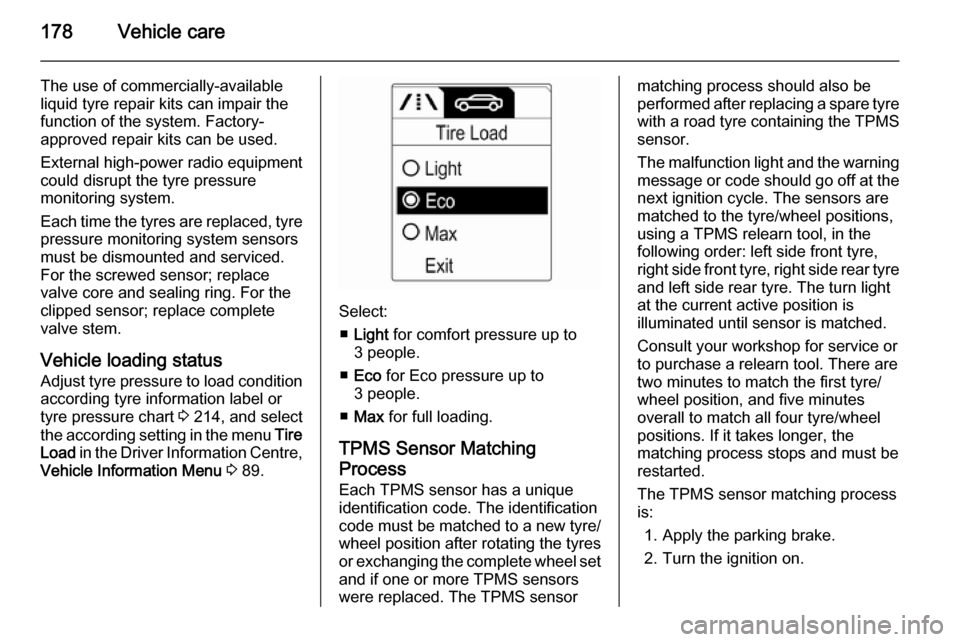
Select:
■ Light for comfort pressure up to
3 people.
■ Eco for Eco pressure up to
3 people.
■ Max for full loading.
TPMS Sensor Matching
Process
Each TPMS sensor has a unique
identification code. The identification
code must be matched to a new tyre/
wheel position after rotating the tyres
or exchanging the complete wheel set
and if one or more TPMS sensors
were replaced. The TPMS sensor
matching process should also be
performed after replacing a spare tyre with a road tyre containing the TPMS
sensor.
The malfunction light and the warning
message or code should go off at the
next ignition cycle. The sensors are
matched to the tyre/wheel positions,
using a TPMS relearn tool, in the
following order: left side front tyre,
right side front tyre, right side rear tyre and left side rear tyre. The turn light
at the current active position is
illuminated until sensor is matched.
Consult your workshop for service or
to purchase a relearn tool. There are
two minutes to match the first tyre/
wheel position, and five minutes
overall to match all four tyre/wheel
positions. If it takes longer, the
matching process stops and must be
restarted.
The TPMS sensor matching process is:
1. Apply the parking brake.
2. Turn the ignition on.
Page 223 of 225

221
Service ....................................... 120
Service display ............................ 81
Service information ....................201
Service vehicle soon .................... 86
Side airbag system ......................42
Side blind spot alert ....................144
Sidelights .................................... 103
Side turn signal lights ................166
Spare wheel ............................... 188
Speed limiter............................... 134
Speedometer ............................... 79
Starting and operating ................121
Starting off ................................... 16
Starting the engine ....................122
Steering wheel adjustment ......9, 71
Steering wheel controls ...............71
Stop-start system........................ 123
Storage ......................................... 52
Storage compartments .................52
Sunroof ........................................ 30
Sun visors .................................... 30
Symbols ......................................... 4
T
Tachometer ................................. 79
Tail lights ................................... 163
Three-point seat belt .................... 37
Tools .......................................... 173
Top-tether fastening eyes ............51
Towing ........................................ 194Towing another vehicle .............196
Towing the vehicle .....................194
Traction Control system ............. 129
Transmission ............................... 16
Tread depth ............................... 179
Trip odometer .............................. 79
Turn and lane-change signals ...106
Turn signal ................................... 84
Tyre chains ................................ 181
Tyre designations ......................175
Tyre pressure ............................ 175
Tyre pressure monitoring system ............................... 87, 176
Tyre pressures ........................... 214
Tyre repair kit ............................. 181
U
Ultrasonic parking assist ...... 87, 135
Upholstery .................................. 199
Upshift .......................................... 86
Using this manual ..........................3
V Vehicle battery ........................... 157
Vehicle checks............................ 153
Vehicle data ................................ 206
Vehicle data recording and privacy ..................................... 216
Vehicle dimensions .................... 212
Vehicle Identification Number ....204Vehicle jack ................................ 173
Vehicle messages .......................96
Vehicle personalisation ...............99
Vehicle security ............................ 25
Vehicle specific data ......................3
Vehicle storage ........................... 152
Vehicle tools ............................... 173
Vehicle unlocking ........................... 6 Vehicle weight ........................... 211
Ventilation ................................... 111
W
Warning chimes ........................... 98
Warning lights ............................... 79
Warning triangle .......................... 68
Washer and wiper systems .........14
Washer fluid ............................... 156
Wheel changing .........................185
Wheel covers ............................. 180
Wheels and tyres .......................175
Windows ....................................... 28
Windscreen................................... 28 Windscreen wiper/washer ...........73
Winter tyres ............................... 175
Wiper blade replacement ..........159