horn VAUXHALL ADAM 2015 Owner's Manual
[x] Cancel search | Manufacturer: VAUXHALL, Model Year: 2015, Model line: ADAM, Model: VAUXHALL ADAM 2015Pages: 225, PDF Size: 6.81 MB
Page 13 of 225

In brief11
1Power windows .....................28
2 Exterior mirrors .....................27
3 Cruise control .....................132
Speed limiter ....................... 134
4 Side air vents ...................... 119
5 Turn and lane-change
signals, headlight flash,
low beam and high beam ....106
Exit lighting ......................... 109
Parking lights ...................... 106
Buttons for Driver
Information Centre ................89
6 Instruments .......................... 79
7 Steering wheel controls .......71
8 Driver Information Centre ...... 89
9 Windscreen wiper,
windscreen washer
system, headlight washer
system, rear wiper, rear
washer system ......................73
10 Central locking system ..........21
City mode ............................ 131
Fuel selector ......................... 80Eco button for stop-start
system ................................. 123
Parking assist ..................... 135
Seat heating .......................... 36
Heated steering wheel ..........72
11 Colour-Info-Display ..............94
Graphic-Info-Display .............95
12 Hazard warning flashers ....105
Control indicator for airbag
deactivation .......................... 85
Control indicator for front
passenger seat belt .............84
13 Anti-theft alarm system
status LED ........................... 25
14 Centre air vents .................. 119
15 Side air vents passenger
side ..................................... 119
16 Glovebox .............................. 52
Fuse box ............................ 171
17 Climate control system ........ 111
18 Power outlet .......................... 78
19 AUX input, USB input ...........1020Selector lever, manual
transmission ....................... 127
21 Parking brake ......................128
22 Ignition switch with
steering wheel lock ............122
23 Horn ..................................... 72
Driver airbag ........................ 42
24 Bonnet release lever ..........154
25 Steering wheel adjustment ..71
26 Light switch ........................ 103
Headlight range
adjustment ......................... 105
Rear fog light ...................... 106
Brightness of instrument
panel illumination ................107
Brightness of ambient light 107
Page 15 of 225

In brief13
Turn and lane-change signalslever up=right turn signallever down=left turn signal
Turn and lane-change signals
3 106, Parking lights 3 106.
Hazard warning flashers
Operated with the ¨ button.
Hazard warning flashers 3 105.
Horn
Press j.
Page 28 of 225

26Keys, doors and windows
Status during the first 30 seconds of
anti-theft alarm system activation:LED illuminates=test, arming delayLED flashes
quickly=doors, tailgate or
bonnet not
completely closed, or system fault
Status after system is armed:
LED flashes
slowly=system is armed
Seek the assistance of a workshop in
the event of faults.
Deactivation
Unlocking the vehicle by pressing
button c deactivates anti-theft alarm
system.
The system is not deactivated by
unlocking the driver's door with the
key or with the central locking button
in the passenger compartment.
Alarm
When triggered, the alarm horn
sounds and the hazard warning lights flash simultaneously. The number
and duration of alarm signals are
stipulated by legislation.
The alarm can be silenced by
pressing any button on the radio remote control or by switching on the
ignition.
The anti-theft alarm system can only
be deactivated by pressing button c
on the radio remote control or by
switching on the ignition.
A triggered alarm, which has not been interrupted by the driver, will be
indicated by the hazard warning
lights. They will flash quickly three
times when the vehicle is unlocked
with the radio remote control.
Vehicle messages 3 96.
Immobiliser The system is part of the ignition
switch and checks whether the
vehicle is allowed to be started with the key being used.The immobiliser is activated
automatically after the key has been removed from the ignition switch.
If the control indicator d flashes when
the ignition is on, there is a fault in the
system; the engine cannot be started. Switch off the ignition and repeat the
start attempt.
If the control indicator continues
flashing, attempt to start the engine
using the spare key and seek the
assistance of a workshop.
Notice
The immobiliser does not lock the
doors. You should always lock the
vehicle after leaving it.
Switch on the anti-theft alarm
system 3 21, 3 25.
Control indicator d 3 88.
Page 74 of 225

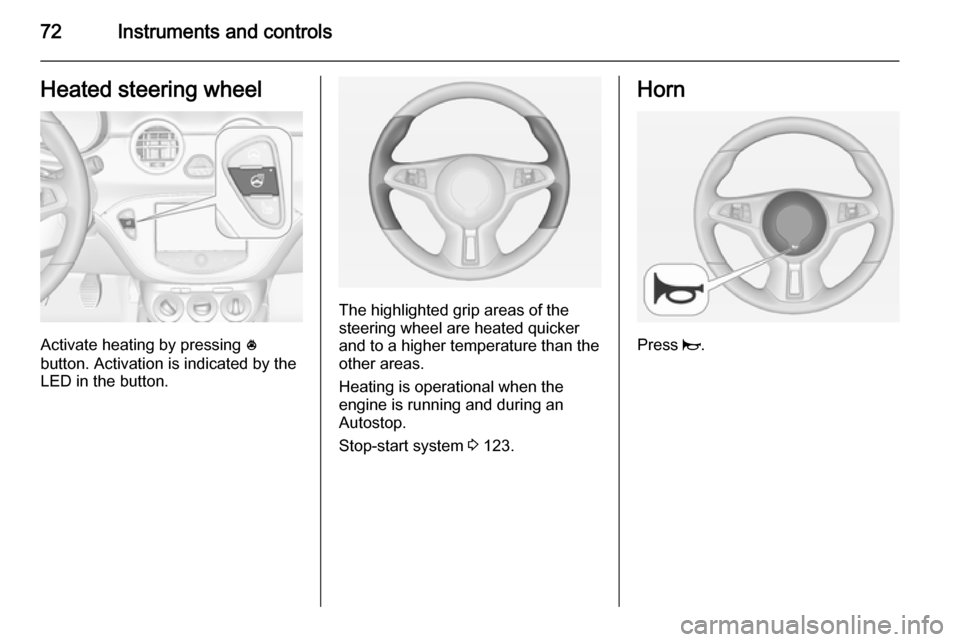
72Instruments and controlsHeated steering wheel
Activate heating by pressing *
button. Activation is indicated by the
LED in the button.
The highlighted grip areas of the
steering wheel are heated quicker
and to a higher temperature than the
other areas.
Heating is operational when the
engine is running and during an
Autostop.
Stop-start system 3 123.
Horn
Press j.
Page 172 of 225

170Vehicle care
No.Circuit1–2exterior mirror switch3body control module4foldable sunroof, Chassis
control module5ABS6daytime running light left7–8body control module9vehicle battery sensor10headlamp levelling, TPMS, fold‐ able sunroof11rear wiper12window defog13daytime running light right14mirror defog15–No.Circuit16chassis control module,
LPG system17interior mirror18engine control module19fuel pump20–21injection coil22–23injection system24washer system25lighting system26engine control module27–28engine control module29engine control module30–31left headlampNo.Circuit32right headlamp33engine control module34horn35clutch36–
Page 174 of 225

172Vehicle care
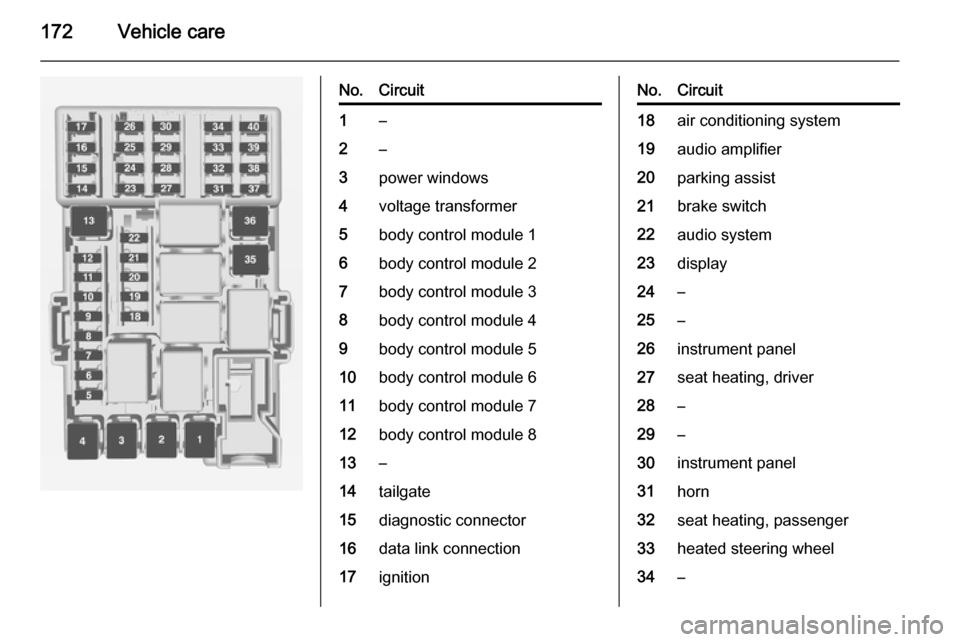
No.Circuit1–2–3power windows4voltage transformer5body control module 16body control module 27body control module 38body control module 49body control module 510body control module 611body control module 712body control module 813–14tailgate15diagnostic connector16data link connection17ignitionNo.Circuit18air conditioning system19audio amplifier20parking assist21brake switch22audio system23display24–25–26instrument panel27seat heating, driver28–29–30instrument panel31horn32seat heating, passenger33heated steering wheel34–
Page 181 of 225

Vehicle care179
3. Use the MENU button on the turn
signal lever to select the Vehicle
Information Menu in the Driver
Information Centre (DIC).
4. Turn the adjuster wheel to scroll to
the tyre pressure menu.
5. Press the SET/CLR button to
begin the sensor matching
process. A message requesting
acceptance of the process should
display.
6. Press the SET/CLR button again
to confirm the selection. The horn sounds twice to signal the
receiver is in relearn mode.
7. Start with the left side front tyre.
8. Place the relearn tool against the tyre sidewall, near the valve stem.Then press the button to activate
the TPMS sensor. A horn chirp
confirms that the sensor
identification code has been
matched to this tyre and wheel
position.
9. Proceed to the right side front tyre,
and repeat the procedure in
Step 8.10. Proceed to the right side rear tyre,
and repeat the procedure in
Step 8.
11. Proceed to the left side rear tyre, and repeat the procedure in
Step 8. The horn sounds twice to
indicate the sensor identification
code has been matched to the left
side rear tyre, and the TPMS
sensor matching process is no
longer active.
12. Turn off the ignition.
13. Set all four tyres to the recommended air pressure level
as indicated on the tyre pressure
label.
14. Ensure the tyre loading status is set according selected pressure
3 89.
Temperature dependency Tyre pressure depends on the
temperature of the tyre. During
driving tyre temperature and pressure increase.The tyre pressure value displayed in
the Driver Information Centre shows
the actual tyre pressure. Therefore it
is important to check tyre pressure
with cold tyres.
Tread depth
Check tread depth at regular
intervals.
Tyres should be replaced for safety
reasons at a tread depth of 2-3 mm
(4 mm for winter tyres).
For safety reasons it is recommended that the tread depth of the tyres on
one axle should not vary by more than
2 mm.
Page 197 of 225

Vehicle care195
2. Screw in the towing eye as far asit will go until it stops in a
horizontal position.
3. Attach a tow rope – or better still a
tow rod – to the towing eye.
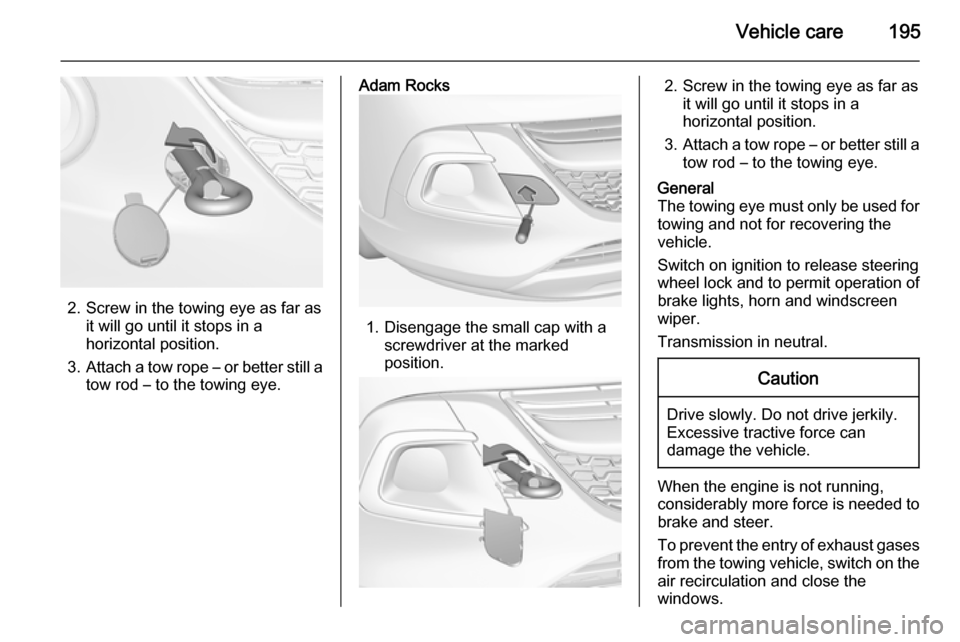
Adam Rocks
1. Disengage the small cap with a screwdriver at the marked
position.
2. Screw in the towing eye as far as it will go until it stops in a
horizontal position.
3. Attach a tow rope – or better still a
tow rod – to the towing eye.General
The towing eye must only be used for
towing and not for recovering the
vehicle.
Switch on ignition to release steering
wheel lock and to permit operation of
brake lights, horn and windscreen
wiper.
Transmission in neutral.Caution
Drive slowly. Do not drive jerkily.
Excessive tractive force can
damage the vehicle.
When the engine is not running,
considerably more force is needed to
brake and steer.
To prevent the entry of exhaust gases from the towing vehicle, switch on the
air recirculation and close the
windows.
Page 221 of 225

219
Coolant and antifreeze...............202
Cruise control ...................... 88, 132
Cupholders .................................. 52
Curtain airbag system .................. 43
D Danger, Warnings and Cautions ...4
Daytime running lights ...............105
Declaration of conformity ............215
Door open .................................... 89
Doors ............................................ 24
Driver assistance systems ..........132
Driver Information Centre .............89
Driving hints ................................ 121
E
Electric adjustment ......................27
Electrical system......................... 168
Electronic climate control system 114
Electronic Stability Control.......... 130
Electronic Stability Control and Traction Control system ............87
End-of-life vehicle recovery .......153
Engine compartment fuse box ...169
Engine coolant ........................... 155
Engine coolant temperature gauge ....................................... 80
Engine data ............................... 209
Engine exhaust .......................... 126
Engine identification ...................205Engine oil ................... 154, 202, 206
Engine oil pressure ......................88
Entry lighting .............................. 109
Event data recorders ..................216
Exit lighting ................................ 109
Exterior care .............................. 197
Exterior light ................................. 88
Exterior lighting ....................12, 103
Exterior mirrors ............................. 27
F
First aid ......................................... 68
First aid kit ................................... 68
Fixed air vents ........................... 119
Flex-Fix system ............................ 54
Folding mirrors ............................. 27
Front airbag system .....................42
Front seats.................................... 33
Front storage ................................ 53
Front turn signal lights ...............162
Fuel............................................. 146
Fuel consumption - CO 2-
Emissions ............................... 151
Fuel for liquid gas operation .......146
Fuel for petrol engines ...............146
Fuel gauge ................................... 80
Fuel selector ................................ 80
Fuses ......................................... 168G
Gauges ......................................... 79
Glass panel .................................. 31
Glovebox ..................................... 52
Graphic-Info-Display .....................95
H Halogen headlights ....................159
Hand brake ......................... 127, 128
Hazard warning flashers ............105
Headlight flash ........................... 104
Headlight range adjustment ......105
Headlights................................... 103
Headlights when driving abroad 105
Head restraint adjustment .............8
Head restraints ............................ 32
Heated mirrors ............................. 27
Heated rear window ..................... 30
Heated steering wheel .................72
Heating ........................................ 36
Heating and ventilation system . 111
High beam ........................... 88, 104
Hill start assist ........................... 129
Horn ....................................... 13, 72
I
Identification plate .....................205
Ignition switch positions .............122
Immobiliser ............................ 26, 88
Indicators ...................................... 79