turn signal VAUXHALL ADAM 2016.5 Owner's Guide
[x] Cancel search | Manufacturer: VAUXHALL, Model Year: 2016.5, Model line: ADAM, Model: VAUXHALL ADAM 2016.5Pages: 239, PDF Size: 7.2 MB
Page 162 of 239
160Vehicle careVehicle careGeneral Information...................160
Accessories and vehicle modifications .......................... 160
Vehicle storage ........................161
End-of-life vehicle recovery .....161
Vehicle checks ........................... 162
Performing work ......................162
Bonnet ..................................... 162
Engine oil ................................. 163
Engine coolant ......................... 164
Washer fluid ............................ 164
Brakes ..................................... 165
Brake fluid ............................... 165
Vehicle battery ......................... 165
Wiper blade replacement ........167
Bulb replacement .......................168
Halogen headlights ..................168
Front turn signal lights .............170
Tail lights ................................. 172
Side turn signal lights ..............175
Number plate light ...................175
Interior lights ............................ 176
Instrument panel illumination ...176
Electrical system ........................177
Fuses ....................................... 177Engine compartment fuse box . 178
Instrument panel fuse box .......180
Vehicle tools .............................. 182
Tools ........................................ 182
Wheels and tyres .......................183
Winter tyres ............................. 183
Tyre designations ....................183
Tyre pressure .......................... 184
Tyre pressure monitoring system .................................... 185
Tread depth ............................. 188
Changing tyre and wheel size . 189
Wheel covers ........................... 189
Tyre chains .............................. 189
Tyre repair kit .......................... 190
Wheel changing .......................194
Spare wheel ............................ 196
Jump starting ............................. 201
Towing ....................................... 202
Towing the vehicle ...................202
Towing another vehicle ...........204
Appearance care .......................205
Exterior care ............................ 205
Interior care ............................. 207General Information
Accessories and vehicle modifications
We recommend the use of genuine
parts and accessories and factory approved parts specific for your
vehicle type. We cannot assess or guarantee reliability of other products
- even if they have a regulatory or
otherwise granted approval.
Do not make any modifications to the
electrical system, e.g. changes of
electronic control units (chip tuning).Caution
When transporting the vehicle on
a train or on a recovery vehicle, the
mud flaps might be damaged.
Page 172 of 239
170Vehicle care
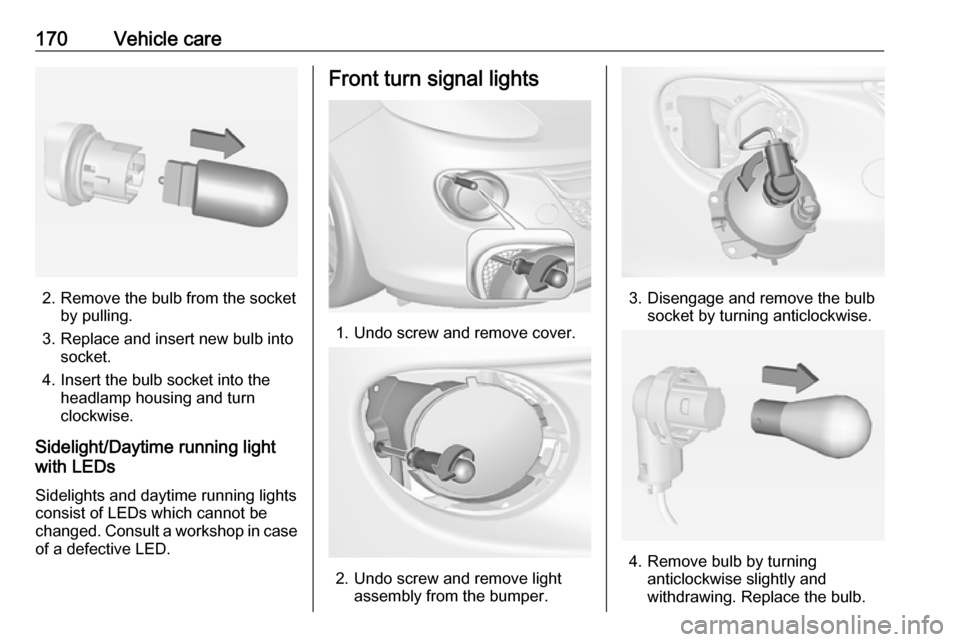
2. Remove the bulb from the socketby pulling.
3. Replace and insert new bulb into socket.
4. Insert the bulb socket into the headlamp housing and turn
clockwise.
Sidelight/Daytime running light
with LEDs
Sidelights and daytime running lights
consist of LEDs which cannot be
changed. Consult a workshop in case
of a defective LED.
Front turn signal lights
1. Undo screw and remove cover.
2. Undo screw and remove light assembly from the bumper.
3. Disengage and remove the bulbsocket by turning anticlockwise.
4. Remove bulb by turninganticlockwise slightly and
withdrawing. Replace the bulb.
Page 175 of 239
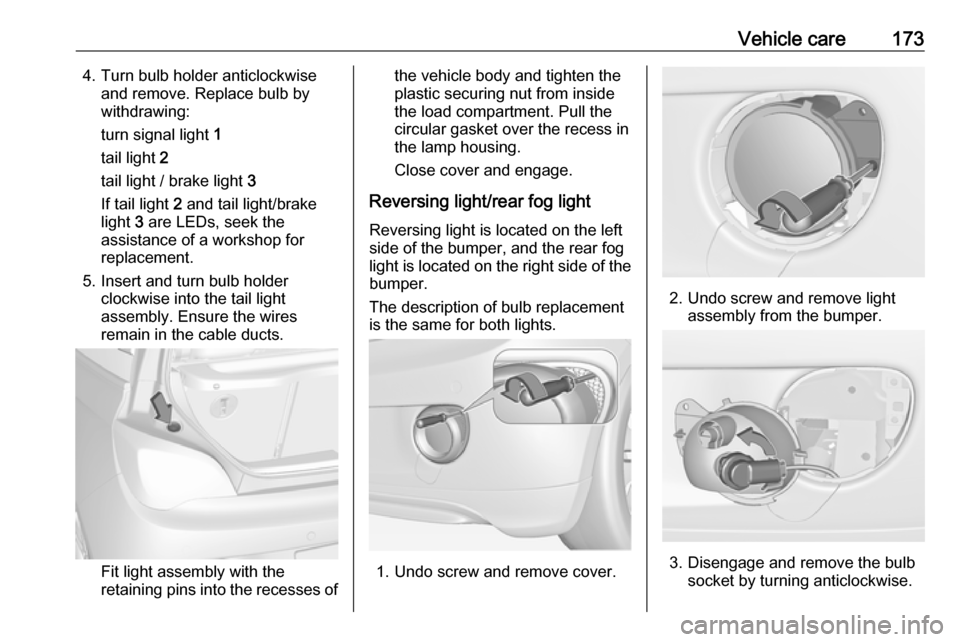
Vehicle care1734. Turn bulb holder anticlockwiseand remove. Replace bulb by
withdrawing:
turn signal light 1
tail light 2
tail light / brake light 3
If tail light 2 and tail light/brake
light 3 are LEDs, seek the
assistance of a workshop for
replacement.
5. Insert and turn bulb holder clockwise into the tail light
assembly. Ensure the wires
remain in the cable ducts.
Fit light assembly with the
retaining pins into the recesses of
the vehicle body and tighten the
plastic securing nut from inside
the load compartment. Pull the
circular gasket over the recess in
the lamp housing.
Close cover and engage.
Reversing light/rear fog light
Reversing light is located on the left
side of the bumper, and the rear fog
light is located on the right side of the bumper.
The description of bulb replacement
is the same for both lights.
1. Undo screw and remove cover.
2. Undo screw and remove light assembly from the bumper.
3. Disengage and remove the bulbsocket by turning anticlockwise.
Page 177 of 239
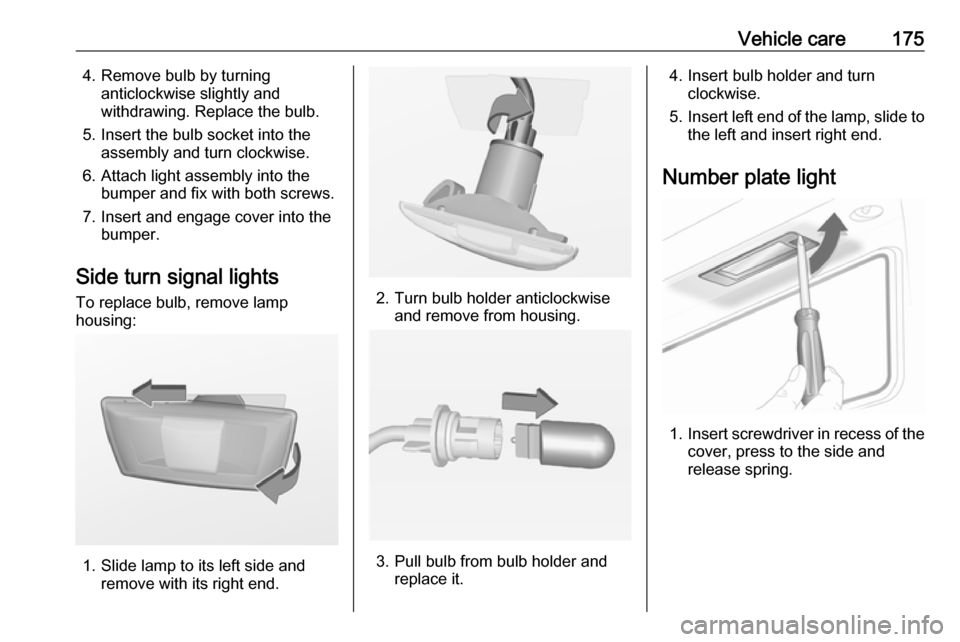
Vehicle care1754. Remove bulb by turninganticlockwise slightly and
withdrawing. Replace the bulb.
5. Insert the bulb socket into the assembly and turn clockwise.
6. Attach light assembly into the bumper and fix with both screws.
7. Insert and engage cover into the bumper.
Side turn signal lights
To replace bulb, remove lamp
housing:
1. Slide lamp to its left side and remove with its right end.
2. Turn bulb holder anticlockwiseand remove from housing.
3. Pull bulb from bulb holder and replace it.
4. Insert bulb holder and turnclockwise.
5. Insert left end of the lamp, slide to
the left and insert right end.
Number plate light
1. Insert screwdriver in recess of the
cover, press to the side and
release spring.
Page 187 of 239
Vehicle care185If the tyre pressure must be reduced
or increased, switch off ignition. After
adjusting tyre pressure switch on
ignition and select the relevant setting on the page Tyre load in the Driver
Information Centre 3 88.
Temperature dependency The tyre pressure depends on the
temperature of the tyre. During
driving, tyre temperature and
pressure increase. Tyre pressure
values provided on the tyre
information label and tyre pressure
chart are valid for cold tyres, which means at 20 °C.
The pressure increases by nearly
1.5 psi for a 10 °C temperature
increase. This must be considered
when warm tyres are checked.
The tyre pressure value displayed in
the Driver Information Centre shows
the real tyre pressure. A cooled down tyre will show a decreased value,
which does not indicate an air leak.Tyre pressure monitoring
system
The tyre pressure monitoring system
checks the pressure of all four tyres
once a minute when vehicle speed
exceeds a certain limit.Caution
Tyre pressure monitoring system
warns only about low tyre pressure condition and does not replace
regular tyre maintenance by the
driver.
All wheels must be equipped with pressure sensors and the tyres must
have the prescribed pressure.
Notice
In countries where the tyre pressure
monitoring system is legally
required, the use of wheels without
pressure sensors will invalidate the
vehicle type approval.
The current tyre pressures can be
shown in the Vehicle Information
Menu in the Driver Information
Centre.
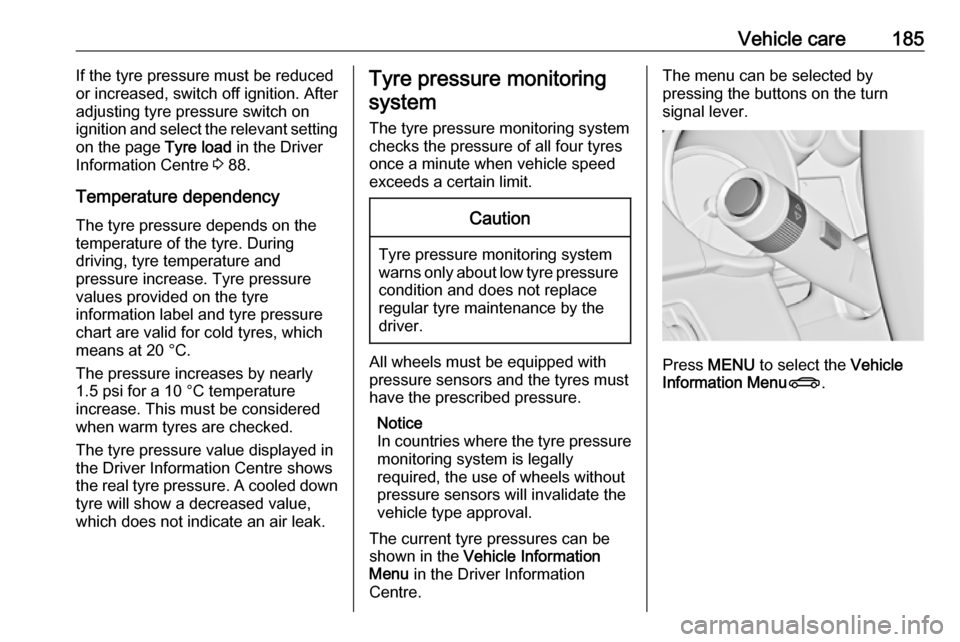
The menu can be selected by
pressing the buttons on the turn
signal lever.
Press MENU to select the Vehicle
Information Menu X.
Page 189 of 239
Vehicle care187Each time the tyres are replaced, tyre
pressure monitoring system sensors
must be dismounted and serviced. For the screwed sensor; replace
valve core and sealing ring. For the
clipped sensor; replace complete
valve stem.
Vehicle loading status
Adjust tyre pressure to load condition according to the tyre information labelor tyre pressure chart 3 223, and
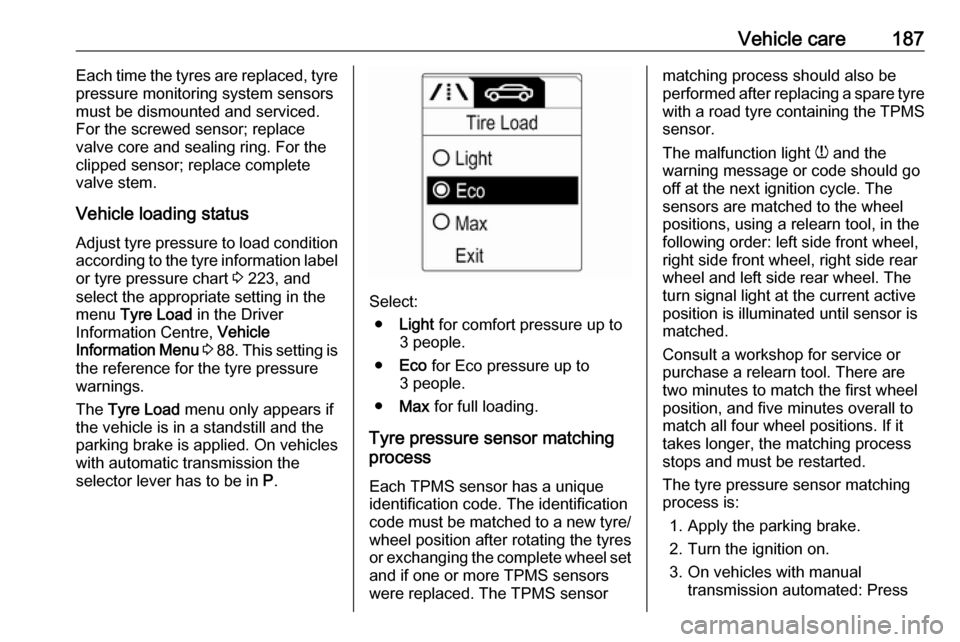
select the appropriate setting in the menu Tyre Load in the Driver
Information Centre, Vehicle
Information Menu 3 88 . This setting is
the reference for the tyre pressure
warnings.
The Tyre Load menu only appears if
the vehicle is in a standstill and the
parking brake is applied. On vehicles
with automatic transmission the
selector lever has to be in P.
Select:
● Light for comfort pressure up to
3 people.
● Eco for Eco pressure up to
3 people.
● Max for full loading.
Tyre pressure sensor matching process
Each TPMS sensor has a unique
identification code. The identification
code must be matched to a new tyre/ wheel position after rotating the tyres
or exchanging the complete wheel set
and if one or more TPMS sensors
were replaced. The TPMS sensor
matching process should also be
performed after replacing a spare tyre with a road tyre containing the TPMS
sensor.
The malfunction light w and the
warning message or code should go off at the next ignition cycle. The
sensors are matched to the wheel
positions, using a relearn tool, in the following order: left side front wheel,
right side front wheel, right side rear
wheel and left side rear wheel. The
turn signal light at the current active
position is illuminated until sensor is
matched.
Consult a workshop for service or
purchase a relearn tool. There are
two minutes to match the first wheel
position, and five minutes overall to
match all four wheel positions. If it
takes longer, the matching process
stops and must be restarted.
The tyre pressure sensor matching
process is:
1. Apply the parking brake.
2. Turn the ignition on.
3. On vehicles with manual transmission automated: Press
Page 190 of 239
188Vehicle careand hold brake pedal. Move and
hold the selector lever for five
seconds in position N until P is
displayed in the Driver Information Centre. P indicates
that the sensor matching process
can be started.
On vehicles with manual
transmission: select neutral.
4. Use MENU on the turn signal
lever to select the Vehicle
Information Menu in the Driver
Information Centre.
5. Turn the adjuster wheel to scroll to
the tyre pressure menu.
6. Press SET/CLR to begin the
sensor matching process. A
message requesting acceptance
of the process should be
displayed.
7. Press SET/CLR again to confirm
the selection. The horn sounds
twice to indicate that the receiver
is in relearn mode.
8. Start with the left side front wheel.
9. Place the relearn tool against the tyre sidewall, near the valve stem.Then press the button to activatethe tyre pressure sensor. A horn
chirp confirms that the sensor
identification code has been
matched to this wheel position.
10. Proceed to the right side front wheel, and repeat the procedure
in Step 9.
11. Proceed to the right side rear wheel, and repeat the procedure
in Step 9.
12. Proceed to the left side rear wheel, and repeat the procedure
in Step 9. The horn sounds twice
to indicate that the sensor
identification code has been
matched to the left side rear
wheel, and the tyre pressure
sensor matching process is no
longer active.
13. Turn off the ignition.
14. Set all four tyres to the recommended air pressure level
as indicated on the tyre
information label.
15. Ensure the tyre loading status is set according to the selected
pressure 3 88.Tread depth
Check tread depth at regular
intervals.
Tyres should be replaced for safety
reasons at a tread depth of 2-3 mm (4 mm for winter tyres).
For safety reasons it is recommended
that the tread depth of the tyres on
one axle should not vary by more than 2 mm.
The legally permissible minimum
tread depth (1.6 mm) has been
reached when the tread has worn
down as far as one of the tread wear
Page 235 of 239

233Convex shape .............................. 27
Coolant and antifreeze ...............210
Cruise control ...................... 88, 139
Cupholders .................................. 51
Curtain airbag system .................. 43
D
Danger, Warnings and Cautions ...4
Daytime running lights ...............107
Declaration of conformity ............225
Door open .................................... 88
Doors ............................................ 24
Driver assistance systems ..........139
Driver Information Centre .............88
Driving hints ................................ 123
E Electric adjustment ......................27
Electrical system......................... 177
Electronic climate control system 116
Electronic driving programmes ..133
Electronic Stability Control.......... 137
Electronic Stability Control and Traction Control system ............86
Electronic Stability Control off....... 86 End-of-life vehicle recovery .......161
Engine compartment fuse box ...178
Engine coolant ........................... 164
Engine coolant temperature gauge ....................................... 80
Engine data ............................... 217Engine exhaust .......................... 129
Engine identification ...................213
Engine oil ................... 163, 210, 214
Engine oil pressure ......................87
Entry lighting .............................. 111
Event data recorders ..................229
Exit lighting ................................ 111
Exterior care .............................. 205
Exterior light ................................. 88
Exterior lighting ....................12, 105
Exterior mirrors ............................. 27
F Fault ........................................... 133
First aid ......................................... 67
First aid kit ................................... 67
Fixed air vents ........................... 121
Flex-Fix system ............................ 53
Folding mirrors ............................. 27
Front airbag system .....................42
Front seats.................................... 33 Front storage ................................ 52
Front turn signal lights ...............170
Fuel............................................. 153
Fuel consumption - CO 2-
Emissions ............................... 158
Fuel for liquid gas operation .......153
Fuel for petrol engines ...............153
Fuel gauge ................................... 79Fuel selector ................................ 79
Fuses ......................................... 177
G Gauges ......................................... 78
Glass panel .................................. 31
Glovebox ..................................... 51
Graphic-Info-Display .....................94
H Halogen headlights ....................168
Hand brake ......................... 134, 135
Hazard warning flashers ............107
Headlight flash ........................... 106
Headlight range adjustment ......107
Headlights................................... 105
Headlights when driving abroad 107
Head restraint adjustment .............8
Head restraints ............................ 32
Heated mirrors ............................. 28
Heated rear window ..................... 30
Heated steering wheel .................70
Heating ........................................ 36
Heating and ventilation system . 113
High beam ........................... 88, 106
Hill start assist ........................... 135
Horn ....................................... 13, 71
I
Identification plate .....................213
Ignition switch positions .............124
Page 237 of 239

235Seat belt ........................................ 8
Seat belt reminder .......................83
Seat belts ..................................... 37
Seat folding .................................. 35
Seat heating ................................. 36
Seat position ................................ 33
Selector lever ............................. 131
Service ....................................... 122
Service display ............................ 80
Service information ....................209
Service vehicle soon .................... 85
Side airbag system ......................43
Side blind spot alert ....................151
Sidelights .................................... 105
Side turn signal lights ................175
Software acknowledgement .......227
Spare wheel ............................... 196
Speed limiter............................... 141
Speedometer ............................... 78
Starting and operating ................124
Starting off ................................... 16
Starting the engine ............125, 131
Steering ...................................... 124
Steering wheel adjustment ......9, 70
Steering wheel controls ...............70
Stop-start system........................ 126
Storage ......................................... 51
Storage compartments .................51
Sunroof ........................................ 31Sun visors .................................... 30
Symbols ......................................... 4
T
Tachometer ................................. 78
Tail lights ................................... 172
Three-point seat belt .................... 38
Tools .......................................... 182
Top-tether fastening eyes ............50
Towing ........................................ 202
Towing another vehicle .............204
Towing the vehicle .....................202
Traction Control system ............. 136
Transmission ............................... 16
Transmission display .................131
Tread depth ............................... 188
Trip odometer .............................. 78
Turn and lane-change signals ...108
Turn signal ................................... 83
Tyre chains ................................ 189
Tyre designations ......................183
Tyre pressure ............................ 184
Tyre pressure monitoring system ............................... 87, 185
Tyre pressures ........................... 223
Tyre repair kit ............................. 190
U Ultrasonic parking assist ...... 86, 142
Upholstery .................................. 207
Uplevel-Display............................. 88Upshift .......................................... 86
Using this manual ..........................3
V Vehicle battery ........................... 165
Vehicle checks............................ 162
Vehicle data ................................ 214
Vehicle data recording and privacy ..................................... 229
Vehicle dimensions .................... 221
Vehicle Identification Number ....212
Vehicle jack ................................ 182
Vehicle messages .......................95
Vehicle personalisation ...............98
Vehicle security ............................ 25
Vehicle specific data ......................3
Vehicle storage ........................... 161
Vehicle tools ............................... 182
Vehicle unlocking ........................... 6
Vehicle weight ........................... 220
Ventilation ................................... 113
W
Warning chimes ........................... 97
Warning lights ............................... 78
Warning triangle .......................... 66
Washer and wiper systems .........14
Washer fluid ............................... 164
Wheel changing .........................194
Wheel covers ............................. 189
Wheels and tyres .......................183