sensor VAUXHALL ADAM 2016 User Guide
[x] Cancel search | Manufacturer: VAUXHALL, Model Year: 2016, Model line: ADAM, Model: VAUXHALL ADAM 2016Pages: 237, PDF Size: 7.16 MB
Page 108 of 237

106LightingWhen switching on the ignition,
automatic light control is active.
When headlights are on, 8
illuminates. Control indicator 8
3 87.
Tail lights Tail lights are illuminated together
with headlights and sidelights.
Automatic light control
When the automatic light control
function is switched on and the
engine is running, the system
switches between daytime running
light and headlights automatically
depending on the lighting conditions
and information given by the rain
sensor system.
Daytime running light 3 107.
Automatic headlight activation When the automatic light control
function is switched on and the
engine is running, the headlights are switched on during poor lighting
conditions.
Furthermore the headlights are
switched on if the windscreen wipers
have been activated for several
wipes.
Tunnel detection When a tunnel is entered the
headlights are switched on without
any delay.High beam
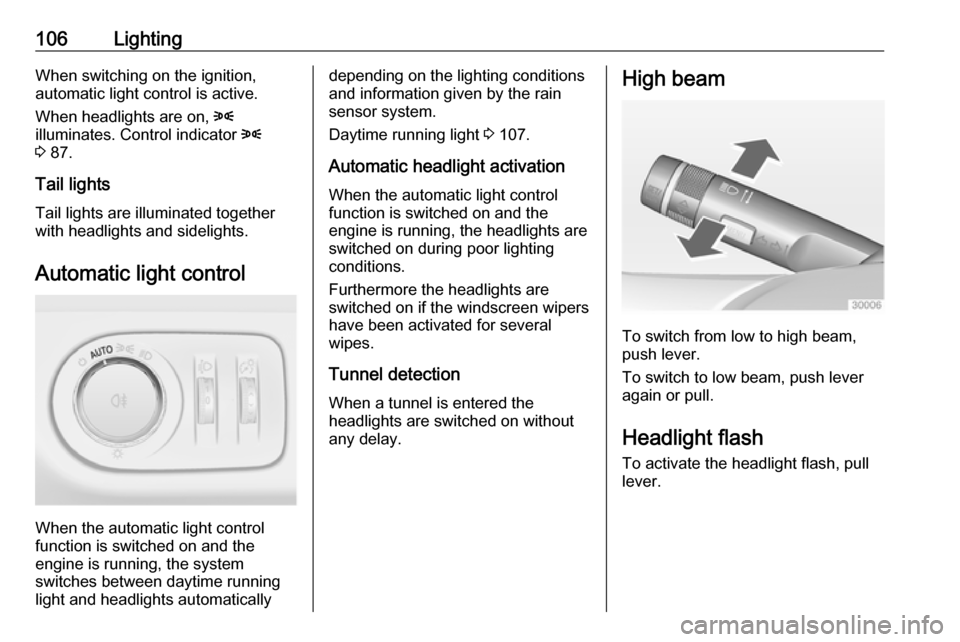
To switch from low to high beam,
push lever.
To switch to low beam, push lever
again or pull.
Headlight flash To activate the headlight flash, pull
lever.
Page 128 of 237

126Driving and operatingStop-start systemThe stop-start system helps to save
fuel and to reduce the exhaust
emissions. When conditions allow, it
switches off the engine as soon as the
vehicle is at a low speed or at a
standstill, e.g. at a traffic light or in a
traffic jam.
On vehicles with manual
transmission, the engine is started automatically as soon as the clutch is
depressed.
On vehicles with manual transmission
automated, the engine is started
automatically as soon as the brake
pedal is released.
A vehicle battery sensor ensures that
an Autostop is only performed if the
vehicle battery is sufficiently charged
for a restart.
Activation
The stop-start system is available as soon as the engine is started, the
vehicle starts-off and the conditions
as stated below in this section are
fulfilled.Deactivation
Deactivate the stop-start system
manually by pressing eco. The
deactivation is indicated when the
LED in the button extinguishes.
Autostop
Vehicles with manual transmission:
If the vehicle is at a low speed or at a
standstill, activate an Autostop as
follows:
● Depress the clutch pedal.
● Set the lever in neutral.
● Release the clutch pedal.The engine will be switched off while
the ignition stays on.Vehicles with manual transmission
automated:
If the vehicle is at a standstill with
depressed brake pedal, Autostop is
activated automatically.
The engine will be switched off while
the ignition stays on.
The stop-start system will be disabled
on inclines of 15% or more.
Indication
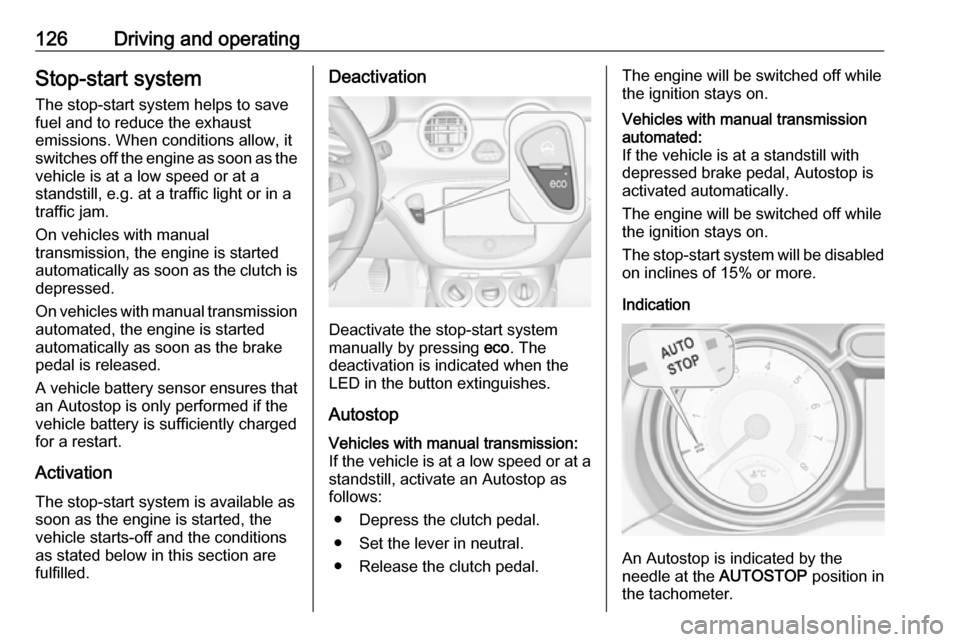
An Autostop is indicated by the
needle at the AUTOSTOP position in
the tachometer.
Page 135 of 237

Driving and operating133Tyre pressure monitoring systemTo start the sensor matching process
of the tyre pressure monitoring
system, the selector lever must be
moved and held in position N for
five seconds. P illuminates in the
transmission display to indicate that
the sensor matching process can be
started.
Tyre pressure monitoring system
3 183.
Manual mode
If a higher gear is selected when the
engine speed is too low, or a lower
gear when the speed is too high, the
shift is not executed. This prevents
the engine from running at too low or
too high an engine speed. A warning
message is displayed in the Driver
Information Centre. Vehicle
messages 3 94.
If engine speed is too low, the
transmission automatically shifts to a
lower gear.
If engine speed is too high, the
transmission only switches to a higher gear via kickdown.When + or - is selected in automatic
mode, the transmission switches to
manual mode and shifts accordingly.
Gear shift indication
The symbol R, with a number
alongside it, is indicated when
gearshifting is recommended for fuel
saving reasons.
Shift indication appears only in
manual mode.
Electronic driving programmes
● Following a cold start, the operating temperature
programme increases engine
speed to quickly bring the
catalytic converter to the required
temperature.
● The adaptive programme tailors gearshifting to the driving
conditions, e.g. greater load or
gradients.Kickdown
If the accelerator pedal is pressed down completely in automatic mode, the transmission shifts to a lower gear
depending on engine speed.
Fault
To prevent damage to the manual
transmission automated, the clutch is engaged automatically at high clutch
temperatures.
In the event of a fault, control indicator
g illuminates. Additionally, a
warning message is displayed in the
Driver Information Centre. Vehicle
messages 3 94.
Continued driving is restricted or not
possible, depending on the fault.
Have the cause of the fault remedied
by a workshop.
Page 144 of 237

142Driving and operatingChange speed limit
With speed limiter active, turn thumb
wheel to RES/+ to increase or SET/-
to decrease the desired maximum
speed.
Exceeding the speed limit
In the event of an emergency, it is
possible to exceed the speed limit by
depressing the accelerator pedal
firmly beyond the point of resistance.
The limited speed will flash in the
Driver Information Centre and a
chime sounds during this period.
Release the accelerator pedal and
the speed limiter function is
reactivated once a speed lower than
the limit speed is obtained.
Deactivation
Press y: speed limiter is deactivated
and the vehicle can be driven without
speed limit.
The limited speed is stored.
Additionally, a corresponding
message appears on the Uplevel- Display.Resume limit speed
Turn thumb wheel to RES/+. The
stored speed limit will be obtained.
Switching off
Press L, the speed limit indication in
the Driver Information Centre
extinguishes. The stored speed is
deleted.
By pressing m to activate cruise
control or by switching off the ignition,
speed limiter is also deactivated and
the stored speed is deleted.
Parking assist
Rear parking assist9 Warning
It is the driver who bears full
responsibility for the parking
manoeuvre.
Always check the surrounding
area while reversing and using the rear parking assist system.
The rear parking assist makes
parking easier by measuring the
distance between the vehicle and
rear obstacles. It informs and warns
the driver by giving acoustic and
visual signals.
The system has four ultrasonic
parking sensors in the rear bumper.
Activation
When reverse gear is engaged, the
system is ready to operate
automatically.
An illuminated LED in the parking
assist button r indicates that the
system is ready to operate.
Page 146 of 237

144Driving and operatingThe system has six ultrasonic parking
sensors in both the rear and front
bumper.
It uses two different acoustic warning
signals for the front and rear
monitoring areas, each with a
different tone frequency.
Front-rear parking assist is always
combined with advanced parking
assist, see "Advanced parking assist" section below.
Parking assist button and operation
logicFront-rear parking assist and
advanced parking assist both use the same button for activation and
deactivation:
A brief press of D activates or
deactivates the parking assist.
A long press of D (approx.
one second) activates or deactivates
the advanced parking assist, see
separate description.
Button logic operates the systems by
pressing as follows:
● If only front-rear parking assist is active, a brief press deactivates
front-rear parking assist.
● If only front-rear parking assist is active, a long press activates
advanced parking assist.
● If only advanced parking assist is
active, a brief press activates
front-rear parking assist.
● If only advanced parking assist is
active, a long press deactivates
advanced parking assist.● If a forward gear or neutral is selected, a brief press activates
or deactivates only front parking
assist.
● If reverse gear is selected, a brief
press activates or deactivates
front and rear parking assist.
Operation
When reverse gear is engaged, the
front and rear parking assist is ready
to operate.
An illuminated LED in the parking
assist button D indicates that the
system is ready to operate.
The front parking assist can also be
activated at a speed up to 7 mph with
a brief press of the parking assist
button.
If D is switched on once within an
ignition cycle, the front parking assist
is deactivated at a speed above
7 mph. It will be reactivated if vehicle
speed has not exceeded 16 mph
beforehand. If vehicle speed has
exceeded 16 mph beforehand, front
parking assist remains deactivated
when speed drops below 7 mph.
Page 148 of 237

146Driving and operatingAdvanced parking assist9Warning
The driver bears full responsibility
for accepting the parking slot
suggested by the system and the
parking manoeuvre.
Always check the surrounding
area in all directions when using
the advanced parking assist.
The advanced parking assist
measures a suitable parking slot
while passing, calculates the
trajectory and automatically steers
the vehicle into a parallel or
perpendicular parking slot.
Instructions are given in the Driver
Information Centre 3 87 or,
depending on the version, on the
Colour-Info-Display 3 92, supported
by acoustic signals.
The driver must control acceleration,
braking and gear shifting, while
steering is done automatically.
Advanced parking assist can only be
activated when driving forwards.Advanced parking assist is always
combined with front-rear parking assist, see previous section. Both
systems use the same sensors in the front and rear bumper.
Button D and operation logic
Advanced parking assist and front-
rear parking assist both use the same
button for activation and deactivation:
A brief press of D activates or
deactivates the parking assist.
A long press of D (approx.
one second) activates or deactivates
the advanced parking assist, see
separate description below.
Button logic operates the systems by
pressing as follows:
● If only front-rear parking assist is active, a brief press deactivates
front-rear parking assist.
● If only front-rear parking assist is active, a long press activates
advanced parking assist.
● If only advanced parking assist is
active, a brief press activates
front-rear parking assist.
● If only advanced parking assist is
active, a long press deactivates
advanced parking assist.
● If forward gear or neutral is selected, a brief press activates
or deactivates only front parking
assist.
● If reverse gear is selected, a brief
press activates or deactivates
front and rear parking assist.
Page 152 of 237

150Driving and operatingBasic notes on parking assist
systems9 Warning
Under certain circumstances,
various reflective surfaces on
objects or clothing as well as
external noise sources may cause the system to fail to detect
obstacles.
Special attention must be paid to
low obstacles which can damage
the lower part of the bumper.
Caution
Performance of the system can be reduced when sensors are
covered, e.g. by ice or snow.
Performance of the parking assist
system can be reduced due to
heavy loading.
Special conditions apply if there
are taller vehicles in the vicinity
(e.g. off-road vehicles, mini vans,
vans). Object identification and
correct distance indication in the
upper part of these vehicles
cannot be guaranteed.
Objects with a very small reflection
cross-section, e.g. objects of
narrow size or soft materials, may
not be detected by the system.
Parking assist systems do not
detect objects outside the
detection range.
Notice
It is possible that the sensor detects a non-existing object caused by
echo disturbance from external
acoustic noise or mechanical
misalignments (sporadic false
warnings may occur).
Make sure that the front number
plate is properly mounted (not bent
and no gaps to the bumper on the left
or right side) and the sensors are
firmly in place.
Advanced parking assist system
may not respond to changes in the
available parking space after
initiating a parking manoeuvre. The
system may recognize an entry, a
gateway, a courtyard or even a crossing as a parking slot. After
selecting reverse gear the system
would start a parking manoeuvre.
Take care of the availability of the
suggested parking slot.
Surface irregularities, e.g. on
construction zones, are not detected
by the system. The driver accepts
responsibility.
Notice
If engaging a forward gear and
exceeding a certain speed, the rear
parking assist will be deactivated
when the rear carrier system is
extended.
If engaging reverse at first, the
parking assist will detect the rear
carrier system and provide a buzzing
sound. Press r or D briefly to
deactivate the parking assist.
Notice
After production, the system
requires a calibration. For optimal
parking guidance, a driving distance
of at least 6 miles, including a
number of bends, is required.
Page 153 of 237

Driving and operating151Side blind spot alertThe Side blind spot alert system
detects and reports objects on either
side of the vehicle, within a specified
"blind spot" zone. The system alerts visually in each exterior mirror, when
detecting objects that may not be
visible in the interior and exterior
mirrors.
Side blind spot alert uses some of the
advanced parking assist sensors
which are located in the front and rear bumper on both sides of the vehicle.9 Warning
Side blind spot alert does not
replace driver vision.
The system does not detect:
● Vehicles outside the side blind zones which may be rapidly
approaching.
● Pedestrians, cyclists or animals.
Before changing a lane, always
check all mirrors, look over the
shoulder and use the turn signal.
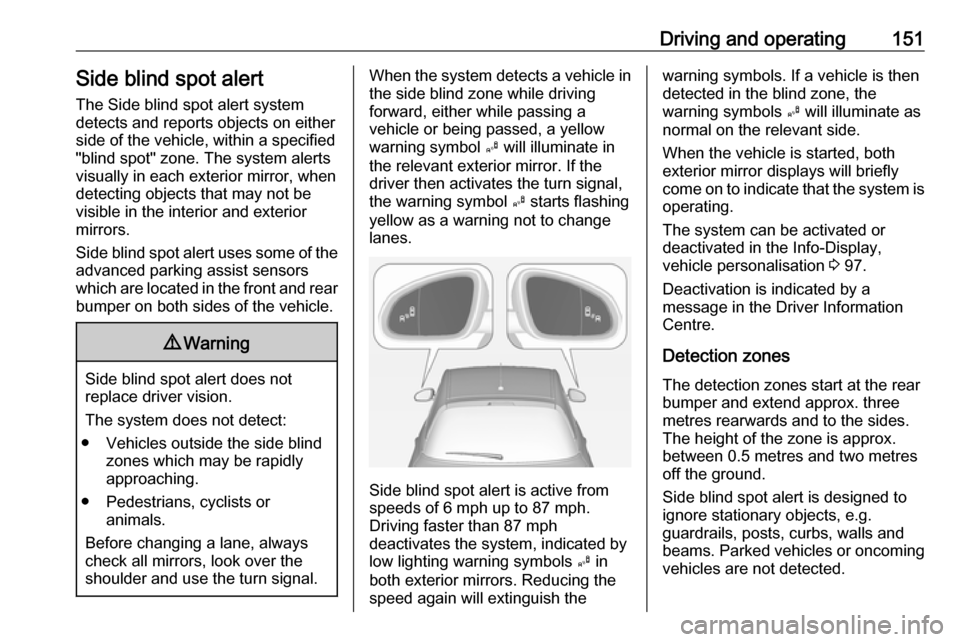
When the system detects a vehicle in the side blind zone while driving
forward, either while passing a
vehicle or being passed, a yellow warning symbol B will illuminate in
the relevant exterior mirror. If the
driver then activates the turn signal,
the warning symbol B starts flashing
yellow as a warning not to change
lanes.
Side blind spot alert is active from
speeds of 6 mph up to 87 mph.
Driving faster than 87 mph
deactivates the system, indicated by
low lighting warning symbols B in
both exterior mirrors. Reducing the speed again will extinguish the
warning symbols. If a vehicle is then
detected in the blind zone, the
warning symbols B will illuminate as
normal on the relevant side.
When the vehicle is started, both exterior mirror displays will briefly
come on to indicate that the system is operating.
The system can be activated or
deactivated in the Info-Display,
vehicle personalisation 3 97.
Deactivation is indicated by a
message in the Driver Information
Centre.
Detection zones The detection zones start at the rear
bumper and extend approx. three metres rearwards and to the sides.
The height of the zone is approx.
between 0.5 metres and two metres
off the ground.
Side blind spot alert is designed to
ignore stationary objects, e.g.
guardrails, posts, curbs, walls and
beams. Parked vehicles or oncoming
vehicles are not detected.
Page 178 of 237

176Vehicle careEngine compartment fuse
box
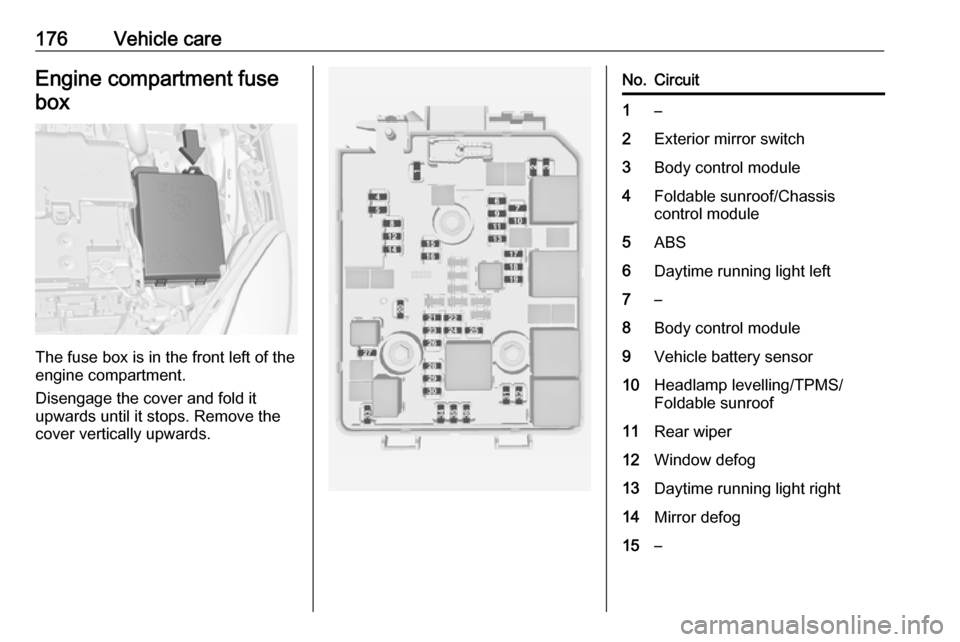
The fuse box is in the front left of the
engine compartment.
Disengage the cover and fold it
upwards until it stops. Remove the
cover vertically upwards.
No.Circuit1–2Exterior mirror switch3Body control module4Foldable sunroof/Chassis
control module5ABS6Daytime running light left7–8Body control module9Vehicle battery sensor10Headlamp levelling/TPMS/
Foldable sunroof11Rear wiper12Window defog13Daytime running light right14Mirror defog15–
Page 185 of 237

Vehicle care183Temperature dependencyThe tyre pressure depends on the
temperature of the tyre. During
driving, tyre temperature and
pressure increase. Tyre pressure
values provided on the tyre
information label and tyre pressure
chart are valid for cold tyres, which
means at 20 °C.
The pressure increases by nearly
1.5 psi for a 10 °C temperature
increase. This must be considered
when warm tyres are checked.
The tyre pressure value displayed in
the Driver Information Centre shows
the real tyre pressure. A cooled down tyre will show a decreased value,
which does not indicate an air leak.
Tyre pressure monitoring system
The tyre pressure monitoring system
checks the pressure of all four tyres
once a minute when vehicle speed
exceeds a certain limit.Caution
Tyre pressure monitoring system
warns only about low tyre pressure condition and does not replace
regular tyre maintenance by the
driver.
All wheels must be equipped with pressure sensors and the tyres must
have the prescribed pressure.
Notice
In countries where the tyre pressure
monitoring system is legally
required, the use of wheels without
pressure sensors will invalidate the
vehicle type approval.
The current tyre pressures can be
shown in the Vehicle Information
Menu in the Driver Information
Centre.
The menu can be selected by
pressing the buttons on the turn
signal lever.
Press MENU to select the Vehicle
Information Menu X.
Turn the adjuster wheel to select the
tyre pressure monitoring system.